DIY garage equipment. Garage workshop
Thinking about how to equip the garage inside, we usually want to combine incompatible things:
- Get a comfortable workplace;
- To provide the opportunity for gatherings with friends;
- Make the garage stylish and cozy;
- Avoid big expenses.
And if you think that this is unrealistic, then after reading our article you will understand that you were mistaken.
Take a look at examples of apartment design in the trendy "loft" style. By the way, they are more like garages than living quarters. Coarse masonry, exposed beams, strange accessories ... All this can look very good. Here you can spy a lot of ideas for the garage. Loft allows you to turn the disadvantages of premises into advantages, reception at a very affordable price. There is something to learn.
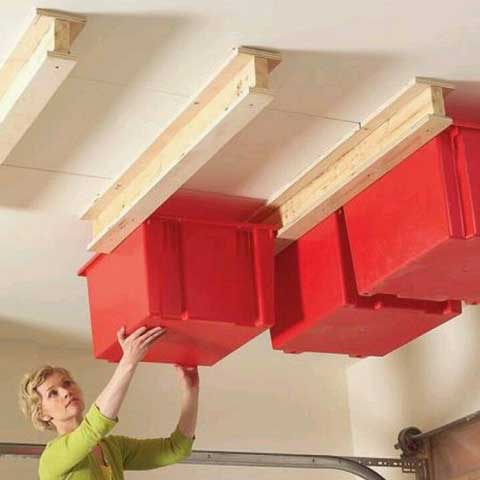
In such an interior, things made by hand more than naturally look. Even if the item made by you looks rude - do not worry, perhaps this is even for the best!
How to equip a garage inside
How to equip the garage inside? Show your imagination or use other people's ideas. Surely you have a lot of scraps of pipes and boards, several empty plastic cans and other rubbish that you are sorry to throw away. Use it. And the place will be freed up, and save will be.
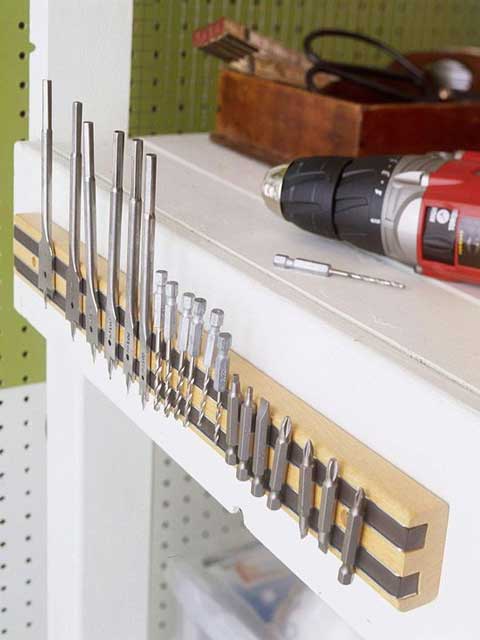
Of course, there are things you should not save on. For example, it is better to use specialized. When solving a problem, it is also worth avoiding various homemade products.
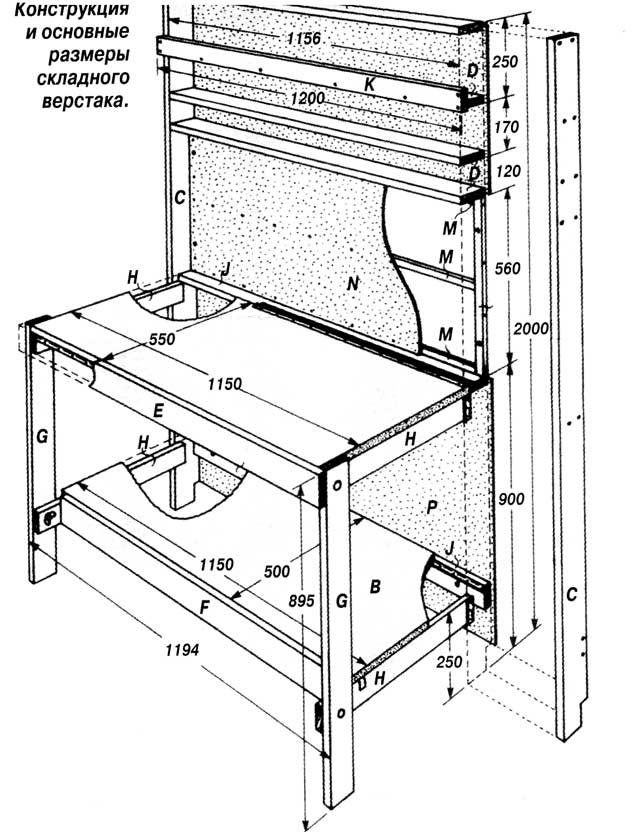
How to equip the garage inside - do-it-yourself folding workbench
A work corner or a workbench for a garage, especially designed for professional use, is a very expensive pleasure. But you can just do it yourself. Sophisticated equipment is not required for this. The main thing is to adhere to the recommended ergonomic dimensions. As a basis, you can take your favorite industrial model.
![]()
How to equip the garage inside - a convenient stand for storing tools you can do it yourself
It’s also easy to make a convenient stand for tools with your own hands. You just need to take a sheet of plywood and drill a hundred neat holes in it. And if you hang a few sheets on the hinges in the form of a book - the owners of neighboring garages will simply envy.
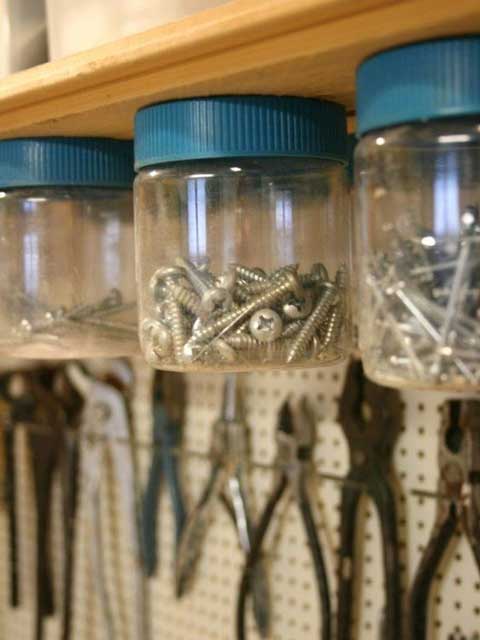
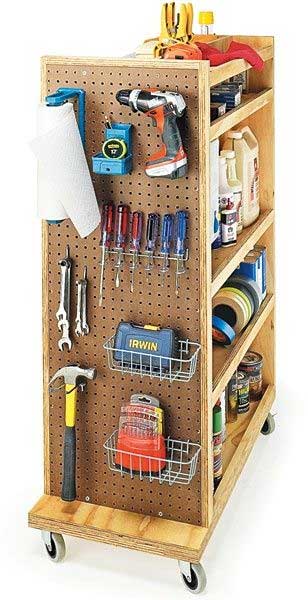
Comfort
The cosiness of the garage is given not by practical things, but by excesses. In addition to, hang a stylish home-made lamp, put a coffee table made of an old tire ... You don’t have to spend much, and at the same time attach old rubbish that is gathering dust on the shelves.
Many owners think how to equip a garage for a workshop. After all, it is quite convenient and practical.
And the main thing is useful, here you can not just make repairs, but also engage in individual activities and this can be a good income. Today we will tell you how to equip a garage with your own hands and at the same time take into account all the details.
It’s quite possible to do the internal arrangements with your own hands, in which case you will simply avoid the additional costs.
Arrangement inside the garage is not a complicated process, but everything just needs to be provided here. Everything for the arrangement of the garage can be purchased in retail chains, and it will be necessary to take into account some details and features.
Before making a decision, you should watch the video and calculate everything. Here, the height of the ceilings and the size of the garage will be important. Arrangement of a 6x4 garage, this will be a standard solution. But there are quite different sizes and you will need to choose according to your sizes.
Choosing a workshop location
The arrangement of garages with a workshop begins precisely with the correct determination of the place. Here you can put the workshop in the basement, and you can equip the main part. It all depends on what you want to install.
When choosing a place to create a workshop, first of all, it is necessary to calculate what area is required for work, as well as what equipment, tools, equipment will need to be placed in it.
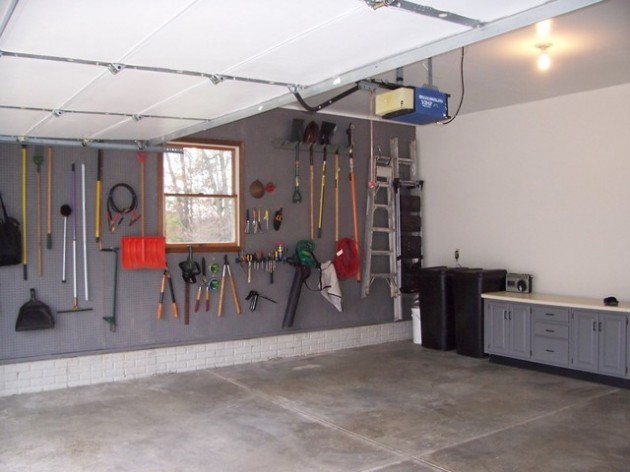
It can be racks, machines, workbenches, etc.:
- It is necessary to imagine what area will need to be allocated for this and multiply the planned value by a coefficient that can vary from one and a half to two. This is necessary in order to take into account the free space for possible gaps, work behavior and movement of tools.
- Also, when planning, it is necessary to provide in which place tools and materials will be stored. If storage will be carried out directly in the workshop, then you must also take into account the additional space for this.
- If the working area is organized in an unheated garage, measures must be taken to heat it. The easiest way to create heat in a room is to use electric heaters, which include a convector, fan heater or oil cooler.
- But it is necessary to take into account the fact that such devices consume a significant amount of electricity, and they cannot create a constant microclimate. The best option is to warm the workshop.
Dryness in this room is very important for work, and for the safety of materials and tools, and for the proper functioning of electrical wiring, which is affected by dampness. - Work in the workshop is impossible without good lighting in it. Work areas require the greatest amount of light, the sources of which are better to choose a diffused version that does not create sharp shadows and does not create a distorted perception of proportions and sizes.
- It is also better to foresee in advance what power the devices located in the workshop will consume, so as not to overload the wiring in this room. To reduce the noise created during operation, it is necessary to ensure soundproofing of the room.
- In order to avoid the dustiness of the workshop, it is necessary to place a high-power vacuum cleaner in it, it is desirable that it be designed specifically for repair. Such devices, as a rule, can not only suck in, but also blow out air, and are also provided with some additional elements, for example, sockets.
Dust from various surfaces is best removed with a rag, a place for which also needs to be foreseen in advance. - It is also best to have a metal bucket in the visible zone that is needed for various wastes that may occur during operation, such as glass fragments, bent nails, parts, and more.
Rules for arranging a workshop
The garage arrangement of the workshop is done according to the basic rules that should be followed in the arrangement of the workshop:
- You need to plan twice as much space as you need for all the tools, equipment and machines. This is required for freedom of movement.
- For stability of the working equipment, the floor (see) in the working room should be smooth, hard and dry.
- Sound insulation and adequate ventilation must be provided.
Workshop Security
It is also necessary to equip the garage from a safety point of view.It is very important to monitor the waste being thrown into the bin and not to store varnishes, solvents, paints and containers from them open for a long time, since the evaporation of these chemicals can cause malaise.
It is better to wear a respirator when working with chemicals.
Caution: Do not place naked flame sources in the work area. It is very important to have a working fire extinguisher in the workshop, since there is a high probability of a spark occurring during operation, which can lead to fire. Along with the fire extinguisher, you can use a blanket specifically designed to extinguish the fire.
No workbench in the workshop
Arrangement of a garage without a workbench is almost impossible. It can be called the main equipment in the workshop at home.
It can be carpentry for woodwork or metalwork for metal. If you need to work with these two materials, you will likely need both tables.
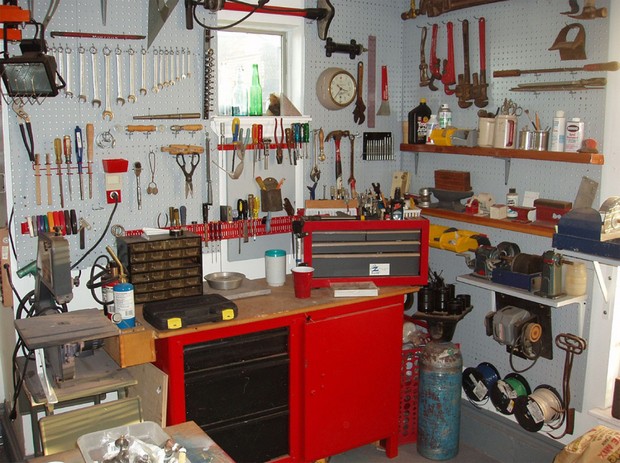
So:
- It is worth considering that the carpentry workbench is larger than the metalwork in size. So, the first option can have a length reaching 2.5 m, and the second only up to 1.5 m. The width of these tables does not differ much and can range from 0.5 to one meter.
- The price of a carpentry workbench is usually much higher than a bench, so some people prefer to assemble it on their own. In this case, it is necessary to ensure good stability of such a table, as well as massiveness of more than 1 centner.
Attention: The height of the table must be selected for the growth of the master working behind him. If this indicator is insufficient, it is better to create a foundation that allows you to raise the workbench. Otherwise, if necessary, the bend will constantly bend during work, the wizard will tire more quickly, and may also get quite a serious injury.
- The surface of the table should have a vertical hole in which the tool is placed when working with the material. It’s better to position the workbench by the window, which is a good source of daylight.
But at the same time, it is important to take care of security and equip the window with a protective screen, as well as a mesh netting, which should be located in such a way as not to impede the opening of the window for ventilation. - Artificial lighting for a workbench can be organized using a table lamp with a flexible base, which is reinforced with special clamps to the edge of the table.
- When working, you must have within reach the necessary tools that can be located on shelves next to the table. Tools that are not needed very often can be put into drawers, where you can also place small materials, such as screws, screws, nuts, etc. A workbench is usually supplemented by a massive stool.
Do-it-yourself garage is done on the basis of a number of requirements. There are several main ones:
- A workbench must necessarily be massive, as well as unusually stable. For the latter, it can be additionally fixed to the floor covering.
- The height of the countertop should be convenient for the master, this will also further secure his work.
- The thickness of the table top must exceed 40 mm.
- A vise is an important component of a workbench. They can have different sizes.
Instruments
Do it yourself with your own hands, taking into account the necessary tool, which can be either manual or in the form of equipment.
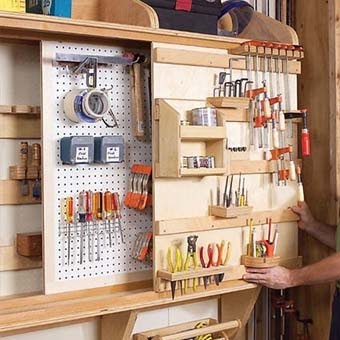
So:
- When choosing machines, it is necessary to take into account the ability of some of them to perform the functionality of some hand-held devices. This will make it possible not to litter the room with unnecessary devices.
- It is also important to choose those models that work from a standard outlet, giving a voltage of 220 V.
Doing it yourself with a do-it-yourself garage is not so difficult, it is important to provide for everything. An important point here will be lighting. You should immediately decide on energy saving. Also, when making wiring, do not use twists, purchase terminal blocks that will make the connection safe and reliable. The most important thing is not to rush and think over everything.
The farm has accumulated a lot of tools - manual and electric - and various small things: fasteners, scraps of steel, aluminum and wooden workpieces ...
I was going to place all this belongings in the garage so that, if necessary, I could quickly find the right one and not try again all the bins for this.
The main issues that I needed to solve were as follows.
Storage of tools, materials, fasteners, a small amount of grease, paint, etc. Placing stationary machines (I have drilling, turning and grinding machines) with the ability to work on them at any time.
I used the often used tool (drill, jigsaw, screwdriver, milling cutter, small grinder, etc.) on shelves or in packing cases. A special purpose tool or one for the use of which special conditions are necessary (chain and circular saws, an electric plane, a grinder for working with large disks, electric shears for metal, etc. - you will not use these tools in the room where the machine is located) is stored me in drawers of nightstands that are easy 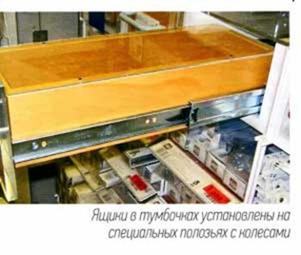 put forward on special runners with wheels.
In the same nightstands in special drawers with different-sized sections (honeycombs) I store hand tools and various devices. I fix fixtures and hardware in special cassettes with small sections. To store large quantities of hardware are various cans and jars.
I placed the welding machine on a small metal table on wheels, which is conveniently located at the bottom of the rack at the rear of the garage. Since I usually do welding work on the street, I have to move the welding machine around the garage or outside. Doing this has become quite simple.
I also have a tool bin (container) on wheels that are equipped with locking devices. If you roll out the car from the garage, install this container in the middle of the room and lock the wheels, then it can be used as a workbench. With it, with the help of clamps, you can fix a circular saw or a planer and process lengthy products from wood, metal, plastic, etc.
For storing tools often used in work (screwdrivers, wrenches, special keys for machine tools, milling cutters, cutting discs and much more), I made special tablets from laminated chipboard, which I placed on the walls of the garage.
Drills from 1 to 10 mm (in 0.1 mm increments) are stored in a special conductor with a drill diameter marking. The hole size in the jig matches the diameter of the drill. The jig can be used to calibrate drills (if marking is not visible).
Nearly the entire perimeter of the garage, at a height of 2 m, I made racks for storing things and materials. There is a lot of stuff; jacks, a pump, cans of paint and solvents, dishes for mixing mortars and many, many other necessary, not absolutely necessary and completely useless items.
If the garage has a basement, like mine, then there is also a lot to store. But we must remember the increased humidity in the basement. Therefore, even with good ventilation, I do not recommend storing clothes, cardboard, etc. things in the basement that may become moldy or absorb the smell of dampness.
To work outside the garage, I collect the necessary tools and fixtures in a plastic box container. After finishing work, I hang up and put everything in its place in the workshop.
Workshop lighting and heating in the garage
The garage is brick, but not heated. To warm the room for work in cold or winter time, it is enough to turn on an electric heater of 1500 watts. To illuminate the ceiling, I hung three spotlights with 500 W halogen lamps. In not very cold weather, there is enough heat generated by these lamps to heat the room. Local illumination of the workplace when working on machines I carry out lamps with incandescent lamps, the design of which allows you to change the direction of light and the distance to the object.
TIP:
To facilitate the search for fasteners, I pasted labels with an inscription about the contents. For this, pieces of an ordinary medical plaster or multi-colored bright stickers for price tags used in stores are suitable. The color may indicate the type of fastener, and on the label itself I write its size - diameter and length and, for example, the type of head.
Workshop ventilation in the garage
In the garage you need to have good ventilation. Especially if there will be welding, soldering and cutting of metal, and ventilation will not hurt when working with wood. In my garage, two independent ventilation circuits were made - in the basement and in the room itself. Plastic pipes through which air circulates, go to the roof of the garage. If in the workshop it is planned to work with paints, varnishes, impregnations, etc., then it is necessary to make a forced hood using an electric fan.
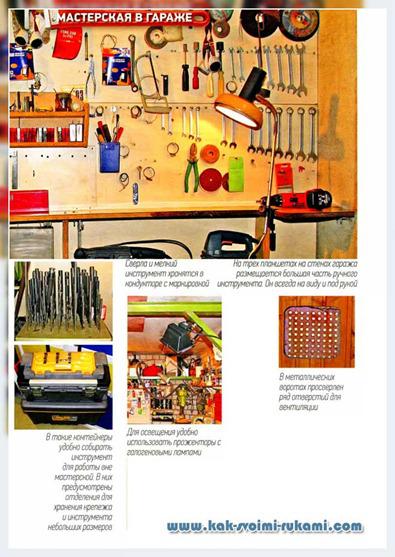
Location and equipment of the working area in the workshop
The size of my garage is 6.5 x 3.0 m 2. If you place the car close to the gate, then with a car length of about 5 m, about 1.5 m remains in the rear. In this place I located the so-called working area. There I made a workbench rack for the entire width of the garage. He installed a drilling machine, a vise on it and concentrated the bedside tables with drawers for storing the tool, fasteners and auxiliary equipment. I made the floor in this part of the garage from the floorboard, it is comfortable to work on it even in winter. There you can do some work without driving the car out of the gate.
In order for the car to be placed as close to the garage door as possible, it is necessary that the door in the gate leaves is located as close to the wall as possible and that the garage can be entered and exited without rearranging the car. Another small tip: the switch to turn off the electricity in the garage should be located next to the door. This will turn off the electricity immediately before closing the garage, so as not to leave it in the dark.
Basement equipment in the garage
Under the main room of my garage was a basement bunker 2 m high. I divided it into two zones - food and technical.
Between them he built a brick wall. The grocery is under the “working” one and insulated from above (a layer of mineral insulation is laid between the floor slabs and the wooden floor). There you can store cans with preservation, potatoes, apples, etc. The technical area is located under the place where the machine is and has access to the main room along the entire length of about a meter. It’s convenient to repair the car from this part of the basement, where I store building materials that are not afraid of moisture.
The basement is lit with 36 volt light bulbs. For this, a transformer is used, which is located in the main room of the garage next to the electrical panel.
Garage Cleaning
Do not forget about cleaning the room. To facilitate this work, I use a vacuum cleaner, which is located on the top shelf above the workbench. The flexible hose of the vacuum cleaner freely reaches any place on the workbench and is always at hand. Sawdust and shavings are best collected immediately with a vacuum cleaner. For the final tidy at the workplace, you need: a brush on a long handle, a scoop and a garbage container.
The vacuum cleaner was placed on the upper shelf of the rack above the workbench. Turning it on and off with a standard switch is not always convenient. To do this, there is a special outlet with a switch, which is located in a convenient place at a low height.
I always have soap in my garage, handwashing paste, a fresh towel and a wash basin that can replace a plastic bottle with a cork in which several holes have been drilled.
In the workshop you must have a first-aid kit with a minimal set of medicines (you can use a first-aid kit for this), a fire extinguisher and a piece of fiberglass in case of unexpected fire.
In the basement of the garage, the temperature does not fall below 0 degrees. Therefore, I planned to place a small water tank, an electric heater and a sink with a mixer there.
Electricity in the garage
In the garage, it was necessary to seriously change the wiring diagram. There were several reasons for this. Firstly, I use the garage as a workshop, and my welding machine, lathe and drilling machines are powered by a three-phase network. Secondly, for lighting the basement, for safety reasons, a low-voltage network is needed, galvanically isolated from the common power supply via a transformer. And besides, the motley manual power tool that I use has plugs of a wide variety of designs for connecting to the network. Powering them through adapters is not only unreliable, but also unsafe.
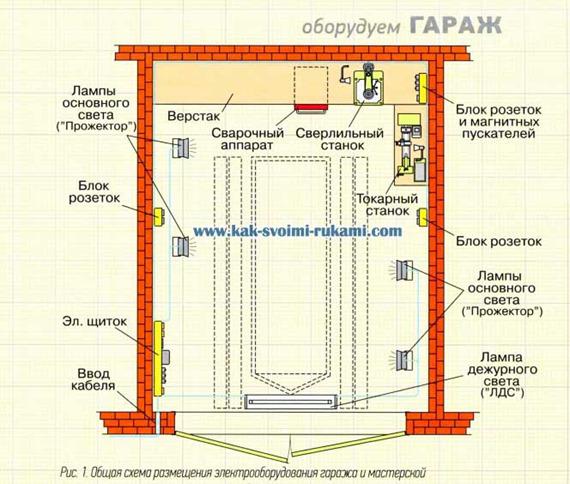
Consider working conditions
My garage is capital, brick, but unheated. Therefore, in winter it has high humidity. And, working in the garage in the cold season, I use electric heaters. It is clear that in such a room and during the installation of electrical wiring, and during the use of electrical appliances, special safety measures must be observed.
Power calculation and cable selection for a garage workshop
I began the implementation of ideas by working out a general scheme of the garage-workshop power grid (Fig. 7) and evaluating the main current loads. Machine tools and power tools during alternate operation consume a maximum of 2 kW, a welding machine (3 phases) - 5 kW.
I decided to use cables with copper wires only. Aluminum breaks after several bends and with the same cross section can withstand 25-40% less current than copper.
If there is no marking on the wire, its cross section can be calculated by the formula S \u003d ND2 / A, where S is the wire cross section in mm 2;
N is a number equal to 3.1 A;
D is the measured diameter of the wire in mm.
The diameter of the conductor (without insulation) is measured with a micrometer or vernier caliper. The cross section of a flexible stranded wire is determined by the sum of the cross sections of all the wires entering the core. Conducting conductors of wires have standard sections: 0.75; 1.0; 1.5; 2.5; 3.0; Blood pressure 6.0; 10.0 mm2.
If there are several simultaneously loaded conductors in one cable, then reducing factors are used. The maximum allowable current passing through such a conductor must be reduced by approximately DO% during calculations.
After calculating the current load, he entered the garage with a cable with four copper conductors with a cross section of 4 mm 2, protected by a 25 A circuit breaker. For three-phase sockets, he made a lead in with a cable with four conductors with a cross section of U mm 2 (it was possible to take 3 mm 2), the machine applied at 16 A. The wall outlet blocks (maximum current 10 or 1 A) were supplied with a cable in two conductors of 2.5 mm 2 each. Socket blocks on the opposite walls of the garage connected to different phases. The lighting was carried out with a cable into two conductors with a cross-section of 2.5 mm2 and protected by a 10 A automatic machine. The three-phase meter on the shield is designed for 20 A.
Entering a new cable into the garage
The electrical wiring in our garages is laid out in metal pipes along the external walls from one box to two garages. Having disconnected the old input, I connected my cable and laid it in the metal hose to the shield in the garage. To connect copper conductors to a common network made of aluminum wires, you can use special clamps - branching "nuts".
DIY switchboard in a workshop
I developed the electrical panel circuit (Fig. 2) based on my own needs (Fig. 3). I connected the phase wires from the general network to the P1 circuit breaker (25 A), which has a combined splitter: electromagnetic - for instantaneous tripping during short circuits and thermal - for tripping during overloads. So I can remove the voltage to work in the shield itself or replace the counter without turning off all the tools. 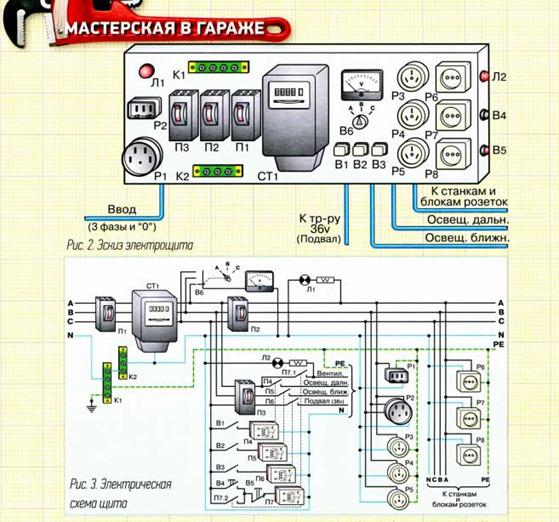
The meter in the garage is in difficult conditions. High humidity and temperature changes in winter can lead to its failure. Being energized, he dries himself. In case of frost, some experts recommend installing a low power bulb next to the meter in an unheated room.
The zero wire comes to block K1 and is wired from it to all devices with separate conductors. The installation of protective devices in the neutral wire in the presence of electrical appliances requiring zeroing is unacceptable. Moreover, all the cases of machine tools, fixtures, heaters and grounding sockets of sockets with three plugs must be connected to a special protective wire (PE or PEN).
If you have an individual ground loop, which I highly recommend doing, the protective wires from the enclosures of electrical installations can not be connected to the zero bus, but assemble them on a well-grounded separate bus in the electrical panel. The body of the metal box of the shield must be nullified.
Circuit breaker P2 is installed to protect and disconnect outlets. I have four outlets in my garage. In each of them I tried to install sockets of various types. When working with a manual power tool, this avoids unnecessary adapters and avoids many inconveniences.
Five types of sockets are installed on the electrical panel (see. Fig. 3). Sockets РЗ, РД, Р5 are connected to different phases, and sockets Р6, Р7, Р8 are connected in parallel and connected to one of the phases. Socket P2 is three-phase, I connect a welding machine to it. Socket P1 (this type is used to connect electric stoves) - single-phase, for a maximum current of 25 A.
A voltmeter with a switch after the counter allows you to control the voltage in each phase. The L1 lamp is an indicator of the voltage in the outlets on one of the phases to which the bipolar outlets are connected.
The automatic circuit breaker PZ serves to protect and turn off the lighting in the garage itself, in the basement and turn on the engine for forced ventilation of the premises. Formally, the lighting is divided into zones of the front and rear of the garage. It does not always need full illumination. Sometimes the standby light of a lamp located near the entrance to the garage, or the lamps of one of the zones, is quite enough. I illuminate the workplaces with additional lights, which I plug into power outlets.
Switches B1 and B2 supply voltage to electromagnetic starters (P4, P5) for controlling the inclusion of light in the rear and front areas of the garage, and the BZ switch to a 220/36 V transformer for lighting the basement (Pb). To prevent moisture from entering the cartridges 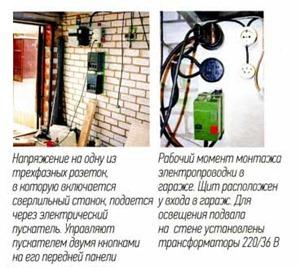 a light bulb, in the basement I used lamps of a sealed design, and placed the wires in plastic corrugated pipes.
In the side wall of the flap are two buttons VD and B5. They control the P7 electromagnetic starter, which supplies voltage to the forced ventilation motor. Light bulb L2 - indicator of the ventilation.
I turn on the lathe in a three-phase socket. Spotlights and lamps for lighting the garage are connected to the network through mounting boxes mounted on the walls.
A properly equipped workshop in the garage (very often a workplace for "dusty work" is equipped in the basement) can become a comfortable and functional workplace for a car enthusiast who prefers to service the car on his own, as well as just do something with his own hands. Before you understand the process of arranging a workshop in a garage, you need to understand the basic principles and rules of this process. About them, in fact, will be discussed today.
No wonder it is generally accepted that the garage is the second home of the car owner. The workshop located in the garage has many advantages. This building serves not only to shelter the beloved “iron horse” from the weather, but also to store various tools and devices necessary for repair work.
Interesting to know! Very often, non-automobile things are stored in the garage, for example, bicycles, old clothes and even vegetables. This greatly expands the utility of the garage for the family.
Each owner tries to approach the issue of arranging a garage from the point of consideration of his personal preferences. It is important to note that a workshop equipped in a garage must meet certain requirements. Otherwise, instead of benefit, the garage will bring only problems. How to do it? To do this, you can use the simple tips from our study.
Important! The specifics of the arrangement depend on how the workshop located in the garage will be used. If it comes to making money on machine repairs, you will need to take care of installing special professional equipment.
The room where the workshop will be located should be dry and warm. In addition, it is important to protect it well from third-party penetration. You can install a quality lock, or you can equip the garage with an alarm system. Than not equip, and protection should be at a high level. It all depends on the financial capabilities of the owner. Before equipping a workshop, you need to think about the locations of equipment and tools, to which free and convenient access should be provided. In addition, all material values \u200b\u200bmust have their place. These are just general recommendations that will help equip the workshop. For carrying out various works, more specific equipment will be needed.
We install racks and shelves
Often, for the high-quality arrangement of the workshop, a lot of space is needed, which is not always physically possible. After all, a huge number of tools and household appliances need to be stored somewhere, without forgetting that you need to leave space for the vehicle itself. Therefore, it is necessary to provide as much space as possible for shelves, racks and all kinds of cabinets. They must be positioned so as not to interfere with the free movement of the garage. They can be adapted wherever they will interfere.
Important! When hanging shelves, the distance to the vehicle must be at least one meter.
A very convenient place in the garage for this is the wall farthest from the gate. As a rule, they equip it with different shelves and racks. What is planned to be used more often, it is better to put it at eye level or slightly lower so that it is at hand. It is better to place heavy equipment at the very bottom (in case the rack is on the entire wall). On the top tiers you can store various boxes and other little things that are used infrequently. It’s good to build a small closet for clothes, because, as a rule, people always work in the garage in their “work clothes”.
We equip the "pit"
The issue of constructing a “pit” is very individual, but for the minimum maintenance of the machine it is simply necessary. If you decide to do it, you can use several recommendations:
- Walls and floors are best made concrete.
- The edges of the "hole" must be strengthened with the help of iron corners.
- It is necessary to think over how to close the "hole" when it is not used. Alternatively, use a backing made of sturdy boards fastened together.
- In the walls of the "pit" you can provide special niches for the tool.
- It is important to think over the “pit” lighting system in advance;
The importance of arranging the “pit” is that with its help it is possible to diagnose malfunctions of the car chassis, as well as replace some of its parts, change the oil. Having a “pit” and racks in the garage, we can already talk about a partial arrangement of the workshop.
The most necessary equipment for a car workshop
If you just need to replace the wheel or tighten something under the hood, it will be enough to have a jack and a standard set of tools.
But to perform more complex tasks, special equipment is needed:
- Crafting table. You can buy it in a specialized store, but you can do it yourself. To do this, you need wood and metal. The future working area should be covered with a piece of metal, which will protect the tree from premature wear.
- Welding machine. For repairs in a garage, an aggregate with tungsten electrodes in a protective gas environment is sufficient. A carbon dioxide apparatus that welds metal with wire is also suitable. It is important not to forget that if a wooden floor is "laid" in the garage, welding work cannot be performed.
- Water separator. It is used to clean air from vapors, oil droplets and other components that may be present in it. In addition, the device is used when painting the machine.
- "Pneumatic wrench." A very convenient device that allows you to remove the wheel or unscrew the bolts in a few minutes to dismantle different parts. Works from a network.
In the modern market there are many useful automotive equipment for almost any purpose and need. It all depends on what kind of repair work will be carried out.
