We make a wooden case for a flash drive. The original case for a flash drive with your own hands Case for a flash drive made of wood
Greetings to all beginners and experienced life hackers of this site!
We have an electronic journal in which we write different interesting articles about useful gadgets and unusual concepts. We also look into the future or make the present more interesting, beautiful and useful. Read another ezine article.
Almost everyone has a USB flash drive today. But with all the variety, the range of cases for such devices is rather limited. Why not make a case for the flash drive yourself? It is not as difficult as it seems, you just need to spend quite a bit of time. But you will become the owner of a unique gizmo.
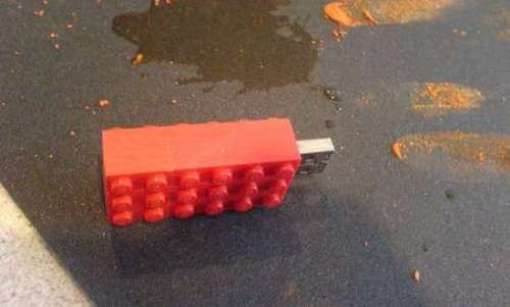
So let's get started! Following step by step instructions, we will make a case for our USB flash drive from bricks from children's designer Lego.
 This is how it will look
Tools and materials
Penknife
Pliers
Several Lego Bricks
Super glue
Sandpaper
Metal polish
Flash drive
Step 1. chassis base
 Internal elements are broken
USB memory cards are different sizes... We will be packaging a fairly large board. Therefore, we need a Lego brick with a size of 6 × 3 cylindrical landing elements (let's agree to call them "points").
Using a pocket knife, you need to cut all the inner partitions of the brick, and then break them out with pliers.
We will use two more low-profile bricks with dimensions 4 × 2 and 2 × 2 “dots” to create the cover. Also for the cover you will need a low-profile element 1 × 6 "points" (for the cover, you can use other combinations of designer parts, or you can just take exactly the same brick as for the base of the case (6 × 3) and carefully cut off its upper part with a jigsaw parallel to the horizontal plane).
With the help of superglue we glue the elements of the lid to get a part of 6 × 3 "dots".
Step 2. Installing the board
 PCB in case
At the end of the case we cut out a groove for the USB connector, and after a slight adjustment with the help of a penknife, we install the device into the case.
Step 3. Securing the board
 Fill the body with silicone
We put the brick scraps on the bottom of the case and make sure that the board is parallel to the horizontal plane and does not push through. We fill all the remaining space in the case with transparent silicone, sealing it to reduce the possibility of any movement of the flash card inside the case.
It is important to use transparent silicone, since the indicator LED will have to shine through it.
Step 4. Bonding and polishing
 Cleaning the edges
 Polishes of different abrasiveness
So that there are no gaps between the lid and the body, we take sandpaper, put it on a flat surface, and align the lower plane of the lid on it.
After we superglue the cover to the case, using the same sandpaper, remove burrs and glue stains from the side edges of the case.
Then we finally polish the case with polish.
Step 5. Completion
 The case is ready
 Compare your exclusive and mass consumer goods
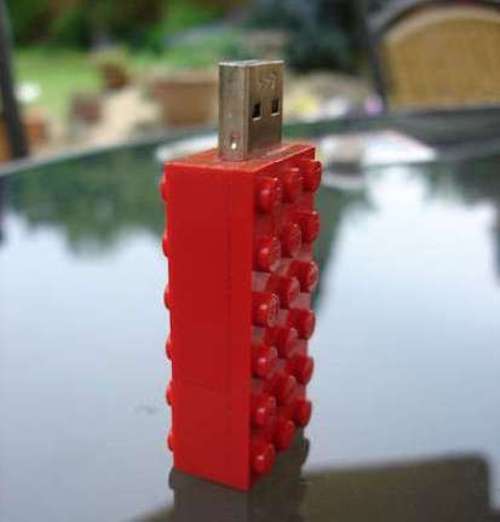 Looks stylish!
But on this creative possibilities on the creation of exclusive flash drives are not limited to. On the contrary, there can be an infinite variety of types of cases for them.
See what other craftsmen have done.

Do you have an original designed USB stick? What ways do you know to customize this mini-media?
In the meantime, there are still some unread curiosities in the mini-journal: a visionary video about the medicine of the future; gadgets - stationary cellular telephone and a bottle for the tourist to disinfect water. and don't miss anything!
There are many ideas for wooden flash drive cases. Usually, common materials are used for hulls - pine, birch, etc. But in this modding, we will use Karelian birch and exotic paduk (the wood of this tree has a red-orange color).
DIY flash drive modding
Having decided on the size of the future flash drive, we cut off two plates of Karelian birch and one paduk.

We mark where the USB stick will be located.

In the paduk plate, it is necessary to remove the core for the board. To do this, drill along the contour of the hole.

With a jigsaw we saw through the resulting jumpers between the holes. And with the help of a file we grind such a hole so that the board enters the plate without any extra effort. Do not forget to leave small steps in order to prevent the flash drive from dangling inside the case.


The wood of the Karelian birch is very dense, poorly chipping and difficult to cut, so you need to work carefully, otherwise you risk injuring your fingers.
First, we select the wood with a semicircular cutter, then either with a straight cutter or with a file, align and adjust.

Having adjusted the layers of Karelian birch, we glue the "sandwich" with the "Moment-joiner" glue and lightly clamp it in a vice until the glue is completely dry.
We continue modding the flash drive with our own hands. Now let's take care of the insert between the flash drive and its cap. We will make it from 50 kopeck coins. We grind it with sandpaper on both sides.

With an awl we mark the place of the future hole for the USB connector.

Drill holes with a 4mm drill. Constantly checking with the USB, we grind off the extra file.


We polish the coin with GOI paste and glue it to the USB flash drive with epoxy resin.

Let's leave the epoxy to dry and work on the cap. In order for the cap to hold on to the USB flash drive, we will use the USB socket. Cut out the socket from the extension cord.


Sew the protruding edges with a file.

We make the frame and overlays according to the already tested technology.


We glue.

So what do you think? Don't be alarmed, this is not the end of modding)


With the help of a file, we give the flash drive a more beautiful look.


Now we will saturate the flash drive with Danish oil. You need to soak several times.

Well, the oil is dry, you can brag.


Evgeny Ozhogov
Based on materials from the site: modding.ru
Fpeshka is a modern and highly symbolic gift that everyone will appreciate. But the plastic cases of USB-drives do not look very presentable. If you want to make your gift pleasant not only from the point of view of the attention you have given, but also aesthetically effective, work hard and make a wooden case for a flash drive with your own hands.
Materials
To make a wooden case for a USB drive with your own hands, prepare:
- the flash drive itself;
- a block of wood of any species;
- joiner's glue;
- linseed oil or wood stain;
- hot glue;
- milling machine or hand tool for wood processing;
- saw;
- grinder;
- sandpaper.
Step 1... Cut a piece 6 - 7 mm thick from the block you have. The section parameters in this case were 55 x 55 mm.

Step 2... After cutting off the block, carefully grind it for further work.

Step 3... Considering the parameters of the plastic case of the flash drive you have chosen, sketch its prototype on paper. Attach it to the cut off piece of wood, and then start making a groove for the internal filling of the flash drive. The depth of each groove should be 2.4 mm.

Step 4... Cut a part of the bar with grooves into two parts of the flash drive body. Sand them.

Step 5... Disassemble the plastic case of the flash drive, leaving only the inner part and the port.

Step 6... Place the USB stick schematic into one of the blank wooden case. Secure it in place in the correct position with a drop of hot glue.

Step 7... Lubricate the halves of the wooden case with wood glue. Clamp it and place it in a vice. Remove excess glue immediately.

Step 8... After the glue is completely dry, cut band saw edges, giving the body a streamlined shape. Then sand the product. If desired, you can paint the case with a stain or linseed oilto emphasize the texture of the wood or to shade it.

Hello, friends. The creation of unusual cases for flash drives has long been a separate trend in modding. Many craftsmen work exclusively with flash drives and, moreover, even sell their mods through online stores and auctions. It would seem like an ordinary compact USB drive - why exactly has it become so popular? Before the advent of flash drives, almost every PC was equipped with a floppy drive for reading and writing floppy disks. Unfortunately, floppy disks were not very convenient and greatly limited the capabilities of users. The flash drive, on the other hand, has become a step forward - a compact device characterized by reliability, lightness and the ability to accommodate a large amount of memory. A flash drive has become a constant companion of many people, because it is very inconvenient to carry disks or bulky external HDDs with you and it is much easier to take a neat keychain that stores all the necessary information. Since this thing is always at hand, many began to think about external design and style. USB drives... does not require a huge amount of materials, large costs and time. There are a lot of ways to decorate your USB flash drive or make it a full-fledged custom case with a unique design, and many can be done even by novice and inexperienced modders.
Steampunk flash drive modding.
Steampunk has appeared relatively recently, but its popularity only grows with each. Many designers even began to deal exclusively with steampunk, as the demand for such unusual and original things is growing at a tremendous speed. The steampunk style occupies a special niche. Particularly popular is the direction of alternative historical steampunk, which is based on stylization for the real historical world of the 19th - early 20th centuries.
Modder Rob Smith, also known under the nickname Back2root, became known in the foreign modding scene precisely because of his quality work on creating custom cases for flash drives. For all of his mods, he uses wood, elements from old mechanical watches for styling, and small brass and copper inserts. Everyone is different interesting design and a comfortable body. Here, for example, is a stylish flash drive that can hold up to 16 GB of information in a new steampunk-style case:


Modder - \u003d ReBiT \u003d - built his flash drive into the body from an old zizhigalka using a regular school eraser. An example of simple, cheap and. Despite the simplicity of modding, such a case will perfectly protect the stuffing of the flash drive from mechanical stress.

Greetings to all beginners and experienced life hackers of this site!
We have an ezine in which we write various interesting articles about useful gadgets and unusual concepts. We also look into the future or make the present more interesting, beautiful and useful. Read another ezine article.
Almost everyone has a USB flash drive today. But with all the variety, the range of cases for such devices is rather limited. Why not make a case for the flash drive yourself? It is not as difficult as it seems, you just need to spend quite a bit of time. But you will become the owner of a unique gizmo.
So let's get started! Following the step-by-step instructions, we will make a case for our USB-stick out of Lego bricks.
This is how it will look
Tools and materials
Penknife
Pliers
Several Lego Bricks
Super glue
Sandpaper
Metal polish
Flash drive
Step 1. chassis base
Internal elements are broken
USB memory cards come in a variety of sizes. We will be packaging a fairly large board. Therefore, we need a Lego brick with a size of 6 × 3 cylindrical landing elements (let's agree to call them "points").
Using a pocket knife, you need to cut all the inner partitions of the brick, and then break them out with pliers.
We will use two more low-profile bricks with dimensions 4 × 2 and 2 × 2 “dots” to create the cover. Also for the cover you will need a low-profile element 1 × 6 "points" (for the cover, you can use other combinations of designer parts, or you can just take exactly the same brick as for the base of the case (6 × 3) and carefully cut off its upper part with a jigsaw parallel to the horizontal plane).
With the help of superglue we glue the elements of the lid to get a part of 6 × 3 "dots".
Step 2. Installing the board
PCB in case
At the end of the case we cut out a groove for the USB connector, and after a slight adjustment with the help of a penknife, we install the device into the case.
Step 3. Securing the board
Fill the body with silicone
We put the brick scraps on the bottom of the case and make sure that the board is parallel to the horizontal plane and does not push through. We fill all the remaining space in the case with transparent silicone, sealing it to reduce the possibility of any movement of the flash card inside the case.
It is important to use transparent silicone, since the indicator LED will have to shine through it.
Step 4. Bonding and polishing
Cleaning the edges
Polishes of different abrasiveness
So that there are no gaps between the lid and the body, we take sandpaper, put it on a flat surface, and align the lower plane of the lid on it.
After we superglue the cover to the case, using the same sandpaper, remove burrs and glue stains from the side edges of the case.
Then we finally polish the case with polish.
Step 5. Completion
The case is ready
Compare your exclusive and mass consumer goods
Looks stylish!
But the creative possibilities for creating exclusive flash drives are not limited to this. On the contrary, there can be an infinite variety of types of cases for them.
See what other craftsmen have done.
Do you have an original designed USB stick? What ways do you know to customize this mini-media?
In the meantime, there are still some unread curiosities in the mini-journal: a visionary video about the medicine of the future; gadgets - a landline cell phone and a bottle for a tourist to disinfect water. and don't miss anything!

