Original crafts from the remains of building materials. Sleight of hand and no fraud: country furniture from nothing Crafts from the remnants of siding
Imagine the beautiful: you bought a cottage. Or rented a house for a couple of months. Alas, few people sell and rent Russian country houses with chic furniture. At best, you will get shabby chairs and cracked cabinets. But do not rush to furniture hypermarkets for cheap furnishings. Take a look around: interesting furniture can be made from anything. Almost.
It all starts with a hanger
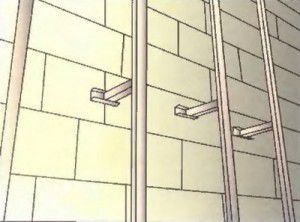
The cottage may be different. Maybe - with lace napkins and gzhel, or maybe - with shelving from boxes and a bar as a hanger-shelf. Why not? As you can see, various unexpected objects can play the role of hooks - even nails, even hammers.
Photo from Houzz.ru, author Advice: if you like the idea with a bar, consider the solid weight of the material when calculating the fastening. A six-meter pine beam with a section of 20 by 20 cm weighs about 210 kg! And 10 by 10 cm - a little over 50 kg.

Photo from Houzz.ru, authorVeritas Fine Homes Inc.
A compromise option for thin walls is decorative hooks on an old board (for example, a picket fence).

Photo from Houzz.ru, author From textured wood, you can also make a spectacular frame for a mirror in the hallway.
Sleeping place
If you have a bed or mattress, that's fine. It remains to ennoble the sleeping place with the original headboard. For this, trimming boards, painted and arranged in a curly composition, are useful. However, the old lumber can not be brought into a civilized form, but, on the contrary, you can choose colorful, “beaten by life” specimens.
Photo from Houzz.ru, author Do not want to throw the mattress on the floor - build a podium. The minimum height of the bed is 30 cm, the maximum is 75. For example, the remaining beam will fit as a podium. But remember that not every floor can support a bed weighing a ton.
Photo from Houzz.ru, author A bed frame made of bars, plywood and boards will be much lighter than a monolithic array. And in production, such a design is very simple. Do not be afraid of the handicraft look of the product - what looks like a challenge to “European-quality repair” in a city apartment looks like cute fun without pretensions in a country house.
Photo from Houzz.ru, author Advice: wide euro pallets will fit as a headboard of a wooden bed. Be sure to sand the tree, treat it with an antiseptic from fungus and bugs, and varnish it on top - glossy or colorless matte.
Sofa
Wooden euro pallets (pallets) for transporting goods have been at the peak of interior fashion for several years. They make low coffee tables, frames for sofas and beds, headboards and shelving. It is fashionable, and most importantly - cheap: pallets are sold at construction bases at a price of 200 rubles per piece (used). To paint or cover with a colorless varnish after grinding is a matter of taste.
Photo from Houzz.ru, author Pallets have proven themselves particularly well as frames for sofa areas. It is clear: if a home-made chair from a pallet can be replaced with a cheap plastic one, then this will not work with a sofa.
table
Put pallets on top of each other - you get a roomy table. Screw roller wheels to the pallet - and now you have a mobile design table. Close it on top with a sheet of plexiglass or glass - the dirt will not be absorbed into the wood, and nothing will fall through the cracks.
Photo from Houzz.ru, author But it is not necessary to go for pallets specifically for the table - it can also be made from an old door. The more worn the canvas, the more colorful the countertop will be. If you are satisfied with a small table, then there is no need to look for legs for it - just cut the door leaf into three parts, fasten it with corners from the inside.
Photo from Houzz.ru
From an old suitcase living out its age in the attic, an excellent coffee table of decent capacity will also come out. And from two or three suitcases you get a chest of drawers or a bedside table.
Photo from Houzz.ru
A bar from this point of view is a much more convenient material. We clean and fasten the parts with wood glue.
Photo from Houzz.ru, author
In addition to the drawers, we will need furniture wheels, corners, self-tapping screws and wood glue. For structural stability, the boxes can be mounted on a frame made of board or plywood.
Paint, stain, varnish - optional.
Rack
Are there any more boxes? Wonderful. They are easily assembled into interesting racks and hanging shelves. Such furniture can be painted inside or outside, pasted over with wallpaper or fabric.Storage spaces
Separately, it is worth mentioning the ladders, "goats" and stepladders. These are ready-made heated towel rails, clothes hangers and racks.Any basket will give the ladder even more storage options.
Photo from Houzz.ru, author If the house has niches, fenced off corners - make a built-in wardrobe there. And don't let the modesty of the decoration bother you. Feel free to use pipes instead of rods, boxes instead of shelves - all the stuffing can be hidden behind a bright curtain. It will be much cheaper than doors, and even more decorative.
Installation of vinyl siding without the use of fittings is possible. Despite the fact that some builders say otherwise. But not all. Typically, vinyl siding is installed using fittings (window trims, frames, joints, etc.), which are purchased separately from the siding, having previously selected the color and type.
But is it worth buying it? It's no secret that additional elements for siding are about 1.5-2 times more expensive, although they have the same composition, specific gravity, strength, etc., only the shape is different, although this should not be a reason to increase the price. Many people think that without them the installation of siding is almost impossible and, spending their hard-earned money, resignedly buy them. But this is not so at all! You can do without them, and the installation of siding will cost you much less and without compromising the aesthetic appearance. It is quite possible to use instead of these accessories wooden products that you can make yourself, or trimmings of siding, which will be accumulated a lot during the installation process and it will be a pity to throw them away. For example, corners can be made from thin boards, and window slats can be made from unnecessary siding residues using special glue. It will cost less and no less effective. Some are confused by the fact that the tree is very "painfully" endures adverse weather conditions, quickly "ages" and requires constant care. This can be easily corrected if the wood is treated with an antiseptic HMBB and a special varnish is applied to the surface to protect it from ultraviolet rays, thus the service life will be increased to 20 years. Installation of siding should be started by marking a single horizontal line around the entire perimeter of the house, it is most convenient to use a laser level for this purpose. I have done my own installation of vinyl siding many times without the use of fittings. This is best done in cloudy weather or in the evening when the sun "sets" so that the laser beam is clearly visible. On all walls, a frame of wooden slats is strengthened, on which the siding will lie, you can, of course, use special metal bars, but this will cost more. Then install the lower start panel along the line that was previously marked by level. Here it is very important to install it exactly, since all subsequent sheets will exactly copy the horizontal of the launch pad. Considering that vinyl siding can expand and contract depending on temperature, during installation it is necessary to leave a gap between the joints: 10 mm if work is carried out in winter, and 5 mm if in summer. When mounting walls, it is more expedient to join the panels “overlapping”, since the joints will be almost invisible and the house will look more beautiful from the side than when joined in any other way. The last, top panel must be inserted into the finishing bar, which is pre-attached in the upper inner corner between the cornice and the wall of the house and fixed with at least two self-tapping screws along the entire length, otherwise it may pop out at the first gust of wind. After installing the walls, you can proceed to the windows. Of course, as they say, “there is no friend for the taste and color,” so there may be different options: trim either with wooden boards, or use the remnants of siding. As you can see, installing vinyl siding without the use of fittings is not that difficult.
Repair of refrigerators Avtozavod http://master-nnov.ru.
- excellent material for facing the house. At its affordable cost, it has many positive operational and technical characteristics.
You are offered detailed instructions for self-installation of siding. The guide is universal. Following its provisions, you will be able to complete any finish that provides for installation on a crate: fiber cement, wood, metal, vinyl, etc.

We mount the crate
Siding is best attached to a pre-mounted crate. We work in the following order.
The first stage - choose the material

The frame can be assembled from a wooden beam or a metal profile. Metal products are stronger and more durable. In addition, the metal crate is much easier to attach to an uneven base.
Learn and also familiarize yourself with the calculation algorithm with an emphasis on possible nuances.
Installation of profiles is carried out with a half-meter step. Hangers are used for wall mounting. This technique will allow leveling surface differences and fixing the frame elements in level.
Wooden crate is cheaper. When choosing this option, pay attention to the condition of the wood. It is prohibited to:
- the material was exfoliated;
- was deformed;
- had bluish spots and traces of rot, etc.
The elements of the wooden crate must be impregnated with flame retardant and antiseptic. If the house is built of wooden elements, the walls should also be treated with the listed preparations.

The second stage - preparing the base
The crate is easiest to attach to a flat base. First of all, we remove any details that may interfere. These are all kinds of tiles, bars, platbands, gutters, etc.
The third stage - set the guides
Siding is best mounted horizontally. In this case, we fix the bars or profiles of the crate vertically.
To attach the guides to wooden walls, we use nails or self-tapping screws. If the house is built of concrete blocks or bricks, we fix it with dowels, having previously drilled holes for them in the wall of the house.
We level each rail.
Important! If you plan to do outdoor work, it is best to fix the siding crate after all insulation work has been completed. In this case, there will be two crates: for insulating materials and for cladding. In this case, the rails of the two frames should be placed parallel to each other.


You can, of course, try to lay insulating layers after attaching the siding sheathing, but this is not very convenient.

We mount J-profiles
The starting rails must be perfectly fixed, as the quality of the entire lining depends on the correctness of their installation.

First step. We take the level and find the lowest point on the crate. We step back from it up 50 mm and put a mark. To do this, we screw a self-tapping screw into the rail a little.
Second step. We consistently move around the building and continue to put marks with self-tapping screws to fix the starting profiles. We also screw self-tapping screws in the corners of the house.
Third step. We stretch the rope between the corner marks.
Fourth step. We mark on the rails the boundaries of the installation of corner profiles. We take the profile itself, apply it to the corner of the frame structure and put marks along the edges with a pencil.

Important! We leave a 1-centimeter gap between the profiles to compensate for temperature deformations.
We leave a gap between the starting guides and the nail strips.

In order to avoid a 6 mm setback, you can cut off parts of the nail strips so that they do not rest against the J-profile during temperature changes.

Important! Starting profiles must be mounted strictly horizontally! Correct deviations for as long as necessary.
If you install guides with deviations from the level, the siding will also warp. It will be extremely difficult to fix this in the future.
Prices for fasteners for a profile
Profile mounts
We mount external corner profiles

First step. We mark spotlights. We need to see where the edges of these elements will be in the future.
Second step. Attach the guide to the corner of the frame. We do this with a 3 mm gap to the soffit or roof. We fix the profile with self-tapping screws.
The lower border of the element is placed 0.6 cm below the edge of the starting profile.
Third step. We check the verticality of the installation. In the absence of deviations, we fix the bottom, and after that - the rest of the places. Experts do not advise placing fasteners in corner elements too often.

If the house is higher than 300 cm, the profiles will need to be superimposed one on top of the other. To do this, cut the top profile. As a result, a 9 mm gap should remain between the planks of the joined elements. When laying the elements, we maintain an overlap of 2.5 cm.


Important! We join the profiles at the same level on each side of the house.
If the plinth has a protruding structure, we shorten the profile so that a 6 mm gap remains between it and the plinth.
Useful advice! Instead of a corner profile, it is allowed to install 2 J-elements (starting). This way you can save money. But this solution also has its drawback - the corner will not be as tight as when using a special corner profile. Having decided to use this method, pre-glue the wall at a similar angle with a strip of rolled waterproofing material.

We mount internal corner profiles
The order of installation of these elements does not have significant differences from the technology for arranging external corners - we leave an indent of 3 mm between the profile and the soffit, while lowering the lower end of the profile below the J-bar by 0.6 cm.
If there is a protruding plinth or other element from the bottom that stands out from the general level, then we also leave a 6 mm indent between it and the profile - it is impossible for the profile of the inner corner to rest against it.
There are 3 methods for arranging internal corners, see the picture.

If the wall height is more than 300 cm, we perform profile splicing. The technology is the same as for the arrangement of external corners.

We leave a 9 mm indent between the planks, carefully cutting off excess material. The overlap of the upper element on the lower one is 2.5 cm. We install the fasteners with a 4-centimeter step, placing them strictly in the center of the holes intended for this. The exception is the highest point. Here the fasteners must be installed at the top of the hole.
We mount the frames of the openings

For most inexperienced craftsmen, difficulties arise precisely at the stage of framing and doorways. The order of work will vary depending on how the openings are arranged in relation to the plane of the wall.
Openings in the same plane with the facade

In this case, we do the following.
First step. We perform waterproofing of openings.
Second step. We fasten platbands or J-profiles to the openings. We equip each opening using 4 platbands: a pair of vertical and a pair of horizontal.
Third step. We connect profiles.

To make the connection of platbands as accurate as possible, we do this:

The platband at the bottom is connected in exactly the same way, only the bridges will need to be cut and bent on the side elements for their further lining on the profile below.
Apertures recessed into the facade


When installing near-window profiles, we work in compliance with the same recommendations as when installing platbands, i.e. we create cuts on the profile corresponding to the depth of the opening, and then bend the bridges and insert them into the finishing elements.
Do not be too lazy to understand the principles of bending such bridges. We make them so that they cover the junction of the cladding elements. As a result, moisture will not be able to penetrate inside.

Installing the first panel
We start facing with the least noticeable wall of the building. So we can practice and work out all sorts of inaccuracies.

First step. We insert the first cladding panel into the corner profile and into the locking joint of the starting strip.
Important! We leave a 6 mm temperature gap between the first cladding element and the lower part of the corner profile lock.
Second step. We attach the panel to the crate.
It is important to observe the dimensions of technological indents. If the lining is carried out in warm weather, we maintain a 6 mm indent, if in cold weather, we increase the gap to 9 mm. When installing trim panels, the indents can be reduced.

We build up panels

We build up the cladding elements with an overlap or with the help of an H-profile.
When fixing the panels with an overlap, you must first shorten the locks of the cladding panels and the fixing frames, so that as a result the overlap has a length of 2.5 cm.

The installation of the H-profile is carried out similarly to the corner elements - at the top we retreat 0.3 cm from the soffit, from the bottom we lower it by 0.6 cm in relation to the starting profile.
Important! We leave a 6 mm indent between the H-profile and any obstacles on the houses.
Installing the rest of the siding

We continue to clad the house with siding. The technology of work is similar to the order of fastening the first panel.
Important! Every 2-3 rows, we check the horizontalness of the cladding using a level.
Having reached the opening, we remove the unnecessary piece of the panel falling on the opening.
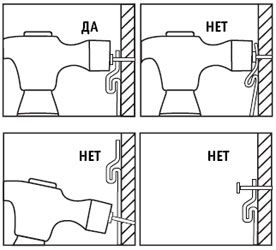
We provide reliable fastening of panels with the help of "hooks". For this we need a punch.

We mount an additional finishing profile at the bottom of the opening. It will allow you to level the lining on the plane.

Mounting under the roof

We fix the J-profile under the roof structure.
We work in the following order.
First step. We measure the distance between the lower part of the lock of the finishing element and the lock of the penultimate facing panel.
Second step. Subtract from the measurement obtained 1-2 mm indent.
Third step. We mark the whole panel, cut off its upper part with a locking connection.
Fourth step. We create "hooks" at the top of the element with a 20 cm step. To do this, we make cuts and bend them to the front side.
Fifth step. We insert the trimmed element into the penultimate siding panel. With a slight upward movement, we snap the inserted element into the locking connection of the finishing profile.

We mount the pediment
We sheathe the pediment around the perimeter. All fasteners, except for the top, are installed in the center of the holes. The upper fastener is installed at the top of the hole. Sheathing can be done both with profiles for arranging internal corners, and with a starting profile.

The installation procedure is similar to the fastening of wall panels. We cut the edges of the elements and connect them with the locks of the receiving profiles. Keep in mind the 6mm setback when mounting in warm weather and 9mm when working in winter.
We fasten the last element of the pediment sheathing directly through the panel material - this can only be done here.

Cladding completed.
Find out how, and also look at the calculations and a step-by-step guide, from our new article.
In order for the paneling of the house to be as successful as possible, you need to know certain subtleties of performing such work. There is a list of general recommendations for any siding, as well as individual tips for panels made from a specific material.
Now you can do it yourself at the highest level.

| Name (model) | Advantages | Length x width x thickness, mm | Quantity in a package, pcs |
|---|---|---|---|
| Vinyl Siding Kanada Plus | 1. Dark coloring is done using the "Cool Color" method (heat absorption), which involves the use of masterbatches. 2. Excellent appearance remains unchanged even when exposed to high and low temperatures, the range of which ranges from -50°C to +60°C. 3. Maintains shock resistance even if the ambient temperature drops to -20-60°C. 4. Not subject to microbiological corrosion (fungi, mold). | 3660 x 230 x 1.1 | 20 |
| Acrylic Siding "Kanada Plus" | Among other useful qualities of Kanada Plus acrylic siding, it is worth highlighting: Increased resistance to direct ultraviolet rays; Excellent tolerance to acidic and alkaline solutions, as well as to various fats; Good washing tolerance with chemical detergents; High degree of deformation resistance (perfectly tolerates temperatures up to 75 ° -80 ° C). | 3660 x 230 x 1.1 | 20 |
| Alta Siding - Vinyl Siding | "Alta-siding" is: one of the safest finishing materials on the Russian market; frost resistance and the ability to maintain strength even at very low temperatures (from -20 to -60 ° C); resistance to significant temperature changes and environmental influences; durability: the service life of Alta-siding is up to 30 years; resistance to aggressive substances (detergents can be used to clean the siding); non-susceptibility to infection by moldy fungi. | 3660 x 230 x 1.1 | 20 |
| Facade metal siding INSI | Siding "INSI" is made of galvanized steel coated with a layer of polymer composition, which means that it inherits all the advantages of this material: resistance to temperature extremes (-50°С - +80°С) and mechanical damage; long service life with preservation of original properties (about 50 years); environmental friendliness; incombustibility; possibility of mounting both horizontally and vertically; protection of the building from overheating (in the ventilated facade system); and when choosing one of two new colors (alder or rosewood) - a complete imitation of the appearance. | Length up to 6000, width up to 200, thickness 0.5 | - |
Successful work!
Siding prices
Video - Do-it-yourself siding installation
After a variety of construction works, there are always scraps, fragments, pieces, even whole sheets. And, since the materials have a hefty cost, throwing them out of hand is not. Everything can be used for crafts both in the country and in the apartment.
Vinyl siding
The material is used for finishing facades. It is produced in the form of lamellas - long finishing boards, and in the form of panels, as a rule, imitating stone or wood chips. Residues are always formed during cladding. The material is produced in a certain size and it is unrealistic to choose it so as to completely cover the facade without joining and adjusting.
Even more scraps remain after installing the basement siding - in the form of panels. Since the finish reproduces stone and brick, its edge is always uneven. This does not affect the quality of the joints, however, when facing corners, trimming is inevitable. If the building is finished with two types of panels, the situation is aggravated.

What can be done from the remnants of siding depends on the needs of the owner and his imagination.
Sale
Finishing is always purchased with a margin. Damage during transportation, during installation, unsuccessful docking and many other factors lead to the fact that the purchased volume may not be enough. And the shade of the plinth panels in another batch may differ significantly. Therefore, facing is purchased with a margin of 10-15%.
However, in the absence of adverse factors, this excess remains unclaimed. Plinth siding: its remnants, if they are large fragments or even entire panels and vinyl lamellas, can be sold. To do this, there are numerous Internet sites, like Avito, where free ads for the sale of any kind of material are posted. Moreover, the cost of the proposed is determined only by the seller. Avito allows for the sale of both new products and used ones.
You can offer trimmings to your neighbors in the country. It is quite possible that just a pair of basement panels is not enough to cover the foundation.

Large crafts
Crafts from the remains of siding usually find their use in a summer cottage or in a garden. The material is designed for external use and is rarely used for interior decoration - it looks rough.
- The remains of the cladding are used to finish minor structures: sheds, utility rooms, garages and even toilets. This option creates a holistic ensemble of all country buildings and looks quite stylish.
- Lamella trimmings are great for building borders for flower beds or low fences.
- What can be made from the remains of siding is a playground. There is no better entertainment for children in the country than their own playhouse. Lamellas and panels are perfect for its decoration: it is durable, not afraid of water, does not burn and perfectly retains its color. Pictured is the playhouse.

small crafts
The remains of stone or wood cladding can be used for decorative purposes.
- First of all, this is a handmade wall decoration. The combination of a smoothly plastered wall with separate elements of "masonry" or wooden cladding looks fashionable, stylish and original. This option is also suitable for a city apartment.
- From the remnants of the material, you can make small shelves in the kitchen, in the hallway, as well as in utility and utility rooms - a garage or a barn. They will not withstand a large load, but they are quite suitable for a variety of small things or kitchen utensils.

- You can include scraps of material in the decor of a veranda or terrace, and use it not only for walls, but also for sheathing cabinet doors, chests of drawers, and even as a countertop. Such garden furniture, made by hand, looks very unusual.
What can be done from the remnants of siding is shown in the photo.