Decorative wall decoration with butterflies. How to make a butterfly with your own hands on the wall from paper: templates, stencils for printing and cutting, photo
Undoubtedly, many would like to transform or slightly refresh their home. Often, the transformation consists in carrying out repairs, at least cosmetic ones. A creative approach and a little creativity will help modify a room (apartment) without much effort and solid financial investments. It is enough to use such a magnificent decor option as ceiling and / or wall panels. Far from the last in this series of decorative solutions will be a relatively simple and financially attractive way of decorating - do-it-yourself butterflies on the wall.
What is it - "do-it-yourself butterfly decoration on the wall"?
This type of decor is one of the varieties of appliqués, or rather, a panel of figured butterflies, for the creation of which a wide range of sheet materials is used. Graceful and light applications can be placed on all walls of the room or only one wall can be used for composition. There are many ways to make and attach butterflies to the wall with your own hands. It is the manufacturing technique chosen by you that will determine the final result and the impression made by this hand-made decoration.
Imagine - from the center of the wall, a whirlwind of moths of different sizes and unprecedented colors just goes flying! Circling in a round dance and fluttering with graceful wings, they are pleasing to the eye and, undoubtedly, attract the attention of everyone. Naturally, we are not talking about living butterflies or their mummies.
Video: do-it-yourself interior decoration with butterflies
To decorate the walls, butterflies of various styles, sizes and colors cut from the selected material are used. A lot depends on the approach to the implementation of this truly enchanting spectacle. Butterflies made of rigid cardboard can be given all sorts of positions and shapes. They are more durable and do not lose their appearance. Moth figures made of light fibrous paper or film, fixed only in the middle, quiveringly flap their lacy wings from any, even the slightest, stirring of air. The impression from such a spectacle is much stronger.
Where to start making butterflies on the wall?
First, decide on the outlines of the application. In the event that your own solutions seem less spectacular than we would like, you can always find a myriad of ready-made models of applied decor on the net. Next, you should decide on the shapes of butterflies and their colors. Considering the individuality of the design of each dwelling, it is important to choose the most appropriate color range of the intended decoration, which should organically fit into the overall concept of the interior. At the same time, do not forget that each element (butterfly) should be bright and stand out on the wall. The shape of butterflies requires a separate reflection.
Of course, you can be content with butterfly stickers of the desired color scheme purchased in special stock stores or on order. We are talking about exclusively independent production of decorative elements for future applications. It is this principle that underlies the recommendations for beginners. A sketch of future butterflies can be created using simple and affordable computer programs for drawing or adjusting images. According to the sketch, templates of various sizes are then made for cutting from the selected material. Are you good at drawing yourself? Great - make freehand templates on tracing paper or plain paper. Do not try to give elegance by increasing the number of bends and ruffles on the wings of moths, if only because you will have to painstakingly cut all this with scissors or a scalpel with a pattern.
Take the advice of practitioners - do not resort to strict symmetry of each individual element. There is no need for “mirror-correct” wings. It is better if they are slightly different in size from each other. This will bring some volume and dynamism to the finished decoration in any surface mounting option.
It’s also not worth it to be especially zealous with asymmetry. Still, measure comes first.
Sketch created. We proceed slowly step by step. We decide on the format of the decoration, the number and method of fixing the butterflies. Now the selected butterfly template can be printed in different sizes for subsequent stencil making. It's not so difficult here - put the printout on a cardboard sheet and carefully cut out the inner fragments along the contour.
Origami can serve as a great option for decorating walls with butterflies. You don’t have to excel in artistic cutting. You just need to master the "assembly" of origami. It's easy and very fun. Numerous video materials about master classes in the formation of all kinds of origami, which can be easily found on the Internet, will help here. So - the problem is solved! Next, we will get acquainted with the features of the distribution and fastening of our butterflies to the wall.
 butterflies on the wall - origami technique
 We compose a single picture
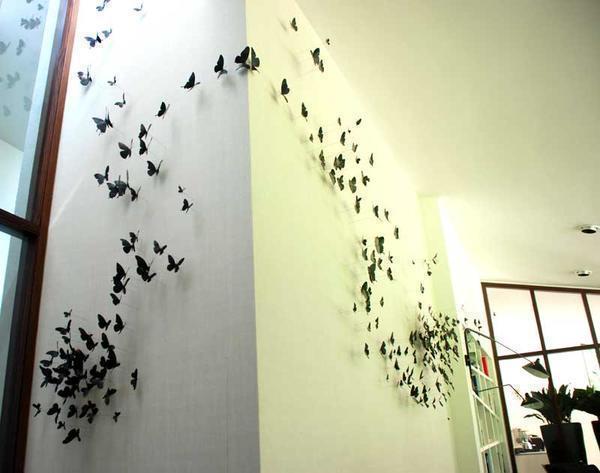
As mentioned above, the shape of the future decor is selected by browsing the options on the Internet or created by your own imagination. You can depict a scattering or a whirlwind of butterflies in places where they harmoniously emphasize the pattern of wallpaper, decorative plaster or any other material of the walls of the room. From a small flock of butterflies, you can create the illusion of their movement from one corner of the room to another. Distributed in small groups, accumulated in the form of a flower or a heart, they will wonderfully decorate and refresh the atmosphere.
The “ripe” idea is initially fixed on paper, then transferred to the wall. Here you can use a pencil or chalk. With thin strokes, apply the main directions in which the butterflies will be attached. Do not draw lines with pressure. They are almost impossible to remove, which will certainly spoil the overall look of the composition and your mood.

We select the material
A wide range of materials can be used to cut out butterflies: cardboard, paper, film, vinyl self-adhesive film, fabrics. The listed materials have multiple advantages.
Paper butterflies on the wall
Butterflies are the easiest to cut out of paper and can be painted in any available way. The amount of consumable material is unlikely to matter given its cheapness. You can use colored paper purchased at any store or stationery department. If you do not want to compose monochromatic butterflies, colorful glossy magazines (already read) are great. Moths cut out from printed pages can be arranged by color and use this technique when composing a wall decoration. Paper decorative elements are easily attached to the walls in any way possible. Butterflies glued completely will not create a visual relief, while those fixed at a distance will be able to “move” their wings from air vibrations.
Cardboard butterflies on the wall
Butterflies made of cardboard are many times more reliable and stronger. The complexity of cutting is offset by the ability of the cardboard to form. This material easily takes the desired shape and retains it for a long time. Parts of cardboard wings, and whole wings, can not only be bent, but also rounded. It is worth slightly moistening the cardboard blank and bending it with a load to the desired configuration. It should be remembered that cardboard is heavier than other materials, and therefore requires more reliable fastening.

Butterflies on the wall from the film
Dense multi-colored polymer film and special vinyl “self-adhesive” are ideal materials for wall decor. Butterflies made of glossy film delight not only with shapes and colors, but with sparkle, brilliance and tints, depending on the illumination of the room. Technically, the figurines are made in the same way as cardboard elements. Ordinary plastic film is attached to the wall surface in exactly the same way as paper. Self-adhesive film will not cause any trouble at all - remove the protective layer and stick the figurine on the place chosen on the wall. If you want the wings to move, remove the protective film strip in the center of the butterfly figurine.
Butterflies on the fabric wall
Fabric decorative elements are perfectly combined with plain liquid wallpaper, draperies, visually and tactilely soft bases. Fabric butterflies have the same “warm image”, which fits perfectly into an existing design with a bright colorful element.
It is better to completely “plant” fabric blanks on glue. With the help of little tricks, you can create a relief picture. It is enough to use an aqueous solution of PVA glue or any soap. It is preferable to treat especially thin fabrics with a soapy solution. The technology is similar to that used to process cardboard blanks: the fabric cut according to the pattern is soaked in a solution and allowed to dry in the desired shape.
We fix the scenery
You have prepared the required number of butterflies. You are looking forward to the final. Let's decide on the option of fastening all the elements of the composition in their places.
Glue
Butterflies partially or completely "planted" on the glue will stick to the surface very firmly. PVA glue and trellis glue are equally applicable. It is important not to go overboard with the amount of glue - it should not protrude beyond the edges of the elements. This is a classic and the easiest way to attach a butterfly wall decoration.
pins
You can use a variety of pins. Especially good are decorative pins with heads made of pearl balls or small figured jewelry. They will help to give a little more charm to the overall idea. Pins as fasteners work great on surfaces made of wooden or plastic lining, cork or bamboo trellises, drywall. For walls pasted over with paper or non-woven wallpaper, you can also use pins, having previously bent their tip at a right angle. The bent part winds up under the wallpaper and secures the butterfly. It is easiest to glue the pins to the figures themselves with glue "Moment", "Second" or similar.
Styrofoam pieces
A butterfly is glued to a small piece of this material. The dried "construction" with the free side is attached to the wall. The option has a drawback - loose foam quickly breaks down, it is quite difficult to remove its remnants from the wall.
Suspension on threads
This mounting option is great for decorative elements made using the origami technique. With a thin, colorless fishing line or butterfly threads, they are hung from the window cornice or directly from the ceiling. With the help of such fastening, it is possible to form full-fledged spatial installations.
Without a doubt - such decoration of planes will require a lot of time and painstaking work. But the dream, embodied in reality, is worthy of admiration. Any interior concept will only benefit from a decorative man-made panel of butterflies. Find the right model and start creating with passion ...
Video: do-it-yourself butterflies on the wall decor master class
To change or even update the look of a home, it is not at all necessary to carry out repairs. Creative people can change the perception of a room with the help of materials, such as making butterflies on the wall with their own hands. Children are taught from school to make decorations in the form of panels. Therefore, it is not difficult to change the habitual appearance of the walls.
What is a decoration?
This decoration looks like an applique, or rather a panel made of paper. Not only the end result, but the visual perception of the room depends on the method of making the decor. Imagine a whirlwind of flying colorful butterflies on the wall. Such decoration will attract the charging of visitors and please the eye. A panel made of rigid cardboard is not only durable, but can also be of any shape. Butterflies, made of fibrous paper, are attached in the middle and flap their wings from any movement of air.
Where to begin?
First you need to decide on the form of the application. You can search for patterns and stencils on the Internet, and then proceed to search for colors. Wall decor with butterflies should be bright so as not to merge with the design of the room.
Finished designs are usually primitive and not intricate. The advantage of homemade decor is the ability to create voluminous applications. It is necessary to prepare a layout of the future composition in any program, and then develop templates of different sizes using it.

Advice! Chasing a lot of bends and ruffles on the wings is not worth it. Subsequently, all these elements will have to be cut with scissors. You should also avoid symmetry, that is, mirror reflection of the wings. One of them may be slightly larger. This will add dynamism to the final application.
After choosing the format and quantity, you can print stencils in different sizes. The blank must be placed on a sheet of cardboard and cut along the contour.
Related article: 10 secrets of the correct placement of the picture on the wall

General picture
The general shape of the picture can be any. An image of a swirl, a scattering of butterflies, which will be combined with a pattern on wallpaper, plaster or other finishing material. Another option for placing decor in the interior - the flight of butterflies from one end of the room to the other, or their distribution in groups. The formed idea must first be fixed on paper, and then the templates should be transferred to the wall with a pencil. The lines should not be bold, so that later they are not conspicuous.

Material selection
You can make stencils from paper, cardboard, film, fabric. Let's consider each of the options.
Paper
A panel of multi-colored paper is the easiest to make. Moreover, this is the cheapest decor option. This material can be replaced with glossy paper from a magazine you read. The resulting butterflies can be arranged by color into a common picture.
Important! A fully glued decoration will not protrude above the level of the wall. Butterflies that are attached at a distance will flutter their wings as the air moves.

Cardboard
Such decoration is more difficult to make, but it is more reliable. Cardboard quickly takes any shape and retains it for a long time. You can make the wings curved or rounded. You just need to wet the cardboard and bend it with a load. After drying, it will take any shape. In view of the large weight, it will be more difficult to mount such a panel.

Film
You can make great colorful stencils from thick or self-adhesive vinyl. Glossy butterflies will not only sparkle, but also shimmer in the room. The manufacturing process is the same as in the case of thin cardboard. The self-adhesive film does not need additional fastening at all, and the usual color is fixed on the wall with glue.
Advice! In order for the butterfly to twitch its wings, you need to fix only the central part of the workpiece.

Textile
For wall decor with plain liquid wallpaper, drapery, any base that is soft to the touch, you can use fabric. Such butterflies will fit into the interior and even improve the design. It is better to fix them completely with glue. To create a voluminous decor, you need to dilute the PVA glue with water. Very thin fabric can be wetted, cut into stencils, and then allowed to dry in the desired shape.
Related article: Interesting options for plasterboard ceilings: levels and lighting

We fix the scenery
It is not enough just to make a panel. It must also be securely fastened to the wall:
Glue
PVA or wallpaper paste should be used if the stencil is made from paper. Just don't go overboard with the quantity.

pins
You can use fasteners with beautiful heads, small pearls. The pin will enter the wooden lining, cork, drywall quickly. With wallpaper, you can do otherwise. You need to bend the tip of the pin 90 degrees with pliers or pliers, and then stick the butterfly under the wallpaper. For greater reliability, you can fix the pin on the Moment glue.

Styrofoam
A stencil is attached to one side, and the other is attached to the wall. The only negative is that in the event of a break, the foam plastic will be difficult to remove the rest of the decor.

Threads
It is better to attach origami to threads. On thin colorless fishing lines, you need to hang butterflies by the eaves or directly to the ceiling. Such a solution will create a volumetric design of the room.

4 master classes
Paper master class
Materials:
- wallpaper cuttings;
- paper for making templates;
- cardboard;
- pencil, scissors.
First you need to print and cut stencils of different sizes to make the result more realistic. Then attach the silhouette to the cardboard, circle it and cut it out. You need to prepare as many copies as possible.

The next step is to apply glue to the bends and attach them to the wall. The middle is pressed with a nail, and then the edges are bent. It is desirable to achieve an effect in the interior when large butterflies fly in one direction, and attach smaller ones along the edges a little further from the main flock.
Master class from vinyl records
Materials:
- records;
- crayon;
- templates;
- scissors.
To make a blank, you need to mark the middle of the template on the plate and circle the outline with white chalk. Then put the foil on a baking sheet and on top - a plate. In the oven, heated to 400 degrees and put a baking sheet, wait until the plate begins to deform and remove it. This takes approximately 45 seconds. Next, you need to cut out the butterfly with scissors. Carefully, but quickly.
Important! Vinyl cools down quickly. It may be necessary to heat the plate several times.

Clay master class
You need to make blanks with a baking dish and make four holes in the middle. Bend the wings at different angles, then arrange the butterflies in a baking dish. Clay should be in the oven for 15 minutes.
Important! Under high temperature, the wings will straighten a little.

If the resulting holes are not large enough, then you can enlarge them with a knife. The edges should then be sanded with sandpaper. If desired, the figures can be decorated. Poke the thread crosswise through the holes, tie a knot. Already through it, skip the pushpin and attach the butterfly to the wall.
Master class from the pages of the book
Materials:
- Old book;
- branches, beads, decorative pearls, shells;
- wire hangers;
- glue, scissors;
- twine and pencil.
First you need to attach a stencil to a page of paper and cut out two wings. Branches of bushes should be cleaned of leaves and soaked. The rods will become softer, will not break when bent. The wire hanger should be bent into a ring and wrapped with rods. After the wreath dries, you need to fix the rods with hot glue.

The body of a butterfly is made of beads, beads, pearls, which are strung on twine and fastened together with hot glue. Then you should glue the "body" in paper. The fluttering effect will be created by slightly bent wings. It remains only to attach the butterfly to the wreath.
Output
To make butterflies with your own hands, it will take a lot of time, perseverance and different ideas. But such decor will bring bright emotions into your life. Moreover, you can decorate any decoration of the apartment with such an application.
Modular origami - butterfly (2 videos)
Butterfly interior design options (39 photos)


As soon as they do not decorate a modern interior in order to achieve a unique comfortable environment in a residential building. To revitalize, decorate and decorate an empty wall in a room, it is appropriate to place beautiful butterflies. There is a situation when an expensive repair is completely completed in the room, pieces of furniture are arranged, attractive curtains are hung, but still there are not enough additional accessories - some kind of individual zest.
A photo of butterflies on the wall shows how interesting this wall design option is, which will undoubtedly attract attention, perfectly completing the image of the room space.

Self decoration decoration
It's no secret that winged beauties can decorate not only walls, but also photo frames, paintings, a chandelier, a mirror, a ceiling surface. This design is by far the most popular, as it embodies joy, love and tenderness.

To create this decor accessory, you practically do not have to spend a large amount of money, time, or material. Suitable paper sheets, perhaps, can be found in any home. But if this did not happen, the material can be purchased at any ordinary stationery store, and they are quite inexpensive.


Sometimes there is no desire or time to draw and cut out the silhouettes of the image, then you can use special ready-made sticky stickers.

Before you make butterflies on the wall, it is important to know that for their manufacture it is not at all necessary to use only paper, you can use any suitable raw materials at hand:
- colored paper;
- soft sheets of cardboard;
- vinyl record;
- textiles treated with starch;
- thin metal sheet (beer or lemonade can).

A completely different size, color scheme, shape is allowed, depending on the desire and preference of the household. Naturally, the quality and composition of the material at hand should be taken into account.

Please note that flying moths can be placed both in a dense flock (in the form of a whirlwind) and as separate elements of interior decoration.

Style ratio
Wall decoration in the form of soaring butterflies is appropriate in absolutely any style of the room: Provence, minimalism, classic, modern, high-tech and more. It is important to achieve a competent implementation of the accessory in the overall style.

It is not at all worth doing the decor of the same shade as the wallpaper in order to avoid complete merging with the general background. As an example: scarlet moths harmonize perfectly on a light beige wall covering, a white background perfectly sets off black or other dark details.

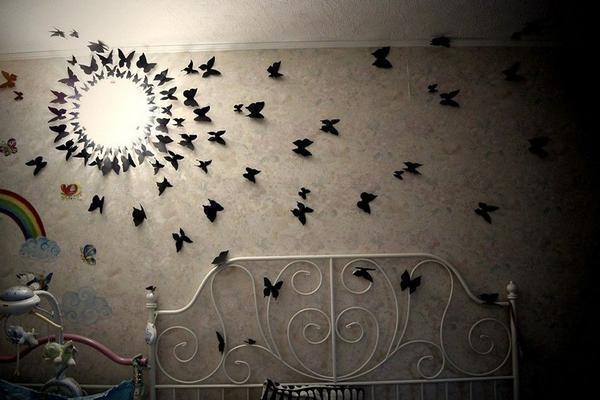
If you further emphasize the decor with artificial lighting, you can achieve a unique effect of take-off and fluttering butterflies. This option is especially relevant in the bedroom or children's room.


Main stages of work
Beforehand, how to make butterflies on the wall with your own hands, you need to prepare a special stencil. If you can’t make the form yourself, many options can be found on the Internet in huge numbers. Next, you need to pick up improvised materials for manufacturing, or buy them in a craft store.

Having decided on the basis, using a stencil for decorating butterflies on the wall, we draw the necessary shape and size of the moth. To make each butterfly unique, it is wise to use several stencils of different sizes.

When choosing a method of mounting a product, it is necessary to take into account a few simple nuances:
- when placing hovering insects for a relatively short period of time, it is better to fasten them with pins or small buttons;
- if you intend to leave the product on the wall for a long time (until future repairs), you should securely fix them with glue.

Before fastening the composition, it is better to place a preliminary sketch on a sheet of paper, and mark the points of the butterfly on the wall with a pencil. This tip helps you place the decor accurately the first time without ruining the wallpaper.

colored elements
As a rule, the simplest and most popular decor method is multi-colored paper, which is quite cheap and significantly saves the family budget. You can create an initial sketch using a special computer program.


A paper sheet is a fairly light material, so it can be easily attached to the wall in any way without any problems. The paper wings will flutter in the slightest possible breeze, reviving the moths. Yes, and removing the decor from the wall will not be difficult and will not cause any damage to the repair.


For work, old color magazines that have long been read are quite suitable. Having transferred the shape of products from the Internet to glossy sheets, they can be coated with glitter with acrylic varnish or fluorescent paint. You will get a beautiful iridescent effect of sparkles.

It is better if the insect is fixed only in the middle, then the wings will be freely unbent and create volume.

Panel of moths
No less interesting and luxurious is the wall panel of fluttering butterflies. For its construction, a small set of materials and devices is useful:
- shiny paper magazine;
- ordinary scissors;
- adhesive tape;
- different stencils;
- picture frame.


To prepare moths, you need bright pages of a magazine. Their number directly depends on the size of the frame. Keep in mind that you should not attach too many figures at the same time to avoid the absurdity of the picture and not spoil the style.

The first stage is the background of a panel of colored paper, or a blank white sheet covered with paint. The elements of the composition are mounted using PVA glue or double-sided glue. The finished panel is placed in a frame and mounted on the selected wall.


To completely decorate a certain room, it is recommended to combine several techniques that are in harmony with each other:
- one wall of the room is decorated with a composition;
- the opposite side includes a panel;
- fluttering beauties hanging on a colorless thread or fishing line are fixed to the chandelier.

Butterflies themselves look great complete with birds, bees and ladybugs. For decorations, it is appropriate to use beads, beads, and for fasteners - only decorative pins.

To fix them to the wallpaper, it is reasonable to bend the sharp ends and drive them under the canvas, you get the effect of a moth fluttering in the air.

There are a lot of ideas for decorating a wall, the main thing is to turn on your imagination and maximum patience! The result will not keep you waiting - your room will become unique and inimitable!

Photo of butterflies on the wall


The end of the repair is marked by pleasant chores for decorating the room. Sometimes the desire to refresh the environment arises spontaneously. A budget option for the original design of the room will be paper butterflies on the wall. Butterfly patterns, a large number of which are presented in this publication, will help to make an individual decoration with your own hands.
Preparatory work
The tradition of using paper butterflies as a decor on the wall originated relatively recently. Multi-colored moths can quickly transform the interior of a room, filling the atmosphere with romanticism and pleasant dreams of relaxation. To achieve the desired result, the preparatory stage will help:
- It is better for paper butterflies to take a wall that is as free from foreign objects as possible. A good view enhances the aesthetic pleasure of a handmade creation.
- Determine the area and shape of the image on the wall. It can occupy a compact area or dissipate as much as possible over the surface.
- It is easiest to make butterflies from colored paper, but there are still a lot of interesting ideas for decorating a wall with original moths. The material of manufacture and its compatibility with the interior of the room are thought out in advance.
- The wall with butterflies of different sizes looks impressive. Pre-prepared stencils for cutting will help you quickly cope with the task.
Comment! When choosing a template, it is worth remembering the complexity of cutting out intricate shapes.


Characteristics of individual materials for butterflies
You can make graceful moths on the wall with your own hands from various materials. Only paper models have several solutions:
- classic colored paper or double-sided colored sheet;
- cardboard;
- corrugated paper;
- newspapers and glossy magazines.
In addition to paper decor, other options for original butterflies are also used in the interior of the room:
- from vinyl records;
- a contour painted on the wall with phosphor paints, applied using a stencil;
- from nylon tights, which are covered with a wire frame;
- from cans or plastic bottles.
Advice! In the absence of experience, it is recommended to make several copies of various materials, then attach to the wall and choose the appropriate option.

Paper
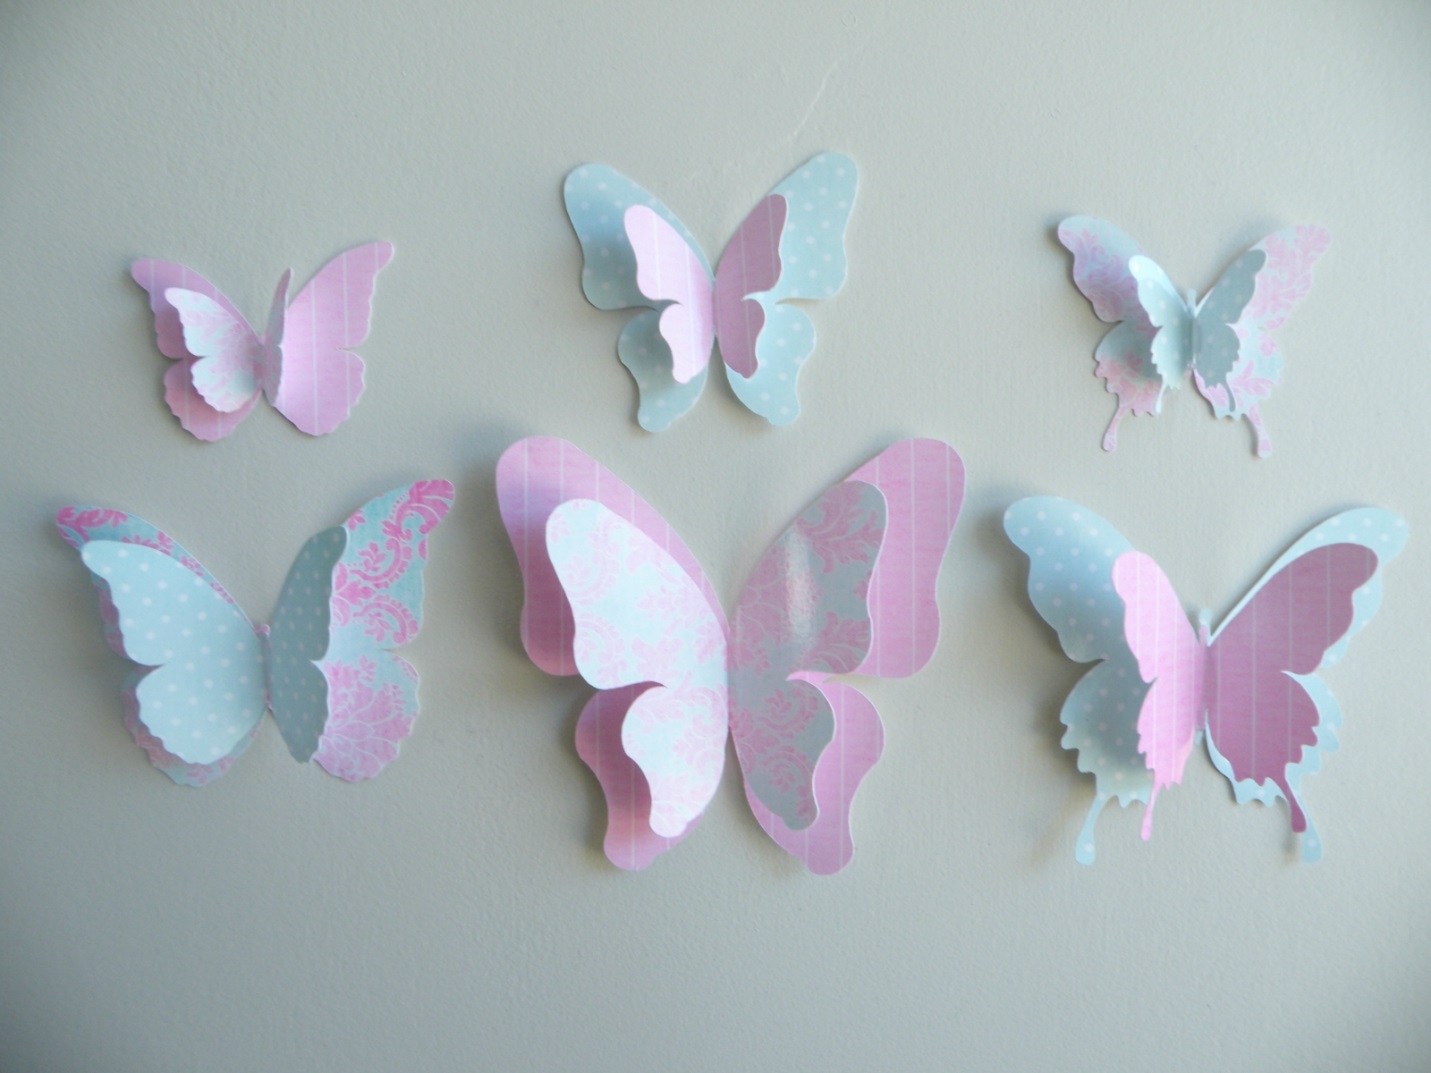
The easiest and cheapest thing to do with your own hands is moths from ordinary colored paper. There are several design techniques. If you plan to stick the butterfly completely on the wall, then paper painted on one side will do. When creating a three-dimensional composition, when only the body of a moth is fixed, it is preferable to take double-sided colored paper for work, so the appearance of decorative elements will only benefit.


In addition to classic colored paper, specimens made of corrugated material look original on the wall. The butterfly turns out to be more airy and light, it is easier to add volume to the figure.

Moths look extraordinary on the wall, in the manufacture of which glossy magazines, postcards, newspapers or wallpapers are involved. In addition to simply cutting butterflies out of paper, they can be additionally dyed, combined with other shades of a similar material, or made multi-layered. There are practically no boundaries for the flight of creative imagination.


Cardboard
For cutting butterflies on the wall, cardboard is selected with a low density. Otherwise, the process will cause a lot of trouble.
Comment! Cardboard is considered the most suitable material for decorating the wall with volumetric moth decor. It keeps its shape well.
Naturally, in this case it will not be possible to make a corrugated copy of the butterfly. Rigid material cannot be folded into small folds.
Cardboard is optimally suited for cutting openwork moths. For registration, you will need a sharp clerical knife and a margin of patience. A high-quality result of decor on the wall is possible only if there is perseverance and the ability to carefully work with small details.
Butterfly stencil for subsequent cutting of numerous copies is also better prepared from cardboard. Original templates for cutting paper butterflies are presented below:

Textile
In order for the decor on the paper wall to take on a complete look, it is sometimes supplemented with similar elements on the lampshade of the lighting fixture. But paper moths are not suitable here, so they turn to fabric counterparts. Butterflies made of matter are not difficult:
- using a cardboard stencil, the contour of the figure is applied to the fabric;
- the detail is cut out;
- the workpiece is given rigidity;
- if necessary, the moth is additionally decorated (wire antennae on the body or beads on the wings);
- the butterfly is attached to a suitable surface.
Advice! Experienced needlewomen can try using a thread with a needle to imitate veins on the wings.

A bit of exotic
Extravagant ladies will like the idea of creating a decor on the wall, which is based on vinyl records. Key process steps:
- Initially, a butterfly contour is applied to the vinyl with chalk.
- In the initial state, the material is hard enough to cut a figure out of it, the plate needs to be softened. An oven with a baking sheet covered with foil or a microwave will help to fulfill your plan.
- When the vinyl becomes plastic, it is taken out and the figure is quickly cut out. If the butterfly has not acquired the desired shape before cooling, the heating process is repeated.
- At the final stage, the moth is given the desired volume.
Attaching a vinyl butterfly to the wall is more difficult than a paper copy. It will not be possible to remove it in the future without damaging the surface.

The material for making a moth can be a sheet of tin or a beer can, which is pre-washed and straightened. The contours of the selected stencil are transferred to the material with a marker or an awl, the workpiece is cut out. Decorate the figure with nail polish or colored markers.
Attention! The edges of the butterflies are very sharp, so you need to work very carefully so as not to cut yourself.
Tin decor can be hung on a thread. It will be appropriate in the interior of a loft; for a classic design, paper moths will still be the best solution.


Making contour butterflies
Let's start with the simplest option, how to make contour butterflies. The main stages of the creative process:
- Butterfly stencils on the wall are best cut out of medium-density cardboard. A suitable material would be a package of cereals or tea.
- The original moth can be selected and printed from the templates below.
- The silhouette you like is applied to cardboard and cut out. The wall on which butterflies of various shapes are fixed looks more colorful.

Some useful tips for decorating paper butterflies:
- For cutting, the entire figure is used completely; if you want to achieve perfect symmetry, the workpiece is folded in half.
- On the wall, specimens with slight asymmetric deviations look more natural.
- If there is a need to get moths of different sizes, the template is converted through a graphics editor.

Making openwork specimens
Openwork paper butterflies are best obtained on the basis of cardboard. To work, you will need a sharp knife, a blade and a printed template with lines for cutting. Obtaining high-quality decor on the wall is possible subject to painstaking work. The algorithm of actions is only slightly different from cutting contour butterflies. First, a template is selected and printed. The required number of elements is cut out on it.


The use of a blade and a sharp knife in work can damage the surface of the table, so it is recommended to protect the tabletop with a sheet of plastic, plywood or chipboard. Openwork paper butterflies on the wall are usually given volume. A little trick can make the process easier. The product is slightly moistened and rounded, the resulting bend is fixed. After evaporation of moisture, the workpiece will retain the desired shape.


Volumetric paper decor options
Volumetric figures of moths made of paper look spectacular on the wall. There are several options for creating butterflies of complex configurations:
- layered instances are created;
- use corrugated paper;
- figures are formed by folding a sheet into several layers;
- the art of origami enjoys well-deserved popularity.
Multilayer
Settling multilayer moths on the wall is quite simple:
- several blanks of the same shape are cut out of paper;
- color and size of parts may vary;
- the elements are superimposed one on top of the other, the bodies are glued together, and the wings are bent in different directions.
Multilayer butterflies look spectacular not only from contour blanks, but also from openwork details. This will require paper in contrasting colors or similar shades. For the upper part, an openwork blank is taken, the lower one remains contoured. The following photo will help evaluate the result:

There is an interesting technique when you can make a multilayer butterfly on the wall from one sheet of paper by folding it in a special way. The photo below shows a simple manufacturing process:

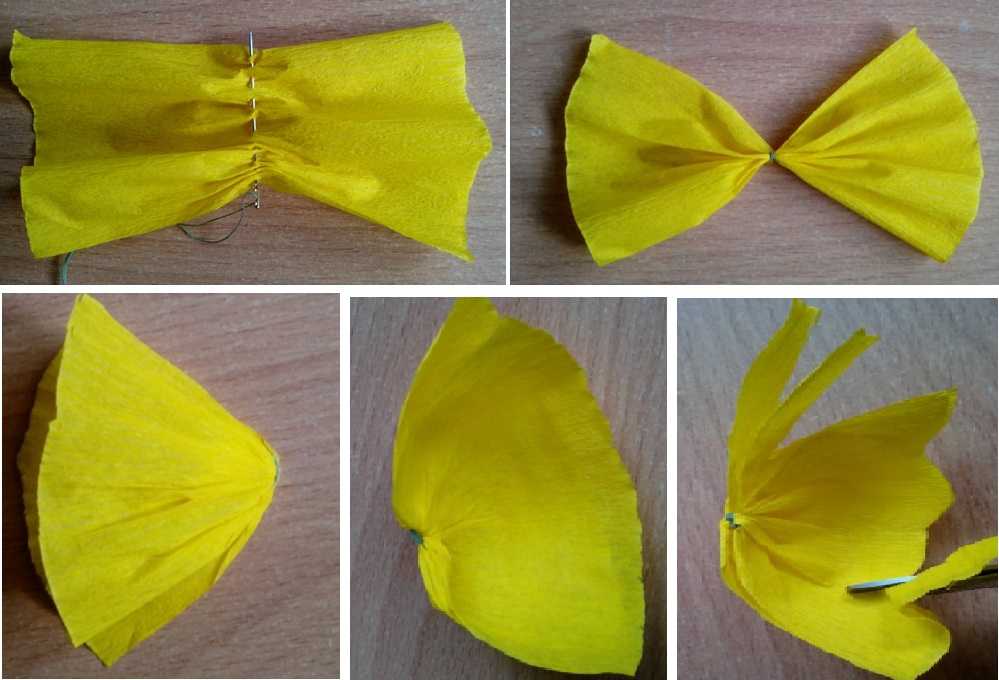
Corrugated paper
It is easy enough to work with butterflies on a corrugated paper wall. The algorithm of actions includes the following steps:
- Choose the right paper colors.
- Rectangles are cut out with an approximate size of 7x10 cm.
- The blanks in the center are stitched with large stitches, after which they are assembled with an accordion and fixed with a thread in several turns.
- The resulting paper bow is folded in half, the future butterfly wings straighten out.
- Then the desired configuration is cut along the edges.
- Flagella for antennae are formed from narrow strips, which are glued to the body.
An entertaining process clearly demonstrates the photo:

Ideas for beginners and professionals
It is very easy to prepare for decorating a wall of butterflies from double-sided colored paper:
- First, a rhombus or square is cut out.
- The figure is folded into a small accordion.
- Two blanks are connected together and fixed in the middle with a thread.
- Antennae are formed from wire.
A photo will help to follow the main stages of making butterflies on the wall:

The origami process, which is so interesting to children, differs in some complexity. One option for making a paper moth is presented below:

Mounting options
You can securely fix paper butterflies on the wall in various ways:
- If the issue of the safety of the wall surface is not relevant, PVA glue or wallpaper solution will help to fix the paper figures.
Comment! Regardless of the chosen template, whether it is a contour or an openwork butterfly, voluminous paper figures look more impressive on the wall. A light breeze can set the wings in motion, making them flutter like real ones.
- Small pieces of foam plastic will also come in handy in the process, which are initially glued to the body of the butterfly, and then to the wall.
- Similarly, double-sided tape is used instead of foam.
- When the task is to maintain the integrity of the wallpaper after removing paper moths from the wall, they are fixed with safety pins.


There are many options for creating decorative images on the wall using paper butterflies. A huge heart or a whirlwind receding into the distance, separately distributed specimens or a flock nestled comfortably on flowers - there are no limits to creative imagination.
Quite often, the repair of a dwelling is carried out taking into account that it will stand idle for several years, but many years of monotony can get boring or even start to strain. What to do in such a situation? It is worth giving preference to updating the interior with the help of accessories or products such as hand-made panels of butterflies.
Butterfly on the wall is a wonderful decoration, and there is no limit to how exactly it will look, what size or color. It is these decorations that modern designers began to use, creating delicate and unusual interiors. Many people in childhood carved butterflies from a variety of materials. For example, from paper and fabric, napkins and even plasticine. At the moment, they can be very different and even made from vinyl records.
A butterfly panel is a flight of fancy, as well as an opportunity to create your own unusual design, which will delight not only the owner of the house, but also guests.

You can use unusual materials, create a butterfly with openwork wings and decorate them with rhinestones and beads. With such a decor, the room will be more comfortable and cozy, which is what every person needs. On the walls will fit fabulous creatures, magical and extraordinarily beautiful.
A panel of butterflies is a panel through which attention is focused in the room. Some designers use such products in order to mask the bumps on the walls, or oversights in previously completed repairs. Naturally, the effect of the panel depends only on who creates it, for example, some people prefer bright colors, while others want to make the house more calm and gentle.
DIY butterfly panel: do it yourself
A master class on creating paper butterflies is not difficult, you just have to pick up ideas and decide on the technique in which the panel will be created.
There are several ways to form paper butterflies:
- Quilling;
- Origami;
- Stencil.

In addition to technology, attention should be paid to the color of the panel. As a rule, it is a bright place in the room, but should look harmonious with the overall interior. The panel should not merge with the wall and ceiling coating.
There are differences in the bending of the wings of butterflies. If the style of the room is classic, then butterflies can be with intricate curves, but for modern the most common ones.
Once the form is determined, it is necessary to work out sketches, the development of which is carried out using computer programs or using stencils. To make the panel bewitchingly beautiful, you need to create several sizes of butterflies. The simplest way is to use tracing paper to translate the drawing and reproduce it.
If the butterflies are not symmetrical and not similar to each other, then the panel will attract even more attention, or to be more precise, with its creativity and originality.

The next step is the formation of the overall picture.
Making paper butterflies by hand is much easier and cheaper, and due to the fact that paper can be very different, for example:
- Color;
- White;
- glossy;
- Matte;
- Velvet.
The choice is simply huge both in terms of types and shades, and therefore creating a decor with your own hands is not a difficult process.
It is not uncommon to create a panel of butterflies with their own hands using brushes and paints, as well as an ordinary album sheet.
All these materials are available and can be purchased at any store. Some use wallpaper left over from repairs or even pieces of the material from which the curtains are sewn.
You need to cut out the butterflies according to the template and with the help of scissors. In order for the butterflies to be different in size, you need to use different templates. To speed up the process, you can prepare the squares in advance, put a few pieces together, bend in half, draw a half of the body and wings of a butterfly, and cut out several insects at a time for decoration. Such cutting is carried out using the same technology as the preparation of snowflakes.
Once all the previous steps are completed, you can proceed to the formation of the picture:
- In appearance, it can be very different, for example, like a heart, like a spiral, a circle, an oval, or even a stream of insects.
- In order to visually see exactly how the panel will look on the surface of the wall, you can lay out the picture on the floor. This is how you can correct mistakes in advance and eliminate unwanted defects.
Butterflies on the wall can be located tightly, or they can be with protruding wings. For cardboard butterflies, you can soak the wings so that they are rounded, which is also very attractive.
Panel of paper butterflies: stylish decor
Creating the shape of a future panel is a special moment, which determines what effect the product will have on everyone who sees it. Naturally, it is quite possible to do it yourself.
A fairly popular panel in the form of a whirlwind, numbers, flowers, or a completely chaotic arrangement of paper insects.
Modern designers prefer to place butterflies on wallpaper with voluminous colors, thereby creating an unusual decor. The ideal option would be to apply a sketch of the panel on the wall, for which you can use pencils or chalk, which can be easily erased from the wallpaper.
Where is the best place to place a panel of butterflies
The most acceptable option is the location of butterflies on the surface of the wall, with the help of which flaws, irregularities and defects are hidden. It is worth noting that the location of the panel of butterflies on the curtains is not excluded. Designer luxurious tulle embellished with butterflies with mirrored wings is perfect for decorating a kitchen or nursery.
In the house you can find a huge number of places where you can put panels.
For example:
- Chandeliers;
- lamps;
- floor lamps;
- Shelves.
Creation panel from butterflies (video)
A creative solution would be to embroider panels on furniture upholstery. Why not decorate the sofa and cushions with textile butterflies with movable wings? Why not make chairs have wings like butterflies? There can be a lot of ideas, but the most important thing is to maintain the harmony of the room.
Butterfly panel (photo)


