How to cut beer cardboard. Master class on processing the edge of a product
How to make cardboard packaging aslan wrote in January 28th, 2015
Every home has it. It sells almost everything that we buy in stores. We tend to ignore it because it is the most utilitarian thing, and we get rid of it as soon as we unpack the purchase.

Just think, some kind of box, what’s so difficult about its production? That's what I thought when I was invited by the Beta-Kuvert company to produce corrugated cardboard packaging. Yes, in fact, I have seen productions that are more complex, but what I saw in production honestly impressed me.
Today at kak_eto_sdelano special report on how corrugated cardboard packaging is produced.
The first stage of production begins on the computer. An order comes from a client for packaging of certain sizes, according to which a product template is developed in a special program. If a company does not have a mold for packaging production, then it is ordered from a separate company engaged in their production.

But in the production workshop there is no shortage of die forms; there are a lot of them, probably more than a hundred. Each customer has his own needs, so the collection of various die forms is constantly growing.

There are both simple packaging from which boxes are assembled, and more complex ones. Depending on the size, one to several templates can be placed on one die board.

Now let's see what she is. Some of the glands located on the form are simply intended to slightly press the cardboard (in the collage they are visible exactly as glands), the other part represents blades/knives that are hidden inside the rubber bands. They are the ones who cut the cardboard along the edges and in certain places where holes are needed.

Cardboard, which is used for the production of packaging, has a standard size - 950 by 1620 mm.

And it varies in thickness. Accordingly, the packages are thicker or thinner, depending on the order.

If the box is large, then the packaging is glued and assembled in two parts using a stapler.

This makes the packaging stronger and more reliable.

If they are small, they are packaged and folded after the packaging is cut out.


I tried to fold one and see what happened. You can put a diamond ring in this one and surprise your loved one)

Cutting out the packaging is simple - put cardboard on a die and roll it through a machine, the rollers of which tightly press the cardboard to the mold.


Let's look at the production process using the example of a cardboard suitcase, and there is such packaging.

Place the cardboard on the form.

We turn on the machine.

Voila, you're done!

Now let's see what happens as a result of the assembly.

Real magic! You can easily transport a laptop in this, although no, the handles won’t hold it. However, if you have a laptop, you remember that it came in almost the same box, but with a plastic handle. Here they make the same boxes, inserting similar handles into it.

While I am getting acquainted with the production process, the workers are doing their job.


In addition to those machines with ordinary die forms, I discovered in the workshop such an interesting machine, with a round shape.


The good thing about the machine is that it allows you to make workpieces faster. You simply pass cardboard through it, and then collect the resulting blanks. But there are very few forms for such a device, and they are more expensive.

There is also a machine that makes blanks for boxes without die molds.

Cardboard is cut with these knives.

Everything is as simple as shelling pears, here you can adjust the sizes for different packages.

When I saw this device, I thought, why do I need to transfer cardboard, from which I can also make packaging for waste. But it turned out that it was not garbage at all. This is a filler that softens the conditions of transportation in boxes so that the things transported in them do not break or deteriorate.

There is another similar device that does not crumble cardboard, but cuts it in a special way so that some object can be wrapped in it.

After such an operation, cardboard can be stretched into an accordion.

And the waste itself is compressed in such a device.

Turning into cubes that will go to a waste paper recycling plant, where cardboard will be remade from it. Such is the circulation of cardboard in industry.


Despite the fact that the production is not so large, the products are a success.

During my tour, several of these vans carried packaging to happy customers.

In addition to the usual machines that you saw, there are also modern plotters that can cut out the desired shape by setting the necessary parameters on the computer. Today we will cut out a figurine of a sheep - the symbol of this year.

Place the cardboard in the plotter, turn it on and wait 20 minutes.

The device cuts more slowly than the die cutter, but no less accurately.

A few deft movements and the figurine is ready. Be-e-e-e!

Detailed anatomy of a sheep.

If you wish, you can print out such a hunting trophy) By the way, you can also buy it.

I was surprised by this figurine of a rhinoceros. All parts are cut out on a plotter and glued by hand.

As I was told, this takes about two hours, with a break for lunch).

In general, you can cut anything on a plotter.

Even such a case. A good thing.

I didn’t know that you could also make a portable wardrobe out of cardboard.

They say it's a popular thing. Especially good when moving.

And at the end of the report, a small assortment of products produced by the Beta-Kuvert company. Large boxes.

And smaller in size.

Now you know how cardboard packaging is made. If you need to order packaging, then you can safely contact the Beta-Kuvert company, they know their business well.
If you have a production or service that you want to tell our readers about, write to Aslan ( [email protected] ) and we will make the best report that will be seen not only by readers of the community, but also of the site
It's been a while since I picked up a checker :))))
Namely, I didn’t write MK on the blog :))) I’ll start to improve little by little :)))
But first, I want to remind you
USE THE LABEL SYSTEM IN YOUR BLOGS!!!
I hope this will be useful to both you and me :))) Because, from readers, I am waiting for comments. Maybe something is not clearly described... Somehow I have doubts that I clearly conveyed the movements of the pad.
So, let's begin:))))
For decors, thick gray or white cardboard 2-2.5mm thick is used as a base. Gray and white cardboard of this thickness is not easy to cut. White is more difficult to cut (its layers are more compressed), gray is easier. But still, you won’t cut any of them the first time. It is necessary to use a breadboard knife several times with medium pressure to cut right through the cardboard. Don't try to do it all in one go.
HOW AND WHAT TO CUT CARDBOARD
To make cutting this cardboard easier, you need to use good breadboard knives. I recommend CONSTRUCTION breadboard knives, which are sold in abundance at any hardware store. They are powerful, their blades are thick and do not bend when cutting thick and hard materials.
My absolute favorite is a knife with a trapezoidal blade and a heavy metal handle (yellow in the photo). It cuts plain paper like butter. I use it for both cardboard and paper.
This is his blade.

It is made of thick metal and does not bend under sufficiently strong force. Thin blades can bend and then the cardboard cut will be vertically straight at 90 degrees, but slightly at an angle, inward or outward, i.e. The edge of your product may end up with a bevel.
Sometimes I also use a traditional breadboard knife (pictured on the left). It is also buildable and quite powerful. But its blades are a bit thin compared to my favorite. They can give an oblique cut.

Why do I pay so much attention to knives??? Yes, because the better and sharper the knife, the easier it will be for you to work with cardboard. And the more high-quality and good cut you will get. The less work you will have to do to bring the edge of your product into proper shape.
In addition, knives and scissors quickly become dull from paper, this fact has been known for a long time. Therefore, be prepared that the blades of your knives will become dull quite quickly, especially when cutting white cardboard.
It is not always possible to cut cardboard perfectly, so that its cut is perfectly smooth (it must be even) and without burrs. Although a very sharp knife will always help you avoid hangnails. But even if the cut is good, it is still necessary to process it with sandpaper to give it a “marketable” and finished look.
sandpaper
I prefer to use a sanding pad. It is very convenient for processing both large and small parts. Pads are sold in all hardware stores. I use one of the finest sandpapers. If we talk about a pad, then it’s 100, and if we talk about sheets of sandpaper, then it’s 400-500.

I rarely use sandpaper in sheets, only if I need to sand some small DEEPENTS or CUT OUT FIGURES INSIDE A CARDBOARD BLANK, then I cut off a piece of sandpaper, wrap it around my finger and sand with it.

But in general, I have a very convenient toolkit for processing all sorts of non-standard places and corners. This is such a set of files and files.

I bought this miracle in 2009. Then the set was also available in scrap stores in the States, but now I think you can look for it on ebay.
These are the tricky places I handle using pieces of sandpaper and needle files.


THE IMPORTANCE OF TREATING THE EDGE OF THE PRODUCT WITH SANDAGE.
Here is a photo showing processed and unprocessed sections. The raw cut may be slightly exaggerated, but you can cut it more carefully, the main thing is a very sharp knife. But don’t forget that cardboard is a collection of compressed layers of paper, and paper is a fibrous structure. And when you cut cardboard, you cut both along the grain and across it. And the quality of the cut will be different in both of these cases.

Here are some photos
The raw cut and edge of a cardboard blank.

Processed cut and edge of a cardboard blank.

It is equally important to sand the edges of the product COVERED WITH PAPER. When you sand over a part that has already been pasted over with paper, in addition to removing rough edges on the cardboard itself, you, as it were, “RELATED” the cardboard and the paper glued to it. In addition, if you cut and scraped the paper before gluing it onto the cardboard, then sanding will remove the “sharp” cut resulting from the knife. Cut a piece of paper with a breadboard knife and compare the resulting cut with the cut on the sides of an industrially cut scrap sheet, and you will understand what I'm talking about.
Look how neat the sanded edge looks. Paper and cardboard seem to have always been together.

Don’t forget that you need to sandpaper ALL SIDES OF YOUR PART, including the SIDES of any part, and it doesn’t matter whether the viewer sees it or not. The accuracy of the entire work consists of the careful execution of each of its elements. As my mother says, “a thing should be sewn in such a way that it would not be embarrassing to wear it inside out” :))))

AT WHAT POINT OF WORK SHOULD THE EDGE OF THE PART BE TREATED WITH SANDAGE?
The main rule in my work:
ALL DECOR ELEMENTS ARE SET ON CARDBOARD
In addition to the base sheet of the decor, a painted drawing is also placed on the cardboard, as well as all the elements that decorate the decor: tags, pieces of paper with inscriptions, flags, stickers, etc.
AND EACH ELEMENT MUST BE TREATED WITH A SANDY PAD.
So, you have cut out a piece of cardboard of the size you need. Now you need to cover your workpiece with paper. Then there are two options:
1. your cardboard blank will be covered with paper edge to edge (the edges of the cardboard and paper will have to match in the finished product)

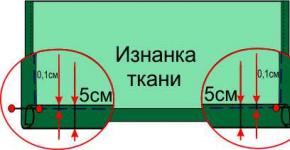
2. you will leave cardboard margins. (I usually leave 5-7 millimeters of cardboard margins, but maybe more, it all depends on the specific decor)

In both of these cases we act a little differently
Option 1
The cardboard blank must be cut with a margin, 5 mm larger than the blank from a sheet of scrap paper on each side. In this case, the quality of the cut of the cardboard blank is not very important to us, the main thing is that everything is smooth.
Next, we glue a sheet of scrap paper onto a cardboard blank. In this case, we either leave cardboard margins on all 4 sides of the sheet of scrap paper, or we combine one edge of the sheet and one edge of the cardboard, and the remaining 3 sides will have margins. It looks something like this

After the glue has hardened, the margins are trimmed using a cutter and a metal ruler. It is necessary to very accurately align the edge of the ruler and the edge of the scrap sheet.

If you are planning a part reinforced with cardboard that is smaller than the size of the scrap sheet (for example, a page for a scrap album, maybe 15cm by 20cm), then we do the opposite, with an allowance of 5 mm on each side, we cut out a sheet of scrap paper, not a cardboard base , the cardboard base must be the final size.

Glue a sheet of scrap paper to a cardboard blank

Turn the piece over with the paper side down and trim off the excess paper. The end cut of the cardboard acts as a ruler.

All this is done to ensure that the edges of the cardboard and the edges of the scrap sheet match exactly, this gives your work a neat, “industrial” look. It is very difficult to cut a cardboard blank to the size of a scrap sheet with an accuracy of 1 mm and 0.5 mm. What if the scrap sheet also needs to be cut to a certain size??? The error can accumulate, and it won’t be nice if the cardboard sticks out 1mm from under the sheet. And cutting 1 mm of cardboard evenly and well with a breadboard knife is considered impossible. If the sheet hangs over the cardboard, then it is of course easier to trim it with a breadboard knife than excess cardboard. But why take the risk??? The margin method will give you a 100% guarantee that the edges will match.
In scrapbooking you can't do without cardboard. There are not so many types of cardboard for scrap, but there are some nuances that are worth knowing about!
Cardboard in scrapbooking is mainly needed for making album covers and notebooks, for album pages, for boxes and chipboards.
Binding cardboard

Binding cardboard - gray-brown cardboard with a density from 950 g/m2 to 2000 g/m2, of various thicknesses - from 1.25 mm to 3 mm.
The higher the density of the cardboard, the greater its strength, the more difficult it is to cut it to the required size.
Binding cardboard is often called "cover" cardboard. It is intended for the production of bindings and covers of books, folders, albums, and diaries.
For scrapbooking, binding cardboard with average density and strength, no more than 1.5-2 mm thick, is suitable. It cuts with little effort, but is strong enough that it can be sewn on a machine.
Thicker cardboard is much more difficult to cut and, if it is slightly bent, it will be difficult to straighten it. If you need to make holes, it is quite difficult for it to fit into the hole punch. Although it is also amenable to a sewing machine, at least one like the Singer.
Binding cardboard is indispensable for covers. In albums where weight and bulk are important, such as a large leather-bound generic book, only binding cardboard is suitable for both the cover and the pages. With 1.5 mm thick binding cardboard, a 30x30 album with 10 spreads weighs 2.4 kg. This is noticeable weight! And an album of the same size and number of folds made of beer cardboard weighs only 1.6 kg.
Cardboard Chrome-Ersatz

Chrome-ersatz cardboard is thin boxboard made from bleached and unbleached cellulose, wood pulp and waste paper, with coated and uncoated coating. It has a density from 220 g/m2 to 520 g/m2 and a thickness from 0.3 to 0.7 mm.
Chrome-ersatz cardboard is widespread and is used for packaging, as a rule, small-sized, lightweight products. In scrapbooking, it is used to make boxes - “mom’s treasures”, gift boxes, etc. This type of cardboard is not suitable for album covers and pages due to its small thickness - a maximum of 0.7 mm. Chipboards made from this type of cardboard turn out grayish due to the insufficient whiteness of the source material. The edges of such chipboards may burn and darken when cutting with a laser.
You can use Chrome-Ersatz cardboard to make blank postcards, followed by gluing them with scrap paper.
Beer cardboard

Beer cardboard is white cardboard with a density from 500 to 660 g/m2, thickness from 1.1 mm to 2 mm.
Cardboard is called “beer cardboard” because it is often used to make a stand for a beer mug. Consists of many thin layers. Easy to cut with a cutter, much worse with scissors. Not flexible, may break if you try to bend it.
Beer cardboard works well for album pages. For the covers of large albums measuring 30x30, it is better to use thicker cardboard, in order to avoid accidental deformations and damage to which the cover may be subjected.
Beer cardboard is also ideal for making chipboards. Thanks to its milky shade, it goes well with any background color. When cutting with a laser, the edges of the chipboard do not smoke or darken.
At Art Scrap we make our chipboards exclusively from 1.15mm thick beer cardboard.
conclusions
1. Binding cardboard: for covers (up to 3 mm) and for album pages (up to 2 mm).
2. Chrome-Ersatz cardboard: for boxes (from 0.3 to 0.7 mm) and postcard blanks.
3. Beer cardboard: for covers (2 mm), for album pages, for chipboards (1.15 mm).