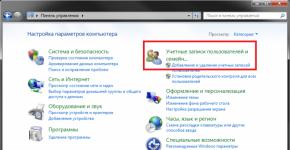
How to install a built-in camera on a laptop. Instructions for turning on the webcam on a laptop
A webcam (webcam) is an integral part of the vast majority of laptops. She, by default and after the first start of the device, is immediately ready for use. But what if you are trying to get an image from the camera, but it is not?
The main thing is not to panic. Situations when a webcam does not work on a mobile computer are more often associated with the fact that it is simply turned off or not installed in the operating system (breakdowns of this device, fortunately, are rare). For information on how to turn on the camera on a laptop and troubleshoot related problems, read below.
How to quickly check if the camera is working
To find out if your webcam works at all (it may not "plow" in only one program, since it is disabled in the settings), go to the service and click " Check webcam».

If you see a request for permission to access the device for Adobe Flash Player, then everything is in order: the camera is working. Check " Allow»And check if an image appears on the screen.

If you see a message like in the screenshot below, then the camera is really not working. What to do in this case, we will figure it out further.

Checking the status of the webcam in the system
We start diagnosing any hardware problems by checking how it is displayed in the device manager. To open the manager, press the Windows + R hotkeys (this will launch the Run application), enter the command in the Open field devmgmt.mscand click OK. The method is convenient because it works in all versions of Windows.

In the dispatcher window, open the list “ Imaging devices”And see if our webcam is there. The following options are possible:
- The webcam is not on the list of equipment - the computer does not see it. This happens due to a hardware shutdown or physical breakdown.
- There is no camera, but there is an unknown device, which, most likely, it is. This means that the computer sees it, but cannot recognize it. The reason is the lack of a driver.
- There is a camera on the list, but next to it there is a yellow triangle with an exclamation mark or a black arrow in a circle. The first indicates a malfunction, the second indicates a shutdown in the operating system.

Turn on the webcam from the keyboard
The function of turning on / off the webcam from the keyboard is not implemented on all laptop models. Where it is, a miniature image of the camera is applied to one of the keys. Most often this is the "V" key, sometimes "Escape" or others from the number F1-F12.

To turn on the web-camera, press this key simultaneously with "Fn". After that, the webcam should appear in the device manager. If it is still not there, you probably have that rare case when it is physically broken or not connected.
Installing the driver
If, after turning on the webcam in hardware, something unidentified appears in the device manager, install the driver on it. The best way is to download it from the website of the laptop manufacturer or the webcam itself, if you know its model for sure. Or install from a disk, if one was included with your device.
If you do not know the exact name of the laptop model, turn it over. There is a sticker on the bottom cover of each laptop where this is indicated.
This is how the branded label of the MSI MS-1757 laptop looks like:

Having identified the model, find it on the manufacturer's website and download the driver for your operating system in the "Support" section. Install like a normal application, after installation, reboot the machine.
By the way , there may not be a separate webcam driver for some OS versions, since it is included inWindows (USB Video Class Driver). Problems with this group of drivers are solved by installing updates or .
Fixing webcam recognition errors in the system
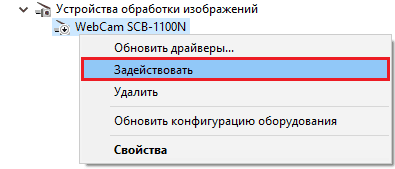
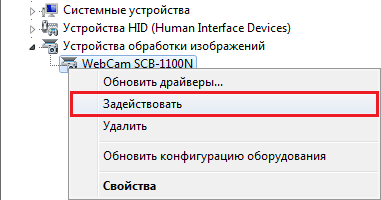
If the webcam in Device Manager is marked with a black arrow (disabled in Windows), right-click on it and click " Engage».
When disabled in the operating system (by the user or programs), this is enough to make it work.
If the webcam is marked with an exclamation mark on a yellow triangle, which means: "the device is not working correctly", click the command " Delete”And restart your computer. The system will recognize it again and automatically reinstall the driver.
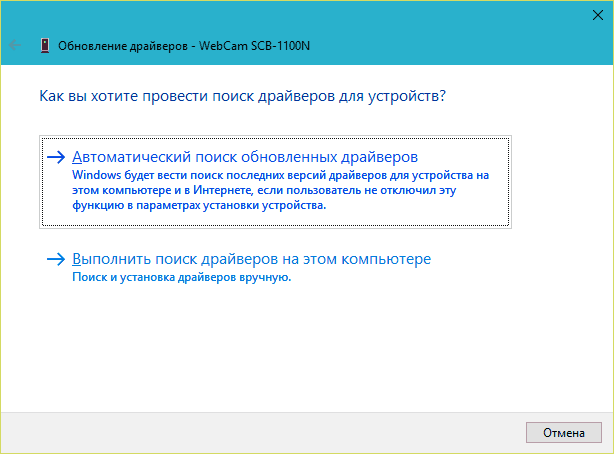
If it does not help, click the item " Update drivers»:

Search for the Internet (if you are not sure that the correct driver is present in the system) or this computer (if the camera worked properly with the old driver before the problem occurred or you have a fresh version of it).
Almost all modern laptop models are sold with a built-in webcam. Considering that video communication is becoming more and more popular among computer users every year, it is very convenient.
But suppose you did not use the camera, and after making the first call, you noticed the image - very light, dark, black and white, and this option is also possible - the camera simply did not turn on. In any case, you need to set up a webcam on a laptop for its correct operation in the future.
Often times, camera problems are easy to fix. If all else fails, then there may be a hardware problem and the laptop needs to be brought in for repair. To buy a brand new, or not quite brand new, laptop with confidence that the camera is in working order, I advise you to read about several ways to test the camera on a laptop.
So the first thing to do is check the installed drivers on the camera... We go "Start" - "Control Panel"... Here we open the item "Device Manager".
Find the item in the list and expand it by clicking on the small arrow. The available connected devices will be displayed here. The one that is responsible for the camera will be called like Web, Cam, Video. Make sure that there is no yellow exclamation mark or a red cross on the pictogram near the name - this may indicate incorrect installation of drivers or their absence.
Right-click on the desired device and go to the "Properties" context menu item.

On the General tab in the box "Device status" should be written "The device is operating normally."... This means that the camera is in good working order. If there is another inscription, go to the "Driver" tab.

Here you can see which driver was installed, update or remove existing drivers.
If problems with the camera started after the laptop was repaired, then click "Update" and select "Automatically search for updated drivers"... The wizard will search for drivers on your laptop and on the Internet. If he finds drivers on the laptop, install them and the problem will be solved.

You can install the drivers yourself. An installation disc must be included with your laptop or camera. Insert it into your laptop, then follow the steps in the setup wizard. As a result, you will install all the drivers necessary for the connected devices, including the camera.
If you cannot find the disc, or if you bought the camera separately, and the laptop simply does not have a disc drive, it’s okay. You can download drivers from the official website of the laptop manufacturer for free. Then install the drivers for the device yourself.
Special programs can also help in finding and installing drivers on a laptop. You can use the free Driver Pack Solution program. You can download it and read about it in more detail by clicking on the link.
After installing the drivers, be sure to restart your laptop.
The second thing to do is check if the camera is connected in device manager. We go into the already familiar device manager and open the item "Imaging devices"... Look at the icon of the device responsible for the camera, there should be no arrows near it, as shown in the figure.
If it is, right-click on it and select from the context menu "Engage".

The device manager will blink, that is, it will be updated, the arrow will disappear, and the camera should work.
The third thing to do is to install a special a program for working with a web camera... You can download it from the Internet, for example, LiveCam, WebCam Max or SplitCam. There are also various portable versions that do not need to be installed on your computer, download and use.
Start the selected program. After that, a window should appear with the image entering the camera, and a green indicator near the camera itself will light up, indicating that it is working.

In such programs, you can configure the camera. Find the appropriate item. I have it "Options" - "Video Capture Filter".

Here you can change some parameters of the camera, and make the image normal for perception.

If you do not want to download any programs, then consider the fourth point. It will suit those who have skype is installed on the laptop... You can also configure the camera using it. Go to "Tools" - "Settings".

Next, on the "Basic" tab, open "Video settings"... Here, in the main window, the video from the camera should appear, to change the settings, click on the button "Webcam Settings".

In the next window, you can select the desired settings for the camera image.

I hope the described methods will help you set up the camera on a laptop: the image from it will be displayed during video calls, with normal brightness and contrast.
Rate article: (1
estimates, average: 5,00
out of 5)
Webmaster. Higher education in the specialty "Information Security" .. Author of most articles and lessons of computer literacy
Thanks to the internet, people are constantly evolving new ways of communicating. More recently, the most popular means of communication have been chat rooms, social networks, emails, and more.
Now there is an opportunity not only to talk to another person on the Internet, but also to see him. This became possible thanks to Skype and other similar programs. True, for communication it will not be enough to install and turn on Skype, you also need to know how to turn on the webcam on Windows 7. Below we will try to figure out how this is done.
The first step is to connect the camera to your computer. On a laptop, it is already installed and built into the computer itself. It should be connected to a stationary PC via a USB port. Normally, the camera is powered automatically from the computer system.
However, there are models that need additional batteries or connect the power cord.
Today there are two variants of cameras. The first is attached to the top edge of the monitor using a specialized mount.

The second option is a camera on a special leg with a built-in microphone.

To do this, you will need to do something, such as.

How to turn on a webcam on Windows 7 and configure it
An external camera refers to an additional device. It must be connected externally in most cases to a laptop USB port. Since almost all webcams are equipped with a USB interface, they can work with any computer.
The shapes and designs of external video cameras are completely different. Many have their own and a switch.
In order for the connection to be complete and the signal is transmitted without interruption, you can use extension cables. They power up the devices additionally and improve the quality of signal transmission.
An active type extension cord, if necessary, will allow you to carry the camera away from the computer at a distance of more than 10 meters. Passive is a little shorter and will not allow you to move away from the camera by a maximum of 5 meters. They look like this.

Such cameras are sold complete with a CD / DVD disc containing drivers and software from the manufacturer.
In order to connect an external video camera to a computer and configure it, you need to connect it to the port and turn it on if the camera has a button to turn it on. You need to insert a disc into the drive and install the software.
The program, which is installed on the disk, will help the user to configure absolutely all parameters for working with a video device, for example, adjust sound, password protection, and more.
However, modern developments allow the inclusion of removable cameras without the need for manual installation. After connecting the device, Windows will find it and automatically configure it.
Camera setup in Windows and in various applications
Usually just turning on the camera is not enough. In order to see your appearance, you need to check how the device works. To do this, go to the control panel and find a section of cameras and scanners there. If the device is working, then after double-clicking on the camera, an image will appear on the screen.
A significant number of users buy a video camera for the first time precisely to use all the functions of an application such as. It is very convenient and easy to set up. It is even easier to set up the camera there than in Windows itself.
Having launched the program, you can start preparing the video image. At the top there is a tool parameter, where at the bottom you need to click on settings. A window will appear in which we select what exactly needs to be changed. In this case, you need a video setting. At the bottom you need to click on the word "nobody".
Then left-click on the webcam settings. A new window will appear where you can adjust the parameter values. Conveniently, you can watch their changes in real time.

Enabling an embedded device in a laptop
In a laptop, the camera is initially disabled. It does not work in standby mode. Therefore, you must turn it on before using it. The easiest way is to use the hardware keys. One of the keyboard shortcuts is the Fn button.
The second key depends on the laptop model. In most cases, the function buttons are F1 or F12.
To do this, study the purpose of the keys, or even better, the instructions attached to the laptop. The meaning of these keys is shown as small pictures in the corner of the buttons. For example, Fn plus V, which has a camera icon in the corner.
After the device has been activated, some applications can automatically turn on the camera and broadcast the image to the interlocutor by default.
Good day.
Every modern laptop is equipped with a webcam (after all, Internet calls are a thing every day more and more popular), but it does not work on every laptop ...
In fact, the webcam in the laptop is always connected to power (regardless of whether you are using it or not). Another thing is that in most cases the camera is inactive - that is, it does not take pictures. And this is partly correct, why should the camera work if you do not speak with the interlocutor and did not give permission for this?
In this short article I want to show how easy and simple it is to turn on the built-in webcam on almost any modern laptop. So…
Popular programs for checking and configuring a webcam
Most often, to turn on the webcam, you just need to launch some application that uses it. Very often, such an application turns out to be Skype (the program is famous for the fact that it allows you to make calls over the Internet, and with a webcam you can generally use video calls) or QIP (originally the program allowed you to exchange text messages, but now you can talk with video and even send files ...).
QIP
Official site: http://welcome.qip.ru/im
To use the webcam in the program, just open the settings and go to the "Video and Sound" tab (see Fig. 1). At the bottom right, the video from the webcam should appear (and the LED on the camera itself, as a rule, lights up).
If the image from the camera does not appear, try the Skype program first (if there is no image from the webcam, there is a high probability of a problem with the drivers or the camera hardware itself).
Fig. 1. Checking and configuring a webcam in QIP
Skype
Website: http://www.skype.com/ru/
Setting up and testing the Skype camera is identical: first, open the settings and go to the "Video settings" section (see Fig. 2). If everything is in order with the drivers and the camera itself, a picture should appear (which, by the way, can be adjusted to the desired brightness, clarity, etc.).
Fig. 2. Skype video settings
By the way, one important point! Some laptop models allow you to activate the camera with just a couple of keys. Most often, these are the keys: Fn + Esc and Fn + V (when this function is supported, usually a webcam icon is drawn on the key).
What to do if there is no webcam image
It also happens that not a single program shows anything from the webcam. Most often this is due to the lack of drivers (less often with the breakdown of the webcam itself).
Opposite it there should not be any exclamation marks or crosses (example in Fig. 5);
Press the enable button (or enable, see Fig. 4). The point is that the camera can be turned off in the device manager! After such a procedure, you can try again to use the camera in popular applications (see above).
If in device manager an exclamation mark is lit in front of your webcam - it means that there is no driver for it in the system (or it does not work correctly). Usually, Windows 7, 8, 10 - automatically find and install drivers for 99% of webcams (and everything works fine).
How to find your "native" driver:
Automatic driver update software:
Fig. 5. No driver ...
Privacy settings in Windows 10
Many users have already switched to the new system Windows 10. The system is not very bad, apart from problems with some drivers and privacy (for those who care about it).
Windows 10 has settings that change the privacy mode (which might block the webcam). If you use this OS and you do not have a picture from the camera, I recommend checking this option ...
First, open the START menu, then the "Parameters" tab (see Fig. 6).
Next, you need to open the section " Confidentiality". Then open the section with the camera and check if applications have permission to use it. If there is no such permission, it is not surprising that Windows 10 will try to block all "unnecessary" that wants to access the webcam ...
Fig. 7. Privacy options
By the way, to check the webcam - you can also use the built-in application in Windows 8, 10. It is called consonantly - "Camera", see fig. 8.
Fig. 8. Camera app in Windows 10
That's all for me, successful setup and work 🙂
A webcam ("webcam") is a digital device for recording video information that can be transmitted over the network. “Webka” is an attribute of any laptop: the manufacturers of these equip their products with web cameras “by default”. Also, a lot of their types are sold separately.
The difference between “webcams” \u200b\u200band full-fledged video cameras is the focus on the capabilities of network programs with multimedia functions, that is, the emphasis is not on the quality of shooting, but on the ability to quickly transfer images to the network. Therefore, most of the models have a low resolution, not the best color reproduction and a minimum of settings. The most expensive web cameras are capable of shooting at the level of a “middle hand” camera.
How to install and configure a webcam on Windows 7
Installing and configuring the built-in camera
The built-in webcams of laptops are usually ready to work right away, it is enough to launch a network application, for example, Skype, and set the desired video parameters in it.

If the program says that you do not have a camera, but you are definitely sure of the opposite, then it is disabled or not installed. On some laptop models, first of all, you need to turn on the "webcam" physically - simultaneously press the Fn key + one of the F1-F12 keys. A miniature in the form of a camera drawn on the button will help to determine the desired combination.

Find “Imaging Devices” in the hardware list and expand the tab. If the webcam is installed, but not active, you will see an icon in the form of a circle with an arrow next to it.
To turn on a device, open its context menu and click “Activate”. When prompted by Windows, restart your computer and the camera will start working.
If there is no web camera in the device manager, but there is unidentified hardware, as in the picture, then you need to install the driver.

You can try to install the driver for the webcam using the system tools - most likely, Windows will find something suitable in its databases, and the device will work. To do this, select the "Update drivers" command from the context menu of the unknown hardware.

and specify the search method - automatically or manually. If the web camera was not installed before, then there are probably no suitable drivers on the computer. An automatic search will find them on the Internet.

You can also find out the “webcam” model from the laptop documentation, go to the manufacturer's website and download the drivers from there.
Along with the driver, not always, but often a program is installed to configure the built-in web camera. For example, Cyberlink YouCam on HP laptops:

With its help, you can not only adjust the shooting parameters, but also edit the image.
Installing and configuring an external camera
By external, we mean "webcam" as a separate device that is connected from the outside to the peripheral port of the computer. Most of these cameras have a USB interface, that is, they are universal, capable of working on any PC and not only for Windows.

External webcams come in completely different designs and shapes, many are equipped with a built-in microphone, and some have a separate switch on the body. To connect them, it is best to use active extension cables that can additionally power the device, thereby improving the signal quality. An active cable allows you to move the camera away from a computer at a distance of 10 meters or more, and a passive (normal) cable - a maximum of 5 meters.

The delivery set of an external web camera always includes a CD / DVD disc with the manufacturer's drivers and software. To configure the camera, simply connect it to a PC port, turn it on, if there is a button for this, insert a disc into the drive and install the software. The included program will allow you to adjust shooting settings, as well as enable or disable options such as microphone volume, password protection and much more.

However, thanks to plug & play technology, most "webcams" can work without manual installation of drivers. Once physically connected, Windows recognizes and configures them automatically.
Programs for working with webcams
If webcam control software is not included, you can install it separately. There are many applications for Windows 7 that allow you to customize your camera more subtly than the standard ones. And their additional features make video chatting more fun.
ManyCam

This program will not only improve the quality of the picture transmitted to the interlocutor, but also add a special charm to your appearance - cartoon eyes or mouth, glasses, mustache, beard, horns, etc. Or change the background of the room, for example, to a seascape. The program can recognize movement, so all visual overlays will move with your face. In addition, ManyCam allows you to draw on the image directly online.
If you communicate in video chat with several interlocutors, you can enable for each a separate window with different special effects.
ManyCam is fully compatible with Windows 7.
iSpy

iSpy is a video surveillance program with the function of transmitting footage over the Internet. Allows to partially replace the more expensive IP video surveillance technology and can be used to protect premises and outdoor areas.
To work with iSpy, you can configure an unlimited number of web cameras, including those connected to different computers on the same local network. The recorded material is saved in Flash format and transferred to the server for storage. The user can view both archives and real-time images at any time, as well as remotely enable or disable cameras.