How to make a wooden staircase with your own hands. How to make a wooden staircase to a country house or gazebo: step by step instructions
Without observing the rules and without making safety calculations, the staircase with your own hands will be built, at least unsuccessfully, will require global alterations and costly improvements. To exclude unsuccessful attempts, it is better to do everything initially, focusing on building codes.
The simplest solution will be modular - they only need to be assembled from complete parts, strictly following the manufacturer's instructions. Ready-made kits are supplied for the assembly of cruise and screw versions, equipped with a full set of fasteners and structural components.
A spiral modular staircase is assembled according to the principle of a children's designer of their fully prepared constituent elements for installation
Material selection arguments
For the construction of a welded metal staircase, the skills of a welder and an inverter machine are required. You can learn the basics of welding on your own, but for the construction of a presentable structure, the initial course is not enough. The pouring of a concrete structure is often determined by the operating conditions. Concrete steps are used to equip two, three-story mansions made of bricks, foam blocks, gas silicate panels. In addition, the cold concrete system will still have to be sheathed with wood or veneered with other material. As a result, it turns out that you have to do double work.

Constructing a concrete staircase with timber cladding is financially and labor-intensive as producing two separate structures
Attention. In two-three-storey cottages, in accordance with fire safety requirements, it is necessary to install concrete or metal staircases, which guarantee evacuation from the upper floors in case of fire.
Those who need a staircase to the attic should prefer wood. The material is lightweight, easy to process, will not push through the floors.
Council. For the arrangement of new low-rise wooden buildings, stepped systems made of wood are recommended due to shrinkage. It is difficult to predict how much the ceiling height will decrease, and what the difference will be between a concrete or metal staircase and a ceiling.
Possible mistakes made in the manufacture of a wooden structure will be easier to correct.
Simplest design
For those who want to make a staircase on their own, no one will advise starting with a complex screw type. If the limited dimensions of the room do not allow you to choose a simple, flat option, it is better to purchase a ready-made set of modules or contact the builders.
A gentle "means of interfloor communication" will take up a lot of space, but the ascent and especially the descent along it will be the most comfortable. It is optimal that the angle of inclination does not exceed 37º. An inclination of 45º automatically converts the structure to the category of attachments. You will need to go down it with your back forward. The 40º steepness is also not very comfortable for descending.

A sloping staircase with an angle of inclination of no more than 37 degrees is the most comfortable
If there is a question of building on a limited area in terms of size, preference should be given to a two-march building with a staircase or with winding steps.
Attention. Between the straight flights directed towards each other, the distance should be at least 100 mm.

It is necessary to leave a distance between the marches going "towards" each other
The steps can be supported by the supporting beams-stringers, can be attached to the wall with bolts-bolts, attached to two side bowstrings. Consider an example of construction with kosoura.
We construct a ladder with our own hands
Regardless of the presence or absence of experience, any master should start with calculations and design. The project focuses on safety and creating better conditions for relocation.
Design and project requirements
- The structure must support a load exceeding the average weight of a person.
- It must be equipped with fences, the location of which must be taken into account at the stage of project creation.
- Fences are equipped with handrails and balusters, the distance between the balusters standing next to it should be less than the size of the child's head.
Note. To protect the stairs in order to prevent situations that threaten users, it is possible not with balusters, but with a continuous "canvas" of plexiglass or mesh, if there are small children in the house.
- The height of the structure is calculated according to the finished floors of both floors or according to their estimated elevations.

- According to standards, the sum of the tread width and the corresponding riser height must exceed 50 cm (slight deviations are possible). Recommended height in the range of 14-17 cm, tread width 25-32 cm for full foot support.
- The height of the passage is 1.9-2.0 m. The size depends on the height of the users, it is calculated taking into account the height of the tallest family member + 5 cm.
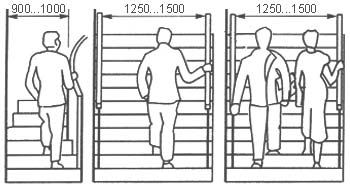
- The comfortable width of the internal staircase is the distance between the wall and the handrail or between two handrails 0.90 - 1.00 m.

The principle of calculating the steps is based on a simple formula
Design is the most critical stage. Mistakes made in the process will turn construction into a waste of time, effort and money. Projects are carried out by analogy, regardless of the selected material, the rules and calculations are identical.
We will prepare the necessary material
We finally decided that we were building a ladder from lumber. For the manufacture of stringers, a pine board with a width of 40 mm is suitable. The risers, which you can refuse to install, can also be made from conifers. It is optimal if the treads are made of hard wood.
Council. It is better to buy ready-made steps from glued wood, created like glued beams from bars with different fiber directions. They will not deform, crack, crack.
Let's make the kosoura correctly
According to the projected dimensions of the step, we will draw a pattern. Then we will apply the markings on the boards and use a jigsaw to cut peculiar teeth on it. Those who wanted to know how to build a staircase with their own hands without mistakes and alterations, probably guessed that all elements must be symmetrical. This means that the first sawn beam with teeth will serve as a template for making the second, and if the width of the stairs is 1.20 or 1.50 m, then the third.

You need to start with the manufacture of stringers, for the production of which you need a template with the exact dimensions of the step, after which the teeth are cut out in the beam to install the steps
Installation of step elements
We fasten the steps and risers to the stringers with nails and self-tapping screws. A craftsman who decides not to use ready-made factory components will also need to cut out these elements according to patterns made especially for them.

The tread can be composed of two boards
A structure is considered more reliable, on the supporting beams of which simple triangular or more complex fillets are first installed. For their installation and fastening, dowels and pre-made grooves will be required.

Diagram: how to make a ladder with more reliable curly wooden filly
Install balusters and railings
To install each baluster, we will use an anchor or hairpin. First, according to the markings, we "stick" a hairpin onto the glue with its end, which will then penetrate into the stringer through the tread, then we will twist it and screw the baluster onto the free end. In the same way, fence posts are installed, between which balusters are placed. At the end, the posts and balusters are equipped with handrails.

Installation of fencing elements
Video information: common mistakes
Before getting started, you should watch videos with a list and description of common mistakes.
The process of building stairs with your own hands cannot be classified as the simplest, but it is also not a super-difficult task. The main snag in competent design. And then pedantry and accuracy must lead the performer, and everything will certainly work out.
DIY staircase.
You can do everything with your own hands if you have your hands where you need to, there is a set of tools and, most importantly, you want to make wooden stairs with your own hands. In this case, this article will allow you to try making stairs with your own hands and make a simple staircase to the veranda, which will cost as much as a budget staircase, when you make a simple staircase, a spiral staircase with your own hands will also be within your power. In the course of the "DIY ladder" process, you will have to solve a number of questions: technical calculation of the ladder, it would be nice to sketch a simple ladder diagram with your own hands, a drawing of what you will do when you decide to make wooden ladders with your own hands. To make the ladder yourself, you will need tools: a hacksaw, a building level, a plane, sandpaper, a metal ruler, a pencil, a hammer, paint brushes, a drill, and a screwdriver. From materials for the process of "stairs in the house with your own hands" you will need: wooden boards 100x20x2.5cm, timber 150x25x5cm, timber 100x5x5cm, to make balusters with your own hands, nails 10cm, 7cm, screws L \u003d 10.15cm, drying oil, stain, varnish, impregnation against decay, impregnation against woodworms. In the course of work, you may need some more tools, but a very complex and special tool is not used in the construction of a staircase, so there will be no special problems with finding it (not provided) .If you cannot make a drawing for the construction of a concrete staircase yourself and a concrete staircase is "too tough for you", use the projects of wooden stairs in Kiev, with their help you can make wooden stairs with your own hands, including you can get a wonderful modular staircase.
Photo stairs.  So, we are building a staircase with our own hands. First of all, you need to calculate the stairs, think over the size of the stairs, the design of the stairs and define the terms. The calculation of a staircase for a wooden house is needed so that it is convenient to climb it, in addition, the staircase must meet very specific safety requirements, which are spelled out in the regulatory documents. We will not bother you with the study of these documents, and we will give the basic requirements along the story as make a ladder with your own hands... Now about the terms. Here are the main components that any staircase has: degrees, under steps, kosour, handrails. Kosour is the main bearing part of the staircase, it is on it that the main load occurs when people walk on the stairs, there are staircase options without steps, but this greatly weakens the structure, so we will consider the option dIY stairs in the house (photo) under the steps. More clearly about the elements of wooden stairs in the photo below, you can immediately see the approximate design of the stairs.
Photo stairs.
We have defined the terms. Now we need to set the dimensions stairs made of wood hands (photo): stair width, step width, tilt angle and height under steps. If we talk about the width of the stairs, then they usually take a width of at least a meter, this is necessary so that furniture, household appliances, and so on can be brought into the house. In our case, the width is set by the departure of the terrace or veranda. We recommend reading the article on bathroom design.
Calculation of the angle of inclination of the stairs, the width and height of the steps dIY wooden staircase (photo).
Determine the height of the stairs. To do this, we fix a straight board on the terrace, like the beginning of the stairs in the photos below, check the horizontal, adjust the horizontal if necessary and measure the height of our staircase. To prevent the level from falling, it is fixed with tape on the board. In our example, the height of the staircase is 145 centimeters.
Making stairs with your own hands  About the angle of inclination of the stairs. The angle of inclination of any staircase is regulated by standards and has a range of angles from 30 to 45 degrees. If you begin to deviate from these rules, then when you make a ladder, you will notice that the angle is less than 30 degrees, it is dangerous to walk, the angle is more than 45 degrees, the ladder will take up a lot of space. The angle of inclination of a particular staircase is determined individually, depending on the number of steps and their height. The approximate ratio is summarized in the staircase table for the house.
Go see the similarities.
As practice shows, lestnica with a step height in the range of 140/170 mm and a tread width of 300/370 mm is the most convenient and safest for movement. This is explained by the following. The width of the step is taken along the length of the foot of the average person, and the height of the step corresponds to the step height of the average person. The higher you make the steps, the wider its width will be and vice versa. But there is a rule - width 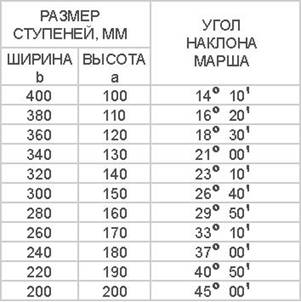 the minimum step corresponds to its height.
If you get very narrow standard round steps, this is not very good for safety, but you can add another 20/40 mm to their width due to the projections. Do not forget that we said at the beginning of this article about the width of the entire staircase, the most comfortable width is 1 meter, but if conditions do not allow you, you can reduce it to 70 centimeters, usually this is done for house projects in a narrow area, make the width no less recommended. Our staircase has seven steps, the eighth step of the staircase in DIY cottages is the surface of the terrace.
Diy ladder, photo schemes and drawings.
We make kosour dIY stairs in a wooden house.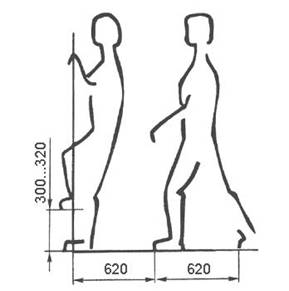
 We need to see how you will attach the braid to the terrace. Mono support it on the beams of the terrace, or make the beams fly out from under the platform. This should be done locally. In addition, the best option for a platform on which a wooden staircase will rest is concrete. It is necessary to take a wooden beam, mark it as shown in the first photo, and cut out the grooves under the steps, in no case cutting them, the places of the notch will be stress concentrators, the staircase may collapse along them. First, make one braid and then, using it as a template, mark the rest, in our example, four braids. As you can see from the photo, the more braids, the stronger the structure will be. Seating corners
 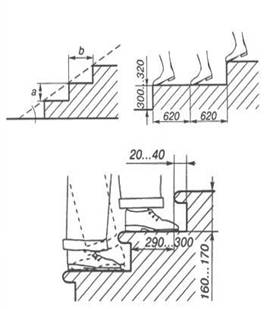 under the steps, knock down with a plane by 4/5 mm. This is necessary for a good fit of the steps and under the steps to the braid. Having installed the kosour in place, you can mount the steps into the house, not forgetting about the overhangs of the steps, if they are narrow.
Ladders clip art.
Installation of balusters.
Wooden balusters drawings, sizes of options, of which there are a lot and mount the handrail last, you can make metal balusters, but that's another topic. How do-it-yourself bolasins are very clearly visible in the second photo of the article, a diagram for installing balusters is also visible there.  Finally, I note that it is necessary to impregnate all wooden parts with impregnation from woodworm, decay, treat with a plane and sand the surfaces, soak them with linseed oil and, after installation, open them with varnish. Wood under the kosuor, under the steps, handrails - pine. Under the steps and balusters and pillars, the best option is oak board and beams. The volume of our article cannot include various options for wooden stairs in the interior. Photos can be viewed on the net.
A house in the country can be one-story or have 2-3 floors - much here is determined by the financial situation of the owners. Usually, if there are enough funds, people prefer to build a two-story house - there is more usable area, and it takes up the same amount of space on the site as a one-story building or a little more. The construction of any two-story house will not do without stairs. Wood is one of the most suitable materials for making it. A staircase made of wood will suit any interior and will become its decoration. Wooden stairs for summer cottages today can be ordered from specialized firms or made by yourself.
The main types of stairs are, of course, marching and turning. Straight stairs are marching structures, they are easiest to assemble, but they take up a lot of space, so this option is more suitable for a large house.
Marching staircase with risers and interesting railings made of timber, mesh and metal rungs. Lateral supports are used little, their lack is compensated by the use of a grid. The lobby of the first floor is spacious, the use of a flight staircase is quite appropriate here
The swivel staircase is compact, it can be spiral and marching. Installing a swing ladder saves space, especially screw structures, but the disadvantage is that it is not easy to make them yourself.

Spiral staircases look much more original than marching ones, such a staircase itself is the central detail of the interior, but for its manufacture it is necessary to involve specialists
The main stages of the construction of the stairs
Work begins on the creation of the stairs already with the choice of material. Pine, beech, birch, ash, oak are the types of wood that are best suited for this - they look beautiful in the interior and are durable in use. Oak stairs are the most expensive and durable, but pine is a relatively inexpensive material with good characteristics.
Stage # 2 - carrying out calculations and drawing up drawings
Before you start designing, you will need to calculate the dimensions of the stairs and make a drawing of it. For the house, you can make a stringer staircase with risers, balusters and railings. We will look at how to build a staircase without turns with a one-march rise.
First you need to prepare a place for installation. If you neglect this point, the ladder may be installed incorrectly, over time, creaking and gaps will appear. Unevenness in the floor and walls entails incorrect load distribution, which leads to deformation of the structure.
Knowledge of the basic rules is necessary in order to make the necessary calculations. The ideal elevation angle of the march is 45 degrees, but if there is not enough space, it can be reduced to 30-40 degrees.

Scheme of the construction of a wooden flight staircase with risers. The simple design can be used both indoors and outdoors when building a porch
Then you need to calculate the length of the stairs. Here we will have to remember the school geometry course. The formula for calculating the hypotenuse of a right triangle will help you: c \u003d √ (a2 + b2). Here c - will be the length of the side bases, a - the height from the floor to the second floor, b - the distance between the point where it is planned to place the first step to the mark of the second floor, which will need to be projected onto the floor.
Depending on the height and internal structure of the house, the staircase can be one-flight or two-flight. The riser height is 290 mm. The width of the steps is no more than 25 cm, 3 cm goes to the ledge. If the steps are high, or the number of steps in the march exceeds 18, you can make a small platform (700 / 1000mm). The width of the march should not be less than 80cm, ideally it should be one meter.
According to the established standards, the height of the railing is from 90 cm to one meter. It will be much easier to work if you indicate all the necessary calculations on the drawing of the future staircase.
Stage # 3 - preparation of tools and organization of work
Tools and materials that will be needed for work: a meter, a marking pencil, a hammer, a square to mark the stringers, a hacksaw, boards for steps, risers, kosour, screws, nails, a bar for railings and balusters.
First, the side bases are made. We measure the angle of abutment to the floor from the bottom edge of the board, draw a horizontal line. From the line with a square, measure the width and height for each step to the top, then measure the angle of adherence to the 2nd base. In the same way, we make the markup of the second board. We cut out the patterns with a hacksaw, fix them in the right place with screws.
The next step is cutting out and nailing the risers to the base. They should adhere to the stringers without distortions, ideally even. After the base is finished, you can mount the steps.

The steps can be made of a solid board or use two narrow boards 15 cm wide. What you choose is up to you, but the tree must lie firmly, evenly. Boards are fixed with screws and nails
Stage # 4 (optional) - installation of handrails and fences
Railings are an important part of any staircase, they make the ascent and descent safe, and serve as a decorative function, giving completeness to the staircase structure. A simple option that will look good is a railing from a bar. We cut out meter balusters. Two balusters will be straight supports, the rest must be filed and shortened by 5-10 cm at an angle of 45 degrees. The side supports are nailed to the steps, you can cut grooves into them. A bar is placed on top, serving as a handrail.

Variants of stairs for summer cottages: 1 - marching with risers, 2 - without risers, 3 - rotary structure, 4 - light wooden staircase, 5 - light spiral staircase made of wood and metal, 6 - spiral staircase with steps along the support pillar
If you want to create an original staircase, the railings can be made of another material - you can order forged railings, metal or even tempered glass, for a wooden staircase. Carved details will also give an attractive look to the stairs.

Swivel staircase made of wood and metal. Wrought iron railings and metal supports match perfectly with wooden steps

Marching staircase with a small platform. The platform will be convenient with a large number of steps. A staircase without classic risers looks lighter. The design looks aesthetically pleasing, despite the simplicity
The staircase can be without a railing, but this option is not common - it is dangerous for children to walk on such a staircase, carry bulky objects up.

If you wish, you can make a staircase without railings - for example, like this staircase-wardrobe, where the space under the stairs is used for the benefit of business - in such a kind of cabinet you can place dishes and other little things, and the structure as a whole looks very original
Here's a simple ladder that will turn out if you follow these instructions. The design is ready, and if you cover it with varnish, skillfully choose the decor, then it will look attractive and aesthetically pleasing, despite its simplicity.
Hello everybody!
How to get to an object that is at a height unattainable for you? How to collect fruit from the very top of a tree or paint at home? Such questions, most likely, have visited you more than once, it was for these purposes that a special device was invented, which is called the Stepladder.
Stepladders are, perhaps, the most popular and necessary stairs, they are used in everyday life and in other areas of activity.
This article will describe a method for making a ladder, with a detailed photo report.
To make a staircase, we need:
Materials:
Two beams 60 * 40 mm;
- timber 50 * 35 mm;
- self-tapping screws;
- paint.
Tool:
A hacksaw for wood, or another available cutting tool;
- Sander;
- drill;
- a hammer;
- ax;
- mount.

Let's start with the fact that we take two vertical bowstrings with a bar section of 60 * 40 mm, we take its length at our discretion, in this case the length was 3.6 m.

In order to make the staircase strong and the upper edge of the steps was horizontal when tilted, we make special notches, we apply markings in those places where we plan to install the steps, the distance between the rungs is 30 cm.We use a cross-section of 50 mm for the steps, according to these dimensions we make markings, we apply it on both sides of the bowstring. Next, mark the depth of the notch - 15-20 mm. We connect the resulting marks with an oblique line, as shown in the photo.

Then, using a sharp ax and a hammer, we remove part of the wood at an angle, but before that with a hacksaw, you need to make a depression along the marked line, this so that the bar does not split in an unnecessary place for us.

We use the ax as a plane, leveling the angle of the notch.

In a similar way, we make notches on both bowstrings.

Next, using a grinding machine, we process the surface of the bar.

We need to carefully align the notches we made.

Now paint the inside of the notches with paint. We put them aside until they dry completely.

Next, we take a bar with a cross section of 50 * 35 mm for steps, it needs to be slightly modified. Take a plane and use it to chamfer. We do the same operation on each bar.

Then you need to make one of the sides of the beams as the base one, for this we take an angular ruler and use a pencil to mark up.

When everything is ready, using a cutting tool, we saw off all the uneven edges, after that we process the surface with a grinder, smooth the ends.

Now you can proceed to making the upper and lower rungs of the stairs. In order to distinguish between the top and bottom of the stairs, it must be done with a slight taper. The top should be shorter than the bottom. We take the width of the stairs 65 cm from the bottom and 55 cm from the top. You can take other sizes at your discretion. Use a tape measure to mark the length.

With the help of a square, we apply markings in the place where the future step will be cut.

We start cutting.

When the steps are ready, we process the ends with a grinder.

Further, at the edges of the bar we find the center, for this you need to step back from each of the edges by half the thickness of the bowstring (20 mm).

Then on the marked centers we make holes for self-tapping screws. The self-tapping screw must pass freely through this hole.

We make a countersink using a larger diameter drill.

Now install the top and bottom crossbars by placing and aligning them in the notch. We make the ends of the steps flush with the side parts of the bowstrings. After that, through the existing holes in the steps, we make a mark of the place where it will be necessary to drill a hole. They are needed so that the self-tapping screws do not split the wood when twisting. The holes were made with a drill 0.2-0.3 less than the thickness of the screws.


Now you can fix the step in its place, but before that the pressure side of the crossbar should be painted.


When the stairs are given the necessary dimensions, we add the missing steps, for this we lay out the prepared bars in the notches, setting the base ends flush with the side parts of the bowstrings.
When building a house, it is often necessary to build a staircase. After all, most projects involve a second floor. Stairs between floors can be built from different materials. However, wood is one of the simplest, most environmentally friendly and convenient. Even a beginner can handle this material.
Of course, the work will take some time. However, the work will quickly pay off, because the design, made with a soul, will serve for many years to the delight of the owners. In addition, building a staircase with your own hands is a significant cost saving.
Types of wooden stairs
 In total, there are two main types of wooden stairs:
- screw;
- marching.
Marching stairs are the simplest, so it is for the construction of such a structure that it is best for a beginner to start building. Spiral staircases are very complex, they require careful calculations and measurements. One mistake - and the design may not work.
Marching stairs are divided, in turn, into two types: one-marching and two-marching. Both varieties are not difficult to make on your own.
Straight flight staircase

Before making a wooden staircase with your own hands, you need to purchase materials and prepare tools.
From the materials you need to take:
- thick boards (they will go up the steps);
- bars of a sufficiently large section (about 40 mm);
- screws.
Before making a wooden staircase, it is imperative to think over its design on paper.
It would be very unreasonable to build without a drawing, therefore, before erecting the stairs, it is necessary to take measurements and make an approximate plan.

When measuring, you must take into account:
- the height of the stairs;
- angle of inclination of the structure;
- number of steps;
- width.
You can draw up a similar scheme electronically. There are special computer applications that allow you to create such models. Professional building software may even have 3D functionality. However, this is not at all necessary - to create such a visual example when calculating a simple staircase.
Bowstring or stringer?

A simple flight ladder can be installed on stringers or on bowstrings. The difference is that the bowstrings are located on the side of the steps, while the stringers are under the steps.
A simple flight ladder usually has two side bowstrings. The steps are attached on both sides. The construction described here will be arranged in exactly this way.
Mounting

Painting stairs
 The entire staircase painting process can be divided into three parts:
- training;
- painting;
- protection (varnish layer).
First you need to prepare each element of the staircase for painting. This involves two types of work: puttying and sanding. Putty is made with special mixtures, which are intended exclusively for wood. It is prohibited to use compounds that do not fit under the tree.
When the putty layer is dry, you can start sanding the surfaces. Grinding is done in two stages. The first stage is rough and superficial. After that you have to wait a couple of days. Very soon, it will become noticeable that villi are rising on the surface of the wood. Before the second sanding, they must be blown with air.
After sanding, the board becomes perfectly flat and smooth. Now you can start coating.
When the surface of the staircase is ready for coating, you need to decide what it will be. Before you paint a wooden staircase with paint, you need to apply a layer of primer. It is better to choose a primer to match the coloring composition.
The choice of paint is best done among alkyd and urethane coatings. They are ideal for painting a flight of stairs. From flowers it is preferable to take something light.
 If you wish, you can use wood stain instead of paint. The advantage of the stain is that it perfectly emphasizes the unique pattern of the wood. The staircase will look great. Natural drawing is always preferable. Why hide it with coloring compounds, when it can serve as a decoration by itself.
The stain can be selected together with the varnish. When buying, it is advisable not to save. Indeed, the better the composition, the longer the structure itself will last. Stain is not just a decorative finish. This composition perfectly protects against various factors.
When the paint has dried, a finishing coat of varnish is applied to the surface. It is better to choose a matte varnish, a semi-matt variety is also suitable. In the case of stairs, varnishing is carried out in three stages. The composition is applied three times, and before each new application, the previous layer must dry well. If bubbles form on the varnish, then they must be sanded.

If you still want to make a spiral staircase in the house, then you can try the simplest installation option. The advantage of this design is that it significantly saves space.
When building, it is important to take into account that the stairs are not too steep. If there are elderly people and small children in the house, then it is wiser to abandon such a design, because it can be dangerous.
The easiest way to install a spiral staircase is to buy a ready-made, already measured kit, and simply mount it. Savings on installation will also bring significant benefits.
The construction of a spiral staircase consists of three main elements: posts, railings and steps. It is better to choose oak steps. They are not only one of the most durable, but also have high aesthetic characteristics. Bog oak and thermo oak look very good too.
Before buying, you need to measure the dimensions of the future staircase in order to choose the structure exactly for your house. A more expensive option is to hire a specialist who will measure everything himself, and then place an order for the design. If you have the skills to work in construction, you can make the steps yourself by ordering only a rack and railings. Most often, racks with railings are metal, but there are also wooden varieties.
Ladder device

- Steps on one side have space for fastening to the rack. On the other side there is an opening for the handrail.
- The rack is most often metal. It has a flange to which the steps are attached.
- The simplest design of a spiral staircase is “duck step”. A special form of steps is assumed here.
- The rack is mounted between floors. It is attached to the floor with anchor bolts.
- When the rack is installed, you can start installing the steps. The distance between them should not exceed 20 cm. This is necessary for safety reasons.
The spiral staircase also has many decorative details. Moreover, each set may have its own decorations and various fastening elements. When installing a conventional marching staircase, the calculation is carried out differently, the geometry of the opening here is rectangular. At the spiral staircase, the staircase is a circle.
Video
You can learn more about the process of building stairs made of wood in the following videos:
If you nevertheless decide to order the manufacture of wooden stairs to the second floor, contact a trusted company with good reviews, compare prices for wooden stairs. Buy ready-made stairs or do it yourself, it's up to you.