Phased construction of a bath. Small bath with your own hands
A do-it-yourself frame bath, a step-by-step construction instruction of which includes several stages, is erected quite easily, subject to the technology of erecting frame structures. The option of building a frame-panel bath is considered the most suitable for most homeowners. The simplicity of the construction made this type of baths one of the most popular among the owners of suburban areas.
This is due to the fact that this design will look very good from the outside, requires little time and money and is guaranteed to serve its owner for up to fifty years.

The main advantages of frame baths
Baths of this type have a number of other advantages in addition to those already mentioned. So the structure can be built independently without the involvement of heavy construction equipment or outside help. The structure can be erected regardless of the season, complete absence of shrinkage. The structure of the building allows for covered communications. When using a frame structure, it is possible to choose a practically unlimited number of finishing options for the building, both inside and out.
At the same time, the frame bath can still be moved to another place if necessary, sometimes without analyzing its design. This allows it to be moved to a new site in the event of a sale of the old one.

In the process of building a frame-panel type bath, it is necessary to take into account and correctly think over its thermal insulation. The fact is that the walls of such a bath keep heat worse than walls, for example, buildings made of wood, so it definitely needs good thermal insulation.
The second point to pay attention to is vapor barrier. The whole question here is that the frame structure of the building favors the collection of steam condensate in it. It is possible to get rid of it only by using a vapor barrier film or glassine. Such insulation is laid between the layers of mineral insulation and the cladding of the building.
When choosing a building material for a frame bath, you should pay serious attention to the fact that the boards used during construction work are dry. It is desirable that they be aspen, linden or larch. These wood species practically do not deform and have a reduced thermal conductivity.
 Frame mini bath
The main stages of work
If we consider the construction of a frame-panel bathhouse in stages, then it consists of the following operations:
- laying the foundation;
- assembly of walls;
- roof construction;
- finishing of the building from the inside and outside.

The preliminary work is worth mentioning separately. They include the preparation of a construction plan, its estimates, the purchase of building materials, and communications.
So, even before the start of the construction of the foundation, it is worth marking and clearing the site for the bath, performing the necessary earthworks, and purchasing all the necessary building material.
Laying the foundation of the structure
In order to make a frame bath, a foundation built according to a simplified scheme is enough. The fact is that a building of such a structure weighs extremely little and can be built, for example, on pipes made of asbestos cement, poured with concrete.
For its construction it is necessary:
- to execute wells with a depth of 1.5 meters and a diameter of 200 millimeters;
- cut the pipes in half and place them in the wells, then cover them with sand;
- pour the pipes with a concrete solution made of fine gravel, water, sand and cement.
 The foundation for a frame bath
The plank strapping is created at the next stage of the construction work. Their size should be 50x100 mm and they should be impregnated with an antiseptic. The harness marks the walls, while the boards are mounted with the outer edge and knocked down with nails. The fastening of the harness to the plinth is carried out on the supports.
To make the entire structure highly durable, the strapping and logs are fixed using metal fasteners embedded in concrete. At the end of its manufacture, this building structure is impregnated with an antibacterial agent.
Bath walls installation
Having decided to build a frame bath with his own hands, the builder should know that when installing the walls, the distance between the axes should be equal to 0.6 millimeters. At the same time, such a wall should not provide for the arrangement of a window or doorway or docking with other walls.
The gap for such walls is up to 0.4 mm. To give the overall strength of the structure in the area of connection of the frame, walls and lintels, an additional stand must be installed. At the end of the frame installation, its geometry is checked.

Further work begins with the removal of the corner of the building. For this, a wall is first built, directly communicating with the strapping. After checking for verticality, it is temporarily secured with struts. The rest of the walls are mounted in approximately the same way. When their construction is completed, the cladding is installed.
Roof construction and finishing
The assembly of rafters and other roofing elements is usually done on the ground. Directly to the roof, they are manually raised and placed strictly above their counter. There are several types of roofs, but the most common for baths is ventilated.
It allows you to remove excess moisture from the room. When erecting it, the crate is stuffed directly onto the beams, and the hydro and vapor barrier is laid under the counter beam. The finished roof is covered with ondulin, and the gables are covered with chipboard sheets.

The final stage in the construction of a bath complex is its interior and exterior decoration. Exterior walls are nowadays usually finished with siding or block houses. The cheapest option is planks, most often spruce or pine. Sometimes a frame bath is plastered or tiled. At the same time, do not forget about waterproofing and insulation of voids in the building cladding.
The interior of the bath usually excludes the use of paints and varnishes due to their high toxicity when heated. It is best to finish the ceiling and walls with the same OSB sheets. You can use clapboard or wood siding. To avoid decay of the walls, the walls must be insulated with foil.
 Decorating the bath with clapboard
Separately, it is worth mentioning the joints between the walls and the ceiling. The fact is that the heat insulator to be mounted must have a margin of 15 centimeters. It should be checked whether the floor boards are nailed to the joists with the front side.
Do not forget about fire safety: it is better to separate the steam room from other rooms with bricks.
DIY frame bath: step-by-step construction instructions
A do-it-yourself frame bath, a step-by-step construction instruction of which includes several stages, is erected quite easily, subject to the technology of erecting frame structures.
How to build a frame bath with your own hands

In our country, a summer cottage or your own house without a bath looks at least lonely. For centuries, baths were built from logs and could not boast of a variety of layouts due to the peculiarity of the material. Today the situation has changed. Construction technologies and modern materials will make the most daring architectural ideas a reality. Following the advice of this article, you can learn how to build a frame bath with your own hands step by step.
Frame technologies have been used to build houses for about 200 years. Construction using this technology is widespread in the Scandinavian countries and North America. Simplicity and relatively low cost of construction have become the reason for the growing popularity of frame construction in Russia.
Preparation for construction
To start construction and accurately calculate the material, it is advisable to have a project. You can find it on the Internet or order it from a specialized company. Frame baths do-it-yourself photo projects are best ordered from professionals, however, you can draw it yourself, but you need to be as careful as possible. In addition, certain materials will be required for the construction of a bath, namely:
- timber 100x100 mm;
- dry planed board 50x150 mm;
- insulation, vapor barrier;
- waterproofing;
- facade elements (siding, metal tiles);
- interior elements (lining, panels, etc.).

The next stage after the purchase of the material will be the preparation of the construction site and the construction itself. Let's outline the main steps:
- foundation construction;
- lifting and sheathing of the main frame;
- roofing;
- interior finishing work.
It is very important to create the correct project for a frame bath, and it is better to use existing drawings. Below is a diagram of a frame bath with your own hands photo projects.

Foundation construction
The main box of our bath is a lightweight construction, so the foundation requirements will be minimal. You can use a foundation made of concrete blocks laid along the perimeter of the frame or the so-called columnar foundation.
The columnar foundation is made of asbestos-cement pipes filled with concrete. The depth of the pipe laying is selected based on the type of soil. If the soil is dense - clayey, it is enough to dig in the pipes 0.5 meters. For light soil types - sandy, the depth should be at least 1.5 meters. The optimum pipe diameter is 100 mm, the standard length is 4 m, take this into account when calculating the amount of material. When digging in pipes, a gasoline drill will be an excellent assistant; it can be rented, since it is quite expensive. The borehole diameter should be twice the diameter of the pipes. The pipes are sawn, taking into account the depth of the laying, it is enough to leave 0.5 meters on the surface. After installing the pillars in the well, fill them in a circle with soil and tamp them well. The pipes are poured with concrete. The composition of the solution (cement grade M400):
An important point: the distance between the posts is selected based on the thickness of the walls (optimally 27 cm). To strengthen the foundation, you can fill the pipes additionally with a tape method (along the perimeter of the frame).

Erection of the walls of a frame bath
If you purchased dry material for the frame, then construction can begin immediately after the foundation has solidified. Otherwise, let the wood dry for a while. Further, guided by the project plan, prepare the frame posts and roof rafters. Mark the installation locations of the racks and proceed with the installation of the main frame. The assembly of the bath begins with the treatment of the basement bar with a fire-bioprotective compound. The processed timber is laid along the perimeter of the bath, and connected with nails and staples. From above, support beams are mounted, connected from above by structures with boards of 50x150mm. Constantly check the level of the accuracy of the mounting of the supports.
An important point: when assembling the main frame, use only the correct size NAILS. The use of self-tapping screws is not allowed! The difference in the resistance of nails and screws to fracture makes the use of the latter in the assembly of the frame DANGEROUS! (SNiP 31-02).
Wall assembly order:
- two racks are mounted in the corners and several intermediate racks;
- the frame is sheathed with an OSB plate (the plates are leveled and fastened with self-tapping screws);
- some more racks are mounted, sheathed with OSB.

Following this algorithm, the whole structure is assembled. Consider the location of door and window openings. It is advisable to select the distance between the inner racks of the frame according to the width of the insulation plate. Calculate the places of windows and doors in advance so that the racks do not have to be moved during construction.
Advice! When assembling the supporting frame, the racks can be reinforced with slopes; after the building is covered with an OSB plate and the roof is installed, the slopes are removed.
Roof construction
A do-it-yourself frame bath involves mandatory work with the roof of the building. As described above, the rafters and the base of the roof are mounted on the ground, after which they are installed according to the design scheme. The material of the rafters is a board with a section of 150x50 mm. Before the final collection of the roof, a beam (Mauerlat) must be laid around the perimeter of the frame, it serves as the lower support of the rafter system. Remember to cut out the OSB for the gables prior to the final installation of the roof structure. At the time of installation, assemble the rough flooring for ease of assembly.
The sheathing must be installed before the final roof covering. The lathing is laid from the ridge with boards of 100x25 mm. After assembling the lathing, the roofing itself can be laid. A good roofing material is metal or ondulin. In order for the roof rafter system to not get damp and collapse over time, it is important to make good ventilation. To do this, a vapor barrier is laid under the rafters, and already on top of the rafters - the roof sheathing.

Next, you should close the gables, install windows, doors and you can start interior decoration. Do-it-yourself frame bathhouse step-by-step instructions will help you make a reliable construction, so construction should be carried out strictly according to the indicated stages.
Interior decoration
The first priority is to lay the floor. The classic flooring procedure consists of the following points:
- Bars 50x50 mm are nailed onto the strapping logs.
- A rough floor is laid on them.
- Waterproofing (roofing felt, roofing felt) is laid on the rough floor.
- Mineral slabs are laid on top, the thickness of the slabs is about 10 cm.
- A layer of vapor barrier is laid.
- Then the final floor is laid.
- An exhaust pipe is installed to ventilate the space under the floor.
It is worth noting that during the installation of the floor, errors are possible, which can further cause the alteration of part or the entire floor. Take your floor assembly seriously. We will give the recommendations of specialists, thanks to which the floor will last as long as possible:
- Do not neglect vapor barrier.
- Do not replace the membrane vapor barrier with regular polyethylene.
- Carefully glue all waterproofing joints with a sealant.
- The thermal insulation layer must be dense and of sufficient thickness.
- Don't forget about ventilation.

An important point: before laying the floor in the wash compartment, solve the problem with the water drain. We talked about the organization of the sewage system at the summer cottage in one of the previous articles. In the wash compartment, the floor should be slightly sloped towards the drain. Floor boards should fit tightly together.
After installing the floor, proceed to finishing window and door openings and installing interior partitions. After that, it will remain to sheathe the walls and ceiling with clapboard, for a pair compartment it is better to use a clapboard made of non-coniferous wood - alder, ash, linden. For the rest of the premises, pine is perfect. Vapor barrier and insulation are placed under the cladding. A few words about the facade cladding. Several types of materials are used:
- siding (plastic or metal);
- lining (plastic, wood);
- imitation of a bar;
- block house.
Each of them has its pros and cons. The choice is yours.
How to build a frame bath with your own hands - step by step instructions - projects - photos
Frame structures are quite common due to the simplicity of the construction technology. You can build a frame bath with your own hands if you have
How to build a frame bath with your own hands step by step?
Prefabricated and inexpensive frame baths are very popular. More and more owners of country houses decide to build it on their own site on their own, since the construction does not require large investments. All about the construction of a frame bath with your own hands, learn the video from the foundation to the roof from the article.
How to build a frame bath with your own hands: step-by-step instructions with a photo
The advantage of a do-it-yourself steam room is that the weight of the structure is small and the building does not require a powerful foundation. You can buy inexpensive materials for construction. It is necessary to purchase asbestos pipes 100 mm in diameter and 4 m long. You need sand, crushed stone, cement. The scrap materials left over from the construction of a house, gazebo or garage are also quite suitable. We offer you to familiarize yourself with the advantages of building a frame bath with your own hands, namely:
- The design is fast-erected, of low cost.
- It can have any shape, design and will harmoniously fit into the exterior of the site.
- The possibility of carrying out construction work all year round.

A frame bath in its design differs significantly from a building made of bricks, logs and foam blocks. To make the room more practical, you need to pay special attention to vapor barrier and thermal insulation. Masters recommend using a vapor barrier film and mineral wool for these purposes. Thus, a high degree of tightness will be achieved, and the normal air exchange will not be disturbed. This point must be given due attention, since the disadvantage of frame buildings is the tendency to form a large amount of condensation.
Before starting construction, it is necessary to select the type of construction. The most inexpensive option is a frame sauna attached to the house. This saves money on the construction of walls, and the capital structure gives the structure greater rigidity. A detached building with an attic or a gazebo is a great opportunity to combine business with pleasure. However, the cost of such a bath will be higher.

Where is the best place to place a frame bath on the site? In this matter, you can completely focus on your personal preferences. It is better to place the structure in a recreation area in a suburban area. Many owners decide to build a bathhouse next to a pond or pool. If you place the steam room next to the barbecue, then after the thermal procedures, you can immediately start eating delicious food.
Boards made of these types of wood have low thermal conductivity, and they only need to be placed vertically. Boards made of the above wood are capable of maintaining an excellent appearance and shape for a long time, they do not deform under the influence of high temperatures.
How to build a frame bath with your own hands: construction stages
It takes a little time to independently build a bath, but this will not affect its service life in any way. According to the reviews of many owners of such structures, they can without problems serve for several decades, strong enough to withstand gusts of wind and heavy snowfalls.
We propose to adhere to the following sequence of work:

- Pouring the foundation... This requires previously purchased asbestos pipes. First, wells with diameters of at least 200 mm are dug or drilled, up to 1.5 meters deep. Pipes are inserted into them, the vertical position is set using a level. Around the perimeter, the well is filled with sand, and the pipe itself is filled with concrete. The sand around the pipe is carefully compacted.
- Floor laying... A wooden beam is attached to asbestos pipes, as shown in the photo. Subfloor boards, vapor barrier and insulation are placed on the fixed beam. The last to be laid is the flooring. The entire tree must be treated with an antiseptic to protect it from pests and decay. Mineral wool is suitable as insulation.
- Building walls frame bath. The assembly of the walls begins with the formation of the corner. Wood and logs are fastened together with nails. The last step is the installation of the inner lining, which is carefully polished. The external parts of the frame bath will be exposed to high temperatures and high humidity, so they must be treated twice with furniture varnish.
- Roof erection... Beams with a diameter of 150x150 mm are laid on the upper harness, the distance between them is 50 cm. The rafters are assembled. The roof must be assembled taking into account some features. For example, it must be well ventilated, strong enough and well protected by roofing material. The ceiling is insulated, and lining is used for cladding.
- Finishing work... Boards are attached to the logs with the front side, after installing the vapor barrier material. All voids are filled with thermal insulation material. In a brick steam room, fences are built to protect the walls from the high temperature emanating from the boiler or stove. Outside, the walls can be sheathed with any finishing material. For example siding, which is quickly installed and inexpensive. You can use pine boards, which cover the entire structure along the outer perimeter.

Despite the fact that the frame bath is assembled quickly and is simple, this structure is quite attractive and practical. Maintenance of the structure is simple and inexpensive, and it will last more than 50 years if properly used.
DIY frame bath: video from foundation to roof
The owners of a country house are increasingly preferring a frame bath, it is simple and inexpensive to build it with your own hands. Photos and videos from foundation to roof
DIY frame bath: ready-made drawings, step-by-step guide and recommendations for finishing
It is quite simple to build a frame bath with your own hands. If it is also properly insulated and protected from moisture ingress, it will be possible to get a steam room, which will practically be in no way inferior to structures made of stones or rounded logs.
Advantages and disadvantages of a frame bath
Each building material has its own advantages and disadvantages that must be considered. Recently, frame baths have begun to be popular, so it makes sense to find out why they are better than designs from other materials.
The advantages of such a bath:

However, it is important to know that a frame bath has significant disadvantages:
- The cost of insulation and finishing materials. By itself, a frame building is cheaper than a stone or timber steam room, but the cost increases several times during finishing and insulation work. Panels for decoration and plastering are required.
- Shrinkage. The process takes at least 2 years, while the building can sag by 10 cm. This can lead to deformation of the finishing layer. To reduce the effects of shrinkage, it is recommended to use chamber drying materials during construction.
- The difficulty of choosing a quality material for insulation. If you use budget mineral wool, then the bath will not be able to fully cope with its functions. The use of budgetary expanded polystyrene is also not allowed, since the material is easily flammable.
Preparing for construction: project drawings
Drawing creation requires certain skills. If they are not there, then it is better to entrust the implementation of this work to a specialist or use a ready-made drawing.
Before drawing up a diagram, it is important to decide on the following points:

All the information received must be entered into the drawing, as well as the project must be supplemented with the necessary details. The more detailed the scheme, the easier it is to build a bath.
 The more detailed the project, the easier it is to make a frame bath with your own hands.
The standard bath includes a corridor, a dressing room, a washing room and a steam room.
 A standard frame bath consists of a dressing room, a steam room, a shower and a relaxation room
Quite often, a separate recreation room is provided. It is recommended to mark the place of installation of the stove on the diagram. If it is a steam room, then the stove is best placed in the corner closest to the door. The stove can be stone or brick.
It is recommended to determine in advance the dimensions of each of the premises and designate them in the drawing. The standard dimensions of the steam room are 200x240 cm. The optimum ceiling height is 220 cm. This design can simultaneously accommodate 2-3 people.
On the drawing you can see a bathhouse for a suburban area with a balcony measuring 1.5x4 m. The overall dimensions of the building are 4x6 m. The project is suitable for organizing gatherings in an open area in summer.
 A frame bath can be equipped with a terrace for gatherings in the warm season
Such a bath consists of 3 rooms:
The corridor is shown separately in the diagram. There is no room for the dressing room. There is a small changing area in the washroom. The terrace connects to the living room.
The optimal wall thickness of the frame structure is 100 mm or more. The wood that is used in the process of making a bath must be treated with an antiseptic. It is recommended to use dried, calibrated lumber.
It is obligatory to perform vapor barrier insulation of the insulation material on the inner base. In the steam room, you need to use a foil vapor barrier. The reflective layer can increase the temperature inside the steam room.
Walls and ceilings in the area of the stove should be made using non-flammable materials. For example, the frame is made of a rack-mount metal profile, which is coated with zinc. Cuts can be made from asbestos cord. In these places, a basalt slab can be used as an insulation material.
A supply and exhaust ventilation device is mandatory in all rooms. Sink floors should be made with a slight slope or screed. The upper and lower floors must be insulated in the same way as the walls.
The minimum size of a frame bath is 3x4 m.
 The minimum size of the bath for a comfortable stay of several people is 3x4 m
The budget version of the frame is made in this way: the racks are sheathed from the inside and outside with boards up to 25 mm, basalt insulation or ecowool is laid inside the frame structure.
If it is planned to use ecowool inside the walls, it should be carefully compacted and horizontal platforms for unloading should be installed. The frame must be sheathed inside and out. To do this, you need to make a crate. From the outside, the insulation material is covered with a membrane to protect it from the wind. In the horizontal plane, the use of ecowool is a more economical option in comparison with basalt insulation.
Outside, the frame structure can be covered with any cladding material. Inside, the building is sheathed with clapboard, plasterboard sheets with tiles or imitation of timber.
The frame should be assembled from the following parts:
- bars;
- slats for creating a crate;
- boards for the floor base.
Instead of plank flooring, the floor base can be tiled. You need to choose based on personal preferences, however, in the case of a steam room, it is recommended to give preference to wood. There will also be materials for protection. Quite often, lining is used for wall cladding.
 A frame bath is recommended to be sheathed with wood clapboard
For covering the structure from the outside, you can use larch lining. Inside the building is sheathed with coniferous clapboard. The sheathing boards must be fastened vertically.
Excess moisture and high temperatures will negatively affect structural elements, so you cannot do without the use of special protective materials. You can use glassine, polyethylene or roofing felt. The vapor barrier should be placed between the thermal insulation and the casing. The disadvantage of roofing material is that during the heating process, it will emit an unpleasant odor. Therefore, it is not recommended to use it.
You need to pay attention to the selection of material for thermal insulation. In the case of a competent choice and correct installation of insulation, it will be possible to significantly reduce heat losses, as well as the cost of heating a bath building.
In most cases, mineral wool is used as a heater.
 Mineral wool is a good insulating material for a frame bath.
Fiberglass is a good option. In some cases, the ceiling is insulated with expanded polystyrene, and the floor base - with expanded clay.
Calculation of materials and tool list
As an example, the calculation for a frame bath of the most common sizes will be considered. The frame is made of timber, the size of the structure is 5x4 m. The base will be columnar reinforced.
 For the frame structure, you can use a lightweight foundation made of asbestos-cement pipes
For the decoration of the walls inside and outside, lining of coniferous trees is used. The roof will be gable, the covering will be metal.
The current point is the choice of wood. The material must be dried. Linden, larch or aspen are most suitable. These rocks have low thermal conductivity, they are able to maintain the original shape of the structure for a long period of time. The walls are erected from boards with a thickness of 2-3 cm. For external cladding, larch or pine slats are suitable.
Columnar reinforced base in terms of cost and reliability is the best option for frame construction.
 The columnar reinforced foundation is suitable for the construction of frame baths in most regions
It can be used in most regions. You will need to prepare materials in the following quantity:
- concrete - 2 m 3;
- edged boards for the frame - 0.3 m 3;
- reinforcing bars - 80 m.
The frame can be made from boards, pieces of plywood or OSB. If the soil on the construction site is clay, then the formwork does not need to be done.
The most difficult and financially costly part of the bath is the frame. The acquisition of materials at this stage must be approached carefully. List of required materials:
- timber 120x120 mm - 5.3 m 3;
- mineral wool 10 cm thick - 36 m 2;
- vapor barrier material - 40 m 2;
- lining made of wood - 70 m 2;
- waterproofing material - 40 m 2.
To save money, instead of bars, you can purchase boards of 50x100 mm.
 To save finances, you can use edged boards 50x100 mm in the process of making the frame
The timber must be of the second grade and lower, the board can only be of the first grade. Wall cladding from the outside can be done not with wooden clapboard, but with plastic sheets or corrugated board.
The floor is made of edged veneer boards. The ceiling should be upholstered with clapboard. If you want to save money, you can use mineral wool for thermal insulation. List of materials:
- edged boards - 1.8 m 3;
- boards 150x50 mm - 0.2 m 3;
- plinth - 20 meters;
- mineral wool - 20 m 2;
- lining made of wood - 20 m 2.
It will be possible to save money on attic flooring. If you do not plan to use it, then mineral wool can be covered with an unedged board or pieces of slabs.
The roof is gable, the attic can be used for storing tools.
 The best option for the frame structure is a gable roof
There is no need to insulate the roof. The rafters will be hanging. You will need the following materials:
- drainage system - 1 set;
- rafters for rafters - 0.2 m 3;
- lathing strips - 0.1 m 3;
- cornice slats - 0.1 m 3;
- metal tile - 20 m 2.
In the bath, quite often, instead of a drain, a blind area is equipped around the perimeter with the help of a cement-sand mortar.
It is important to think over all the architectural and construction tasks, which include:
- the inner lining of the sauna building;
- selection of optimal materials for construction work;
- actions that are required to ensure the safe use of the structure.
After preparing the tools and materials, you can proceed to construction work.
Step-by-step instructions for making with a photo
A structure of this type has a low weight, so the base can be lightweight. The easiest way is to make a columnar foundation on pipes made of asbestos cement, which will later be filled with concrete mortar. Sequencing:

Next, the structure is strapped. To do this, you need to prepare slats with a section of 100x50 mm. Materials will need to be pre-treated with an antiseptic mixture to protect them from decay. The walls are marked, after which the slats are set along the external line.
 Before tying the boards, you need to treat them with an antiseptic.
The boards need to be positioned with the outer edge and nails driven in to fix it. The plinth trim can be connected using supports.
The upper and lower straps should be made of boards, while the lower one must be cut off from the base in order to be able to lay roofing material. The horizontal arrangement should be checked with a level. If deviations are found, it will be necessary to lay only in several layers.
Intermediate racks are mounted taking into account that it was possible to install thermal insulation and cladding materials in the future. To increase the strength of the structure, strapping and joists should be fastened using pre-fixed iron plates.
 It is recommended to use metal plates to give strength to the structure.
The harness must be treated with an anti-rotting compound.
How to make walls
In the process of erecting walls, the center distance is essential. The indicator will be equal to 0.6 m, provided that the preparation of the opening and docking with the rest of the walls is not planned. Otherwise, the gap must be reduced to 0.4 m. The distance between the pillars will depend on the dimensions of the doors and windows. For the frame, you need to use boards of 50x100 mm. The sequence of actions for the construction of walls:

If you plan to make a frame bath with an attic, you need to leave space for installing doors and windows.
For the frame structure, 100 mm strips are used, so the insulation must be of the appropriate thickness.
 The thickness of the mineral wool must match the thickness of the boards
During the installation process, the excess length and width can be compressed, as a result, the resulting gaps will be tightly closed.
In the process of warming, each connection must be carefully inspected, otherwise the structure will be leaking. Such baths are unsuitable for use. Steam and waterproofing is made of foil. The minimum material thickness is 40 microns. Foil joints are sealed with tape or foil film. The foil is laid in strips from bottom to top. To secure the foil to wood pieces, you need to use a hand stapler.
How to equip a roof
For convenience, you can make a template that will make it easy to assemble the rafter system.
 Installation of a gable roof must be performed according to the scheme. Template can make the process easier
You will need to do the following:
- The roof must be assembled on the ground, and then raised up. Each structure is positioned above the corresponding post.
- To facilitate the work, temporary overlaps of thick planks can be laid on the battens.
- Each part has its own place above the rack, so it is important not to make mistakes when performing calculations.
- The roof is recommended to be ventilated. To do this, you need to lay the crate and ondulin between the rafter legs and the counter-rail.
- The gables must be covered with OSB plates.
- Installation of doors and windows is in progress.
After that, the structure can be clad on both sides. It is also important to take care of good ventilation. For a small bath, a pipe made of asbestos cement with a diameter of 12 cm is suitable. The part must be taken out to the attic.
Outside, the bath is sheathed with siding, boards, plaster or ceramic tiles. A waterproofing material should be placed under the sheathing. The resulting gaps can be filled with thermal insulation material. A small gap must be left between the lining and the foil for ventilation. For this purpose, strips several cm thick should be nailed to the vertical support parts. The distance between the elements must be selected taking into account the distance between the supports.
 On the diagram you can see the structure of the wall cladding.
To stiffen the walls, they need to be upholstered with plaster shingles. After the cladding work is completed, the structure must be plastered from the outside.
Framing Interior Cladding Guide:
- The cladding of the building from the inside should not be painted, as paints and varnishes during the heating process will emit harmful chemicals.
- To make a rough ceiling, OSB boards should be used. They must be fixed at the bottom of the floor beams.
- The walls in the steam room should be covered with foil. The rest of the walls can be closed with glassine.
- The minimum ceiling height is 2.2 m. In this case, it will be possible to install the lining and additionally insulate the ceiling.
- It is important to pay attention to the joints between the walls and the ceiling structure. The vapor barrier material must protrude at least 15 cm.
Reiki can be nailed in different ways - during the fitting process, a sample is made in a groove or in a quarter. The slats must be attached to the lags with the front part.
Between the foil and the corrugated board, airflows can be omitted, the sheets are nailed to the foil. Fixation is done using self-tapping screws with rubber gaskets.
After that, the furnace and boiler are installed. It is important to remember the fire safety rules. The wall, with which the hovering and the resting place will get off, should be lined with bricks. It is recommended to place the heating boiler in the dressing room. The best option is a brick oven, however, if there is no experience in laying such a design, it is recommended to entrust this work to a qualified stove-maker.
In the process of working with foil, you need to be careful, as the material is easily damaged. Any gaps will significantly reduce the effectiveness of the thermal insulation. The vapor barrier should be fixed with a stapler, while it is important to ensure that there is no sagging of the material. The minimum distance between the wood paneling and the insulating material is 1 cm.
 In the bath, the foil is best fixed with an ordinary stapler.
Frame structures are convenient in terms of finishing. Work can be done both inside and outside. If there is a forced break, you can make partitions frames at this time, upholstery them with a blockhouse or clapboard. In this case, the time will be well spent.
For most regions, the optimal wall thickness of a frame building is 10 cm. Insulation can be done both with mineral wool and with expanded polystyrene. A 12 cm thick layer of mineral wool can replace a wall of 50 cm thick slabs.
 You can insulate the bath from the inside with the help of mineral wool
For northern regions with a cold climate, there are 2 methods of bath warming:

If you plan to use expanded polystyrene, then after installing the sheets, you need to make a screed of small thickness using a mesh of reinforcement. Finally, a top coat should be applied.
 It is not recommended to use sawdust and clay for ceiling insulation
During the cooking process, they will be stirred in water with clay, and therefore the insulation will have a lot of weight. In addition, a large amount of liquid is often the reason for the wetting of wooden ceiling parts. This has a negative impact on the operational characteristics of the sauna building.
Framed walls are great bait for rodents who love Styrofoam. For 2-3 years, solid sheets can turn into dust. Therefore, it is not recommended to use expanded polystyrene for insulation of premises inside the frame structure.
Particular attention should be paid to the quality of the vapor and waterproofing. Such a bath has no free supports, each of them will carry the load and hold other parts of the building. If the strength is broken due to prolonged exposure to moisture with one rack, the bath may become unstable. In this case, complex repair work will be required. This situation is best prevented even at the stage of warming rooms.
To insulate insulation, it is best to use aluminum foil.
 It is best to insulate the insulation with an aluminum film.
However, the material is not cheap. If you want to save money, you can use plastic wrap. The material is cheaper, however, in terms of steam and water protection parameters, it is practically not inferior to foil. It should be remembered that polyethylene can be damaged by exposure to sunlight. For this reason, it is important to cover the frames. This will reliably protect the film from exposure to ultraviolet radiation.
Bathhouse - how much is in this word! The smell of birch brooms, fertile steam, a tub of cold water on steamed shoulders, renewal of body and spirit in the pleasant coolness of the dressing room ... It's time with pure thoughts to start building a Russian bathhouse that has come to us from time immemorial. The traditional "soap" will not be replaced by any new-fashioned jacuzzi bathtub or shower cubicle.

The foundation for the bath is chosen based on its size and the type of soil on which it will stand. As a rule, the owner has a choice between columnar and tape foundation.
The wooden bath has light weight and can be reliably erected on shallow basis.

On the columnar foundations of wooden baths in the country are placed more often. Such bases are simpler, they are erected from pillars, which are installed separately. Supports are built from reinforced concrete, brick, concrete or rubble stone. Pillars made of natural material or bricks (size 51-51 cm) are erected at the corners and walls of the building at a distance of about 2 m apart.
Optimal cross-section supports - 60-60 cm. Often a cushion of gravel and sand is arranged under them.
The columnar foundation is built to a height 20-30 centimeters from the ground level, the top is leveled with a solution and covered 2-3 layers of roofing material - waterproofing:

Let's move on to the second type of foundation.

Tape the foundation will cost more as it will pass around the perimeter the buildings. A trench is pre-dug with a depth 40-60 cm. A sand pillow is compacted to the bottom, the task of which is to protect the base from seasonal ground movements:

The foundation is fastened with mortar, and filled with rubble, concrete or reinforced concrete blocks, red brick. Rubble bases are made of different widths, depending on the size of the building and the internal structure of the bath.

Reliable and rubble concrete foundations. As a filler for them are used: crushed stone, gravel, brick breakage. If the depth of the foundation is up to 1 meter, at the bottom of the trench, you first need to pour a layer of concrete. After that, put the filler in a layer 15-25 cm, fill in with a solution and tamp.
After leveling the base, set on top of it waterproofing of two layers of roofing material and poured with bitumen:

We suggest that you familiarize yourself with our article, which indicates the main errors that arise when arranging the base - what you need to know before starting the foundation pouring.

Wood- this is a traditional material for the construction of a bath, therefore, we do not consider options for building walls from cinder blocks, bricks, foam blocks and other materials within the framework of the article. To build the perfect wood bath, you need to choose special log- after harvesting the wood is "kept" for about 2 years.
Dried the forest does not contain "excess" moisture, and therefore does not deform, it is resistant to cracking.
A wooden substrate is laid on the waterproofing 50-60 mm thick and not less 150 mm wide, filled with tar or bitumen.
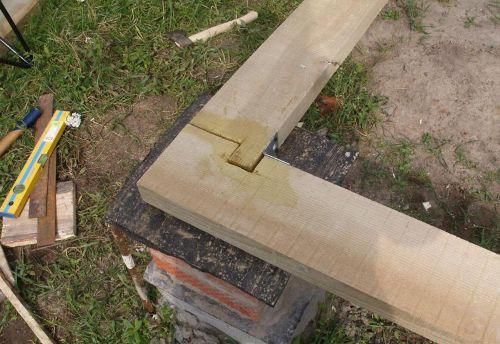
Before installation flap(its lower surface is impregnated with antiseptic compounds) on the lining is spread in an even layer tow, dry moss or stripes mineral felt... And between the logs they place inter-lead seal.

Logs for outer walls cut from one side, for interior and partition walls- from both sides to the depth 2-3 see Cutting begins with the first (flap) crown, it is made from a log hewn from both sides at an angle 90 °. The lower surface of the wood is laid on the foundation, and its side becomes the beginning of the inner wall.

Avoiding the use of conifers for finishing the interior of the bath, use wood alder, aspen, linden trees, less often - larch and cedar.
Aspen- this is an almost perfect answer to the question of choosing a material for interior decoration.
Ceiling in a log, in a brick and in a panel bath it is done the same way. A distinctive feature of the ceiling for a chopped "soap house" - it can be made of planks. This will give the building a natural look. It turns out the interior is "antique", but there is practical sense: natural roofing provides intensive air circulation with good thermal protection.
You can equip additional thermal insulation:

To complete the installation ceiling for a bath, wood is needed, which has low thermal conductivity, tolerates changes in humidity and temperature. Low resin content.
Temperature the bathhouse is the highest under the ceiling, and if the boards contain a lot of resin, then, when heated, it will drip down... Therefore, for the arrangement of the ceiling and interior decoration of the steam room, wood should be used exclusively hardwood.

Plank floors laid in this way: first, brick pillars with a cross section are installed on the concrete layer 25-25 cm, lags are laid on top of them. Planks are laid on the logs 20-30 mm thick:

Material moisture should not exceed the indicator 12 %, otherwise the boards will begin to deform after installation.
Stone floors for a bath they serve much longer. The concrete should be poured over a gravel pad. Such floors are durable and reliable, however, they have one, but large flaw: they are cold. Therefore, wooden ladders or planks must be laid on top of the concrete floor.

You can do and warm floor... For its manufacture, use any heat insulator: glass wool, mineral wool, basalt wool, expanded clay, perlite, expanded polystyrene.

Roof and roof

A rafter roof consists of the following elements:
Roof truss... A rigid bundle of beams, serving to distribute and damp the loads that have arisen in the system. Rafters are the main massive parts of the structure, onto which the weight of the entire roof is distributed. Stiffeners increase the stability of the beams.
Lathing... A horizontal base of a bar, stuffed over the rafters for a tight fastening of roofing materials.
Mauerlat... A timber beam placed on top of the finished walls and used to connect the rafters to the walls of the building.
Below are the main, time-tested erection schemes roofs:


Woodburning stoves are 2 species: metal and brick... We will tell you more about them and will not ignore them. electrical ovens.
Metal ovens

Metal a batch oven without a water heating tank is very compact. In an iron casing with doors, grates with a stove are laid on metal shelves, which make up the bottom of the combustion chamber.
Inside the body there are cavities where they put stones... There are stoves open and closed types. During the operation of the furnace, gases enter the chimney, passing through the channels. The firebox is usually lined with bricks:

The oven is equipped with chimneys consisting of drop wells and collecting pipes. The stone chamber has two doors, but chimneys are often installed that allow flue gases into the lower part of the stone chamber from the space around the channel.
Brick heaters

Construction brick heater begins with the construction of its foundation. To prevent the stove from sagging or tilting due to freezing of the soil or moisture, the base must be buried on 0,5 meters. The transverse dimensions of the support should be one brick more than the furnace.
Furnace foundation does not need to be combined with wall... The distance between them is not less 5 centimeters.
The most the best base - rubble concrete or concrete. In dry soil, it can be built from bricks using cement, lime or lime-cement mortar.
The surface of the foundation must be filled with a cement-sand mortar, leveled with a rail and covered with waterproofing. Usually it is roofing felt or roofing material, which are laid in 2 layer (item 4 on the diagram below):

Designations on the diagram are as follows:
Sole.
Underground part.
Upper ledge.
Waterproofing.
Stove masonry.
Building material for the construction of the furnace- ordinary solid brick. In no case silicate or hollow bricks cannot be used for masonry.
Heaters

In modern saunas, the air is up to 100 ° C is most often heated electric heater with built-in automatic control device. The control unit disables Heating element when the temperature of the casing exceeds the permissible level, as well as, if, for example, towels come into contact with the oven.
Electric heater in the bath must be equipped with a temperature limiter disabling Heating element, and a time relay that cuts off the supply of current to the heating element after a certain operating time (up to 5 hours). The market today is full of different modifications.

Let's give some useful tips, which will be useful when going to the bathhouse:
Dry birch firewood ideal for heating sauna stoves. Don't experiment unnecessarily.
For a novice bathhouse attendant the time spent in the steam room should not exceed 5 minutes. Experienced people can be in the steam room more: from 25 before 30 minutes.
The musty spirit in the bath can be eliminated, if you add a few drops of ammonia to a ladle and splash on stones. Do not forget to ventilate the steam room afterwards.
Do not go to the bathhouse on a full stomach... But a couple of cloves of garlic, on the contrary, should be eaten. This vegetable removes toxins well through sweat.
Contrary to popular belief, you should not take beer with you to the bathhouse, and even more so, strong alcohol. Delight the body with tea or a decoction of rose hips, raspberries.
Choose a picturesque place for a bathhouse... Courageous decisions are rewarded with double pleasure from the process.
Finally, we suggest looking video, on which the issue of building a bath is analyzed in detail:
Sometimes you so want to leave the hustle and bustle of the city, and go to the country. Silence, walking, doing what you love - what could be better! If comfort is provided at the dacha, you want to come again and again. One of the most comfortable living conditions in the country is a bathhouse.
Construction can, of course, be entrusted to professional builders. However, it is quite possible to build and equip a bathhouse at a summer cottage on its own. This saves you from additional expenses and allows you to make decoration and improvement in full accordance with your desires and preferences. Therefore, this task is not easy, but it is quite within the power of a novice builder. The bathhouse built with his own hands will delight the owners even more. So, how do you build a bath yourself?

Firstly, as with any construction, you first need to decide on the project and the materials from which the bath will be built. The choice of the main material for construction depends on the geographical location and operating conditions, as well as on its own capabilities.
Baths are made of bricks, aerated concrete and other stone materials, some prefer frame baths, however, many novice builders prefer to build a bath from wood. This lightweight and durable material does not require a serious and expensive foundation, but it has excellent characteristics. With proper care, the operation of the bath will not cause much trouble.
And of course, preference should be given to a bar - a bath made of this material will retain all the advantages of a wooden structure and save you from problems and additional costs that may arise when building walls from logs. Erection of walls from a bar is similar to working with a designer - it can have different geometric dimensions and sections (rectangle, square, semicircular), and, in the case of a profiled bar, there are grooves for fastening. It is easy and convenient to build from a bar - what could be better for a novice builder!
How to choose a place to build a bath.
One of the most important points is the choice of the location of the future building. The site must comply with both existing legislation and ease of use. When choosing, basic recommendations can help:
- if there is a reservoir nearby, do not place the bath too close to it, as the building will be threatened by flooding;
- it is necessary to decide how the bathhouse will be located relative to the house: a separate building or will be attached to it, since each option has its positive and negative sides;
- it is believed that it is better to build a bath in the backyard, in relative seclusion;
- it is imperative to provide for mandatory ventilation during construction, as well as provide for wastewater disposal;
- it is highly discouraged to determine the location next to a nearby road;
- when placing a building, it is necessary to take into account the cardinal points and the direction of the wind: the best place is the southern part of the site, protected from the wind, so that it does not interfere with vacationers, it is better to have windows with an exit to the west;
- it is desirable that the bath be located at some distance from other buildings, and if it is an extension to the house, it is imperative to observe fire safety rules during construction, as, incidentally, when erecting a detached building;
- when determining the location of the bath and its size, it is necessary to observe the distance from the boundaries of the site established by the rules so that the neighbors do not feel discomfort in the future and do not make claims to the owner;
- it is recommended to keep the distance to the water intake (well or well) - no more than 20 meters.

At the beginning of construction, it is highly desirable to make a project, which should, among other things, determine the optimal construction area.

It is believed that the estimated area for 1 person should be approximately 5 sq. M. Thus, if the expected number of visitors to the bath is 4 people, its total area should not be less than 20 sq. M.

The minimum composition of the premises is as follows: a steam room, a washing room, a rest room and a dressing room. It is important to determine the most convenient location of these rooms relative to each other, as well as their geometric dimensions.

First you need to complete several diagrams and drawings:
- general plan of the building;
- drawings of each room separately;
- a diagram of the foundation device;
- the scheme of the roofing device;
- a plan for fastening and laying out a bar;
- plan for the arrangement of the floor and ceiling of the bath;
- a diagram of the installation of the furnace, taking into account its structural features.

All the necessary drawings can be done independently, as well as found in many open sources. As a rule, timber baths have similar designs and you can easily choose the most suitable one. If you wish and have the necessary budget, you can order the design to a professional architect or builder.

The choice of building materials.
Below is a list of materials that will be needed to build a bath from a bar:
a) a bar of 150x150 mm, although it is possible to use a bar with a section of 100 mm or 200 mm;

b) floorboard (an edged board 150x50 mm 4 meters long is excellent);

c) hardwood boards for the ceiling (usually lining with a width of 100 mm and a thickness of 20 mm or more is used);

d) material for wall decoration (as a rule, the same lining is used);

e) material for vapor barrier (an excellent option would be to use a vapor barrier film);

f) waterproofing (it is advisable to use penofol, although plastic film is suitable);

g) ceiling insulation (a good option is mineral wool materials);

h) sheet asbestos for insulation of wooden structures from temperature effects, including for walls near the stove and elements located next to the chimney;

i) cement, sand and crushed stone for the foundation (recommendation - cement should be purchased before starting construction);

j) roofing material for the roof, which can be selected based on personal preferences and, most importantly, that it fits organically into the surrounding roofs of other buildings;


l) insulation for the mezhventsovo space (it is better to use jute, although moss or tow are perfect).

The best time to start construction is in spring, since after the completion of the main construction work, it is necessary for the timber to dry out and shrink. This requires at least 6 months.
Do-it-yourself bath - step by step instructions.
Step I - preparation of the site for construction.
Before starting construction, it is necessary to clear the site - remove shrubs, stumps, remove debris and everything that will interfere with the work on the foundation.


Step II - building the foundation.
It is best to build a bath from a bar on a columnar foundation, which is inexpensive and great for the construction of small wooden and frame buildings.

When constructing it, you first need to dig the estimated number of holes for the installation of supports. Their number is calculated as follows - the supports must be installed in the corners of the building and at the intersection of the walls, as well as with a certain step along their perimeter.

The step is chosen taking into account the type of soil and the estimated total weight of the structure. The depth of the holes should be 1-1.5 meters, although depending on the depth of freezing of the soil in a given area, it can change. To complete this type of foundation, in addition to the materials listed above, asbestos-cement pipes and fittings will be required.

At the bottom of the pit, it is necessary to fill in a mixture of sand and crushed stone 10-15 cm thick. Then install an asbestos-cement pipe of the required length in it, strictly vertically, and fix it. Several reinforcement bars should be placed inside the pipe.

After that, pour concrete mortar into the pipe and into the free space between the walls of the pit and the pipe.


After pouring the solution, you need to wait a few days, then lay out a half-brick wall between the posts.

Step III - erection of walls and roofing.
The traditional material for the construction of bath walls is a bar of 150x150 mm in size. Before laying the first crown, it is imperative to put waterproofing on the foundation. The lower part of the crown must be treated with an antiseptic. Most often, the timber is laid out in the "paw" method.

The first crown must be carefully aligned geometrically - all angles must be exactly 90 degrees. After the first crown has been erected, they begin to lay the beams for the set of walls. Laying out the walls, you need to make openings for future doors and windows and be sure to insulate each row with the selected thermal insulation material.

To connect the crowns, pins are used - metal or wooden pins.
After the walls are removed, the roof is installed. Depending on the selected roof shape, it is necessary to fix the rafters, which are attached to the upper rim with brackets.

When constructing a single-pitched sloped roof, the rafters are fixed either with two external, or one external and one internal support. When erecting a gable roof, it is necessary to reliably support the rafters from below on the wall, and connect them together from above to form a roofing ridge.


Sheathing boards are attached to the fixed rafters, then hydro and vapor barrier, insulation are placed on them.

The installation of the roof is completed by the installation of the selected roofing material.

Step IV - interior finishing work.
Interior decoration must begin with a communications device - sewage, water supply, electricity. You should worry about the sewage system even during the design and construction of the foundation.

It is necessary to dig a drainage well next to the future bath, into which a sewer pipe buried in the ground with a slope enters for the drainage from the washing department.

After the installation of the sewage system, a clean floor is made, which is made of wood or concrete. The concrete floor is more durable, most often it is tiled with tiles or porcelain stoneware.
If a wooden floor is chosen for interior decoration, it is usually made leaky. To do this, floor boards are nailed to the installed logs with a small gap, or a small drain hole is installed in the floor, closed with a grate.

In this case, the floor must be made with a slight slope towards the drain. Then the water that has got into the drain will be discharged through the sewer pipe into the drainage well.

After the installation of the sewage system, it is necessary to carry out insulation, waterproofing and vapor barrier of the walls and ceiling with the help of appropriate materials, to conduct electricity and water supply.

After installing windows and doors, then finishing the room using, for example, lining.

After finishing the finishing, you need to install the necessary electrical appliances.

Step V - installing the oven and shelves.
There are a great many options for placing shelves, you just need to comply with the recommended sizes and the fact that they should be made of hardwood. The installation principle is simple - a stable frame is mounted, usually from a bar, and boards are attached to it.
The oven must be installed in full compliance with fire safety requirements. Wooden structures must be insulated from the high temperatures of the operating stove and chimney. In the case of a large furnace weight, its installation must be carried out on a specially equipped foundation. This is determined on a case-by-case basis, depending on the selected oven.

The stove is chosen according to the preferences of the owner. It can be a traditional wood-burning stove, a metal wood-burning stove or an electric stove, sometimes it is advisable to choose a gas stove for a bath.
Step VI - choosing accessories
There are many bath accessories.

The main ones are:
- brooms (oak, birch and others);
- containers (buckets, basins);
- wooden ladle for adding water;
- wooden floor grates and much more.

Additional individuality can be added by the interior decoration of the premises, which remains at the discretion of the owner - here, depending on desires and financial capabilities, you can give free rein to your imagination.

It should be added that all the listed accessories can be made by yourself. The bathhouse is a great place to spend time in a pleasant, friendly company or with your family. It will be much more pleasant to realize that all this is done with your own hands, including useful and necessary devices: for example, hangers, lamps or ventilation grilles.
Enjoy Your Bath!
Video about building a bath yourself.
Rest without a bath is not a rest. Neither summer shower nor bathing can replace the bathhouse in a suburban area. Of course, if the budget is very limited, you should not aim at building a two-story bath complex with a swimming pool. But it is possible to build a small cozy bathhouse on a suburban area with minimal investment.
In this article, we will look at how a budget bath is built with our own hands, we will reveal the secrets of choosing and saving building materials, and we will tell you how to prevent oversight and mistakes for novice craftsmen.
The most popular materials for building baths are wood, bricks and blocks. A wooden bath can be in the form of a log house or frame.
Wood

Wood is a classic material for building baths. Wood is prized for its environmental friendliness and ease of processing. Wooden baths warm up quickly, and essential resins released into the air have a beneficial effect on the well-being of visitors.
However, wood is far from ideal for construction. In order for the walls of the bath to be even, you need to choose a high-quality bar or log. Don't forget about shrinkage. The better the wood is dried, the lower the percentage of shrinkage and the risk that the frame will "lead".

It is important to be able to work with an ax and a saw, to have sufficient physical strength and endurance to cut down locks for connecting corners, external and internal walls, floors. Of course, you can buy a ready-made log house with delivery to the site, but this is associated with additional costs and is not relevant for the construction of a budget bath. It is best to build at least two people, because alone it is extremely difficult to lay the crowns, especially the upper ones.

Hardwood, such as linden, is best suited for building a bath. This material is considered relatively light, therefore, if the geological conditions of the area allow, you can save on the foundation and limit yourself to a lightweight tape option (monolithic or prefabricated).
What else can you save on? For example, for insulation and decoration. If the bath will be used for its intended purpose only in the warm season, there is no need to purchase insulation, battens for lathing, steam and wind insulation, decorative finishing material for the bath's facade. Wood, if it is properly sanded and coated with a protective impregnation, varnish, is quite aesthetically pleasing and fits perfectly into the landscape design of private land plots.

In a budget bath, you can save on the organization of a full-fledged sewerage and water supply system. Since ancient times, in Russian baths, the floors were made pouring, and water was carried in buckets in advance. Yes, this causes some inconvenience, but it will not spoil the overall pleasant experience of bathing procedures.
What can you not save on? Wood is a highly flammable material. It is worth a little oversight, not closing the blower door, as a falling-out hot coal will lead to a fire and damage to property. A similar situation is possible in case of neglect of fire safety rules when installing the furnace and therefore, in no case should you save on:
- fire-retardant impregnation;
- fire-fighting cutting;
- materials for insulating the floor in front of the firebox and
We strongly do not recommend saving on fasteners. Firstly, the difference will be insignificant, and secondly, low-quality metal hardware will quickly begin to rust, and ugly black smudges will appear on the walls. The worst thing that rusted fasteners will lead to is the collapse of building elements due to the loss of nodes of their strength.
It is very important to properly organize ventilation in wooden baths. Even if the bath is only 4-6 square meters. Visitors are unlikely to enjoy the musty and mildew scent, and the owner will not be pleased with rotting floors and walls.

Now more specifically about the prices of wood, to roughly calculate the cost of construction.
| Lumber | Breed | Section or diameter, cm | Price in rubles per cubic meter |
|---|---|---|---|
| Profiled timber | Pine, spruce | 140x140 | From 11.5 to 14.5 thousand rubles. |
| Profiled timber | Larch | 140x140 | From 16.5 to 18.5 thousand rubles. |
| Round timber | Larch | 180 to 460 | From 8.5 to 10 thousand rubles. |
| Carriage | Larch | 150x250 | From 15 thousand rubles. |
* The average cost of building materials is relevant for 2017.
Based on the cost of new sawn timber, a budget bath will definitely not work. The way out of the situation is to buy a used timber at a price of 1000 rubles per cubic meter or from 80 rubles per 1 piece. Used pallets can also come in handy if they are used correctly.
Bricks and Blocks
A block or brick bath will undoubtedly turn out to be more durable than a wooden one. And the suddenly flared fire is not terrible for the stone walls. To your taste and discretion, you can build a bath of any size and shape, as long as funds and personal time allow.

Brick manufacturers always have a large assortment of products of various shapes, shades, textures. For example, by combining bricks of two different shades when building walls, you can build a bathhouse that looks very neat and aesthetically pleasing.
On a note! In a brick bath, the window can be replaced with glass blocks. They have sufficient light transmittance. But in this case, it is important to take care of the arrangement of effective ventilation.

A brick bath warms up longer than a wooden one, and cools down much faster. Brick walls are in need of finishing, and this adds cost items to the overall estimate. For laying bricks, a cement-sand mortar is used, which can be bought ready-made and simply diluted with water in the right proportions, or you can prepare the mixture yourself and spend less money.
How much will it cost to build a bathhouse from a private M100 brick?
| Building material | Description | Price |
|---|---|---|
| Width 120 mm, height 65 mm, length 250 mm. | From 6.20 rub. for 1 piece. | |
| Has the same dimensions as a private. It is used for laying those walls that are directly heated. For example, fireclay bricks are used to lay out a base for a furnace and a protective screen. | From 41 rub. for 1 piece. | |
| River sand for the preparation of masonry mixture or concrete mortar for pouring the foundation | From 68 rubles for 30 kg | |
| The purpose is the same as that of the sand. Crushed stone fraction 5-20 mm. | From 86 rub. for 30 kg | |
| M400 | From 195 rub. over 50 kg |
For an example of calculating the cost of masonry, take a single brick and laying in one brick (the wall thickness will be 25 cm). Using the data in the table, we get:
- taking into account mortar joints per 1 sq. m of masonry, 102 bricks are needed;
- 102 bricks x 6.20 rubles. = 632.4 rubles.
Brick prices
Usually, brick is purchased with a margin of up to 15%, taking into account possible marriage. And to the cost of masonry 1 square meter of the wall, you need to add the cost of the mortar. Do not forget that you may need a concrete mixer, joint for joints, a set of mason's tools, etc.

Foam blocks and gas blocks are materials that are increasingly used for the construction of baths. Their main advantage is their high construction speed. Disadvantages are similar to bricks.
Blocks are laid with reinforcement of rows, fixation is carried out with special glue or cement-sand mortar.
For the construction of a bath, blocks with dimensions of 200 x 300 x 600 mm are often used. One such block costs from 93 rubles. For internal partitions, blocks of smaller thickness are suitable - 100 or 120 mm and cost from 50 rubles per 1 piece.

The number of blocks in 1 sq. m the following:
- with a wall thickness of 20 cm, there will be 5.5 blocks in one square meter of the wall (5.5 x 93 = 511 rubles);
- with a wall thickness of 30 cm, in one square meter of the wall there will be 8.33 blocks (8.33 x 93 = 774.69 rubles).
We conclude: for the construction of a budget bath, it is preferable to use not brick, but blocks of 200 x 300 x 600 mm, construction should be carried out with a wall thickness of 20 cm.It is necessary to take into account the cost of glue for blocks (from 155 rubles per 30 kg, consumption is about 1.2- 1.4 kg per 1 sq. M of masonry) and do not forget that the blocks are purchased with a margin.

Important! In an effort to save money, you should not sacrifice the reliability and durability of the bath. You can always buy, for example, a second-hand brick for a penny, but there is no guarantee that in the next decade such a brick, and with it the walls of the bathhouse, will not begin to collapse.
A big plus of building a bath from blocks is the high strength of the walls, which is achieved by reinforcing the rows. Provided that the reinforcement is done correctly, the walls will not crack. Even when building a budget bath, you should not neglect the safety margin of the walls, so as not to start overhauling the bath in the next few years.
Prices for foam blocks
foam block
Construction of a bath from aerated concrete with a brick base
We will consider the process of building a bath with dimensions of 6x5 m. This area is enough for arranging three main premises: a rest room or dressing room, a shower room, a steam room. If the free area on the site does not allow the construction of a 6x5 m bathhouse, the dimensions can be reduced to 4x4 m, and the internal space can be divided into a dressing room and a steam room, without a shower and other amenities.

So, let's begin. Inspect your land, prepare a place for construction. It is necessary to remove debris, uproot stumps, remove the top layer of soil with grass growing on it, level and tamp the area.
In advance, you need to prepare a bath project with a masonry order. According to the drawings, it is easier to calculate the amount of building materials and carry out construction.
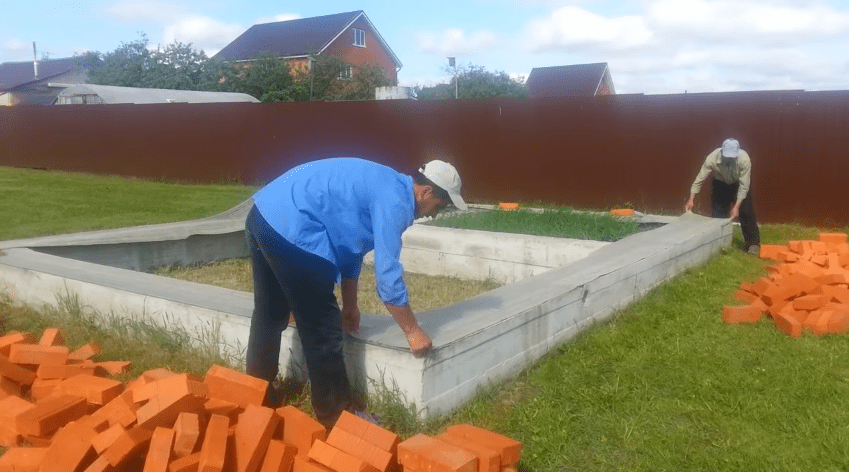
Make markings on the ground, dig trenches, fill in the shallow strip foundation. Don't forget about the air. You can read more about the filling technology.

It is important, already in the process of pouring, to especially carefully level the upper surface of the foundation. If, nevertheless, the base has horizontal deviations, it is necessary to level everything with a cement-sand mortar.
Step 1. We put a waterproofing material on the foundation strip, for example, strips of roofing material.

Roofing material prices
roofing felt
Step 2. We mix the cement-sand mortar for brickwork. To prepare the solution, we use the proportions:
- cement M400 - 1 bucket;
- sifted river sand - 2 buckets;
- dishwashing detergent or any similar - from 50 to 100 ml.
Important! We recommend that you first add water and detergent to a concrete mixer or mortar container, then add cement and sand, with constant stirring. The consistency of the finished solution will resemble thick sour cream, and if you run your finger over the mixture, a clear, non-spreading mark will remain. Mixing should be carried out for 3 to 5 minutes.

We transfer the finished solution into buckets and transport it to the construction site.
Step 3. We begin laying a brick base. We will carry out the work from the corners of the bath.
Apply the mortar with a trowel to the brick. We lay the brick at the corner of the foundation (along the outer edge). Place the bubble level on the brick and, if necessary, tap the brick with the trowel handle. We repeat the procedure at the next corner of the bath foundation.

It is important that the bricks laid at the corners are at the same level. To check, we pull the mooring thread, additionally check the position of the bricks with a water level. We put the second brick at each of the corners perpendicular to the first one.

We carry out the laying of the basement "in one and a half bricks". With standard brick sizes, the total width of the basement will be 38 cm. This width is the sum of one brick length (25 cm) and one brick width (12 cm), 1 cm is a connecting mortar joint.

Lay out the first outer row with a spoon outward. We lay the bricks on the mortar previously applied with a trowel, pressing into the mortar and slightly moving back and forth. We leave a gap between the adjacent bricks, into which we add the mortar with a trowel. We immediately remove the excess solution with a trowel. We knock out the bricks so that they are all in a single plane (the reference point is a stretched thread-mooring). As a result, if you look at the base from the "street" side, you will see a row laid "in half a brick".
We lay the inner row with a jab towards the future premises of the bath. Further, the laying is carried out according to the scheme-order, observing the dressing of the seams.
We lay out 2 rows of bricks and proceed to the arrangement of the floor overlap.

Step 4... To equip the floor overlap, you need to prepare the beams.

The beams must be fixed in the “sockets” of the base to a depth of 10 cm. We measure the width of the interior room, add 20 cm, we get the length of the beams. The section of the beams can be selected using the table.
* The section is indicated in millimeters. The beams are laid on the edge. Maximum floor load 400 kg / m 3.
We cut the roofing material into rectangular pieces 15 cm wide. We wrap the ends of the beams with roofing material, fix it with a construction stapler.
We lay the beams on the ends, observing an equal distance between them.
We continue to carry out the brickwork.


We lay out two more rows, observing the dressing. We also lay the brick between the beams, sawing it with a grinder if necessary.

The height of a single ordinary brick is 65 mm. Accordingly, two rows of bricks plus two mortar joints in height will be 150 mm, the upper surface of the beams will be flush with the surface of the brickwork.

Fourth row masonry
Recommendation! If the brick is pre-moistened with water (without soaking it), it will not absorb moisture from the solution. The masonry will turn out to be very strong. The recommendation is relevant for work in hot weather.
Step 5. The basement has been built, we proceed to laying the walls from aerated concrete blocks.
We lay a layer of roofing material on the brick over the entire surface of the external and internal walls of the bath.

We start work again from the corners of the bath. Knead the solution, spread the layer on top of the roofing material.
We level the solution with a notched trowel. Install the first block.

Similarly, we install the second block on the adjacent corner of the base. The hardest part is to bring both blocks to zero. We carry out the check with a hydro level, a bubble level, if there is a laser level, it is better to use it.

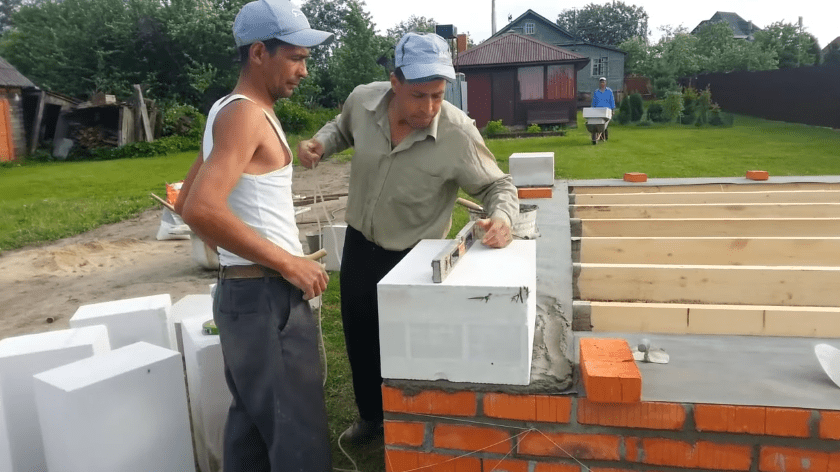
Haste is inappropriate here. If necessary, you can remove the block, remove excess solution, or add more solution. The horizontal deviation should not be more than two millimeters.


We spread the first row of blocks on the solution. If the distance between adjacent blocks does not allow installing the whole block, it is necessary to cut with a hacksaw with fine teeth. After cutting from the block, we sweep the dust with a brush.
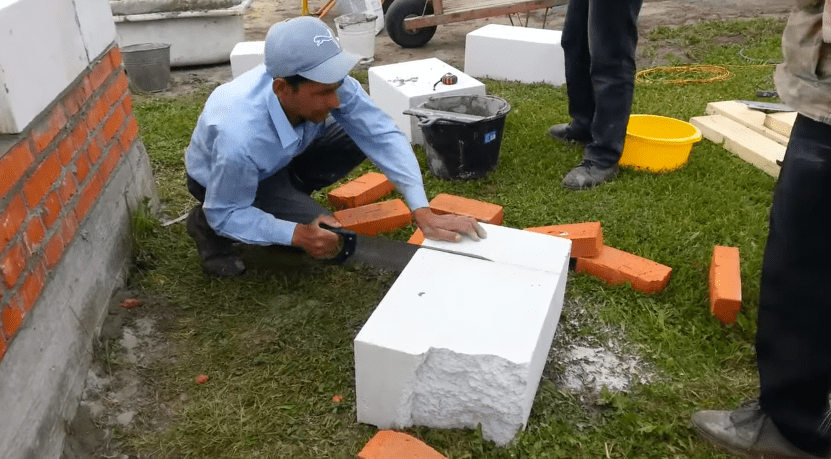
Laying out the blocks, do not forget about the doorway.

Step 6. We pass to the reinforcement of the first row of blocks.
Prepare a set of tools for work in advance.
| Tool | Approximate minimum cost, rub. |
|---|---|
| 450 |
| 490 |
| 500 |
| 600 |
| 365 |


* Used tools will cost less.
For reinforcement we use corrugated rods of class A3. The diameter of the bars is 8 mm. It is not advisable to take reinforcement of greater thickness.
Using a manual wall chaser, we cut two grooves for the reinforcement. For convenience, you can draw two parallel straight lines along a ruler on the surface of the blocks in advance with a pencil. At the corners of the bath and at the junction of the inner partitions with the outer walls, the grooves are rounded, parallel.
We clean the surface of the strobe from dust using a damp brush.

We take the reinforcement and put it in the grooves. We bend the reinforcement at the corners. Pay attention that the reinforcement bars are not connected at the corners. The connection of rods is possible at a distance of more than 30 cm from the corners.

We take out the reinforcement from the gates, put it on the surface of the blocks.
We knead the glue for aerated concrete (the approximate cost for 25 kg is 220 rubles).

Pour water into the bucket, then pour the dry mixture from the bag. We mix the glue with a drill with a mixer nozzle at low speed (up to 800 rpm). The consistency of the glue should be similar to thick sour cream. The glue should not flow.

We fill the grooves with glue. We spread the glue with a spatula. We embed the reinforcement in the glue. If necessary, add more glue on top of the laid reinforcement so that the surface of the gas blocks turns out to be even, without grooves or bumps.
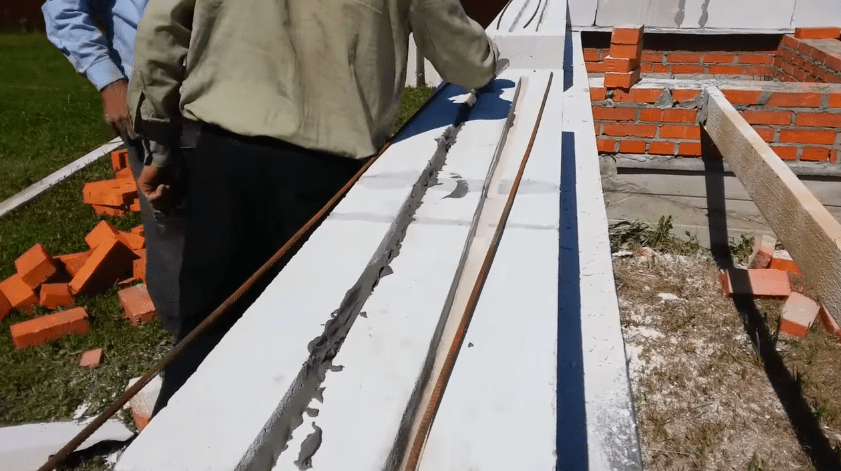

Step 7. We proceed to laying the second row of gas blocks. We start traditionally from the corner. We proceed to applying glue under the block.
Important! Do not forget about the need to lay blocks with a bandage similar to that of half-brick masonry. The offset of the upper block relative to the lower one should be between 15 cm and ½ the block length.
It is most convenient to apply the glue with a bucket (trowel). The working width of the trowel must match the width of the block. This will allow the adhesive to be applied quickly and accurately. But sometimes builders use home-made devices, for example, as in the photo. The main thing is to evenly apply a thin layer of glue over the entire surface of the blocks.
On a note! The applied layer of glue can be continuous, but it is the use of notched trowels or special buckets that reduces the consumption of glue.

We continue laying the blocks of the second row. We check the correctness of the installation of the blocks in two planes - in the vertical and horizontal. If necessary, we grind the surfaces of the blocks.


For the convenience of bandaging the blocks, you can start laying from half of the block. We cut the gas block with a hacksaw. We sweep away the dust with a brush. Apply a thick layer of glue (2-3 mm) to the ends of the block. Install the block.
We continue laying the blocks of the second row. We check the correctness of the installation of the blocks in two planes - in the vertical and horizontal.
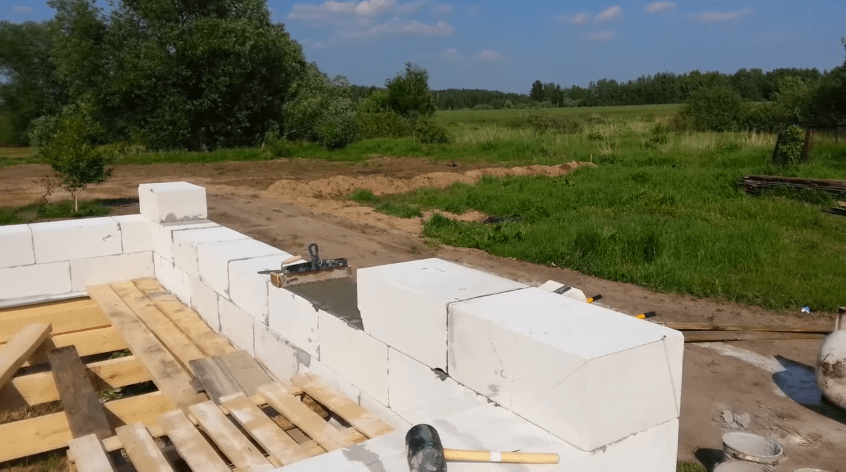
Important! If the bath is more than 6 meters high, it is recommended to reinforce every fourth row of masonry.
Prices for cement M600
cement М600
Step 8. We pass to the laying of the lintels, their reinforcement.
There must be reinforced lintels above the window and doorway. The easiest way is to use U-boxes, but this comes with additional costs.
To save money, you can manually make recesses in conventional gas blocks. To do this, make two cuts with a hacksaw across the width of the groove on the block, then remove the excess material using a chisel and a hammer.
For stacking blocks, we make formwork from boards. Blocks will rest on the top of the formwork. We fix the horizontal board with props, fix the elements with ordinary self-tapping screws.
The armopoyas should protrude at least 15 cm beyond the window and door opening. We install the blocks on the formwork. We fasten the ends of the blocks with glue.
Inside the blocks, closer to the outer edge, we lay pieces of EPS (Penoplex) 50 mm thick.
We start knitting an armored belt. For the bundle, we use plastic clamps (ties). Armopoyas consists of four long parallel rods, and every 0.5 m - vertical sections of reinforcement. In cross-section, the armopoyas should form a square.
Important! You cannot lay the armopoyas directly on aerated concrete. Plastic retainers must be used. Without clamps, the reinforcement cage will not take the correct position and will not be filled with concrete mixture on all sides.
We install the frame with clamps and fill it with concrete flush with the edges of the gas blocks. We compact the concrete mixture by piercing it with a bar or wooden lath. We level the surface as carefully as possible.
Now you need to make a technical pause and wait for the solution to set. This will take from 10 days to two weeks.

Step 9. So, the concrete in the lintels has frozen, we continue construction. If the height of the walls is not enough, lay out another row of blocks. In our case, this row will be the final one on the ground floor and at the same time perform the function of an armored belt.
We make the armopoyas on the floor using the same technology as the lintels, but with one difference. Now the armopoyas will be poured along the entire perimeter of the outer and inner walls. For the sake of economy, we do not use U-blocks, but we cut and hollow out solid wall blocks.
- We put the whole row of prepared blocks on the glue.


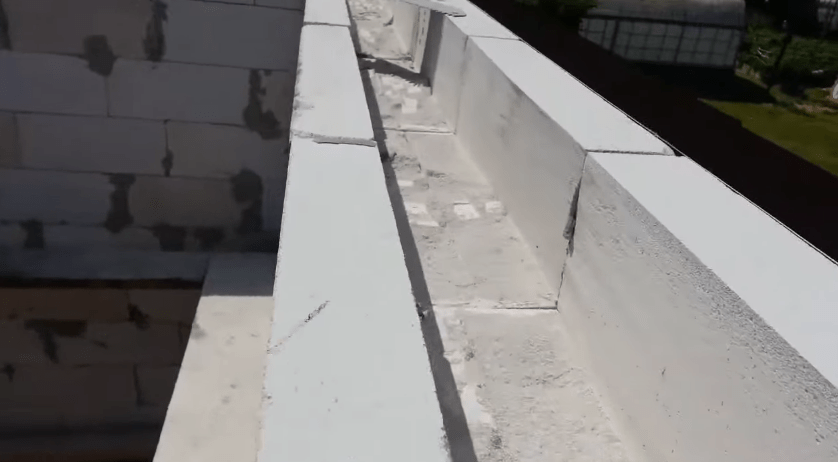
- We install expanded polystyrene plates. We cut them carefully, along a ruler, so that the edges are even.
- We knit a reinforced frame.


- We put the clamps, we put the frame inside the blocks.

Pour concrete.
- Align the surface.
- We are waiting for the concrete to harden.

Step 10. The first floor cannot immediately end with a roof, of course. We turn to the arrangement of the interfloor overlap. It will be wooden. We lay antiseptic beams with waterproofed ends on an armored belt. A similar technology was discussed above when the basement was being built.


But since now we are putting not a brick, but an aerated block, we make cuts in each block under the ends of the beams.


It is important to accurately measure the distances between the beams and carefully select smooth rectangular niches in the blocks with a chisel and hammer. We lay the blocks in the standard way, observing the dressing, applying glue to the previous row and the ends of the blocks.


Important! In our example of construction, the bath will have a small balcony. Therefore, several beams are carried out beyond the walls of the bath.

Step 11. We lay the rough floor. We lay the edged board on top of the beams. We fix the boards to the beams with self-tapping screws through the board. If the board is 50 mm thick, we take the hardware with a length of 8 cm.
We leave a rectangular opening in the floor for access to the attic.

In the future, when the floors are ready, windows and doors are inserted, decorative finishing will be done, foil vapor barrier will be stretched in the steam room, lining or a simple hardwood board will be nailed.
Step 12. Usually a one-story bath is enough for the owners for a comfortable pastime. The space under the roof is often used to store fragrant bath brooms.
Sometimes in the bathhouse on the second floor they put a small sofa, a table, equipping the rest room. Our project provides just such a room on the second floor. After bath procedures, it will be pleasant to relax, cool down, going out onto a small balcony. A window on the second floor will increase ventilation efficiency and reduce the cost of building materials.
The roof is of a complex configuration. On both sides there are two trapezoidal pediments, tightly laid with a gas block. And if you look from the side of one of these gables, the perpendicular slopes of the roof are clearly visible on both sides.

Advice! If you are not confident in your abilities, limit yourself to the construction of a simple shed or gable roof.
The main stages of work during the construction of the second floor and roof:
- installation of vertical racks from a bar;
- installation of horizontal piping;

- flooring of floor beams on top of the strapping;


- installation of extreme trusses along the gables;

Floor beams and rafters

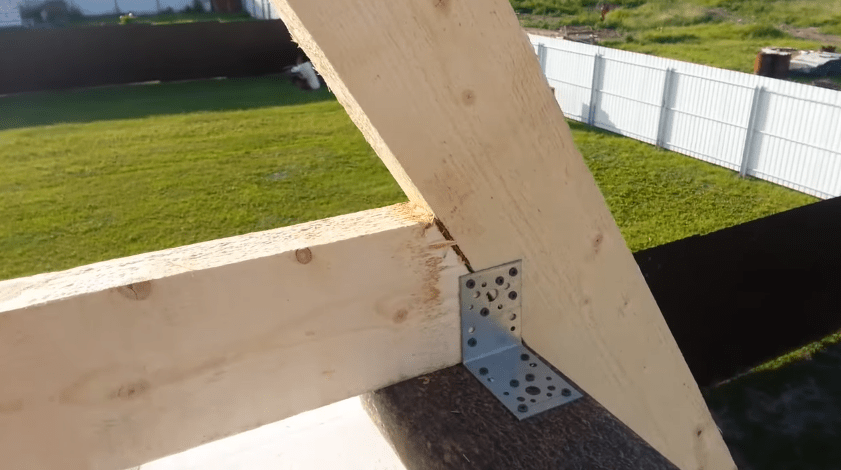
- installation of intermediate roof trusses;

- masonry of gables from blocks;


- installation of vapor barrier from the side of the room;

- filing the ceiling, slopes from the inside with a board;

- laying mineral wool in two layers;

- installation of a windscreen over insulation;

- installation of counter-lattice for metal tiles;


- assembly of a gable canopy over the balcony, installation of a windproof membrane and counter-lattice on the canopy slopes;

- installation of metal tiles and additional elements.


You can watch the video about how a roof of a complex configuration is being erected.
Gas block prices
gas blocks
Video - Roof construction
Video - Construction of gables
Video - Rafters, armopoyas
Video - Completing the installation of rafters, laying aerated concrete walls of the second floor
Video - Overlapping, vapor barrier
Video - Roof insulation
Video - Counter lattice for metal tiles
Video - Washed down the ends of the counter-lattice, filing the ceiling of the ceiling
Video - Laying metal tiles
Shed roof for a budget bath
Step 1... We fasten the Mauerlat on top of the armopoyas. It is a board fixed with dowels (wood grouses).
We drill holes in the boards, and then in the blocks. We hammer in the dowels. We lay a layer of roofing material as waterproofing. We put the Mauerlat board, screw in the screws (capercaillie).


Step 2... We install vertical posts and a horizontal strapping bar. The height of the front part is 130 cm, from the rear of the bathhouse - 30 cm. The roof slope will be 18 degrees.
We fix the beams with metal perforated corners and wood screws.
On a note! So that the racks do not loosen from gusts of wind, we temporarily fasten the boards connecting the front and rear frames with self-tapping screws.


Step 3. We lay the rafters (we put straight boards on the edge and fasten with perforated corners to the horizontal beams of the front and rear frames).

Step 4. We mount counter-lattice boards perpendicular to the rafters.

Step 5. We fasten the sheets of corrugated board. We cut off the counter-lattices sticking out at the edges of the board.


Step 6. We strengthen the frame with jibs. On the sides we install posts from a bar and one additional jib in order to attach the sheathing in the future.


Step 7. Sewing the rough ceiling.


Step 8. We sheathe the frame with plywood. We treat plywood sheets with protective impregnation.


Step 9. Foam the gaps between the blocks and the plywood.

Step 10. If the decorative finishing of the facade is not yet planned, we attach the protective canopies made of tin.

Plaster can be used as a decorative finish on the facade of the bath. It is necessary to choose a mixture for aerated concrete. Conventional cement-sand mixtures are not suitable for this purpose. Aerated concrete quickly absorbs all moisture from the plaster, the decorative coating cracks and falls off.
To plaster the facade, you need to clean it from the remnants of glue with a float, grind off irregularities, if any. After sanding the walls need to be primed "Aerated Concrete-Contact". The plaster mortar is applied with a wide trowel over the fiberglass mesh fixed with self-tapping screws. After the plaster has dried, you can paint the facade or simply apply a water repellent agent.
Almost every owner of a land plot, sooner or later, thinks about building a bath. After all, the bath is not just a washing room, but also an important element of a summer cottage. Turnkey construction of a bath can be ordered from professionals for a tidy sum, or try to build a bath with your own hands.
After reading this article, you can choose a project, find out the sequence of the construction process, get acquainted with the models of boilers and find the best option for a bath for your summer cottage.
Before starting construction, it is necessary to develop a bathhouse project. For this, it is not necessary to contact an architect, you can develop a simple project yourself, especially since now there are many computer programs for design.
Consider what size bath is best for your family. What premises will be located inside the bath. What materials to make the foundation, walls and roof from, do not forget also about finishing the bath. An important point in the design is the placement of the boiler and the way it is fired.
Below you can see the popular bath projects:

- The bath project is 4x4 meters in size.

- Baths project - 4x6 meters.

- Baths project - 5x6 meters.

- Baths project - 6x3 meters.

- Baths project - 3x3 meters.
After you have decided on the dimensions and materials for the bath, you need to make an estimate of the costs.
Foundation
For the construction of a bath, several types of foundations are used. Depending on the weight of the walls and the characteristics of the soil, foundations of the following types are made:

- Slab foundation.
- Column foundation for light walls.
- Pile foundation.
- Concrete strip foundation.
As practice has shown, the most reliable foundation for almost all types of soil is a concrete strip foundation, reinforced with reinforcement.
To make a strip reinforced foundation for a bath, you will need:
- Cement.
- Sand.
- Gravel.
- Armature.
- Formwork.
- Roofing material.
- Wire.
- Shovels.
- Concrete mixer.
- Harness.
- Stakes.
- Tools (pliers, hammer, tape measure, and others).

In the place chosen for the construction of the bath, mark the trench for the future foundation. For marking, use a tourniquet stretched between the pegs. The width of the trenches is made based on the weight of the material for the walls. For a one-story bathhouse made of wood or brick, it is enough to make a trench 30-40 centimeters wide. Having installed the markup, do the following:
- Guided by the markings, dig a trench 50-80 centimeters deep.
- Tamp the bottom of the trench and fill it with water to shrink the soil.
- Cover the bottom of the trenches with tar paper for waterproofing.
- Backfill the trench with gravel to a third of its depth.
- Place the formwork around the edges of the trench.
- Make a frame reinforcing the foundation from reinforcement rods connected by wire.
- Place the reinforcement cage in the formwork.
- Using a concrete mixer, make a cement mortar in the proportion: one part cement to one part sand and two parts gravel.
- Pour cement into the formwork, taking care not to allow air voids.
- After the concrete has dried, remove the formwork.

The foundation for the bath is ready!
Walls
The following materials are used for the construction of walls:
- Wooden bar.
- Logs.
- Boards.
- Brick.
- Blocks from various building mixtures (cinder block, aerated concrete, wood concrete and so on).
Since the construction of a bathhouse from logs or bricks is already widely described on the Internet, let's consider the option of building a frame bath from a bar of 15x15 and 5x10 centimeters and boards with a section of 2x15 centimeters:

- Make the bottom harness, for this take bars with a section of 15x15 cm and install them on the foundation, connecting them together with special metal plates and corners. There is another way to connect the bars, by cutting out spikes, grooves at their ends and then fastening them with screws or nails. When making the strapping, do not forget to put waterproofing under the bars.
- Install vertical racks of 5x10 cm timber. The distance between the racks is usually 50-60 centimeters. First of all, determine the position of the window and door openings and install the racks framing them.
- In the process of work, secure the already installed racks with temporary strips so that they do not warp.
- Make the top harness by attaching it to the ends of the uprights.
- When making the final fastening of the upper harness, carefully monitor the position of the vertical posts, checking their evenness with a level.
- Be sure to reinforce all corner joints with diagonal posts, this will help prevent the frame from skewing.
- Make the ceiling lathing.
- After making the frame, make the outer sheathing of the walls of the bath with a board with a section of 2x15 centimeters. If you do not want the appearance of gaps between the boards, then make the sheathing - "overlap", laying the bottom edge of the board on the nailed board. In appearance, this method resembles siding wall decoration.

- Having sheathed the bath from the outside, proceed to the installation of insulation. Foam or rock wool sheets are installed along the vertical posts of the frame.
- On top of the insulation, it is necessary to install a layer of vapor barrier, which is attached to the vertical posts using thin slats.
- After installing the vapor barrier, make the inner lining of the bath with clapboard or slats.
- Insulate the ceiling by laying vapor barrier sheets on the inner lining, then insulation. Sheathe the outside of the ceiling with plywood sheets.
Please note that the manufacture and insulation of the ceiling can also be done after the installation of the roof.
Roof
There are three types of roof for a bath:
- Shed.
- Gable.
- Complex - consisting of four or more slopes.
Usually, the first two options are used for a bath. Let's consider the option of a gable roof covered with metal tiles: 
Roof manufacturing begins with installation - Mauerlat. In the case of frame walls, the upper outline plays the role of the Mauerlat.
- Place the uprights on the bed.
- Connect the struts with purlins and braces.
- Install the rafter legs by attaching them to the Mauerlat, girder and connecting the upper ends together. The distance between the rafters should be 50-60 centimeters.
- Install sheets of metal tiles.
- Sheathe the gables with wooden battens or sheet metal.
For a more visual acquaintance with the roof fastening, a picture is given: 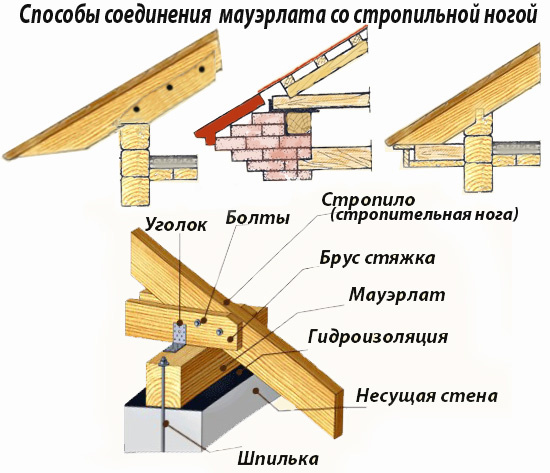
All sizes of roof elements are shown in the list: 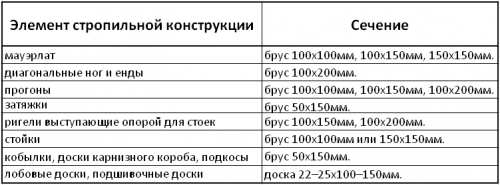
Please note that the less you tilt the roof, the more snow load will fall on it in winter. Also, a small slope of the roof can lead to poor water drainage and leaks.
Floors
Floor construction depends on the type of room. The common wood floors are made in the break room. In the washroom and steam room, the floors are made of two levels:
- The first level is made of concrete and has a slope towards the drain hole.
- The second level is a finished floor of planks with gaps for water drainage.
If you want to make a floor from porcelain stoneware or tiles, then they are simply laid on the first level with a slope towards the drain hole. 
In order to make a concrete floor and a drain in the bath, you need:
- In the center of the steam room and the washing room, install plastic pipes with a diameter of 5-10 centimeters with a bell at the end. The pipes must go through the foundation to the street and connect to the sewage system.
- Lay a layer of waterproofing material.
- Spread a layer of gravel 10-15 centimeters thick over the entire area of the rooms.
- Make a grout and fill the floor with a slope to the hole installed on the drain pipe.
- Install a grate on the drain hole to prevent debris from entering the drain.

In the second stage, wooden floors are made:
- Install wooden logs in all rooms of the bath. Make the distance between the lags 30-40 centimeters. As a lag, you can use bars with a section of 3x5 cm. Or 4x6 cm.
- Nail boards with a section of 2x15 cm or 5x20 cm on the logs.
- In rooms where water is supposed to drain, leave gaps of 0.5-1 cm between the boards.
Do not forget to treat all parts with wood impregnation before starting the installation of wooden floors. When making floors, keep in mind that they should be higher, or at the level of the upper edge of the foundation.
Boiler
The model of a boiler for a bath will largely depend on your financial capabilities and the fuel that you will use for heating. If you know how to use welding, then you can make a simple boiler yourself, from thick sheet iron. If you prefer more advanced gas or electricity colas, they can be purchased from specialized firms.
The boiler in the steam room is installed in such a way that the combustion chamber is loaded with fuel either from the street or from the rest room (dressing room). The boiler itself, for fire safety purposes, is located 10-15 centimeters from the nearest walls. The walls are at the height of the boiler, covered with iron sheets. A good solution would be to impose a brick on the boiler, there you will reduce the cooling time and protect the walls from fire.
When arranging a chimney for a boiler, pay special attention to the place where the chimney is in contact with the ceiling. The chimney opening should be insulated with refractory material. Also, pay attention to the place where the chimney pipe exits through the roof. Usually, this area is prone to leakage, so you should carefully cover it up. Below are the options for boilers for a bath:

- Homemade boiler made of metal sheets.

- A gas boiler.

- Electric boiler.

- Solid fuel boiler.
Bath arrangement
After the bath is built, you need to equip it:

- Bring all communications on the site to the bath - electricity, sewerage, water supply.

- Place a sink, shower cubicle, light sources, and furniture for rest inside.

- Decorate the walls of the steam room with curly slats and make stepped shelves.

- Buy wooden tubs, buckets, ladles and brooms.
After the arrangement, you can safely invite guests, take a steam bath in your personal bath!
Instructions for assembling a mini-bath for a summer residence without a foundation, you can also watch in the video:
Options for beautiful and unusual baths
In addition to traditional materials and designs for the bath, there are many alternative solutions. Below we give photos of the most unusual baths:

- A mobile bathhouse made of "lining", built on a car trailer.

- Bathhouse in a huge wine barrel.

- Bath from plastic bottles.

- Bathhouse dugout, built right in the ground.

- Bath, arranged in an iron container.

- Forest sauna made of untreated logs.
![]()
- A beautiful bathhouse from a gun carriage.

- Bath from not edged boards.
At the end of the article, I would like to remind you that the heating of the bath is associated with fire and high temperatures. Therefore, when building a bath from bricks, logs, cinder blocks or boards, pay great attention to fire safety. This warning also applies to the wiring device, since the rooms inside the bath have high air humidity and the risk of a short circuit due to condensation is very high. 
We hope that reading our article will push you to build a bath yourself!

