Preparing fence posts. How to properly install fence posts
The question of how to make a fence evenly arises often. This is due to the fact that any irregularities are clearly visible on such a design. This type of fencing can be made both as a temporary protective structure and as a permanent one. Installation of corrugated board can be done both vertically and horizontally. This primarily depends on the type of material used. Currently, the color of corrugated board can be any.
Classic smooth green corrugated fence
Including there is under a brick or under a stone. With this coloring, the sheets are mounted only vertically. This coloring imitates the appearance of the fence for this material and looks very nice. It is better to make such a fence permanent.
General provisions
How to make a smooth fence from corrugated board? To do this, the boundaries of the fence are taken out on the ground. The extreme points of each side are fixed with a column of any material. A thread is pulled over the posts. It is she who will be the starting point for. A standard sheet of corrugated board has a width of 1.2 m. However, its working width is slightly less.

Existing sizes of corrugated sheets
To make the fence solid, it is necessary to superimpose the extreme ridges of the sheet one on top of the other. The length of the sheet can be any, up to 6 m. For fencing with horizontal sheets, this length is optimal. Pillars are selected depending on its purpose.
Wooden poles can be used for temporary construction. For permanent fencing, it is preferable to use a metal square 100x100 mm.
The pillars are buried in the ground by at least 1.5 m. The already installed ones are checked with a cord. The cord should lightly touch the surface of each post. Next, attach the crate. It is mounted with a level or under the level. The correct installation of the sheets and the overall beauty of the entire structure obtained depend on the horizontality of the crate. If the profiled sheet is mounted vertically, then it is enough to install 2 horizontal lines of the crate at the bottom and at the top of the fence.

Scheme with the dimensions of the fence from corrugated board
If the location of the profiled sheet is horizontal, then the crate is made to the width at the junction of two overlapping sheets. In this case, the distance between the supports should allow you to connect the horizontal sheets exactly at the place where the pole is installed. In this place, an additional vertical crate is made on the pole.
The sheets at the junction should fit snugly against it and overlap for a length of at least 5 cm. In any case, the pillars must be placed vertically. The height of the fence should not exceed 2 m. If a greater height is required, then this is agreed with the supervisory organizations and architecture.

Dimensional drawing of a corrugated fence
In the case of fencing a construction site, an additional width of at least 1.5 m is provided. It is necessary to maintain the position of the fence at a certain distance from existing or under construction buildings and structures. This distance is provided by fire regulations.
It is allowed to adjoin the fence to the front wall of the garage or to the wall of an existing house. In this case, for the beauty of the whole structure, the sections of the fence and existing buildings and structures must match.
temporary fencing
Profiled sheet fencing is often used to protect the construction area. This is due to the simplicity of design, speed of installation and relatively low cost. This enclosing structure can be easily dismantled and reused at the following facilities. Such a fence also creates complete invisibility of the construction work carried out behind it. A gate with a wicket is also made from a profiled sheet.
For a temporary fence, it is easier to use a crate made of slabs 25 mm thick. The evenness of the installation of pillars and battens is checked with a cord. If it is planned to operate for several years, then the ends of the pillars buried in the ground are wrapped with roofing material, coated with bitumen or fired. This is necessary to prevent rotting of the bottom of the pillars before the end of the life of the fence itself.
Sheets are attached to the crate with roofing screws with a rubber washer.

Design and installation of a temporary fence made of corrugated sheets
If the fence sheets are arranged horizontally, then their joints are also fixed with roofing screws in increments of 25-50 cm. To carry out these works, the corrugated board is drilled using a drill that has a slightly larger diameter than the screws used. The use of nails is irrational. When fastening fencing sheets with nails, it will be more difficult to remove them when disassembling the fence. Yes, and the profiled sheet can be damaged during dismantling.
If galvanized sheet C-8 is used, then this requirement is not critical. If a painted sheet is used, rust may occur if the painted surface is damaged.
Very often, at the top of the fence, a visor is made out of the same material. It protects not only from rain, but also from the possible falling of building materials moved around the construction site by a crane. It is desirable to strengthen such a visor with external pillars with an additional stiffening frame.

An example of an installed visor in a combined fence made of corrugated board and brick pillars
Such structures are quite often found in settlements during the construction of multi-storey buildings. The main errors in the construction of a structure with a horizontal arrangement of the profiled sheet include such as the lack of rigidity at the joints of the sheets, an insufficient number or large distance when installing the crate, connecting the profiled sheets with roofing screws to each other, insufficient rigidity of the pillars.
In this case, sagging or warping of the sheet is possible. Cracks form at the joints. The roofing screw holds the connection well if it is screwed not only into the sheet itself, but also into the crate. The connection of sheets only on a roofing screw does not give strength. It is possible for such screws to fall out. The weak design of the frame and the crate also leads to the loss of self-tapping screws. This happens especially often after strong winds. 
Metal fence posts in a country house or city cottage are a reliable support for the fence. The fence post acts as the main load-bearing element, so if it is made of metal, it will provide reliable protection for both the fence and the country house.
At the same time, any material can be mounted on a metal pole, which ensures resistance to various influences of cottage fences. Before proceeding with the direct installation of the pole, you need to find out what characteristics the main material for erecting a fence in a country house has. After all, the erection of a fence is a responsible task for any owner of a cottage.
Metal poles are the best option for supporting a fence. Metal is the only material that can withstand heavy loads and has a rigid structure. It has strength and durability. If you install such a fence, it will last for decades.
The basis for the manufacture of pillars is a profiled pipe of various diameters. The price of the poles is relatively low. It is possible to select different metal poles in diameter, which can significantly reduce the cost. This parameter will depend on the material of the fence, for example, heavy poles are not needed for a mesh fence.
The advantages of metal poles include ease and ease of installation. This parameter is provided by electric arc welding. This method is inexpensive and practical. By welding, you can create additional decorative elements.
It is worth paying attention to the fact that the poles can be made from a round pipe, a used pipe, or from screw poles. For the construction of a fence, many site owners use a used pipe. Thus, they save their money. Most of these pipes have not lost their properties and can be used as fence posts.
But at the same time, regardless of the purpose for which the pipe was used, if necessary, it is worth restoring and sandblasting. Install such poles in the same way as round ones, using one of three methods.
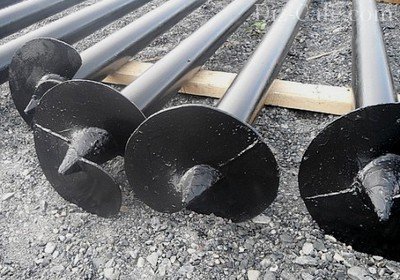
Screw piles are a steel pipe whose lower part has a specially shaped cutting blade. Thanks to this, they can be screwed in without any effort. The lower part will help to ensure the stability of the pillars in the ground. They are used for the construction of prefabricated fences. Piles can be used on any soil soil. At the same time, you can spend no more than two days on their installation.
In order for metal poles to retain their main characteristics for a long time, they need to be painted and thereby extend their service life.
Metal fence posts - the first installation method

Metal fence posts in country houses can be installed in three known ways. The first of these is driving posts into the ground - the easiest way to create a metal support for a fence in cottages. This method is the easiest and cheapest for building a fence in a country house. It is worth paying attention to the fact that this method can be performed by any owner of the cottage on their own. At the same time, he does not need to have any special skills in building a fence in a country house or cottage.
Before starting the installation, it is necessary to mark the site. At this stage, you need to mark the place where the pole will be installed. It is worth paying attention to the distance between the pillars: a minimum of three meters.
It is recommended to hammer the posts with a sledgehammer or a pile driver. If you use a sledgehammer, be prepared for the fact that you will have to spend a considerable amount of effort. You need to hammer the posts through a wooden gasket. If a pile driver is used, then the number of strokes will be reduced several times.
This type of installation is only suitable for erecting a fence on slightly stony soil. This installation method cannot be used on soft soils. If your posts are made of round or shaped pipes, then they must be driven into the ground to a depth of at least 1.2 m.
Metal poles for fences - the second installation method

Metal poles for fences in a country house or cottages, in addition to hammering, can be mounted using backfill. This installation method is used mainly on soft soil, then the metal poles go deep into the depth, and the fence becomes a reliable protection for the cottage. The installation process is not as simple as the first, but at the same time, with the right tool, you can install the fence very quickly.
At the same time, it is recommended to stock up not only with tools, but also with additional materials necessary for a fence in a cottage - this is gravel, crushed stone or broken brick. You can choose the material at your discretion, construction organizations mainly use crushed stone and gravel, less often brick for building fences in country houses.
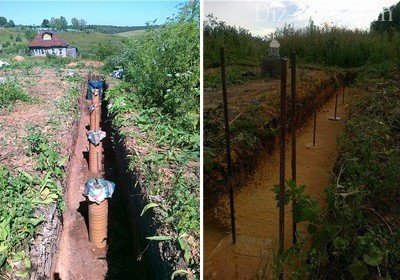
Installation begins with marking the site, after which the required number of pillars is calculated. Under each post you need to drill a hole. Its diameter can be up to 200 mm, and its depth up to 1500 mm. At the bottom of this well, you need to pour an extremely large amount of sand, while carefully compacting it.
The filling process is carried out with crushed stone or gravel, but it is possible to use broken bricks that remained after the construction of your house. The stone should be small, so if necessary, detail the stone or brick. Each layer must be poured with a copious amount of water and compacted, several such layers should be obtained. After that, the material is covered with sand. This is necessary to avoid flooding.
In each well you have to insert a pole strictly vertically, of course, the fence should not fall over. To achieve the vertical of the pillars, you can use a rope or building level.
Metal fence posts - the third installation method

If you do not know or cannot determine what type of soil you have on which you will install metal fence posts in a country house or cottage, the third installation method is suitable for you - concreting. The only exception to this method is heaving soil; metal poles cannot be installed on it, otherwise the fence will be unstable and will not fulfill the basic protective properties for a country house.
For all other soils where your cottage is located, this method is the best solution. It is worth paying attention to the fact that for concreting the owner of a country house will have to stock up on a large amount of resources. But at the same time, you will get a reliable fence for your cottage.
Initially, you need to mark up the area. During it, you need to decide on the height of the future fence, the number of pillars and the distance between them. As in the previous method, concreting involves drilling a hole. To do this, you need to use a hole drill (manual or electric). At the bottom of the hole you need to lay a pillow of gravel. Its thickness should not exceed a value of one hundred millimeters. After that, you need to put metal poles in a vertical position in the hole.
Pillars need to be filled with concrete mortar. Portland cement and sand are mixed in a ratio of one to three until a semi-liquid consistency is obtained. It is worth paying attention to the fact that during the pouring of the solution it is necessary to control the position of the column. Therefore, it is best to invite an assistant who will keep the building level.
To ensure the stability of the pillars, it is best to weld metal plates before starting the concreting process. After each pillar is filled with concrete mortar, you need to wait about two weeks for the mortar to harden well. Only after that it is worth continuing the installation of the fence.
By installing metal fence posts, you will provide the fence with basic protective properties. Such a fence will not be afraid of wind, precipitation or temperature changes, with the use of metal poles, the process of erecting a fence becomes even easier.
Fences are an integral element of the arrangement of suburban areas. Fences serve not only as reliable protection against prying eyes and uninvited "guests". They act as the finishing touch to the integrity of the architectural ensemble. Beautiful, elegant and reliable fences, being the "face" of the site, are designed to maintain its aesthetic qualities. When arranging any fence, special attention is always paid to the selection and installation of elements such as support posts. Properly made do-it-yourself fence posts will increase the strength of the structure and complement it in design and style.
When choosing a material for support poles, it is necessary to focus on the fact that they must withstand the load created by the fence sections, mechanical shocks and powerful wind loads. In suburban construction, when erecting fences, metal, wooden, concrete or brick pillars are most often used.
Metal poles are versatile in use, as they are suitable for the construction of fences from a metal grid or mesh, wooden picket fence, plastic sections and corrugated board.
Metal structures are made of hollow pipes and are strong, stable and durable.
Quality wood is expensive. But, unfortunately, even high-quality tree species are not particularly durable in open areas. In comparison with metal poles, the service life of which is about half a century, wooden structures, even with proper processing, can last no more than two to three decades. Therefore, most often they are used in the arrangement of low hedges, front gardens and temporary fences.

Wooden poles are one of the easiest options for arranging a fence, but far from the cheapest. Wooden fences are always aesthetically pleasing and prestigious
It is advisable to install concrete and brick pillars only when installing heavy fences. However, sometimes people install brick pillars as decoration. In this case, they serve as an excellent “calling card” for a rich site.

Concrete pillars are relatively inexpensive and technologically advanced. They, like metal support poles, are strong and durable.

Brick posts are one of the most expensive options for arranging a fence. Due to the variety of modern finishing materials, brick fences are a worthy decoration of the facade.
Fence layout
When deciding to build a fence, it is necessary to outline its location on the site and calculate future pillars. Competent calculation will prevent distortion and collapse of the building envelope during operation.
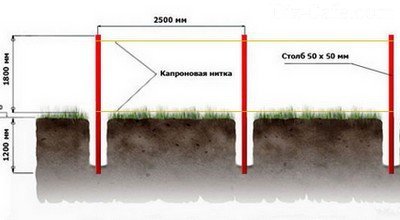
On average, the distance between the pillars does not exceed 2.5-3 meters
The required number of poles is calculated depending on the length of the entire building envelope and the size of the fence sections.
Technological options for installing poles
The method of installing fence posts is determined by the design of the fence and the nature of the soil.
Universal way - concreting
Installation of fence posts in a universal way is well suited for the installation of metal, reinforced concrete and wooden structures on stable, non-moisture-saturated soils. This method involves digging a hole under the support, installing the pillar itself and filling the remaining space with concrete.

The use of a drill will greatly facilitate the process of digging a hole and excavating
You can increase the efficiency of drilling with the help of water, which is poured into the hole and wait 10-15 minutes so that the earth in it becomes softer and more pliable.
To install pillars up to one and a half meters high, it is enough to dig a hole 0.5 m deep, and to install higher support pillars - 0.8 m. On average, the pillar is buried by 1/3 of its length.

Having decided to dig in support pillars for a fence on non-rocky soils, you can do without the use of concrete at all
Advice. It is enough to use a drill, the diameter of the blades of which fully corresponds to the diameter of the column. This will avoid "fluffing" of the near-stem area: the pillars enter the ground tightly and do not require additional concreting. But this method requires the skill of strictly vertical drilling of holes.
But how to install fence posts on "difficult" soils with a high level of groundwater? Indeed, in such conditions it is necessary to deepen the supporting structure below the level of soil freezing, and this, with traditional concreting of the base, is a troublesome and costly undertaking. In such cases, before installing the supports, the bottom of the pit is lined with a layer of rubble 15-20 cm high.
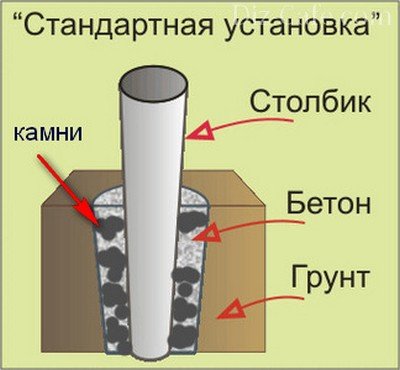
The pillars are immersed in the hole and aligned vertically with a building level or plumb line. After that, the empty space around the entire circumference of the pillars is filled with a layer of rubble
Such a crushed stone "cushion" simultaneously acts as a drainage of the supporting structure and softens the impact of frost heaving forces. The crushed stone layer should not reach the ground level by 12-15 cm: the remaining space of the hole is concreted with fresh mortar.
Clogging of load-bearing pillars of metal structures
Pillar driving is one of the easiest and cheapest ways to mount supporting metal structures.

This method is effective in the construction of fences on low-stony soils, which include layers of dense rocks.
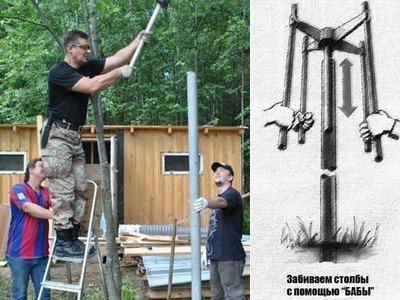
You can hammer in small one and a half meter fence posts with an ordinary sledgehammer. For the installation of three-meter supports, you can use the "headstock" - a device for driving piles, pipes or poles into the ground
The design is a one-meter section of a pipe, one of the ends of which is tightly welded and weighted up to 15-20 kg. When hammering in the “headstock”, the structure guide is located in the pipe, which makes it possible to increase the accuracy of striking, since it must be carried out strictly along the axis of the object.
When driving pillars with the help of a “headstock”, difficulty may arise when lifting the structure. You can facilitate the work by welding long handles to it, which, as they are clogged, are rebuilt to the most convenient position.
Construction of a concrete plinth for a brick fence
Traditionally, such pillars are erected on a concrete strip or column foundation. The strip foundation is a solid reinforced concrete strip with a depth of 500-800 mm, the width of which is 100 mm more than the width of the fence.
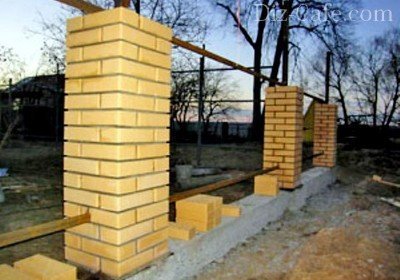
Since brick pillars are heavy enough structures to put brick pillars for a fence, it is necessary to make a shallow base
For the construction of such a foundation, it is necessary to dig a trench. Pipes are driven into the bottom of the trench, which later will act as the basis for brick pillars.
The trench is covered with a 300 mm layer of sand, crushed stone, broken bricks and compacted tightly
A formwork is installed along the perimeter of the trench, equipped in such a way as to prevent the loss of moisture from the concrete solution and provide waterproofing of the structure.
Formwork assembly is clearly shown in the video:
After arranging the formwork, they start knitting the reinforcing cage and pouring the trench with concrete mortar. Concrete hardens within 5 days, but the fence can be erected within a couple of days after laying the foundation.
Installation of pillars - screw piles
The use of piles can significantly reduce the cost of the construction process. The cost of a screw base is an order of magnitude lower compared to a traditional columnar or tape base.
In recent decades, when building fence posts, screw piles are often used as a reliable foundation.
Piles are easily mounted manually or with the involvement of small-scale mechanization. They are like "screws" screwed into the ground, compacting the interblade space as they go deeper, and form a reliable foundation for heavy building structures.
Supports for the construction of fences can be metal, concrete, wood, brick,. Anyone can make such pillars with their own hands. Their installation is not particularly difficult and even amateurs can do it. Proper installation of fence posts implies a sequence in the stages of work and compliance with the required technologies.
Installation process of concrete fence posts
Functions of fence posts
The fence is built for many years of operation. The more correctly it is made, the longer it will last. For this reason, installation should be treated with no less responsibility than, for example, building a house. Most fences are structures consisting of supports, foundations, sectional filling.

Diagram of a brick fence
Those who think about how to install fence posts with their own hands should understand that it is this part of the structure that bears the main load. The stability of the supports provides the entire fence with the necessary rigidity, durability and preservation of its original appearance. Competent implementation of installation work will determine the quality factor of the structure and will allow you to do without repairing the fence for many decades.
When installing pillars with your own hands, you need to understand that the depth of the holes for the pillars and the method of fixing the piles have a huge impact on the level of load resistance. It is these parameters that are responsible for the safety of the vertical fence.
Supports can be made both from the sections used in the design, and from any other material. In this matter, the main role is played by the design ideas and preferences of the owners.
Fence building mistakes
Most often, the following mistakes are made during the construction of fences:

Installation drawing of wooden poles for the fence
- Incorrectly selected foundation;
- Incorrectly made foundation;
- Incorrectly installed poles (just buried in the ground).
Mistakes made on and pillars lead to the collapse of supports and the collapse of the fence after five years of operation. Those who decide to build a fence on the site with their own hands need to pay special attention to the arrangement of these elements (supports).
Since there are many types of fences, different poles are selected for them. They also differ in the installation method. The type of foundation and supports should be chosen based on the type of fence and the building materials used in its construction.
Types of pillars
Support poles are made from a variety of building materials. This allows you to build such a fence with your own hands, which will be in perfect harmony with the architecture of outbuildings and landscape design of the territory.

The process of installing metal fence posts
The choice of one or another option depends on the individual taste of the owners of the site, as well as on their financial capabilities. Today on sale you can buy inexpensive ready-made fence posts, made with high quality and using modern technologies.
The most popular types of fence posts: 
Pole Mounting Methods
Do-it-yourself installation of support pillars should be done taking into account the type of soil. So, for example, if the soil is non-porous, sandy, then it is best to use. To do this, a post is inserted into the hole, which is leveled and fixed with concrete. For heaving soils, this method is not recommended, since over time the soil is able to push the post out of the hole, which will cause the fence to deform.
Heaving soils suggest the installation of a support in a hole dug below the freezing level of the soil.

Scheme for installing pillars in heaving soils
They additionally arrange an extension. In this case, the pillar is almost half dug into the ground, while a lot of concrete mortar, building materials and labor costs are consumed. This option is one of the most effective, but uneconomical.
The installation of pillars by concreting is not used for sandy soils. In this case, the holes are made according to the diameter of the pipes themselves by drilling holes. But drilling vertical wells requires experience. A universal installation method can be called the installation of pillars in holes larger in diameter than the supports themselves. The remaining empty space is covered with small gravel and chipped bricks. This option will provide the structure with good drainage.
Do-it-yourself concrete poles
The most economical are those made by hand.

The process of pouring a figured column of concrete
The main characteristics of such products:
- Reliable and durable;
- Do not rot, do not rust;
- Do not require maintenance;
- Resistant to mechanical damage;
- Not affected by the weather.
Making concrete pillars at home requires special molds, concrete mix and a place to dry. can be made of polyurethane, metal or fiberglass. The prepared fresh solution is simply poured into such a template and kept in it until it solidifies.
Before pouring the freshly prepared mixture into the mold, it is treated with a special lubricant. The associated reinforcement is evenly placed over the entire area of the template. Special inserts, which will later be used as fastening sections, are installed in the lower and upper parts of the column at the same distance from the edge. The solution is poured into the prepared form in one step.  It must be carefully leveled and compacted. In seven days the pillar will be ready.
Wooden poles
They are also an economical option. Most often, such supports are made for. They can last several years, but require constant care. The benefits of these pillars include:
- Ecological cleanliness;
- Combination with lumber panels;
- Mechanical reliability.
Those who are thinking about how to install wooden fence posts should start by choosing the right type of wood. Preference should be given to bars made of oak, pine and larch. They should be well dried without bark. The optimum moisture content of such lumber is not higher than 15%. A good bar does not have knots, delaminations and traces of mold. If the bars are bent or scrolled, it means that they were not dried properly.

Detailed installation scheme for wooden fence posts
If there are areas with bark on the material, then, most likely, insects have already found refuge there. All material should be treated with antiseptic impregnations and means that make them resistant to fire.
Installation steps:
- The lower part of each wooden post is fired and smeared with resin. So, if the beam has a height of about 270 cm, then at least 90 cm from its lower edge is subjected to such processing.
- Installation begins with marking the territory of the future fence. Places of installation of columns are marked with the necessary interval.
- With the help of a drill, holes are made, about one meter deep. Pillars are installed in them, which are fixed by backfilling or concreting.
It is important to remember that the insufficient depth of the holes can cause the collapse of the fence.
The lower part of the supports should be treated with a primer with an anti-corrosion effect. First, the poles are installed at the corners of the fence (at the corners).

An example of the processing and installation of metal profile posts
Then it is necessary to mount additional supports, for example, in places of height differences (on steps). Differences up to 25 cm can be safely ignored. After installing the corner and additional supports, the intermediate supports are fixed. On average, the step of the intermediate column is about 250 cm, but not more than 300 cm.
Before installing the support, 15 cm of fine gravel are poured into the pit. In order for the supports to stand level, they must be checked for level and supported with props. You also need to constantly check with the readings of the plumb line, which will help determine the verticality of the supports. A number of poles are checked for verticality with a stretched rope. After fixing the metal poles, concrete is poured into the pit.