How to lay Lenolium. How to lay linoleum: the best step-by-step videos and photo instructions
Of all the existing types of flooring, linoleum is the most affordable, and therefore the most popular. Anyone can lay linoleum with their own hands, since this technology does not require special knowledge and skills. For more than a hundred years, this material has been used by humans in the decoration of residential and industrial premises. It is too early to leave the market of finishing materials for linoleum, because another floor covering, the same functional and easy to maintain, has not yet been invented. In addition, the decorative qualities of this material, imitating any textures and colors, remain at their best and allow you to decorate the interior in different design styles.
Stage # 1 - preparation of the base
When preparing any base, concrete or wood, it must be carefully leveled. In this case, visible cracks on the concrete are sealed with a putty, after which the surface is sanded. If there are separate decayed areas in the old concrete screed, then local repairs of these places are carried out. In the event of a large amount of damage, it makes sense to fill in a new concrete screed, dismantling the old one. It is recommended to pour a thin layer of self-leveling mixture over the screed to create a perfectly flat floor surface.
The leveling of wooden floors is carried out using plywood sheets, the thickness of which should be at least 6 mm. The seams between the plywood sheets are sealed with putty. When attaching plywood to the base, make sure that the heads of the self-tapping screws are recessed into the sheet.
Many are interested in the question, is it possible to lay linoleum on old linoleum? Opinions differ. Some say that this can be done, but at the same time it is necessary to dismantle the baseboards and stretch the old coating properly. However, experts recommend cleaning the floor surface from all old coatings.
Stage # 2 - preparing materials and tools
In addition to linoleum, the following consumables may be needed in the work:
- putty;
- slats for joints;
- Double-sided tape;
- glue, if the appropriate method of flooring is selected;
- trailing edge;
- screws;
- cold welding;
- nails, in the case of linoleum flooring on chipboard, plywood, boards, etc.
For high-quality laying of linoleum, a special tool is needed that will facilitate and speed up the implementation of all operations. You will need:
- flooring knife;
- tape measure, ruler, felt-tip pen for marking;
- scissors;
- notched trowel;
- special skating rink;
- wall markers;
- ordinary small spatula;
- a hammer;
- equipment for hot welding.
Stage # 3 - calculation and selection of linoleum
After completing the preparatory work for leveling the base, they proceed to measuring procedures. In this case, all sides of the room are measured in order to determine the maximum value of its length and width. To minimize the number of seams, the width of the linoleum is determined. If it is impossible to do without seams, then when calculating the footage, a margin for the selection of a pattern is taken into account. In this case, one centimeter is added to each side to compensate for the possible curvature of the walls.
Having drawn a room plan for conveniently calculating the required amount of material, they begin to select it. At the same time, attention is paid to the marking, which divides linoleum according to the purpose of use into household, commercial and semi-commercial material. In addition, there is a division of this floor covering according to the intensity of use.
Important! After delivery of linoleum, you should not immediately start unpacking it, especially during the winter months. It is necessary to leave the coating indoors for temperature adaptation, which takes about two days.
Stage # 4 - directly laying
- Cutting of linoleum is carried out, in which the direction of the pattern and the coincidence of its elements on the aligned strips are taken into account.
- The prepared canvases are laid out in the room and left, as mentioned above, for two days to fully straighten. During this time, all dents and folds disappear. In this case, the temperature in the room must be at least 18 degrees. At the same temperature, it is desirable to carry out the rest of the work. In residential premises, it is recommended to glue linoleum.
- First, a primer is applied to the surface.
- Next, glue is applied to the prepared, well-cleaned and primed base with a notched trowel. Some time is given in accordance with the instructions for its absorption.
- After that, linoleum is laid and carefully smoothed to the surface with a special trowel, which removes air from under the coating.
Also, double-sided tape is used for laying linoleum. This method requires great care, since wrinkles may appear if there is insufficient smoothing. In this case, the entire canvas is glued with double-sided tape around the perimeter, and then attached to the base. In order not to do the work again, you must try to prevent the appearance of bumps and wrinkles.
Rules to be followed:
- Strictly observe the temperature and humidity conditions when laying linoleum. The humidity level should not exceed 4%. Exceeding this indicator will cause delamination of the coating, as well as rotting and subsequent destruction of the basement.
- The presence of drops and irregularities on the surface of the base, the presence of open seams in prefabricated screeds and at the joints of reinforced concrete panels is not allowed.
- Laying of linoleum is carried out at the final stage of the renovation of the premises.
- The installation of wooden plugs in the walls is carried out in advance, which will be useful for fixing the baseboards. To do this, the nests are drilled at a level of 1.5-2 cm from the floor, maintaining a distance between them of 80-120 cm.
- The application of a primer coat is mandatory. In this case, use dispersion glue (mastic), which is diluted with water. Gasoline and solvents are used when working with glue or mastic based on resins, bitumen and rubbers. The surface is primed with a brush, roller or spray.
- The thickness of the glue application depends on the characteristics of its composition. Follow the recommendations specified by the manufacturer in the instructions.
- At home, the joints of the panels are cold welded, which provides a strong adhesive bond. It is possible to design joints with decorative plates - moldings.
- To obtain an even joint, the canvases are overlapped, and then an incision is made along the construction ruler with a special knife, cutting both layers at the same time.
Features of laying antistatic linoleum
This coating is available in the form of tiles, which are attached with an adhesive that maintains conductivity when dry. The technology for laying antistatic linoleum differs from the methods described above. The flooring is laid on electrostatically conductive copper strips, which are connected to each other and the home's autonomous grounding system. When performing these works, it is necessary to be guided by building codes and regulations, as well as the requirements of the provisions of electrical safety.
When laying material with antistatic properties, one should strive to ensure tight contact of the coating with the substrate. Therefore, a heavy roller is used to remove air bubbles, the weight of which reaches 68 kg. When trimming, trimming, cutting through material, be careful not to damage the copper strips. The joints of the tiles are hot-welded. It should be understood that hot welding requires professional skill, since the air temperature in this case reaches several hundred degrees.
Important! There is a choice of cord that can be monochrome or multi-colored. The choice is made in terms of the chosen design. If desired, you can use luminescent welding cords that have recently appeared on the market.
Stage # 5 - welding seams
For complete insulation of the seams, they resort, which can be cold or hot. In which case to choose one or another type of welding depends on the type of linoleum and the complexity of the butt seam. Hot welding provides a stronger mechanical joint and is therefore a must for commercial paving applications. It is also necessary to weld seams in this way on canvases that will be subjected to intense loads during operation.
Hot welding uses a compressor to blow air onto the heating elements, a welding torch and filler rods that act as a bonding element. Welding of the seams is carried out after the linoleum is securely fastened to the base, therefore, after laying, you must wait at least a day.
Cold welding does not require any additional equipment, therefore, when laying linoleum with your own hands, it is most suitable. There are two types of adhesives used for cold welding:
- for processing the seams of freshly laid linoleum - type A glue;
- for welding the seams of a long-standing covering - type C glue.
These types of glue differ from each other in consistency, which is much thicker in type C glue. After all, the gap between old linoleum canvases, as a rule, is larger. In this case, the principle of operation is the same. It consists in the following: glue, falling into the space of the seam between the canvases, melts their edges. The result is a reliable fixation.
Linoleum does not require special care, however, you still have to follow some rules. To prevent the surface of the flooring from cracking or fading, it is worth avoiding active cleaning agents when cleaning. To freshen up the color, try to give preference to special products developed for the care of linoleum. It is advisable to put on caps made of soft material on the furniture legs to prevent the occurrence of punching and tearing of the material.
We hope that this material will help you install linoleum on your own without any difficulty. After all, now many important things will not slip out of your sight. Perhaps you will share your experience with your friends and acquaintances more than once.
Thanks to modern technologies, the choice of floor coverings on the construction market is presented in a huge range, as they say, for every taste. However, the most in demand is the most practical of them - linoleum. In addition, it has a long service life and an easy installation method that even an inexperienced person can handle.
In addition, you can use options for a beautiful styling of linoleum in the interior, as in the photo.

Preparation of tools and materials
Before you start laying linoleum, you should make the necessary measurements of the area of the room, calculate the required number of sheets with certain dimensions. This will help determine the amount of material required.

When purchasing material in a store, a small margin (20-30 cm) should be added to the calculated amount of material obtained, suddenly in the process of work there will be a need to cut off the edge or cut out a piece in some places.

How to lay linoleum with your own hands? To do this, first of all, you need to acquire faithful helpers in the form of tools, devices or means:
- an ordinary vacuum cleaner,
- means for removing various types of stains,
- sharp construction knives with straight and hook-shaped blades,
- lath made of wood or a ruler used in construction,
- marking devices,
- glue or double-sided tape,
- construction trowel,
- glue-based mixture for seams.


Main features of the coating
To properly lay linoleum with your own hands, you need to study the instructions, which describe in detail all its features. First of all, it should be said that linoleum belongs to the category of PVC (polyvinyl chloride) panels.

The most important is the feature of laying on top of almost flat substrates associated with the high elasticity of the material.

Various minor defects and damage can be transformed into significant destruction of the flooring, which can be noticeable upon visual inspection. This option is not suitable for residential property owners who dream of presenting their home only from the best side.

Considering all of the above, we can conclude that before laying linoleum, you should responsibly and efficiently approach the preparation of the base. Defects must be invisible to the naked eye, the product must be clean, free of dust, debris and dirty spots.

Choosing a base is not considered a straightforward and hassle-free affair. On the contrary, sometimes these very problems arise.

But the most win-win option is the self-leveling screed method, the simpler ones are wood flooring: chipboard, plywood or gypsum fiber.

But remember that laying a wooden base, and linoleum on top of it, is not recommended in rooms with high humidity. So not only the wooden layer will rot, but also the linoleum itself.


When laying flooring from sheets for linoleum, it is important to process the joints at the joints and fix them so as to slightly drown the screws in the thickness of the coating.

Then the joint seams are covered with putty and sanded from above. Thus, the base will be of high quality and you can safely lay linoleum on top of it. In this case, the places of voids and protrusions will not provoke the coating to deformation.

An equally important factor in laying various types of linoleum is the process of adapting it to the humidity and temperature of the room. Therefore, the acquired material is brought into the room and left for a couple of days.

In this case, the optimum temperature will be +18 degrees and humidity 60%. After that, the material must be spread out to level the coating.


Laying options for linoleum
Owners of houses or apartments often face problems when doing work on their own in cases of installation:
- floor heating,
- ceramic tiles on linoleum,
- linoleum on a special base (substrate).


Linoleum underfloor heating

It contains synthetics, which at elevated temperatures begins to release substances hazardous to human health. In addition, surface deformation can occur with temperature jumps.

Coating linoleum with tiles
This process includes a technology similar to laying tiles on a concrete base, since a mesh for reinforcement is laid over the linoleum and a concrete screed is made, after which the tiles are laid.

But it is better to resort to this method when it is impossible to remove the PVC flooring.

Laying linoleum on a substrate
How to lay linoleum correctly? The most correct way of installation is to use a special underlay, which will help to avoid contact of the floor material with the linoleum.


In addition, she performs the following tasks:
- final leveling of the base, because even a screed will not give a perfect surface evenness. The underlay will remove any remaining minor irregularities.
- thermal insulation, as it protects the floor from heat loss.
- soundproofing, muffles sounds, which is especially important in multi-storey buildings.


The most popular are the following types of substrates with a base:
- from jute,
- from cork,
- from expanded polystyrene (foamed),
- from flax.

The best option is a cork backing, but again, the final choice is yours. Can linoleum be put on old linoleum? Of course yes. In this case, the old coating, which does not have any special defects, will play the role of a substrate.

Cutting material
When the base has already been selected, you can start cutting the material and leveling it between the walls. When planning a non-standard shape, the material should be leveled, taking into account the factory cut, and only on one side. Then the second corner is cut with a sharp knife under the ruler.

After processing the corner, move the linoleum 1 cm away from the wall and go to the corner opposite (diagonally). Make the markup of the material in advance so as not to cut off the excess. A loose belt can swell, so adjust the tension right away.


Installation instructions
Having adjusted the dimensions of the canvas correctly, securely fix it in any way:
- without using fasteners,
- using double-sided tape,
- using glue.


Each installation method has its own characteristics, although in principle the process itself is identical:

The free method is the usual linoleum flooring. Suitable for small areas. The material is fixed with skirting boards, pieces of furniture or household appliances. But before that, it is necessary that he lay down.

The method using double-sided tape is more complicated. It is glued to the linoleum from below near the sheet joints, while the other side of the tape must be protected with a film, which is removed during the laying of the canvas.

The method using glue is used in rooms with a large crowd of people. The prepared canvas is folded in half on one side, then the other is smeared with glue. After the canvas is turned away and straightened. They do the same with the other part.

Summing up, we can say that laying linoleum is not at all a complicated process. Moreover, you can use step-by-step photos of how to lay linoleum. But if you doubt your own abilities, then it is better to entrust this matter to professional craftsmen.


The modern building materials market offers customers a variety of floor coverings that differ in price range and technical indicators. Among this variety, we note the material that appeared in the middle of the last century, the popularity of which has not changed for several decades. Linoleum has excellent characteristics, reasonable cost, easy installation. Owners of city apartments often have a question about laying this floor material with their own hands, we will consider this issue in detail.
Tools for the job
In order to properly lay linoleum, you will need the following tools:
- pencil;
- roulette;
- metal ruler;
- stationery knife.
The list of basic tools can also be supplemented with a screwdriver, nailer, hammer, roller and brush.
Stages of work
Professionals distinguish two main stages of linoleum laying.
- Preparatory work.
- Direct laying of the coating.
At the stage of preparation, it is necessary to remove all furniture from the room, to provide free access to the floor.
Floor preparation
This stage involves leveling the surface, since the linoleum is laid on a smooth and even floor. All unevenness on the floor must be eliminated.
Wooden floor
In country houses, mainly wooden floors are used, the preparation of which must be taken with great responsibility.

When laying the coating on a wooden floor, proceed as follows:
- Dismantle all old floor plinths around the perimeter of the room. Instead, it is then better to use new PVC skirting boards. Examine the condition of the floor surface. All debris accumulated under the skirting boards is removed.
- Raise the entire wooden floor, move the boards tightly, eliminating the gaps between them. If we identify low-quality boards, we simultaneously replace them.
- After all the gaps between the boards are eliminated, the surface will have to be additionally processed. Armed with a grinder or hand plane, you need to walk around the entire perimeter of the floor. To simplify the procedure for leveling the floor, you can use plywood, laying it with a slight offset. Use parquet glue to fix the plywood. All gaps between plywood sheets must be treated with mastic, dried with high quality, and pierced with nails (if necessary).
- If squeaks are found, a similar problem is eliminated. All rotten boards are removed and replaced with new ones. The protruding heads of the nails are carefully hammered with a hammer, all the screws are screwed deeper.
- In the presence of differences in height, the boards are leveled using stands or using scraping. Large cracks are eliminated with putty, then primed, treated with a special antiseptic.

Concrete floor
Modern apartment buildings are characterized by concrete floors. For their leveling and strengthening, it is important to use cement-based self-leveling floors. It is quite possible to do this on your own, without involving qualified specialists.

If there is a self-leveling or concrete floor in the room, its preparation is carried out according to a certain algorithm:
- First you need to conduct a visual inspection of the floor surface, remove debris. If sharp changes in height are detected, the problem is solved by using concrete or leveling mixtures. If the differences are too large, you can build a wooden frame, then lay the chipboard sheets. All seams between the sheets must be carefully putty.
- Next, the most decorative coating is laid.
Tiled covering
When laying linoleum on a tile, first inspect the surface, assess the condition of the tile. If broken or chipped tiles are found, they need to be replaced. All the seams between the tiles are carefully rubbed, getting a flat surface.
Attention ! Laying linoleum on a floor that has not been previously prepared will lead to the "manifestation" of all tile joints on the linoleum.
If you cannot level the floor covered with ceramic tiles, remove the tiles, or cover the tiles with chipboard sheets. Minor irregularities can be eliminated by using a lining under the decorative material.

We lay linoleum
After the base is ready, you can proceed to laying the linoleum with your own hands. We offer step-by-step instructions.
Before you start laying linoleum, bring it indoors, spread it out at room temperature for 10-12 hours.
Advice ! To level the linoleum, you can put heavy objects on it.
This "trick" will help you eliminate all waves, avoid mistakes when cutting the material. This decorative material can be fastened in two main ways: by welding or on double-sided tape. The choice of laying technology depends on the surface, room humidity, type of linoleum. Small rooms involve laying linoleum in the width of a roll, but for apartments with a modern layout, this width will not be enough.

Single Strip Option
We cut out linoleum along the perimeter of the room, making an allowance on each side of 10-15 cm. During the operation of linoleum, its shrinkage is possible, if you do not leave allowances, the linoleum will lose its aesthetic characteristics. The strip is spread around the room, checking for size. Next, you need to fold the strip of material in half lengthwise. The open part of the subfloor is treated with special glue using a brush or roller.

Advice ! After applying glue to the floor surface, wait 10-15 minutes, then start laying the linoleum.
Unfold the linoleum, carefully start laying it on the glue-treated surface. Take your time, use a clean roller to smooth the surface. Further, perform the same actions with the second part of the coating.
Instead of glue for fixing the decorative coating, you can use double-sided construction tape. The laying technique is similar to the case with glue, but first, an adhesive tape is applied to the floor, then the protective film is removed from it, the covering is laid.
Laying the coating with a multi-lane method
The cover can also be laid in two strips. In modern construction, two types of laying are used: hot and cold welding.
Cold welding
This method is considered simple, you can lay the coating on your own, not involve professionals. Cold welding requires model C and A glue.

When choosing brand "A", you will additionally need an adhesive tape. It is applied to the joints between the edges of the coating. Then it is cut with a sharp knife along the joint, glue is introduced into the gap formed. Once the glue dries, the tape is removed.

When choosing "C" brand glue, it is enough to simply apply it to the edges between the coating strips, at the moment of their joint.
Hot welding
This type of linoleum fastening involves the use of special equipment. In addition, additional materials will be required for hot welding. In work, a welding machine is indispensable, into which a special polymer cord will be inserted (a substance that holds the linoleum strips).
First you need to bring the temperature of the welding machine to +350 degrees Celsius. This temperature allows the polymer cord to melt. Hot welding is performed in two stages:
- At the first stage, the apparatus is placed at the end of one strip of linoleum, so that the bonding polymer substance falls directly between the strips of the coating. Then we move the device to the center of the room. The polymer layer will be slightly higher than the coating, its excess can be removed with a sickle knife. Excess polymer must be removed until it hardens.
- At the second stage, we perform similar actions, only with the second half of the decorative coating. At this stage, it is necessary to overlap the bonding material with the first part. Excess material is also removed with a knife.
How to lay linoleum on a concrete surface
Laying is allowed from any corner of the room. First you need to spread the covering over the entire area of the room, align the stripes so as to comply with the pattern. All excess pieces are cut off, leaving 5-10 cm of overlap on the wall. Between the wall and the covering, you need to leave 0.5-1 cm gaps around the entire perimeter of the room.
When laying the flooring in a room with an area not exceeding 20 m2, there is no need to additionally strengthen the strips, it is enough to use skirting boards. When working in a room with a larger area, after completing the markings, it is necessary to bend the linoleum, coat the floor with special glue, then lay the coating back.

After laying the covering, pass it with a heavy roller, moving towards the walls from the center, expelling all air bubbles from under the covering.
To fasten the joints between the strips of linoleum, use polymer welding, or double-sided tape. After 1-2 days, you can start installing decorative skirting boards on self-tapping screws or a dowel - nails.
Conclusion

If you do not install skirting boards, the decorative flooring will look unfinished. In hardware stores there are PVC skirting boards of any color, you can choose corners, connecting elements for them. If you install plastic skirting boards around the perimeter of the room, you will turn your floor into a real work of art.
Laying linoleum on the floor - from the choice of material to technology and methods of installation on different types of bases.
The content of the article:
Laying linoleum on the floor is a simple process that even a layman can handle. This topcoat imitates everything, even marble and river pebbles, so it fits perfectly into any interior style. To put linoleum on the floor, you need to know how to choose a finishing material and substrate, and understand how to lay them on different types of substrates.
The main types of linoleum for the floor

There are many varieties of such a finishing floor covering. Moreover, the models differ not only in appearance, but also in quality and composition. How to choose linoleum for the floor and not be mistaken, we will consider below.
Oiled and resin-based floor finishes date back to the 18th century. For the next 2 centuries, linoleum was completely natural. By the middle of the 20th century, it was replaced by synthetic one - it was cheaper, and it was much easier to produce it.
Modern linoleum is divided into several groups:
- By the field of application - for residential premises (household), for offices and warehouses (semi-commercial and commercial).
- By material - alkyd (glyphthalic), polyvinyl chloride, nitrocellulose (colloxin), rubber, natural.
- By the presence of the base - basic / baseless.
- By structure (by the number of layers) - homogeneous and heterogeneous.
Synthetic and natural linoleum differ significantly in cost. It is rather difficult to find material without artificial impurities. Choosing cheaper linoleum, pay attention to its smell. High quality PVC material is almost odorless. Additionally, ask the seller for a certificate. If he finds it difficult to provide it, refuse to purchase.
The main linoleum does not require laying the substrate, which greatly simplifies its installation. For base material, a layer between it and the rough base is required. The substrate, like linoleum, must be chosen correctly.
Criteria for choosing linoleum for the floor

Note how the rolls of material are stored in the store. They must stand vertically or be wound on special bobbins and be in a suspended horizontal position.
Bend the tip of the linoleum before buying, if after that a white stripe forms, refuse to buy. Such material will quickly begin to deteriorate, as it is fragile, moreover, stains will appear on it over time.
Examine the surface of the linoleum. It should not have any delamination, bumps, bubbles, color deviations. Their presence indicates the low quality of the material.
When buying linoleum, pay attention to:
- Cover thickness... The minimum is 0.15 mm. This protection wears off quickly, leaving stains and streaks on the coating. Linoleum in these places will quickly deteriorate. The maximum thickness of the protective coating is 0.6 mm.
- Linoleum thickness... For a child's room, choose a thicker one to make the floor softer. However, remember that the thicker the linoleum, the worse it reacts to furniture legs and sharp objects - it gets pushed and torn.
- The presence of the base... If it is, installation will be faster and easier.
- Marking... Linoleum is divided into classes: 21-24 refers to household, 31-34 to semi-commercial, 41-44 to commercial. Also consider the range of operating temperatures, moisture resistance, fire safety, abrasion.
- Design... Modern linoleums imitate anything from river pebbles to granite, marble and laminate flooring. For a small room, choose light cold colors, for a large one - warm.
Colloxin linoleum has an attractive appearance, but changes significantly in size with changes in temperature. Glyphthal type flooring is difficult to install and requires a professional approach.
Linoleum laying rules

Despite the fact that laying linoleum on the floor is much easier than finishing the floor with parquet or laminate, you need to remember a number of rules, without which the end result may be far from ideal:
- Be sure to prepare the base and use a backing. This will extend the life of the linoleum.
- The purchased material should "lie down" for a couple of days. Stand it upright, and after "acclimatization" unfold so that it straightens out.
- Try to use large pieces and minimize the number of seams.
- Linoleum is laid in three ways - on glue / mastic, dry and on double-sided tape. The first option is suitable for large premises, the second for small - up to 12 m 2. The third method is relevant for rooms of any area.
- Fastening the skirting boards when finishing the floor is carried out only to the walls. This allows the linoleum to shrink / expand during temperature changes and not wrinkle.
- The edge of linoleum, located in the doorway, must be fixed to the floor using metal strips and self-tapping screws.
Linoleum installation technology on the floor
Having bought the material, you need to figure out how to lay linoleum on the floor so that the result will please for a long time. For work, you will need a certain set of tools, as well as a set of preparatory work with a rough floor.
Tools and materials for laying linoleum

Linoleum is an easy-to-use material. For its installation, a minimum set of tools is required:
- Sharp knife for cutting material;
- Notched trowel, if laying with glue;
- Heavy roller or small roller for rolling linoleum;
- Long ruler (race tire) or tape measure;
- Glue / double-sided tape for rigid styling;
- Plastic skirting board;
- Metal nut (if required);
- The required amount of linoleum.
Preparatory work before installing linoleum

Installation of linoleum on the floor begins with the preparation of the base. Such a topcoat can be laid on any surface - wood, concrete, tile. The main condition is evenness, the absence of obvious bumps and pits. On an uneven surface, with a large difference in height, it will not be possible to lay linoleum with high quality.
The order of preparatory work, if the subfloor is concrete:
- Examine the stove. Knock down the obvious hillocks, fill the holes with mortar.
- Check the surface with a level. With a height difference of more than 2 cm per 1 meter, a self-leveling thin screed will need to be poured.
- Close the dry mixture with water according to the instructions, stir with a drill with a mixer nozzle, let stand for 5-7 minutes and mix again.
- If the area of the room to be finished is small, divide it into two equal parts. If the room is large, divide it into equal squares.
- Pour the mixture into one part first, then use a needle roller to expel any bubbles. When the surface hardens, repeat the work on the remaining floor.
- Let the surface gain working strength and dry well (at least a month!).
If rot is found, proceed as follows:
- Disassemble the wood floor... Throw away the rotten floorboards and replace them with new ones. Clean old ones from paint, inspect, sand. Treat all boards with antiseptics and leave to dry.
- Inspect the lags... If there is a hint of rot, then it is best to replace them.
- Re-lay the wood floor... If the floorboards lie tightly against each other, do not creak, you can do without the leveling layer of plywood. Walk over the surface with a grinder with a grinding wheel.
- Check evenness with a level... If everything is in order, you can start laying the substrate (if you chose linoleum without a base).
Laying underlayment for linoleum on the floor

Linoleum flooring begins with the choice of a substrate, if preference is given to a baseless sample of this finishing material. An interlayer between the sub-base and the topcoat will create an additional heat-insulating layer, hide small irregularities, and make the floor softer.
There are several types of substrates:
- Linseed... Linen underlay for linoleum has a small thickness, quite tough, consists of 100% flax. Not a bad option in the middle price category for polyvinyl chloride baseless linoleum on a wooden base.
- Cork... Cork backing is the best on the market, but also the most expensive. Suitable for any baseless linoleum and any subfloor. Does not absorb water, does not collapse under the influence of moisture, does not deform during temperature changes, has high shock-absorbing properties. Additionally, it provides high-quality sound and heat insulation. To prevent the cork backing from getting bent, choose the material with the highest density.
- Jute... Jute is a natural material. The substrate from it has high heat and sound insulation qualities. It has a low density, so it will slip under heavy furniture. Choose a jute backing under baseless linoleum if you plan to lay it on a wooden base.
- Combined... The combined linoleum lining consists of linen, jute and wool. Such a substrate has high heat-insulating properties, it is quite dense, therefore it does not bulge under furniture, it absorbs noise well.
Thoroughly sweep and dust the base concrete floor before laying the underlay. After that, lay a vapor barrier film, dense polyethylene will do. Be sure to put it on the walls. Cut off the excess after installing the skirting boards.
Roll the backing around the floor. Fix the joints with construction tape. Leave a technical gap of 3-5 mm between the wall and the substrate.
The vapor barrier does not fit on wooden floors, all other points are relevant and are performed in the same sequence.
Floating linoleum flooring

The easiest way to put linoleum on a wooden or concrete floor is to roll out the roll and let it rest for several days, then install the baseboards, and that's it. This is called floating.
If you choose it, observe some subtleties:
- Leave a technological gap between the linoleum and the walls (about half a centimeter).
- Use this styling only in small spaces.
- Do not attach skirting boards tightly to the floor. When the temperature rises, linoleum expands slightly, and when it decreases, it contracts. If you press it firmly against the floor with the baseboard, unevenness may appear.
- Be sure to secure the edge of the linoleum in the doorway with a metal sill so as not to tear it by accidentally catching.
Fixing linoleum with glue

Suitable for large spaces and used for concrete floors or tiles. Such laying is more time consuming than floating.
Operating procedure:
- Spread out the linoleum rolls. When they are straightened out, proceed with the installation.
- Close the adhesive mixture according to the instructions.
- Peel back half of the prepared linoleum and apply the compound to the floor with a notched trowel.
- Place the linoleum on top and gently press it into the glue with your hands. To improve traction, use a heavy roller or small roller - roll the floor.
- Do the same with the second half of the linoleum.
- Let the glue dry (maximum one week).
- Dust off the linoleum. Glue masking tape on each side of the joint and seal the gap with cold welding. After it hardens, remove the tape.
- Install the skirting boards by securing them to the walls.
Fastening linoleum to double-sided tape

Quite an easy way. Suitable for both large, medium and small spaces.
Operating procedure:
- Remove all dust.
- Peel off the protective tape from one side of the tape and apply it around the perimeter of the room.
- Use the tape to create a grid on the floor.
- Cover the tape with linoleum.
- Peel back half, remove the protective covering from the tape, lay the linoleum and press it to the floor.
- Do the same with the other half.
- Attach the skirting boards to the walls without pressing them too hard to the floor.
Linoleum as a floor finish is a convenient and practical material. It will not be difficult to lay it on your own if you follow all the nuances. The result will be a stylish flooring that can imitate both tile and expensive parquet flooring that fits perfectly into any interior.
Specialization: Capital construction works (foundation laying, wall erection, roof construction, etc.). Internal construction work (laying of internal communications, rough and final finishing). Hobbies: mobile communications, high technologies, computer technology, programming.
Several months ago, my wife and I had to work as specialists of a homebrew cleaning company, washing linoleum from dirt and various stains in our neighbor's apartment. And what would you think? It was all in vain.
Baba Glasha, that is the name of my neighbor, did not stop there, and decided to change the floor covering in her home. She does not have a presidential pension, so the choice fell on the same linoleum.
She knows that I have been renovating apartments for many years and I am well versed in how to lay linoleum on the floor. Therefore, she turned to me with a corresponding request, because her son-in-law can do little with his own hands, since “he just presses buttons on his computer”. In return, she promised to pay me a not very large fee and constantly treat me to pies throughout the year.
Types of linoleum
Before spreading linoleum, you need to purchase this flooring. I will not talk for a long time about all the twists and turns of our trip to the construction supermarket with a neighbor, since these adventures are worthy of a separate article.
I’ll tell you about several types of linoleum that I had to lay in those apartments where I was doing repairs. The choice of a particular variety is a matter of taste and no instruction will help here. Moreover, in most cases, the price for the floor covering is still decisive.
But to make it easier to decide, I will give the pros and cons that I consider important.
- PVC linoleum... It is made from polymer raw materials, to which various chemical elements are added that change the properties of plastic. As a result, elastic linoleum is obtained, which is characterized by sufficient strength and attractive appearance.

I personally consider the main advantages of PVC linoleum:
- the widest range of models and colors;
- ease of laying the flooring, regardless of the material of the subfloor (you can put it on fiberboard, and on plywood, and on, and even on old linoleum);
- antistatic, that is, linoleum does not accumulate static electricity, which from time to time is consumed in the form of discharges that cause inconvenience to the inhabitants of the apartment, and especially to pets (I do not mean cockroaches);
- excellent hydrophobic properties.
But it was not without its drawbacks, because of which it was not very widespread. First of all, this flooring does not tolerate low temperatures well, so you cannot put it in a country house, where it is not heated in winter.
In addition, PVC linoleum is damaged by the action of even weak chemical solutions. So it is better not to lay it in the garage either.
The coating may be baseless or available with a fabric or non-woven backing. Naturally, the presence or absence of an additional layer affects the heat and sound insulation properties.
- Relin... Synthetic rubber linoleum. In the store, Baba Glasha and I saw a two- and three-layer. However, I installed such linoleum only in commercial premises with a high level of humidity, so I would hardly recommend it for an apartment.

As the advantages of the coating, I can point out good elasticity, high strength, long service life and low coefficient of thermal conductivity.
Cons - poor chemical resistance and low environmental friendliness. The coating releases chemicals harmful to humans into the air, therefore it is more often used for equipping commercial and industrial premises with a specific microclimate.
- Nitrocellulose linoleum... It is made from a special composition containing colloxylin, chemical stabilizers, dyes and flame retardants. It is made only single-layer without a backing.

In this regard, the main advantages are hydrophobicity and flexibility. The disadvantages are the very high thermal conductivity. Before laying linoleum, you will have to lay a special substrate, which complicates installation and makes it more expensive.
- Alkyd linoleum... This linoleum, despite the rather high cost, was chosen by my neighbor and I completely agree with her. For its production, a special resin mixed with filler is used. The fabric base is impregnated with it.
Linoleum is ideal for living quarters, as it retains heat well and protects against noise. The store we visited had a huge variety of models, so Baba Glasha's fantasies were a place to roam.

The only thing you need to pay attention to when buying is poor tolerance to significant temperature fluctuations. But since in our house each apartment has autonomous heating, we do not expect emergency shutdowns of the batteries in winter.
Unless the price of gas will rise and you will have to switch to potbelly stoves.
General installation requirements
After the purchase, I had to think about how to deliver the linoleum. However, the perseverance of the neighbor, who ordered the local bums for this business, did the trick and the linoleum was safely lifted from the truck to the dwelling of Baba Glasha.
Before laying the linoleum, it is necessary that the purchased flooring has been in the room for several days.
Moreover, it is advisable not to put it on the floor, but to put it on the end of the roll.
This is necessary to equalize the temperature and humidity of the material.

While "the client is getting to the condition", you can estimate how the seams of the floor covering will be located. It is necessary to plan the installation so that they are located along the luminous flux from the window in the room. Then the seams will not be so noticeable.
My neighbor and I acted wiser and bought linoleum, the width of which slightly exceeded the dimensions of the room. Therefore, no special design work had to be done. After all, the venerable woman decided on the pattern and color even in the store (this is important, otherwise the linoleum would have to be changed).
By the way, we also acted wisely with the substrate. That is, we bought the flooring immediately with it. We had a synthetic backing, but in stores there is linoleum with jute.
And if you didn't immediately think about it, then I can offer several options from personal experience:
- Cork. Very environmentally friendly material, but very difficult to install and operate. The cork backing breaks when glued and is pressed through by furniture legs and thin women's heels.

I consider the advantages of a low coefficient of thermal conductivity and excellent sound-absorbing properties. Be prepared right away that you won't be able to save money on buying a cork backing.
- Jute. The pleasure is even more expensive. But I do not see any other shortcomings. Jute is not subject to biocorrosion, does not ignite in a fire, and has a long service life.

If there is no jute for linoleum in your store, flax will serve as an alternative.
All characteristics, including cost, are almost identical.
- Combined underlay. If we buy, then it. It is made of flax, wool and jute, but it is impregnated with special flame retardants and antiseptics, making it more convenient to use.

Sometimes I have come across options when penoizol is laid under linoleum. Personally, I would not recommend this, since the material is fragile and "paths" will soon appear on the linoleum. It looks, to put it mildly, unattractive.
Step 1 - Preparing the subfloor
In order for the linoleum to be laid evenly and beautifully, you need to properly prepare the subfloor, that is, the base on which the decorative coating will be glued. This stage is the longest and most laborious, but the final result depends on it by 80%.
Concrete
If you live in a city apartment building that is not too old, then your floor is made of concrete. The same as mine and my neighbor's. Therefore, there is no need to carry out special measures for its alignment and preparation.
- If you find wide chips, cracks or other defects in the overlap, they must be eliminated. You can resort to spot repairs or fill in a new concrete screed.

I didn't have to do that in Baba Glasha's apartment, but I did the screed more than once before laying the linoleum. Especially in cases where preliminary measurements revealed a significant difference in height at different points in the room.
- If the surface is almost flat, but there are slight deviations, I recommend using self-leveling floor mixtures. Nothing complicated there.
Buy a bag of dry powder or a ready-made solution, and then carry out the entire procedure as indicated on the label. This is exactly what I did to my neighbor. Naturally, it turned out to be a little more expensive, but, as they say, “the firm does not knit brooms,” and I am used to doing my job efficiently.

After the screed has completely dried, the surface must be primed. This will remove dust from the floor, reduce adhesive consumption and improve adhesion. We bought the primer immediately with linoleum, so we didn't have to go to the supermarket.
From wood
If your subfloor is made of wood, this does not mean that you do not need to carry out preparatory operations. Only the scheme of work in this case will be different.

I once laid linoleum on a wooden floor in a village, so I can give you the sequence of actions that I followed in that case:
- I checked how tightly the individual floor planks fit together. I found several nails, the heads of which protruded above the surface. Scored them. Several planks were generally rotten. Replaced them.
- In another room, the top layer was completely dry. I had to rent a cycler and level everything up. Several cracks were found. Putty them.
- I didn't have that, but I'll tell you. If, as a result of inspection, it is found that the support lags (one or more bars) have become unusable, they must be replaced. As a last resort, place thin wedges under the bottom to level the surface.

If the situation is completely deplorable, it is better to replace the boards with plywood or gypsum fiber board.
The scheme of work here is simple:
- dismantle old wooden elements;
- install new support logs;
- lay the plywood sheets so that the seams go randomly.
You can fix the sheets with self-tapping screws, making sure that the caps do not protrude above the surface. There should be a gap of 3-4 mm between the individual elements to avoid warping due to thermal expansion.
Covered with old linoleum
I am personally not a fan of installing new flooring on old linoleum. Even at the dawn of our careers, we have resorted to such a solution to the problem, but more often than not the result turned out to be deplorable. Therefore, I strongly advise all novice craftsmen to get rid of the coating before laying a new one.
However, some masters suggest buying single-layer linoleum without a backing, and using the old flooring as the latter. It is for such a case that I will tell you about the technology of preparing old linoleum for laying a new one in more detail.

It is important to consider a few things:
- Before installing new flooring, the old one should be thoroughly washed and cleaned. Get rid of paint stains, cement, dirt, grease and so on. If you have thoroughly washed linoleum on the floor at least once, you will understand that it is easier to rip everything off and throw it away than to waste time on the washing procedure.
- After that, you should get rid of irregularities and defects in the coating by making patches. Considering that the new linoleum will be without a substrate, all the irregularities of the base will be visible on it, which will not add grace and beauty to the room.
- At the last stage, you need to prime the linoleum. This will eliminate dust and improve surface adhesion.
Step 2 - Cut the cover
Cutting the flooring is usually entrusted only to experienced linoleum laying specialists who have laid more than one square kilometer of this material. I do not consider myself one of such specialists, therefore I get out of the situation simply: I buy linoleum, the width of which exceeds the dimensions of the room. In this case, only those parts that are adjacent to the walls will have to be cut off.

However, this does not mean that I have never cut linoleum, so I can quite tell you about the nuances of the process. To do this, you need to buy a special cutting knife and a metal ruler.
In the future, you can act in several different ways:
- Fitting the linoleum at the installation site. It is necessary to press the edges of the linoleum to those areas where the wall connects to the floor. Then trim the material. It should be borne in mind that the edge of the linoleum should be 0.5-1 cm from the wall to compensate for thermal expansion.
- Trimming the floor covering according to the markings. To do this, lines are applied to the spread material, after which the excess is cut off. This is necessary in cases where the coating is laid without gaps.
- Cutting in a room with a complex configuration. In this case, the linoleum is first cut in those places where there are additional architectural elements. Then the cover is cut in the manner described in point 1.
- Cut by templates. First, templates are made from cardboard or other similar material, after which the configuration is transferred to linoleum and cutting is performed. This method is used to treat areas laid around utilities or permanently fixed devices.

If it is supposed to lay linoleum with seam joints, I would advise equipping them in the places where pipes and other communications are located. So cutting and styling will be much easier.
After finishing cutting, it is necessary for the flooring to rest on the floor without adhesion for 48 hours for it to be leveled.
Step 3 - gluing
Baba Glasha's apartment is not the largest, the living room occupies an area of only 17 sq. meters. Therefore, I made a courageous decision not to glue the linoleum at all, that is, to perform the so-called "floating" installation. Moreover, this method does not contradict building codes.
If you have linoleum with seams, you can use special adhesive tape for installation. It allows you to quickly fix linoleum, and in the future you will not have to spend a lot of time to dismantle it (after all, sometime a new floor covering has to be changed).

Well, for large rooms I offer two methods that I tried with my own hands in due time:
- Method one. Apply the adhesive with a notched trowel onto the prepared subfloor surface.
Moreover, the middle is processed first, and in the places where the seams of the flooring will pass, there is no need to pour glue at all, leaving about 10-12 cm of dry space. The areas near the walls, on the contrary, need to be smeared with all care.
The thickness of the adhesive is always different. Look more precisely on the packaging with the material you purchased. I personally, to speed up the gluing, additionally process the back of the linoleum with glue.
Once the surface treatment is finished, you can glue the coating, leveling it from the center to the edges. - Method two. You need to roll the linoleum up to half into a roll. After that, spread the glue on the surface in front of it, and distribute the composition directly with the floor covering, swinging it back and forth.

In both the first and second cases, the main task is to expel all the air from under the linoleum. To do this, you need to roll the entire surface with a special roller or wipe it with a rag, applying a fairly significant effort.
If this is not done, over time, waves and bubbles will appear on the floor surface, which will be almost impossible to get rid of.
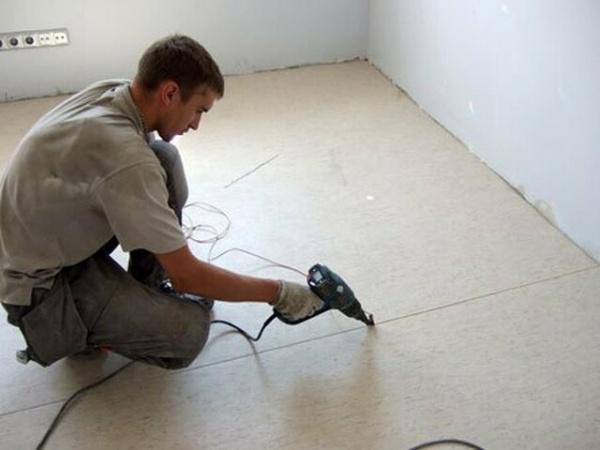
Step 4 - seams
As I already said, in the house of a neighbor, linoleum was laid in a seamless way. But, perhaps, your apartment is very large and it was not possible to find a material suitable for the size of the room.

Therefore, I will not be lazy and will tell you a method using which you can perfectly mask the seam in the floor covering, making it completely invisible:
- The joint of two strips is glued with masking tape. It is glued to the front side and is necessary to protect the decorative layer from damage as a result of further manipulations.
- Then, using a clerical knife, the tape must be cut exactly along the seam. Be careful not to damage the linoleum itself.
- A special glue - "cold welding" should be inserted into the incision through a needle. The composition should be properly dosed so that the substance is only inside the seam, and its excess does not come out. But in extreme cases, linoleum is protected from damage by pre-glued masking tape.
- Then press the edges of the flooring firmly and firmly.
- Once the adhesive has hardened, the protective strip can be removed.

Finally, the seams of linoleum will weld together within about a day. Until that time, I recommend not to walk on the area of the floor treated with adhesive.
Step 5 - installing skirting boards
Well, the final stage of the installation of any floor covering is.
It is impossible without them, since many tasks are assigned to this inconspicuous detail:
- it masks the gap between the wall and the floor covering;
- prevents the penetration of dust and the accumulation of debris in this part of the floor;
- gives the room a finished look.
In addition, in my case, when the installation was carried out without glue, the skirting board will firmly hold the flooring in place, preventing it from moving.
There are many options for skirting boards. If you have already chosen linoleum for your room, I advise you to buy plastic skirting boards. They are in perfect harmony with the installed floor covering, are easy to install and are inexpensive.

I will briefly give a diagram of the installation:
- A decorative strip is removed from the purchased skirting board, which closes the cable channel through which the skirting boards will be attached to the walls.
- After that, the parts are applied to the wall (starting from the corner), after which a hole is drilled in the baseboard and wall. It is better to use a perforator for this, since you will have to drill solid concrete.
- Then the parts are removed and plastic dowels are inserted into the holes.
- Then you can screw on the skirting boards. The connections between the individual elements are made using plastic corners. They need to be bought in advance along with the skirting boards, which Baba Glasha and I did.

