DIY plastic ceilings in the bathroom. We make the ceiling in the bathroom from plastic panels (10 photos)
Let's analyze and look at an example of how to independently make a false ceiling in the bathroom from plastic panels. Necessary fasteners and tools for its installation. The design of the ceiling, which will save in the future on fixing plastic wall panels.
On a regular sheet of A4 paper, I drew an approximate drawing of the ceiling.

Materials and tools for mounting panels on the ceiling
After some calculations, the following materials were purchased and selected:
- five white glossy plastic panels measuring 3000 x 374mm. 8mm thick;
- three three-meter white finishing plastic corners for plastic panels;
- guides PPN profile 28x27mm "knauf" 3 meters long for fastening to walls around the perimeter;
- four ceiling profiles PP 60x27mm "Knauf" 155 cm long;
- self-tapping screws with a press washer metal - metal - 150 pcs. (sharp: 19 mm long, and for a drill 16 mm long.);
- plastic dowels 60x6 - 30 pieces;
- small pieces of plasterboard or PVC panels with a thickness of 8mm.
To install lighting in a mounted plastic ceiling, the following items were purchased:
- three spot LED lamps of five watts each;
- five meters of double-insulated copper cable with a section of 2X1.0.
To get started, we will select all the tools necessary for mounting the ceiling from the panels: a tape measure, a meter metal ruler, an angle grinder, a screwdriver, a drill or a puncher, metal scissors, a hammer, a clerical knife, pliers.
The initial stage for the installation of a false ceiling structure made of plastic panels
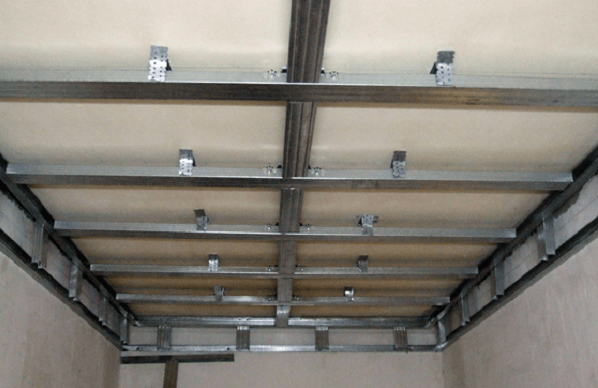
We fasten two guide three-meter profiles PPN 28x27 along two long walls, and short ones along the width of the bathroom, using plastic dowels in increments of 20-25 cm. For three-meter profiles, it is necessary to cut two shelves in order to bend them in the corners in the right direction. I made cuts in the corners of the boxes. Next, we insert the PP profile into the guides of the PPN profile and fasten them to self-tapping screws with a metal-to-metal press washer.

Under the PPN 28x27 profile around the perimeter of the bathroom, I temporarily screwed pieces of plasterboard (cuttings from the ceiling in the kitchen) and pieces of PVC wall panels 8mm thick. This was done on purpose in order to attach the final plastic corner to the rails not close to the wall, but with a gap of 8 mm.


The final plastic corner almost along the entire perimeter of the ceiling was fixed with a gap of 8mm.

In the future, plastic wall panels will be inserted into this groove. Wall decoration with PVC panels was planned in a frameless way.
The ceiling was divided into five identical parts with a step between the PP profiles - 56.8 cm. Ceiling profiles were attached only along the perimeter to the guides.
Installation of plastic panels on the ceiling
Before fixing the panels on the ceiling, the necessary wiring was thrown and fixed. The places where the lamps will be installed were marked on the wall.

It was decided to install the lights in the middle of the central plastic panel, so the first panel was cut lengthwise so that the panel with the lights was located exactly in the center of the bathroom. The edges of the panels were inserted into the final corners and pushed into the groove of the previous panel. The plastic panels themselves were fastened with metal-to-metal screws with a press washer to PP profiles.


The hardest part was inserting the last final plastic panel. In width, it must be made shorter by 5 mm, the measured width, since you will have to bend the edge of the plastic end corner and insert the panel there. To do this, I had to use a meter metal ruler. The width must be measured from the inside of the final corner to the edge of the penultimate panel.
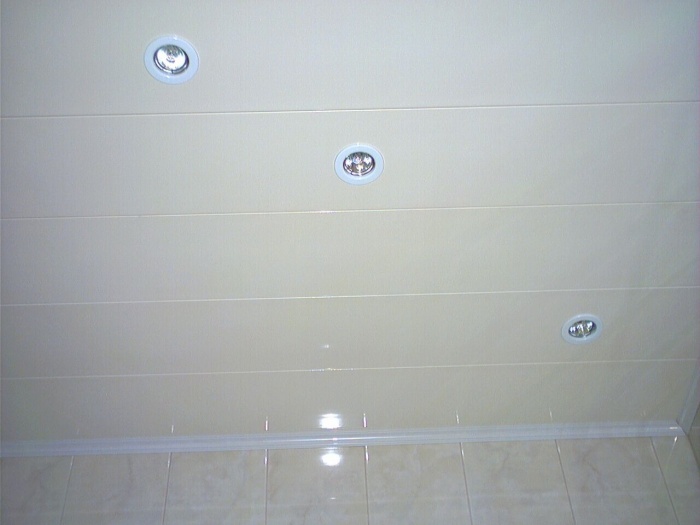
At the end of the fastening in the central panel, I drilled holes with a cutter according to the marks marked on the walls. I inserted lamps with LED lamps into the holes, connected them and this is what came of it.


Bathroom renovation is always a headache, big expenses and a lot of topical issues. One of them - how to finish the ceiling surface? Features of the bathroom with unstable temperature conditions and always high humidity narrow the range of suitable materials to a very uncomfortable minimum. One option is a plastic panel ceiling in the bathroom. We reveal the installation technology and demonstrate numerous design solutions in today's material.

Why plastic panels?
The advantages of PVC panels are many:
- practicality;
- light weight;
- simple installation;
- moisture resistance;
- affordable price tag.


The latter is very remarkable if you are going to make a ceiling of plastic panels in your bathroom (read about what is better to make a ceiling in the bathroom): after all, this is a room that easily "eats" almost your entire budget, even already at the stage wall decorations. But you can always buy such panels in a hardware store and not empty your wallet. In order not to go unfounded, we have compiled a special table for you, which displays the prices for popular types of PVC panels, as well as for the elements necessary for do-it-yourself installation.
| Name | Vacation unit | Price |
| White gloss PVC panel 3000x375x7 mm | PCS. | 232 rubles |
| White matte plastic panel 3000x500x10 mm | PCS. | 315 rubles |
| Super gold slatted ceiling AN135A 3 meter | PCS. | 265 rubles |
| French slatted ceiling Golden stripe | PCS. | 330 rubles |
| Suspended ceiling hanger | PCS. | 10 rubles |
| Metallic profile 1.2 m | PCS. | 50 rubles |
What are there?

If the idea of a ceiling made of plastic panels in the bathroom has taken shape in a specific solution, you should think about which types of PVC panels will best fit into the format of your room:
- seamless- tight butt-to-butt connection, which helps to create a visually monolithic canvas on the ceiling surface;
- lining imitation- the cheapest panels imitating a wooden finishing material popular in construction;
- plates- large panels with a locking connection, opening up the possibility of quick and high-quality installation;
- rack and pinion- without a doubt, the most popular option, attracting everyone with wide decorative possibilities and modern appearance.


What to be guided by when choosing?
- the total area of the bathroom;
- minimizing residues;
- interior integration;
- ceiling heights.

In the process of decorating the ceiling, the owners of the premises may encounter the problem of choosing sheets with the necessary parameters. And if with the last parameter - thickness - everything is extremely clear (the lower the ceilings in the room - the thinner the material needs to be selected), then there are problems with the length and width. Most often - due to the inability to come to the necessary compromise between reducing unused balances to a minimum and solving purely interior design problems.

If we are not talking about slatted panels, then it is better to minimize the number of seams on the visible part of the ceiling. In this case, the optimal length of the material is directly dependent on the length of the walls of the room.
In general, PVC panels with a width of 0.15 to 0.25 meters and corresponding length from 2.70 to 5.80 meters

Mounting technology
Any person can correctly make a ceiling from pvc panels in the bathroom - this is far from being only the prerogative of specialists from professional offices. Our small manual will help to master this simple art.

Tool preparation
- level;
- perforator;
- hacksaw;
- metal scissors;
- screwdriver

As you can see, nothing out of the ordinary - all the same standard set, which, in principle, should be in the "stash" of every owner.
Material calculation
- determine the area of \u200b\u200bthe ceiling surface (length multiplied with width);
- the resulting value is divided by the area of one panel;
- add 15% to trimmed parts;
- round the number to the nearest whole number of PVC sheets;
- in order to correctly calculate how many UD and CD profiles are needed, we take into account all the same dimensions of the room, plus we observe a step width of up to 60 centimeters.
You will also need:
- ceiling hangers;
- dowels;
- self-tapping screws;
- silicone;
- brackets.
The number of all of the above elements is calculated based on how many profiles will eventually have to be used to organize the frame in the room.

Ceiling surface preparation
- clean the concrete base from dust, dirt, debris and everything superfluous;
- treat the surface with a primer with an antifungal effect;
- there is no point in leveling the base - plastic perfectly hides all the defects of the original surface.


markup

- using a level, make markings around the entire perimeter;
- determine the lower point based on practical considerations.

frame

- UD profiles are screwed to the marks made with the help of self-tapping screws;
- longitudinal CD profiles are attached to already mounted bearing brackets and self-tapping screws;
- in finished form, the frame is a grid - and if you actually see something like what is observed in the photo below, then feel free to proceed to the next step.


Conducting wiring
- insulate the ends of the cables with a special tape;
- perform parallel wiring from the box;
- prepare the base for a large lamp, if one will be used indoors;
- for small spots, holes are cut in the panels already in the process of their direct sheathing.


sheathing
- prepare the panels for sheathing;
- cut off the excess parts with a hacksaw;
- place the first panel closer to the corner and fix it with self-tapping screws;
- all subsequent panels should easily fit into the structural groove;
- install the last panel with extreme caution, there should be no gaps between it and the wall surface;
- the ceiling plinth, which beautifully draws the border between the ceiling and walls, is mounted last.


For fans of video manuals - all stages of installation of plastic panels in one video.

The light material has an excellent reflective surface and can turn your bathroom into a beautifully lit and interesting looking room. With the help of well-placed mortise lamps, you can achieve the placement of accents on certain elements of furniture.


When choosing PVC panels directly, pay attention to the thickness: you should not go to extremes and, in order to minimize losses in the height of the room, give preference to the thinnest option. Otherwise, you run the risk of encountering such a picture in practice, when the light emanating from the spots literally shines through the mounted sheets. Terribly ugly sight!
In the photo - a ceiling made of plastic panels in the bathroom with sheets of the correct thickness.

If you place the connecting seam between the sheets along the lighting, then in such a simple way you can completely disguise it and create the impression of a solid plastic sheet in the bathroom.


Slatted plastic panels come in a variety of color variations. If you want to correctly fit them into the interior of the room, observe the compositional features: for example, beige shades always go well with brown, and cream shades with gray, graphite.


Often, the rack version of plastic ceilings is preferred to be used in the bathroom for the reason that it greatly saturates the space with relief and helps to make a relatively simple room made at minimal cost more expressive.


Don't get hung up on the most popular options. We invite you to take a look at the design options for the ceiling in the bathroom, which immediately attract attention and make you inexorably reach for the "like" button.


Conclusion
If you decide to make a ceiling of plastic panels in the bathroom, you certainly have something to think about: a relatively simple installation will not cause any difficulties, but a certain amount of ingenuity for competently and interestingly fitting the ceiling surface into the overall interior of the room will undoubtedly be needed. Relevant specialists can also help you with the final choice, but it is always interesting to make a bathroom design with your own hands. I think we've given you a lot of good ideas. The point is small - for their creative processing!

For a modern person, the bathroom is a kind of cult space, this is especially noticeable for residents of city apartments. We spend a lot of time in the bathroom. Daily water procedures become a kind of ritual for us, and here the main aspects of operation are cleanliness and comfort level in the bathroom. Such indicators can be achieved only if the interior decoration of the bathroom meets the special conditions that are typical for this room.
Given the high humidity, which is an essential condition for the operation of this type of premises, panels, floors and ceilings are made of materials that are resistant to constant moisture. Ceramic coatings used for wall and floor cladding are not always suitable for ceilings. For this purpose, it is better to use plastic, which will make bathroom ceiling panels beautiful, stable and durable. Why plastic in this case becomes the best finishing option and how to make such a design yourself, we will consider in more detail.
What is the difference between the ceiling in the bathroom
Among all the rooms that are present in our apartment or house, the bathroom is in the most extreme conditions. High levels of humidity and frequent use put forward special requirements not only for the condition of the interior decoration of bathrooms, but also for their cleaning. Interior decoration elements must successfully withstand moisture, be practical and easy to maintain. The choice of design options in this case is not as wide as we would like. As for the ceiling part, here plastic panels on the ceiling in the bathroom become almost the only solution.
On a note: moisture-resistant drywall, painted with acrylic or silicate paint, is not suitable for these purposes.

Especially when it is necessary to obtain a durable, beautiful and moisture-resistant ceiling structure. Ceilings in the bathroom play not only an aesthetic role, but also carry a large technological load. For premises of this type, the installation of ceiling lighting fixtures and forced ventilation elements becomes a prerequisite for operation. Ceiling structures to be installed in the bathroom must meet the following requirements:
- first and foremost, the material from which the ceiling is made must be able to withstand the effects of moisture, including the presence of 100% humidity (warm steam, water spray);
- strength and resistance of the structure to moisture both from below and from above (direct contact with the aquatic environment);
- ceiling surfaces in the bathroom should be made taking into account the need for constant care for them (washing, cleaning and disinfection);
- high manufacturability of the design and the presence of aesthetic content.
All of these requirements are met by the design option when you have a ceiling in the bathroom made of plastic panels. This material allows you to solve the goals and objectives in a comprehensive manner.

Important! The internal surfaces in the shower room, in the bathroom are subject to constant cleaning and cleaning with the use of antibacterial and detergents containing aggressive chemical components.
The main advantages of plastic How should the material be chosen?
If plastic panels are not always suitable for finishing other rooms, then for a humid and warm room such material is a real find. The structure of the plastic is inert to moisture and is able to withstand minor mechanical loads. Do not forget about the cost of PVC finishing materials. Compared to other finishes, repairing the ceiling in your bathroom with plastic panels will cost several times cheaper.
Other advantages of this finishing option include the following aspects:
- plastic, unlike drywall, does not swell or dry out, constantly retaining its original structure and shape;
- hygienic coatings. Mold and fungal formations will never appear on PVC panels;
- good reflectivity of PVC panels, which allows you to create a visual effect of increasing space;
- a variety of finished products used for the installation of ceiling structures;
- quick and easy installation of ceiling structures.
Knowing the advantages of plastic finishing materials, you should carefully consider the choice of materials for the future decoration of the ceiling in the bathroom.

Choosing material for work
Today, the domestic industry and foreign companies - suppliers offer consumers a fairly wide choice of plastic finishing materials. You can always accurately select the desired color that matches the overall tone of the interior decoration of the bathroom. If you wish, you can opt for plain products or make the ceiling in your own bathroom from panels with a pattern or with a certain texture.
Depending on the design features of the room and the design of the ceiling, plastic panels of different sizes are used. Traditionally, plastic is produced in the form of long panels, the length of which is 2.6 - 2.7 and 3 meters. The width of the products at the same time varies in the range of 240-375 mm, which is very convenient for finishing rooms of various sizes and heights. The panels are 8 or 10 cm thick.
On a note: narrow slats are ideal for small bathrooms with low ceilings. For bathrooms of a large area and with high ceilings, wide plastic panels will look good.
Installation of plastic ceiling surfaces in the bathroom
Before you start working with ceilings in your own bathroom, you need to prepare a rough surface. It’s good when you already have a plan for the placement of fixtures and exhaust ventilation at hand, there is a sketch or outline of the future design. Making edits already during installation is a rather problematic task. You must clearly know how many panels to use and in what order the structure will be installed.

The panel ceiling in the bathroom must be done, knowing exactly all the measurements and parameters. It will be very useful to come to the store with a ready-made working sketch and a tape measure in order to choose the optimal dimensions of the plastic panels. Trimming during the installation process is inevitable, but you don’t really need extra material. The lack of panels at the final stage of work will also be unpleasant.
Note: the length and number of aluminum profiles used to equip the frame of the future ceiling are measured in the same way.
From the tools for work you will need:
- drill or perforator;
- crown for mounting lamps;
- building level;
- screwdriver or screwdriver;
- hacksaw for drywall or plastic;
- mounting knife;
- liquid Nails.
Almost all of the listed tools are freely available and often available in one's own household.

Features of the installation of ceilings in a plastic bathroom
For those who have an idea about finishing work and are familiar with the installation of suspended ceiling structures, there should not be any particular difficulties. The main thing is to follow the technology and sequence of actions. To make a plastic ceiling in the bathroom on your own and with your own hands today is possible and realistic.
For reference: Comparing the design of plastic ceilings with the design of the plasterboard ceiling, we can say the following - working with plastic in this regard is easier and less laborious.
The main condition on which the effectiveness of the work depends is the correct location of the frame guides and the precisely calculated number of profiles for the future frame. Plasterboard false ceiling requires the creation of a solid and massive frame with a large number of profiles, then a lightweight version is suitable with plastic panels.
On a note: if there are tiles on the walls in the bathroom, the ceiling level can be beaten off with a regular tape measure without using the level.
The beginning of the installation comes down to determining the desired distance from the rough surface. As a rule, for prefabricated structures, such a distance does not exceed 7-10 cm. We orient ourselves along the tile seam closest to the ceiling surface and set aside the required distance.
Important! It is advisable to make a future suspended structure at a distance of 5-10 from the nearest horizontal seam. In this case, the tile and plastic ceiling will look harmonious.
We make marks for the future lower edge of the new ceiling in increments of 40-50 cm around the entire perimeter of the bathroom.
Making a frame
After the marking work, the direct installation of the guides begins. Aluminum profiles are placed on the basis of your marks and attached to the panels with self-tapping screws.

On a note: if your tile is laid on plastic mounting crosses with a line width of 1-2.5 mm, then the guides can be mounted without drilling holes in the tile. Self-tapping screws in this situation are screwed directly into the body of the seam.
From a practical point of view, the installation of the frame is simplified due to the ease of the future ceiling structure. To achieve the required strength of the frame, this method of attaching profiles is quite suitable.
As soon as guide profiles are installed around the perimeter of the bathroom, you can start laying the stiffeners. This frame element is an important component that ultimately ensures the strength and stability of the entire stacking structure. Stiffeners or load-bearing profiles are attached to the rough surface with U-shaped brackets. It should be said that the need to install stiffeners arises when installation is carried out in large rooms. For small apartments, where the average bathroom is 1.5 x 2.5 meters, there is no such need. Plastic panels have sufficient rigidity to independently withstand the created load.
Laying plastic panels
After the installation of the frame, we begin work on laying the panels. It all starts from the starting profile. By observing the sequence of laying, it is possible to achieve an exact fit of the cut pieces of plastic to each other. The starting profile is attached to a regular profile using texes.

Which plastic panels will be best for your bathroom on the ceiling, wide or narrow, you decide. Starting from the starting profile, the entire ceiling is gradually laid, panel by panel. Each piece fits into the existing groove of the previous piece. At the end of the work, when laying the last piece of plastic, the starting profile is not required.

The set is carried out to the very last guide. Try to make sure that the last panel, which is likely to be cut along the entire length, is located at the far wall.
Conclusion
Laying plastic ceilings in the bathroom is an interesting activity. All work is built on a clear sequence of actions. Each measured piece of plastic is stacked behind the previous one. Holes are made in the plastic at the installation site of the fixtures. A regular mounting knife will easily make a hole of the desired diameter. Having installed the lamp, we continue to set the structure further and do this in each case, installing the lamp. Having reached the old wiring, we connect new lighting fixtures. The connection can be parallel or series, depending on the functionality of the existing wiring and the number of fixtures in your bathroom.

Before installing and fixing the last panel, check the operability of lighting equipment and ventilation. The end of the work will be the installation of the last plastic panel.
Polyvinyl chloride is a material widely used in various fields of activity, it also finds its application in construction. PVC panels are made for walls and ceilings. Due to their low cost, resistance to adverse external influences and durability, such panels are well suited for finishing ceilings in the bathroom. Installation here does not require high qualifications and expensive equipment, it is enough just to familiarize yourself with the algorithm for its implementation, which will be described in this material.
Advantages and disadvantages

Prices for plastic ceiling panels
plastic ceiling panels
But there are a number of disadvantages that should also be kept in mind.
- If the bathroom is too large, such a ceiling may look inorganic, since the panels have a limited length (3 meters).
- Installation on a metal frame lowers the height of the ceiling by several centimeters.
- Complex design solutions, such as a multi-level ceiling and its bends, are not feasible here.
As you can see, the disadvantages of this type of ceiling are insignificant and outweighed by its advantages.

Required inventory
To equip a PVC ceiling yourself, you will need the following set of materials.

Decorative profiles are used to give the ceiling a preferred edging, their varieties are presented in the table.
Table. Types of decorative profiles for suspended ceilings made of plastic panels.
| Profile types | Purpose |
|---|---|
| Hides panel ends |
| Hides corner joints |
| Connects two standard profiles if their length is not enough |
| Completely hides all ends |


Ceiling profile prices
ceiling profile
Execution of work
Step 1. Draw up a work plan. It is not necessary to strictly comply with all the rules for the technical design of drawings, but it is important to accurately fix all dimensions and intervals.

Reference! There is an option for decorating a PVC ceiling that does not require the creation of an iron frame. In this case, the fastening of plastic blocks will go directly to the draft ceiling. The unequivocal advantage of this method is the preservation of the same height of the room.

Fastening plastic panels to the ceiling with "liquid nails"
But such work is possible only if the draft ceiling is in very good condition, if it is perfectly even, has no roughness and fungus damage. Here, fastening will be carried out using building glue for plastic or liquid nails.
Step 2 Next, preparatory activities are carried out. If lime is crumbling from the rough ceiling, then such areas must be removed. All loose wires must be wrapped in corrugated plastic pipes, leaving them free exit only in those places where they will go into lighting fixtures. The old ceiling is treated with an antifungal solution.

Step 3 Then a horizontal line is drawn along the perimeter of all walls. It will indicate the height of the panels. The line should be at a certain distance from the ceiling, which depends on the planned use of the resulting empty space. If nothing will be placed there, then a five-centimeter indent is enough. If it is planned to place ventilation or massive lighting fixtures, then the distance can increase to two to three tens of centimeters.
Step 4 The line is drawn with a level. If the bathroom is already tiled, then its extreme seams can be used as a ruler.
Frame installation
Step 1. Before starting work, the tile is closed with polyethylene or cardboard.

Step 2 The start profile, that is, the UD form, is installed first. You need to apply it to the wall so that the lower border coincides with the drawn lines. Cut into pieces the length of the entire wall.

When the profile is attached to the wall, holes are drilled in it every fifty centimeters to insert dowels there, the depth of the hole is equal to the length of the dowel with a margin of 10-20 mm. There are hammered dowels and screwed with a screwdriver, the first type is more convenient to use. Before drilling a wall, it must be checked for wiring using a detector device.


Step 3. Then the CD profile is laid out. It is inserted perpendicular to the UD into its slots. There are two ways to lay these elements: along a long wall or across it. They have different aesthetic effects: if the room seems more spacious when laid along, then when laid across it looks more compact. The longitudinal structure has one disadvantage: since the profile sags between two grooves at a sufficiently large distance, it requires additional fastening to the ceiling in the form of suspended structures.

Hangers are fixed before installation of CD forms. To correctly calculate their future location, make marks on them when installing the UD, which will help you determine both the location of the hangers and the place of the CD mount.
Step 4 If a chandelier will be used for lighting, then it is necessary to draw one rail across all the others in the place where it will hang.
Chandelier prices

Panel installation
A plinth is installed along the perimeter of the wall directly under the base profile, liquid nails or glue are used for fastening. The plinth is made of the same material as the panels themselves, differing from them only in their shape. Some types of skirting boards are fixed without the help of special tools, mechanically attached to the UD panel. This includes F-shaped skirting boards.

On a note! During the arrangement of the plastic ceiling, you will probably be puzzled by the problem of creating the right angles. For the wall panel, it is not necessary to make them, since this element is still not striking. But for skirting boards that are in plain sight and represent the edging of the ceiling, the design of the corners is necessary.

The most time-consuming way is to cut them out with a miter box from standard products. But the miter box is not always at hand, and not everyone knows how to work with it. In this case, you can purchase special corner nozzles that can easily be attached to the junction of two skirting boards.

The panels are cut according to the dimensions of the wall. For convenience, you can make them a little shorter than necessary, but with a difference of no more than 5 mm. A profile strip is taken, one end of it is threaded into the groove between the UD form and the plinth and fastened there. The other end of the strip is attached in the opposite groove; to be able to thread it there, you need to slightly bend the strip, but be careful, because at this point it is easy to break. Each strip has mounting locks. The first inserted panel is fixed to the plinth with a screw. Subsequent panels are connected to each other using press washers. The latter has a half width, for which a standard panel is sawn into two parts. This panel is attached to the groove of the profile and the plinth without the use of bolts and washers.
Prices for ceiling plinth
ceiling plinth

Please note that the laying of plastic panels occurs perpendicular to the direction of the CD molds. In other words, if the CDs were stacked along the long side of the room, then the plastic panel should run across it.
Reference! In addition to parallel and perpendicular, there is also a diagonal direction of frame fastening. It requires more precise calculations for its implementation, but a rough planning guideline is a parallel direction rather than a perpendicular one.

Lighting
A place is allocated in advance for the lamps. Check the functionality and safety of all wiring. When laying plastic blocks, do not forget to remove the ends of the wires from the filled areas so that they do not become “walled up” between the ceilings. You should not feel sorry for the wires, even if they are carried out with a spare length, the risk of not reaching the wire to the planned place can jeopardize the entire arrangement plan.
In the desired panels, holes are drilled to form your lighting fixture. The easiest way is to make round holes, for which it is enough to put a special nozzle on the puncher. The luminaire is mounted after the panels have been installed.

On this, the process of arranging a plastic ceiling can be considered completed. And this is another advantage of this material - it does not need any additional lining. After the completion of the main work, such a ceiling is a full-fledged element of the home interior, and the bathroom with its help can change beyond recognition.
Video - Finishing the ceiling in the bathroom with plastic panels
When starting a bathroom renovation, we strive to do it quickly, but at the same time not to lose in the quality of the finish. In addition, it often happens that financial difficulties do not allow you to fork out and purchase expensive materials, and you also need to add the cost of paying workers. If you are faced with a similar situation and do not know how to decorate the ceiling in your bathroom, the best option would be a suspended ceiling made of PVC panels in the bathroom.
What makes PVC
The use of plastic sheets has started relatively recently, but they have already gained wide popularity in the construction market due to their good price-quality ratio. They are used for decoration and residential premises, and offices. Ease of installation and attractive appearance allow you to quickly, efficiently and relatively inexpensively decorate any room. In apartments, the material is ideal for decorating the ceiling of the kitchen, and especially the bathroom.
Advantages of PVC panels:
- Remarkable moisture resistance, which allows them to be used in rooms with high humidity (bathrooms, showers);
- Resistance at elevated temperatures, resistance to temperature extremes;
- Ease and speed of installation (even beginners in the construction business can install pvc panels);
- Light weight, which allows you to easily transport pvc panels and mount them in a sheet;
- The use of pvc ceiling panels for the bathroom will allow you to close the irregularities of the ceiling, mask pipes, ventilation ducts, hide electrical wiring;
- Installing a ceiling in a bathroom made of pvc panels will increase sound insulation and reliably protect the ceiling from moisture accumulation and the formation of fungus.
Important ! The ceiling in the bathroom of plastic cladding has another advantage. It is not only easy to install, but also, if necessary, can be easily disassembled, gaining access to communications that require urgent repairs.
Upon completion of the necessary work, you can install the plastic sheets back, and the decor of your bathroom will be safely restored.
Material characteristic
PVC ceiling panels are divided into matte and glossy. Glossy sheets reflect light well, so they are better suited for the ceiling. Although matte options also look very good.
Panels are also divided into suture and seamless. In the seam cladding, special locks are made for joining into the canvas, and the seams between adjacent panels are visible in the finished canvas. In a seamless version, they form a single canvas due to a very tight fit to each other.
According to the method of drawing a picture, plastic panels are:
- Printed, the pattern is applied to the surface of the panels using a special shaft, which is rolled over the surface;
- Film, a special thermal film is used to transfer the pattern, the pattern is transferred from it to the surface of the cladding under the influence of high temperature. Such options are more resistant to abrasion and the use of detergents.
In the assortment of building supermarkets you will find many options for colors and patterns for every taste. Panels are produced both in plain color and with various patterns. It can be an imitation of marble or wood, geometric or floral patterns, even whole paintings. When choosing the color scheme of PVC panels for the ceiling in the bathroom, give preference to light colors.
The classic option is, of course, a white ceiling, it is ideal for any wall design, but by showing your imagination, you can choose an interesting color scheme for the PVC panel ceiling in the bathroom, as in the photo.

When purchasing plastic sheets for the ceiling, pay special attention to their quality, since any marriage or flaw in the material on the ceiling will be especially noticeable. Also check that the characteristics specified in the accompanying documents correspond to the actual product being purchased.
Ceiling panels differ from wall panels in a smaller thickness, respectively, their rigidity and strength are lower, this should be borne in mind when you buy, deliver them home and install them. They can be easily damaged by careless handling.
Installation of the ceiling in the bathroom with PVC panels
PVC sheets are attached to a wooden or metal frame. For the bathroom, it is preferable to use metal, as it is not subject to decay and destruction by fungus, thus, it will last much longer.
Preparation for work
In addition to panels, you should stock up on PVC profiles. They are made of the same material as the sheets, designed to make aesthetic and beautiful transitions in the corners of walls and ceilings.
Please note: for finishing ceilings, you must purchase special ones. They are significantly lighter than wall panels due to their thinner thickness. The thickness of the sheet is 3mm, while the thickness of the wall plastic can be up to 10mm.
Due to their lightness, ceiling panels give less load on the fastening. But the disadvantages include the great fragility of the sheets for the ceiling, they can be easily broken during installation, if carelessness is allowed in the work.

Before proceeding with the installation of a PVC sheet ceiling, consider which lamps you plan to hang in the bathroom, what their power will be, how to arrange them so as not to overheat the plastic lining. In the case of installing recessed fixtures from the draft ceiling, it is necessary to retreat at least 10 cm, and preferably with a margin, marking the level of the new ceiling.
To calculate the number of pvc panels, you need to determine the area of the ceiling (multiply the lengths of two adjacent sides), then divide it by the area of \u200b\u200bthe panel indicated on the package, add 20% for the margin and round up to the whole panel.
If the length or width of the ceiling is less than the length of the PVC sheets, you can visually calculate how many pieces are needed.
For the manufacture of a metal frame, we need two types of profiles: UD-profile 2.5x2.5 and CD-profile 2.5x6cm.
To calculate the required number of metal profiles, we need a ceiling diagram. We lay straight lines on it parallel to one of the walls, given that the distance between the profiles should be approximately 40-50 cm. Multiplying the length of the wall by the number of lines drawn, you get the required number of profiles 2.5x6cm. To determine the amount of a 2.5x6cm rigid profile, calculate the perimeter of your bathroom ceiling.
In addition, you will need self-tapping screws for fastening in the bathroom and dowels for attaching metal profiles (with a margin).
It is better not to use a wooden beam and brackets for mounting the ceiling frame in a bathroom made of PVC panels, as this will affect the reliability and durability of the structure.

Ceiling plinth (usually 3 meters) - divide the perimeter of the ceiling by 3 and round up to get the required number of plinths.
Installation of panels in the bathroom
Necessary tools: puncher (you can drill), metal shears, screwdriver, hangers, knife, hacksaw, level, liquid nails (or glue), miter box, rag.
Work in the bathroom is carried out in the following order:
- Using a level, along the perimeter of the walls we mark with a pencil or marker the places where rigid profiles are attached. They need to be attached to the walls strictly horizontally, it will depend on whether your ceiling will be even. The horizontal line on the wall will be the level of the new ceiling;
- Along the line along the walls, we fix a rigid profile 2.5x2.5 cm with screws;
- Then we attach a 2.5x6cm profile to the ceiling and wall profile using self-tapping screws, the distance between the profiles should be 40-50 cm;
- We attach plastic skirting boards to the wall, the joints must be cut so that they fit well in the corners of the room so that there are no gaps;
- PVC plastic sheets need to be cut to the size of the ceiling. It is better not to cut all the panels at once, but to cut each one separately as they are installed;
- We insert the first PVC sheet into the recess in the plinth, fasten it to the ceiling profile with self-tapping screws with a press washer;
- Then we cut the next sheet to the required size, insert it into the recess on the fixed panel, fasten it to the profile. This is how all pvc panels are installed, except for the last one;
- The last PVC panel will need to be cut not only in length, but also in width. Then we insert it into the recess on the plastic plinth and move it to the previous panel so that there is no gap. We do not fasten the last panel.
To thoroughly understand all the nuances in the work, before starting an independent repair, look at the options for installing the ceiling in the bathroom from PVC panels on the video posted on the repair sites.

