How to ditch walls for wiring. Options on how to ditch walls in a monolithic, brick or panel house: is it possible to ditch without dust How to ditch walls for wiring
The most popular and safe option for laying electrical wiring is hidden.
In this case, power cables and wires are mounted in special grooves made on the surfaces of walls and ceilings of various materials. A similar process is called gating and is carried out by professional tools.
Let's figure out how to properly ditch the walls for wiring and what rules to follow when carrying out work.
Important rules for chasing surfaces
Installation of electrical wiring is carried out in a closed way. After completion of work, all strobes are carefully sealed with plaster, putty mixture or gypsum.
The rules for the distribution and laying of electrical wires in buildings and structures are strictly regulated by the current building codes. Therefore, when arranging strobes, it is necessary to adhere to the following rules:
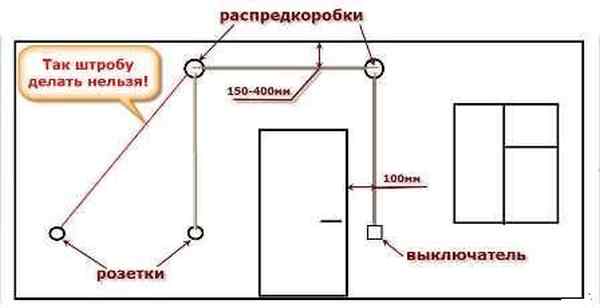
- Shtroblenie is carried out only in the vertical and horizontal direction. Inclined strobes are equipped in rooms with sloping surfaces of walls and ceilings - attics, attics, stairs.
- The width and depth of the strobe is determined by the cross section of the electrical wiring. Optimal dimensions: depth - 25 mm, width - 30 mm. When laying wires in corrugated hoses or metal trays, the depth can be increased up to 35 mm.
- The maximum allowable length of one channel from the switchboard to electrical accessories (sockets, switches) is 3 meters.
- The minimum allowable distance from engineering equipment (heaters and gas risers) to horizontal channels is 50 cm, and from floor slabs - 18 cm.
- The optimal distance from corners, door and window openings is 12 cm.
- When arranging a strobe under the ceiling surface, an indent of 20 cm is made from the upper corner.
- If there is a metal frame in monolithic reinforced concrete walls, it is not allowed to cut or damage it. Wiring is carried out without disturbing the steel support.
- Laying of power cables is not carried out in load-bearing walls, columns and floor beams of multi-storey buildings, which can lead to weakening of the finished building structure.
- It is forbidden to cross individual elements of electrical wiring during their installation.
- With a low location of electrical accessories on the wall, the strobes can be arranged in the floor or the cable can be wound through the floor plinth.
Competent preparation of the working drawing and chasing in accordance with established rules guarantee the safe and uninterrupted operation of hidden electrical wiring.
Marking the surface for wiring
Wall chasing is carried out in accordance with the developed wiring diagram. If it is planned to redevelop the premises with the laying of new wiring, the existing wires are checked along the gating route.
For this, a special detector is used to detect wiring. The marking of the surface of the walls is carried out as follows:
- A route for laying power cables is applied on the surface in the form of horizontal and vertical lines using a building level.
- The location of electrical accessories is determined: switches, sockets, dimmers, thermostats.
- The doorway is covered with clean rags or film, which prevents dust from entering other rooms.
Overview of strobe tools
Professional tools are used to arrange strobes for power cables.
The most requested of them are:
- hammer and chisel;
- perforator;
- grinder and grinder;
- wall chaser.
Hammer and chisel
The standard tools for making strobes for wiring are a hammer and a chisel. With their help, you can make short and shallow channels in soft material - wood, putty and plaster.
The work process is carried out in stages. The tip of the chisel makes small indentations along the edges of the channel. Next, using a hammer, the core of the cavity for laying the cable is knocked out. To obtain the required depth of the strobe, the removal of each subsequent layer must be carried out evenly.
The disadvantages of this method of chasing include laboriousness, high time costs, and poor quality of strobes.
Perforator with nozzles
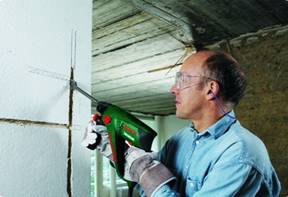
A more professional tool is a hammer drill with special nozzles that make it easy to ditch hard materials - concrete, brick and aerated concrete.
The perforator is used for arranging cable channels and mounting sockets for electrical accessories. To perform the work, two types of nozzles are provided - a shovel and a wide drill.
The work is carried out as follows:
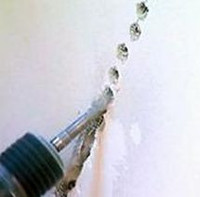
- using a perforator, small holes are made up to 2.5 cm deep in increments of 1.5 cm along the intended cable laying line;
- the blade is set at an angle of 45 degrees to connect the holes into a single groove.
This method provides for obtaining a more even strobe with minor surface chips that require additional processing.
A significant drawback is the high noise performance (95 dB).
Bulgarian
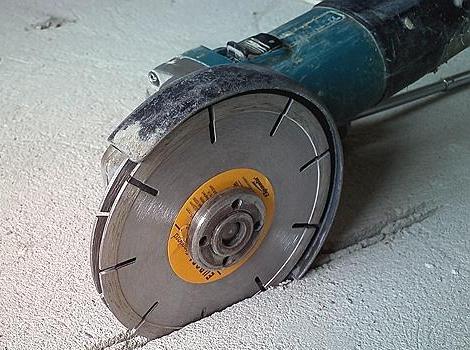
With the help of an ordinary grinder (grinder), you can quickly and efficiently pierce a wall made of brick, concrete or with a plastered surface. For work, a diamond disc is used.
Chasing walls for wiring is carried out as follows:
- along the line for the strobe, the grinder runs two files parallel to each other with the required parameters in length and width;
- a perforator or chisel removes material inside parallel lines to the required depth.
Bulgarian allows you to get a smooth channel along the entire length. The only drawback of the tool is the large amount of dust produced during the work.
wall chaser
This is the fastest and most professional way of chasing surfaces for electrical wiring. The tool is completed with replaceable disks and a special dust collector.
The wall chaser allows you to simultaneously make two cuts under the gate, while the necessary parameters are set by the working disks.
Thus, two parallel furrows are obtained with a small amount of material in the middle, which can be removed with a drill equipped with a special nozzle.
The advantages of the wall chaser include high performance, evenness of the cable channel, low level of dust formation due to the dust collector. A significant disadvantage of the tool is its high cost.
Features of the technology of chasing various surfaces
Having a prepared scheme and a working tool, even a novice master can carry out wall chasing for electrical wiring. Depending on the type of wall material, the chipping technology can vary significantly.
Concrete surfaces
Chasing concrete is a long and laborious process. Such material is characterized by high strength and density, so it is inappropriate to use a metal chisel and hammer.
A suitable material for chasing concrete surfaces is a hammer drill with a special drill and a chasing cutter. The perforator creates a high noise level, which can cause a lot of inconvenience to neighbors, so work should be carried out during the daytime with small technological breaks for 2 hours. In addition, working with a hammer drill is associated with the formation of a large amount of dust when processing a hard surface.
When performing large volumes of work, a professional wall chaser is used, which allows you to chase concrete in a short time with a minimum amount of dust.
Wood surfaces
For arranging strobes in wooden walls, all household tools are used with the exception of a perforator. The best option is a hammer and a chisel (chisel replacement), which allows you to quickly and efficiently remove excess layers of wood between the cuts made by the angle grinder.
You can also use:
- circular saw. It allows you to make even cuts of the desired size;
- manual frezer . For this, a special cutter is used, which allows you to make straight and side strobes.
Aerated concrete surfaces
The process of making channels for wiring is as follows: the tool stretches along the drawn line and is pressed against the surface with force. It is allowed to use a grinder with a circulation type nozzle, during which much more dust and noise are generated.
Brick surfaces
When installing electrical wiring in rooms with brick walls, chasing is not performed. The cable is fixed to the surface with dowels, after which it is covered with a thick layer of plaster.
If it is planned to lay the cable in protective corrugated hoses or metal channels, chasing is performed with the same tool that is used for concrete walls.
For arranging horizontal strobes on brickwork, you can use a chisel and a hammer, for vertical ones - a grinder with a diamond blade, a chasing cutter and a perforator with a nozzle.
If the walls are plastered, you can limit yourself to a hand tool, but it will take much more time to gouge.
The rules for making strobes for electrical wiring are as follows: horizontal ones are made at the seams, vertical ones - between separate rows.
For mounting sockets and switches in the wall, seats are made using power tools.
Are load-bearing walls allowed?
When developing a project for laying electrical wiring, the number and location of load-bearing walls are taken into account, and the possibility of making gates in them is also determined.
In accordance with current legislation and architectural regulations, it is prohibited to carry out any kind of work in a load-bearing wall.
Shtroblenie as one of the types of construction work can lead to a decrease in the strength of the structure of the house as a result of the exposure of the reinforcing belt and the development of corrosion processes.
To carry out such work, you must obtain permission. For brick, block and wooden houses, permission will be issued, for panel houses - denied.
Important! In load-bearing walls, the depth of the channels for laying cables should not exceed 2 cm.
A well-chosen tool, taking into account the wall material, will allow you to make do-it-yourself strobes for electrical wiring. Of course, in practice, beginners may encounter unforeseen difficulties or make blunders. To guarantee a high result, if possible, it is worth entrusting the work to professional teams.
Most often, they begin to think about concrete chasing when they begin to make repairs in new housing, or they want to redo something in the old one. refers to durable materials, especially if it still has it, but if you want to run additional sockets, electrical wires or other pipes, then you can’t do without it.
Consider the norms and standards, where you can do it, and where it is strictly forbidden, what tools you will need, and much more.
If you have planned work, then be sure to draw up a diagram and do not forget to take pictures of everything, as this will come in handy in the future.
As we have already said, gating is done in order to lay, make new sockets or switches. It is necessary to make special grooves. Before starting work, study the regulatory documents. If you violate load-bearing walls, you can not only pay a fine, but also harm your neighbors' homes.
It is impossible to make horizontal channels in houses from panels, as in this case the reinforcing materials are damaged. It is not allowed to make strobes in the seams, camps bordering the stairs, if this will affect the floors. The only option in these cases is to work on the plaster.
Wall chasing is done only in horizontal and vertical directions. The width and depth of the groove should not exceed 25 mm. According to SNiP 3.05.06-85, it is necessary to deviate from:

The work process also depends on the material where it is necessary to make a strobe. For example, in, this can be easily done using a chisel and a hammer. But if you need to work with concrete, then you need special tools.
Do not forget to prepare before work. Find the places where the old wiring was carried out, this will save you from getting into electricity. If you do not know there is no wiring diagram, then you can use the indicator. Remove the old coating from the walls (wallpaper, paint, plaster). So that the whole house or apartment does not become dusty. Be sure to hang a wet rag or a special one on the door. Construction film.
Materials and tools
Ideally, you need to invite specialists who will do all the necessary work, but you can do everything yourself.
You will need special tools. If possible, use a strobe, when choosing, pay attention to its power. It is also possible to cut through the wall with diamond circles, but some parts still have to be knocked out with your hands. You can drill a large number of holes, but this is quite a tedious job. As you understand, there are many options for which tools you can use.
IMPORTANT: it is not necessary to buy expensive tools, you can just rent them.
When carrying out work, first find out what the wall is made of. This will allow you to find out if there is reinforcement and approximately how and where it is located, location, and the choice of tool also depends on the surface material.
The easiest will be gating or. It is bubbly, so it is easier to destroy than a monolithic structure. After your strobe is ready, do not forget to cover it with a small layer, as well as close up extra potholes. This will provide you with an additional protective surface.
The most difficult will be chasing. The work is complicated by the fact that reinforcement is laid in the wall. Here it is necessary to use only specially designed equipment.
When buying tools, pay attention to the fact that it is best to immediately purchase nozzles that will be useful on different surfaces.
Make two notches for the entire width of the strobe, they should be parallel to one another. Deepen the groove with a perforator, as we wrote above. This way you will get smooth edges and good channel depth.
Disadvantages: a lot of dust, but with an industrial vacuum cleaner this can be fixed. To immediately work as a grinder and a vacuum cleaner, you need an assistant. The closer the vacuum cleaner is to the strobe, the less dust there will be. After work, ventilate the room well.
wall chaser
It is considered a professional tool for creating strobes. 2 disks are fixed on the tool, the distance between the disks can be adjusted. Thus, 2 cuts are made at once. You can also adjust the depth. On the wall chaser there is a casing that is tightly adjacent to the wall, and a vacuum cleaner is also attached, the process can be considered dust-free work. It is important when working that no old wallpaper remains on the walls, as they clog under the casing and clog the vacuum cleaner.
The remains of concrete are selected with a perforator. This method is the most expensive. Most often, only professionals have such tools. A wall chaser can make holes for pipes up to 5 cm in diameter.
Strobe under the wallpaper
Sometimes it is necessary to make a track right under the wallpaper. To do this, remove a small strip of wallpaper. We retreat more than 5 cm from the future track, and make an incision with a clerical or assembly knife. If you need a horizontal strobe, then we make an incision higher.
Soak, fold and attach using tape. The resulting area where the work will take place should be more than 10 cm. We use only a puncher or wall chaser to avoid a lot of dust. After carrying out the work, we lay the wires, putty and wait for everything to dry, then glue the wallpaper in its original place. Do this very carefully so as not to damage the wallpaper. The same work is carried out if it is necessary to shred the walls for sockets.
Sockets and finishes
To make a hole for a socket or switch, follow these steps:
- Drill a hole with a diameter of 0.8 cm in the center. Using a crown, make a notch. This will be the circuit of our outlet or switch.
- Drill 8 to 10 small holes along the contour.
- Without applying force, make a hole using a crown. When working, do not damage the reinforcement, this can lead to the destruction of the walls.
If the outlet is not high from the floor, then the wires can be hidden under the floor.
When all the holes are ready, clean everything well from dust. We lay the cable, putty (gypsum, plaster, alabaster powder), close up the strobe, carefully align everything. Glue wallpaper on top.
During a major overhaul or redevelopment, we always face the question of laying wiring, pipes, laying cables, moving switches and sockets. All these works are connected with wall chasing. Let's try to find out what kind of work it is, why it is needed and what tool is needed for wall chasing.
So, gating is the gouging of grooves in the walls and ceiling for laying electrical wiring, piping systems. To lay and hide electrical, antenna or telephone wires and cables, we also use gating.
When we install the air conditioner, the wall also needs to be ditched.
If you need to hide the existing wiring, we make a channel (strobe) in the thickness of the plaster or concrete, lay the wires or cable there and putty it.
We also ditch walls when it is necessary to mount internal models of electrical sockets or switches.
Such models are built into the wall, so you need to cut a round hole that matches the size of the switch or outlet.
Choosing a tool depending on the wall
Chasing is carried out with the help of special tools, the choice of which depends on the material of the wall in which the channel needs to be made. For this, a grinder, a puncher, a wall chaser, a chisel and a hammer are used. We can make gates on concrete partitions with a grinder, a puncher, and a wall chaser.
The panel wall is processed in the same way as a concrete wall. But you can not do diagonal chasing. The maximum depth of the channel should not reach the reinforcing cage, so as not to damage the structure. If the depth of the channel reaches the reinforcement, then it is better to make an additional layer of plaster or level the surface with drywall. We make grooves in a brick wall with a wall chaser.
Bulgarian
This is a manual angle grinder, which is used when chasing hard concrete walls, when you need to punch many long grooves for wires. We install a special disc for concrete work on it, for example, a diamond disc.

The thickness of such a disk is usually sufficient to obtain a strobe of the desired size.
If the width of the channel should be greater, then we make two channels in parallel at a distance of at least 5 mm, and then we hollow out the gap with a perforator.
It is impossible to expand the strobe by moving the grinder disk perpendicular to its plane: the machine is not designed for this, and this is very dangerous.
When making strobes, we use heavy tools, the power of which exceeds 500 watts, and high-quality concrete discs. When working with such a tool, do not forget about the safety rules. We work carefully, we hold the car firmly in our hands.
You can't drop the tool either. Although it will turn off, the rotation of the disc will not stop immediately, and the surface of the floor or even the legs may be damaged. Tighten the disc fastening nut tightly so that the cutter does not fly out during operation. This also happens, and it is extremely dangerous. Shtroblenie with a grinder is ideal. The only drawback of this tool is a large amount of dust.
Perforator
We use this tool if we need to make strobes in concrete. Working with a puncher, we insert a "shovel" into it. This is a nozzle, the shape of which allows you to gouge a narrow and elongated hole corresponding to the shape of the strobe.
Do not forget that when making a direct cut, the blade cannot be placed across the basting, since pieces of wall material may break off. If you need to make a recess for the socket, we use, in addition to the “shovel”, the “bayonet” nozzle. We mark the hole with a bayonet, and with a spatula we make it wider.

Performing wall chasing with a perforator, we can use another method. We insert a drill with a diameter of 6 to 10 mm into the puncher and set the mode of the impact drill. We drill holes along the channel at a distance of 10 mm, then insert the spatula, set the bumper mode and punch the gaps between the holes. We do the same when making seats for sockets or switches.
To get a hole of the desired depth, on the drill (at the required distance from the tip of the drill) we wind electrical tape, which will be the mark of the desired depth.
I must say that the channels punched by the perforator may be uneven, and they will have to be processed additionally.
To make wall chasing with a puncher quickly and easily, you need special skills, so using this tool, you need to be careful and careful. The rotary hammer makes a lot of noise during operation.
wall chaser
This tool is designed specifically for chasing any wall and is considered the best tool for punching grooves. Using a wall chaser, we make recesses for electrical wiring, for water supply or heating systems. It works on the same principle as the grinder, but differs from it.

In the wall chaser, there is not one, but several diamond discs, the distance between which can be adjusted. It is possible to adjust the depth of the strobe. The tool is equipped with a dust collector that directs the waste into the vacuum cleaner or takes it to the side.
Starting to make channels and holes, be sure to check the thickness of the walls. If the wall is thin, we take into account the loads and make strobes closer to the ceiling or to the floor, so that there are few of them on the wall itself. If the wall thickness is more than 10 cm, we cut the grooves along the shortest distance, saving time and effort. In addition, do not forget to check if there is electrical wiring in this area.
Chisel and hammer
The cheapest, but also the most time-consuming option. We use these hand tools if we need to make short channels in plastered walls. Hammering concrete or brick by hand is impractical.

If you still have to hammer the wall with a hammer and chisel, then we follow simple rules:
- first we make a recess along the marked edges;
- we make a cut across the future recess, and then with a hammer we punch the desired groove by 5-10 mm;
- we go deeper to the same depth, and as a result we get the desired channel.
Knowing about the features of using tools for chasing, you can choose the right device and do all the work yourself.
When making repairs in an apartment or house, each owner is faced with a stage when new wiring needs to be laid. This is done in order to install new sockets, since there is no power supply in the intended locations for their placement. It would seem: I bought a branched wire, invited a professional, and that's it. But the work of the master is not free, and you can ditch the walls for wiring yourself. It is enough to carefully study the material of the article and correctly apply it in practice.
How to ditch a concrete wall
Before starting work, take a sheet of paper and a pencil to schematically depict the passage of the wire, the exact locations of the switches and sockets. To do this, it is recommended to familiarize yourself with the set of rules for the distribution of electrical equipment in documents 3.05 06-85 SNiP. Many people think that they know how to ditch, but in fact, unfamiliarity with the elementary, at best, leads to a dead end for an amateur electrician. It is better to read the main points once and do the job well. Below are 6 basic requirements that must be followed:
- Do not carry out horizontal chasing more than 150 mm from the overlapping slabs.
- Beware of vertical grooves near gas pipes. The distance from them should be at least 400-450 mm. Corners and windows should be at least 150 mm apart.
- Walls can only be shredded horizontally or vertically. Ideally, there should be no extra slopes. The only exception can be the design of the attic: here the wiring is laid parallel to the wall at an angle.
- The length of one continuous furrow should not be more than 3 meters, and the depth and width - 25 mm.
- As well as tilts, there should be no turns. The transition to the switch and the socket must be at the same angle (horizontal to vertical transition), except for the case with joints that have a horizontal surface.
Important! Horizontal chasing of load-bearing walls is strictly prohibited. This rule applies to absolutely all buildings in any region. For panel houses, these are all walls. In this case, you need to watch a video tutorial specifically for your layout.
After studying these rules, drawing up an action plan, determining the location of the wiring and outputs, you can begin. Don't forget about safety. Any construction work requires care and accuracy.
Tool selection
There are a huge number of ways of gating for wiring. They differ in the use of different tools: a wall chaser, a puncher, a grinder, a chisel and a hammer, an impact drill. The first method is famous for its ideal result (smooth cuts), but it has a high cost. The procedure is performed with a perforator very quickly and has a relatively low price. Grinding with a grinder gives even furrows, but creates a lot of difficult-to-clean debris. The only plus of a chisel with a hammer in this case is cheapness. But if you want the work to turn out to be of high quality, do not spare money for tools.
How best to make furrows, choose for yourself. The work depends not only on the tool, but also on the master, so it is better to check the correctness of the actions once again than to redo the work twice.
How to ditch walls for electrical wiring with a perforator
Wall chasing with a perforator is the most popular of all existing ones. This is explained by the fact that this construction procedure does not require much time and money.
Before starting, it is necessary to carry out the classical preparation of the walls. It is no different from the one that is carried out using other tools. All stages are extremely simple, but require a responsible approach of the master:
- Check for old electrical wiring. Sometimes there are unpleasant moments when wires from the old electricity circuit appear in the walls. Do not risk life and health, carefully check the surface. There is a special device that quickly copes with this task.
- Direct marking of the wall. After making sure that there are no live wires left in the wall, you can proceed to the schematic markings at the places of the proposed wiring. Draw lines from the central distribution box to power sources (switches, sockets, lighting wires).
- Protection against dirt and dust. Don't forget to cover windows and doors: the process isn't too clean, dust will spread throughout the room and be difficult to remove.
After completing the preparation, proceed to the main actions. Take a puncher and drill small holes along a pre-drawn line at a distance of about 1.5 cm from each other. Then it all depends on your tool: either you switch it to the mode intended for chasing (you need a special nozzle), or insert a simple drill. Carefully connect the holes by advancing the punch.
Important! If you are a beginner, do not neglect making holes, since without experience in such work it is quite difficult to achieve a perfectly even path of lines.
If you still have questions, check out the video below:
Bulgarian when shtroblenii
A grinder is another tool that will help you make cuts for wiring. How to cut through a concrete wall with it? It is imperative to have a diamond disc, as the material of the wall is very durable. You can consult with a professional, and he may suggest some other disk. But do not complicate the task: the diamond one is easy to get, plus everything, the work will go much faster with it.
So, the process consists of several steps. First, we cut two strips on the marked section of the wall. The slots should be parallel to each other and have a distance of 2 cm between them. Next, you will need a puncher or other tool to eject unnecessary residue between the cuts. You can take a puncher with a so-called hammer. After that, the wiring is laid in the openings and covered with plaster.

Important! The recess for the wires should be of such a depth that it is convenient to plaster at the end of the work. When the wires are completely hidden and lie quite far, there is free space that is easy to work with, while at the end the wall looks smooth.
You can watch the supporting video:
No dust: is it possible?
The two previous methods have one common disadvantage - the formation of a huge amount of dust. Its layer is so large that even an industrial vacuum cleaner is not able to completely clean the room. People who are interested in cleanliness in their homes prefer a wall chaser for making slots. This is a tool that resembles a grinder, only diamond wheels are already built into it. A special cover allows you to adjust the distance between the two discs and control the depth of the furrows. The advantage of a wall chaser in a vacuum cleaner that does not allow dust to go beyond the casing. The downside is the price of the tool. For a one-time construction work, this method is clearly not suitable: you will have to buy a tool for a significant amount. But if you require indispensable cleanliness, you can rent the device. Although not the fact that it will be inexpensive.

How much does the construction procedure cost
The price of the process directly depends on the criteria for its implementation. It is clear that doing it yourself at home is more profitable. The cost will directly depend on the tool, plaster, the wiring itself. Sometimes it's cheap, sometimes it's not. For example, choosing a puncher as a device, you only need to pay for wires and termination materials, because, as a rule, every man has a tool. But giving preference to a wall chaser, it is unlikely that you will be able to save money.
Having decided to order the work of a master in a construction company or from a private specialist, you should not count on an acceptable price. Get ready to shell out a tidy sum. This work is dangerous, therefore, appropriate payment is requested.
Home renovation is never complete without making channels for electricity, so it is important to know the basic requirements for wall chasing, as well as follow safety rules during construction.
If the wiring in the house changes, it is not always laid through the old channels. In order not to violate the aesthetics of the interior, to ensure fire safety, to protect the wiring from possible damage, it is made hidden and hidden in strobes - longitudinal recesses hollowed out in the wall or ceiling. The process of preparing surfaces for wiring is called gating.
Basic norms and rules for wall chasing for wiring
Chasing walls and ceilings for wiring is a critical type of work, and the procedure for its implementation is regulated by a number of regulatory documents in the field of construction.
- Chasing channels in a load-bearing wall can affect its bearing capacity, so such operations require mandatory coordination with the architecture department. It is possible to obtain permission for chasing load-bearing walls in brick houses; as a rule, the ban on panel houses is categorical. The problem can be solved by laying wiring in walls made of. We talked about the installation of such walls in.
- It is also strictly forbidden to carry out gating in floor slabs, horizontal wiring is laid at a distance of 15-20 cm from them.
- An embroidered seam between the plates cannot be used as a strobe.
- The distance from corners, door and window openings to the gates should be at least 10 cm.
- Shtroblenie should be carried out at a distance of at least 40 cm from the gas pipes.
- Do-it-yourself wall chasing for wiring should be done strictly horizontally or vertically, in planes parallel or perpendicular to the floor. The only exception is attic rooms, where chasing of an inclined surface is possible.
- The maximum continuous length of the strobe can be 3 m, depth and width - 2.5 cm.
- If the thickness of the structure is more than 8 cm, the wire should be laid along the shortest path, if less - parallel to the construction lines.
Wiring diagram
Video instruction on how to ditch the walls
What tools will be needed?
Chasing for electrical wiring can be carried out using different tools, their choice is largely determined by the base material on which the chasing will be carried out. It can be plaster of different composition, brick, stone, concrete of different hardness, including cellular or with a high content of crushed stone.
- If the layer of plaster is thick enough, a strobe can be laid in it for wiring without affecting the base. In this case, it is permissible to ditch along the ceiling and load-bearing walls.
- In a brick wall, it is most convenient to lay horizontal strobes along the seam between rows of bricks, and for vertical chasing, cutting bricks is indispensable.
- Concrete is the most difficult to ditch, it is the most durable material.
The following tool can be used for chiselling for wiring:

In addition to this tool for chasing walls for wiring, you will need:
- indicators or testers for detecting old hidden wiring;
- level;
- a vacuum cleaner;
- personal protective equipment - goggles, gloves, respirator.
How to prepare for work?

Chasing walls for electrical wiring should be carried out according to the markup, which is carried out using a level and a pencil in accordance with the above standards
If it is necessary to shred the walls in a panel house, the wiring must necessarily pass along the load-bearing wall and ceiling, it is necessary to check the thickness of the plaster layer. If it is not enough to lay the strobe, you will have to additionally plaster the surfaces. An alternative is to cover the walls with plasterboard, arrange a suspended or stretch ceiling - communications will be hidden under them.
Chasing walls for electrical wiring should be carried out according to the markup, which is carried out using a level and a pencil in accordance with the above standards, taking into account the location of openings, niches and protrusions that form additional corners, communications, as well as old wiring.

Chasing under the cable must be done taking into account the fact that it must be laid inside the corrugated sleeve, the thickness and depth of the strobe is determined taking into account the dimensions of the latter.
If it is not dismantled, it must be identified before starting work, referring to the old plan, in its absence, using a tester or indicator, and de-energized. The new wiring must not match or overlap with the old one.
With a pencil, 2 parallel lines are drawn for each strobe. Not only strobe routes are marked, but also places for switches, sockets, junction boxes.
Chasing under the cable must be done taking into account the fact that it must be laid inside the corrugated sleeve, the thickness and depth of the strobe is determined taking into account the dimensions of the latter. A plan is drawn up for laying electrical wiring and placing electrical products.
If the room is residential, it is necessary to take out the furniture and office equipment, if possible, or carefully preserve it with a plastic film.
Gating technology: step by step instructions
Work is carried out in a certain sequence:
- Parallel grooves are made at a distance equal to the width of the strobe. The wall chaser allows you to make both grooves at the same time.
- The strobes are selected to the desired depth using a hand chisel or a puncher with a chisel attachment.
- The strobes are cleaned of dust and primed, after which you can proceed to laying the wiring.

Parallel grooves are made at a distance equal to the width of the strobe.
When using a perforator, the technology is slightly different:
- The material between them is selected using a perforator, which must be held at an angle of 45⁰;
- The edges are aligned with a nozzle - a semicircular chisel.

First, along the entire length of the route, with an interval of 10-15 mm, holes are made with a drill to the depth of the strobe perpendicular to the surface.
- If you do not have the right power tool, you can rent it, it is better to opt for a wall chaser, the cost of renting it (from 260 rubles per day, depending on the brand and model) is comparable to the cost of renting a hammer drill (from 200 rubles) or a grinder (from 240 rubles), and the advantages are obvious.
- It is better to rent a wall chaser or a grinder complete with an industrial vacuum cleaner, it is better to catch dust than a household one. The average rental price is 400 rubles. per day.
- It is better to grind the walls with a grinder together, the assistant should either moisten the surface with a spray bottle to reduce dust formation, or hold the vacuum cleaner nozzle at a safe distance from the tool in order to ditch the walls without dust.
The cost of specialist services
Wall chasing for wiring is the simplest type of chasing (in comparison with chasing for pipes), these works can be done independently. The cost of their implementation by specialists depends on the material of the walls and the tool used.
Most companies provide this service at the following prices:
- in plaster, gypsum wall - 100 rubles / meter;
- in brick - 200 rubles / meter;
- in concrete - 300 rubles / meter;
- on the ceiling - double coefficient;
- the cost of gating a non-standard shape is calculated individually.
By entrusting the gating to specialists, you can count on the fact that they will offer the best plan for laying electrical communications.

Gating scheme in a panel house
Chasing surfaces for wiring is a job that you can do yourself, but you must strictly follow the rules and make sure that there are no prohibitions on chasing. Labor costs depend on the tool used and the material of the surface on which the chasing is performed. To avoid the formation of dust during the work will allow the use of a special tool - a wall chaser along with a vacuum cleaner, it can be rented.

