How to mount metal roof tiles. DIY metal roofing installation - step by step instructions
The question of how to properly lay the metal tile is asked by the majority of developers who have decided to choose this practical, modern and durable material when building a house. This article will talk about how the installation of metal tiles is carried out - the instructions will tell you about all the subtleties and nuances of doing this work.
The article also talks about the construction of a roofing pie, materials, tools, and much more required for the construction of a roof.
The scheme "metal roofing - installation - instructions" used in the article can be useful both for developers and for the builders themselves, both when building a house and when performing such work as erecting a canopy from metal tiles.
Installation technology
Before proceeding with the installation of metal tiles, you can watch or download a video on the Internet - installation of metal tiles, but first of all, we will consider the scheme and basic principles of the device of the so-called roofing pie for metal tiles.
This name is associated with a large number of layers, each of which performs a specific function.
Subject to the correct selection of materials, as well as the calculation and installation, it is this structure that makes the roof made of metal tiles the most reliable and durable.
Regardless of how the instructions will be applied - the installation of metal tiles is planned to be carried out with your own hands or with the invitation of hired workers, you should be aware that the roof is a rather complex structure, during the construction of which it is important to strictly follow the recommendations of manufacturers for the installation of metal roofing, as well as all construction rules and regulations.
Once again, we remind you that it is recommended to watch the video - installation of metal tiles, and the entire process of installation itself should be constantly monitored, since poor-quality work may not be revealed immediately, but during operation.
For example, poor-quality installation of waterproofing and vapor barrier can lead to the accumulation of condensate, a decrease in the quality of thermal insulation and rotting of wooden structural elements.
Important: a reliable and durable roof can be built only in full compliance with all the rules, which include the instruction: installation of metal tiles.

- Rafter system;
- Counterrails;
- Waterproofing film;
- Bars of vertical lathing;
- Starting bar of horizontal crate;
- Horizontal lathing bars;
- Additional lathing;
- Wind board;
- Gutter bracket;
- Cornice strip;
- Metal tiles;
- Roofing ridge;
- Ridge seal;
- Dormer window;
- Insulation material;
- Vapor barrier material;
- Attic filing.
The figure shows the installation diagram of the metal tile, in accordance with which the works described below are performed.
But first you need to figure out what tools will be used to install the coating.
Tools and equipment
This instruction: metal tiles - installation describes the process of installing metal tiles using the example of the Monterrey brand and similar ones, the installation of other brands is generally performed according to the same principle, the distinctive features will be discussed at the end of the article.
To complete the work, you will need the following tools and materials:
- Tool for cutting sheets of metal tiles;
- Screwdriver, preferably with batteries;
- Medium hammer;
- Rule or even long rail;
- Marker.

In order to cut sheets, manufacturers advise using the following tools:
- Manual or electric scissors for metal;
- Hacksaw or reciprocating electric saw with the required blades;
- Cut-through electric shears;
- Electric jigsaw;
- Circular saw with teeth from Pobedit.
After cutting the sheets, you should remove various sawdust, which, by rusting, can damage the polymer coating of the metal tile.
Important: when cutting sheets of metal tiles, do not use a tool with abrasive cutting wheels, such as a grinder.
In this case, exposure to high temperatures will lead to the destruction of the zinc and polymer coating of the material, which will subsequently cause a corrosion process, as a result of which rusty smudges will appear on the roof.
Installation instructions

Useful: Although the installation of long sheets reduces the number of joints, the installation process itself is much more difficult than laying shorter sheets with an overlap.

- Roof freezing;
- Formation of ice on metal tiles;
- Rotting of the battens and rafters;
- Destruction of interior decoration.
In order to avoid the listed unpleasant consequences, the rules for installing metal tiles are recommended to use heat-insulating material of the required thickness.
In addition, when installing metal tiles, it is imperative to protect the insulation material from the side of the metal tile - with the help of a waterproofing film, from the side of the interior - with a vapor barrier film.
Removal of wet vapors from the space under the roof is ensured by the creation of natural ventilation, which is the free movement of air masses from the eaves to the ridge of the roof.
To do this, a gap of about 40 mm should be left between the waterproofing film and the metal tile using the crate. When hemming the overhangs of the eaves, gaps should be left on them, as well as special holes in the rubber seal on the ridge should be released.

Useful: with Yutavek and Tyvek films, the insulation can be installed without a gap.

- On the rafters on top of the waterproofing film, beams are nailed down, falling from the ridge to the eaves. Sheathing boards are attached to these bars;
- The first lathing board from the eaves should be approximately 10-15 mm thicker than the rest. Next, you must observe the correct distance between the boards;
- In the case of the Monterrey metal tile, the installation instructions: the metal tile prescribes to install the second board with an indent from the bottom edge of the first one by 300 mm (the measurement is made from the middle of the second board to be nailed), for the Maxi metal tile this distance is 350 mm;
- The distances between the axes of the lathing boards, nailed in the future, are for different brands of metal tiles: for "Monterrey" and "Supermonterrey" - 350 mm, for "Maxi" - 400 mm.
- Solid lathing is performed in places such as valleys, chimneys, dormer and dormer windows. On both sides of the ridge, two additional edged boards are nailed, while the end strips are raised to the height of the metal tile profile above the ordinary crate.

The tight abutment of the metal-tile roof to the walls on slopes and chimneys is carried out using an internal apron made using the lower abutment strips:
- The bar is applied to the pipe wall, after which its upper edge is marked on the brick;
- With the help of a grinder, a strobe is punched along the drawn line, after which it is necessary to remove the dust and rinse this area with water;
- The installation of the inner apron begins on the wall of the pipe, which is located in the lower part of the slope, that is, from the side of the cornice. The bar is trimmed in place, installed and fastened with self-tapping screws;
- Similarly, the apron is installed on all remaining sides of the pipe;
- If it is necessary to join the strips, an overlap of approximately 150 mm is made. The edge of the apron, inserted into the strobe, should be treated with a silicone sealant, preferably colorless;
- Further, a tie is put into the space under the lower edge of the inner apron - a flat sheet that ensures water drainage. The tie can be directed either into the valley or down to the eaves. Along the edges of the tie, a side is made with a hammer and pliers;
- Sheets of metal tiles are mounted over the tie and apron;
- After laying the roofing around the chimney pipe, the manufacture and installation of the outer apron, made using the upper abutment strips, begin;
- The upper strips are installed in the same way as the lower ones, but the upper edge does not start in the groove, but is attached directly to the wall.
Important: when moving on a metal-tile roof, all necessary safety measures should be observed.
Metal tile: installation instructions prescribes to wear comfortable and soft non-slip shoes and step only in wave deflections. In addition, an installer's belt and safety harness should be used.


- The first sheet is aligned along the end of the roof and fixed at the top with one self-tapping screw.
In this case, near the eaves, you should make a take-off (metal-tile visor) of about 40 mm. The second sheet is laid with an overlap of the first one during installation from right to left, or its edge is brought under the first sheet in case of installation from left to right. - The sheets are fastened to each other using self-tapping screws at the top point of the overlap, while they should not be screwed to the crate under the metal tile - it should be possible to freely move the sheets relative to the self-tapping screw holding the first sheet in the ridge part.
- The third sheet is laid in the same way as the second, after which the sheets fastened together are aligned parallel to the cornice.
If it is necessary to dock the sheets along the length, the order of their stacking, shown in Figure B.
Important: if there is a protective film on the metal tile, be sure to remove it before installation.

Important: when purchasing metal tiles, you need to find out the conditions of the guarantee for the material.
Many manufacturers provide a guarantee for metal tiles only with the condition of using a certain brand of self-tapping screws, therefore it is recommended to purchase self-tapping screws from the supplier along with the material itself.


When installing ventilation elements, first of all, a hole is drawn in the metal tile and cut according to the template.
Further, silicone is applied to the passage element, after which the structure is attached to the metal tile using self-tapping screws.
The ventilation outlet is inserted into the passage element, leveled vertically with a level and also fixed with self-tapping screws.
To connect the hood and the indoor air duct, a corrugated pipe is used, passed through the roof pie, after which the passage is sealed with adhesive tape.- For the installation of ladders, brackets are used in the amount of 4 pieces per section.
They are put on the ladder posts and fixed with M8x40 bolts.
The brackets are fastened to the roof surface in the deflections of the waves with the help of Ш8х60 bolts, and their abutments are sealed.
Along the length of the roof slope, the ladder is recruited in sections, the uppermost of which is attached to the ridge bar with special brackets.

The vertical fencing grating, which ensures safety when performing roof maintenance, is installed on a continuous crate at the level of the eaves.
The fence supports are installed in the deflections of the metal tile waves, the brackets are attached to the support bar using galvanized M8x60 screws using a rubber gasket.
The distance between the supports should be approximately 900 mm. The supports are adjusted with respect to the slope of the roof and are fixed, after which the fence itself is hung on them.
Holes are drilled at the mating points of the supports and sections of the fence (12 mm in the lower crossbar, 12 mm in the upper).
Through these holes, the supports are connected to the sections using the corresponding bolts. After installation is complete, all connection points must be sealed.
To service antennas, chimneys and other elements, transition bridges are equipped on the roof, for the installation of which a continuous crate is also made in advance.
The fastening of the bridge support brackets is carried out in the same way as the roof railing, the slope is adjusted by selecting the holes in the fastening brackets.
Fixation is carried out using M8x20 bolts, located two on each side of the platform.
Tubular snow holders are mounted to protect against avalanche-like snow falls from the roof, while the lathing is also solid.
The brackets are fixed in increments of approx. 100 cm, the end brackets are installed approx. 50 cm from the end of the snow guard.
The snow retainer must also be 35 cm away from the eaves. In the case of a slope length exceeding 8 m, an intermediate row of snow holders is installed.Important: if there are skylights above them, it is also necessary to install snow holders.

The lathing is made of beams or edged boards, treated with antiseptic preparations. The recommended cross-section of beams is 50x50 mm, boards - 100x32 mm.
The installation of the lathing is carried out in several stages:
Important: if the rafter pitch exceeds 1000 mm, thicker boards should be used for the lathing.

Installation of metal tiles. Endova
Before the metal tile is laid, the instruction provides for attaching the lower plank of the valley with self-tapping screws to the solid crate along the inner junction of the slopes.
If it is necessary to join the planks, an overlap is made of 100-150 mm. Next, markup is carried out and, if necessary, cutting of sheets of metal tiles.
Installation of metal tiles is carried out from the bottom up (see fig.). The upper joint of the sheets rarely has an attractive appearance, so a decorative element is installed on top of it, for example, the upper plank of the valley.
Important: the weakest point of the roof is the junctions. In order to avoid subsequently repairing the roof, their device is instructed: metal tiles must be performed with special care.
Installation of other types of metal tiles
Above, the general procedure for the construction of a metal-tile roof was considered, we will consider the main nuances when installing certain types of material.

The figure shows that the step of the lathing during the installation of the metal tile of the Kaskad brand differs from the step for the Elite and Monterrey brands. These differences are due to differences in the dimensions of the material profile.

When installing Andalusia metal tiles, which have a Z-shaped lock, you should also take into account your own nuances. In the hinge part of this brand there is a perforation that simplifies positioning of the sheet on the roof and its fastening.
In this case, the fasteners are hidden, which makes it possible to make the joints of the sheets almost invisible.
When purchasing metal tiles, you should find out various subtleties about a specific type of material, and when performing installation, it is important to follow the rules and requirements described in this manual. This will allow you to build a reliable and durable metal roofing.
Metal tiles are becoming more and more popular every day. It is an excellent roofing material with an optimal balance of performance and cost. The metal tile is suitable for finishing of roofs of almost any complexity. At the same time, you can do it yourself with the tasks of installing the material.
The metal tile is produced in the form of galvanized sheet material made on the basis of steel. The composition of the sheet includes several layers that perform important protective or decorative functions.

- Zinc layer. It is the basis for applying the following layers. Additionally, it prevents the development of corrosion.
- Passivating layer.Prevents build-up of static electricity.
- Priming layer. Provides the highest quality adhesion of the previous and next layers of the metal sheet.
- Polymer layer. Protects the material from adverse external influences and gives it the required appearance. The coating can be matte and glossy. Many color variations are available, which allows you to choose the roofing material that fully meets the needs of the owner.
Metal tiles have many advantages over other popular roofing materials, namely:
- light weight. There are many excellent roofing materials available on the market today, but the use of many of them is limited precisely because of their high weight. Modern houses are increasingly being built from "light" building materials and they absolutely do not need additional load. Metal tiles weigh a little, so it can be safely used even for roofing the roofs of houses built on weak foundations;
- many color variations. It is unlikely that you can find another roofing material presented in such a variety of colors as metal tiles;

- good technical characteristics. The metal tile is resistant to atmospheric and other adverse influences. Installation of sheets can be performed at any time of the year;

- relatively affordable cost. Metal tiles noticeably gain in price over other coatings with similar parameters. Natural roof tiles are much more expensive, although their properties practically do not differ from those of modern high-quality steel sheets.
Metal tiles look great on the roofs of almost any structure. It is best suited for large and solid houses and cottages, however, if you wish, you can develop an excellent roof project even for a small country house.
Video - Do-it-yourself metal tile installation instructions

Before you start arranging the lathing and fixing the sheets of metal directly, you must definitely think about reliable and high-quality waterproofing. Thanks to the moisture-proof material, the possibility of condensation on the inner surfaces of the elements of the roofing system will be excluded, which will contribute to a significant increase in their service life.

The most popular waterproofing option is plastic sheeting. This material, affordable at its cost, flawlessly copes with all the tasks assigned to it.
Waterproofing should be laid on the rafters under the counterbeam. Individual pieces of film are stacked with an overlap of about 15-17 cm. The sag of the film between the rafters can be no more than 1.5-2 cm.Use galvanized nails or a construction stapler with metal staples to fix the film. Glue the waterproofing joints with adhesive tape. It is desirable that it be metallized.

The technology of installing a roof made of metal tiles requires mandatory installation of insulation. It is most convenient to use mineral wool slabs. The material is laid between the rafter legs. For fixing the slabs, the already familiar construction stapler is perfect.
Sheathing device

The shingles will be laid on a supporting structure known as the sheathing. The frame of the system is assembled from wooden planks about 100 mm wide and 25-30 mm thick. All wooden elements must be treated with an antiseptic. Otherwise, the wood will rot in a fairly short time.

The lathing is fixed between the installation of the waterproofing and the installation of the insulation. The task comes down to attaching wooden planks or beams to the rafters. Start to fasten from the ridge of the roof structure, gradually moving vertically down to the eaves. Fix the elements of the crate in a horizontal position. Use nails of the correct length. As a rule, the boards are mounted with a solid sheet.
Laying roofing material

Laying metal tiles should start from the bottom corner of the roof slope. It is best to start from the lower left corner. In this case, each next sheet will overlap the previous one. If you start the installation of the cover from the right corner, the next sheet of metal tile will have to be placed under the already laid material. It is undesirable to do this, because with such an installation, there is a high probability of damage to the roofing.

Laying of metal tiles should be carried out parallel to the cornice. Do not forget to leave an overhang behind the cornice of about 4 cm. There is a technology according to which sheets of metal can be stacked vertically. But in the absence of proper experience in carrying out roofing work, it is better to refuse this method, opting for a more traditional and simple horizontal installation.

When laying, you will need to rotate the corners slightly clockwise. This is done so that the right corners of the elements laid in the same row are located along a single straight line.
1 self-tapping screw is used to secure adjacent sheets. This pre-attachment is placed at the top of the sheet. After that, you need to align the elements of the system and perform their final fixation.
Place the longest sheets of metal tiles in the bottom row. With this option, installation is greatly facilitated, and the finished coating takes on a more solid and attractive appearance.

About 7-8 self-tapping screws are needed for 1 m2 of coating. It is necessary to fasten the sheets in transverse waves, screwing in self-tapping screws with a pitch of 35 cm. You can also install self-tapping screws in longitudinal waves. With this method, it is necessary to fasten it through the wave, placing self-tapping screws in the upper ridges.
An electric screwdriver is best suited for tightening self-tapping screws. An electric drill will also work.The main thing is that it has the function of slow and smooth rotation of the cartridge. To achieve greater accuracy of fastening, it is recommended to screw the hole in advance.

The covering sheets should be fixed in the lower crest of the wave, where the material is pressed against the crate. This will create the most reliable fastening and not deform the material.
The lower sheets of metal tiles must be attached to the first purlin in each wave, without gaps. This section will be subject to the most powerful wind loads, so the fastening should be as reliable as possible so that the sheets are not torn off at the first strong gust of wind.

Attach to other purlins at a minimum distance from the bottom to the step. This is where the sheet material has the highest stiffness. In addition, with this arrangement, the screws will be almost invisible.
In the overlap places, the sheets of metal tiles must be fixed through the wave. If you wish, you can capture each wave. This will ensure the highest quality fit of the top sheet elements.

For fastening the roofing material, galvanized self-tapping screws made of alloy steel are best suited. Also stainless steel self-tapping screws with a seal have proven themselves perfectly.Such fasteners can have a wide variety of colors, which will create the optimal color combination of screws and the main coating.

Self-tapping screws are screwed strictly perpendicular to the lathing elements. Deviations are not allowed. Sheets of metal tiles should be as tightly attracted to the crate as possible. Any distortion of the self-tapping screws can lead to the appearance of through holes in the sheets. If the roof will be exposed to prolonged exposure to an acidic or alkaline environment, self-tapping screws with plastic caps should be used to fix the metal tile.


Check the screws 3-4 months after the completion of the roofing work. Under the influence of wind loads, fastenings are usually weakened. Tighten loose screws.

Thus, there is nothing difficult in self-assembly of metal tiles. Follow the instructions, adhere to the recommendations received and everything will work out.
Happy work!
Video - Do-it-yourself metal tile installation instructions
Metal tile - is one of the most popular roofing materials, which is characterized by reliability, depravity and affordability. In order to perform the coating work properly, you must follow the instructions below. But first, let's take a look at what is so remarkable about this material and what drawbacks it has.
Advantages and disadvantages of metal tiles
Among the advantages of this coating are:
- Light weight that allows you to cover the roof without much effort;
- The work will not cause difficulties and special training is not required, it is enough to have basic knowledge in this area;
- The service life is very long, which allows you not to think about overlapping for a long time;
- Affordable price and high wear resistance are no less important criterion when choosing a roofing material;
- Such material does not burn, and does not melt or deform under the influence of high temperature;
- A huge selection and stylish appearance will allow you to find a suitable option for everyone, without exception.
The only drawback that many buyers call it is its noise. But even this can be dealt with if you take care of soundproofing when covering.
We cover the roof with metal tiles correctly: step by step instructions
To do this work with your own hands correctly, you must follow all the rules indicated in the step-by-step instructions. So where to start:
- Carry out the necessary calculations to find out the amount of materials, not forgetting about the insulation and fasteners;
- Cover the chimney;
- Lay the material using one of the options.
Calculation of the amount of metal tiles on the roof
Usually the width of the full sheet is larger than the work area. This difference can be between 80 and 120 mm. therefore, when buying material, you need to know the exact dimensions of the working surface.
To perform the calculation correctly, you need to focus on the following formula:
- The longest material length is divided by its width. The resulting figure must be rounded up.
- First, you need to measure the length of the slope, while the overhang of the eaves must also be taken into account;
- The overlap is 0.15 m per row. If there is such an opportunity to lay the coating in one row, then the overlap does not need to be taken into account.
Having measured both indicators, add them up.
If the purchased metal tile was made to order according to certain sizes, then in order to correctly calculate all the indicators, it is better to use the help of specialists.
The sizes of such material are from 70 cm to 12 meters.
But the best option would be a coating with dimensions of 4 - 4.5 m.
Apron equipment

Where the chimney passes through the ceiling, care should be taken about the inside of the junction.
Do-it-yourself apron installation should be done according to the following scheme:
- The main material should match the planks in color;
- The groove made in the pipe should be about 15 cm deep, and the slope should be small;
- Heat-resistant insulation must be brought out to the chimney pipe. The place of contact must be glued with tape;
- Where the chimney passes the level of the roof, it is wrapped in a special film.
The decorative apron can be installed when the sheets of metal tiles are laid on the roof. External junction strips are placed on the chimney so that their upper part moves into the prepared strobe. For more reliable protection, the joints are filled with heat-resistant sealant. And the lower part of the slats must be attached with self-tapping screws to the crate.
In order to have good ventilation between the chimney and the rafters, it is necessary that the distance between them be large.
And to protect the brick chimney from possible cracking, the pipe must be wrapped with your own hands with polymer-coated steel. To ensure good ventilation, leave a small gap of about 20 mm.
A chimney with a circular cross-section must be insulated where the roof surface passes. To do this, you can take a special tape that has the ability to self-expand. It perfectly seals all holes, including the entire diameter.
Installation of metal tiles: sequence of works
So that the installation of the roof covering with your own hands does not cause great difficulties, you need to take care of the method of supplying the metal tile to the roof. For this, it is recommended to make lags.
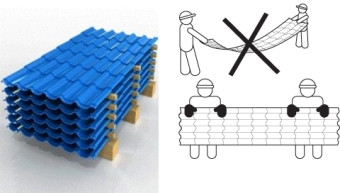
If the roof is large or it is not possible to store all the purchased material near the house, then you can try to make a kind of rack with your own hands. All materials will need to be transferred there, and then installed. So that the sheets are not damaged during storage, in the process of moving them, they must be shifted with strips.
As soon as the metal tile is in place, the protective film should be removed.
If you have to walk on the laid material, then you need to know how to do it correctly so as not to damage it. The first is caution. Before you step anywhere, you need to carefully choose a place for this. Secondly, movement should be carried out only along the sheets and only step between waves of material.
If it is necessary to go across the cover, then the place where the foot will step should be a fold. Thirdly, you need to cover the roof in soft shoes, this will help to avoid damage to the material.
If you have to cover in rainy weather, then water can get into the docking places. All moisture is squeezed upward under the force of the second sheet. To completely eliminate the accumulation of moisture, each sheet of material contains a special groove, which helps to drain unnecessary water. There are some species that have such a groove on both sides, but mostly it is on one side, to the right. When, it should be checked that this groove is covered by the subsequent coating.
Having laid the beginning of the row, you can continue to cover in any direction:
- right;
- left.
The direction of laying is chosen for personal reasons, regarding convenience. But the beginning of laying should start from the side on which there are no cuts and bevels. You need to cover, focusing on another roof slope or valley.
If the process starts from the left, then the sheets laid after should lie on the wave of the sheet in front of him. And the groove should be on the left side of the cover.
If the laying principle provides for the direction to the right, then the overlap of the groove occurs with the edge of the next sheet, being under the wave of material. Covering with the second method is much easier and simpler, since the laid material does not shift. But, scratching it is also very easy.
Whatever method of laying this work is carried out, the initial sheets should be placed parallel to the cornice, and the length of the overhang should not be more than 50 mm.
You can cover the roof with sheets using two technologies:
- Lay the material in one row;
- Perform multi-layer styling.
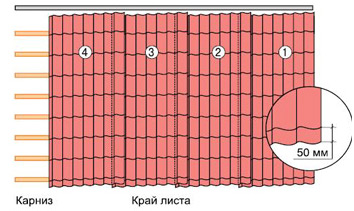
How to lay metal tiles in one row
This technology involves mounting to the right of the edge. This means that the coating should be leveled, focusing on the ends and cornices. When the first sheet is aligned in relation to them, it must be fixed in the middle, not far from the ridge. Subsequent materials are applied with slight overlap. Usually, one wave of the sheet is enough for good strength. After aligning the second sheet, in relation to the first, it is also fixed, but not in the middle, but together with the previous canvas. By this method, blocks are laid out, 4 sheets each. The resulting block is aligned with respect to the cornice and the end and, leaving space for the overhang, the entire structure is attached to the sheathing boards. The last sheet in the block must be fixed when the last block is adjusted. In the figure below, you can take a closer look at this installation method.
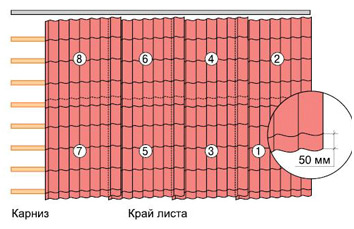
Multi-row mounting method
This method of installation involves covering the roof according to the following scheme:
- You need to cover on the right side. The initial sheet must be leveled, relative to the end and the cornice. Another cover element is mounted on top and attached to the first sheet, after aligning the two sheets. The subsequent sheet must be mounted to the left of the first covering element, and also fastened to it. The fourth element should be laid on top of the third, and this continues until the end of the roof. After completing two rows of such a coating, the block is fixed on a wooden crate.
In the figure below, you can see the described scheme.
Laying the material on the skate
Before laying, mark the slope and determine the center line. On one sheet of metal tiles, you should do the same, outline the central axis. Align the surface of the slope and the sheet of material together, the latter must be fixed with a self-tapping screw. Subsequent sheets should be laid on both sides of the ridge, using one of the above methods.

What points you need to pay attention to
- should occur only at the point where the boards of the sheathing touch;
- The bottom sheet must be mounted, passing one wave over the step;
- The subsequent rows are fixed at a short distance, relative to the steps;
- When attaching the material from the beginning of the end board, it is necessary to use all the waves;
- The laid material must fit snugly to the sheathing boards;
- With vertical overlap, the material is fixed with self-tapping screws into the groove of the waves.
Having disassembled the process with your own hands, you need to pay attention to the processing of the sheets.
- It is forbidden to use a grinder when working with metal tiles, as the coating can be damaged, and this will lead to further corrosion. For these purposes, it is recommended to use an electric cutter or a jigsaw. A hacksaw for metal work is also suitable.
- Damaged areas should be painted over to avoid further rusting.
In the figure below, you can consider laying the material with your own hands.

In the picture shown, number 3 means waterproofing film;
- Number 4 means crate;
- Number 21 - end board;
- Number 22 - outer corner;
- Number 23 is a self-tapping screw.
End plate
If installed correctly, then it serves not only as a decorative element, but also as a protective one. It allows you to protect fasteners from the harmful effects of environmental factors. It is also her responsibility to prevent moisture from entering.

Endova

It is designed to beautify the external joints. Removing excess moisture is also within her power. When fixing the upper valley, it is necessary to control so that the self-tapping screws do not damage the lower valley, this can lead to damage to the waterproofing.
Roof breaks
Fractures on the roof are of two types: 
If the roof has a slope with a straight break, then the boards for the sheathing must be placed close enough to each other. The coating material must cover the place of a straight break, with a slight protrusion.
If the roof has a reverse bend, then it is necessary to use a wall junction, which will serve as a connecting element. Where there is a reverse fracture, the battens should be close enough to each other. And between the metal tile and the junction there should be a layer of sealant.
One of the important stages of building a house is roofing and roofing (roofing work). One of the most popular roofing materials can be called metal. And it is not surprising, because among its advantages are low weight, ease of installation, wide range of colors, durability.
Of course, there are also disadvantages - this is low rigidity, which makes it problematic to move on the roof, and a significant waste of material when laying on slopes with complex geometry, poor sound insulation, heating. All of them are removable, for example, the susceptibility of metal to corrosion can be reduced if the installation of metal tiles is performed correctly.
Metal roofing device
The manufacturer has already taken care of the protection of the metal tile by creating a multi-layer roofing structure (see figure).
As you can see, the presence of several layers of protective coating suggests that the tiles are made of high quality material. Therefore, in order for the roof to serve for a long time under such a coating, it is necessary to adhere to the technology of installing metal tiles.
Basics of choice - parameters of metal tiles:
- The thickness of the metal tile. Metal roof tiles are manufactured from sheet steel. The thickness of the metal tile sheet is 0.5-0.7 mm, this is noted in SNiP II-26-76 "Roofs".
Council. The thickness of the metal within one sheet can vary. Allowable variation +/- 5%.
Please note that low-quality metal bends under strong pressure.
- The thickness of the zinc layer of the metal tile. This parameter cannot be visually tracked. Therefore, read the passport for the metal bay from which the sheets were rolled. According to the standard, the thickness of the protective coating should be 275 g / m2. If this requirement is not met, it can lead to the result shown in the photo.
- The thickness of the metal tile coating depends on the type (type) of the coating.
- Sheet geometry. Here it is important to pay attention to the fact that the sheets are not just cut exactly, but also do not have bends along the cover side.
The snug fit of the edges is shown in the photo.
With poor geometry of the sheet, the result will be visually noticeable. In the best case, the joint will be ugly. At worst, water will flow under the sheet. And do not even hope to tighten such an edge with self-tapping screws.
- The color of the metal tile. Plays an important role in the case of gradual development. That is, when you need to select a shade. In principle, there are two color coding systems, and knowing your color, you can choose the appropriate one.
Types of metal roofing
- PE (polyester) is applied 20-25 microns thick. Its disadvantage is fast, but uniform burnout. And also the fact that the snow does not linger on the smooth surface of the sheet.
- PEMA (polyester matt). Its layer is 35 microns. It is more resistant to fading and mechanical damage. The rough surface prevents the snow from sliding down quickly. In principle, matte finishes virtually eliminate the need for snow holders.
- PU (pural) and PUMA (Pural matt - matte pural). Coating thickness 50 microns. This coating can be used in regions with aggressive environment.
- PVC (Plastisol). In a metal tile with such a coating, the most protected metal core, since the layer is from 100 to 200 microns.
Nuance. The tone will be different. The speed of color fading depends on the metal coating.
Calculation of metal roof tiles
We will illustrate an example of calculating metal tiles for a gable roof with a slope size of 8 by 5.
The calculation of the number of sheets of metal tiles required to cover a rectangular slope is calculated as follows - the length of the slope along the ridge divided by the width of the sheet.
Nuance. When calculating, rely on the working width. That is, taking into account overlaps. Sheet sizes for Monterey metal tiles are shown in the photo.
For example, the length of the slope is 8 lm. Then 7.27 sheets are needed for work. Round to the nearest whole - 8 sheets. Two slopes - 15 sheets. Since one sheet is divided in half and used on the second ramp.
Nuance. In this case, you will need to start work from half a sheet.
For the convenience of calculating more complex skate configurations, you can use the constructor (calculator).
You can make drawings of the roof slopes and draw a scheme for laying metal tiles, i.e. arrangement of sheets.
Nuance. The more complex the ramp configuration, the more material waste will be.
The length of one sheet of metal tile is determined by the height of the slope plus the eaves overhang (about 5 cm). It should be taken into account that the longer the length of the sheet, the less material will be spent on the overlap. But, it is difficult to work with a long sheet, and transportation of large metal sheets is costly. Therefore, a sheet more than 6 m long is advised to be broken into parts. To do this correctly, you need to adjust the resulting length by the amount of overlap. The overlap must be at least 0.15 m for slopes with an angle of inclination of more than 25 ° and 0.2 m of smaller angles. For our example. 5 lm we divide in half - we need 1 sheet 2.5 m long, and the second 2.65.
At the same time, the technology for manufacturing metal tiles is such that there are unfeasible sizes. Each manufacturer has their own and depend on the equipment used.
Then for the entire roof you need to buy 15 sheets of 2.5 m and 15 sheets of 2.65 m.
Calculation of the number of additional elements for metal tiles.
The accessories include - ridge strip, end and eaves strips, snow retainer, internal and external valleys.
It is easy to calculate additional elements - the total length of the surface that needs to be closed is divided by 1.9 m. - (2 lm standard plank length, minus 0.1 m overlap). For the lower valley, divided by 1.7. The overlap is 0.3 m.
For our gable roof, you need 5 ridge slats (the length of the ridge is 8 lm); 9 cornice strips ((8 + 8) / 1.9); 11 end. We do not need Endova due to the roof structure.
Special strips. These are custom made accessories according to your size.
Self-tapping screws. Their consumption is 7-8 pcs. per sq. m. metal tiles and 3 pcs. by 1 lm additional element. Self-tapping screws should be with a drill, this will simplify installation, and preferably painted in the color of the sheet. This will give the finish a more finished look.
We need 768 pcs. on sheets and 3x (5 + 9 + 11) \u003d 834 pcs. They are usually sold in packs of 250. Naturally, it is better to take with a margin.
Sealing tape for metal tiles. It is recommended to install it under the ridge bar.
Film - equal to the total area of \u200b\u200bthe slopes minus the overlap tolerances. For example, a roll of film is usually 1.5 by 50 lm. \u003d 75 sq. The working area of \u200b\u200bthe film is about 65 sq.
Insulation for metal tiles is also equal to the total area of \u200b\u200bthe slopes.
A tool will come in handy: a screwdriver, a hammer, a mallet, a tape measure, a marker, a level, a jigsaw or a hacksaw.
Council. Cutting a sheet of metal with a grinder is strictly prohibited. From heating, the coating is destroyed at the cut, and the sheet will begin to rust. In addition, sparks can damage paint all over the sheet.
How to store metal tiles
If you purchased the material before you erected the rafter system, you need to know how to properly store the metal tile (especially in winter). The sheets must be laid on a flat surface, preferably on a pallet. In addition, it is important to protect the metal from moisture, ultraviolet radiation and provide ventilation. If the sheets will be stored for more than a month, they must be stacked as shown in the photo.
The filler strips are also stored in a lying position.
1. The device of the rafter system for metal tiles
Installation of metal tiles begins at the stage of the sheathing device. It is important to initially fix the battens at the desired distance. Namely, the distance between the first and second boards is 300 mm, then 350 mm, 350 mm is the distance from one bend of the sheet to the next. In professional language, the distance is called a tile.
Council. In the place where the chimney exits, in the valley, near the windows, you need to make a continuous crate.
2. Checking the dimensions of the slope
The main thing is that the roof slopes are even and flat.
3. Fastening the curtain rail for metal tiles
The eaves board directs the water flowing from the roof into the drainage system.
Nuance. Long brackets for the gutters of the gutter system must be installed on the cornice board. The short ones can be installed after the completion of the roofing work.
4. Laying the film of the hydro-barrier under the metal tile
In order to prevent the attic from getting wet in case of sudden rain, as well as to further protect the insulation from getting wet, a hydro-barrier film is used.
The waterproofing film under the metal tile is laid on the rafter system in accordance with the description, which contains the installation instructions. To avoid leaks, it is necessary to provide a minimum 10 cm overlap of the film. For sloping slopes, at least 25 cm. For hip roofs up to 50 cm (in the roof ridges). The film is fastened with a construction stapler.
Council. The foil is spread parallel to the end if the roof slope is more than 25 °. And parallel to the skate, if less. In this case, you need to withstand a sag of 1-2 cm along the edge of the rafter leg.
In places where chimneys, antennas, etc. exit. you need to remove the film by 4-5 cm on these elements.
5. Installation of a counter-lattice for metal tiles
A counter grill is needed to provide a ventilation gap between the film and the sheet of metal tile. Otherwise, in the place where the film is adjacent to the metal, it will quickly lose its properties.
For installation, a rail with a cross section of 30 mm and a length of 135 cm is used.
Nuance. When using a superdiffusion membrane with a high permeability, a counter grid is not required.
6. Installation of the lower valley
The valley for the metal tile is installed if the roof configuration requires it.
Nuance. It is better to install the lower valley not on self-tapping screws, but on a kleimer. So it will maintain its integrity, which will reduce the likelihood of leakage. You can make a kleimer yourself from trimming metal.
7. Installation of the first sheet of metal tiles
To avoid deformation, the sheet rises to the roof using runners (see photo).
Nuance. It is better not to mount the sheets in strong winds. Loose sheets may bend.
Installation is carried out from right to left, so that each subsequent sheet covers the groove for water drain on the previous one.
The bottom row of sheets must be mounted so that the sheet hangs over the edge of the rafter system by 50 mm. (that is why the distance between the first and second battens should be 300 mm, not 350). This is necessary to ensure ventilation and ease of water drainage.
Methods for installing metal tiles are shown in the diagram
The technology of laying metal tiles provides for the alignment of the first sheet along the end of the slope and the cornice. If everything is correct, the sheet is attached from above with one self-tapping screw. The second sheet is installed with the same requirements and bonded to the first sheet. After all the rows are aligned along the eaves overhang, the sheets are attached thoroughly to the crate.
Advice:
- During the performance of work on the roof, you need to move. Therefore, it is better to put on shoes with soft soles and step only at the bottom of the wave.
- If during the installation process you need to cut the sheet, it is better to paint over the cut point with special paint.
- After mounting the sheet, you need to remove the protective film (if any) from it. Under the influence of ultraviolet radiation, it will crumble, and will have an ugly appearance. It will also be much more difficult to remove.
8. Fastening metal tiles
Fasteners of metal tiles are made with special screws. The presence of a sealing gum allows you to tighten the self-tapping screw as much as possible without deforming the sheet itself.
The scheme of fastening metal tiles with self-tapping screws - through one wave.
Nuance. A self-tapping screw is attached to each tile along the length of the end.
Many advise to mount the self-tapping screw down the waves. It is not right. Because water flows along the gutter of the tiles, which means that the slightest violation during installation is fraught with rust.
The photo below shows that the self-tapping screw needs to be mixed a little to the right.
It is also important to tighten the self-tapping screw correctly. The fastening rules are shown in the figure.
9. Installation of additional elements
9.1 Installation of metal roofing valley. Depending on the roof structure, an upper valley is installed. When attaching it, they try to tighten the screws so that they do not fall on the lower screws. If cleaimers were used, this requirement is omitted.
9.2 Mounting the wind bar on the metal tile. Regardless of the roof configuration, an end (wind) strip must be installed. The overlap of the slats is 10-15 cm. They are fastened with long self-tapping screws. At the rate of 1 self-tapping screw per 1 lm. planks. The wind bar is laid on top of the shingle sheet and fixed with self-tapping screws on both sides.
9.3 Installation of the ridge strip of a metal tile depends on its configuration. When installing a round ridge strip, it is required to close the ends with special plugs.
The broken strip adheres more tightly to the sheets, so the plug is not needed.
You can protect the ridge for metal tiles from the ingress of snow and moisture by laying a special ridge sealing tape (ridge seal).
9.4 Next, we mount the aprons (abutment strips) for metal tiles near the pipes or the slat abutting the slope to the wall. To do this, the wall needs to be punched out by 1-1.5 cm. Insert a bar into the resulting strip, and treat the installation site with a sealant. It should be noted that the sealant will degrade. Therefore, the junction must be inspected and sealed in a new way from time to time.
Nuance. It is forbidden to put an abutment bar into a masonry seam, this can violate the integrity of the wall. And then the manufacture of a reliable structure in the junction will turn into sabotage.
9.5 Installation of snow holders on metal tiles. Last of all, we install snow retainer strips on a sheet of metal tile. They are simply necessary if the metal tile is covered with polyester.
Snow holders for a metal roof may look as shown in the photo.
Snow guards are often reinforced with an additional bar.
Its cost is low, and the strength of the snow holder increases significantly.
The choice of plank depends on the preferences of the owner, as well as on the intensity of snowfall and the angle of inclination of the roof slope.
How to install snow guards on metal tiles?
The snow bar is located parallel to the cornice in one row or in two rows, in a checkerboard pattern.
The final roofing cake is shown in the photo.
10. Insulation of the roof, installation of a vapor barrier film and interior decoration
Installation of metal tiles - video instruction
Errors during the installation of metal tiles
In conclusion, I would like to briefly recall the most common mistakes in installing metal tiles:
- an unaligned slope will lead to the leaf being bumpy;
- improperly cut sheets can quickly rust. Therefore, do not use a grinder in your work;
- incorrectly screwed in self-tapping screws lead to deformation of the sheet;
- you need to use only high-quality self-tapping screws with a special rubber seal;
- saving on high-quality seals leads to the fact that snow is blown into the roofing cake or moisture gets into;
- it is better to examine the sheet several times for scratches and paint it over with special paint in time, rather than then admire the rusty streaks;
- use special (made to order) additional elements if the standard ones do not completely cover the openings. Their manufacture will cost you less than the subsequent replacement of a whole unit or roofing materials;
- do not buy long sheets of metal tiles. The metal has a high coefficient of linear expansion. This means that the sheet will play and over time the screws in it will loosen. Therefore, cut the sheet into several pieces;
- on the other hand, the more joints there are, the more likely it is to leak. Therefore, stick to the golden mean;
- maintain the correct overlap values.
Conclusion
As you can see, the installation of metal tiles can be done independently. Adhering to certain rules, the installation of metal tiles on the roof will be successful and in a short time.