How to properly apply liquid wallpaper to the ceiling. Should I make liquid wallpaper on the ceiling
The construction industry is developing quite rapidly, as a result of which new finishing materials appear. One of the latter was liquid wallpaper on the ceiling, with the help of which you can make the interior in your home even more interesting and attractive. In this article, you will learn about all the nuances of both the material itself and the do-it-yourself repair process.
Material advantages
The technology of liquid wallpaper on the ceiling is gaining popularity more and more rapidly due to its following advantages.
- The main difference between liquid wallpaper and similar materials is the naturalness of all constituent components. As a result, they do not emit toxic gases during installation and drying.
- There are no synthetic fillers in this material, as a result of which liquid wallpaper will not absorb dust. They also have antistatic properties.
- The soundproofing qualities of liquid wallpaper will be very relevant in multi-storey buildings, where there are a lot of extraneous sounds. The material has a microporous structure through which steam can pass.
- In addition, liquid wallpaper for the ceiling is very easy to maintain and does not require the use of additional funds.

Types of liquid wallpaper
The range of liquid wallpaper for the ceiling is quite diverse. They can be divided into three types.
- Silk-cellulose. The best option when choosing between price and quality. The composition of such ceiling liquid wallpaper contains both cellulose and silk fibers. They are resistant to sunlight and keep their original appearance for a long time. Well suited for a bedroom or children's room.
- Cellulosic. Such liquid wallpaper for the ceiling is the most affordable. However, given such a low cost, one should not expect high decorative qualities. But even if you find more or less decent-looking wallpapers, they will not last so long. Considering that under the influence of ultraviolet radiation they will fade, a corridor or bathroom will be a more suitable place for them.
- Silk. This type of liquid ceiling wallpaper is the most expensive one. The high price is due to the fact that they are entirely composed of silk. Due to this, they have good decorative qualities and will remain in their original form for many years. They are also not afraid of ultraviolet radiation, so they do not fade or change color.

The process of applying liquid wallpaper
Before you start applying liquid wallpaper to the ceiling, you should prepare the following tools and materials:
- drill with a special attachment;
- rollers of different sizes;
- hard brush;
- putty knife;
- primer.

To better understand the method of applying the material, first you need to find the difference between plain and liquid wallpaper.
When you have to glue paper wallpaper, it takes a lot of time to mark the rolls, join the pattern, carefully cut it out, and much more. The technology of finishing the ceiling with liquid wallpaper does not require all this. Their application is much easier: all that needs to be done is a panel. Also, with the help of liquid wallpaper, you can hide various defects in the ceiling. But in order for everything to work out in the best possible way, before gluing such wallpapers to the ceiling, you need to carry out high-quality preparation.
The whole process of applying liquid wallpaper with your own hands will consist of the following stages:
- preparation;
- cultivation of wallpaper;
- ceiling covering.

Now let's take a closer look at each of them.
Preparatory work
First you need to get rid of the previous ceiling covering. Different tools should be used depending on the type of old surface. You can remove oil paint or enamel with a special remover. If there was previously an acrylic or water-based coating, it is not necessary to completely remove it. Using a spatula or metal brush, remove looseness and clean the exfoliated areas.
In the presence of defects in the ceiling, such as cracks and cracks, they should be filled with a putty. If the irregularities are significant, you should think about leveling the ceiling with drywall.

When buying liquid wallpaper for the ceiling in a store, you need to know that they are sold in different forms.
- Liquid wallpaper is sold in plastic buckets, which can be immediately applied to the surface without additional mixing. They are already tinted and have a paste consistency.
- In the form of a dry free-flowing mixture, which must be mixed with water according to the instructions provided by the manufacturer. They go on sale with the addition of dyes and fillers to create texture.
- As a dry mix, but supplements and colorants are purchased separately.
The dry mixture must be kneaded as follows.
- Pour the required amount of water into a plastic container.
- Pour the mixture into water and stir thoroughly. Now we leave the solution for 12 hours to allow it to swell.
- When the specified time has passed, add another liter of water to the mixture. The material is ready.

Ceiling application
There are two ways to apply material to the ceiling:
- manually;
- mechanically.
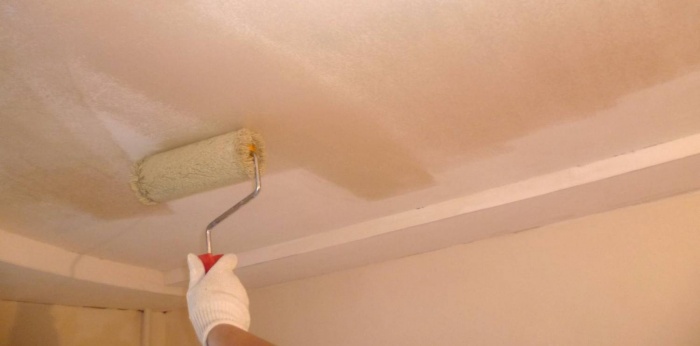
The manual method consists in applying liquid wallpaper to the ceiling using a roller, spatula or stiff brush. The layer is applied with a thickness of 3-5 mm. After processing with a trowel, the ceiling is smooth. The texture can be applied after about 5 hours using a structured roller dampened with water.
The use of a spray gun will significantly speed up the work. The texture is also applied with a roller after application with a gun.
After that, the surface is dried for two days. During this time, the ceiling should not be affected by any external factors.
If liquid wallpaper is applied in the bathroom, then after drying it should be covered in three layers with acrylic varnish. Each layer should dry for at least an hour. For more information, we recommend watching a video of professionals working on the ceiling.
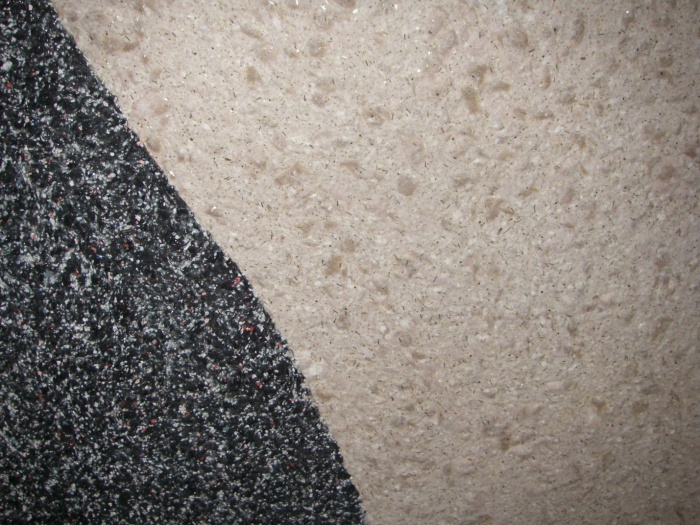
The technology of applying liquid wallpaper allows you to create unusual panels with your own hands that will decorate any living room. You can see how much it is possible to diversify the interior of your own home in the photo.
To create a pattern on your ceiling, you need to follow the following instructions.
- On the ceiling, we create a layout of the drawing with a simple pencil.
- We apply liquid wallpaper on the surface with a layer of 1.5–2 mm, while protruding beyond the contour of the drawing by 1–2 mm.
- To create the borders of the picture, we shift the material in the opposite direction using a small spatula.
- Let the material dry. A household hairdryer can help speed up the drying process.
- Now we retreat from the dried liquid wallpaper 2 mm and apply the following look with a thin strip. Move the applied layer to the previous one to create a clear border. At the same time, we make sure that different types do not mix.
- If necessary, you can use a marker to highlight small elements. It is also allowed to glue beads, threads, sequins and other decorative details.

When creating a picture, you need to take into account that it is silk liquid wallpaper that will best cope with this purpose. And do not forget that all elements of the picture must be applied with a layer of the same thickness.
When buying liquid wallpaper for the ceiling in the store, do not try to save a lot. Pay attention to well-known manufacturers who will not spoil their reputation with low-quality goods. The choice of material will determine how quickly the ceiling decoration with liquid wallpaper will lose its appearance, and replacement will be required.
Liquid wallpaper on the ceiling is no longer news. Consumers understood the advantages of this finishing material, therefore they are increasingly used in the interior of premises. In addition, liquid wallpaper is easy to apply, making the ceiling beautiful with your own hands is not a problem with their help. And if we talk about applying to walls or ceilings, then there is practically no difference. It is simply recommended to bring the ceiling surface to the maximum level of evenness.
Why? It's all about the fixtures installed on the ceiling. Light rays are directed to the surface at a low angle, so all its flaws in the interior of the ceiling will be clearly visible. This is especially true for bulges. And if the unevenness of the walls is allowed up to 3 mm, then the ceiling should be very even. Therefore, applying liquid, although simple, will have to tinker with the surface in terms of its preparation.
Ceiling preparation
The preparatory stage must begin with the identification of all defects. And if a suspended or tension structure was installed at the top, then you will have to get rid of it. What else needs to be done.
- Remove all protuberances with a spatula.
- Expand (widen) cracks.
- Clean the surface of the ceiling from dust.
- If there are smudges, then sand their places with sandpaper. It will be optimal to deepen these areas, that is, to remove some of the material.
Now the most important step is to treat the surface with a deep penetration primer. This mixture strengthens the surface, penetrating into its material, where it polymerizes. The outer layer of the ceiling becomes durable, does not crumble or crack.
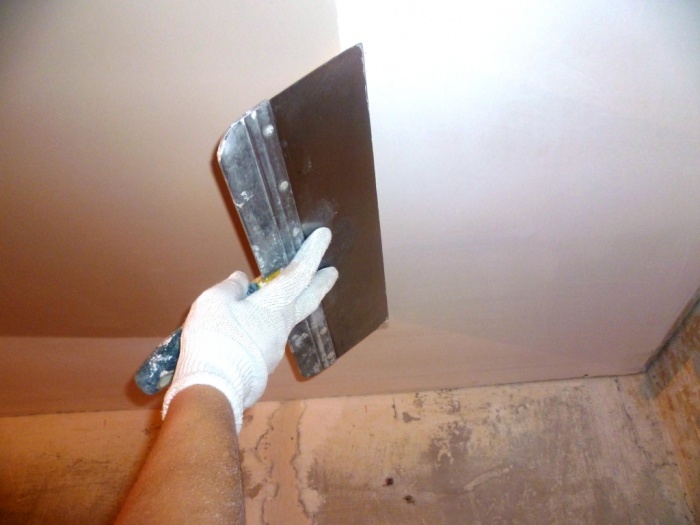
Now you can proceed to leveling operations. For this, gypsum plaster or putty can be used. Plaster is usually used if the surface has a sufficiently large drop. Putty, if the drop is insignificant. In this finishing operation, the most important thing is to correctly apply the solution to the surface. Doing it yourself is not always easy, especially to create an even layer on the surface in one horizontal plane. therefore, experts recommend applying putty or plaster in several thin layers. The last layer should be the thinnest, as they say, finishing.
Attention! Plaster or putty is applied only to a dry surface, therefore each layer must be dried naturally.
So, the ceiling is leveled, now it must be treated with a primer. And the last one is the application of white paint, better than water-based paint. On this we can assume that the preparation of the ceiling for liquid wallpaper is completed.
Preparation of plasterboard suspended structure
Often, in order not to mess with a large amount of dirty work, the ceiling is finished with plasterboard. Moreover, it is possible to build multi-tiered structures, thereby making changes in the interior of the room.
Preparing a plasterboard ceiling is not as difficult as a conventional concrete ceiling. This is already an almost leveled surface, which has its own flaws - these are the joints with the sheet and the places where the screws are installed. It is them that need to be putty. Putty is applied to the joints, on which a special fastening tape is applied. Then another putty layer is applied. The caps of the self-tapping screws are simply closed with a leveling compound. But the alignment of the ceiling does not end there. It is necessary to fill its entire plane with a thin layer.

Is the plasterboard ceiling primed? Necessarily. This also applies to the gypsum board sheets themselves, and the putty layer. After that, decorative silk plaster is applied, that is, finishing with liquid wallpaper is performed.
The last stages of preparation
So, before applying liquid wallpaper to the ceiling, it remains to make a few small efforts. If any patterns or drawings will be placed on the surface, then it is necessary to apply a sketch or outline the boundaries.
Often, different materials are used in the interior of the ceiling, so it is worth strictly marking their boundaries. Usually, chalk is used for these purposes, on top of the applied line of which construction tape is installed. Do not allow the decorative silk plaster to get onto the adjacent surface.
If it is decided to make a complex figure on the ceiling, then for these purposes you need to cut out a template from thick paper. It is installed at the place of the future application of liquid wallpaper, where it is fixed with double-sided tape. As soon as the operations on the decoration of the sections of the ceiling that are not intended for finishing with liquid wallpaper are completed, the template is removed, and decorative silk plaster is applied over the open area.
How to make liquid wallpaper
The preparation method for this finishing material is quite simple. To do this, you need a clean container (bucket, basin), into which the material itself is poured. Then water is added to it. The serving ratio is six liters of pure water per kilogram of material. Now you start to press the mixture with your own hands, stir it until a homogeneous mass is obtained (see photo and video). After that, the almost finished silk mixture is put back into a plastic bag (in a container), where the silk plaster should, as they say, ripen, that is, be completely saturated with water and swell.

And a few more tips:
- You cannot use any tools to mix the mixture with water, everything is done by hand.
- If decorative additives are included with the wallpaper, then first water is poured into the container, then the additives are poured, where they mix well. And only then the cellulosic material is laid.
- It is worth purchasing more decorative plaster, regardless of the recommendations of the manufacturers (one kilogram per five square meters). The thing is that it is much more difficult to work above the ceiling, and it will be simply impossible to maintain the accuracy of the applied layer thickness of 2-3 mm. Yes, and there is a high probability that at the beginning of applying decorative plaster, material delamination will appear, which will lead to overspending.
Application process
Applying liquid wallpaper to the ceiling requires only two tools: a float (two types) and a wide metal spatula. The first is the application itself and the distribution of the material over the surface, the second is the final alignment (see photo and video).
Decorative silk plaster is applied in a small volume, which is spread over the ceiling with a grater. In this case, it is necessary to carry out circular and chaotic movements. This is done with one purpose - to distribute the cellulose fibers in different directions. This will create a more beautiful structure in the interior of the ceiling.
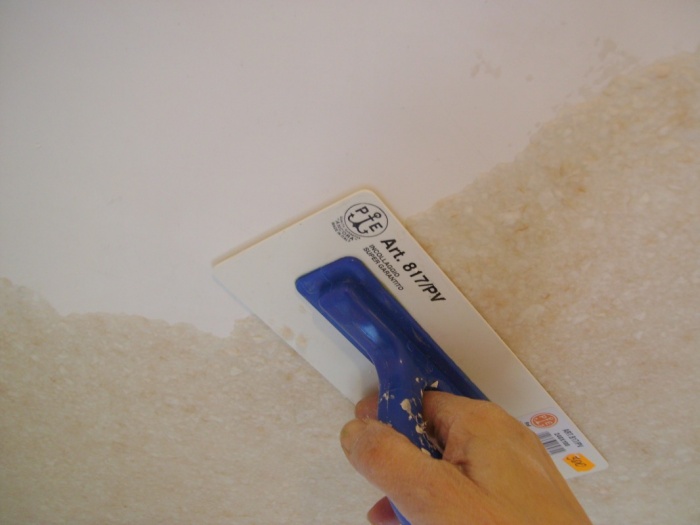
Then a plastic float is taken into the hands, it is made specifically for the application of liquid wallpaper, with the help of which the finish is brought to a thickness of 2-3 mm (see video). And now there is a fine finish, where a wide trowel is used. Its working edge is pre-moistened in water and held over a practically finished ceiling. In principle, on this, one might say, the process of finishing the ceiling with liquid wallpaper is over. Better if you check the flatness of the surface again. Therefore, it is worth climbing to the very ceiling and looking at it from an acute angle. This is how you can identify small differences, which can be eliminated by running a wet spatula over the surface.

And some helpful tips:
- There is no need to keep the ceiling trimmed with liquid wallpaper to dry in some unique conditions. Decorative silk plaster is not afraid of drafts, high humidity and temperature changes. So such a ceiling will dry out anyway.
- Leftover material should not be thrown away. They can be dried, put back in a plastic bag and put in a dark, secluded place. Suddenly there will be a need to use it, for example, if some area has become dirty or damaged by mechanical stress. Simply, this area must be moistened and the applied plaster removed, after which the residues are mixed with water and applied using exactly the same technology as the bulk.
Liquid wallpaper on the ceiling- an excellent finishing material, with the help of which an interesting and attractive interior is made. It is an economical method for shaping the decor with your own hands on the surface.
Advantages:
- Absolutely natural material (cellulose and paper base), due to which, during drying, wet wallpaper does not emit harmful gases. It is worth noting that glue, special acrylic elements and dyes are added to modern liquid wallpaper.
- Does not collect dust and has anti-static properties.
- Liquid wallpaper is a soundproofing material.
- Due to its microporous structure, the material is breathable.
- Easy care.
Variety
Before choosing liquid wallpaper, it should be borne in mind that on the modern market you can find 3 types:
- Silk
 They contain only silk fibers, due to which they are resistant to ultraviolet rays. They have high decorative characteristics. They remain in their original form for a long time (they do not change color). The main disadvantage is the high cost.
- Cellulose
They are made entirely of cellulose fiber. Not durable. They have low decorative characteristics and are susceptible to rapid fading in the sun, so this type of wallpaper is best used in bathrooms and corridors. The cheapest material.
- Pulp and silk
Cost and quality are some compromise. A mixture of cellulose and silk fibers is used as a filler. UV resistant. They do not lose their original appearance for a long time. You can apply this look with your own hands in bedrooms and children's rooms.
Scope of application
You can apply liquid wallpaper on drywall, paint, plastered surface, concrete. Surfaces such as plastic, wood, metal surface, which have not been previously treated with primer, are not suitable for applying the material with your own hands.
Types of finishing materials:
- Wallpaper that can be used immediately. They are sold in special plastic containers, have the appearance of a paste and a certain color.
- Dry wallpaper that should be properly diluted with water (instructions with proportions are on the package). The composition already includes additives and dyes.
- Dry type of wallpaper that does not contain fillers and dyes.
Tools required for finishing the base with your own hands:
- Capacity where it will be necessary to breed the material;
- Trowel for applying the mixture to the paint;
- Rollers - embossed and foam;
- Drill with a special attachment;
- Plastic graters.
Application technology
- Preparatory work
- First, the old coating is completely removed. The choice of the necessary tools for this is influenced by the type of topcoat. For example, paint can be removed with a special solution (or not at all), acrylic bases should not be removed completely, only the exfoliating parts of the base are removed, for which a stiff brush is used.
- All cracks in the base should be repaired with putty.
- A liquid primer can then be applied to the paint.

It is worth noting that if the surface has irregularities, then drywall can be used to level it. This method is inexpensive and it is much easier to apply liquid wallpaper to drywall.
- How to properly breed liquid wallpaper with your own hands
- First you need to prepare a plastic container and fill it with water. The package contains instructions for use with the proportions that must be observed. Then you need to stir the composition thoroughly. The resulting mixture is left for 12 hours.
- After a while, the resulting composition is mixed again and another 1 liter of liquid is poured into it.
Application to the base
There are two options for DIY finishing:

Properly applied do-it-yourself liquid wallpaper must be left for 48 hours to dry completely. During this period, there should be no mechanical stress on the surface. If the finishing material was applied by hand in the bathroom, then it should be treated with acrylic varnish in 3 layers.
Image creation
With the help of wet wallpaper, it is possible to create an original and interesting ceiling. It is worth noting that it is best to create a ceiling with a pattern from silk liquid wallpaper according to the following instructions:
- On a previously prepared base, an image is applied with a pencil.
- Then liquid wallpaper is applied with a layer thickness of no more than 0.2 cm. In this case, it should be applied, going beyond the boundaries of the image contour by 0.1-0.2 cm.
- Using a small spatula, the applied mixture is pushed backwards so that the outline of the image becomes visible.
- Further, the applied composition is left to dry. A household hairdryer can be used to speed up drying.
- The thickness of the next layer should be 0.5 cm, while 0.2 cm should be retreated from the previously applied and dried material. Then this layer is closely shifted to the previously applied composition, for which mechanical action is applied. Thus, a clear border is created and different types of material do not mix.
- In the case when the outlines of small elements need to be selected, you can use a marker. And with the help of decorative elements (multi-colored sparkles and threads), you can additionally decorate the ceiling.
In conclusion, all liquid wallpapers differ from each other in quality depending on the manufacturer. At the same time, the country of origin is not the main authority, but the popularity of the brand plays an important role. A well-promoted manufacturer will not spoil its reputation due to poor quality material, but small manufacturers are able to lure buyers with a low cost, and the quality of the product is also not high.
IN more often, already simple methods of finishing ceilings do not attract attention and sometimes a person wants something special, soft and cozy ... Liquid wallpaper can be an option for finishing the ceiling with your own hands. Modern liquid wallpaper can be purchased and applied to the ceiling yourself. For this, the great skills of a painter are not required, but you still have to try.
So, first, you need to look at the wallpaper and purchase, for example, Silk Plaster liquid wallpaper → https://silkstar.ru/catalog-zhidkie-oboi/. Any type of liquid wallpaper is suitable for the ceiling. Be sure to tell the seller the area of the premises and take a small margin (10-15%) to be sure.
Content:
1.
1.1
1.2
2.
2.1
2.2
3.
Features of finishing the ceiling with liquid wallpaper
Liquid wallpaper, or, as it is correct to say "silk plaster", has its own characteristics of application. Naturally, we will consider all of them below.
Finishing room
Liquid wallpaper can be applied to the ceiling in any room, but there is a nuance for finishing the ceiling in a bathroom or other room with high humidity. So, after applying liquid wallpaper to the ceiling in the bathroom, they will need to be treated with a water-based varnish, applying it in 2 layers after the liquid wallpaper dries, the drying process of liquid wallpaper lasts 2-4 days.
The varnish can be taken colorless, matte or glossy - this is your choice.

In all other situations, liquid wallpaper is applied to the ceiling in the same way.
Preparation of the base
Special attention must be paid to the preparation of the base. And there are 2 ways here:
- Prepare the base well: primer, plaster (leveling), putty ...
- Easier to prepare the base.
If with the first option "everything is clear" - everything is done according to the classics of finishing, then in order to apply liquid wallpaper on unprepared the ceiling needs to be qualitatively understood some of the nuances.

In the first case, you need to understand how to carry out the work, and in the second - how to make sure that there is no need to carry out these works and get high-quality coverage.
In general, silk plaster is not demanding on the quality of the base, since it is a thick tissue-cellulose mass and by itself bridges any irregularities and depressions. But it all depends on the specific situation.
- If the ceiling has a horizontal drop, then in this case it is still better →, since you cannot hide the horizontal curve of the ceiling with any decoration. This applies to ceilings with a noticeable deviation, if the deviation is less than 0.5-1 cm over the entire area, then the unevenness of such a ceiling may not be noticed.
- If the base has bulges, it is better to beat them off, or again bring out the whole plane →.
- Small depressions are not important, they will overlap with liquid wallpaper, respectively, if you do not prepare the base. Again, it is better to prime the ceiling and putty with plaster putty, at the same time practice, because especially liquid wallpaper does not differ from putty.
Many experts call liquid wallpaper for the ceiling an ideal finishing material. It allows you to create beautiful seamless surfaces that delight the eye with their flawless appearance.
Ceiling surfaces in living quarters can be finished using various materials. Liquid wallpaper has been very popular recently; it looks very attractive on the ceiling. And from a purely practical point of view, such a coating has many advantages, it is:
- is antistatic (liquid wallpaper does not attract dust and does not accumulate static electricity) and non-flammable;
- has no seams;
- belongs to the group of environmentally friendly materials;
- does not absorb foreign odors;
- has excellent adhesion to the ceiling base;
- not afraid of exposure to moisture;
- ideal for decorating curved and wavy ceilings;
- easy to clean with a cloth soaked in water, and also cleaned with a vacuum cleaner with a soft nozzle;
- it can be restored without problems (if any part of the surface is damaged during the operation of the wallpaper, you can always replace it using a new material);
- allows you to mask small imperfections (cracks, irregularities) of the ceiling;
- characterized by a high rate of heat and sound insulation (due to the fibrous structure of the material);
- does not lose its original appearance under the influence of sunlight (does not fade).
Liquid wallpaper ceiling
A huge variety of shades and textures allows you to choose liquid wallpaper for any ceilings, organically fitting them into the general style of decoration of a particular room. It is also important that the considered decorative and facing material, a home craftsman who does not have special skills, is quite capable of applying to the surface on his own. To do this, it is enough to understand some of the features of such a procedure, and then immediately get down to business.
The disadvantage of liquid wallpaper is their high cost. But, given the long service life of such products, this minus can be ignored. In addition, it is necessary to remember about one more feature of the described finishing material. According to its characteristics, as we noted, it is moisture resistant. But in no case should you wash it with water.
The finishing material of interest to us is made in the form of a dry mixture. It usually includes the following components:
- cellulose, cotton natural fibers;
- wood impurities;
- mineral particles;
- silk;
- natural dyes;
- decorative additives (glitters, sticks, flocks);
- seaweed;
- harmless glue.

Preparation of the composition for application
It is customary to subdivide liquid wallpaper for ceiling surfaces into several types. The first includes mixtures consisting of silk fibers. Such a finishing material has a high price and truly ideal aesthetic characteristics. Silk liquid ceilings are not afraid of ultraviolet radiation. They allow you to create exclusive interiors that amaze with their originality. Combined wallpapers (silk-cellulose) are more affordable.
The price for such finishing mixtures depends on the percentage of cellulose and silk threads in them. The more silk there is in the products, the more expensive they are.
Wallpaper of the third type - cellulose, is considered the most budgetary. They are recommended for finishing glazed balconies, hallways, corridors. In bedrooms and living rooms, such cladding may not look the best. When choosing a liquid plaster for ceilings, it is imperative to take into account the geometric features of the rooms in which it will be used, and also take into account the decor style of the entire room. Light wallpapers are classified as universal. They, in principle, are allowed to be used in any premises. But it is undesirable to use dark wallpaper in rooms that are small in size and low in height.
Before applying the wallpaper in question to the ceiling, you should take care of its preparation for finishing, as well as deal with the technology for preparing liquid plaster. You need to remove all bulky items from the room and cover the floors with any dense material or plastic wrap. Then clean the ceiling surface. If it has been whitewashed, wash the ceiling with water. Old wallpaper can be easily removed with a spatula. With painted ceilings, in general, everything is elementary - just peel off the exfoliating areas of acrylic, oil or.

Preparing the ceiling for liquid wallpaper
Next, you need to fill large gaps and cracks in the ceiling with a putty compound. Wait for the applied compound to set, and then gently level it with a float. If there are fasteners on the ceiling surface, old plaster mesh, other metal products, paint over them with enamel or remove them. Then you should apply a primer to the base treated as described above. This procedure is easily performed with a wide brush either.
While the primer is setting and drying, you can start to obtain ready-to-use wallpaper from the dry mixture. All the rules for performing such a procedure are available in the instructions of the manufacturer of the liquid plaster. In most cases, the operation is performed like this:
- Pour clean water (not cold, but not hot) into a 10-liter container (for the required volume of liquid, see the package of the mixture).
- Pour the dry composition into water, mix (as thoroughly as possible). Mix liquid plaster exclusively by hand. When using a construction mixer or similar device, there is a high risk of damage to the elements that make up the wallpaper.
- Wait for the adhesive components included in the mixture to swell well (read the instructions).
- Stir the resulting composition, add (if necessary) texturizing impurities and pigments to it.
Liquid wallpaper is ready to use. They should be applied immediately. If the composition dries, it can theoretically be re-diluted with water. But the quality of such plaster will be low. Its performance will deteriorate significantly. And the wallpaper will adhere to the ceiling with great difficulty. If the plaster is too thick, add a small amount of water to the prepared composition and stir it. There is one nuance here. More than 800-1000 g of liquid cannot be added to one portion of the composition made. If adding water in the indicated volumes did not correct the situation (the solution remained excessively thick), you will have to wait until the excess moisture evaporates by itself.
Finishing activities are carried out in rooms with a temperature within the range of + 20-26 ° С. The application of liquid wallpaper to the ceiling is carried out according to the following scheme:
- Take with your hands a small part of the composition made, form a lump out of it. The latter must be put on a plastic grater.
- Apply the plaster in a reciprocating motion to the surface to be decorated.
- Form the next lump. Apply it to the ceiling. Remember to periodically dampen a plastic grater with water. Then the surface treatment will go much easier.
- Smooth all the lumps on the ceiling.
- Leave the surface treated with liquid decorative plaster to dry for about three days.

Spray application of liquid ceiling
To speed up drying, it is allowed to use heaters and ventilate the room. The coating described in the article is not afraid of drafts! Many home craftsmen are interested in whether it is possible to apply liquid wallpaper to ceiling surfaces in rooms with constant high humidity. Experts say that it is possible. But with one condition. Be sure to treat the wallpaper with a good waterproof varnish. It should be noted that it does not need to be used for rooms with normal humidity levels.
And the last thing. Ceiling decoration with liquid wallpaper is sometimes not done manually, but by means of a spray (spray gun). Such a tool must have a capacity of at least 200 l / min and a pressure of about 3.5 atmospheres. The possibility of applying liquid plaster using a spray gun is negotiated separately by the manufacturer of the decorative composition. Carefully read the instructions for the wallpaper. At the same time, decorative compositions with a fibrous coarse structure are never applied with a spray gun. Remember this.

