Creative work in physics "Fountains" (grade 7). How to make a heroon's fountain with your own hands from bottles Calculation of the economic costs of building a model of a fountain
THE EASIEST FOUNTAIN
In order to build a fountain, take a plastic bottle with a cut-off bottom or glass from a kerosene lamp, pick up a cork that covers the narrow end. Make a through hole in the cork. It can be drilled, turned with a faceted awl, or burned through with a hot nail. A glass tube, bent in the shape of the letter "U" or a plastic tube should fit tightly into the hole.

Pinch the opening of the tube with your finger, turn the bottle or lamp glass upside down and fill with water. When you open the exit from the pipe, water will pour out of it with a fountain. It will work until the water level in the large vessel is equal to the open end of the tube. Try to explain why this is so.
THREE FOUNTAINS
Cooking equipment
We take a bottle with a tube inserted into the cork from the stem of a ballpoint pen or an ordinary pharmacy pipette. Only her glass tube is too short. Therefore, it is better to leave the rubber bag as well, cutting off its bottom with scissors.
Burn a hole in the cork with a hot nail and insert the tube very tightly into it. If it turns out rather weak, fill the gap with wax or pitch. Find a small bottle that has a tight stopper.
Pour slightly ink-tinted water into this bottle almost to the neck, and plug it with a stopper.
The water in the bottle is at atmospheric pressure. Outside, the pressure is the same.
How do I make the fountain start flowing?
Test 1
There are two ways to do this. The first is to reduce the pressure outside.
Place the bottle on a shallow plate. Pour some water into this plate and lay out the blotting paper. Take a three-liter glass jar and hold it upside-down over a burning candle, over a stove or electric stove. Let it warm up well, let it fill with hot air.

Ready?
Place it upside down on a plate, the edges on blotting paper. The bottle is now covered. The air in the jar will start to cool down, water will be sucked in from the plate. Soon it will all go under the can. Hey, watch out, now the air will slip under the edges! But we planted a blotter for a reason. Press firmly on the bottom of the can, it will press the wet sheets, and the air will not slip through. The fountain will score!
Experience2
The fountain can be activated in another way. The air in the bottle must be squeezed! Take the top end of the tube into your mouth and blow in air as much as you can. Bubbles will run from the lower end of the tube.

Now let go. Look, how gloriously our fountain gushed!
The only pity is that it does not last long. This is because the supply of compressed air is rapidly running out. To make the fountain work longer, you need to pour a little water into the bottle. All the same, it will be enough for the fountain to work, and more air will enter the bottle. And you don't need to tint the water with ink. After all, this fountain will not beat under a glass jar, it will be clearly visible even without ink. And here you have to take the tube in your mouth.
Test 3
This fountain is similar to the previous one. Increased pressure builds up inside the bottle. Only not by blowing air, but in another way.

Place a few pieces of chalk in a bottle and fill it three-quarters with vinegar. Quickly plug it with a tube and stopper and place it in a sink or large basin so that the vinegar does not end up where it is not needed. Indeed, carbon dioxide will begin to emit in the bottle, and under its pressure a vinegar fountain will flow from the tube!
FOUNTAIN IN A BOTTLE
Take a small bottle or vial, drill a hole in the cork and insert a used long refill from a ballpoint pen into it. First, you need to clean the rod from the remnants of the paste, using a wire and a piece of cotton wool dipped in cologne. For better tightness, close up the place on the plug where the tube is inserted with plasticine. The rod should not reach the middle of the bottle a little, and let its outer end rise a few centimeters above the cork. The hole in the end of the rod, which is inside the bottle, must first be reduced in diameter. This can be done by inserting a cork from a piece of a match into it and piercing it with a thin needle.
Pour water into a saucepan, put a bottle in it (so it doesn't float!) And bring the water to a boil. Let the water boil for a few minutes. While the water is boiling, prepare a glass of water tinted with red watercolor paint or a grain of potassium permanganate on the table. Put a piece of cardboard on the glass with a hole through which the neck of a bottle or bottle with a ballpoint pen can enter.

Now you need to act decisively and quickly: remove the bottle from boiling water and, turning it upside down, insert it into the hole of the prepared cardboard on the glass, while the outer end of the rod will sink into the tinted water. From the tip of the rod in the bottle, a thin colored trickle of the fountain will begin to beat. When you boiled water, part of the hot air, which expanded from heating, left the bottle, a rarefied space formed in it, and the external atmospheric pressure drove water from the glass into it. At the same time, a trickle of cold water also helped cool the air inside the bottle and reduce its volume.
Now that the jet has stopped rising, look at how much water has accumulated in the bottle. Exactly so much air came out of it when it was being prepared for the experiment - it was boiled in a saucepan.
FOUNTAIN ON THE TABLE
You will need a tube 30-40 cm long; the wider it is, the longer the fountain will take. Cut out two circles that fit tightly into the tube. Cut the empty ballpoint pen obliquely in half. Take out the tip, push out the ball from the inside with a needle and insert the tip back.
Half of the rod with a tip is passed through one circle, the other half through the other. Cut obliquely so that the halves, even resting against the mugs, are not closed.
With the lower end of the toy we scoop up water from the bath and wait for it to pour from the tip. Then we turn it over. The water only remains between the circles. In this position, we lower the toy into the bathtub, which is shown in another picture.
Water fills the bottom of the toy, forcing air into the compartment between the mugs. He presses on the water that is there - and a jet gushes from the tip.
Now you can start making a tabletop fountain. You will need plastic cubes, a plastic plate, tubes and again an empty rod with a tip. The third figure shows a diagram of what will come out (only the frame on which everything is fixed is not shown).
When the action starts, the water is in the top cubes. Water flows from the first top to the second bottom. Note that the end of the pipe is cut obliquely against the bottom of the cube. The air from it through the next tube enters the second upper cube. Also note that this tube runs from "ceiling" to "ceiling". Etc. From the last top cube, a fountain hits the plate. From it, water flows into the first lower one.
If we only took a couple of cubes, the fountain would be small. And here - a column of water from the plate down, then from the first top cube down, then from the second top down. With each column, the pressure increases, and with it the height of the jet. In fact, in front of us is like a water tower, which was cut into three parts (like a sausage across) and put them in a row. You can take not three pairs of cubes, but any number of pairs.
At the end of the action, all the water is in the lower cubes. We turn the installation over. Recharging takes seconds as the water is held back by the handpiece and air escapes quickly.
The installation will look more beautiful, and it will work more clearly if the cubes are placed on the edge, or even better on the corner. Then the tabletop fountain made of cubes will have the shape of a rhombus. The plate can be cut in the form of a flower, the upper cubes will be the "leaves", the lower cubes will be the "roots". You can also plant a butterfly for decoration!


Already in ancient times, people thought about how to create artificial reservoirs, they were especially interested in the riddle of running water. The word fountain is of Latin-Italian origin, it comes from the Latin "fon tis", which translates as "source". In terms of meaning, this means a stream of water beating upward or flowing out of the pipe under pressure.


From an architectural point of view, a fountain is a structure that serves as a base or a fence for streaming up and down streams of water. The fountains were originally built as a public source of drinking water. Later, the combination of green spaces, moving water from fountains and architectural compositions became one of the means of performing unique artistic and figurative solutions in modern architecture.


Aivazovsky Ivan. "The Great Peterhof Palace."


Poems about fountains. A painful sea lurked by the fountain, The light dawns and the shallow catches the breeze. Wet sleep in the valleys and on the hills, At the fountain, austere cypress. The fountain is sunny and clear, The charm and myths of the velvet pore, The earthly world is born and fades In the spray of jets and the games of midges. Smoky and cloudy camps Lead the shadow by the copper stream. By noon I come to the fountain, Where love is like an eternal draw ... And from the heat, drunk and tired, Savage in tropical dust I drink the sky with the lips of the pass, And I hurl ships to the south. Crimea under the stellar dome of the arena, Crimea in the stones, licked by the wave, In every visiting visitor, With a look that became related to me. Danilyuk Sergey. I will stop by the fountain. He will hang out his palms, He will sprinkle joy at length, Arrange the droplets in pursuit. The fountain live splashes of happiness On the body will leave freshness, Give coolness in the midst of bad weather, And make a rainbow of life. Yana Honcharuk.

How many interesting things are around us.
At all times, people have decorated their homes with flowers. And we have a lot of flowers in our house, which are placed on window sills, shelves and even stand on the floor. They require a lot of attention: watering, spraying. Some require a lot of water, others a little. Once I noticed that the earth in flowers dries out very quickly. Mom said that the air in the house is obviously rather dry. I wondered if it was possible to humidify the air in the house and thereby help the plants?

Ways to humidify the air in the apartment.
There are many ways and devices for air humidification. Household appliances that increase the humidity in the air in the home are beautiful and effective, but very expensive. There are traditional methods of humidifying the air in the room. Most of them boil down to the fact that water must evaporate naturally. These can be open containers of water or a damp cloth. However, in order for this method of moisturizing to bring a noticeable result, you need to regularly moisten the cloth and add water to the container. The amount of liquid evaporated will be small, which means that it is necessary to hang more than one piece of cloth and put more than one container of water. Is it worth turning the room into an exhibition of vessels with water and wet pieces of cloth? I suggest using a model of Heron's fountain for humidifying the air.

Fountain of Heron.
Even the ancient Greeks drew attention to the miracle of nature - springs. They decorated the springs with greenery and flowers, and covered them with stones. The water flowed in a trickle, and it was convenient to fill the dishes with it. In ancient Rome, they began to build artificial springs. This is how the first fountains appeared.
The ancient Greek mechanic Heron of Alexandria created the most ingenious fountain in design. It consists of three vessels: the upper, open A and two spherical B and C, hermetically closed. The vessels are connected by three tubes.
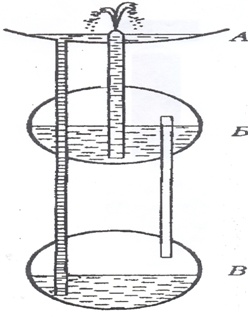
When there is a little water in A, the ball B is filled with water, and the ball C is filled with air, the fountain begins to act: water pours through the tube from A to C, displacing the air from there into the ball B; under the pressure of the incoming air, water from B will rush up through the tube and gush with a fountain over the vessel A. When the ball B is emptied, the fountain ceases to function.
Assembling and testing the model of Heron's fountain.
I tried to create a simplified construction of Heron's fountain at home. Instead of balls, I took two plastic bottles, vessels B and C, from under carbonated water with a capacity of 1 liter, with two holes in the lid and bottom. A flat vessel was made from the bottom of a larger plastic bottle. Instead of glass tubes, I took nylon tubes from the medical system of transfusion of solutions. Vessel A was connected to vessel B using a tube, and vessel B was also connected to vessel B using a tube. Vessel B was connected to vessel A, in which a special device was made to produce a jet. She placed all three vessels at different levels one above the other. Vessel C is filled with air, water was poured into vessel B, and water was poured into vessel A to the level of the device for forming a jet. Water is poured through a tube from A to B, displacing air from there into vessel B; under the pressure of the incoming air, the water from B moves up the tube and a fountain jet is formed. When all the water from vessel B is poured into vessel C, the fountain ceases to function.


Houseplants will benefit from my fountain.
By placing the structure of the fountain next to the flowers, we significantly improve the microclimate, and the flowers respond with abundant flowering. To increase the efficiency of the fountain, you can use larger bottles and increase the jet height. When vessel C is 35 cm lower than vessel B, the stream of water in vessel A has decreased. We measured the stream with a ruler - it turned out 5 cm. We tried to put all three vessels on the same level, then the water from vessel B stopped flowing into vessel A, and there was no jet.
And when vessel C is lowered 60 cm below vessel B, a good stream of water is formed.


Calculation of the economic costs of building a fountain layout.
This design of the fountain does not require material costs.
For the manufacture of my fountain, I used used plastic bottles and a system for pouring solutions:
1. bottles of carbonated drink with a capacity of 1 liter. - 3 pieces;
2. medical system for transfusion of solutions - 1 set.
I did not take into account labor costs, since I did not make the product for sale, but as a gift to my mother. For my mother, my work, I think, will be priceless, but for me happiness and pride that this model will delight the eyes of our guests and be useful. I will be very proud when my mother tells me that I made this model of the current fountain.
Conclusions and self-esteem.
A fountain can be built at home from improvised means.
In order for the fountain to flow, pressure is needed, and in order for it to appear, there must be a difference in water levels.
The model of the fountain, made by me, turned out. But the work was not easy. It was difficult to design and manufacture the model itself: to make holes in the bottles and achieve a good stream of water. It took me a lot of time to work on the project, but I am very pleased with my result. And I am sure that the knowledge, skills and abilities that I have acquired will be useful to me in the future.
I believe that I coped with the task I set for myself.
Although the task was difficult, luck came to me!
I answered the questions, which means I read a lot.
With a calm soul I am sending you my report.
Bibliography
1. Great Soviet Encyclopedia. –M., 1977.–t. 27
2. Technique: Encyclopedia / Design. Series L. Yakovlev. - M .: OOO "ROSMEN-IZDAT", 2000. – 399 pp. - (Children's encyclopedia).
3. Ya. I Perelman “Entertaining physics” book 2, TRIADA – LITERA Moscow, 1994.– 117p.
Chuprova Polina Petrovna,
7th grade student.
Supervisor:
Chuprova Natalia Alexandrovna,
Physics teacher.
MOU Vosyakhovskaya secondary school
with. Vosyakhovo
In this description, I'm going to tell you how to make Heron's fountain that doesn't require electricity. Although, you can trick people into thinking that this is how it works. We will make the Heron's fountain with our own hands from ordinary household materials. It is very easy to build and would be the perfect project to do with your kids. Maybe you could even give a lesson on fluid dynamics or constant motion?
Heron (Hero, Hero) of Alexandria was a mathematician and inventor. He is well known for his steam engine, Aeolipile, and many other inventions that use pneumatics (Wikipedia). I'm going to try to recreate one of Heron's favorite inventions - Heron's Fountain.
Total construction cost = $ 2 (you will need to drink 3 bottles of soda).
What you need: Consumables

(3) 0.5 liter water bottles
(1) 9 "Tube Length
(1) 11 "Tube length
(1) 15 "tube length
A small amount of plasticine or sealant
Note: Aquarium tubing 3/16 "(5mm) or any other with thin, rigid walls. Almost any tubing will work, even flexible, but rigid tubing is very easy to work with. For example, I got the appropriate tubing from my local pet store. at about $ 0.50 per foot.
What you need: Tools and equipment

Scissors
Drill (hand or electric)
5/32 "(4mm) drill bit (slightly smaller than tube diameter)
You have prepared the materials and the tool, and we will begin the story of how to make the fountain of Heron with our own hands.
Step 1: make the fountain reservoir

Cut one of the bottles in half as shown. Don't throw away the bottom of the bottle, you can use it to fill the fountain when we're done.
Step 2: drilling holes

You will need to drill 2 holes in each cover. Before drilling holes in the cap, place a piece of wood to support the cap.

When you are finished with the first lid, use it as a guide to drill holes in the second lid. You can align the caps with the top caps when drilling holes. You should now have covers, each with holes drilled in roughly the same location.
Step 3: Drilling Holes Part 2

Take one of the caps and use it as a guide to drill holes in the bottom of one of the remaining untouched bottles. This will end up being the bottle (B) as shown in the picture below.
Step 5: connect the tubes of Heron's fountain
Connect the tubing as shown in the picture above. All connections must be tight. If you used a 5/32 drill, they should work. If not, just add a small amount of plasticine (or sealant) to seal the hole around the tube. It is also necessary to seal the connection between bottle (A) and (B). You can see it in the first picture. The rest of the connections will not leak, and I did not use any sealant there.

Note: Make sure the tubing is at the correct height in each bottle. These heights are very important!
Step 6: Add water and enjoy!
Now all you have to do is fill bottle (b) with water and twist the whole system together. To make the self-assembled Heron's fountain work, add water to the top bottle (s). Enjoy your home fountain without electricity!
Based on materials from makezine.com
Gerona. This water device was known 2000 years ago. However, few people these days think about how it works. Indeed, now there are many different types of home fountains on sale. But the peculiarity of this fountain is that it works without any engine, and you can make it yourself.
No need to buy
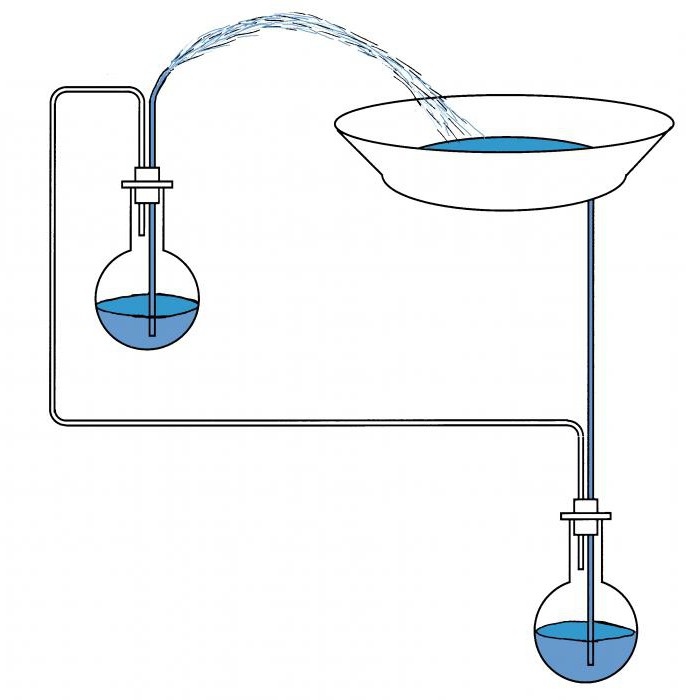
DIY enthusiasts will be happy to know that this device can be made quickly and easily. How to make Heron's fountain? First you need to prepare materials and understand the principle of its work. It is not difficult to make a simple fountain of Heron with your own hands. And it consists of only two containers for water, pipes and a bowl. All these objects are connected to each other and, thanks to the gravity existing on the Earth, a stream of water is pushed out above the surface of the bowl. The fountain of Heron also operates in full compliance with the laws of hydropneumatics.
Details
Each container of the fountain serves a specific purpose. Heron's fountain begins with a bowl. It is a bowl filled with water, from which a thin tube extends, directed to the lower container. It is along it that the water begins its movement. This container is empty. Water accumulates in it, which, rising upward, creates air pressure that rises through a thin tube and enters the upper container filled with water. From here, the air pushes the water, which moves through the tube into the bowl of water and creates a jet that is visible above the surface of the liquid. Heron's fountain can work for a very long time, but the containers have to be swapped. Because the lower one is gradually filled with water, and the upper one - with air, which means that the necessary pressure ceases to be created.
What's the secret
You might be surprised to read now how you can make a fountain with your own hands. After all, this model uses plastic, and 200 years ago it was not invented yet. It's simple. The Greek inventor used glass containers. To begin with, he conducted an experiment. He poured water into a glass bottle, then plugged it with a cork, in which he made a hole. He inserted a tube into this hole that reached the bottom of the bottle. Having placed this structure in the sun, Heron began to observe it. The sun began to heat the bottle, and the water rushed up the tube. Moreover, the more the sun warmed, the more water flowed out. Then Heron took a magnifying glass and pointed it at the bottle to enhance the effect of the sun's rays. The heated water burst out of the bottle in a high stream through the tube. This prompted Heron to think that water can move in a circle, rising from the bottle and returning to it. Then he began to think about how to make the water flow back into the container on its own.

What's next
The inventor came up with the idea of placing two more inside one vessel. The third vessel was empty and the second was filled with water. Water enters the third vessel, creating air pressure, from which it rises up the tube located in the middle of the third vessel. From the second vessel, water begins to move into the third, expanding when heated by the sun's rays. As a result, viewers see the gushing stream of the fountain over the surface of the bowl. Heron placed his first fountain in the temple. At that time, it looked like a miracle, because no one could explain how this fountain works, because there were no mechanical devices or pipes that could be used to pump water.
Nowadays
Heron's invention is still interesting to our contemporaries. It especially surprises children who are not yet familiar with the laws of physics. Modern inventors are gradually improving Heron's project. They add something new to it, improve its properties and, of course, come up with something of their own. For example, you can increase the height of the jet if you connect several containers together, then the pressure is added up and pushes the jet of water over a long distance. They also come up with various ways to recharge the fountain. It would be nice to make sure that the person does not have to take part in this process.

Nowadays, even a schoolboy can make his Gerons - you read it in our article. You can decorate this invention and install it in your country house or apartment, surprising your guests.

