How to make beautiful beds and decorate a vegetable garden? Recommendations for creating a design project for a vegetable garden with beds Ideal beds in a vegetable garden.
For many, their own garden or summer cottage is not only an opportunity to grow their own vegetables, but also a kind of option for recreation. Therefore, it is so important that the territory with your landings has. At the same time, you can beautifully arrange the plantings and give them a neat look using different materials. Let's find out how to make original beds with your own hands, not like everyone else. Interesting ideas in our review will help you create a variety of designs.
Do-it-yourself beds are not like everyone else: interesting ideas and tips for their arrangement
The design of the beds in the garden depends on the selected materials. Photos of popular designs are presented in the article. The beds differ in the type of material used. To choose a quality material, first decide on the purpose and shape of the structures. The location of the landings is also an important factor.

Using the sides for framing is practical and beautiful. Such barriers prevent the soil from crumbling, and also give the territory a well-groomed appearance. It is a good rainy day.
In the video below you can see how you can make reliable enclosing elements:
When creating beds, use the following nuances:
- the width of the bed can be 50-70 cm, the height is -30-60, and the distance between the paths is 40-50 cm;
- the length of the bed depends on the area of the personal plot, as well as on the volume of the crop;
- before the construction of the beds, the marking of the planting territory is carried out. This takes into account the agrotechnical characteristics of plants;
- crop yield per 1 sq. m .;
- plant compatibility;
- with a slope of the site;
The nuances of designing a garden design with beds
Do-it-yourself photos of beautiful beds will help you decorate your garden. This process must be accompanied by a rational distribution of space, as well as the correct combination of vegetable crops.

If your site has a small area, then choose the corner version of the beds. You can try radial and radial layouts. The radial pattern is often used along. It can be used for the local area.
You can install rectangular or round beds and plantings along the yard and garden paths.

Pay attention to the compatibility of the crops that you intend to plant in the same area. There are special tables that will help determine the favorable neighborhood of individual crops.
The creation of the layout of the garden and the location of the beds should be done taking into account some recommendations:
- ... The site must be divided into an economic zone, a recreation area and a front one;

- it is important to think it over. The site should be lit from all sides, as many vegetable crops love the sun;
- limit planting areas to create additional protection and quality care for crops;
- placement of landings and original configurations;

- what matters is the width of the stands and the aisles between them. Experienced gardeners advise against making a width of more than 70 cm;
- site improvement is the most important component.
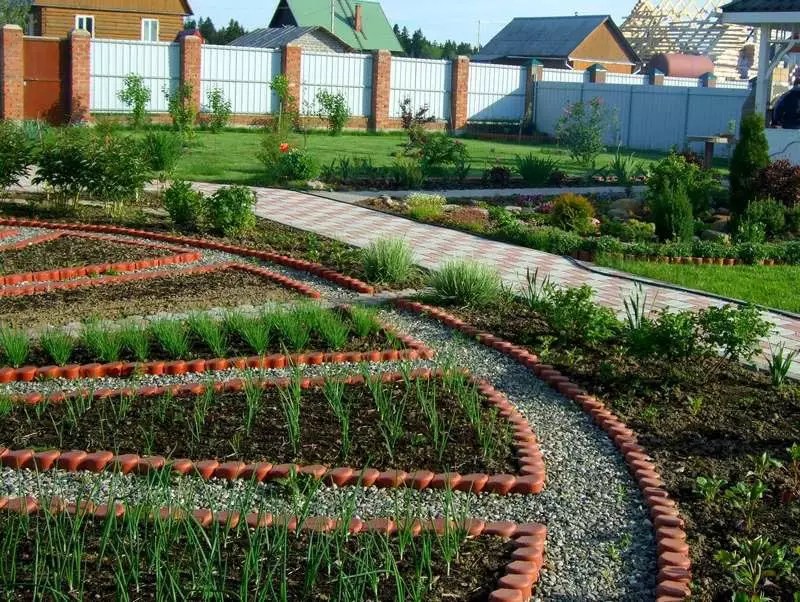
Decorative bumpers must be used for do-it-yourself beds. Not like everyone else's interesting ideas can be found on our website. With the help of the sides, you can raise the embankments. If the design of the entire territory involves the use of smooth lines, then you can make curly frames from ready-made modules.

Planting plants in containers has many benefits. They are especially appreciated for their mobility. You can move them anywhere in the territory. With such boxes with greens, you can not only arrange beds in the garden, but also a barbecue area or.
In compact containers, you can plant cherry tomatoes, eggplants or decorative peppers. In large containers, you can plant several crops at once.

Flower and vegetable beds look good. In this case, the flowers can be placed in groups, like bright islands.
For your information! Do not forget to use fine rubble, granite elements or wood cuts to decorate the paths.
DIY gardening in the country: how to make the right size
When planning your garden space, consider the size of your plantings. The placement of narrow ones for vegetables is popular, since such a design makes it easier to care for the plantings.

The functional design of the beds is carried out taking into account their length, height and width, which are determined in advance. The size parameters can affect the yield, the level of complexity of the design, as well as the appearance of the beds.
You can choose any width, but the best option is 70-90 cm. On such beds, plants can be planted in several rows. Even at a size of 90 cm, you can easily reach the center of the planting from both sides. If you plan to plant vegetables near the wall or, then do not make the width more than 50 cm.

Particular attention should be paid to the height. If you plant plants on a hill, then they can freeze in winter, so not the best solution for perennials. In this case, the height can be no more than 15-20 cm.
Do-it-yourself design of garden beds in the country: photos of paths and materials
When decorating the garden with your own hands, not like everyone else's interesting ideas, you can bring to life with the help of unusual paths. For their arrangement, stone, sawdust or crushed stone is used.

You can concrete paths, such a coating is particularly convenient. And if you are going to change the planting patterns every year, then lay out the paths with wooden platforms, rubber or.

If no other materials are available, tree bark or wood shavings can be used. This material does not rot, unlike sawdust.
Green manures can be planted on the paths, which will enrich the soil and also help to obtain high-quality mulch. But such a coating is not dense enough and it will be inconvenient to walk on it.
 g Tracks from boards
 The budget options include crushed stone sprinkling. In some cases, pieces of roofing material, laths of laths and flat slate are used.
From pieces of ceramic tiles, you can lay out a variety of ornaments and mosaics. A reliable coating is obtained from multi-colored.
For your information! The materials of the paths and fences must be compatible with each other. For stone fences, rubble, paving stones, or tiles are a good option. If the structures are wooden, then the paths can be made from wood cuts or sawdust.
How to make a fence for the beds with your own hands
To create high-quality and beautiful designs, pay attention to the choice of materials for the manufacture of beds.
The design instructions begin with universal steps. First you need to prepare and level the soil. Apply markings around the perimeter of the landings.
Let's consider some options for materials:
- for borders it is used steel material with added polyurethane... This solution will keep the structures from fading for a long time. The material is easy to install and can be dismantled when cold weather sets in. In addition, such fences are resistant to corrosion and are distinguished by their mechanical strength;

- through plastic panels you can create multi-tiered structures. In this case, the elements can have a curved or smooth shape. This material is in demand due to its resistance to temperature extremes, as well as its high strength. You can make an original bed from plastic pipes;

- common material is wood... Before use, such a material will have to be treated with additional impregnations, as it quickly deteriorates. More expensive solutions include decking;

- polycarbonate curbs produced in a variety of colors. This material is fire resistant and resistant to mechanical stress;

- slate durable material that perfectly withstands the effects of precipitation.

When creating any border for a garden with your own hands, adhere to the following rules:
- fences should not be high. The optimal value is from 10 to 30 cm;
- the framing should be in harmony with the configuration of the beds;
- Set the material firmly enough so that the soil does not fall out onto the paths.

For your information! Plastic fences are easy to clean. To do this, it is enough to douse them with water from a hose.
Related article:
If you do not know which plastic constructions can be used, then our review will help you. You will not only get acquainted with the specifics of such products, but also learn the most unusual ideas for their use.
Do-it-yourself options for unusual beds in the country: photos and tips
Consider the options for decorating unusual beds with your own hands from scrap materials. The photo shows the most original ideas.
With the right design, beautiful beds are in no way inferior. Some ideas you can bring to life on your own:
- high beds allow to raise plants, and also contribute to their rapid heating and development of seedlings;

- round structures look unusual. They can be used to grow beets, cabbage, tomatoes and radishes;

- multi-level structures recommended for small areas;

- for creating ladder apply;

- vertical made in the form of boxes for seedlings or in the form of plastic pipes. They are fixed vertically, which significantly saves space. Vertical beds are used for strawberries, onions, lettuce, herbs and even cucumbers;

- comfortable suspended structures... You can plant greens or strawberries in them.

To create beds, you can use any materials at hand. These can be plastic boxes, barrels or wooden containers.
Related article:
In this article, we will look at how to properly use the curb tape, prices and reviews for these products, and also find out what types of such decor can be used for the landscape design of your site.
How to make a strawberry bed with your own hands: photo and manufacturing method
Let's find out what you can make beds for strawberries and other materials. For growing, wall and vertical structures are suitable, which provide optimal conditions for this plant. You can use spunbond. The price per meter of this material is less than the cost of film coatings.

So, here are the advantages of such designs:
- used for installation on a terrace or veranda;
- fill the space along the fences;
- can be placed on walls.

How to create a strawberry garden with your own hands from car tires
You can make a strawberry pyramid. In this case, you need tires from the car. This material is ideal for creating multi-tiered structures.

The tires are first cleaned, then washed, and then dried. Then the material should be painted over in the chosen color. Make holes on the sides. Then the tire is mounted in place. A pipe is installed in the center, and soil is poured inside the tire. Be sure to wrap the pipe with synthetic fabric and punch holes in it. The rest of the tires are laid on top and also filled with soil.

When the bed is done, fill the pipe with water. In this case, the liquid will flow into each tier of the structure.
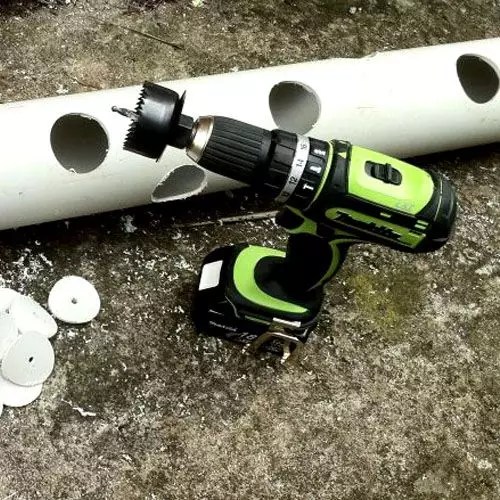
How to make a strawberry bed from a pipe
The option of arranging vertical beds for strawberries from.
To make an interesting design, you will need two types of pipes with different diameters. In a pipe with a large diameter, make holes for planting seedlings. And in the smaller part, make holes for. The length of the structure can be any. Planting strawberries in a pipe horizontally, can be done from separate elements.
Then the smaller product is inserted into the larger one, and the space between them is filled with soil. Such a material is resistant to environmental influences, which is why it is so often used.
You can also make original strawberry beds from a sewer pipe.
In the table you can see the installation step by step.
| Image | Installation steps |
 | Holes are cut in the surface of the pipe, the diameter of which should not exceed 25 -45 mm. The distance between the holes should be about 100-150 mm. |
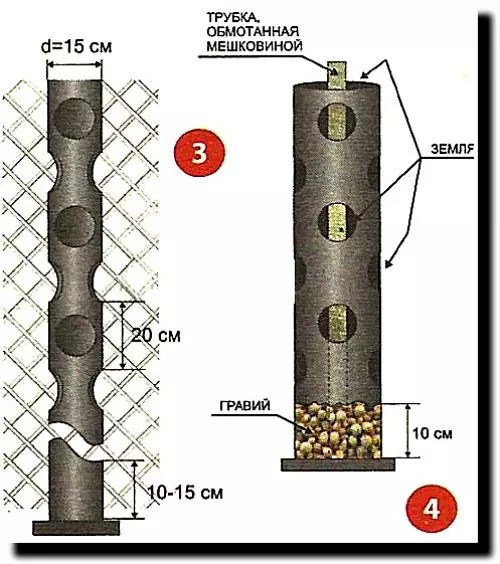 | Preparing the irrigation pipe. Punch holes with an awl. The rate of watering the soil depends on their value. Then wrap the part with spunbond or burlap, and then secure the material. Cover the bottom hole with a plug. Place a watering can at the top. |
 | Place the large pipe in a recess up to 0.5 meters. Sprinkle gravel around and then tamp. In the fall, such designs can be moved to a warmer place. |
 | Place a smaller pipe inside, and then pour the substrate around. After watering, the soil can get stuck, so it may need to be added occasionally. |
 | Plant outlets from strawberry bushes into the finished structure |
Making multi-tiered strawberry beds with your own hands
Let's figure out how to make a multi-tiered strawberry bed. In this case, constructions in the form are used. They can also be used as shelves for containers or pots.
A simple solution is to make a pyramidal structure from boxes. In this case, you will need boards that need to be connected in the form of rectangular and square products. Then the boxes are assembled according to the principle of nesting dolls: the largest element will be at the bottom, and the smallest at the top. Earth is poured into the container, and then the seedlings are placed there.

For your information! Multi-tiered structures can be made from various materials at hand, for example, from plastic bottles.
The technology of creating beds for strawberries from bags
You can try the method of growing strawberries in bags. For this, high-density polyethylene products or burlap are suitable.
Constructions made from natural materials offer superior flow capacity, environmental friendliness and durability. In case of self-production, it is recommended to additionally strengthen the material with strong threads. Then the bags need to be filled with earth and slits in them. Strawberry bushes will be placed in them. It is important to firmly secure such a product. Sew a loop on top to secure the bag to the support. This is a good option for creating tall beds in the country with your own hands. Photos allow you to see interesting ideas, for example, checkerboard design.

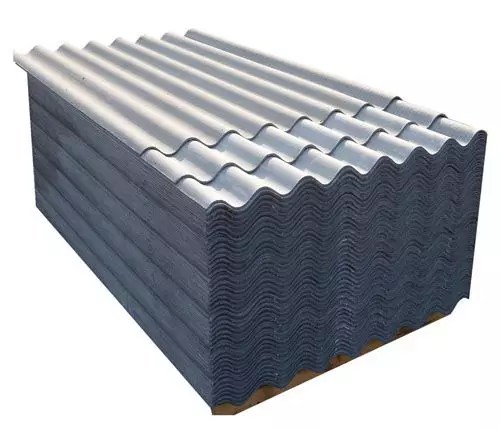
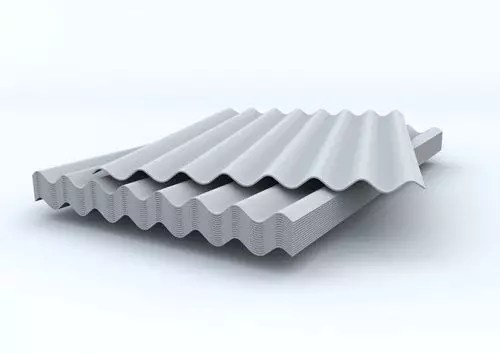
How to make a bed of slate with your own hands: photo ideas
Gardeners and gardeners are popular with the fencing of the beds with slate. It is a simple material that is durable. With the help of such elements, you can protect the soil embankment from creeping along the paths.
Let's note their advantages:
- used for long fences;
- the material heats up quickly, while the process of getting nutrients to the plants is accelerated;
- ease of use;
- low cost;
- long service life;
- attractive appearance.
But the slate border also has negative sides. In rainy weather and erosion of the soil, the leaves may deviate to the side.
In the video below you can see how to make a slate fence:
Useful information tion! The slate surface can be painted in any color.
Features of do-it-yourself corrugated slate beds
Let's look at how to make a bed of corrugated slate with your own hands. A similar material is used for roofing, but often small pieces remain that can be used for useful purposes.
Here's what you can do:
- cut the material into suitable pieces;
- highlight the boundaries of future plantings. Dig trenches in which you install pieces of slate and sprinkle them with earth;
- use metal pegs to fix the sheets.

Slate sheets are covered with vertical or horizontal waves. Horizontal material is more difficult to cut.
How to make a flat slate bed with your own hands
You can use flat slate for the beds. This option is not as convenient as the previous one. For beds, sheets are suitable, the length of which is about 1.75 meters.
Here is the manufacturing procedure:
- workpieces are cut into two parts;
- a trench is being dug;
- prepared parts are placed there, and then sprinkled with soil;
- holes must be made in metal corners through which bolted connections will be made;
- metal elements are connected to slate sheets. They must be additionally treated with special compounds that protect against corrosion;
- after the material has dried, it is necessary to fill the bed with organic fertilizers. It can be compost or brushwood.

Important information ! The slate must not be driven into the soil, as it can easily break.
The nuances of buying slate for beds: the price of products
You can specially buy flat slate for the garden. A grinder is suitable for cutting this material. When working with this tool, turn it so that the dust is flying away from you. Such dust can be harmful to human health, so wear glasses especially for such work.
You can also buy strips for slate beds. This material is sold for the design of various landings.
You can see the prices in the table.
| Image | Material | Dimensions (edit) | Price, rub / piece |
 | Flat slate | 3000 * 1500 * 10mm | 1450 |
 | 8 waves | 1750 * 1130 * 5.2mm | 210 to 245 |
 | 7 waves | 1750 * 980 * 5.2mm | 200 |
 | Flat not pressed | 1500 * 100 * 10mm | 389 |
 | Metal slate 0.55 | Different sizes | 150 to 208 |
 | Schiffer PVC (matte, colored) | 0.9 * 2m | 320 |
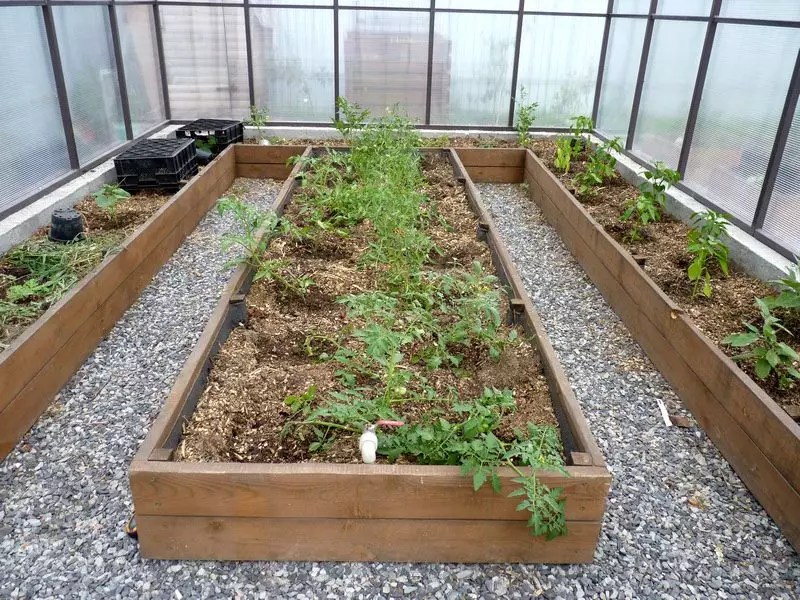
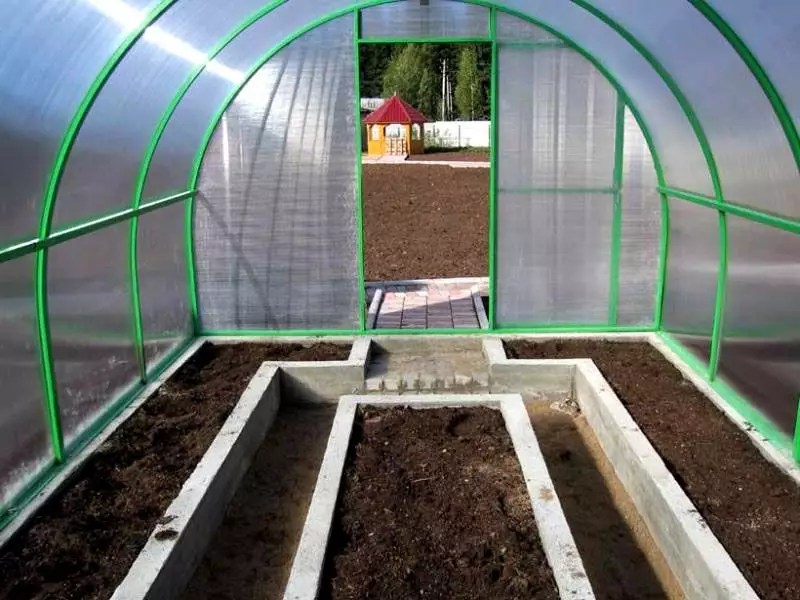
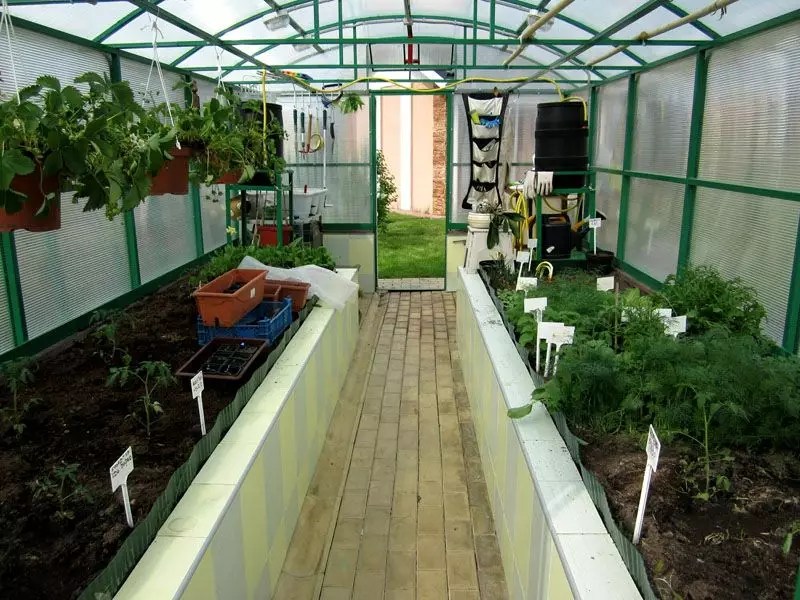
How to make beds in a greenhouse: photo options and manufacturing nuances
Beautiful photos of the beds in the greenhouse demonstrate how you can properly equip. If you organize the planting correctly, you can get a rich harvest. Greenhouses with a size of 3 * 6 m are in demand, since they can be used even in small areas. Similar designs are made from sheets. This material is highly durable and has good solar transmission. Such products are easy to assemble and disassemble, as well as easy to transport.
For greenhouse beds, you can use the following elements and materials:
- great as sides boards... Long parts are securely fixed with wood pegs;

- aluminum sides easy to install;

- slate sides durable and comfortable;

- as tire bumpers it is better to use cut tires;
- glass suitable for low structures;
- brick fences can be operated for more than one year.
In terms of dimensions, the beds can be narrow, medium, wide. All sorts of original configurations are also popular: pyramidal, vertical, French or spiral.

For your information! The greenhouse can be built from foil, glass or wood. Functional items can be purchased in the store or made yourself from scrap materials.
Features of the location of the beds in the greenhouse 6 × 3: photo and arrangement of structures
Greenhouses 3 by 6 are especially popular, many gardeners are interested in how to arrange the beds in such structures. Incorrect planting placement can lead to a decrease in yield.

Some rules will help you make the layout correctly:
- low plants require a lot of light. To provide the required level of illumination, position the greenhouse from north to south;
- when growing tall plants, it can be installed in the direction from west to east. This approach will provide sufficient lighting for the lower parts of the seedlings;
- if the surface is not even, then step patterns can be built. In this case, the plants will be evenly illuminated.
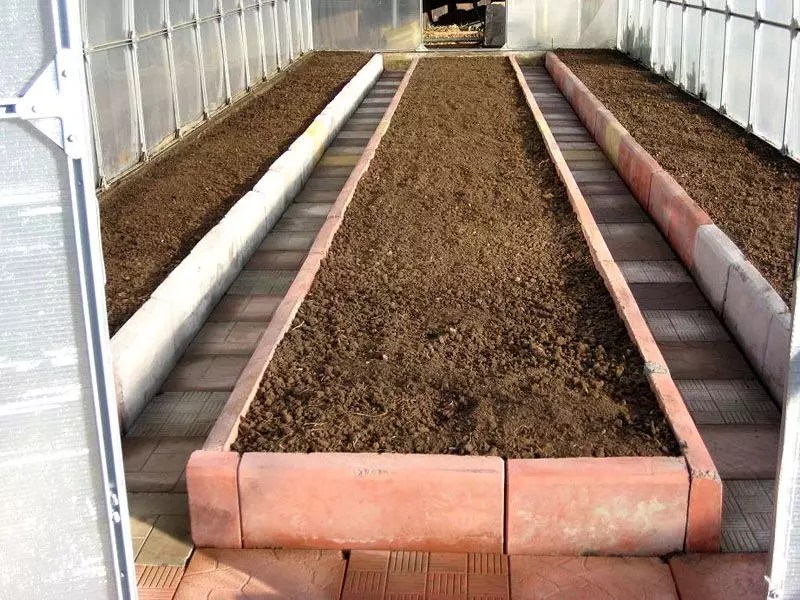
How to make beds in a greenhouse 3 × 6: photos and layouts
A competent approach to planning the interior of the greenhouse will allow you to achieve high quality yields. Use a small bed width in a 3 meter wide greenhouse. Since the overall dimensions make it difficult to care for the plants.
Try these layouts:
- wide beds of 120 cm, and a path between them. In this case, the width of the passage will be about 0.5 m. But difficulties may arise when trying to get to the extreme plants;

- vertical placement of beds in the greenhouse;

- placement of three beds with two paths that separate them. Such a scheme has a smaller area, which makes it easier to care for;

- one wide bed in the center and two narrow paths along its edges. This allows you to properly organize even a small space and ensure maximum illumination;
- several rows of small width, located along the walls of the greenhouse and one large bed in the center.
The layout depends on the do-it-yourself installation in the greenhouse, as well as on the vegetable crops that are planned to be grown.

Warm beds require the use of special organic insulation. For this, a manure layer can be used, which heats the soil layer well. To increase the decay process, you can add some sawdust or straw to the manure. In this case, sawdust is first laid, and a manure layer on top. After that, the insulation is poured with boiling water. Then, after a couple of days, the manure cover is covered with soil.

Different wood chips can be used. Bark, sawdust and tree branches are laid at the bottom, then potato tops. After that, the leaves are paper and rags. Then the insulation is watered with chicken droppings. After that, the layers are covered with a film. After a week, the insulation is covered with a layer of earth, and the plants are planted.
How to make a warm bed can be seen in the video below:
Do-it-yourself garden beds in a greenhouse: non-standard placement options
When choosing the location of the beds in height, take into account the climatic features of your region. This value can vary from 20 to 50 cm, which provides access to plants. Also, there is no accelerated drying of the soil. For unusual designs, materials such as board, slate, brick or polycarbonate are used. It is recommended to cover the bottom of the structures with straw fillers, rotten or rotten bark.

If such waste is poured with boiling water, then the fermentation process will begin, the formation of heat and rotting will increase, which has a positive effect on plant growth. The vertical arrangement helps to save valuable space. Thus, the strawberries are planted vertically in the pipes.
So, let's look at the main options:
- garters to supports often needed for plants that are too tall. To build vertical structures, you can use nets, partitions or shields. In so doing, stretching cultures will rely on such a foundation;

- shelves look like boxes and are placed one above the other. The height is determined by the needs of the plants. You can apply this method to low crops;
- plastic pipes are covered with holes where the soil is placed, and then the plants are planted. It is necessary to fix such structures in an upright position.
Article
Wooden bed and greenhouse - two in one

An interesting idea of a greenhouse on a wooden bed, only, it seems to me, it would be more convenient to open it backwards, and not sideways. The frame turns out to be painfully high and the likelihood of damage to it by the wind increases significantly.
The idea of beds with bumpers

An interesting idea of a garden bed with horizontal bumpers platforms, on which you can, for example, put some kind of pot, a watering can, etc. A convenient utilitarian device that will help in the household.
The idea of a raised U-shaped bed
A functional and convenient idea for a garden bed for growing greens or vegetables. The format allows you to easily reach any part of the ridge. The central part allows you to service the entire perimeter in one pass.
Generally, the main advantages of narrow beds detailed in the following infographic. Let's study them and take notes.

The idea of a U-shaped wooden bed with a mesh fence
If there are animals on your site that can eat your plantings. for example, goats or rabbits, then a net will help protect the garden. By the way, even chickens often "hooligan" in the garden, so protection in this case is important to preserve the harvest.
How to make removable fences in the garden
The next idea continues the development of thought with the protection of the garden from the invasion of pets. An example of creating a removable mesh fence.
Wooden bed with trellis

Growing cucumbers may require a trellis to allow the plants to curl. By adding a vertical plane to the garden bed, you will ensure the convenience of harvesting future crops. Curly flowers can be planted in a similar way.
Fast bed of hollow blocks
Sometimes it may be necessary to quickly build a flower bed, in which case this idea will be most relevant. Using the blocks, you can literally create a wonderful bed for your flower garden in half an hour.
Arch made of reinforcing mesh and wooden trays

An interesting idea of creating a pergola arch from a thin reinforcing mesh. The construction is based on wooden trays into which the earth is poured. Climbing plants such as cucumbers, grapes, or flowers can be grown in this bed.
Ceramic tube bed

An original bed of ceramic tubes covered with earth. A similar bed can be broken even on a paved area, for one season, and then disbanded, if circumstances so require.
The idea of \ u200b \ u200bcreating a wooden garden bed - a greenhouse
This idea is good because your wooden frame will have cells for mounting arcs onto which you can throw agrofibre at night or during frosts.
Traditional wooden beds

If you make small beds, then it will be easier to control the growth and development of crops.
Decorative raised beds on legs

You can also protect your plantings from rabbits and chickens by raising the beds on their legs, although, of course, this is more laborious. Rather, these containers can be used to plant flowers in them, in the background of your composition.

Another beautiful idea of the garden is not like everyone else's - all the same U-shaped, universal and practical.
Bed with cells

Several Spiral Flower Bed Ideas
In addition to flowers, ornamental vegetables can be grown on such beds, as well as greens for the kitchen and for beauty.
Square bed stands with mesh

For small ornamental gardens, the idea of square boxes of beds with nets for vertical plant growth will come in handy.
Arch beds for climbing plants

If you plan to grow grapes, then such beds will be very useful, using trays and thin fittings, you can create a twisted green arch in several seasons.
Vine garden ideas
Wicker beds will be a wonderful decoration for your garden or flower garden. The photo shows the sequence of applying organic layers to provide the bed with nutrients.
Garden bed with water-retaining wall

The original idea of a bed with a wall that retains moisture. Pictured is a coconut fiber base.
Arrangement of raised beds

Use wooden beds to create an original geometric composition in your area.
Natural bed of briquetted grass

This idea is good because the plants in such a bed will also receive minerals from the grass, which will gradually release nutrients into the soil.
Beautiful bed of facing stone

Of course, such a bed will cost a decent amount, but definitely not like everyone else! In principle, the idea is rather good for a flower bed.
Stylish wooden bed from a bar
The idea of a garden bed from a bar impressed me so much that I decided to inspire my husband to create the same one in the next summer season. A very original idea!
Galvanized metal beds

Modern and durable bed structures made of galvanized metal.
Mini beds of wine boxes

As small beds, you can use a variety of boxes from under some goods, in the photo - wine boxes.
Garden beds made of wood frame and metal

Such a bed will last much longer than a simple wooden one, since the walls of the structure are made of metal. If you make a bed so that the soil does not touch the tree, then it will last ten years.
Prefabricated bed of planks
The magic of prefabricated beds of this type is that you can pre-prepare the boards according to the template, and then, on the spot, simply assemble in a matter of minutes. Additionally, the photo shows the possibility of creating an autowatering system.
Improved F-shaped bed

Remember the U-shaped beds at the beginning of this collection? So, the next idea is based on a similar F-shaped principle, where another small bed is additionally provided in the center of the structure.
Bed tray of half barrels


To be honest, it's not entirely clear why you should cut up good plastic barrels and use them as trays? I would put these containers under water for irrigation. But the owner is a master ... The idea is dubious, it seems to me ...
Metal beds


But this idea seems to me very, very promising, as I said, galvanized metal can last a long time. In principle, any wooden bed can be sheathed with sheet metal from the inside, thereby significantly increasing its service life.
Garden bed with coasters

The original idea of a wooden bed with stands for tubs, watering cans or garden tools.
The idea of painting wooden beds

By painting your beds in bright colors, you will not only add positive to your garden, but also bring originality into everyday life.
The idea of a garden bed - a greenhouse of four boards
Note the white matter added to the peat and humus in the garden bed. This is agroperlite - a material that is capable of absorbing up to 400% moisture, which means that it can provide a garden bed with water, gradually giving it to plant roots. Plus, perlite promotes aeration of the beds, prevents soil caking and the formation of crusts on its surface.
Before each owner of a backyard, summer cottage or garden plot, the question arises about the correct placement of the garden on his site. The very word "correct" suggests that there are certain rules, norms or mandatory principles, according to which the vegetable garden should be equipped. And some general principles, of course, can be distinguished - but precisely some... This is due to the huge variety of conditions in which the plots are located, and besides, the personal preferences of the owners are of no small importance.
At all you should not blindly copy someone else's experience, especially if this is an experience gained in a different soil and climatic zone. But what about? What to do for novice gardeners?
Choosing a place for a vegetable garden
Let's start with a question that invariably arises when planning: where to place a vegetable garden on the site, what part of the total area to allocate for it... After the simplest calculation of the need for vegetables (see), it usually turns out that it is enough to allocate a plot for the garden with an area of about 3 acres... More or less - will depend on the composition of the family and the desire to experiment with any cultures.
The sunniest place is allocated for the garden, without shading on the south side. Unlike the garden, which is located on the northern slope, it is preferable for the garden southern exposure... This is if the vegetable garden is only a vegetable garden. Certain requirements:
- increased doses of fertilizers (both organic and mineral) are applied under vegetables;
- provide good air permeability to soils, for which baking powder is introduced in the form of straw cutting, straw manure, river coarse sand;
- create optimal conditions for moistening, remove excess water through drainage or arrange watering with insufficient moisture;
- protect the site from the prevailing winds, planting decorative or fruit trees from the windward side, but so that there is no shading - all vegetables are photophilous.
Recently, it has become fashionable to arrange decorative vegetable garden... Here, vegetable crops also perform decorating functions, so they are selected for their decorative qualities. But this is still exotic. If the topic of the ornamental garden is interesting to you, read the articles on the principles of its organization from the list of recommended literature for the lesson.

It is undesirable to plant vegetables in the aisles of the garden, where there is shading, competition for water and nutrients, there is a danger of contamination of products with poisons used to protect the garden. And vegetables work better in open areas.
We place greenhouses and hotbeds
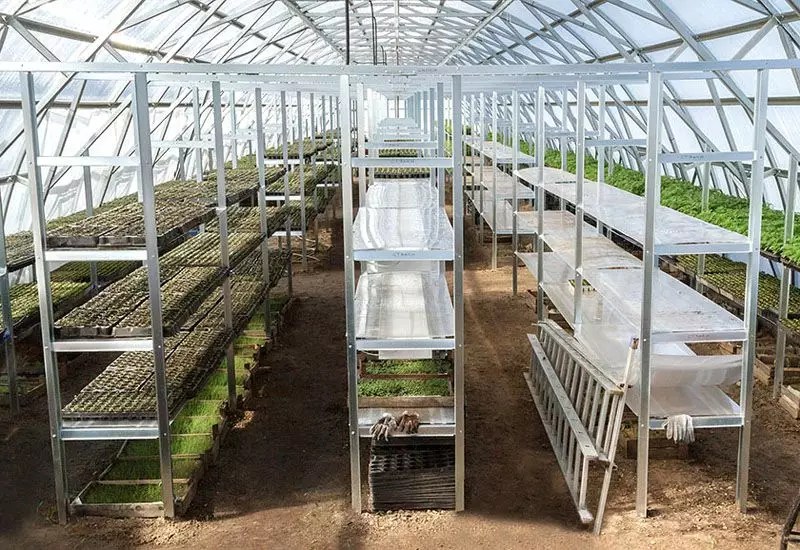
There are a lot of vegetable crops, and they are very diverse in their appearance and cultivation characteristics. The gardener's desire to provide himself with early vegetables leads to the need to allocate an area for warmed soil. Now there are no problems in acquiring various greenhouses and greenhouses or materials for their own construction.
In greenhouses, heat-loving vegetable crops are grown in small quantities: tomatoes, pepper, eggplant, cucumber, zucchini... To obtain early greenery in warmed soil, they are sown as compactors salad, Dill, parsley and other herbs. To meet the need for early vegetables, 4-5 plants of each crop are usually sufficient.
The area under the insulated soil is usually no more than 100 sq.m... But in areas with cool summers, growing thermophilic vegetables outdoors is problematic, and they are grown only under shelters. In this case, greenhouses are needed, and their area will already be higher - up to 300 sq.m and even more. Of course, it is better not to grow related crops separately, for example: cucumber with zucchini in one building, and tomatoes, peppers and eggplant in another. But if there are few plants, then it is difficult to implement, and not too necessary.
The features of growing vegetables in greenhouses are dedicated to next lesson-. There we will consider in detail all the important nuances.
We build the beds
The beds are made in the spring, simply by marking the paths. The paths between the beds should provide free passage and the ability to reach with your hand from the path to the middle of the bed. As a rule, for this the track width should be not less than 40-50 cm... The length of the beds themselves can be arbitrary, and the width is convenient for work: such that with your hand you can freely reach a little further than the middle of the bed. This is necessary for carrying out manual work - sowing, weeding, harvesting.
It is better to place beds for individual crops (like greenhouses) with a long side from North to South- this way the plants will be better illuminated during the day. The number of rows of plants in the beds is arbitrary.
Usually the beds are made rectangular... They can be different in their design. So, in the south they try to make it flush with the soil surface or even deepened, and in the center of the country and in the north - raised. The edges of the beds are usually not limited to a frame, but when constructing narrow ridges along the Mittlider or warm steam ridges, a frame is made of boards or flat slate, and other materials.
Various ways of arranging ridges: buried or raised, in a frame, and so on - it is better to master gradually. For more information about what kind of beds are, how to build them, what are the advantages and disadvantages of different options - read the articles from the reading list for this lesson.

For large plants (with a large bush) or lianas, wide distances between rows are made - from 40 to 90 cm, and between small plants, on the contrary, the aisles are reduced to 15 cm or even less. The largest row spacings require pumpkin and climbing zucchini- more than 1.5-2 m;
- wide aisles are needed for tomato, pepper, eggplant, bush vegetable marrow, beans.
- narrow aisles - for beets, carrots, green crops.
Plants placement schemes in the beds:
- roots- 6 cm between plants in a row and 10-15 cm between rows; it is also convenient to place most of green and spicy aromatic plants;
- nightshade support is required for each bush; place them according to the scheme 50 × 50 or 70 × 70 cm;
- early cabbage placed according to the scheme 40 × 40 cm;
- late cabbage- according to the scheme 50 × 70 cm;
- cucumber: when grown on a support, leave 25-30 cm between the bushes; when grown without a garter, 60-70 cm is left between the plants, and the row spacing is increased to 90-120 cm;
- bush squash placed every 40 cm;
- climbing zucchini- through 70-120 cm.
Soil requirements
The plot for the garden should be fertile. Vegetables were traditionally grown in rural farmsteads, where a lot of organic matter was introduced into the soil, but in modern garden plots there is a completely different situation, additional reclamation measures may be required - for example, if the groundwater is shallow, drainage is arranged with excess water flowing into arranged reservoirs or wells.
Usually, beginners just need to fertilize in the fall:
- organic(manure, humus, composts from organic waste) at the rate of 60-100 kg per 100 square meters;
- mineral complex where there is nitrogen, phosphorus and potassium (azofoska, nitroammofoska, foskamide, autumn and others) - up to 5 kg per 100 sq. m.
Good results are obtained sowing perennial grasses(alfalfa, clover, sainfoin) for 2-3 years and their plowing. Instead of perennial grasses, you can smell annual grasses as siderates... These can be mixtures based on barley or oats with vetch or peas. Before plowing the grass, it is necessary to grind and apply nitrogen-phosphorus fertilizers on top at the rate of 1-2 kg per hundred square meters.

Compost - good organic fertilizer
Fertilization of individual vegetable crops has its own peculiarities... So, organic matter (manure, humus, compost) is introduced under the cucumber, zucchini, late and medium cabbage, and only humus or well-decomposed compost under the tomato, pepper, eggplant. Under onions and root crops, early cabbage, only mineral fertilizers are applied.
Fertilizers and dressing is dedicated to separate lesson:. You will also find more information in the Reading List for this lesson.
What is crop rotation, why is it needed and how to organize it
You cannot grow the same crops every year in the same place. Specific pathogens accumulate in the soil, pests overwinter on plant residues, the soil is unilaterally depleted, harmful substances accumulate in it - decay products that are toxic to plants.To avoid these negative consequences, scientists have come up with crop rotation- scientifically grounded alternation of cultures in time and on the territory. In small areas, it is difficult to use full-fledged crop rotations, here they are more often used fruit change- alternation over the years of some crops with others.

With fruit change, one group of crops changes to another according to nutritional requirements. It is better if, after the crops for which organic matter was introduced, there are crops that make good use of decomposed organic matter, and after them - crops with predominantly mineral nutrition.
For example, like this:
- medium and late cabbage;
- tomato;
- carrot.
Or like this:
- cucumber;
- pepper, eggplant;
- beet.
For some crops it is required early harvested predecessor... For example, only cucumber, zucchini and green ones are suitable for winter garlic, since garlic is planted in autumn, and it is also necessary to prepare the soil for it. Perennial vegetable crops are grown in flooded areas, where they can be in one place for more than 3-5 years.
In detail about the organization of crop rotation (fruit change) in the garden, favorable and negative combinations of crops, their correct alternation and other nuances are discussed in one of the following lessons: .
Organization of watering in the garden
Vegetables are demanding not only for soil fertility, but also for providing moisture. Even in regions where there is sufficient rainfall, there are times when irrigation is required. Therefore, the site must be water source in the form of a centralized water supply system, a well or a container for several tons of water.
If groundwater are located closer than 60-70 cm from the surface, it is better to arrange their removal outside the site or into a drainage well. In arid regions, it is necessary to worry about artificial irrigation, creating a supply of irrigation water on the site in tanks or pools.
You can supply water to the vegetable plot with a hose, a stationary pipeline or using a drip irrigation system. It is better to choose a reinforced or corrugated hose that is resistant to kinks, lightweight polypropylene pipes that are UV resistant, and low pressure gravity drip lines.

But for any watering method, it is necessary to determine water quality... Here it is necessary to find out the degree of mineralization, the presence of toxic salts, and the pH value. The analysis can be carried out in zonal scientific institutions for agriculture or laboratories that monitor the quality of drinking water.
If the water meets the requirements, then it can be safely used for irrigation, but if the water is excessively saline, or contains toxic salts, or is very hard, then it is better to collect and use rainwater, use filters (which of course is expensive) - in any case, use less of it.

There is the rule: water toxicity is less pronounced, the higher the content of organic matter in the soil.
Determine the landing dates
Each crop is sown and planted at its own time. If possible, then to extend the timing of the arrival of the crop, insulated soil is very often used: various types of greenhouses, greenhouses. Various films and non-woven materials are used as a translucent coating, and in such structures, seedlings of thermophilic crops are planted: tomatoes, peppers, eggplant, cucumber and zucchini, as well as cold-resistant crops such as early cabbage, cauliflower, Beijing cabbage - to obtain earlier products.When using insulated soil, it is important that the seedlings are not only of high quality, but also certain varieties and hybrids, able to recoup the costs of structures and films as much as possible with the harvest.

Also, vegetables can be sown directly into open ground or seedlings can be planted. Green crops are usually sown first in the ground, followed by carrots, onions, beets, and then seedlings of heat-loving crops and cabbage are planted.
Selection of varieties- it's a complicated matter. It is better to focus on the assortment recommended for a specific area. There are many options and each has its own pros and cons. We talked in detail about how to choose varieties of vegetables for your garden.
How to care for a vegetable garden
Caring for the garden consists of loosening row spacings- usually after rains, watering or fertilizing. As the plants develop, the depth of loosening will first increase and then decrease, so as not to damage the growing roots.Top dressing are carried out to adjust nutrition. It is better for them to use special brands of complex water-soluble fertilizers containing 5-7 microelements. When applying fertilizers, the attached instructions are usually followed.

There is also a need for protection against pests, pathogens and weeds... The use of herbicides is a means of weed control, in small areas it is impractical. Still, they are not safe, and it is difficult not to damage the cultivated plants themselves. Manual weeding remain the most effective weed control.
Among plant protection products there are not only chemical, but also biological, and they should be preferred. But in the fight against especially dangerous diseases and pests, chemical protection should not be neglected. At the same time, it is necessary to strictly adhere to the regulations for the use of plant protection products, do not exceed the dose and do not reduce the waiting period - the time during which, after processing, it is impossible to work with plants and use products for food. This will be discussed in detail in one of the following lessons -.

Vegetable crops are subdivided into one-piece and multi-assembly... Multi-harvest plants are characterized by continuous flowering and yield formation. In crops such as tomato, pepper, eggplant, zucchini, cucumber, fruits are harvested as they reach removable maturity. Their harvest increases with regular harvests. Cabbage, roots and onions are harvested once, when fully ripe. Many cultures practice a combination of periodic collection and one-time cleaning. In dill and lettuce, for example, you can first pick off some of the leaves, and at the end of the ripeness, the whole plant.
Gardening is a fascinating business: as you master some questions, new, even more complex ones appear. This process is creative and akin to art.
The yield of plants depends not only on the time of planting seeds, their germination, but also on the place of planting and the height of the embankment. We hope that our advice on building garden beds in the country with our own hands will be useful not only for novice gardeners.
Seat selection
Some vegetable crops, for example, peas, dill, sorrel, lettuce, can grow in partial shade. But most plant species are not able to fully ripen with a lack of light.
Therefore, when placing the beds in the garden, they are primarily guided by their illumination - it is desirable that they be warmed up by the sun from the very early morning until 6-7 pm.

Ornamental garden planting
When choosing a place for planting, the following requirements must also be taken into account:
1 Do not plant plants in lowlands or on northern slopes, where the soil freezes deeper than on flat areas; yields in these places will be low; plus the water in this place will constantly stagnate, which can lead to decay of the roots
2 The plot should not have a strong slope, otherwise the water will simply drain from it when watering, and the plants will receive less moisture
3 There should be no large trees, buildings and fences near the plantings that could shade the plants.
4 It is desirable to arrange them north to south, so that during the day they are evenly illuminated by the sun
5 For growing vegetables for a family of 3-4 people, about 1 are enough; the rest of the territory can be planted with potatoes, berries and flowers
6 To make the plot look neat, try to make "correct" beds of the same width and length; standard sizes - 3.5x0.8 m
7 Do not forget about the compatibility of plants: some of them do not get along well with each other.
Dimensions (edit)

Basically, you can make a bed of any length - up to 10 m. Agree, these beds look original. But constantly bypassing them when watering is very inconvenient. It is better to prepare an embankment with a length of 3.5-4 m. This size is considered optimal. Or split a long bed in two using a small path. This will greatly facilitate your movement around the site.
Standard width 0.8 m. Do not save space (!) And in no case make it wider. You may be able to reach the center of the garden when planting and scatter the seeds, but weeding will turn into a real torment. Don't believe me? Experiment and prepare a small but wide embankment. Believe me, next year the desire to make beds of this size will disappear.
A more compact version, only 0.45 m wide, is made for carrots. This culture does not like thickened plantings - the sprouts must be well blown. For the same reason, try not to place tall plants next to carrots. Otherwise, you will significantly reduce its yield. On thickened plantings, it will grow small.
Shape and height
When decorating a site, you can decorate it with beds of different shapes, from standard rectangular to triangular, trapezoidal or oval. There are plenty of ideas for unusual beds on the net. The main thing is that it is convenient to approach them from either side for watering and weeding.
The height of the embankment depends on many factors, including the type of site. In most cases, it is enough to raise them to a height of 35-50 cm. This will be enough to prevent plant roots from rotting. Too high beds - up to 0.8 m - are usually made in very swampy areas.
But such structures are very laborious. Plus, they will need to bring at least a couple of KamAZ trucks of fertile soil to the site. One small bed will need at least half a ton of it.
Often the raising of the beds is also required for the cultivation of heat-loving crops, for example, cucumbers. Indeed, in high beds, the earth warms up much faster. It is often impossible to get an early harvest without this.
They raise the beds sometimes and just for their own convenience
Taking care of plants in this case is much easier. Just keep in mind that in high-altitude beds, the earth dries out much faster, so you will have to water the plants more often. Experts advise also to raise the planting site in areas located in the shade. The optimal embankment height in this case is 50 cm.
So that when watering the water does not slide down the path, the bed should be slightly concave inward.
Arrangement of a high bed

A box for it can be made from improvised means: boards, plastic, metal or stones:
1 It is better to put a metal mesh on the bottom - it will protect the plants from the ubiquitous rodents.
2 Crushed stone, expanded clay or broken brick are used as drainage. The thickness of such a layer is 10-15 cm.
3 It is better to pre-treat the prepared soil with agents against pathogenic microbes and insect pests. If you do not want to use chemistry, mix the soil with a little wood ash - it will protect the plants from harmful bacteria.
4 It is not worth filling the bed with soil to the very sides - it will constantly spill out onto the path. Leave about 5 cm.
Drainage

When you find a site in a lowland or swampy area, it becomes a problem to grow many types of crops on it. If vegetables and berries ripen on it, then due to excess moisture they quickly deteriorate during storage.
Their taste also changes - much less sugar accumulates in them. To prevent this from happening, take care of the drainage of the wetland.
Most gardeners know that cabbage, melons, vegetable marrows and cucumbers require more moisture to grow than other crops. But it turns out that it is also possible to grow massive heads of garlic only in areas rich in moisture. On dry land, even with abundant watering, it is rarely large.
For the above plant species, drainage is not required (unless, of course, water stagnation in the beds is insignificant). It is better to drain the area for growing other crops.
For the construction of multi-tiered beds, you can knock down special boxes from wood. It is extremely undesirable to use metal - it heats up quickly in the sun, and the earth in them will dry out even faster. If necessary, paint the metal containers with light paint - light surfaces heat up less.
Often used for such structures and ready-made boxes, racks or containers of a suitable size. You can also place large containers filled with earth on the shelves.
Lazy beds

Such embankments are used when planting a large number of plants. They have a low height and outwardly represent bulk trapezoids without the use of a box. True, such embankments will have to be done every season - they settle during the winter.
Make a shallow ditch in the area of the path, throwing the earth onto the ridge. Level the soil with a rake. The garden is ready.
We repeat - the drier the land on the site, the lower the height of the embankment should be. In swampy areas, dig the paths as deep as possible and make the bed higher. On sandy soil, you don't even need to do this - just stomp the paths well with your feet on the dug-up earth, thus marking the location of the paths.
Boxes for beds
Decorative options limited to a box are a favorite technique of many gardeners. After all, caring for them (watering and weeding) is greatly simplified. The use of boxes is a good way to protect against soil erosion. In addition, the paths between them will always be clean, without drips and puddles.
As a rule, paths are covered with wood, tiles or concreted to prevent grass from breaking through the ground.
Before proceeding with the installation of the box, the place for the beds must be prepared - dig up the ground, carefully removing all weeds. Level it carefully with a rake so that the water can be evenly distributed over the entire surface during irrigation or rain.
When digging, it is necessary to capture the area a little more. Otherwise, the roots of perennial plants will again break through from the ground. Pulling them out from under the box will be problematic. It is better to pre-dig a neglected area twice in spring and autumn.
It is simply unrealistic to get rid of the roots of perennial plants at a time. For easier work, simply turn the turf over with a shovel so that the roots of the plants are above the ground. Gradually, they themselves will dry out under the rays of the sun and die.
Box made of wood

Box made of wood
The simplest wooden box is assembled from 4 long and 8 short boards of a suitable size. They are connected in pairs using bars. Nails, self-tapping screws and metal corners are used as fasteners.
You will also need 4 pegs or trimming reinforcement 0.6 m long - they are driven into the ground from the outside to strengthen the strength of the structure. To make the bed perfectly flat, its walls are verified with a building level horizontally and vertically.
Stone or concrete box

Stone or concrete box
Such structures are characterized by high strength and long service life. However, they will cost a lot.
Plus, the procedure for their construction takes a lot of time. And moving the bed will be a serious problem - the structure will have to be broken.
Metal boxes

Metal boxes
If you have scrap metal at hand, you can make beds out of it. Such structures are lightweight and, if desired, can be easily moved to another place. They can be easily painted in any color, so they look quite decorative.
However, to create such products requires the ability to work with a welding machine. You can cut the metal at the nearest scrap metal collection point.
Slate fencing

Slate fencing
It is quite resistant to decay, even when buried in the ground, and is able to serve a lot.
The disadvantages of slate structures include increased fragility - when assembling and cutting them, high accuracy and accuracy are required.
Plastic constructions

Plastic constructions
If you have a few plastic panels left after the repair, you can make a fence out of it. Bright, they stand out favorably against the background of plants.
Moreover, plastic is able to lie in the ground for an infinitely long time - it is not afraid of moisture. However, under the bright rays of the sun, this material quickly fades and loses color.
Mulching
Weeding often takes a lot of time from summer residents. If the site is large, this becomes a serious problem. In the garden, you just have to day and sleep.
To reduce the time spent on endless weeding, prepare the so-called smart beds. The principle of their manufacture is simple. To protect plants from weeds after planting, cover the spaces between the shoots with sawdust, needles, straw, or last year's dried foliage.
Mulch the soil and cover with a dark film. It is spread before planting, making small holes for the plants. Transparent film is not suitable for these purposes - weeds will continue to develop with access to light.
It has been proven that mulching significantly (by almost 30%) increases yields
After all, the closure of the top layer of the soil protects from weathering of the fertile layer and rapid drying out. Plus, beneficial microorganisms and earthworms multiply faster under the layer of organic matter.
Using this method, even abandoned areas can be quickly put in order - it is enough to cover the soil overgrown with weeds with mulch for a couple of years.
Unfortunately, mulching in swampy areas often leads to a sad result - covering the soil leads to stagnation of water in the beds, and as a result, decay of plants. But in this case, mulching can come in handy.
The only difference is to cover the ground for the winter and should not be in early spring. Wait until the ground dries well.
Do not use mulch during rainy seasons. If the summer is hot, with the help of mulch you will get rid of not only weeding, but also frequent watering. The moisture underneath will evaporate much more slowly. In damp areas, be sure to prepare drainage around the perimeter of the beds to drain off its excess.
Warm beds

Getting an early harvest in our climate is not easy. At the very first return frosts, tender sprouts planted in open ground will simply die. Surviving plants will be stunted and diseased. In this case, warm beds are ideal for growing.
They can be used for many types of crops: first greens and radishes, heat-loving cucumbers, zucchini, pumpkin, eggplant, tomatoes, etc.
Consider the basic rules for creating warm beds and how to grow each of the crops on them:
1 They can rise above the ground or, on the contrary, be constructed below ground level.
2 They burrow into the ground no more than 0.5 m. This is quite enough to protect the sprouts from spring frosts. At greater depths, the plants will be in the shade and will be pulled over.
3 They are raised to a height of 0.5-1 m. In principle, they can be made higher - taking care of them will only be simplified.
4 The drainage layer of fine gravel and sand is laid first. You can replace it with broken brick, but learn that over time, this material can decompose under the influence of moisture.
5 The next layer is vegetable waste. The heat generated during their rotting will serve as a natural heating. It is better to prepare such a bed in the fall, during the harvest. As a "warm layer" you can use cut tops or any weed left after weeding. The most important thing is that it does not have time to form seeds.
6 For cucumbers, pumpkins and zucchini, manure is often used as a warm layer. When overheated, it heats up much more. For the same crops as tomatoes, manure, as well as pure humus, is contraindicated. Plants on it will only increase the green mass. You can simply not wait for a crop on manure - the ovaries will immediately fall off. Therefore, use ordinary vegetable waste to heat the tomato.
7 The last layer is fertile land. It is poured at least 30 cm thick.
8 Novice gardeners sometimes complain that their neighbors have high yields on warm beds, but for some reason nothing grows for them. Indeed, if a layer of grass or manure is only slightly "sprinkled" with earth, it will be simply impossible for the roots of the plant to gain a foothold in it. And the nutrition for the sprouts will not be enough. Overheating plants serve only as a layer of insulation. Therefore, without a solid layer of land, you will not achieve harvest.
9 Further, arcs are placed above the bed, which are covered with a film. Covering material such as spunbond (agrofibre) should not be used for these purposes. It can be spread directly on the ground in case of recurrent frost or used as an additional cover. Unlike polyethylene, agrofiber has many holes through which precious heat will freely escape to the outside.
Such a bed "works" for about 4 years. After its complete depletion, a new one is prepared, and the rotted plants are used as fertilizer when digging up the beds. For the first two years, the most thermophilic crops are planted on a warm garden bed - cucumbers, pumpkins, zucchini, eggplants, etc.
In the third or fourth year, any garden crops can be planted in this place - from carrots, beets, onions to potatoes.
When warmth comes, the plastic wrap is thrown back from both sides in the daytime so that the plants are blown a little. Otherwise, they will simply "burn out" from the heat. At night, the plants are again completely wrapped in foil.
Read also:
Paths between the beds

French method of planting crops
French version- one of the ways to decorate the site. Unlike traditional planting methods, such a garden always has a strictly symmetrical shape. Moreover, it is not at all necessary to make the beds rectangular. They can be in the form of rhombuses, ovals or semi-ovals, etc. The most important thing is that each of the segments is strictly symmetrical to the neighboring one.
As a rule, for the convenience of caring for crops, French beds are placed at a certain height.
It is advisable (but not necessary) to plant plants symmetrically as well. For example, radishes are located along the edge of all the beds, lettuce in the center, and red cabbage on the other side.
Unlike the French, english do not require strict symmetry. The main emphasis in them is on the lawns, with the help of which the site is decorated. Against the background of sown grass, plantings of even ordinary garden plants look like ornamental crops. In fact, it is a mixture of a vegetable garden and a flower garden.
A garden house with the English planting method looks like a huge vertical bed. Climbing plants are planted near its walls. Pots and flowerpots of various shapes are placed along the structure. Each of the plants is carefully cared for - despite the riot of vegetation, there is no smell of "wildness" here.

The beds are such a simple summer cottage construction, and they also need our close attention. Indeed, not only the yield of garden crops, but also the appearance of the site where we not only work, but also rest, depends on their location, height, content and shape. And we, of course, would like to see our summer cottage oasis beautiful and well-groomed.
The beds should be located from north to south: this way the soil warms up better, and vegetables receive more sun. If your site is located on a gentle slope, build beds across it, and if the slope is already very steep, organize terraces (also across) and build boxes-beds there. This will prevent the soil from being washed out by flood waters and rains. Details of the implementation of the idea in life will tell the material.
Raised bed
For an earlier and more bountiful harvest (and just for beauty) it makes sense to do it.

To do this, in the place you have chosen, dig a hole 40 cm deep, and put the selected soil aside for now. Choose the length of the pit arbitrarily, but make the width 1-1.2 m, so that later it would be convenient for you to care for the plants. Along the perimeter of the pit, install a frame made of stones, bricks, logs or other material at a height of 40-50 cm.Close it from the inside with plastic wrap, and put a steel wire mesh on the bottom of the pit (this will protect the crop from harmful ones).

Fill in the first layer with long-decomposing organic material: board trimmings, shavings, fabric ( not synthetics!), branches, paper, cardboard and so on. Fill the garden with these "goodies" by about 1/3, sprinkle it a little with earth and spill it well with water. Next, fill the garden bed to the top with soil mixed with manure, compost, mineral fertilizers and spill water again. That's all the wisdom. Just keep in mind that next year the land will settle by 15-20 cm and the top layer will need to be updated, so prepare the fertile land in advance.

Also see the material about raised or high beds:
How to arrange the beds in a small area
If you have a small area, and you want to organize as many beds as possible, in addition to the usual arrangement, use any horizontal surfaces and overhead structures.
You can combine the recreation area with decoratively decorated beds using multi-tiered, spiral structures and other options.

When arranging a garden bed, do not forget that its surface should be strictly horizontal: in order to avoid the accumulation of moisture in an elevated place and waterlogging - in an underestimated one.

Read also about a small garden plot:
Features of tillage in the beds
The land in the beds is usually dug up twice (in spring and), adding the necessary mineral and. When digging in the fall, it is better to leave the earth blocky in order to keep as much moisture as possible in the beds. In addition, with such digging, the larvae and eggs of soil pests almost completely freeze out. You can replace the autumn digging: fill the soil with a thick layer of peat, sawdust, rotted compost and so on. In the spring, remove the not rotted layer with a rake and dig up the ground. Digging on a shovel bayonet for a garden with vegetables or flowers is quite enough. And if the soil on your site is light and crumbly, spring digging can be replaced by loosening.How to make beautiful bumpers for garden beds
Of course, not all summer residents are concerned with the beautiful design of the sides for the beds. Many use dividing paths, some simply knock down the boards with a square or perimeter, and install these structures on a horizontal surface. But we want to arrange everything beautifully, right? Therefore, I present to you several photos, where you can clearly see how you can beautifully decorate the sides of the beds with simple improvised or purchased material.Here are used ready-made plastic bumpers purchased in the store. 
The sides of these beds are lined with white bricks. 
Here the sides are lined with paving stones. 
This bed is decorated with colored slate bumpers.

On these raised beds, the bumpers are made from ordinary plastic crates. There are doubts about their strength, but, undoubtedly, the beds look original)) 
To decorate the sides of the bed, you can use any available material: boards, large stones, bricks, cut pieces of slate, vine,

