How to make a bowling alley out of plastic bottles. Master class: do-it-yourself bowling ball and pins
When a pack of little pranksters appears in the family, the question arises of what to do with the children at their summer cottage during the summer. In addition to "socially useful" work and bicycles, kids can be offered a playground. You can break this right in your summer cottage. The new review provides examples of just such playgrounds.
1. Carousel

If the yard area and finances allow, it is worth thinking about building a large children's carousel. To implement such a project, you will need wooden beams, a rotating mechanism, cables, strong wicker baskets and, of course, building skills. The main thing is to take care of the reliability and safety of the structure, and the joyful faces of the children will be worthy payment for their efforts.
2. Territory of childhood
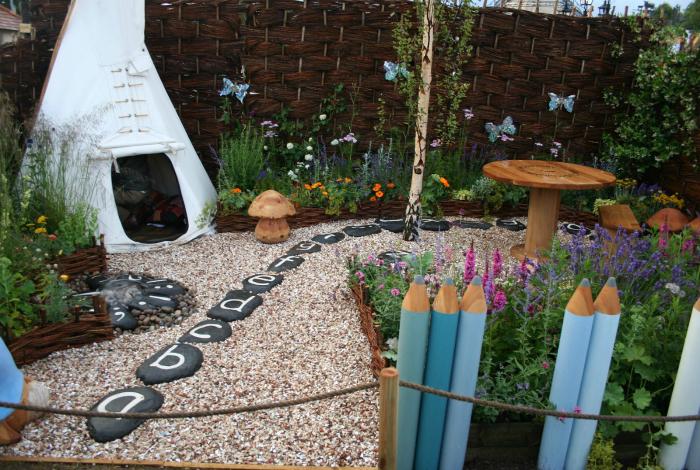
Fence off a small piece of the backyard and set up a playground there. It can be a very modest corner with bright paths, a table, a bungee and a makeshift house, or a full-fledged amusement park with swings, carousels and slides.
3. Mini-vegetable garden

Let your child feel like a real gardener. Separate a small piece of land with stones or wooden blocks, plant flowers, greenery and any other plants there, and teach your child to care for them. Such a garden will teach the kid to work and responsibility, and the harvest grown with his own hands will be an excellent reward for his efforts.
4. Sports ground

Wooden stumps and blocks are perfect for building a small sports field in your own backyard. Such uncomplicated attractions will definitely appeal to children and will not let them get bored during a family vacation in the country.
5. Slides

A wooden structure with slides is an idea that suits those who have a rather large space. You can buy slides, or you can do it yourself, but in any case, the children will be happy.
6. Trampoline

A trampoline is a wonderful attraction that will delight both children and adults. To do it yourself, unfortunately, will not work, but soon the costs will justify themselves.
7. Pointers

Come up with fabulous names for all structures in the yard and make bright signs with your child. Such signs will help children better navigate the terrain and will allow them to turn their stay in the country into a fun game.
8. Chess board

From wooden boards or plywood, you can build a wonderful chessboard that will be suitable for adults and children, and will also become an original decoration of the backyard.
9. Swing

Unwanted car tires can be turned into adorable swings. In addition, the creation of such an attraction does not require any special skills and special costs.
10. Slate board

To prevent children from getting bored while their parents are working in the garden or sunbathing in the sun, hang a large slate board on the fence or on the facade of the house.
11. Bowling

A regular concrete track can be easily turned into a bowling alley, and plastic bottles make great pins. Instead of a bowling ball, you can use a tennis ball or any other heavy ball.
12. Target

It turns out that noodle harnesses can come in handy not only in the pool. They can be used to make a bright and colorful target for throwing balls. Such an attraction will not only amuse children, but will also contribute to the development of speed, agility and coordination.
13. Water mattress

A large cool mattress filled with water can be made of plastic wrap, which will bring a lot of joy to adults and children.
14. Twister
Backyard obstacle course.
The backyard can be turned into a small obstacle course for active kids' fun. From the materials at hand, you can make a rope maze, islands, a bungee, a cable car and much more. Such a playground will not only become a field for fun games, but will also help to significantly improve the physical fitness of children.
In continuation of the theme, we present more, which must be implemented this summer.
Hi friends! Do you play bowling? I suspect that the share of positive answers will not be large: someone does not have the opportunity (not everywhere there are bowling centers), someone has time or desire. To be honest, until recently I would have answered this question in the negative. But now we have our own cardboard bowling alley at home, almost like a real one, at a scale of 1: 1. Let's play?

Master class: do-it-yourself bowling ball and pins
But before indulging in the thrill of bowling, you still need to make game shells. For this we need little.
Materials and tools:
A4 sheets of office paper (for printing templates);
- corrugated cardboard about 3 mm thick;
- stationery knife;
- scissors;
- metal ruler;
- pencil;
- glue stick;
- double sided tape.
You can learn or refresh your memory of the technology of using templates for cutting out parts from cardboard, you can master class "Doll's rocking bed with your own hands."
When cutting, orient the templates according to the recommended direction of the waves of the corrugated layer (it is indicated on the templates).
1. Assembling the bowling ball.
The best part about the construction of the cardboard ball and pins is that they do not need to be glued at all, they are assembled like puzzles. Therefore, we just cut out a set of parts, and then it is sheer pleasure!)
Paired parts can be cut by folding the cardboard in 2 layers with the right sides to each other - this is faster. For convenience, you can number the round parts with a pencil.

First we put on one of the parts Sh-6 all round details.
A tip for perfectionists: if you combine the pattern of cuts of round parts, then the product will turn out to be more perfect.
On the opposite side, insert the second part Sh-6.

The cardboard ball is ready!

2. Build bowling pins.
It is very important here to number every detail immediately after cutting, otherwise it is not surprising and confusing. By the way, keep in mind that the pairs of vertical parts differ slightly in transverse dimensions.

First, we insert the round parts into the slots of the vertical part from the first pair. Kv-1.1 - Kv-1.2... Round parts are numbered from top to bottom.

Insert the second vertical piece from the first pair.

And we finish assembling the skittles.

After that, it remains to make 9 more pins (or less if there is not enough space for the game) and the start of the bowling championship can be announced.
Now, if you have corrugated board and are eager to play a wonderful game with friends and / or family members, you know what to do and how to do it.
The main advantage of cardboard bowling is that you can play it anytime and anywhere - in your apartment, in the yard, in your country house or even in your office. And of course, this is a game for all ages!
In addition, the pins and the ball can be transported without any problems when disassembled. For example, we went on vacation - a cardboard bowling alley is always with you.
Happy and active summer vacation for you!
Looking for an inexpensive way to have fun with your kids outdoors or at home? Why not try making your own bowling alley? Here are some ideas on how to make funny pins and a ball for you and your kids out of unnecessary items, I think this is the best way to recycle them! From bottles. We will need: Three to ten plastic 1 or 2 liter bottles. Light bowling ball Stickers, colored paper Sand and funnel. Chopsticks or other long chopsticks How to do: Remove labels, wash and dry bottles. To add some weight, use a funnel to add a handful of sand to each bottle. For luminous pins, fill each bottle with scraps of cloth or crepe paper. Use sticks to push the paper through the neck. Add stickers for extra decoration. You can also paint the bottles with paints. Pour a different paint into each bottle and shake them. Wait until the paint dries up and add sand.  Alternatively, you can fill the bottles with colored water.
  There are many options - how to decorate the pins, it all depends on your desire and imagination.
 From rolls.
  We need: Toilet paper rolls Colored tape Twine How to do: Wrap the rolls with tape, decorate with twine. To make a ball, you need to crumple a piece of paper into a ball shape and wrap it with tape.

 Another option for roll pins will give your kids the opportunity to learn the numbers.
  You can knit funny skittle cases, it will be more fun to play with)
Do you like bowling? So why not build a bowling alley in your backyard? Today we'll talk about how to assemble a track with our own hands and prepare everything for an exciting pastime with your friends.
If there is an opportunity to allocate some space on your site, then this idea is just for you. A great addition for celebrations, weekends or just social gatherings with barbecues and entertainment. You can easily organize competitions among friends and neighbors.
Let's start with a list of materials and tools that will be required to build a bowling alley.
Materials:
- floorboard (preferably grooved and flat);
- board 150-25 (30) mm (preferably treated with protective equipment);
- plywood sheet, 12-16 mm thick;
- wooden slats 25x30 mm or 25x50 mm;
- black self-tapping screws for wood 6x100 6x75 and 6x35;
- self-tapping hooks;
- rope 10 mm and rope;
- carbines;
- lighting devices (lamps with holders or LED strips with a power supply).
Of the tools you will need:
- saw or jigsaw;
- roulette and level;
- drill or screwdriver;
- wood drills - ordinary and feather, with a diameter of 18 mm.
The presented pictures show in detail the design of the bowling track. From all angles, you can group together a complete idea of how to assemble it in your own backyard.

You can use hardwood, lining or even laminate as the top cover of the track, the main thing is that there are no gaps between the elements if possible. You can use a grinder. Although, as you can see, the original track is not particularly smooth - maybe in order to facilitate the game, because all this is for the sake of entertainment.


Pins on this track are easy to install - just pull on the rope pulled along the entire structure, and they will fall into place. The balls always return to the place of the throw, if in the chamber itself with the pins and the back edge along the floor is made slightly with a bias to one side.
Do you like bowling? So why not build a bowling alley in your backyard? Today we'll talk about how to assemble a track with our own hands and prepare everything for an exciting pastime with your friends.
If there is an opportunity to allocate some space on your site, then this idea is just for you. A great addition for celebrations, weekends or just social gatherings with barbecues and entertainment. You can easily organize competitions among friends and neighbors.
Let's start with a list of materials and tools that will be required to build a bowling alley.
Materials:
- floorboard (preferably grooved and flat);
- board 150-25 (30) mm (preferably treated with protective equipment);
- plywood sheet, 12-16 mm thick;
- wooden slats 25x30 mm or 25x50 mm;
- black self-tapping screws for wood 6x100 6x75 and 6x35;
- self-tapping hooks;
- rope 10 mm and rope;
- carbines;
- lighting devices (lamps with holders or LED strips with a power supply).
Of the tools you will need:
- saw or jigsaw;
- roulette and level;
- drill or screwdriver;
- wood drills - ordinary and feather, with a diameter of 18 mm.
The presented pictures show in detail the design of the bowling track. From all angles, you can group together a complete idea of how to assemble it in your own backyard.
You can use hardwood, lining or even laminate as the top cover of the track, the main thing is that there are no gaps between the elements if possible. You can use a grinder. Although, as you can see, the original track is not particularly smooth - maybe in order to facilitate the game, because all this is for the sake of entertainment.
Pins on this track are easy to install - just pull on the rope pulled along the entire structure, and they will fall into place. The balls always return to the place of the throw, if in the chamber itself with the pins and the back edge along the floor is made slightly with a bias to one side.

