How to make a bow from a PVC pipe with your own hands. DIY installation of pvc pipes Dimensions of an arch-type greenhouse
In the design of pipelines, polyvinyl chloride pipes are increasingly used, which have replaced heavy and bulky metal pipes. They have been widespread for a long period - ever since the polymer appeared and began to be widely used in construction work. Pipes made of this material are applicable for the installation of not only cold water supply systems, but also hot water systems. They are used to create technological systems, they are used to create sewage systems, and in addition, they are used in the food industry. We offer to discuss the installation of PVC pipes with your own hands.
Features of PVC pipes

PVC pipes are common in the construction of external pipelines and in the construction of hidden ones. If this is an outdoor lining, then such a system looks aesthetically pleasing and neat. In addition, this design stands out for its favorable price. Polyvinyl chloride is not only the cheapest polymer. Its cost is much lower than the cost of galvanized steel plates, which explains the low cost of such a pipeline.
PVC pipes have a number of advantages that distinguish them from other materials:
- Ease.
- Long service life. They last much longer than metal ones.
- Corrosion resistant.
- Resistant to temperature extremes.
- Good cross-country ability.
- High sound insulation.
No special tools required. The method of "cold welding" is used.
PVC is very tough, so special fittings are used when working with such pipes. This property makes them look like steel, which means that when installing them, calculations for steel systems can be involved.
Most European plumbing pipes are made of PVC pipes. Increasingly, such pipes began to displace metal in domestic production. Their popularity is growing every year.
Installation of PVC pipelines
Such pipelines are reliable and lightweight. It is very easy to install PVC pipes with your own hands. In this case, you should use the following tools:
- Sandpaper.
- Pipe shears.
- Glue.
- Primer.
- Brushes for applying glue.
The gluing process is carried out using aggressive adhesives and does not require additional equipment. This process is based on the dissolution of the surface layer of the connected elements with glue. There is an interpenetration of parts into each other at the molecular level. This results in a single monolithic robust construction.
Before starting bonding, you should check the dimensions and resort to the so-called "dry" connection.
It is important that the pipe slides freely into the fitting socket.
If necessary, the pipes can be cut. To do this, use special scissors or a roller cutter. If there are no such tools, you can resort to using a hacksaw for metal. Pipes are cut in such a way that a right angle is maintained relative to the axis.

Next, a special knife is used to remove the chamfer from the ends of the pipes. You can file the ends with a file. The treated pipe ends should be cleaned of dirt and sawdust and then degreased. It is desirable to blow through the pipe.

When starting to glue all the elements of the pipeline system, it is necessary to cover the parts to be joined with a special cleaner - primer. This will remove the remaining dirt from the surface and soften the plastic, which in turn will improve the penetration of the adhesive.

The glue is applied both to the pipe and to the fitting socket. The layer should not be thick. The pipe must be inserted into the socket as far as it will go and turned ¼ so that the adhesive can be evenly distributed over the surface of the parts to be joined. The gluing time is no more than a minute.
After connecting, the elements must be held for 30 seconds. This is necessary so that the pipe is fixed and does not slip out of the connecting piece.

If everything is done correctly, an even layer of adhesive will appear at the junction of the pipe and fitting. This is called a "bandage" and is removed with a clean cloth.
When working with PVC pipes and connecting components (fittings), it is recommended to use the adhesive specified by the manufacturer.
In the case of using adhesives of other brands, there is no guarantee that the connection will be tight and strong.
When installing a pipeline, parts of which exceed 50 mm in diameter, a special tightening device should be used.

There is no shortage of adhesive today. Manufacturers have specially developed and produced a quick-drying adhesive for gluing PVC pipes. This substance does not require additional use of a primer to clean the pipe surface.
Video
This technology is clearly shown in this video.
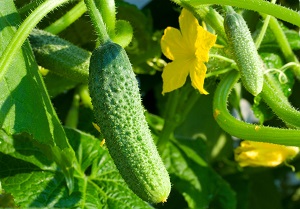
One of the inexpensive but effective ways to provide yourself with early vegetables, berries, herbs from early spring to late autumn is a greenhouse made of polypropylene pipes, you can build a structure with your own hands in 1-2 days. The product is lightweight, strong, mobile, durable, does not require significant costs and skills in construction, and can be easily dismantled if necessary.


Secrets of erecting greenhouses from PVC pipes
PVC profile greenhouses can be built in any shape:
- arched;
- rectangular under a single, gable roof;
- combined from several sections;
- rectangular buildings with an arched roof.
The construct depends on the preferences of the owners, the chosen project. It is important to remember that the more mates, the more docking elements will be required, which leads to additional costs. It is advisable to arrange structures of small and medium size, 2-2.4 m high, about 3 m wide, 4-12 m long.
Good to know: Ergonomic width of 1 bed 800-1000 mm, paths - 700-800 mm. Based on these parameters, the dimensions of the building made of pvc pipes should be calculated.For the construction of greenhouses, pvc water pipes are suitable, the standard diameter is 16-110 mm, the length of the pipes is usually 5 m, you can buy a product in a thread: 2.3.4 m.Pvc pipes are also on sale with a reinforced layer of thin aluminum or a mixture of fiberglass with polypropylene. They are more durable, but the price is also higher; for the construction of greenhouses, the use of such products is not economically justified, but the owner is a master.
The optimal polyethylene pipe for a greenhouse has a diameter of 25-32 mm - for arched products, 50 and more mm - for uprights-vertical supports in rectangular structures.

Homemade greenhouse made of polypropylene pipes, suitable for summer cottages
Useful characteristics of pvc pipes
A greenhouse made of polypropylene pipes is durable, does not require additional costs for special care during operation, is not afraid of an aggressive atmospheric environment, due to the characteristics of the material:
- the service life of pvc pipes is 10 years or more, wear-resistant;
- moisture resistant, do not rot;
- are not afraid of chemical and biological effects;
- do not burn;
- no harmful substances are emitted;
- withstand significant mechanical loads, do not deform;
- the material is flexible, which allows you to bend an arc of different radius independently, without additional devices.
Drawings and design features
For construction, drawings of a greenhouse made of polypropylene pipes will be required, it is not difficult to make a sketch with your own hands: it is enough to think over the shape of the frame, indicating the size and valuable structural units. You can find a ready-made project on the Web, adapt it to individual conditions. What should be foreseen if you are making a greenhouse drawing yourself:
- what will be the foundation (foundation);
- constructive materials for gables;
- shape, placement of the main nodes, the distance between the bearing elements;
- docking, fastening of parts.
Plastic pipes can be glued, put on self-tapping screws, soldered with a special device, in the video we offer a practical and simple way of how to connect pvc pipes yourself at home.
The easiest way is to build an arched frame for a greenhouse from polypropylene pipes, cover it with a film. Rectangular structures are more difficult for self-erection, additional calculations will be required, more stiffeners will have to be provided. It should also be taken into account that numerous docking points weaken the structure.

Standard drawing of a greenhouse made of pvc pipes
How to build a greenhouse from plastic pipes with your own hands - video tips and step-by-step photos of construction
A greenhouse made of polypropylene pipes is installed by one or two people in a few hours. An open, sunny, flat area should be chosen.
Preparing the site
It is better to pour a strip foundation under the greenhouse, or lay out a platform around the perimeter of bricks, blocks, rubble stone. The simplest, fastest version of the foundation is a foundation made of a board of 50 * 100-150 mm or a bar with ribs of 100-150 * 100-150 mm.
We mark the site according to the drawing, hammer in the pegs, pull the rope around the perimeter. It is recommended to remove the top fertile soil layer, 300-500 mm deep, along the foundation pit. You can dig a trench around the perimeter, 300-400 mm wide, 300-700 mm deep. We level the bottom, fill it with crushed stone - 100-200 mm, sandstone - 100-200 mm, tamp it. We cover 1-2 layers of roofing material. We process the timber with refractory, antiseptic impregnations, coat with liquid bitumen, machine oil. We put the parts in the trench, check the geometry, the diagonals should be equal. We attach to galvanized corners and long screws.
Useful advice: A stronger base is obtained if the ends of the timber are cut down by ½, put one in one, drill through, and bolt together.We assemble the frame of the greenhouse from PVC pipes
We cut the pipes to size according to the drawing with a hacksaw for metal, grinder, clean the ends with a file.
The first stage is the manufacture of gables. It is better to collect them on the ground, and then install them on a prepared foundation.

Assembly scheme for greenhouse doors made of pvc pipes
We assemble the doors, you will need: 2 vertical parts, 2-2.1 m high, 3 transverse parts - 700-900 mm wide, connecting elements - 4 corners, 2 tees. The opening is made from 2 vertical posts, 1 cross-section, as in the diagram above. The height and width of the opening should be 5-10 mm larger than the door itself. We attach the hinges to one of the racks.

A simple scheme for assembling a greenhouse from pvc pipes with your own hands
Useful advice: For the strength of the greenhouse, it is recommended to put on an additional 1-2 tees on the front arch, fix vertical posts on them and install horizontal stiffeners. The pediment can be made of wood or welded from metal profiled pipes.Along the long sidewall, from the outside of the foundation, we drive into the ground to a depth of 300-700 mm, depending on the softness of the soil, reinforcing, corrugated rods, 8-12 mm thick. The length of the rod is calculated individually, taking into account the fact that it should stick out 500-800 mm. The distance between the reinforcement is 600-900 mm, but not more than a meter.

How to install a greenhouse from polyethylene pipes with your own hands, photo of the base with fittings for fastening the frame
Pvc pipe, cut to size, put one end on the rod, bend, insert the second end from the opposite side of the foundation. Using this algorithm, we install the remaining arches.

Due to the elasticity of pvc pipes, the arches for the greenhouse are the same in shape
To make the installed greenhouse made of plastic pipes strong with our own hands, we attach the arcs to the foundation with galvanized brackets, which can be replaced with wide polymer clamps.

An example of how a greenhouse is assembled from plastic pipes with your own hands, a photo of attaching arcs to the base
In the same way, we install the previously prepared greenhouse gables. It remains to connect the frame with transverse elements. We cut pvc pipes along the length of the greenhouse, and fix them on the frame with plastic clamps, as in the photo below. One transverse element in the center of the greenhouse, at the highest point of the arc, in large buildings, it is desirable to additionally one more on each side.

Greenhouse frame made of plastic pipes, in the photo, how to attach longitudinal elements to clamps
According to the door assembly scheme, air vents are made and mounted in openings. Next, the frame is covered with plastic wrap.

Assembly diagram of a reinforced version of doors and vents made of pvc pipes
Good to know: Do-it-yourself hinges for opening openings. To do this, 2 pieces of 10 mm are cut from a pvc pipe with a larger diameter, glued together, vertical elements of doors and vents are inserted into them, and fixed on self-tapping screws.Look at another option for assembling a small greenhouse with your own hands.
Other ways to build greenhouses from pvc pipes
An arched greenhouse with your own hands from plastic pipes can be built entirely on connecting elements, but such structures will require large financial costs. Thanks to the frequent sections of the greenhouse made of pvc pipes, the connectors are more durable.

One of the examples of how to assemble greenhouses from polypropylene pipes with your own hands, in the photo there is a structure on special connecting elements
A rectangular greenhouse made of pvc pipes is assembled in a similar way, but in this case, a material with a diameter of 32-50 mm should be used.

Greenhouse made of plastic pipes, in the photo is a typical gable structure
How to attach the film to the frame
To attach the film to the pvc pipe frame, you can cut pieces of 50-100 mm, cut a quarter along the length, you get staples. After the film is stretched over the greenhouse, it is fixed to vertical and longitudinal posts by the obtained latches.
More ways of attaching the film from to the greenhouse from pvc pipes:
- mesh throughout the frame;
- ropes;
- on double-sided tape glued to the frame;
- using tapes cut from linoleum, fasten with ordinary self-tapping screws.
How to attach polycarbonate to the frame of a greenhouse made of pvc pipes
For polycarbonate cover, the greenhouse frame is recommended to be made of pvc pipes with a diameter of 32 mm. Honeycomb sheets with a thickness of 4-6 mm are suitable.
The polycarbonate is fastened with self-tapping screws with a 3.2x25 mm press washer. The excess is cut off in an arc with a sharp knife. The second sheet is attached with an overlap of the first by 100 mm. You can also fix a special detachable docking profile with self-tapping screws on a frame made of pvc pipes, insert sheets into it, close the joint with a plug.
Look at the reviews of the master who made a greenhouse from pvc pipes with polycarbonate with his own hands, in the video he explains the main stages of installation and mistakes that should be taken into account when erecting a structure.
Today, any hardware store is replete with a huge assortment of building materials that can be used in the construction of water supply and heating systems, as well as their periodic replacement. However, products made of polyvinyl chloride are the most common raw materials due to their resistance to aggressive substances. In order to correctly install PVC pipes with your own hands, you will need to take into account the properties of the material and a number of important features when connecting the elements.
The main advantages of PVC are:
- resistance to chemicals and environmental factors;
- perfectly flat surfaces of products exclude the formation of build-ups, blockages and other deposits;
- a wide selection of component parts allows you to build any pipeline design;
- resistance to corrosion and premature destruction;
- huge period of operation;
- ease of installation;
- low heat conductivity;
- small specific gravity and flammability coefficient;
- the tight connection of pipes is intended for use on floating ground.

Disadvantages:
- temperature restrictions;
- the presence of special fitting devices.

In general, the installation of plastic pipes is a combination of individual PVC elements, fittings and accessories into a single sealed network. It is carried out through three technologies:
- bell-shaped method;
- by "cold welding" method;
- by using special couplings.
Installation using the first method in most cases finds application in the construction of sewer systems, since it is the simplest and provides for the usual fixation of the end of the connecting pipe in the rubber gasket of the other.
The second method is to use a special chemical composition that ensures reliable contact of all elements. The third method is used when connecting pipes of different nature, for example, from metal and polymers.
Training

Carrying out preparatory work is an extremely important procedure, which provides for a clear organization of actions and the availability of all the necessary tools. The first step is to draw up a rough diagram that will fully reflect the number of fittings, pipe sizes and their number. Before cutting PVC pipes for gluing, preliminary measurements should be taken on a dry surface. The ends of the connecting elements must be cleaned and degreased. Cutting should be done using a regular metal hacksaw or a special cutter. Do not forget that the pipes are fixed with special brackets attached to the wall.
In order for the cut to be smooth and airtight, it is worthwhile to first outline the pipe at the place of the future cut. Cutting is carried out strictly at an angle of 90 °. The remaining irregularities are smoothed out with a knife and sanding paper.
The connecting pipe must enter at least 2/3 of the fitting device. Then the cut points should be treated with a cleaner that will not only remove all the dirt from the edges, but also soften the future attachment point somewhat. The inner space of the fitting and the end part of the pipe are covered with a small layer of glue, after which they are tightly clamped for 1 minute. A uniform adhesive ring should form at the junction of the elements, which should be cleaned with a dry cloth.

Having finished with all the preparatory measures, it is worth installing the future structure. When constructing a sewage system, all work is carried out from risers to plumbing fixtures. The connection of sewer pipes to the fitting is carried out by simply fixing the piece of the product in the rubber gasket of the fastening device. The main thing is to insert the pipe without bevels until it stops. Loose contact can subsequently lead to an unpleasant odor.
It will be useful to check the place of the future joint and the rubber layer for dirt and dust before performing this procedure. To ensure a more reliable connection, it is necessary to lubricate the end of the connecting piece and the rubber band of the fitting with soapy water or glycerine grease.

After the main communication is ready, it is worth starting to connect all the plumbing fixtures, not forgetting to equip the sinks and bathrooms with siphons. The next basic step is to test the system for leaks. In this situation, you need to turn on all plumbing in the house and check all connections for leaks. In addition, you should see how the structure will behave in critical situations - take a bucket of water and quickly pour it into the sink or washbasin. If there is no moisture on the floor, then the work was carried out efficiently and efficiently, if there are leaks, then the "problem" areas should be dismantled and reinforced using various adhesives. Then repeat testing.

Any water supply system is due to high pressure, therefore, to install water pipes, you will need to use a special welding machine (ironing). Having finished with all the preparatory measures, we proceed to the assembly of the entire structure, which, as in the arrangement of the sewage system, should be started from the riser. Before using the welding equipment, be sure to read the attached technical documentation. Depending on the power of the heating element, the heating time of the connecting elements may vary.
After the heater is ready for use, insert the connecting pipe and fitting from different sides into the heated nozzle and wait about 15–20 seconds. Then carefully remove them from the device and immediately insert them into each other, while observing the required connecting angles. Then, in this position, it is worth fixing for 10-15 seconds so that the plastic elements have time to grab. The resulting connection will function effectively for a long time due to the fact that the structure of the two component parts will become one.
In no case should you neglect the precautions: safety glasses and gloves are included with the welding machine. The slightest contact with the heating element can cause severe burns.
The financial benefits of using PVC pipes can be tracked at almost every stage of DIY construction - from planning to start-up. The use of this material will make it possible to avoid calculating the transition coefficients at the stage of arranging a metal pipeline. During operation, such communications are unpretentious, since they do not require maintenance and additional staining. At the same time, the material is environmentally friendly, which allows it to be laid in the ground, thereby accelerating the launch of the water supply system.
Video
This video shows the adhesive method for joining PVC pipes:
We will send the material to you by e-mail
P arnik, or, simply put, a greenhouse is an integral part of any suburban area or vegetable garden. This structure protects plants from adverse environmental influences. Although the greenhouse is not heated, it is always warm inside it. This factor is provided by the materials from which the greenhouse is made. So, polyvinyl chloride (PVC) pipes are now widely used as a frame. Let's find out how to make a greenhouse with your own hands from PVC pipes.
Greenhouse made of PVC pipes
- Strength. Such pipes will not break under enormous weight. Studies have shown that one PVC element of an average size can withstand a weight of up to 500 kilograms;
- Elasticity. As you know, for the construction of a greenhouse, you need to create arches from pipes. It is quite difficult to do this from metal and wooden materials, while PVC pipes can be easily bent into the desired shape. Do-it-yourself arcs for a greenhouse are easily made only if you use PVC as a source material;
- Durability. All polyvinyl chloride products do not break down for decades. Therefore, the greenhouse will be a safe haven for your plants for many years.

If you decide to make a greenhouse from plastic pipes with your own hands, then polyvinyl chloride is the best material that exists today.
Video: greenhouse options for giving
What do you need to build a greenhouse yourself?
The construction of a greenhouse is a rather fascinating and not complicated process, the main stages of which are presented in the photo below.

The greenhouse consists of three main elements: foundation, frame, cover. These elements are made from the following materials:
- PVC pipes. It is desirable that their cross-section is 13 mm, since this size is most optimal for creating a greenhouse;

- Boards. Prefer processed, durable wood, with a thickness ranging from 20 to 40 millimeters. It is advisable to cover them with transparent varnish before laying - this maneuver will give strength to the structure;

- Steel wire. Required to connect pipes together. Prepare sections from 80 cm to 1 meter. Their number should be twice as many as pipes;
- Coating. For this purpose, you can use a special greenhouse film or polycarbonate sheets. They are strong enough to protect plants from negative environmental factors. In addition, they are breathable, so the crops will not wither;
- You will also need a hammer, pliers, screws, nails and other trifles.

To make greenhouses with your own hands from PVC pipes, stock up on all of the above materials in the right amount. The larger the size of the greenhouse is planned, the more materials will be needed.
Related article:
Step-by-step instructions for the construction of a greenhouse
Greenhouse creation consists of 4 stages:
- Construction of a foundation made of wood;
- Installation of fasteners for PVC pipes;
- Installation of arches;
- Covering the greenhouse.
Let's take a closer look at each process.
Construction of a foundation made of wood
To begin with, it is worth leveling the area that is reserved for the greenhouse. Use a tape measure and steel rods to mark the corners of the greenhouse. Using the level, you can check how flat the ground is.

Next, in the corners of the greenhouse, dig trenches (there should be 4 of them) with a depth of at least 10-15 centimeters. 4 boards are installed there, which serve as the foundation for the greenhouse. These boards should be reinforced with nails and screws. This will achieve better fixation and durability of the greenhouse.

Installation of fasteners for PVC pipes
Next, we drive steel rods into the ground. They must be installed evenly. To make the length between the rods the same, count their number, divide by two (one batch on each side) and measure the length of each side with a tape measure. Then calculate the optimal distance between the rods. It is important that they are located opposite each other, and that the distance between them is the same. Steel rods are hammered into the ground. They should stand close to the foundation, that is, to the boards that were previously installed.

Also, to fix the arches, you can use special glasses that are attached directly to the wooden base.

Installation of arches
In order to create arches from plastic pipes, you will need a pipe bender or a construction hair dryer to warm up the pipe and give it an arc shape. After the arch is ready, it is put on a steel bar from both sides and fixed to the base with a clamp.

After installing all the arches at the top point, a pipe is attached to the entire length of the greenhouse with a wire. This extra stiffener will give the structure strength and stability.

The PVC industry offers a large selection of fittings for pipes, therefore, there are special crosses to give the structure a presentable appearance and ease of installation.

A greenhouse is not only a decoration for a summer cottage, but also a guarantee of a good harvest, especially in temperate latitudes. Prices for industrial greenhouses are quite high, and the typical design is not suitable for all summer residents.

In this case, it is easier and cheaper to assemble a greenhouse with your own hands from improvised materials, for example, from plastic pipes.

The classification of greenhouses is quite complex: they can differ in shape, seasonality, presence and type of heating, used frame and shelter material.

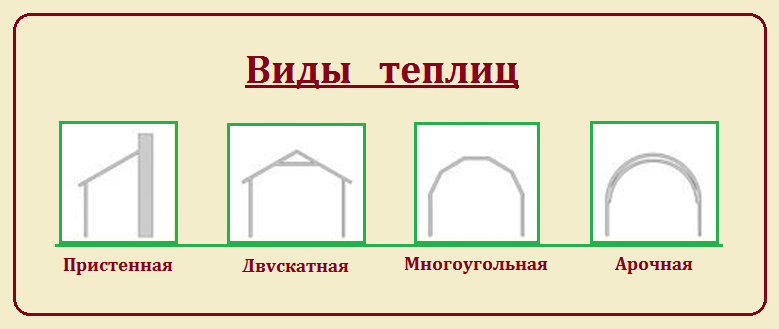
The simplest and most reliable designs are suitable for the manufacture of PVC pipes, including:
- wall greenhouse;
- gable, in the form of a house;
- polygonal, with a complex shape of rays;
- arched, with a frame in the form of a semicircle.
Wall mounted greenhouses they are usually attached to the southern or southwestern wall of a house or other room. At the same time, the wall plays the role of thermomass: heating up during the day, it gives off heat at night, which reduces the average daily temperature fluctuations, and also protects against cold northern winds.

In back-to-wall greenhouses, a microclimate favorable for plants is created, and the cost price is lower than that of free-standing models. The main disadvantage of this design is the constant exposure to moisture on the wall and the lack of good ventilation, which can lead to the destruction of the wall material.
Gable structure - one of the most convenient and popular. This is explained by the strength of the frame and its resistance to snow and wind loads. The reflectivity of gable greenhouses is low, most of the sun's rays penetrate inside, which increases the lighting efficiency. By increasing the angle of inclination of the slopes, it is possible to achieve snow melting in winter, and the greenhouse does not have to be shoveled.

Gable greenhouses are equipped with one or two doors, as well as air vents. The side walls of gable greenhouses can be either strictly vertical or inclined. In the second case, the illumination in the greenhouse in the morning and evening hours will be higher, which is important for temperate latitudes.
Polygonal design the greenhouse practically repeats the shape of the arch due to several planes that form slopes and walls. This increases the internal space and at the same time compensates for the main disadvantage of arched greenhouses - the high reflection coefficient of sunlight.

It is difficult to assemble a polygonal greenhouse from pipes with your own hands due to the large number of connecting nodes, therefore, it is usually made from metal pipes by welding or from a drywall profile, assembling the frame with self-tapping screws.
- perhaps one of the most common designs, and this is easily explained: it is distinguished by its strength and stability, the minimum number of connecting nodes and a large internal space. It can be made from almost any type of pipes, choosing any size and height.

The disadvantages of arched greenhouses include an increased accumulation of snow on the roof in winter and a high coefficient of reflection from the inclined plane of the film or polycarbonate.
Partial reflection is compensated for by correct installation of the greenhouse - from north to south. With this arrangement, the side walls are illuminated by the morning and evening sun, and the rays hit the greenhouse walls almost at right angles. During the day, when the sun is high, it illuminates the southern pediment and roof, where the refraction of the rays is not so strong.
Snow accumulation is fought in three ways:
- regular cleaning;
- dismantling the film or the entire greenhouse for the winter;
- change in shape to a pointed arch.

Greenhouses in the form of a pointed arch have a more stable structure, and their increased height has a beneficial effect on the microclimate: hot overheated air accumulates at the top and does not oppress the plants. At the same time, material consumption and planting area do not differ from those of conventional arched greenhouses.
PVC pipes and methods of their connection
PVC pipes are intended for installation of cold water supply systems and can be operated at temperatures up to +65 degrees. Thanks to their flexibility and a wide variety of connecting elements, it is easy to assemble a greenhouse of any configuration from them.
For greenhouses, PVC pipes with a diameter of 20 to 32 mm are used, they provide the necessary rigidity of the frame. Standard pipe lengths can be 1, 2, 3 or 6 meters.

There are several ways to connect PVC pipes for a greenhouse:
- with the help of clamps, ties;
- on furniture bolts through pre-drilled holes;
- on the glue.
When connecting pipes with clamps or bolts, the greenhouse can be completely disassembled and transferred to another place, ensuring crop rotation. In this way, film greenhouses and hotbeds are often mounted. The film is usually removed for the winter in order to avoid damage by snow and wind, at the same time the frame is disassembled.

The adhesive connection is non-separable, but more durable. It is recommended to use it for greenhouses installed on foundations and left for the winter. Such greenhouses, as a rule, are covered - it serves for at least 5-7 years and does not require annual replacement.
Connecting elements for PVC pipes used in the installation of the greenhouse:
- corners, allow the fastening of mutually perpendicular elements;
- tees - connect three pipes in the same plane or at an angle (single-plane tees can have an angle of 45, 66 and 90 degrees);
- crosspieces, for connecting four pipe elements.
The number and type of fittings used depends on the design of the greenhouse and the type of connections selected.
Prices for PVC pipes
pvc pipes
The procedure for connecting pipes and fittings with glue
The connection is made on Tangit PVC-U glue from Henkel or its analogue. This glue provides strong fastening of parts and hardens quickly, so installation does not take much time.

Prices for Tangit PVC Kleber
Sequencing.
- Cut the pipe to the required length using a cutter, hacksaw or construction scissors. Check the compatibility of the pipe and the fitting: the pipe must go into it 2/3 of the socket length.
- Clean the edges from burrs, with a knife remove the chamfer from the end.
- Degrease the surfaces to be connected with any solvent. Apply adhesive to both bonding surfaces: the pipe and the inner surface of the fitting.
- Insert the pipe into the fitting strictly along its axis 2/3 of the depth until it stops, then turn it 90 degrees inside the fitting so that the glue is evenly distributed.
- Fix them in this position for 15-30 seconds, then wait another 1-2 minutes until completely glued.

The procedure for connecting pipes to bolts
Furniture bolts with a diameter of M6 or M8 are chosen as fasteners, depending on the diameter of the pipes. The length must be sufficient to connect two pipes.

Sequencing.
- Places for drilling holes are marked in pipes before installation.
- Through holes are drilled with a drill 2 mm larger than the diameter of the bolts.
- Connect the pipes by aligning the holes. Insert and tighten the bolts.

Holes can also be drilled locally, with the pipe temporarily attached to a wire tie or otherwise fixed.
Calculation of the required materials
First you need to decide on the shape and size of the greenhouse (length, width and height). Typically, a greenhouse has two beds separated by a passage. The width of the beds usually varies between 0.8-1.1 meters - this allows you to plant two rows of plants at the required interval and provide easy access to them.
The width of the aisle should be such that you can walk freely with buckets and other gardening tools, including a wheelbarrow. Usually, the path is made 0.6-0.8 m wide.As a result, the width of the greenhouse will be 2.2-3 m.
The length of the greenhouse depends on your needs and the placement rate of the vegetables you plan to grow in it. Planting rates per 1 m 2 of greenhouse area are given in table 1.
Table 1. Rates of planting vegetable crops in the greenhouse.
| Culture | Number of roots per 1 m2 |
|---|---|
| 2-4 |
| 1-2 |
| 4-6 |
| 2-4 |
| 4-6 |
| 2-4 |


Based on these standards, the length of the greenhouse is determined. Usually the length is 3-6 meters - it is impractical to put a greenhouse of a smaller size, and for structures of greater length it is better to use more durable materials and capital construction technologies.
Note! If you plan to use polycarbonate as a greenhouse cover, choose a length that is a multiple of the width of the sheets (2 meters). This will avoid unnecessary clippings.
The height of the greenhouse should allow free movement in it, in addition, at least 50 cm of free space should remain above the plants - hot air accumulates there and air exchange occurs during ventilation. For low-growing crops - pepper, eggplant, low-growing tomatoes - a height of 1.8-2.0 meters is sufficient. For tall crops, the height of the greenhouse should be at least 2.2-2.4 meters.

Another important parameter for an arched greenhouse made of pipes is the length of the arc, which is found by the formula:

Here L is the length of the pipe for the arc, m; h is the height of the greenhouse, m; B - greenhouse width, m. Table 2 shows the L dimensions for the most commonly used greenhouse sizes.
Table 2. Arc length for standard greenhouses.
| Width | h \u003d 1.8 m | h \u003d 2.0 m | h \u003d 2.2 m | h \u003d 2.4 m |
|---|---|---|---|---|
| B \u003d 2.2 m | 3,1 | 3,5 | 3,8 | 4,1 |
| B \u003d 2.4 m | 3,4 | 3,8 | 4,1 | 4,5 |
| B \u003d 2.6 m | 3,7 | 4,1 | 4,5 | 4,9 |
| B \u003d 2.8 m | 4,0 | 4,4 | 4,8 | 5,3 |
| B \u003d 3.0 m | 4,2 | 4,7 | 5,2 | 5,7 |
To calculate materials, it is also necessary to determine the step between the arches. If you plan to remove the cover from the greenhouse for the winter, it is enough to arrange the arches with a step of 0.8-1 meter. For a non-separable structure, the step should be reduced to 0.5-0.7 meters - this will save the greenhouse from deformation under the influence of snow.
It is necessary to take into account the material for the manufacture of longitudinal screeds, end walls, doors and vents. The total length of the longitudinal screeds can be calculated by multiplying the greenhouse length by the number of screeds. Usually there are at least five of them: two lower, two lateral and ridge. Additional side ties can be used to strengthen the structure.
The end walls will need pipes with a total length of 15-20 m. Each door will need about 5 meters of pipe, and 2-2.5 meters for the window. For convenience, you can draw up a detailed sketch, which indicates all dimensions, as well as the number of connecting elements.

Step-by-step instructions for assembling an arched greenhouse
Below is a step-by-step instruction for assembling a PVC pipe greenhouse with the following dimensions:
- width - 2.4 m;
- height - 2.0 m.
- length - 4 m.
According to table 2, the length of the arc is determined - it is 3.8 m. For the frame, PVC pipes of a standard length of 6 m with a diameter of 25 mm are used. Such pipes will provide the structure with reliability and rigidity. The pipes are connected using standard 25 mm fittings and adhesive connection.
For a greenhouse of the indicated dimensions with two doors and vents and with a pitch of 67 cm arches, you will need:
- pVC pipe L \u003d 6 m, Ø25 mm - 16 pieces;
- one-plane crosspiece Ø25 - 5 pieces;
- one-plane tee 90 degree angle Ø25 - 28 pieces;
- one-plane tee, 45 degree angle Ø25 - 4 pieces;
- double tee Ø25 - 4 pieces;
- corner 90 degrees Ø25 - 16 pieces;
- self-tapping screws or furniture bolts for attaching side ties - 36 pieces;
- two-legged clamps - 18 pieces, for them self-tapping screws 55 mm - 36 pieces.
- door hinges - 8 pieces, for them self-tapping screws 24 mm - 48 pieces;
- polycarbonate - 3 sheets of 2x6 meters;
- self-tapping screws for fixing polycarbonate with a thermal washer - 100 pieces;
- connecting profile for polycarbonate or construction tape.
You can also use a film as a greenhouse cover, it will need about 8 running meters with a width of 6 m.
Ground leveling and foundation installation
To avoid skewing of the structure during installation and operation, the area for the greenhouse must first be leveled. To do this, mark the location of the future greenhouse on the ground with the help of pegs and twine and check the site by level. With a slope of more than 1 degree, the site must be leveled. It is recommended to make a sand cushion 5-10 cm thick under the foundation.

A wooden beam with a section of 10x10 cm is traditionally used as a foundation for greenhouses. It provides load distribution and serves for at least 10-15 years, while it is inexpensive, and its installation does not take much time.

Step 1. The timber is sawn to the size of the greenhouse, impregnated with an antiseptic for the lower rims of a log house or used oil and dried. Antiseptic treatment is more convenient to carry out using a spray bottle.

Step 2. They assemble the foundation on the site for the greenhouse, laying the timber on a sand cushion or auxiliary posts made of bricks, while using a level. They check the dimensions, as well as the diagonals - with proper installation, they should be equal.

Step 3. The bars are connected using metal corners and self-tapping screws. If the length of the beams is insufficient, they are fastened with staples. For better grip with the ground, metal pins are used - lugs. All fasteners must have a protective coating, it is best to take galvanized elements. After installing the foundation, they can be additionally painted or varnished.

Step 4. Sand is poured along the perimeter of the foundation, finally fixing it. In this case, you can immediately make paths in the greenhouse and fence of the ridges.

Assembling the greenhouse frame
The assembly of the frame begins with the preparation of the necessary pipe sections. After cutting to size, it is better to sign them with a marker so as not to get confused.
For the described design, you will need:
- pipe sections 400 cm long - 2 or 4 pieces;
- pipe lengths 190 cm - 10 pieces;
- pipe sections 180 cm long - 4 pieces;
- pipe sections 140 cm long - 4 pieces;
- pipe segments 76 cm long - 8 pieces;
- pipe sections 65 cm long - 18 pieces;
- pipe sections 46 cm long - 4 pieces;
- pipe sections 10 cm long - 4 pieces.
The rest of the elements, including the frame of the doors, vents and end braces, are cut in place during the installation process.

Step 1. Pipes for five intermediate arches 190 cm long are glued in pairs using crosses. In the illustration, the connections are highlighted in blue.

Step 2. End arches are connected according to a scheme of four pipe sections and three tees. Two pipe sections of 140 cm each form side arcs, which are attached to the tees with an angle of 45 degrees so that when the arch is bent into an arc, the free sockets of the tees are directed downwards - the pillars of the doorway will be attached to them. Pipe lengths of 46 cm are connected to a 90 degree tee, then the parts are combined into a common structure, while the side socket of the 90 degree tee should be directed perpendicular to the axis of the 45 degree tees.

Step 3. Collect two lower side ties from six pieces of pipe 65 cm long and five single-plane tees for each tie. The leads of the tees are directed strictly in one direction - arcs will be attached to them.

Step 4. Collect two end ties from three pieces of 76 cm pipe and two single-plane tees for each tie.

Step 5. Collect doorways according to the scheme. Sections of pipes with a length of 1.8 m are fixed in the lower tees, then they are connected with tees and a jumper with a length of 76 cm. Sections of pipes with a length of about 10 cm are glued to the tees - continuation of the racks. Later they are cut to size when connected to the arch.

Step 6. Collect the end walls. End braces and end arches are connected using tees and racks, as well as two-plane tees at the bottom. The pipes at the top of the racks are cut to size.


Step 7. The greenhouse frame is assembled on the foundation. Install one end arch and connect it to the lower couplers. Install the first intermediate arch in the tees on the lower screeds and connect it to the end arch with a 65 cm long jumper. All intermediate arches are sequentially fixed. A second end wall is installed by connecting it to the upper and lower side ties. Temporary wire ties can be used for assembly stability.

Step 8. Check the diagonals of the frame, align it if necessary. The frame is fixed to the timber with the help of metal double-footed clamps and self-tapping screws.

Step 9. Install side ties. They are attached to furniture bolts at a height of about 1.4-1.6 meters from both sides from the inside of the greenhouse. For greater rigidity, additional longitudinal ties can be attached. The bolt location is marked with red crosses.

Step 10. Doors and vents are assembled in accordance with the scheme from pipe scraps, tees and corners. Fix the vents to the door frames on the hinges using self-tapping screws. Attach the hinges to the door frame.

Step 11. Doors are fastened with hinges in doorways. Install end screeds from pipes according to the scheme, fixing them to furniture bolts. The attachment point is marked with red crosses.

 An alternative is a kink-free design
Fastening polycarbonate
Polycarbonate is a relatively new material that has gained wide acceptance among summer residents.

It has many advantages:
- good light transmittance;
- two-layer honeycomb structure that retains heat well;
- sufficient mechanical strength;
- resistance to UV rays;
- simple and quick installation;
- service life not less than 5 years.
Disadvantages of polycarbonate:
- reflects the sun's rays more strongly than glass and film;
- not resistant to scratches and pinpoint impacts, requires careful handling;
- if installed incorrectly, moisture and dirt accumulate inside, from which the material fades.
To extend the service life, polycarbonate must be installed strictly according to the manufacturer's recommendations.

Three important factors to observe:
- fix the polycarbonate so that moisture can drain along the inner longitudinal stripes;
- one of the sides of the polycarbonate has a protective UV coating; during installation, the sheets must be placed with this side up;
- fastening is carried out on special self-tapping screws with a thermal washer on pre-drilled holes, otherwise the sheets will lead when heated.

Sequencing.
Step 1. Remove the protective film from the polycarbonate and mark the top side with a marker (the protective film on it is usually colored or has the manufacturer's logo). Better to make a few marks on each sheet.

Step 2. Cut out polycarbonate for the end walls. For this, a standard sheet is cut into three pieces measuring 2x2 meters. One piece is applied to the end of the greenhouse so that the cavities are directed vertically. Align the left side of the sheet with the left edge and with a marker outline the contours of the arc to the left rack and down along it. Apply the right edge of the sheet to the right side of the end and proceed in the same way. As a result, the contours of two semi-arcs are obtained on the sheet. Cut them out with a mounting knife or jigsaw with a small allowance of 3-5 cm. Do the same with the second end.

Step 3. Fasten the cut out parts to self-tapping screws with thermal washers using a screwdriver. The fixing step is 30-50 cm. At the same time, they try not to pinch the polycarbonate. Trim the excess polycarbonate with a knife.

Step 4. The third piece of sheet is used for trimming doors and vents. The sheet is applied to the doors, observing the verticality. They circle the doors with a margin, cut out blanks and attach them to the doors and vents. An arch above the door is cut out of the remains of polycarbonate, and it is closed. It is better to connect polycarbonate at the joints using special profiles.