How to make an apple juicer with your own hands: components and assembly. Domestic electric juicers
Electric juicer- This is a household electrical appliance designed for grinding fruit or vegetable pulp, followed by squeezing the juice.
According to the principle of operation, electric juicers are of two types: - centrifugal and auger. Centrifugal juicers, due to their low price and high performance, have gained great popularity. The article is devoted to self-repair of centrifugal juicers, one of which, Sonifer SF-5508, is shown in the photo.
The electrical circuits of most types of juicers are fundamentally no different. Only an electronic mode control unit can be added.
The supply voltage is supplied through a C6 plug with a flexible cord. Capacitor C1 serves to suppress interference emitted by the brush assembly of the motor. Resistor R1 is used to discharge the capacitor C1 after disconnecting the plug from the outlet to prevent electric shock to a person when touching the pins of the plug. These elements may not be available in budget models of juicers.
The choice of operating modes of the juicer is carried out using switch S1. In the position shown in the diagram, the juicer is off. When the switch knob is moved one position to the right, its movable contact closes terminals 1-2 and the supply voltage through the rectifier diode VD1 is supplied to the electric motor, indicated by the letter M in the diagram. The diode does not pass half the AC sinusoid and thus the rotation speed of the grater-sieve twice.

When the engine moves one more step, contacts 1-2-3 are closed, and all mains voltage is applied to the motor winding, and the juicer operates at full power.
The limit switch Sbl serves to exclude the possibility of turning on the juicer when the top cover is removed and performs the task of protecting a person from injury. It is mechanically connected to the cover, and if it is not installed, the switch is open.
Spark-extinguishing capacitors C2-C3 are used to reduce wear on the brush-collector assembly of the engine and suppress radio interference. Often, in order to better suppress radio interference, inductors (chokes) are also installed in the open circuit of the engine power supply.
To protect the motor from overheating during prolonged operation (more than 15 minutes), the thermal protection element St is used, which opens the power supply circuit.
The connection indicator can also be set in the diagram. Usually this is a miniature neon light bulb connected through a resistor to the supply voltage wires.
Juicer malfunctions and how to fix them
Attention! Care must be taken when repairing an electric juicer. Touching exposed parts of a circuit connected to an electrical outlet may result in electric shock. Don't forget to remove the plug from the socket!
The juicer is used more intensively in autumn, when vegetables and fruits ripen, therefore, on average, it experiences a small load per year and, subject to the operating rules, lasts a long time. But over time, even with careful use, grease is produced in the bearings and the juicer has to be disassembled for maintenance.
In juicers, two types of breakdowns are most often observed. It does not turn on or the grater rotates at insufficient speed.
| Table of common malfunctions of juicers and how to fix them | |||
|---|---|---|---|
| External manifestation of a malfunction | Possible cause of malfunction | Troubleshooting | Repair method |
| The juicer turns on, but the grater turns slowly | Thickened or developed grease in the motor bearings | If the bearings are not sufficiently lubricated during operation, the juicer emits increased acoustic noise and a burning smell may appear due to overheating of the motor windings | It is necessary to disassemble the juicer and lubricate the plain bearings with machine oil |
| Mechanical wear of the upper motor bearing due to lack of lubrication. In this case, lateral vibration of the grater-sieve relative to the center of rotation is often observed. | Swing the clutch-holder of the grater to the sides. If the play is more than 0.5 mm, then the bearing is worn | Replace the bearing with a new one | |
| The juicer does not turn on, the grater does not rotate | Cord not plugged in | Verify | Insert the plug into the socket |
| No voltage at the socket | Check the presence of voltage in the outlet using a working electrical appliance | Connect the juicer to a working outlet | |
| Faulty power cord | Visually check the plug and cord for mechanical damage, check the integrity of the cord wires with a multimeter | In case of failure, replace the cord | |
| Faulty switch blocking the engine start when the cover is removed | It is necessary to open the juicer and ring the switch with a multimeter. When the cover is removed, the resistance between the contacts should be equal to infinity, and when closed - zero | It is necessary to disassemble the juicer and first of all check the free movement of the pusher. If the pusher is in order, and the switch can be disassembled, then use sandpaper to clean the contacts from carbon deposits. If the switch cannot be repaired, replace it | |
| Engine brushes worn out | Perform an external inspection of the brushes. They should fit snugly against the lamellas of the rotor collector with their entire surface, not have cracks and chips, and be easy to move in holders. Collector lamellas should not have a large output | Replace brushes if worn. | |
| Breakage of the rotor or stator windings of the motor | Check the external inspection of the winding for mechanical damage and local darkening, check the integrity of the windings with a multimeter | If a break in the winding is detected or it smells of burning, then repairing the juicer is not economically feasible. | |
| The thermal fuse has tripped due to overheating of the electric motor due to a malfunction or the juicer has been running for a long time. Household juicers are designed to work no more than 15 minutes, followed by a half-hour break | Thermal fuses are disposable and self-healing. Therefore, you need to let the engine cool down and check after half an hour. If the juicer does not work, then you need to disassemble it and check the integrity of the thermal fuse with a multimeter. Its resistance should be zero. To check in the absence of the device, you can temporarily close its outputs | If the thermal fuse is broken, replace it. If, after replacement, the thermal fuse blows again during a short operation of the juicer, then the electric motor is faulty | |
Sonifer SF-5508 juicer repair example
The Sonifer SF-5508 juicer bought a year ago worked properly for a year, and during the next extraction of carrot juice, the sieve knife began to cling to the housing cover.

By ear, the level of acoustic noise did not increase, but extraneous sounds appeared; But its side play was more than 3 mm, which indicated wear on the upper engine bearing. It became obvious that it was necessary to disassemble the juicer and change the bearing.
How to disassemble a juicer
I did not describe the device and the principle of operation of the juicer, as everything will become clear when viewing the photos.

Disassembly of the juicer, regardless of manufacturer or type, begins with the removal of the bottom cover. To do this, unscrew a few screws.

Some of them were in plain sight, while the rest were hidden under the legs. The legs had to be removed to get to the screws.

The screws were at a great depth, and a Phillips screwdriver with a long shaft was needed. Screwdriver shaft with interchangeable bits not included.

After unscrewing the screws, the bottom with a little effort separated from the juicer body and all elements and the electric motor became available for repair.

External examination showed that the build quality was up to the mark, all parts were free of visible defects, the engine rotor manifold was in good condition, and there was no wear on the engine lower bearing.

A self-resetting thermal fuse was installed on the electric motor for a response temperature of 105 ° C, which guaranteed its protection against overheating in case of exceeding the permissible operating time.
The electric motor is attached to the body of the juicer with three screws, but in order to remove it, you must first remove the coupling on which the grater-sieve is installed.
Couplings on the motor shaft in juicers are threaded or pressed. How the clutch was fixed in this case was unknown and had to be determined experimentally.
All attempts to remove the coupling from the shaft by acting on it with levers did not lead to success. It was suggested that the coupling on the shaft is fastened with a thread. When trying to remove the clutch, it was noticed that the rotor shaft moved up relative to the bearings. That is, the coil on the shaft has shifted down a little.

Usually, on the shafts of electric motors of household electrical appliances, on which the working tool is wound, there are splines, for example, as in a coffee grinder. By the way, there was also a defective bearing. But in this case, there was no slot. Therefore, I decided to cut through it with a mini-drill with a nozzle in the form of an emery disk.

But the slot didn't help. When trying to unscrew the clutch, the blade of the screwdriver pulled out. Remembering that the winding on the shaft is moving, he put a plywood plate on the clutch and hit it with a hammer several times, in weight. The shaft moved out of the lower bearing by a few millimeters, which was enough to clamp it in a vice.

In order not to damage the surface, a fabric was applied to the sleeve and, using a pipe wrench, clockwise rotation, the clutch was safely unscrewed. The nozzles are always unscrewed from the motor shafts in the direction opposite to their rotation during operation..

The coupling was removed without damage from the outside, there were only traces on the plastic from the tool when trying to remove it. There was a fear that the plastic would crack or fall off the brass bushing.

When repairing a juicer, removing the bushing proved to be the most difficult task. But it was successfully solved. The top cover was held by screws from the bottom and was easily removed.

The upper bearing was badly worn from the inside, the gap was more than 3 mm. It was amazing how the juicer could work with such bearing wear. The juice was squeezed out by the wife, and did not complain about the work of the juicer until the sieve-grater began to cling to the top cover.

Unlike the bearing, there were no signs of wear on the motor shaft. To select the axial clearance, two wear-resistant washers were installed on it, and a spring washer between them.
Juicer repair
Repairing a juicer turned out to be much more difficult than it seemed at first glance. I had to perform a lot of high-precision metalworking, which at home on my knee is not easy.

To remove the bearing, the engine had to be disassembled and the rivets that held the bearing fixing bar to be drilled with a drill.

The drill diameter was chosen to be 2 mm in order to further cut the M2.5 thread to secure the bar after installing the new bearing with screws.

The search for a similar bearing did not lead to results. The shaft diameter was 6.4 mm. There are no bearings in the standard range with this size. The closest in size was number 696 with an inner diameter of 6 mm, an outer diameter of 15 mm and a thickness of 5 mm. To install it, a shaft groove was to be made. The test showed that it is possible to remove 0.4 mm from the shaft at home using a file. Therefore, bearing 696 was chosen for the repair of the juicer.

The fitting showed that the rolling bearing was well installed in the seat, but did not allow the fixing bar to be pressed against the plane of the engine part when the screws were tightened. There was a gap of 2 mm, which did not exclude the displacement of the bearing during operation and arbitrary unscrewing from the vibration of the screws.

Therefore, it was necessary to make a fixing washer from a duralumin plate 2 mm thick. The bearing hole was cut out with a jigsaw with a metal file installed.

The hole was cut a little smaller than the desired diameter, and further enlarged with a semi-circular file to the size of a tight fit of the bearing.

To turn the motor shaft, it was clamped into an electric drill from the collector side. To prevent accidental damage to the winding, a wide washer was put on the shaft, and the thread was protected by a piece of vinyl chloride tube.

I hold the electric drill, turned on at low speeds, in one hand, and the file in the other, the diameter of the shaft has been brought to the desired size. When turning the shaft, you must first remove more metal near the thread in order to eliminate the drawdown of the diameter of the winding. Drive the file along the shaft with minimal pressure.

Every 30 seconds of processing, the drill should be turned off and the diameter of the shaft measured in several places with a caliper or micrometerso as not to miss the size. The groove took no more than 5 minutes, and the bearing was tightly put on the shaft.
It took no more than 10 minutes to assemble the juicer, which is done in reverse order. Turning the shaft by hand showed its free rotation and sufficient clearance between the rotor and the stator, which indicated the correct alignment of the installed bearing. Before assembling the juicer, the lower bearing was lubricated with machine oil.
The first part of the video shows the operation of the juicer before repair. The engine makes extraneous sounds, the clutch strongly deviates from the center of rotation. The second part shows the juicer when squeezing juice. The vibration of the sieve grater is practically absent.
Of course, I had to think and work a lot, but I managed to repair the juicer with my own hands and return household electrical appliances to service. I'm sure it will last for many more years now.
A healthy lifestyle for many people is an integral part of existence. High-quality and proper nutrition in this matter plays a decisive role. Therefore, for such people, buying a juicer is an urgent matter. But during operation, problems may arise.
Types of juicers
In the modern market of kitchen appliances, 4 types of juicers are offered:
- centrifugal;
- screw;
- combined;
- for citrus.
They qualitatively squeeze juice from vegetables and fruits, and each model differs in features of operation. But, like any other technique, a juicer can break down.
Faults and their elimination
There are basic malfunctions of juicers of any type:
- If the device does not turn on, then most likely there are problems with the integrity and serviceability of the cord, switch or motor winding.
- If the shaft does not rotate and the engine hums, then loosen and fasten the starter pack ties. You also need to check the bearings and, if necessary, add grease to them.
- If the juicer vibrates strongly, then the reliability of fastening on the platform shaft of the grater disk and basket, as well as the assembly of parts, is checked.
The engine is the heart of the juicer. There are asynchronous and collector electric motors. Often the repair is associated with a failed motor. Any type of motor is equipped with impellers that are used to blow the stator coil. If during a breakdown it was found that these parts are not there, then you can buy them and install them yourself.
In addition, the operation of the electric motor can be increased. The juicer often has several speeds.
Juicers often do not have a starting winding, but use a coil division circuit. In order for the motor protection to work, it must fully comply with the installed relay.
A large assortment of juicers allows you to choose a convenient model of high-quality performance, which will last a long time and if it breaks, it will not happen soon.
In order to find out the cause of the malfunction and subsequently eliminate it, it is necessary to disconnect the device from the electrical network. Then the windings are called. Next, the coil is wound on the stator again. It should be noted that the rotor will not burn out, since the current that passes through it is quite small. The mechanism of a juicer of any kind is so simple that only oil seals, bearings and gears are subject to damage.
Do-it-yourself juicer repair is not something fantastic. quite simple and almost indistinguishable in different models. Whether it is a domestic juicer Summer Resident or imported Bosch, they all work on the same principle, and are arranged in approximately the same way. Having in stock some knowledge in mechanics and electrics, you can safely pick up a tool.
Juicer breakage is a fairly common thing. This is not surprising, because such country paraphernalia during the harvest season experiences enormous loads. At the heart of each device for obtaining juice from fruits and vegetables is ordinary press. It doesn't matter what form it is in. works by pressing on the fruit and turning it. supplemented with nodes that reduce the physical effort of a person and ensure greater productivity.
In any case, a decent load falls on the devices, and the increase in parts raises the percentage of breakdowns of the devices used. Even a manual juicer, presented as a press, where the pressure on the piston is produced by the rotation of the screw - and that one is not always able to work without fail for a long time.
Repairing manual juicers is not that difficult. If we talk about electric models, then the range of breakdowns is significantly expanded here. The search for a breakdown must be carried out in two directions: in mechanics and in electrical parts.
Troubleshooting algorithm and their elimination
If the electric juicer does not show signs of life, makes a lot of noise or vibrates, do not immediately start disassembling it. Often the reason is very banal. The main thing is to make a thorough external examination.
- It is necessary to check the presence of power in the network, the reliability of the connection between the plug and the socket and the integrity of the power cord. The latter quite often fails due to kinks or exposure to sharp objects. If damage is found on the cord, it must be replaced. In extreme cases, repair by splicing is possible. In this case, special attention should be paid to the insulation of the wires.
- The noise and vibration of the juicer are the result of improper assembly of the device or foreign objects entering the drum.
- The hum of the motor with a standing drum signals the tightening of the fastening of the adapter coupling. As a rule, the problem is fixed by loosening this part.
Other malfunctions will most likely require disassembly of the device.
Cause in the motor
The device of any electric juicer is not complicated. A mandatory attribute is an electric motor, which delivers the lion's share of faults. Motors are used in this household appliance collector type and asynchronous. Each of them has its own disadvantages and advantages.
The former allow to reduce the size and weight of the product, but are not designed for long-term operation and require cooling, which is provided by impellers mounted on the armature shaft. Asynchronous electric motors are more efficient, but take up more space and, accordingly, are characterized by increased mass.
The motors mate with the centrifuge drum or rotate the auger. Depending on the type of juicer ( or ), the connection is carried out by couplings or gears. These parts are usually made of plastic and are the cause of juicer malfunctions. As a rule, manufacturers always provide a stock of these parts, including them with the juicer sold.
The juicer motor is very picky and fails when:
- voltage drops in the network;
- long work under heavy load;
- moisture intrusion into the engine compartment.
Damage can be caused by natural wear and tear.
For preliminary disassembly of the juicer, use the instructions attached to it. If one was not at hand, then it is necessary to use logic.
Attention! You should never use excessive force when disassembling household appliances. This leads to the destruction of the hull and mounts and is fraught with further problems. Manufacturers usually take care of customers and simplify this procedure as much as possible.
After separating the remaining components from the engine compartment, proceed to disassemble it. A Phillips screwdriver is usually sufficient for this. After disassembling the compartment, the engine is released from the couplings.

The speed switch and radio components included in the electric motor circuit are preliminarily checked. This operation is performed by the tester.
Even a superficial inspection of the motor can tell a lot about the malfunction:
- Motor sparking and heating are the result of erasing or brush destruction(for collector electric motors). Replacing them will improve the situation.
- Difficult rotation of the armature shaft indicates a failure or bearing contamination. To remove them, you will need to disassemble the engine and use a puller. When assembling, special attention should be paid to the cleanliness of rubbing and rotating parts, as well as their lubrication. Regular cleaning and lubrication will help prevent this malfunction.
- The smell of burnt insulation and blackening indicates burnt winding. Such a breakdown is not eliminated at home and requires the replacement of the entire unit.
Of all the points, only the last one is critical. All the rest are restored independently, even with relative knowledge of electrical engineering.
Given the wide variety of juicers produced and produced today, it is difficult to describe all the possible malfunctions of these units. Each of them may have its own specific case. But if you study the reviews of the owners of both domestic and foreign models, you can say that the main breakdowns are very similar.
Some useful information about the repair and prevention of mechanical and electric juicers can be found in the video.
Autumn is harvest time. Fresh apples in the gardens of summer residents are pleasing to the eye. At first, it is not clear how to cope with such volumes. Juicers come to the rescue. But, like any technique, sooner or later they break. To make your life easier, you can repair a broken device. To date, there are many types of juicers, such as: Bosch (Bosch), Moulinex (Mulinex), Scarllet (Scarlet), Philips (Philips), SVA, Zhuravinka, Cameron (Cameron), First Austria (First Austria). The good news is that on the Internet you can find various videos on the topic of repairing juicers with your own hands.
Each juicer comes with instructions and an assembly diagram. But if you have been using the device for several years, the instructions could be lost. Even in this case, disassembling the device is not difficult.

The main thing is not to overdo it with efforts when disassembling. Otherwise, there is a risk of damage to the body of the juicer.
You can disassemble the juicer in several stages.
- Make sure the power cord is unplugged from the mains.
- Remove the product pusher from the loading compartment.
- We remove the cover, having previously disconnected the mount.
- Next, from under the lid, we take out the container, which accumulates already squeezed products.
- We get a grinder.
- Disconnect the jug intended for juice.
To get to the juicer motor, which is located below, you must:
- Loosen the screws securing the protective cover.
- Remove the engine guard, if equipped.
- Remove the motor mount and remove it from the juicer body.
There is an exception for auger juicers, which are similar in design to a meat grinder.
To disassemble them you need:
- Remove nozzle.
- Detach the receiving device with the auger from the main body.
- Remove the auger.
- The engine itself can also be reached from below.
Do-it-yourself juicer repair
Damage to the juicer can be caused by both natural wear and tear of materials and engine failure.

The juicer motor can fail for several reasons:
- Mains voltage fluctuations.
- Due to prolonged operation and excessive load on the juicer.
- Due to liquid entering the juicer body.
If you do not have enough experience in repair, it is better to seek help from a specialist.
Engine problems can be reported by:
- Sparking and heating. What is the result of erasing brushes in collector motors. The problem is solved by replacement.
- The rotation of the armature shaft is difficult. The bearings should probably be replaced, as they may have failed or become dirty. To prevent such a breakdown, you should clean the juicer in a timely manner and lubricate the engine.
- If you smell burning and blackening is visible, the winding is most likely burned out. This problem can only be solved by replacing the engine.
These are the main problems that arise with juicers. And only one of them is serious. The first two can be solved fairly quickly.
How to disassemble the Zhuravinka juicer
It would seem that everything has already been considered. How to disassemble the juicer is understandable. What is the peculiarity of Zhuravinka juicer? The peculiarity lies in the fact that when you get to the engine compartment, you will not see any more fasteners that would allow you to gain access to the engine compartment.
You shouldn't worry about this. All compartments are very tightly covered with a plastic disk, to which a grater-chopper was attached. It takes a lot of effort to get it off.

To remove it, it is desirable:
- Put the juicer on the floor and, holding it with your feet, pull the disc towards you.
- If possible, you can ask someone to hold the case, and carefully remove the disk yourself.
It is important to monitor the efforts made so as not to break anything.
After removing the disk, four screws will be available to you, removing which you can get the engine and fix the cause of the breakdown. The Zhuravinka juicer is assembled tightly and quite simply. Unlike the First Austria juicer, which, according to numerous reviews, causes difficulties with disassembly, in disassembling the Zhuravinka juicer, only the disk that closes access to the engine requires additional effort.
Bosch juicer 700w: instructions
Currently, Bosch juicers with a capacity of 380w and 700w are gaining popularity on the market.
Assembling the Bosch juicer (Bosch):

- Insert the pulp container into the engine block.
- First insert the strainer insert with the spout into the hole in the engine block.
- Now you need to insert the strainer. It should be checked for damage.
- Next, you should install the cover, and press it so that it gets up with a click. The switch must be in the Off position.
- To trap the resulting foam, it is necessary to place a juice container with a large hole under the juicer drain.
To get juice, you need:
- Place the juicer on a clean and smooth surface. Turn it on.
- While the engine is running, put vegetables and fruits in the loading barrel. Use the pusher, pushing as gently as possible to avoid straining the juicer motor.
- Switch off the juicer only after all the juice has drained from it.
Before opening the juicer, you must wait until the engine has completely stopped. To open the lid of the juicer, you must first turn the switch to the "open" position.
The pomace container should be cleaned before the pomace rises to the upper edge of the container, which must be grasped by hand to remove it.
- The engine speed is reduced.
- The resulting juice became thicker.
- The juicer starts to vibrate significantly.
Do-it-yourself juicer repair (video)
Whether it is spring, summer, autumn or winter, the body will always need juice. And it doesn’t matter what kind of juicer you have: Bosch or Scarlett, Philips or Mulineks, the main thing is to understand the basic principles of assembling / disassembling this device. To, if necessary, replace the failed element. Let your juicer serve you long and productively. Treat yourself and your loved ones every day.
D.Lepaev
Drinking a glass of fruit or vegetable juice is nice at any time of the year. but to prepare it with a grater and subsequent wringing is not so easy. Considerable expenditure of time and effort is required. And an electric juicer handles this matter almost instantly.
This compact device is easy to use and consumes negligible electricity. An hour of continuous operation of the juicer costs a few cents.
Electric juicers are designed to extract juice from fresh fruits and vegetables by grinding the product and centrifuging. In addition, they are used for chopping and cutting fruits and vegetables into slices.
In Russia, the following classification of electric juicers has been adopted (Table 1).

Electric juicers, depending on the additional operations and structural elements, are manufactured in four degrees of comfort (highest, first, second, third). Comfort items include:
devices for grating raw vegetables, chopping and cutting vegetables, mixing liquids, chopping vegetables and fruits;
electric brake;
a device for storing a connecting cord;
speed controller;
additional filter for better juice purification. Juicers have a non-removable connecting cord 1.5 m long. The sound level for the device of the highest quality category should be no more than 72 dBA and for the device of the first quality category - no more than 74 dBA.
Technical characteristics of domestic electric juicers are given in Table. 2.
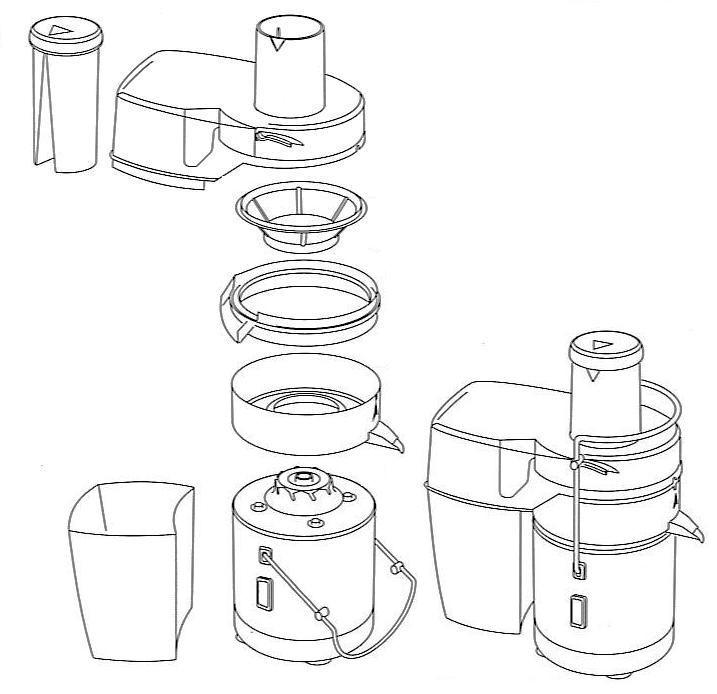
Electric juicer “Juice”
type SVMR consists of a housing of an electric drive 1 (Fig. 1), in which an asynchronous electric motor 2 is fixed with four screws. Platform 8 is mounted on the motor shaft and fixed with fonts, on which, with the help of
A mesh basket 4 and a grater disk 5 are installed and fixed with plastic nuts. A plastic perforated tape 7 is placed in the mesh basket along its walls.
On the body 1 of the electric drive is installed the body 3 of the juicer. To fix it on the body of the electric drive there is a special ledge. The body of the juicer is closed with a cover 6, which has a loading window for placing products. The lid is latched using the carrying handle, translated into a vertical position. Using switch 9, the electric motor rotates the mesh basket and the grating disc.
Products placed through the loading window are fed by a pusher to the knives of the grater disc. The crushed products under the influence of centrifugal force are thrown on basket walls. The juice flows through the holes in the belt and the basket into tray 3 and flows into the prepared dishes.
When preparing the juicer for operation, it is necessary to install the body 3 so that the flats on the holes of the basket and the disk coincide with the flats on the platform shaft. The grater disk and the mesh basket are fixed with a nut.
Dismantling the juicer
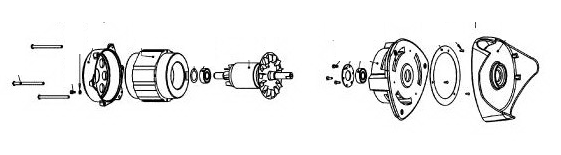
comes down to disassembly of the drive. To do this, put the drive on the table, unscrew the four screws securing the bottom and remove it. Place a support under the output shaft of the drive (so as not to bend the shaft) and, using a beard or tube, knock out the pin that fixes the platform hub 8 on the shaft. Remove platform. Loosen the clamp screw that secures the power cord to the drive housing. Loosen the two screws securing the switch. Loosen the four screws securing the motor to the housing. Remove the electric motor from the housing along with the switch and cord. To disassemble the engine, unscrew the four nuts that tighten the front shield, stator package and rear shield with the help of studs. Disconnect the switch and connecting cord. Replace defective part or assembly.Reassemble in reverse order. At the same time, lubricate the bearings by dropping a few drops of mineral oil into each bearing.
If the juicer does not turn on, check the serviceability of the cord, switch, motor windings.
If the motor hums, but the shaft does not rotate, check for rotor sticking. If necessary, ensure free rotation of the rotor by loosening the stator pack tie and then fixing it. Check the condition of the bearings, add grease. If there is strong vibration, check the quality of assembly of all parts, as well as the reliability of fixing the grater disk and basket on the platform shaft.
Electric squeezer "Zhuravushka-2" SVSP-301.
Juice is obtained by grinding the product with a grater disc and centrifugation. The pulp is periodically removed by bringing the blades of the ejector mechanism to the inner surface of the rotating centrifuge.The electric juicer consists of an electric motor 25 (Fig. 2), a sieve 3 for centrifugal filtration, housings 13 and 16 with a loading hopper, a fan 18, a grater disk 2, a tray 5 and an ejector 12.

Dismantling the juicer for repair.
Remove pusher 4, tray 5, cover 9, nozzle 7, unscrew clamp 11 and screw 10. Remove ejector 12, spring washer 8 and handle 6. Unscrew clamp 1. Remove grating disc 2, sieve 3, body 13. Unscrew screw 19, remove fan 18, unscrew screws 17, remove housing 16. Unscrew nut 23 and screw 20, remove clip 22 with spring 21. Unsolder wires from switch terminals 24 and remove switch. Unsolder the wires from the capacitor leads. Loosen the screw and remove the capacitor. Unscrew the screw 15, remove the electric motor 25. Unscrew the screw on the block, remove the connecting cord 14 and wires.Replacement of the electric motor.
Unsolder the wires from the terminals of the switch 24 and from the terminals of the capacitor. Unscrew the screw 15 and remove the electric motor 25. Install a new electric motor and assemble the device in the reverse order.
Replacing the connecting cord.
Unscrew the block screw, remove the connecting cord 14 and wires. Install a new connecting cord.
Capacitor replacement.
Unsolder the wires from the capacitor leads. Loosen the screw and remove the capacitor. Install a new capacitor and solder the wires.
Assembly. Remove traces of dirt from the body parts of the juicer. Reassemble in the reverse order of disassembly.
Adjustment after assembly. After assembling the lid of the electric juicer, it is necessary that the handle 6 of the ejector 12 turns with little effort. Adjust the turn of the handle with screw 10. The gap between the grater disk 2 and the cover hopper should be 0.5 mm. The gap is adjusted by screw 26, located on the lower shield of the electric motor. After adjustment, the screw must be locked with a nut and painted with enamel.
Inspection and testing. External inspection is carried out visually. At the same time, the integrity of assembly units, appearance, and completeness are checked.
The function test is carried out by short-term connection to the electrical network. The insulation of the juicer must withstand a sinusoidal voltage of 4500 V for 1 minute.
The test voltage is applied to the pins of the cord plug connected to each other and the body of the electric juicer. To check the strength of the insulation, a breakdown unit UPU-1M or similar is used. An avometer is used to check the circuits of an electrical circuit.
Repaired juicers must comply with the requirements of GOST R 50938-96 "Repair and maintenance of electrical household machines and appliances".
REPAIR&SERVICE-11 2000

