Lower rims of a log house: replacement technology and important nuances. Old wooden floor, floor replacement: selection of materials and tools, selection of floorboards and beams, dismantling of the old floor
In this master class, you will learn how to replace the wooden floor in an old house with a concrete insulated screed on the ground. This floor is planned to be used for the installation of a water heated floor. In addition, you will find out what materials you need and their approximate cost.
Preparation for work
To carry out work on the reconstruction of the floor and preparing it for a water-heated floor, we have to do several operations: dismantling the old wooden covering, leveling the soil, filling the pillows, laying insulation, preparing the mortar, pouring the screed.
For work we need the following tools:
- Buckets (plastic).
- Construction level.
- Shovel shovel.
- Rule.
- Concrete mixer.
- Fomka.
Materials that we need based on a room with an area of 4x3 m:
| Name | Unit rev. | Quantity | Unit price, rub. | Total cost, rub. |
| Cement | Kg | 250 | 46 | 1150 |
| Sand | Kg | 3000 | 0,30 | 900 |
| Crushed stone | Kg | 1000 | 1 | 1000 |
| Screening out | Kg | 1500 | 0,60 | 900 |
| Extrusion | m 2 | 12 | 263 | 3156 |
| Styrofoam | m 3 | 0,36 | 1610 | 579,60 |
| Total | 7685,60 |
Dismantling the old wooden floor
We disassemble old floors with a crowbar, not forgetting about safety precautions.

Leveling the ground
After the old floor is completely dismantled, it is necessary to remove all the debris from the underground, and the soil should be properly leveled. You can use a rake or a shovel.

Arrangement of a pillow
After the ground is leveled, we begin to equip the pillow. We fill in a layer of granite crushed stone of fraction 20-40 with a layer of 5 cm. We use crushed stone in order to protect the floor from mice. You can replace it with a small break of bricks, or broken slate. Lightly tamp the poured layer of gravel.


Foam sheets are laid along the perimeter of the room to compensate for the thermal expansion of the screed. It will also play the role of a permanent formwork and insulate the ends of the finished slab. The thickness of the foam sheet is from 20 to 50 cm, thicker is not necessary.
Pour a layer of sand up to 10 cm on the crushed stone. The sand should be clean, without debris and foreign inclusions.
Insulation laying
We use extruded polystyrene foam with a thickness of at least 50 mm as insulation. The dimensions of the sheets are standard 1.2x0.6 m.
The sheets have a "locking" device in the form of a "step", this is clearly seen in the photograph. When laying sheets, the locks are connected, and the surface is solid, without gaps.

Since extruded polystyrene foam (extrusion) is completely indifferent to moisture, you can do without waterproofing. We lay the sheets, checking with a level that they lie flat. We add sand in the right places and check again.

Mortar preparation and screed filling
If the room is a walk-through and is actively used (as in our case), fill the screed in two stages. First one half, then the other. To do this, we install a formwork from a long board.

To prepare the solution, we need cement - 1 part, sand - 2 parts and granite screening (a fine gray fraction obtained when calibrating crushed stone, that is, granite dust and very small fragments of crushed stone) - 3 parts.
Advice on how to knead the solution if the components are dry: first we send the screenings to the concrete mixer, then sand, then cement, mix everything thoroughly on dry and only then add water.
Advice on how to knead the solution if the sand or screenings are wet: first, pour water 0.5-0.7 in the volume of a measuring bucket, then add cement, mix thoroughly, then sand, and lastly screening. So you will avoid sticking of wet sand to the walls and, as a result, the solution is not mixed. Then add water to the desired consistency.
The finished solution should not flow in consistency, but also not be too thick. On a flat surface, when dropped out of a bucket, it will spread into a "cake", as shown in the photo below.

We wear the mortar and level it with a rule, or with a board of a suitable size. The thickness of the screed should be 4-5 cm, it cannot be thinner, it may burst. If desired, you can lay a reinforcing mesh, but you can do without it, since in the future, when arranging a water heated floor, the mesh will be used in the second layer of the screed. This screed is rough, and is only the preparation of the base for the underfloor heating.

After pouring, let the mortar set for at least 48 hours.

We begin to prepare the second part of the room. All works are identical. We remove the formwork, clean the “locks” of the slabs from sand and lay the insulation. Do not forget to set each sheet by level!


We fill the second part of the room with cement mortar similarly to the first part.

Align the fresh screed in thickness with the already poured one.


When the concrete is completely poured, let it stand for at least two days.

After all the work, we should get this floor. You can already walk on it. The screed gains full strength within a month. At this time, it is advisable to moisturize it by watering it twice a day from a watering can. In the future, on this basis, a warm floor will be made based on water heating.
Alexander Birzhin, rmnt.ru
Replacing the lower rims of a wooden house, as a rule, is not necessary, but only if it is built from high-quality dried lumber and the correct technology is applied. Having fulfilled these conditions, the replacement of the lower rims may be required after fifty years or more. Winter felling forest, dried and antiseptic, the roof structure of the house, which has wide roof overhangs to protect the walls from blocking in rain and snow, the device of reliable waterproofing of the foundation and cut-off, cutting corners and sampling longitudinal grooves according to the rules of technology, all these and many other rules better to observe. But if there is a need for a complete and partial replacement of the lower rims, such techniques are available. These works are considered extremely laborious and complex and require knowledge and experience.
Methods for replacing and restoring rotted lower rims of a log house
At the very beginning of the "process", when the owner discovers that the lower chords of the logs begin to rot and the logs are not damaged to a great depth or are damaged along the length of the crowns only partially, redecorating is possible.

Redecorating the lower rims
This method will not give a solution to the problem for decades. In addition, when cutting and replacing part of the rims, a large number of new joints and cold bridges will inevitably appear, and violations of the integrity of the supporting rims of the frame will lead to the fact that the entire frame will lose some of its strength, rigidity and stability. And yet this method is, although temporary, but a way out. In order to cut out the rotten sections of the lower rims of the walls and replace them with new ones, special equipment and large financial investments are not required. This method is quite simple and available to do it yourself.

Partial masonry
An available method of repairing the lower rims of log walls is possible in case of local damage to the rims. If you need to replace a small area, then it is replaced with brickwork, sequentially. Cutting out the rotten areas in parts, instead of them, they remove the masonry from ceramic bricks in a cement-sand mortar.

Replacing the lower rims
Another method of solving the problem of the loss of the bearing capacity of the lower rims as a result of rotting is cardinal, high-cost and time-consuming, comparable to new construction. Although completely effective. They completely disassemble the walls of the house, replace the rotten elements, partially restore the horizontal waterproofing of the foundation if possible. An additional plus of this method is that it is possible to replace not only the lower, but also the upper rims of the house, if necessary.

The third reconstruction method requires disassembling the upper part of the foundation, after which the lower rotten parts of the crowns are replaced and the structures and waterproofing of the foundation are restored. A serious disadvantage of this technique is any violation of the existing structure of the foundation, balance and joint work of the foundation and base soils, as a rule, has an extremely negative effect on the bearing capacity of the foundation and the house, and as a result, on their service life.
Replacing the lower rims with lifting jacks
The most reliable and high-quality method of repairing wooden houses, as well as the most economical, is considered to be the replacement of the lower chords of a log house with lifting jacks. Together with replaceable crowns, it is possible to repair the foundation, in whole or in part, and to strengthen the waterproofing.

When the technology of lifting and repairing is carried out, the geometric dimensions of the house do not change, the strength and stability of the structures does not decrease. Which technology to use depends on the state of the log house. If the walls are in good condition, all the crowns are connected securely, then it is possible to raise the house using jacks. If the dressing and the integrity of the walls are violated by decay processes, there is a need to use stationary support frames.

The required number of jacks - two, four or more, is calculated depending on the length of the walls of the house. To install the supporting parts of the jacks, in the lower parts of the walls, using a chain saw, cut through areas with rot-damaged crowns.

After installing the jacks, the wall is raised as evenly as possible, very slowly. Raise so that it is possible to freely remove and replace the decayed crown. Reinforcement elements from new logs are installed in the walls in parts - short sections are wound up and mounted from the corners, and the middle, longest, is installed in the gap between the jacks.

After the blockhouse is lowered into place and the jacks are removed, the holes left after their installation are tightly sealed with pieces of logs, with insulation and sealing of the joints with seals made of linen, jute fiber or tow.
During repairs, it is necessary to carry out antiseptic treatment, as high quality as possible, using modern wood preservatives. Old methods of bituminization or oiling of logs by mining do not give a sufficient long-term effect, and sometimes they harm the tree, they are blocked by the pores of the wood. Currently, there is a large selection of antiseptics and preparations for bioprotection of wood, odorless, harmless to health and not damaging the facade of the house, with excellent antiseptic properties. The quality of the impregnation directly affects the durability of the log house.

To perform cut-off from capillary suction of moisture, or horizontal waterproofing, it is recommended to use not roofing material on bitumen, but more modern materials, for example, euroruberoid in two layers. The material, reinforced with a fiberglass interlayer, is elastic, is made on the basis of bitumen and has been serving for more than a dozen years, providing sealing. The use of roofing material will lead to the fact that a violation of the waterproofing of the foundation will create conditions for rotting and damage to the replaced crowns.
To protect the lower belt of a log house, metal canopies are used. The installation of canopies over the lower chords of the logs, operating in the most difficult conditions, guarantees the removal of atmospheric water from the crowns and an increase in their service life.


Wooden houses mean comfort and coziness, a special microclimate and positive energy. In order for it to serve for a long time, you need to carry out current repairs on time and with high quality.
The experience of operating wooden buildings shows that it is extremely risky to touch the structural elements of a building without special tools, experience and knowledge. When replacing crowns and repairing the foundation of a wooden house, the cost of professional services will pay off with the durability of the structure.

Causes of destruction of the integrity of the lower rims
Ideally, a wooden building will stand without major repairs for half a century. The "weak link" of the design is the bottom rows. Moisture seeps through the cracks inside the wood and through the cracks between the logs. In damp places, fungal spores begin to develop. Mold appears, then rot. Internal destruction of wood is completed by insect pests.
The reasons why wood is destroyed can be as follows:
Use of unprepared material. Raw wood harvested “out of season” quickly loses strength and begins to deteriorate.
The wood species is of great importance. For example, when choosing larch for the construction of the lower rows, you don't have to worry about high humidity, the tree will only become stronger. It is not recommended to use linden logs as lower rims.
Poor-quality waterproofing of the foundation, performed in violation of technology.
Failure to comply with the antiseptic technology of building material.
Insufficient air exchange in the underground space, lack of ventilation ducts.

Incorrectly erected foundation that does not correspond to the type of soil, relief, without taking into account the depth of the groundwater, the climatic conditions of the region.
Illiterately mounted front panels covering the crowns.
All reasons boil down to two main factors: improper use of the home or an unprofessional approach to the work of builders.
How to determine the degree of destruction of the crowns
In order to radically resolve the issue of replacing the crowns in a wooden house and the degree of reconstruction, it is necessary to determine the extent of the damage.
The dull sound of an ax butt on a log will give out the degree of destruction of the wood from the inside. If you work with a chisel, you can imagine a more complete picture of the damage. A routine inspection is not enough to correctly assess the condition of a building. A professional approach involves assessing the state of the foundation, determining the degree of load on the structure. Experienced craftsmen can give an accurate forecast for the further operation of the dwelling. If you do not need to completely change the rows of logs, you can save the family budget. And, conversely, time, effort and money can be spent on local repairs, but it will not lead to the expected result.

On our website you can find contacts of construction companies that offer a foundation repair service. You can communicate directly with representatives by visiting the Low-Rise Country exhibition of houses.
Features of reconstruction
Before starting work, you should free the premises from furniture and things. Take out the window frames, remove the doors and dismantle the door frames.
The chimneys of the stove or fireplace are separated from the ceilings and the roof. They do everything possible to facilitate construction and avoid distortions. Hold the intact rows together.
Illiterate actions can lead to damage to the roof, chimneys and attic floors. Therefore, it is not recommended to carry out them yourself.
The technology is quite complex and depends on the following points:
foundation conditions;
the degree of destruction of wood;
building dimensions, number of storeys;
the size of the free space near the building;
the presence of adjacent buildings,
chimney design and condition.
If the stove does not have a separate foundation, as provided for by the construction technology, it will not work to raise the house. A specialist who has the necessary knowledge and experience in this area will be able to choose the right method of restoration work.
Whenever possible, materials are used that are as close as possible to the original ones; sometimes it is advisable to replace the decayed parts with bricks.

Sometimes wooden facades are covered with siding or bricked to hide the elements of reconstruction. A waterproofing layer is laid between the foundation and the new rows, the wood is treated with an antiseptic.
Reconstruction methods
There are several ways to repair crowns:
Partial replacement (local restoration of wood rotting places).
Brickwork instead of damaged crowns.
Replacing a lower log in a wooden house when lifting a log house with jacks.
Each of these methods has features, advantages and disadvantages.
Partial crown replacement
Assumes local reconstruction. This is the most affordable and low-budget way. Spot repair is possible when the wood has just started to deteriorate and does not have a large scale of damage. However, such a technological technique has a drawback - the strength of the structure decreases, the heat loss of the room increases. With a competent approach to business, these shortcomings can be minimized.
An important point: it is necessary to correctly determine the boundaries of damage. If this is not done, the effort will be in vain. The decay process will continue.

In order for the inserts to hold for a long time, their dimensions must fully correspond to the removed elements. Around the places where new bars are inserted, craftsmen make special holes for driving in dowels.
Brickwork instead of damaged crowns
Partial wood restoration technology is a temporary measure. Therefore, brickwork is more often chosen as a way to solve the problem. This can be done with or without jacking up the entire structure. The age of the building, the type and condition of the foundation, and possible material investments are taken into account.
Places affected by rot are cut out. End connections are cut off and solid brick supports are installed in their place. A brick foundation is laid, its surface is brought under intact logs. With this method, you can update several rows at once.
If the brickwork is carried out with the lifting of the structure with jacks, the scheme is as follows:
When replacing the two lower rims, cut out two logs and set the jack in such a way that it rests against the third row.
The structure is raised at the corners and temporary supports are installed. To avoid dangerous distortions, the structure is raised simultaneously from all sides.

The old foundation is being removed.
The structure is lowered only after the brickwork is completed and the waterproofing layer is laid.
Complete replacement of the lower rims
Unlike local repairs, the cost of replacing crowns in a wooden house with the help of hydraulic or screw devices will be more expensive, but the result will justify the money spent.
Jacks are installed with an emphasis on the upper logs so that the lower ones can be removed. Temporary supports are being erected. The equipment used to raise the structure must be reliable. Breakage of the jack while lifting the structure can lead to a violation of the integrity of the structure and injury to people.
Although the jacking process will require more time and effort, the lifespan of the structure before the next major overhaul will increase significantly. The renewed waterproofing layer will keep moisture out of the wooden walls.
What is the price of
When replacing the lower rims of a wooden house, the cost of work depends on the complexity of the repair, the degree of wear of materials, the terrain, and the size of the house.

When the lower rims of a wooden house are replaced, the cost of the work consists of the following components:
The whole range of actions to raise the structure.
Dismantling the damaged crown.
Preparation and installation of a new crown.
Construction of a new foundation.
Waterproofing device.
Installation of fasteners.
To this should be added the cost of building materials.
On average, the cost of services for replacing the lower crown in Moscow starts from 5000 per 1 sq. M. rubles for the smallest timber. If the walls are made of logs, then the price for replacing crowns in a wooden house will be more expensive: from 13,000 rubles per 1 sq. M.
Video description
Clearly about lifting a wooden house with jacks in the video:
Conclusion
Determining the exact amount of work and the correct way to restore the lower rims will allow you not to spend extra money on reconstruction. Handicraft restoration can lead to distortion of the structure and further destruction of the house.
It makes no sense to save on hiring specialists, because the price of work to replace a crown in a wooden house is not sky-high and it is better to carry out a renovation once with a high quality than constantly face new problems.
In a private house, from time to time you have to exert effort to maintain it in good condition. The floor requires special attention, and if its quality leaves much to be desired, it must be replaced. In this article, we will tell you in detail how to do this.
Replacing the wooden floor
Changing the floor is not an easy task, but it is necessary when it wears out.
The main criteria for checking the field strength are:
- the floor creaks under load;
- boards on the floor sag under furniture;
- floor level drops;
- cracks and cracks between the boards;
- the quality of the material deteriorates (the tree crumbles, becomes rotten).
If you observe several items from the presented list, then it's time to change the gender.
Work is usually carried out in several stages:
- preparation of the necessary tools and materials;
- dismantling the old floor;
- installation of a new floor;
- topcoat.
Materials, tools, consumables
A number of tools are required for any construction work.
To lay the floor, we need:
- screwdriver;
- drill;
- saw or jigsaw;
- building level;
- axe.
It is also necessary to prepare materials for the installation of the coating:
- timber for lag;
- boards;
- insulation;
- substrate;
- nails, screws.
Having prepared all the materials and tools, you can get to work.
edged board or floorboard
When choosing materials, the question arises of what to prefer an edged or floorboard. First, you need to characterize each species. Edged board is a woodworking product of rectangular section with given dimensions. It is obtained by processing logs from all sides.
For the manufacture of boards, the following tree species are used:
- conifers (spruce, pine, larch);
- hard deciduous (oak, beech);
- non-solid deciduous (birch, aspen).
The cost of the forest will depend on the type of wood. For example, a larch board, due to its durability and resistance to moisture, will be more expensive than its pine counterpart. True, the edged board has one drawback - a large number of knots. Such material is suitable for installation of a sub-floor or flooring in non-residential premises.
Floor board is another matter. It is made from wood and carefully processed from all sides. This material is ideal for flooring. And most importantly, you do not have to additionally dry and process the surface of the boards, achieving a nasty coating.

wooden beam 50x100
Construction timber is widely used in construction and renovation. It is made from softwood and hardwood. The beam can have a square or rectangular cross-section. It is obtained by processing a log from four sides. Material with a size of 50 * 100 mm is widely used for repairs. It can be used to make a crate for wall cladding or floor joists. Its cost can vary from 4 to 10 thousand rubles.
Dismantling the old floor
When dismantling the floor, prepare tools. To do this, you need a nail puller, crowbar, pliers and a saw.
- we free the room from furniture;
- remove old skirting boards;
- we remove the flooring;
- remove the rough floor;
- we take out the garbage and clean the room as much as possible;
- we do wet cleaning of the room.
It is quite difficult to cope alone, so ask for help in advance. Next, armed with a nail puller, we try to remove the nails with which the boards are nailed. This will make it easier to remove them. If it does not work out, the boards can be lifted with a crowbar. If necessary, you can cut the cover and dismantle the boards in parts. This will make it easier to take them out. After that, you need to remove the lags. Thus, we will get absolutely cleaned space for the installation of a new floor.

Installation and alignment of wooden logs
First you need to level the surface for installing the lag.
To do this, you will need to perform the following sequence of actions:
- align and tamp the ground;
- in the place where the supports are installed, we make recesses 20 by 20 cm in size and up to 50 cm deep;
- after that we fill them with layers of sand, crushed stone and rubble crumbs 6 cm thick each;
- fill them with a concrete solution;
- on concrete we erect brick posts for laying beams;
- after that, logs are laid on the beams with a step of 50 - 80 cm;
- the space between the joists can be sewn up with boards or chipboards.
Thus, we get a frame for the flooring of the topcoat.

But, you still need to insulate the floor. For this, mineral wool is suitable, it is placed in the intervals between the logs and covered with a waterproofing film. The even installation of the lag is checked with a level, or they are checked with a cord that is pulled between the two extreme boards.

If the floor is being replaced on a concrete base, it is enough to replace the logs and lay the insulation. And then the flooring of the boards follows.
Floorboard flooring
First you need to decide on the direction of styling. It is best to do this from windows, so the effect of increasing the space will be achieved. We start laying from the wall. In this case, it is necessary to leave a gap of 1 cm from the ends and the side surface of the wall. This is necessary because the tree can expand when moisture rises and contract when it dries. We fix it with self-tapping screws. Next, we sequentially mount the floor, fixing them with self-tapping screws into the grooves of the boards. When installing the last board, it is necessary to measure the distance taking into account the gap. Can be trimmed if necessary. To prevent the coating from deforming, you can insert pegs between the boards and the wall. Now you can varnish or paint the floor.

Laying fiberboard, linoleum
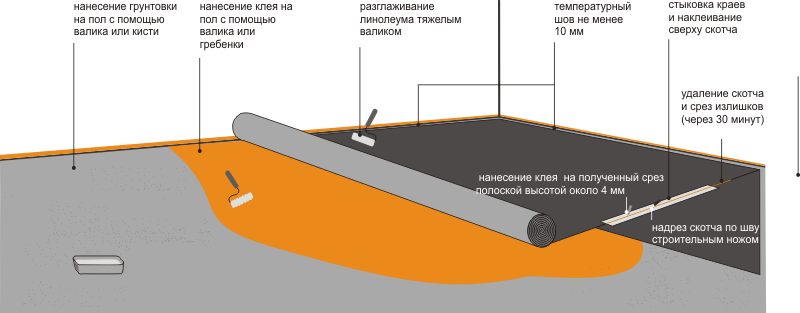
Many will wonder why lay fiberboard when you can lay linoleum on the boards. The fact is that the sheets of this material are a good thermal insulation material. And keeping warm in the house is the most important task. Also, a completely flat surface allows you to achieve an even coating. Before installing the fiberboard, it is necessary to fill all the gaps between the boards with acrylic sealant, and the unevenness with putty. Now you can fix the slabs with nails or self-tapping screws. The disadvantages of such methods can be the heads of the fasteners protruding above the surface. To eliminate this problem, we make recesses in the attachment points so that the caps are completely immersed and flush with the floor plane. Before installing the slabs, leave them indoors for a couple of days. After that, we lay the fiberboard, starting from the far corner of the room, gradually moving towards the door. Now fill the gaps between the plates with putty.

Now you can lay linoleum, it is also left for two days in the room to adapt to temperature and humidity. Next, we spread the material and give it time to lie down. After that, you can fix it with skirting boards. Since this coating dries out over time, it must be laid close to the walls. Another option is to glue it to the surface of the fiberboard. The adhesive is applied with a notched trowel to the floor and wait for it to thicken. Then it is applied to the back of the linoleum and glued to the floor. To make the coating even, it is straightened from the center to the corners. Thus, we get an even and warm floor covering.
This article explains how to replace a wooden floor in a private home. Talk about what tools and materials will be needed. Using the advice of the article, you can prepare the necessary tools and carry out the work yourself. Happy work.
The lower crowns in a wooden frame are one of the most vulnerable places. No matter how the owners try to protect the wooden blockhouse (be it a house or a bathhouse), it is not insured against decay. Wood is an excellent building material, but its lifespan is limited.
The situation when the house is in good condition, and the base is badly rotten, is quite common. The owner of a wooden building should think about the possibility of repairing the lower logs already at the construction stage.
If a wooden blockhouse of a house requires major repairs after 50-60 years of operation, then its lower crowns (basement part) may fail much earlier. Accelerated destruction of wood occurs for the following reasons:
- Rotting as a result of frequent and prolonged direct contact with sedimentary and flood moisture, the release of groundwater, the accumulation of penetrating moisture and condensate.
- Damage by microorganisms (fungi, mold, bacteria), insects (ants, bark beetles, etc.) and various rodent pests.
- Destruction under the influence of excessive loads.
- Mechanical damage of various types.

The following factors contribute to the appearance of these destructions:
- Lack or poor quality waterproofing between the foundation and plinth, as well as on the outside of the lower part of the wall.
- An improperly organized drainage system, which causes the accumulation of sediment and flood water, as well as moisture formed during melting snow.
- Lack of foundation ventilation (air vents or vents).
- Violations during construction - the use of low-quality wood, the wrong choice of the diameter of the logs, the use of undried wood, insufficient antiseptic treatment and anti-rotting impregnation of wooden elements, incorrect calculation of loads, violation of the rules for laying the lower rims.
Important. The lower crowns, made of high-quality, durable material and impregnated with a protective compound, with proper waterproofing, have the same service life as the entire wooden frame of the house.
Preparatory work
A properly conducted preparatory stage creates the basis for a quality repair. It includes such activities:
- Visual inspection. It must be carried out periodically so as not to start a destructive process. The above-ground part of the foundation, the filling element and 3-4 lower rims of the log house are examined with special care. A clear reason for the repair is the appearance of visible defects - cracks in the wood, deformation of individual logs (including bulging in one direction or another), discoloration, traces of the activity of insects and pests. A pronounced symptom may be the presence of a specific smell of rotten wood.
- Checking the internal state of wood. Superficial signs do not always indicate the need for major repairs - sometimes they just need to be cleaned from the logs and covered with a protective layer. Things are much worse if the process has gone deeper into the material. The first sign of this is established by the dull sound that is heard when the logs are tapped with a hammer. For a more accurate picture, you need to use a chisel and carefully remove the top layer of trees to assess the condition of the core.
- Assessment of the front of work and drawing up a repair plan. At this stage, the types of defects and the spread of damage are identified - local, i.e. on a small area of the log; damage to individual logs; destruction of almost the entire basement area (on one wall or around the entire perimeter of the house). Accordingly, the repair can have the following varieties: replacement of a small section of the log; replacement of one log with or without lifting the entire log house; complete replacement of the entire basement part of the log house.

Complete replacement of the lower rims
Overhaul in the form of a complete replacement of the lower rims includes raising the frame, removing rotten logs and installing new rims. The work is carried out in this order: preparatory measures, replacement of the lower rims and timber.
Preparatory activities:
- maximum lightening of the entire structure (removal of furniture and plumbing, removal of doors and windows, dismantling of the floor and roofing);
- dismantling the stove and fireplaces, if they do not have their own, independent foundation;
- separation of the chimney from the ceiling and roof, if the stove is not dismantled;
- detaching the floor lags if they are cut into the lower rims to be replaced;
- disconnection of all communications.
To fix the crowns around the entire perimeter of the house, boards with a thickness of at least 3 cm are nailed vertically at a distance of 45-60 cm from each other. You can fasten adjacent crowns with metal staples. Fastening is provided on both sides of the wall (outside and inside).
To raise the log house at a distance of 60-80 cm from the corner of the structure, an opening 35-45 cm wide is made in the foundation and part of the logs is cut out to form a niche for installing a jack. The following lifting technology can be used:
- With one jack. Each corner rises in turn.
- Using 2 jacks. First, one wall rises completely, and after it is fixed, the opposite one.
- On 4 jacks. The whole blockhouse rises at once. This method excludes damage to the frame, but requires coordination of the devices.
After raising the corner of the log house to a height sufficient to extract one log, a support mounted on 2 posts is brought under the first crown, which cannot be replaced. This is how the blockhouse is fixed at all lifting points, and the jack is removed.
Bad logs are knocked off the nigels and pulled out. Then new logs are installed. They are immediately fastened with nigels. A jack is again brought under the lower rim, with which new logs are compacted.
Before the completion of the work, the foundation is repaired, if necessary, and the waterproofing between the base and the plinth is restored, and a new filling element is installed. After that, the frame is slowly lowered with jacks to its original place with fixation on the pins.
After the felling is completely lowered, all the gaps between the logs are caulked with moss, tow or jute. The heat and waterproofing of the basement is being restored.
Partial bar replacement
If the inspection of the condition of the house showed that the foundation is in good condition, like most of the basement, and only a small section of the crown has been destroyed, then the repair is carried out by partially replacing the elements of the log house. In this case, only the damaged section of one or several logs is removed, and a kind of "patch" is installed.

Such work involves the following steps:
- The area to be repaired is clearly marked, for which you can use a knife, ax or chisel.
- Fixation of crowns. At a distance of 35-45 cm, on both sides of the border markings, screeds from a board 3-4 cm thick (with 2-3 crowns fixed) or metal brackets are installed.
- Cutting along the marking of the damaged area using a chainsaw, electric saw or grinder.
- Opening preparation. The lower surface of the upper, untouched crown is slightly flattened, and cuts 15-20 cm wide are made at the ends of the opening. The entire surface of the opening is carefully treated with an antiseptic.
- Manufacturing and installation of the insert. Elements with a length of 1.5-2 mm shorter than the opening are cut from logs with a size similar to the installed logs. After processing and impregnation with an anti-rotting compound, the insert is tightly driven into the opening using a sledgehammer. All cracks are caulked.
Replacing the timber without raising the frame
Overhaul of the house can be done without raising the log house. The following options stand out:
- Replacing a destroyed log. First, the rotten element is removed in parts. To do this, the log is cut into pieces with a length of 1-1.5 m, which are pulled out in turn. The technology does not differ from the previous method of partial replacement. After removing the entire log, exactly the same element is carefully hammered into the vacant space and fastened to the adjacent crowns with metal staples.
- Replacing a destroyed wooden plinth with brickwork. The technology is based on alternately cutting and removing sections of a wooden basement 1-1.5 m long with laying instead of it a brickwork with a thickness of 1.5-2 bricks. The masonry is brought directly under the remaining lower rim, and waterproofing is laid between them. Gradually moving around the entire perimeter of the house, a complete replacement of the rotten lower wooden rims with a brick basement is provided. Further, it is enough to insulate and plaster the masonry.
Which wood is best suited for the lower rims of a log house
During the construction of a wooden house, wood of the following species is used:
- Spruce. This is one of the most affordable and cheapest materials. Due to their loose structure, spruce logs retain heat well. In addition, they have antibacterial properties. The main disadvantages are low moisture resistance and a tendency to decay, which limits the use in the lower rims.
- The pine tree has an even trunk without knots, but its disadvantages are similar to spruce.
- Birch is considered a hard, durable material, but it dries out a lot, has a high water permeability, a tendency to decay and a low durability.
- Larch. It has high strength, resistance to microorganisms, does not rot. The main advantage is moisture resistance and a fairly high fire resistance. Wood is a highly drying species, which requires good drying before construction. The only real drawback is the high cost.
- Oak. This wood stands out for its strength and durability, high hardness, resistance to any weathering. In terms of resistance to decay and moisture resistance, oak logs are comparable to larch and have a similar disadvantage.

Taking into account the economic side, wooden houses are most often built from spruce and pine. However, in the lower rims, their use threatens with premature overhaul. The best option for making a base is larch and oak. Such materials will cost more than common tree species, but their very high resistance to moisture and mechanical strength will significantly increase durability.
Attention! The lower rims of the log house are subject to maximum loads, and therefore the diameter of the logs for them should be 15-20% larger than the size of the elements of the rest of the walls.
What tools are required to complete the work
When carrying out repairs on your own, you will need the following tools and equipment:
- jack for lifting a house (1-4 pieces);
- Bulgarian;
- a gasoline or electric saw for cutting logs;
- perforator for forming the place of installation of the jack on the foundation;
- electric drill for installing nigels;
- sledgehammer;
- a hammer;
- chisel;
- plane;
- hacksaw;
- scissors for cutting waterproofing;
- metal brush;
- paint brush;
- roulette;
- metal ruler;
- rail for controlling the lifting height.

Is it possible to independently change the lower bar
In general, the considered repair work requires a certain skill, significant time and labor costs.
The question of whether it is possible to independently replace the lower rims of a wooden house is of a purely individual nature. If you have the necessary equipment and sufficient time, work related to lifting a log house can be done by hand.
But, if a person doubts, it is better to invite specialists. In order to carry out repairs correctly and efficiently, some nuances must be taken into account.
When is the best time to carry out work
Repair of the basement of a wooden house must be carried out immediately upon detection of damage. In this case, it is possible to do without major repairs and complete replacement of the lower rims. The work itself cannot be carried out in high humidity and windy weather.
When planning the timing of repair measures, it is necessary to take into account some features of the behavior of wood. In the summer, moisture moves deeper into the log, which can cause cracking during drying.

In winter, the moisture content of the tree is minimal, and the moisture is frozen out, which ensures uniform shrinkage. In addition, in summer, temperature differences between night and day are more sensitive for wood.
The choice of the timing of the repair should be made taking into account the recommendations given for the construction of a wooden house:
- It is better to repair the foundation in the fall, when the air temperature has not yet dropped to minus values. After 2.5-3 weeks, the concrete will gain the required strength, and you can deal with the felling.
- It is better to work with a wooden frame in winter.
- Maximum shrinkage occurs during spring. It is better to wait out this period.
- Summer is the best option for finishing work.
Important! If the overhaul of a wooden house is associated with raising and strengthening the foundation, as well as replacing the lower rims of the log house, then work should begin at the end of October-November, taking into account that the completion of the repair of the log house will be in December-January.
How can you increase the service life of the timber
The service life of the lower rims, and therefore the entire wooden house, can be done in the following ways:
- Application of high quality and reliable waterproofing. These materials include modern euroruberoid. It fits on top of the foundation and protects the frame well from below.
- Covering board. In the absence of financial opportunities for the manufacture of lower rims from larch or oak, you can increase the reliability of the base by installing boards from these materials. It is mounted on top of the foundation waterproofing and has a width of 25-30 cm with a thickness of 6-8 cm.
- Impregnation of wood with folk remedies. It is recommended to use such substances - copper sulfate, "Finnish mixture" (slaked lime, copper sulfate, table salt, flour); natural wax; spruce resin or birch tar; bitumen; drying oil; oils.
- Modern, synthetic, impregnating compounds. Such antiseptics are popular - Pinotex, Sadolin, Senezh Ognebio, Tikkurila, Belika.
Replacing the lower rims in a wooden frame can be done independently in different ways. It is important to correctly assess their condition and determine the scope of work.

To exclude rapid decay of wood, it is necessary to protect it from moisture and pests. Preventive measures can help eliminate the need for time-consuming overhauls.