Homemade hanger for clothes in the hallway. Clothes hanger do it yourself: how to make, drawings, photos, options for outdoor and wall clothes rack in the hallway
Relieved hanger with her own hands - the idea is fruitful. The theater begins with hangers; House too. In the sense of spirit, atmosphere, "energy". The reason is simple: the first thing that looks out the guest - where to hang up the upper clothes. And if the hanger is clearly self-made, but convenient, stable and durable, positive renome owner is provided.
The second argument for making a hanger with your own hands, is prosecated: purchased prices are clearly disproportionate with production costs. A homemade clothes hanger will save quite visible in the budget amount. It is easy to make it, the material will take a bit, go into business and waste from repair. In most cases, you can do the tool.
These factors are especially felt, if the floor hanger is placed in the hallway. In addition, it can be a dryer, if its frame design, see further, because On such hangers, clothing is comfortable to hang on her shoulders, and the hanger moves away from the wall. If the house managed to harvest the dressing room, then the outdoor hanger is the optimal option. The cost of floor hangers is significantly higher than wall mounted, but there is nothing in the design, which would not allow to make an outdoor hanger on their own.
On the floor or on the wall?
The said is already enough to make a choice, just if the floor area was enough. However, the approach is completely attractive than an attractive hanger in a floor-type hallway:
- Clothes raving on her shoulders will dry faster, not stretching; The collar and lining do not rush.
- On a hanger width approx. 1.5 m is placed a seasonal set of clothing of the whole family, which will save on the closet and square under it.
- The blatus is naturally attached to the outdoor hanger, which simplifies the work on the equipment of the hallway and saves its area.
- With properly calculated sizes of the hanger, neither the wall from the clothes or clothes about the wall is not damaged.
- The mobility of the hanger does not prevent the rearrangement of furniture; After moving the hangers, you do not need to close the mounting holes in the wall.
However, outdoor hangers are different, and not all of them are most suitable for residential premises. For example, to orders (from Star. Russian. "Order" - office, office, office) Hanger-lands, pos. 1-4 in Fig., Wash clothes on the shoulders are inconvenient. Because of the small area of \u200b\u200bthe support, they are twisted, especially loaded with winter wet clothing. To emphasize the functional damage to the product, such hangers call the lishes, and they often go to this name.

Types of floor hangers
The best option is the same theatrical dressing frame hanger, pos. five. Performed for residential premises it is complemented by shelves for hats, shoes and gloves / scarves; Perhaps an additional barbell for ties, pos. 6. The lack of "legs" of the hangers are confused under their feet. In trying to get rid of it came up with hangers - frames on the stand, pos. 7, but generally speaking, they roll even more than ordinarians hung. Another option is a hanger frame without legs, leaning against the wall; We still remember this. There are still frame hangers of a folding structure, but in everyday life they have almost no advantages.
If in the hallway with a place in general tight, then more suitable is still a wall hanger. Simple wall hanger-scab, pos. 1 in fig., Maximum compact, but it is not more convenient as possible, except that the next jacket does not fall from the next jacket. Hanger-shelf, pos. 2, it will not fall, if attached as it should, and hats / caps from it, too, but the wall and clothing rub each other.

Types of wall hangers
Wall hanger-panel, pos. 3, saves the wall, but not clothes. Most of all replete leather things on such hangers. Kozhevniki in a joke advise: how, they say, distinguish a sheep of face leather from her the knuckles? The first on everyday use the hanger-panel loses the view of 2 winter, and the second is for clauses. Given the cost of products from genuine leather, it is not good anywhere. Therefore, the hanger-panel on the wall for expensive things is often equipped with a soft upholstery, pos. 4. What is up to wall hangers with openwork shield, pos. 5, then in this case its value is only decorative: neither things, nor the walls he protects.

Floor hangers with lanam and a banquette
There are still floor-panel hangers with a stand, for example. in the form of a handy, chest or varnish, pos. 1 in fig. on right. This option is not from the best: someone once will be put on the lid, and the clothes removed from the hanger it will wake on the floor. Much more practical outdoor hangers-panel with a banquette, pos. 2. The flower under the seat is the matter of taste of the owners, if only he survives there, but a shoe or a flasher for her care accommodation in a box of a banquet place.
Clothes and keys
Regarding the hawk-panel at the amateur mastery, an additional opportunity appears, namely: to supply such a sidewall to the far from the entrance door of the edge. Perhaps not reaching up to bottom, with a force or a notch. Factory do not do this: the hanger must be designed for drinking clothes on the side. One sidewall does not interfere with this, but it is not known how the hanger will stand at the buyer, but to make the right and left hangers.
What gives such an add-on? Place for a key, invisible from the threshold. In the same place, on the side, it can stand in a trumulous or a cabinet, but the main thing is to be a random visitor to the eyes of the eye, and they are in sight, according to criminologists, a serious factor of spontaneous unlawful actions, without which, i.e. The temptation, the visit is not quite a trusty subject would be safely for both the owners, and for him. You can, of course, make the key luxuriously decorated and with secret constipation, but it is a considerable work and the cost of materials. And so - there will be a simple handus with hooks. Or only hooks, screwed to the sidewall outside the clothing section.
We assume that the suitable design is already selected, and we will do how to make a hanger. Preferably wooden: the material is noble, natural, easily processed. Do not forget other versions; In some cases, more comfortable. Let's start with outdoor hangers as the most functional.
Outdoor
Lovers embrace from the soul, which have a milling tool on wood, can immediately take up the floor frame hanger with legs. Completed from the tree of fine-layer hardwood (oak, beech, rhine, walnut, birch), it looks gorgeous, and in the width takes only 360 mm floor.
As a prototype, a costume hanger is well suited, you just need to make it higher and move up the trouser crossbar so that the shoulders can be hung on it. Instead of a tongue rod and handles, you can install the shelf, and the shoe shelf is mounted at the bottom. The drawings of such a hanger are shown in Fig.:

Wooden floor hanger drawings
With the specified other sizes, the structural and overall width (dimensions 430 and 460 compound) without compromising strength and stability can be increased by 1-1.4 m, i.e. The hanger will be already a family width to more than 1.8 m. self-orienting wheels, if complete mobility needs, are installed without problems.
About hooks and trempels
Bags, umbrellas, scarves are also left on the hanger, and the bachelor can also be a skirt with women's linen. It happens, life is life. Clothes are also more convenient to hang on the hooks. Therefore, in frame hangers, sometimes on the main rod (the former trouser in the figure; height 1360) put on the hooks-slings. Their or shoulders, depending on the need, shifted the side of the Skop. But the hooks-runners under the fingers turn into the most inopportune moment. In the hanger of this design and similar to it, the problem is solved simply: the main rod for the shoulders, and still hooks are attached to the top board.
Pipes and profiles
Original hangers are obtained from round or profile metal or plastic pipes, see fig. Nevertheless, despite all the tricks of the design, their organic vices are not going anywhere. The same as the ordinal hung. But high labor intensity is added: to hide the connecting nodes, it is necessary to strain both hands and heads.

Hangers from pipes
From the pipes it is better to make a square base of the flooring-lamps. With the same withdrawable area of \u200b\u200bthe floor, the distance between the points of the support increases 1.4 times. If you still take the base, then weighing up to 1.7 m, it turns into a full-fledged hanger. Most suitable sewer pipes 60 mm.
A brief master class in pictures on the manufacture of the base of the floor hanger from the pipes is shown on the trail. Fig. Cut pipes - 150-300 mm, depending on how much gender you can give the hanger. In addition to them, you will need 3 straight tees, 4 straight angle and 4 plugs. Connections - on a glue for propylene or PVC, depending on the material of the pipe. Weighing - sand or small rubble.

Production of the base of the hangers of pipes
One of the comments to the original design begins with the question of about this: "Why was it possible to just solder?". Judging by the fact that then in the same comment, the angles of 90 with an obvious claim to professionalism are called discharges (plumbing taps are oblique tees), 2-3 more and as much exclamation are asked to an intercom.
Nevertheless, the author of the product, even if not knowing the sanitary terminology, decided the task quite in engineering. Hermetic junctions of a hanger for nothing, and the glue tube will cost much cheaper the rental chapter for propylene. Which, besides, you need to learn how to use, rewriting the material to the material. For a lot of reliability, you can reinforce with phosphatized (black) screws: on black their heads are not visible, and the hanger strength will not lose.
Note: Vfed in the original design, too, from the pipes, but the design of it, to be honest, not ... It would be better to drill oblique holes in the rack and insert some durable pins in the same glue; Wooden, metal.
Simple Rama

Scheme of simple wall-wall hangers from pipes
The frame hanger from the pipes can be without legs, just leaning against the wall with a slope. However, the slope should be negative. Between the wall and clothing on the shoulder should be at least 350 mm. If the tilt of the frame is positive (the upper crossbar is adjacent to the wall), then the lower "leaves" from the plinth by 500-600 mm. In a small hallway, this is a serious inconvenience. In addition, behind the lower crossbar or will be cling to the legs and it will beat the floor, or it will have to be attached to the floor, and this is very bad: any violation of the flooring is fraught with complex and expensive emergency repairs. Have you seen on sale furniture you need to screw up? Is that special purpose, for example. rack. And that, there, too, try to do fasteners to the walls and, in the extreme case, the ceiling.
The scheme of frame hanger with a negative slope from the pipes is shown in Fig. Materials are the same: segments of direct sewer pipes 60 mm, angles 90 and direct tees. The withdrawn of the useful area of \u200b\u200bthe floor is zero. Below can be a shoe or a banquette. For mounting to the wall, so as not to bury a lot and do without expensive collet anchors, it is better to take a couple more tees: with their help holding beams - stretch marks are attached to the wall of the pair of self-tales in dowels each.
Wall mounted
Simple hangers - Panels do not require a special parsing. How made a wooden wall hanger, see eg video.
Video: Wall hanger with her own hands
Here we remember, firstly, about the hanger-sconce. Foldable, it can be very useful if a large company or a child gathered returned from the courtyard at least lick.
An example of a design of this kind is shown on the right in Fig. However, its creators were clearly guided by the principle: "Consumption is the basis of money turnover." The outer (folded form) side of the folding plate is inactive, and the locking mechanism is needed. And another single hanger for every day.

Compact folding wall hanger
Meanwhile, folding wall hangers are known since the time of Ancient Egypt. In the local climate, the upper clothes were abandoned by occasionally, in bad weather, but after socks it was necessary to dry. To keep a separate hanger in the edges where the rain and cold times a year not every year, there was no point, so they came up with such as on the right in Fig.
In folded form, the Compact wall hanger of the Egyptians was fixed by a cypress stick. Now, of course, you can put a ball retainer or just a hook. The main thing is the hooks of the hooks must be in 3/4 of the circle, then they will not fall off with them and with a folder. And without need, the whole hanger looks like a wand on the wall; On hooks you can hang bags, umbrellas, keys.
More about hooks
The original wooden hanger can be made at all without metal, not counting fasteners. Do not rush to throw out the New Year's pine or tree (only workpieces you need to turn upside down):
Video: Original tree hanger do it yourself
Best of all, such a hanger will look at the country, in a brusade or a skeleton house. Depending on the interior design - both in the urban apartment. It will greatly go into the bath: the touch of sparkling skin to the metal and unpleasant, and to some extent even is even attempting.
Hangers in children
Probably, all children scatter wear. It is not necessary to especially marry them for this: not known in the reasonable limits of chaos, they do not seek order. Who is against - answer the question of Friday to Robinzon Cruzo: "Why does God not kill the devil?"
Nevertheless, teach children to handle things as needed. Only a children's hanger so as not to cause explicit psychological rejection, it should look somewhat disordered. It is also very desirable that it is associated with a child with a favorite game or hobby. Examples of wall hangers in the children's type "Game / Hobby" are given to pos. 1 and 2 Fig.

Baby hangers
Universal method of this kind - hanger-tree, pos. 3. In the wood circuit, as in any fractal structure, order and chaos interact and complement each other, generating a harmonious whole. Do not forget to make a tree again, for example. From plywood from 12 mm, and as it should, with a step of no more than 250-300 mm, attach to the wall with screws from 6 mm in propylene dowels. Tree, it's climbing on it.
Outdoor hangers in the nursery for the same reason are undesirable: well, they will still get climb, and rumble. Therefore, if you already want a floor hanger in the nursery, you need to do this on which you can't fit, which is visible to pos. 4 and 5.
About Study Plywood
In any case, there are problems in front of the parents to which there are no small things: the consumption of material and labor intensity. Draw a complex contour on the grid on a whole piece of plywood is already not easy, then it needs to be exactly cut, which is even harder. And in the end it turns out that 60% or 80% of the material went into the departure, nothing more suitable. Needl, on the contrary, make a children's hanger tree from waste. Or uncoll down the one-piece sheet.

Build parts hanger-wood from plywood
The way for this has long been known: elemental cutting and assembly. If the wood is plywood, for the full strength of the finished product, every detail is gained from 2 layers, leaving acc. False and grooves, see fig. Fragments of billets are collected on PVA glue, a wood assembly or express (liquid nails). If the assembly on the PVA, fragments should be additionally copped with small nails with a snake with a step of 100-150 mm with an indent from the edges of 30-40 mm.
Collect a hanger-tree on the same glues, but now each connection must be made by the envelope tree screws. Then the gaps and fasteners heads (they need to drown them when assembling) are rubbed with a putty from sawdust of the same plywood on PVA. Such a tree and without painting, only under varnish, it will look solid.
Note: Just in case we will recall - all wooden parts of any wooden hanger before assembly need to be elapsed by the sandpaper of small numbers and treat the water-polymer emulsion or diluted water three-in-five PVA. After impregnation, before further work, they make a technological break until the details are completely drying (1-3 days, depending on its size).
And about the hooks - finally
Above on the illustrations, you most likely noticed the curved wooden hooks and others. Details of the hangers. They are quite possible to make at home. In production, dense small-layer, without defects, wood or water-resistant birch fane (BS varieties) bent heated with sprinkling or dry, but for homework, these methods are too complicated. More or less simply sprinkled only bamboo: the workpiece is boiled half an hour in a rapidly boiling water, after which it bends hands. In the case of bending on the template, the workpiece to it is needed quickly, until it has cooled, to climb a wide taper x / b or a strip of natural tarpaulin.

Raspil on wood
At home, it is easier to cut the blanks of the required configuration from the plywood sheet (any) or MDF of the desired thickness or twice the quadruple more by quantity, from a thin sheet material to dial it from the thickness. Cut the allowance for the first processing OK. 1 mm. The chopped blanks are tightly tightened with a package in joiner's visits or in a plug-in stripping from thick plywood and are processed by a rashpil on a tree in size, and then the skin is thoughtless. The rashpil is enough single, flat and semicircular working surfaces, see fig.
Billets are collected into the details described above. Face surfaces, if you need to hide the layered plywood structure, stick the film-self-keys with strips under the tree. After that, the part twice and three times lacquate acrylic varnish on a water basis; Nitrolac can spoil self-keys. It is not worth shaping (raging) with a plastic furniture edge: you need to accurately choose a groove under the anchor of the edge, for which the milling machine is required, but on curvilinear surfaces of the large curvature and the low-length edge still holds badly. And the details are saved by self-keys, under varnish, from whole wooden, not immediately differs from the master-chamber.
(Visited 21 674 Times, 1 Visits Today)
Coming home, the first thing we do is remove the upper clothes and hang it in a closet or hanger. The last option has some significant advantages: takes up little space, provides quick access to things, easily mounted, suitable for corridors of various shapes and sizes.
Due to the simplicity of the design, it is not difficult to build a hanger to the hallway with your own hands.
Advantages of self-making:
- N. the estimated cost of the product;
- IN possibility to achieve the best combination with the interior;
- AND nadiality of the hangers: this will not have any friends and acquaintances;
- R scientist work is highly appreciated.

Original wall hangers in the hallway are an important and inalienable element of the interior.
Before proceeding with the manufacture, you need to analyze the form of the corridor. If it is quite elongated, it is better to give preference to a long hanger with compact shelves or without them. For overall premises, you can choose any model.

It is also worth considering interior features: style, details, prevailing colors.
The simplest type of hanger is a wooden hook board, which is attached to the wall. It is allowed to have a shelf for hats, sideways located above or under it. The basis of the design can be taken as a homogeneous large wooden board and a few smaller, bonded among themselves.

In the traditional version of the versa, the wall hanger is a bar on which hooks and pins are located.
If there is a desire to show your creative potential, you can make a non-standard model. For example, a great hanger in the nursery will turn out if you create a blank in the form of a cloud, tree or twig. For the corridor it will be better to cut something different: horns, a fence or inscription.

Wall hangers in the hallway and hooks for clothes are selected according to the style of the room interior.
Materials and tools
Now in almost every construction store, the buyer is provided with such a rich assortment that it is necessary to purchase everything that the tree hanger is created with their own hands in the shortest possible time, will not be difficult.

Wall hanger in the hallway with your own hands is simple work with pleasure from the result.
To do this, buy or prepare the appropriate tools:
- Lobzik
- Hacksaw;
- Soldering lamp;
- Sandpaper;
- Screwdriver or hammer;
- Awl;
- Pencil;
- Roulette.

Tools that will be useful in work.
From materials will need:
- A piece of wooden board;
- Screws;
- Hooks.

Materials for future hangers.
For decorating:
- Primer;
- Painting brush or roller;
- Varnish or other coating;
- Billets for decoupage, scissors, glue, textured sponge.

Materials for decorating hangers.
The process of manufacture of hangers
A classic hanger made by their own hands for the hallway does not require significant effort. Manufacturing takes a minimum of time. Initially, we need to think about the design in detail, it is recommended to make a drawing on millimeter paper and calculate the consumption of materials.

You need to carry the drawing with a pencil or marker.
Then you should get a wooden sheet (or board) and put on stable supports so that several centimeters remain between it and the surface of the floor or the table. Armed with a jigsaw, cut the blanks of the necessary form, observing the contour. If there is a desire to make edges with relief, you need to go through the same tool for them.

It is necessary to treat roughness, sanding the sections of the sections and polish.
The next step - Give the desired appearance. For firing boards, a soldering lamp will be required, which is successfully replaced with a gas burner. At this stage, care must be taken to not injure your fingers, and do not spoil the material. Then you need to get paint or varnish and cover all dug parts.

After drying, the assembly of the product is carried out with the help of screws.
The mounted way implies the mounting of small metal planks of the rounded form, called "ears". They drill holes for fastening into dowel screws. In this case, reliability is determined by their length.

Wall-mounted hanger created by their own hands can be fixed in several ways.
Another, no less popular way is to do through holes. After their creation and processing, screws or nails with a long leg are passed and the hanger is fastened against the wall.

For fastening, as a rule, screws or small nails are applied.
To complete the work, you need to attach metal hangers. It is possible to position them chaotically, in one or more rows.
Perhaps fixed by the following fixtures:
- "Suckers";
- Adhesive strip;
- Magnets.
Such methods do not cause difficulties and take a little time. At the same time, the mount is not very reliable and is suitable only for hats.

Any bold designer options will benefitly emphasize the relevance and originality of the interior.
Making hangers from longitudinal and transverse boards
This design resembles a lattice, it involves the manufacture of the base-fitting base from horizontally and vertically arranged elongated boards. At the same time, two layers can be distinguished: the first- with cross-arrangement, second- With longitudinal.

Wall-mounted hanger drawing.
To create a wall hanger with your own hands, you will need to stock up a few long boards. Preference is better to give lumber 10-20 cm wide and 1 m long. Deciding with the size, you should get the desired number of blanks.

The order of assembling hangers.
After that, it is necessary to treat them so that there are no convexities, chips and roughness remained, paying special attention to the edges. Then it is necessary to decompose first the first layer, observing parallelism and the same distance between the planks. If everything suits, it's time to go to the second level. Armed with a screwdriver (or with its absence of a hammer) to fix their position in the crossing places.

Simple version of hangers for self-making.
Bashed hooks need to top boards. If they have a vertical position, then the hooks are better to place in the top in one row. For hangers, the outer side of which is formed by vertical planks, you can create several levels, securing the hooks on each of them.

Sizes of hangers with shelf.
Decoration
It is possible to complete the manufacturer, giving the product an original appearance. The most interesting will be the surface if:

Before proceeding with coating, it is necessary to clean the tree from the traces of dust, dirt and fat.

Materials for decoupage hangers do it yourself.

It is necessary to primitive our wooden hanger with white acrylic paint.
GYXAL is a transparent paint, which at certain efforts forms a textured surface. Before proceeding with work, it should be diluted with water glumption, according to the instructions. The mixture is then applied to the prepared workpiece and the pattern is created using a textured sponge. It is necessary to act quickly, otherwise after half an hour the coating will freeze.For artificial formation of a tree, this type of varnish is used as cracker.

It is applied to a pre-painted surface, which as a result is covered with small cracks.
Decoupage allows you to create wooden products suitable for any interior. Most often they are resorted to it when they seek to get furniture with the effect of antiquity and complex patterns. To decorate such hangers, you will have to armared with scissors and workpieces with a pattern.

Cutting paper patterns, it is better to impose them on the surface, evaluate how they will look.
If everything suits- introduce the purple side of the glue, attach to the tree and align that it was subsequently not formed bubbles, then coat with furniture varnish and leave until complete drying.

What to choose the final varnish - to solve you. After drying the varnish - fasten the handles into place.
If you have artistic skills, you can apply a drawing with acrylic paints. Initially, background and large elements are created, then the details are drawn. Complete the work better than applying varnish and cracker.
Video: Stylish hangers in the hallway.
Hangers for outerwear are needed in any corridor both at home and apartments. They are an integral attribute of practicality and design. And especially it concerns narrow corridors, where there is very little space in order to install a full-fledged locker.
Figure 1. For structures of wall hangers, use a laminated chipboard 16 mm thick.
Today, designers offer a lot of options for hangers on the walls - from the cheapest to expensive designs. But it will be much more profitable and more pleasant to build such a simple hanger with your own hands. Especially since it is not so difficult, as you may first seem. How to make a hanger yourself? Consider some good hanger options for corridors.
Standard wall-mounted hanger
Material and tools
To begin with, we write in detail how to build a modern wooden hanger to which you can hang not only coat, but also putting the caps and scarves. Look in the end the wall design will be approximately so (Figure 1). Before working at once, go to such instruments and materials:

- Laminated chipboard. You need two details with a size of 25 to 80 cm for lateral planks. You can make them straight, and not figured, as shown in the figure.
- 2 Rear strips 125 by 12 cm.
- 4 identical strips with dimensions 18 by 80 cm for the main vertical inner walls.
- Shelf for caps with dimensions of about 135 by 25-30 cm.
- A hammer.
- Construction level and plumb.
- PVC edge for chipboard edges.
- Electrolovka or grinding machine.
- Line and pencil (chalk) for marking.
- Iron.
- Carpentry glue.
- Scissors for metal or construction knife.
- Soft rag.
- Sandpaper.
- 6 large and 2 small metal hooks (as in the figure).
- Saws.
- Screwdriver or puncher.
- Dowel.
When choosing the main material (chipboard), it is preferable to choose sheets with a thickness of at least 15 mm. In this case, the texture and color are selected in the corridor on their own. Please note that the planks of the necessary sizes can be ordered, and you can cut them on your own by the jigsaw, then stick and go to the ribbon, which is placed on glue and presses the hot iron.
The finish will take more time, but you will spend less money on it. The planks on the order will cost expensive, but at the same time specialists will be able to make them very quickly and efficiently. But the clothes will never get closed for small errors on wood.
Assembly and fastening

When the preparation of the main parts is completed, you can safely begin the assembly and fastening of the hanger. First mark on the wall. It is advisable to hang up the finished design on 4 screws: 2 from above and 2 below the edges. So it will be much safer to stay. When marking, be sure to use a tape measure and pencil and check everything several times to spoil anything.
After that, start collecting the design. First connect the front vertical strips with the rear horizontal. It is very important to measure everything correctly, so that the distance between the vertical strips was the same. And only then everything can be attached to the screws from the back.
After that, from the top is nailed with cloves or the same screws, the shelf for caps are satisfied. During operation, check all the level so that there are no errors. Otherwise, the hanger will turn out to be a curve. Metal hooks are attached depending on what kind they are.
Next you will be left just to fix the hanger on the wall. To do this, you can use self-drawers or use hooks. In any case, the dowels are folded in the planned places, and then the mount is already carried out. After you have a design, make sure of its reliability and evenness, after which you can safely exploit the hanger.
Non-standard options for hangers
Now consider briefly somewhat simpler, cheap hanger options. Of course, the shoulders will not be so large and beautiful, but in their functionality they are quite good. Yes, they look very interesting, since they are non-standard.
Metal appliances hangers

Figure 2. Forks can be used both aluminum and steel.
Clothes rack from ordinary spoons or table forks. To do this, you only need the right amount of forks, dowel, nails and one wooden plank, on which the forks will be attached, because they will look at the wall on the wall.
The knobs of the forks must be bent so that they become hooks. And you can leave the teeth themselves to leave the same or also bend a little to the side of the principle of fans to give them decorativeness. Under the tarts themselves are made by nails.
Then on the wall markings are made to which the wooden canvas is mounted. And already on the canvase itself, there are places for forge-hooks, where they are then attached. Fastening takes place on ordinary nails. As a result, the finished version of the hanger will look something like this (Figure 2).
By the same principle, you can use as hangers, for example, not forks, but wrench. It will be a kind of decoration. But for certain styles it will be quite appropriate. Only here to bend such a wrench will be much harder (Figure 3).
Natural structures from bitch

Figure 3. To make the wrench easier bend, it must be preheated.
Another practically unhaginiar and original version of the hanger for outerwear are ordinary wooden knots (Figure 4). To do this, you first need to choose the most unusual beautiful swirls in the desired quantity, and then prepare them carefully.
First you need to clean them well from the falling bark and dry (only in the shade, and not under the right sunlight). It usually leaves about a week or two. Then you need to impregnate them with a special primer from rotting wood with a slight antiseptic, you can still use olif. And after complete absorption of the liquid, you need to cover the bitch with varnish.
If you want such a natural hanger of glitter, then you need to apply several layers of varnish, the time for drying will leave more, but in the end it will turn out a glossy coating. One or two layers give a light glitter or mattness on the tree, but the wood remains the same protected.
Hooks Such secure directly to the wall is also not recommended so as not to be spoiled wallpaper. It is best to use the chipboard to the panel of the desired size, which you need to hang on the wall, and attach bones to the panel with nails. Such a clothes hanger looks well in the corridor if the walls are made of traffic jams, or on the wallpaper the natural elements are depicted. Permissible and combination with monophonic wallpaper.

Figure 4. Twigs and bitch can be painted in any color or simply to cover with varnish.
The easiest solution is to use an ordinary shield from wood and purchased hooks, which can even have chaotically. In such a hanger for the upper clothes, you do not care great originality, but make it completely without any problems - quick and cheap.
The shield size is selected, which is then cut out of wood. The edges are processed by sandpaper, after which they are separated by a special edge or are thoroughly covered with several layers of paint or varnish. In the same case, if the shield chose you from raw wood, it should also be carefully sanded, then brush the dust and cover with varnish or paint.
If you are not satisfied with the color of the shield, you can repaint it. It is also great for the copyright decoration of bronze or silver paint, which gives the effect of antiquity and at the same time makes the hanger richer. And you can also apply simple drawings with different colors. After drying, the surface is covered with a layer of varnish.
Next, make a pencil to the place of exemplary hooks and approach them. After that, you will only have to attach the canvas to the wall with the help of dowels and nails. As you already understood, even such a simple clothes hanger can be original.
So, how to make a hanger in the corridor for the upper clothes now is clear.
It is possible to conclude from this that for any budget and corridor premises, you have no special problems with a hanger. After all, materials may not only be expensive, but also almost free.
Now in stores for sale various designs of wall hangers. But they all have their own standard sizes. But the homemade canvas you can adjust yourself. In addition, with his own hands, the hanger of this type can be attached not only to the wall, but also to the surface of the cabinet, which will help save space.
The ideas of making hangers for clothes do it yourself: photos and drawings of hangers for an entrance hall. Diverse options for making homemade hangers for clothes.
The clothes hanger can be made with your own hands from practically the girlfriend who are lying at home without a case. Folk craftsmen do not cease to surprise their ingenuity, this is a clear example homemade hanger for clothes from ordinary forks.
A similar option of hangers from metal spoons.
Clothes rack from the pallet.
Here is a clothes hanger from the pallet, and again the old pallet was applied. The wooden pallet is cut into two parts from each half of the pallet can be made along the hanger, it is enough to paint the workpiece and attach screws to the hooks.
Another option of the pallet hangers, the whole wooden pallet is used here, it is grinding sandpaper, staining the boards in different colors and attach hooks.
Wood hanger.
Such a hanger is more suitable for the cottage or bath, as hooks here are used wooden swirls, fixed in a wooden structure.
Hanger of metal profile and bars.
The design consists of several bars and metal profiles of fastened.
Wooden hanger with your own hands.
Here used a wide board with imitation under a piece of old wood, clothing hooks are made of bars and fastened with screws screwed on the back side of the board.
Wood is burned with a soldering lamp than and the original product texture is achieved, the final stage of the coating of the hanger with a transparent varnish.
In this embodiment, it was not without carvings.
And in this design, door handles are used instead of hooks for clothing, which can also be covered with paint.
An interesting option of hangers from boards.
Original homemade hanger in the form of a tree.
For the manufacture, a thick plywood is used, the contour of the pattern of the tree is drawn and is muffled with electric jigsaw. The design is painted and attached to the wall of the dowels.
Hangers for children's clothing.
Details of the hangers are cut from plywich from plywood and paint bright colors, so you can make a hanger in the form of animal figures.
Outdoor clothes hanger do it yourself.
The easiest option of the floor hanger for clothes from pipes, for the manufacture you will need a thin pipe from aluminum 2 - 2.5 m. The pipe must be used, as shown in the picture and clothes hanger is ready.
Wall hanger from pipes.
And this hanger consists of a drawing on the wall, the hooks for clothes are attached to the dowels right into the wall.

In the hallway without a hanger, it is not on the floor to throw off races, coats and hats. You can, of course, drive out several large nails into the wall, but it is not quite aesthetically. Yes, and wallpapers will be sued, stupid from the outerwear. A much more pleasant eye and practical will be real - or who like it. And it is possible to build it yourself, and for this you do not need to be furniture as ars.
Instruments
We will need skillful hands, a simple home tool and minimum materials. You can even use waste, by the way. Or in the forest Beautiful twigs with knots found.
So, the arsenal of the tool will be:
- Screwdriver and screws with a diameter of 4 millimeters with a hat of the appropriate form. Self-samples - 3-5 centimeters (depending on the material).
- Saw-Bulgarian for cutting boards or chipboard.
- Dowel (in the case of wall structures).
- Drill or screwdriver (better electrical).
- Roulette, level, pencil for marking.
- Emery paper for finishing.
To create some embodiments of the hangers, more metallic corners can be useful, jigsaw (if you need to cut curly surfaces). If you want to create, then the need for a welding machine. However, it will not need for simple products.
Simple hanger in the corridor do it yourself
Materials
Now about the materials. The most popular is wooden boards, plywood and bars, as well as their trimming. We often make hangers and wood stoves - it is better to take the laminated, which look more pretty. However, you can paint the usual chipboard, pre-progressing. It turns out also effectively.
And if you have an old floor lamp with a steady basis, which all the hands do not reach drunk, then you can give it a second life in the form of a floor-type hanger. To do this, it is enough to remove the lampshade along with the fastening for the lamp and disconnect the network wire. It remains to paint the product into a lured color, not forgetting the hooks before the upper metal circle - there are well-woven out of the wire.
By the way, hooks for hangers in the corridor - an important detail. They should be big and comfortable. You can buy them in the store furniture accessories, and you can show fantasy. Natural materials are a good help in work. Moreover, the products of them are exclusive - there will be no such things for anyone. For example, you can use knots and branches as hooks, sandwiched and varnished. Beautiful and functional.
Another interesting and original version - hooks of teaspoons bent in half. Or aluminum forks. In both cases, the handle is the bottom (main) part of the product. You can still bend hooks from thick wire, by placing them with decorative elements - beads, for example.
Photo walls B. oshlock in the hallway with your own hands
From the knives of the keys from clothespins old door handles
From sticks from bicycle rolls from bitch
How to make a hanger in the hallway with your own hands
But before starting to create a masterpiece, please look, the drawings that we picked up for you.
Drawings hangers in the hallway
 Natural
 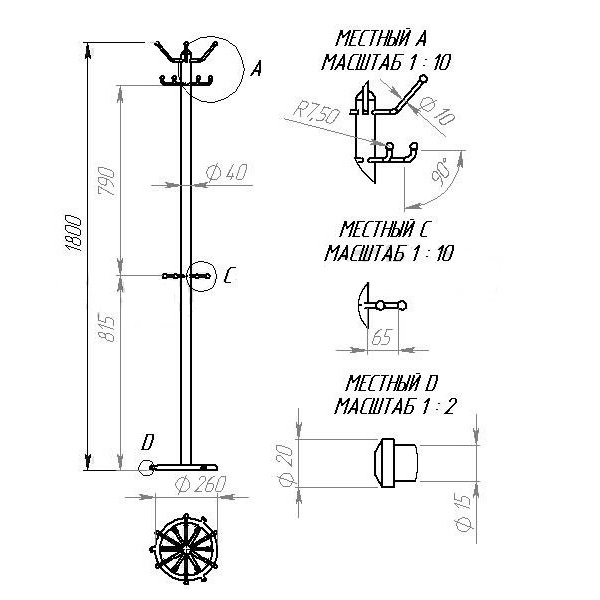 Outdoor
Wall-mounted models
The base of the hangers - the shield on which hooks will be placed. It can be done solid (from wood plate or centimeter sheet plywood) or lattice. The last option is preferable - it is easier, and the material goes less.
- To assemble such a shield, two parallel horizontal boards (bar) attach to the wall with a dowel.
- Then they nourish vertical boards with a width of about 7 centimeters, and to those hooks.
- The size of the product depends on the wall dimensions and the entire room. Registration - at will. It may be varnish, paint, self-keeper. The main thing is not to forget to carefully treat all the edges and ends so that there are no roughness.
- If you wish, on top of the hangers, you can attach metal corners with a shelf for hats - a width board of about 20 centimeters.
- And if the hanger is done on the entire height of the wall, then the bottom is not bad to foresee. It will be at the bottom will be supported by 5 by 5 centimeters.
The next video promises to teach you to create your own hands wall wooden hangers in a hallway from one board:
Outdoor products
It is important here to take care of a severe basis that should not be turned over.
- As already mentioned, it is possible to take scribe materials such as Niza from Torshar.
- Suitable asks of the outdoor fan, which stopped working.
- Another hint is to use the stand for the New Year tree - now they are issued by many.
- And it's easier and cheaper to lean the wooden cross with thick bars, decorating it later.
Now - a post of hangers.
- It can also be made from the bar length from one and a half meters, and at the top of the metal corners to attach several short bars to expand (our hooks will be located).
- Much creative, however, another option will look like - this is if you use a suitable dry tree without a bark, squeaking it and covering it with a varnish. Here and hooks do not need - the twigs will play this role.
Those who have a welding apparatus and likes to work with the metal, you can make a huge and durable metal hanger. To do this, it will take a pipe with a diameter of about 3 centimeters, as well as steel bars for legs and hooks with a diameter of 1.6 and 1 centimeter (respectively). The legs will be three - they are smoothly fused and weld to the pipe. The top make several hooks, as in such finished products. And then the design color.
Outdoor hanger that is easy to create with your own hands

From wood and chipboard
Natural wood is easy to process and finish, besides eco-friendly. In addition, almost every crash owner will have trimming of rails, bars, boards or pieces of plywood. A little fantasy, a couple of free evenings - and here before the delighted households the original hanger. Just needed - two longitudinal planks, several transverse (by the way, good for this purpose use ready-made platbands) and hooks at their discretion. For example, wooden swirls, furniture handles or bright plastic cups.
Very grateful material are wood plates. Of these, it is possible to cut out all sorts of curly products using a jigsaw. For example, a hanger, the contours of which are made in the form of a stylized tree - it is now fashionable. Cutting it, we paint into a fun color (not forgetting pre-irregularities to smooth out the essay) and the crepim dowels to the wall. Then at the ends of the twigs attach hooks for clothes. By the way, for such a tree and thick faeer can be taken.
Before proceeding to the direct manufacture of hangers, we advise you to pay attention to the master class in the video below, which will tell how to create a creative hanger in the form of a tree for your corridor:
You can build from chipboard and easier option hangers in the hallway do it yourself,for example, a solid or lattice shield (the simplest wall-mounted hanger design). And taking laminated plates, we will get rid of the need to finish. But the ends must be processed - for this, a special edge is sold, which is welded using an iron. And also: to cut the laminated sheets only with the inside, but they crack.
Want to create a hanger from wood to the hallway with your own hands? And, preferably, with a shelf for hats? Easy! See closely the following video:

