Do-it-yourself installation of platbands on interior doors - step-by-step instructions. How to install platbands correctly different ways of mounting strips on the door Options for mounting platbands on interior doors
Door trims are designed to mask the gap between the doorway and the door frame. They are selected according to the required texture and width, and the color is chosen exactly the same as that of the door leaf. They are made from different materials and are divided into wood, plastic, laminated, MDF and veneered. The work of assembling them is the last step in installing the door. By the beginning of this work, all other repairs, except for the installation of the floor skirting boards, should have already been completed. This article will discuss how to make and how to properly install door trims.
Types of door trims
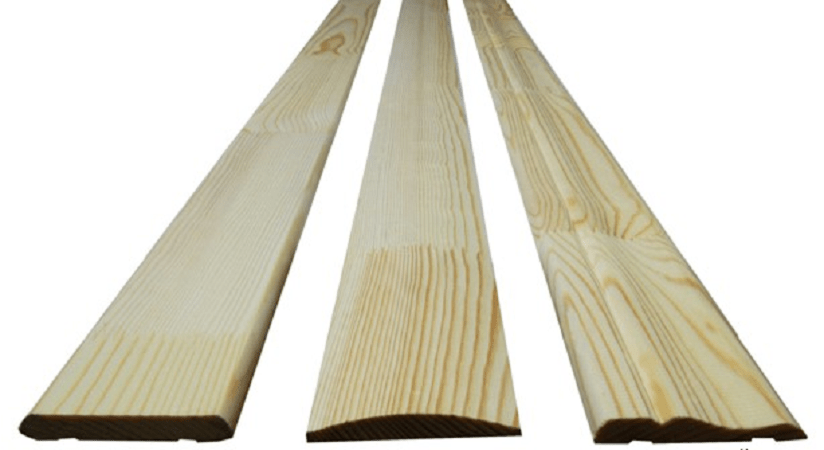
Today the construction market is filled with platbands of all kinds of shapes: carved and figured, drop-shaped and semicircular.

They play the role of finishing door decoration. Some sellers, in order to visually lower the price, indicate the cost of only linen and boxes. But starting to install, unknowingly, it turns out that there are not enough platbands, and you can buy them only for a fee. Therefore, even when buying a door, it is imperative to check their availability in the package. Of course, the price for door trims is quite affordable, but when buying, another problem may arise - the selection of color. It will not be difficult to choose the required shade of platbands for a painted or laminated door, but it will be extremely difficult for a wooden or veneered door.
The standard width of the door casing is 7 cm, the thickness is 1 cm, and the height is 210 cm. For an interior door with one leaf, 5 trim strips are required, and for a door with two leaves, 6 strips.

If you only need to frame the doorway, then two and a half strips are enough. In addition, manufacturers produce door trims of any size in width, height and thickness.
Advice: when choosing platbands for interior doors, their color should completely match the color of the door leaf. And when choosing a frame for an entrance metal door, from the inside, the shade is selected according to the color of the corridor walls.
Door frames are made of MDF, plastic, natural wood, aluminum or steel. Laminated film, veneer, facing plastic or paint and varnish composition are used as a decorative coating.
What is a telescopic casing?

Outwardly, it looks like a regular door casing, but has a protrusion for connecting to the add-ons and the door frame. Their use is most optimal if the door frame is a couple of centimeters narrower than the thickness of the wall. Thanks to a special protrusion, it is tightly fastened in the longitudinal grooves of the end of the door frame.

With proper installation, the fasteners become completely invisible, which gives the entire structure an appearance of solidity, durability and strength. But if the distance is incorrectly calculated, the platband will not fit tightly into the box and a gap will remain. The design will immediately take on an ugly and untidy look.
What is a small cap?
The capital is a relatively recent door decoration. Although their main function is exclusively door decoration, they also belong to the category of door trims.

In most cases, they are made from solid wood or MDF. They are produced in various shapes and are decorated with curly ruffles. The capital is made in both standard and non-standard sizes. After installing them, the door takes on a rich and finished look.
How to make door trims
Nowadays, a large number of all kinds of door trims are presented on the construction market. They differ not only in material, but also in size and color. You can also make them yourself at home, this will reduce the cost of repairs. But in order to make high-quality platbands, you will need special woodworking tools and at least a little experience in working with such equipment.
Below is a list of tools that will facilitate the work on the manufacture of platbands. Some of them can be replaced with a plane, but thereby increasing labor costs.
Required tools:
- sawmill for the manufacture of blanks;
- planing machine for creating a right angle;
- thickness gauge to achieve the required thickness of the workpiece;
- vertical router for creating a pattern (not needed if the casing is simple without a pattern);
- electric sander and router;
- auxiliary tools: squares, rulers, pencils.
Material selection
Board for platbands is selected only well dried, otherwise it will lead over time. The degree of dryness is determined by the sound. To do this, they tap on it with a finger, if the sound is dull, this means that the board has not yet been dried, and if it is sonorous, the material is ideal for work.
In addition to sound, when choosing a board, you should pay attention to its color.

It should be uniform, and blue spots mean that the drying technology has been violated. In the future, they can be hidden only by painting with an opaque paint.
The surface of the board must be free of knots. This not only worsens its appearance, but also increases the risk of fracture of the finished platband exactly in this place.
Manufacturing
After picking up the material and preparing the necessary tool, you can start making door trims. First, blanks are cut to the required dimensions, which are calculated individually for each door. It is worth noting here that the quality result directly depends on how sharply the cutting knives are sharpened on typewriters and machine tools.

When the platband is ready, it is polished. This is done in two stages: the first is coarse grinding with an electric machine, the second is manual processing with fine-grained sandpaper. In the second step, all circular scratches left by the electric clipper should be removed. The finished platband is covered with a protective compound.

How to fix door trims
In total, there are four main ways of fastening door trims: using finishing and liquid nails, on self-tapping screws or on special fasteners called "beaks".
Fastening with finishing nails
This is one of the most popular methods. It has a number of advantages: if necessary, the platbands are easy to dismantle and reinstall, and the fastening process itself is simple and reliable.
For fastening the platbands, nails with a flat, narrow head are selected. It is not difficult to calculate their length, they should go into the door frame to a depth of 1.5-2 cm.The average length of finishing nails for platbands is about 4 cm.
Tip: If you were unable to buy nails with flat heads, you can cut them off with side cutters.
To facilitate the work, points for fastening are marked in advance on the platbands. They are located at an equal distance from each other along the entire length of the bar. The main thing here is to maintain the necessary balance, placing them is often not recommended, but too rarely is also bad. Experts advise keeping a distance of 50 cm.
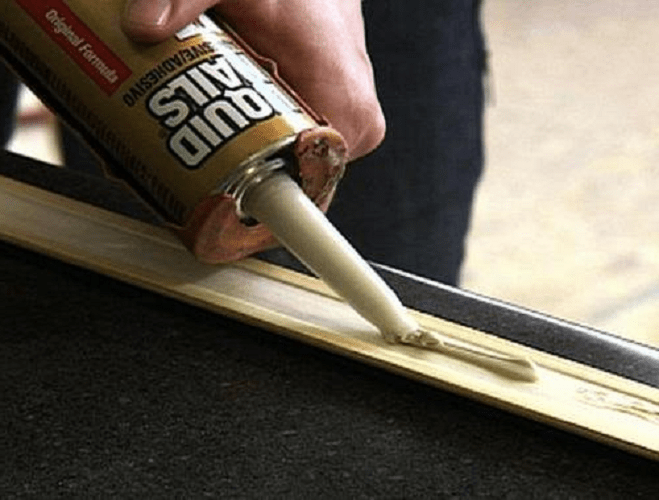
Liquid Nails
They are special glue in tubes. Fastening to it is very simple, the glue is simply applied to the platband from the back side just before fastening. Then the plank is pressed tightly against the wall, held in this way for a few seconds, after which you can release it. Everything, the platband is installed.

The advantage of this method of fastening is not only in the simplicity and speed of work, but also in the fact that no traces of fastening remain on the front side of the platbands. The disadvantage is the complexity of its dismantling and not too high reliability of fastening.
Fastening with self-tapping screws
Due to its simplicity and reliability, this method is gaining more and more popularity. For wooden platbands, wood screws are used with a diameter of 6 mm and a length of 2-2.5 cm.

Places for self-tapping screws are marked in advance on the platbands. After that, small holes are drilled, which guarantees an excellent result in the future and protects the wood from splitting when screwing in the self-tapping screw.
Tip: for less visibility of the screw cap, it is "sunk" into the wood, after having drilled out a small recess.
Special mounts "beaks"
Their advantages are good appearance, ease of installation and operation. But there is also a significant drawback. Most platbands are made of MDF, and when the "beak" is removed, it is likely that it will delaminate.

How to install door trims
To install wooden platbands you will need:
- hacksaw for wood;
- fasteners (finishing nails and glue)
- goniometer;
- roulette.
Stages of work
- First, the platbands are applied along the height of the door, and the required length is measured. Then the plank is placed on a flat surface and a right angle is marked with a square. The excess is cut off;
- the platband with the finished corner is applied to the door frame, aligned at the edges and at the bottom. The height corresponding to the inner hum of the door frame is marked;
- then, starting from the mark made, using a protractor, an angle of exactly 45 degrees is measured and marked with a pencil. The excess is cut off and the platband is temporarily set aside;

- repeating the entire sequence, the parallel side is marked;
Tip: The top casing is prepared last, only after both side strips have already been cut and installed. This will prevent errors in marking and exclude the possibility of the formation of gaps at the joint.

- after both side platbands have been cut off, their installation begins. Carnations are driven into the door frame, after which the cap is removed with the help of nippers, leaving an acute angle. The length of the nail on the surface for installing the platband is left about 5 mm;
- nails are hammered in with a distance of about 50 cm. Usually they are placed at the top, bottom and two in the middle;

- for better adhesion of the platband to the box, glue is applied to it. At this stage, the main thing is not to overdo it, and when pressing, the glue should not squeeze out;

- when nailing the bar to the door frame, it is not recommended to hit directly on it. For this purpose, a wooden block wrapped in cloth is prepared;
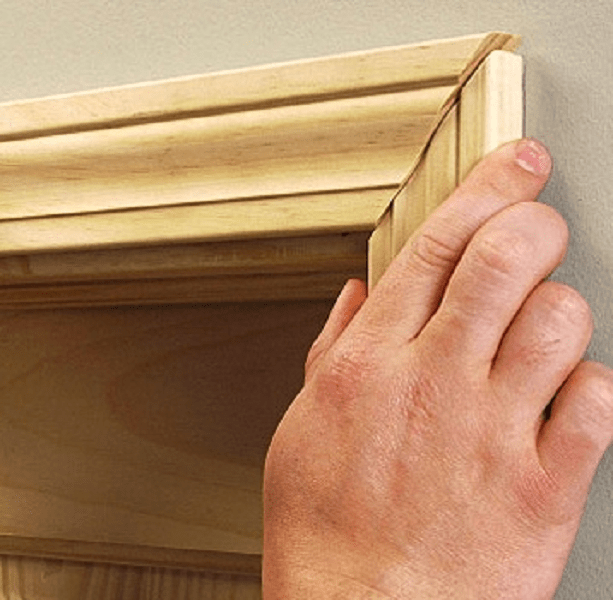
- attaching the finished platband and aligning it, with strong blows through the block we plant it on nails;
- when both side platbands are installed, marking of the upper one begins. Both of its angles of 45 degrees are measured not by a goniometer, but by directly attaching it over the side plates and tracing the cut point with a pencil.

Installation of door trims is complete.
Nuances when installing platbands
The presence of a nail or self-tapping screw can be made invisible with a wax corrector or acrylic sealant of a suitable color.
To avoid cracks in the joints of the platbands, the corners of the upper plank are measured according to the cuts of the vertical planks, taking into account their errors.
It happens that the platbands at the junction have a discrepancy. This is due to the unevenness of the walls or the curvature of the planks themselves due to improper storage. To fix this is quite simple, just connect the planks together with a finishing nail.

If minor gaps are found, they are masked with an acrylic sealant or wax corrector of a suitable color.
When there are significant defects around the box, a wide door trim is suitable to mask them. Its width is 10-12 cm, and with an individual order it can be even larger.
If you are wondering how to glue the platband, then you can choose from several options. For perfectly flat walls, liquid nails are used. Also, for additional fixation when installing on nails, acrylic glue or PVA is used, which lubricates the back of the casing. But it should be noted that there is only one really reliable fastening - on the studs.
As mentioned above, the installation of door trims is the final stage of all repair work. Platbands are fastened flush to the end, and visually it seems that it is on the wall. The most popular way of fastening is on thin studs with a small head. In the event that the platbands need to be fastened directly to the wall, liquid nails are used, but this method of fastening does not provide a long-term guarantee.
For an interior door, the platband should be 10 cm higher than the doorway. The standard installation of platbands is made with a cut at 45 degrees, but it can also be done at an angle of 90 degrees - it looks a little unusual.
If the opening in the wall is located on the side or in contact with an adjacent wall, then the platband will not fit completely. It will be possible to cut beautifully in width only with an end electric saw. Accuracy for the platband is especially important, because its main role is to decorate and mask all the irregularities of the wall and the end of the door frame.
But there are times when platbands are not needed, for example, a bathroom with tiled walls. They will not only look out of place there, but it will also be impossible to attach them. The only possible fixing method is liquid nails, but given the high humidity of the room, they will not last long.
For very wide (thick) walls, door trims are also not the best option. In this case, the slopes can be simply painted, pasted over with wallpaper or plastered. Also, in most cases, door trims are not required when installing compartment doors.
Installation of plastic platbands on the door is an important element of the renovation, since these accessories are always in sight. A poor-quality installation will greatly spoil the impression of the renovation, and a correct one will give the room a considerable chic: the room will look expensive and stylish.
Installation begins by leveling the adjacent walls. This must be done, because if you have deviations from the plane of the wall greater than 3 mm, you will not hide the cracks with any platbands.
Also make sure that the walls on both sides of the opening should be in the same plane by themselves before attaching the plastic trims to the door. Sometimes it is not so, and you have to unfasten the drywall frame itself in order to move it as it should.
When choosing a common tool (drill, hammer, etc.), do not forget to simply miter saw or miter saw: you will have to cut the trims exactly at an angle of 45 degrees. By eye, this will not work, and ugly gaps will remain between the perpendicular strips.
After that, installing plastic platbands on the door becomes very simple:
- take two platbands (left and right) and attach them to the door frame: you will need to mark on them the bottom cut of the corner, which will be 5 mm higher than the box;
- saw off the platbands along this mark at an angle of 45 degrees;
- Apply glue or sealant to the planks for better adhesion to the box (optional but desirable step). There is a special glue for platbands called "liquid nails";
- install the platbands evenly on the box and nail them with nails with bitten off caps or special hardened nails (the nails are placed at the same pitch, usually half a meter, and at the same distance from the edge of the plank). In fact, different fastening methods are suitable for different platbands: there are also special self-tapping screws, and so-called "beaks", and special slots for telescopic grips;
- make the upper platband in the same way, and then make the same three platbands on the other side of the door;
- so that the nails are invisible, rub the place where they are driven in with wax that matches the color of the door.
Now on the building materials market there are many different types of platbands: from different materials, telescopic, different widths, capital and many others. Depending on the species, you will have to apply your judgment and decide how best to do it. However, the above rules apply in general to all models.
We will be happy to advise you on how to fix plastic platbands, and in general on the topic of arrangement and repair. We will help with inexpensive delivery in Moscow and regions. Call us!
A decorative strip is used to renovate and decorate interior doors. Interior platbands carry several functional loads as a frame. It is easy to install the platbands with your own hands, you just need to decide on the installation method.
Functions of the door trim element
Door frames on interior openings are a quite familiar decorative element for us.
Wooden profiled platbands
At its core, the platband is a decorative strip that serves as a frame for the door structure. The main function of the part is to cover the gap at the junction between the wall surface and the box of the interior or entrance block.
The presence of this element is quite familiar and understandable, but the decorative component, which is often attributed to the overlay, carries a number of other functional loads:
- Cashing on the door covers the drawbacks of installation work on the installation of the door frame.
- Platbands for an interior door significantly increase the soundproofing performance of the isolation of adjacent rooms.
- The decorative strip prevents dust from entering the adjacent room.
- Door trim with platbands is guaranteed to isolate the room from drafts.

Constructive finishing of the opening
A number of useful additions are applied to the only function of the door frame in the form of giving the doorway aesthetics. Thanks to this, the installation of the platband completes the complex of complete isolation of the adjacent room in the building.
Previously, platbands in the form of carved openwork strips framed the window and door openings of country-type buildings. Today, the fashion for handcrafts of masterful architecture is returning, which can be seen on many modern buildings.

Carved platbands on a modern log house
Of course, if in the old days everyone could afford to install carved onlays, since in fact everyone possessed, many of them, primitive, but skill. Nowadays, not everyone can afford to decorate the structure with an openwork frame.

MDF platband material
Platbands on the door in its modern form is a plastic, metal or wooden cover, trimmed with various materials or painted. Framing elements of openings can also be created from composite materials. The types, forms of decorative elements and how to choose them for the design, everything is described in previous articles, so you shouldn't dwell on this now. After all, we are faced with the main task of telling about the various methods of installing cashing.
The platband is an indispensable decorative element of any door. You will learn the rules and secrets of its installation.
The platband on the interior door is designed to perform an exclusively aesthetic function, closing the space between the walls and the door frame. A well-installed structure helps to hide any defects that may appear during the installation of the door, and also gives the doorway a finished look. Be sure to read:.
Fastening the platbands is not a difficult job, but it requires precision and the correct approach to the choice of material and installation nuances from the performer.
Useful information:
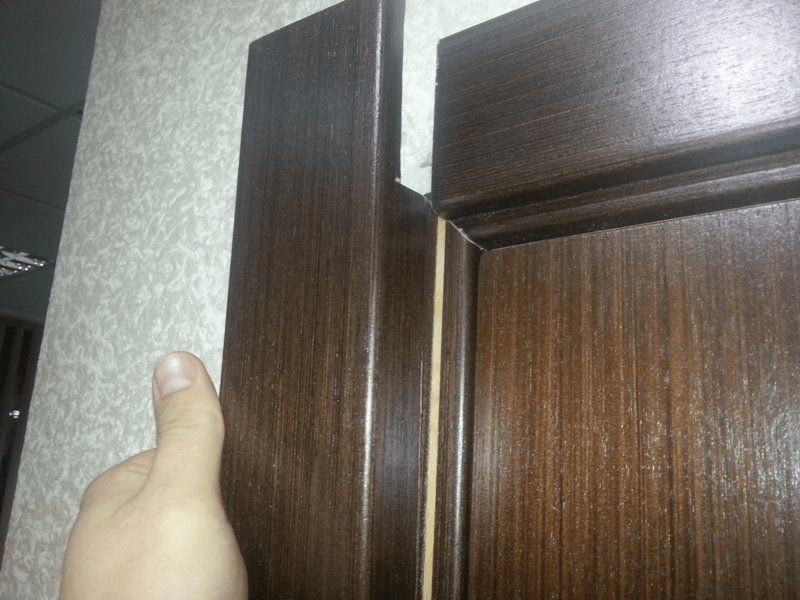
Trimming the corner of the casing
The miter box (a special groove with slots to help determine the angle) can also be a good assistant in precise cutting.
Even if you have all the necessary tools at hand, trimming the trim without basic knowledge of geometry will be quite difficult. The sequence of actions should take place in the following order:
- The length of the door is measured on the platband and, using the building level, a perpendicular line is drawn. The second perpendicular line is drawn in parallel, at a distance of the width of the upper clypeus. As a result, an exact rectangle is formed on the casing.
- A diagonal is drawn in the resulting rectangle, dividing it into two triangles. The main thing is not to make a mistake and draw the diagonal in the right direction. Its beginning should be in the upper corner of the door and go to the ceiling. The marking of the second vertical casing is carried out according to the same principle. The horizontal platband will differ from the vertical ones only by undercuts on both sides.
- Pruning begins strictly along the drawn lines. If the work is carried out with a jigsaw, then it is desirable that the cut was made in one approach. When using a hacksaw, you should choose the option with a small tooth to avoid chipping of the decorative coating.
Varieties of platbands and their installation
Platbands can be classified into several groups according to the type of material from which they are made:
- Wood. The advantage of wooden platbands can be considered their environmental friendliness and durability, as well as the ability to buy them with a carved pattern;
- MDF. An economical option, but with good performance. Such platbands are practical and durable, they are less susceptible to deformation from moisture;
- Plastic or PVC. Plastic structures are most often used in rooms with high humidity. They are easy to care for and durable to use. It is possible to lay the wiring inside the casing;
Platband installation always starts from the side into which the door opens. This is due to the fact that, due to the door hinges, the installation of the platband flush with the door frame is problematic. Mostly, but always, because you can use it.
The platband is installed here with a slight indentation, and on both sides of the door, so that the structure looks symmetrical.
On the reverse side of the door frame, the structure is installed without any indents.
To fix the elements, experts recommend using only nails. Copper-bonded fasteners can be an excellent option, since its caps, which have darkened over time, will be almost invisible against the background of the platbands. In cases where the structure is light, the caps are removed with pliers, or galvanized nails are used.
Liquid nails are applicable only on perfectly flat wall surfaces and, if necessary, dismantling the structure will simply have to be broken.
Most often, plastic frames are glued. They do not require a perfectly aligned wall surface, and their affordable cost makes it easy to part with them during dismantling. In addition, they are so flexible that they themselves can perfectly lie on some irregularities, hiding them.
Laminated platbands differ little from wooden ones, but their installation requires a special approach. It is risky to use nails right away in this case - the material may be damaged. To begin with, holes are drilled in the laminated platbands for nails, and only then you can proceed with the fasteners.
Installation of platbands always begins with the side and top element of the interior door. Attach the second side panel last.
Useful tips
At the initial stage, it is advisable to simply nail the planks with a couple of nails, without hammering them completely. One nail is driven in at the base, the second closer to the middle of the bar. The horizontal bar is attached in the same way, but nails are hammered into it at the edges.
Having thus established the entire three platbands, you can proceed to adjusting their location, easily tapping with a hammer on the sidewalls. If there are gaps between the planks, then carefully pulling out one nail, you can reinstall the plank more tightly.
At the end of the adjustment, you can begin capital fastening of the entire structure. The choice of the pitch of the fastening nails should be guided by the level of load during the operation of interior doors. If the door is subjected to increased loads, the fastening step is on average 15 to 20 centimeters. If the door is rarely used, then the step can be up to half a meter.
Before starting work with platbands, you should measure all doorways in the house, and then start installation with the largest of them. With this approach, if any of the actions turn out to be wrong and the planks are not cut to size, then the remaining planks from the large opening can always be adjusted to the size of a small interior door.
In those cases when the joining of the platbands, despite all the efforts, did not go perfectly and small gaps still remained, the way out would be to purchase a wax pencil for the interior door. Finding it is not difficult, it is sold in any hardware store. Wax crayons are sold in a wide range of colors, so you can choose the one you want. It is easily rubbed in, removing traces of chips and hiding the heads of furniture nails.
Compliance with technological methods and a careful approach to each stage of installing platbands on interior doors will certainly lead to a result that will delight for many years.
Tweet
Zapin
Like
Few people think about why put platbands on interior doors. This is both unnecessary costs and wasted time for installing decor. Experienced craftsmen claim that with the help of classy decor, professionally made from natural wood, you can easily change old, already worn out doors beyond recognition. In any case, decorative platbands on the door have de facto become an integral attribute of any interior door structures; in the modern interior of an apartment or house, they cannot be done without them.
What is platbands
The appearance of this uncomplicated device is well known to everyone, without exception. It's so good that we often don't pay attention to the door decor and have long considered it a part of the door block.
Structurally, the platbands on the door, photo, represent the edging of the supporting frame in the form of a narrow strip, usually protruding above the plane of the wall and the outer surface of the door frame.

Overlays in their modern form appeared relatively recently and were originally used for purely decorative purposes. Modern designs, in addition to purely decorative purposes, are used to solve more practical problems:
- Correctly installed platband visually aligns the interior door frame. Even if the frame was installed in the doorway with a slight mistake, you can always install the platbands on the door at a right angle so that the whole structure looks perfectly flat;
- Interior door frames cover the gap between the wall finish and the outer edge of the door block. In this case, it is possible to close pieces of polyurethane foam, fasteners, wiring or television cable.
Important! With the advent of closed types of door canopies, the mating part of the hangers installed on the shed is masked with the help of overlays.
Simply put, with the help of an overhead decor, it is possible to correct and mask all the irregularities and technological consequences of the installation of interior doors. But, even remaining a completely utilitarian and practical detail, decorative qualities remain the main function of the door edging.
Modern technologies make it possible to install interior doors quite accurately and with very high accuracy. Why, in this case, does it occur to the owners to put curly platbands on the door, if the canvas and frame are installed with millimeter precision? Because the interior door is part of the living space, and you always want its interior to be more comfortable.

Types of platbands for interior doors based on materials of manufacture
A lot of options for decorative overlays have been invented and created for today. For almost any type of door block, its own version of the best shape and size of the casing of the interior door has been developed. Lining is made from the same materials that were used for the front part of the door leaf:
- Wooden decorative strips, both from solid wood, and pressed from cellulose fiber and faced with veneer, film, textured paper;
- Plastic strips in white or brown with a smooth PVC or PP surface. Plastic can be textured under a tree or any other type of finishing material, depending on the design of the interior passage;
- Anodized and painted metal door strips. Usually metal is used as an addition to glass and mosaic door panels.
The most expensive are handmade platbands. Handcrafts made from precious woods with brass and polished copper inserts can cost more than an ordinary wooden interior door.
Such details are planned and assembled only in conjunction with the door block and door leaf. If, for example, a Victorian-style interior is built in an apartment, then platbands for a heavy oak interior door will cost $ 30-40 per meter of length.
Wooden platbands on the door
Fortunately, ordinary wood trims for ordinary door blocks cost an order of magnitude less. But even in this case, in order to select the material for installing platbands on interior doors with your own hands, you will need to try pretty hard. You will have to choose the shape, size and material of the wood.
For framing the box of an interior door, wooden platbands of four standard sizes are used - 40 mm, 50 mm, 60 mm, 70 mm. The width of the strip depends on the dimensions of the door leaf and frame. For example, for a block of 2050x680 mm with an interior door width of 2000x600 mm, you can use wooden strips with a section of 40 mm. For a wooden door 2000x900 mm with a block of 2050x900 mm, platbands of 70 mm and even 100 mm in width are used.
Important! The cost of a set of strips for arranging a decorative outline is approximately 70% of the price of a door block.
Wooden platbands are made mainly of high-quality young Karelian pine, oak, ash and walnut. Veneered versions of MDF boards with a textured coating will cost almost half the price. For example, oak material 70x15 mm costs $ 3.5 per square meter, while an interior door trim made of an eco-veneer with a width of 64 mm will cost only $ 2.5. The exception is MDF-platbands coated with natural oak veneer. These linings cost an average of $ 5 per meter.

Metal door trims
It would be surprising if, with a large assortment of metal doors, metal frames were not used for interior openings. The shape and profile of the linings are usually semicircular or flat. Metal plates are installed together with interior doors on an aluminum frame with a glass insert - a window.
Structurally, the overlays are a stamped profile made of aluminum or thin sheet galvanized steel, so decorative overlays perfectly serve in the most difficult places in a house or apartment. For example, for a balcony door, at the entrance to an unheated room in a house or apartment.
Metal platbands are difficult to mark and cut to size on their own, so most manufacturers complete frames and blocks of interior doors with ready-made products. You just need to properly fix the material around the perimeter of the doorway.
Plastic door trims
Today, decorative plastic overlays are considered the most practical and easy to install. The plastic does not fade and does not lose its surface pattern. The profile of the plastic casing is not afraid of moisture and drafts, therefore, interior doors leading to the bathroom and kitchen are completed with polymer linings.
There are two types of plastic trims. The first ones are cast in the form of a hollow profile with a large number of ribs and partitions. Such material is easy to cut, but when cutting and fastening, it is necessary to handle the plastic decor with extreme caution, due to the risk of cracks and pricks. The second type is a dense monotonous material, in appearance and properties reminiscent of the wood of African oak or young linden. Such parts can be cut, sawed, drilled without any restrictions.
PVC platbands for doors
Most of the decorative cladding for the interior door frame is made of polyvinyl chloride. The width of the PVC trims corresponds to the dimensions of the wood trims. Most often, plastic decor is used with a width of 70 mm and 80 mm.

The most common is a rectangular hollow profile 80x16 mm, it is the lightest and cheapest of all models of PVZ-platbands, the average price of the material is $ 3-3.5 per meter.

If the door frame of interior doors is made "wood-like", then a semicircular profile with a textured surface imitating the pattern of alder, walnut or chestnut wood is best suited.
Platbands are made with a central groove on the back of the profile, which greatly simplifies the installation of the material on the wall.
The special technology for the production of PVC decor frees up most of the internal volume, which can be used for laying cables and wiring. Such platbands are made detachable, with a cover and a bottom part. Such material is inexpensive, $ 2.2 per meter, however, additional elements will have to be purchased for it in order to close the ends on the lining of the interior door.
Polyurethane door trims
The device of the decorative frame made of molded polyurethane is radically different from the PVC linings. Platbands are made not by extrusion, but by pressing the foam material in cast iron molds.

This technology provides two main advantages of polyurethane trims:
- You can make decor with a very complex surface, imitating wood carving, stucco or even metal casting;
- It is very easy to attach polyurethane platbands to the interior door frame;
- The material is easily cut, drilled, painted.
Important! Polyurethane platbands can be glued with ordinary shoe glue, painted with alkyd and acrylic paints. For PVC decor, you will have to buy special adhesives and dyes.
Therefore, polyurethane platbands are used for interior openings in cases where it is important to recreate a complex door design, to imitate stucco molding or stone carving.

Types of platbands for interior doors by type of fastening
According to the method of installation, it is customary to divide the door decor into two independent groups:
- Simple, invoice or independent type of platband;
- Telescopic or prefabricated overlay option.
The choice of the shape and size of the decorative element is based on the dimensions of the doorway and the thickness of the walls. In the latter case, an additional strip can be added to the casing, providing a smooth transition from the outer surface to the door frame.
Independent door trim
The applied decorative element resembles an ordinary polished, wooden or MDF strip in its structure. A slight difference between an independent casing and a conventional board is the presence of a centering groove on the back of the decorative overlay.
Polyurethane and MDF overlays can have a more complex shape, as shown in the diagram. This profile allows you to ensure an accurate and reliable fit of the material to the end plane of the box.
The material is cut to the size of the frame of the interior opening with an allowance for gash in the corner sections. Structurally independent platband is very similar to the details of the wooden frame of some painting.

Telescopic platband for interior doors
The design of the split lining differs only in the presence of an additional side shelf. In cross-section, the telescopic casing resembles the letter "G". Telescopic platbands and extensions for interior doors are used to install and assemble a door structure when the wall thickness is significantly greater than the width of the door frame.
Installation of telescopic platbands on interior doors is carried out only after the selection of the required extension width and bringing the edge of the box into one plane with the wall surface.
How to choose platbands for interior doors
The main criterion on which it is customary to be guided when choosing is the design and way of decorating interior doors. Traditionally, frame covers are selected from the same material as the door itself.
For example, for a wooden frame and canvas, only wood trims are suitable. In this case, it is important that the texture and color on all parts of the door frame completely match.
In addition, it is important to observe the proportions between the width of the vertical racks of the tray and the transverse dimension of the platband. An increase in the size of the lining up to 100 mm is allowed only for interior openings with very thick walls.
Interior door trim width
The second criterion is the conformity of the size of the decorative strip to the area of the door leaf. There are no exact ratios, but usually 40 mm material is used for narrow interior openings of a standard two-meter height. If the door is more than 2.2 m, then the width of the decor is increased to 50 mm.
For interior openings with a standard width of 70 cm, euroforms are most often used today, having a transverse size of 68 mm. For very large or tall doors, the trim can be extended up to 90 cm.
Advice! For novice designers, you can use the rule - the width of the decorative finish is taken at 1/10 of the transverse size of the interior doorway.
How many platbands are needed for one interior door
Regardless of the shape and size of the doorway, decorative trim is installed on both sides of the interior passageway. On each side of the carrier box, three platbands will be installed, of which two are long, 2 m each, and one cornice, the length of which is equal to the width of the opening.
Wooden and plastic blanks are sold with a length of 220 cm, in this case, five threads of material will be spent on the facing of the interior door. MDF platbands can be sold in lengths of 2.5 m and 3 m, so four blanks may be sufficient for a narrow door.
How to attach platbands to interior doors
There are at least four main ways to fix the decor on the end of the box:
- With the help of nails;
- Perform fasteners using self-tapping screws;
- Glue with a special polymer compound;
- Assemble with thorn-groove connection.
The latter option is used exclusively for boxes with additional elements and grooves for installing telescopic platbands. In this case, it is necessary to cut decorative overlays to the size of the box, cut it at an angle of 45 ° and install the strips into the groove on the supporting frame of the interior passage.
How to glue the platbands of interior doors
This is the easiest way to attach decorative strips to the box. The only problem is choosing the right glue. Often, managers of construction salons recommend "Moment" or "Liquid Nails" as the most suitable option for sticking platbands. Convenient packaging in the form of a tube, you can insert it into a hand gun and glue all the details of the interior door in 20-30 minutes. unhurried work.
In fact, both brands of adhesives are not quite suitable for sticking platbands on a vertical surface. Firstly, the acrylic mass dries for a long time, and during this time the planks have time to sink or move out of the attachment point. Secondly, "Liquid nails" more or less glue frames made of MDF or polyurethane, for wooden overlays it is better to use polyurethane and polystyrene adhesives. For PVC parts, you will have to use a special composition of plastic sawdust dissolved in dichloroethane.
To prevent the strips from sliding off the door lute, they are glued with a thermal gun or narrow strips of adhesive tape.
Advice! If the interior partition is thin enough, and every time the doors are closed, the wall with the box shakes, then it is better to use transparent or white sanitary silicone as the glue for the interior door trims.
Its price is slightly higher, but the silicone material dries for only a couple of hours, and holds even PVC cladding many times better, especially in conditions of strong shocks and vibrations.
How to nail platbands on interior doors
The quickest way to secure decorative trim is to nail it down. Of course, not simple carpentry fasteners, but specially designed for fixing the finish on a wooden base. Finishing nails for interior door trims look like ordinary nails, but without the hats.

After the fasteners are hammered into the body of the decorative strip, only a small, barely noticeable dot remains on the surface. When choosing nails, it is necessary to control the length of the rod; in order to securely hold the decor, it is required that the metal goes into the wood of the box by at least 10 mm.
It is clear that it is impossible to fix metal and plastic PVC strips in this way. The finishing nail will not hold on to the metal surface, and any attempt to hammer it into the PVC profile will only lead to the formation of a crack.
Self-tapping fasteners
Often there is simply no way to reliably fix the platbands on the box of the interior passage, except how to use carpentry screws. At first glance, the idea does not look very successful - black or metal heads can seriously ruin the appearance of an interior door. But the situation is easy to fix, you just need to use cut out circles from veneer or film and glue the fastener heads with them.

The second mounting method is used for demountable models. It is enough to disassemble the profile, install its bottom part on self-tapping screws, lay the cable and just snap the cover.
Some decor models are made with mounting grooves from the back surface of the cover plate. In this case, it is necessary, using a template, to wrap the carpentry screws at certain points on the end of the box. After that, the decorative strip is put on self-tapping screws and lowered a few millimeters down. The heads fall into the groove and hold the decor securely in position without any glue or nails.
The most difficult stage in installing wooden planks is to correctly cut a 45 ° angle at the junction of the horizontal and vertical sections. You can file a corner using a square or template. This is usually done if you need to install telescopic platbands with extensions, or the plane of the box is ideally aligned with the surface of the partition.

In other cases, washed down is performed as follows:
- Measure with a tape measure the workpiece for the vertical platband, always with a margin for washing down the docking part. Using a square, a pencil and a hacksaw, cut the required angle line;
- The resulting workpiece is temporarily fixed on the lute of the interior passage, a horizontal bar is applied, it is leveled, the markings are transferred and the mating part of the corner joint is filed.
After installing the overlays, the corner will turn out to be even, without gaps and slips. If you saw the joint according to the template, there will be a gap between the mating edges.
Conclusion
Selecting and installing platbands on interior doors is not particularly difficult for a person who has at least a general idea of the sequence of work and knows how to handle carpentry tools. The only case when the work with interior doors should be entrusted to a specialist is the arrangement of the door block on secret hinges. In this case, experience and knowledge of the peculiarities of the work of complex suspensions will be required.

