How to make a fireplace out of a big box. Master class on creating a decorative fireplace from boxes with your own hands
The fireplace in the house is a symbol of comfort and warmth. A fireplace made of stone is not even in every private house, and the owners of a standard apartment do not even have to dream about it. And you should always dream. If you can’t lay out a real fireplace, then even a housewife can make an imitation of it. Such a simple and affordable material as cardboard will come to the rescue.
For manufacturing, you will need unnecessary boxes, glue, scissors and imagination. Various unnecessary remnants of colored paper, polystyrene and other materials that can be found in the house are suitable for decoration.

Sketch of the future hearth
Before planning the manufacture of a cardboard fireplace, it is necessary to study the experience of those who have already translated the idea into reality.

Planning:
- Determination of a place for future construction. The most suitable would be an empty corner or wall.
- Depending on the availability of free space, the dimensions of the structure are determined.
- Sketch making. On it you need to put down the external and internal dimensions. The sketch can be done in color, supplementing it with the intended decor elements. These elements do not need to be drawn, you just need to define places for them. Such a fireplace scheme will allow you to see the future product in the finished version.
Thinking through the decorative details, we must strive to ensure that in the end the layout is as similar as possible to a real fireplace.

Manufacturing process
The basis of the fireplace design will be a cardboard frame. For its construction, it is best to use thick cardboard boxes. Corrugated cardboard for packaging large household products will be the most suitable. If the packaging from the TV is preserved, then the ideal frame is already ready.

In addition to cardboard, you need to prepare:
- Glue stationery and polymer, which will be attached to the decor elements.
- Wide adhesive tape, it is better to take double-sided masking tape.
- White paint. For coloring cardboard, dispersion will be the most suitable.
- As a cutting tool, you will need scissors and a cutter.
- Paint brushes and foam rubber or sponge.
- Old cloth napkins or scraps of fabric.

Depending on the idea, other materials should be provided. For example, stucco molding from foam material. If there is a residue of liquid wallpaper, then they can be used to create volume.
How to make a fireplace from cardboard?
The assembly of a false fireplace begins with the manufacture of the central unit. First you need to form the columns. To do this, cut out rectangular parts in accordance with the dimensions.

It must be remembered that cutting cardboard is not difficult, but making even folds on it is more difficult work. In order to perform an even fold, you will need a flat bar or ruler and an object to secure the fold. For this purpose, it will be quite convenient to use an ordinary spoon or pen.

The ruler is superimposed along the fold line, the cardboard is carefully folded along the ruler and a line is drawn from the reverse side. This must be done carefully so that the fragile cardboard does not break through.
 The central part is pasted over with paper or painted immediately. After assembly, these actions will be problematic.

Finished parts are assembled with adhesive tape. As mentioned above, for these purposes it is convenient to use double-sided tape.

In order for the product to be evenly painted over, it is possible to apply a white primer before applying the paint. A layer of primer will smooth out existing irregularities. After the cardboard absorbs the applied primer and dries well, you can start painting.


A mandatory attribute of the fireplace is a shelf on top. It should be dense and firm. To make a shelf, you will need to roll the cardboard in three or four layers - this will ensure the necessary rigidity.

As an alternative to cardboard for a shelf, you can cut a plank out of thin plywood. Another option for a shelf is foam. The material is lightweight and durable. Such a shelf will also allow you to fasten the frame of the fireplace.

Finish options
An interesting option is to imitate masonry made of brick or stone. To do this, you can choose a self-adhesive film. In construction supermarkets, such materials are sold. You just need to calculate the size of the canvas and select the desired pattern in the store.

If the product is decorated with stucco, the fireplace will look more interesting. For these purposes, use the remnants of ceiling tiles, foam skirting boards or buy additional moldings.

If desired, the fireplace can be decorated with additional elements. For example, a New Year's fireplace can be supplemented with LED lamps imitating candles.

And, finally, the most important thing that allows you to call a fireplace a home is fire. A few logs wrapped with LED strip will make the hearth almost real. And on New Year's Eve, the flickering light of the fireplace will give the room coziness and a festive mood.

So, a simple and affordable, financially easy option for building a hearth is outlined. We can say that this is a basic instruction on how to make a decorative fireplace. There is a basis, and decoration with decorative elements is done by everyone according to their taste.

DIY cardboard fireplace photo


A fireplace is always associated with coziness and comfort, therefore, even living in an apartment in a multi-storey building, people often dream of creating such an original corner in one of the rooms. A do-it-yourself cardboard fireplace, made with love and care, can replace a real fireplace in the interior, while fully maintaining the design style of the room.
It must be said right away that there is nothing particularly difficult in the manufacture of this decor element, and it can be performed not only by a man with skills in construction, but also by the owner of the apartment. Moreover, the work is not laborious and does not require special devices and tools. The maximum that is required for the process is a fantasy with the external design of the fireplace, which can be easily diversified due to the fact that in our time there is a large assortment of polyurethane foam decorative elements that imitate stucco, columns and other decorations. If the sketch of the fireplace itself is developed independently, and decorative details are correctly selected for it, then the design itself can turn out to be absolutely original and exclusive.
Preparing to create a fireplace
Planning for a future fireplace
Before starting work, it is necessary to do a number of preparatory measures, without which it will be impossible to make this original interior decoration.
- To begin with, the installation site of the future is determined. Usually, an empty wall or corner is chosen for it, where it fits perfectly, unlike bulky pieces of furniture. In addition, a fireplace can be a great cover for unsightly corners.
- Further, the size of the future decorative structure is determined, which is calculated directly at the place of its installation.

- The next step is to draw up a sketch of the future product, on which all dimensions are necessarily affixed - such a carefully prepared drawing will help not to be distracted by measurements already in the process of work. It is also recommended to make a finished drawing of the fireplace, preferably in color, that is, with all the intended decorative elements that will complete it. This drawing will help you immediately decide on the purchase of all the necessary parts and finishing materials. It is not necessary to accurately draw each of the decorative elements - it will be enough to determine their location and approximately determine the dimensions.
When choosing a fireplace for the appearance, you need to take into account the fact that this element of the interior must be decorated in the most careful way. Visiting friends should not even suspect that the main material for the manufacture of this fireplace was ordinary corrugated cardboard.
Materials for manufacturing and necessary tools
The next task to be solved in the process of preparing for work is the selection of suitable materials.

- To make the case, you will need to get a large corrugated cardboard box, in which large household appliances are usually packed - TVs or refrigerators. Since most buyers usually simply throw away the boxes after unpacking, the main material can be obtained for nothing at all. Therefore, if such a craft is conceived, then it makes sense to turn to friends or neighbors with a request to give such packaging in case of purchasing such equipment.
Another option for obtaining a box can be "duty" in a household appliance store. There you can negotiate with the buyer of the refrigerator so that he does not rush to throw away the packaging, since you will free him from the hassle and pick it up when it is no longer needed.
In a word, if a goal is set, then it will certainly be achieved, if there is a desire to bring the developed projects to life.
- In addition to cardboard, you will need two types of glue - a polymer, such as "Dragon", for gluing polystyrene foam decorative elements, and PVA - for pasting cardboard and corners using pieces of thin paper.
- You can use wide masking tape to glue the corners, which is easy to purchase at any hardware store.
- You will need white water-based paint - for priming and painting the finished fireplace.
- You may need a clear water-based varnish.
- If it is multi-colored, then color additives to the paint will be required to give the individual details of the craft the desired shade. In addition, you can buy some acrylic paint (for gold, silver, bronze, etc.), if any special decorative design of the elements is conceived.
- Some home craftsmen use liquid volumetric wallpaper to create imitations of marble chips or other materials on the surfaces of the future fireplace.
- The decorative details themselves are purchased directly - these are moldings of the required length and corners for them, columns and capitals, stucco elements and others.

- For work, you will need a sponge and brushes of different sizes, a long ruler and tape measure, stationery tape, and a simple pencil. Dry, clean, soft cloths should always be on hand.
- In addition to the above, it is quite possible that other materials will be needed if they are provided for by the draft. Everything you need can be purchased at stationery and construction stores.
The process of making a fireplace
In order to be able to determine which fireplace is best suited for a particular room, it is better to consider the manufacturing processes of two fireplace options - wall and corner.
Looking for how to make a decorative fireplace with your own hands?
We suggest that you familiarize yourself with a step-by-step guide on how. In addition, this material shows in detail the process of decorating the fireplace with stucco molding and the stage of connecting the LED strip!
Wall variant
The wall fireplace is quite compact and will not clutter up the room. In addition, a mantelpiece, if made rigid enough, may well serve as a stand for decorative figurines, candles, a vase or a clock.

First of all, you need to make room for work, where you can freely spread a large sheet of cardboard. Acting according to the sketch, in compliance with the dimensions indicated on it, all the details of the future fireplace are marked and drawn on the unfolded cardboard (former box). When carrying out this process, you need to remember that the folds of the box can also be used rationally and make them the corners of the fireplace.
The fireplace is made of three components - this is the base, which must be sufficiently rigid, the fireplace and the top shelf.
fireplace base
The base must be rigid in order for the fireplace to stand firmly on the floor, so the base mold must be well reinforced. This podium is strengthened with the help of additional inserts - stiffeners, which are fixed inside.

The ribs can be assembled into a lattice, or they can be randomly glued to the bottom and lid of the box.

The width of this part of the fireplace must exceed the length and width of the fireplace portal by 80 ÷ 120 mm. You can definitely decide taking into account the preferences of the master and the area on which the fireplace will be installed.
There are two ways to make a base:
- Cut out a box with sides, install or glue stiffeners on its bottom, on PVA glue.
- Cut out two identical panels of the desired size from cardboard - this will be the bottom and the surface of the base. Stiffeners are attached and pressed to the bottom - they can be glued to glue or double-sided tape.
The side surfaces of this design consist of even strips that are glued together from two or three layers of cardboard, which will give additional rigidity to the base. They are installed between the panels and glued to masking tape.
Doing stand - base, you need to immediately think about how the portal will be fixed on the lower structure, since sometimes it is fixed to the bottom panel of the base.
Most often, the portal is installed on the upper plane of the base and then fixed with tape.

portal
The portal is cut out of the box along pre-drawn lines and can also be made in several ways: on a frame basis or with a solid back wall.
First option
- If the portal is built on a frame basis, then the fireplace will have a more rigid structure, since the frame partitions will be made of several layers of cardboard glued together.
- To begin with, the front part of the portal is made, to which the frame will be attached, making this whole structural detail more rigid.
 Cutting out the window of the future "hearth"
 - A window for the future hearth should be marked on the cardboard. The upper part of the window is cut off with a clerical knife. Then the plane that is marked as the window is split in half. The resulting "sashes" are bent inward - they will become the inner side walls of the hearth.
 The preparation of the portal with the opening of the "hearth"
 - To make the ceiling of the hearth, a rectangle is cut out of cardboard, the length of which is equal to the width of the hearth, and width — width inner walls. This rectangle is fixed with adhesive tape in place of the ceiling of the hearth.
The result is the front part of the portal - it needs to be reinforced from the inside with a frame.

Frame panels are sometimes made from solid rectangles of cardboard that are glued together and dried under pressure. Then they are attached to the front of the portal and fastened together with masking tape or PVA glue and pieces of paper.
Another option for making frame partitions, which will make the fireplace lighter in weight, is not solid panels, but lattice partitions.

- Then sheets of cardboard are glued onto rigid cardboard grids in one layer.
- The portal is mounted on a podium base and fixed with masking tape or PVA glue and paper.
- After the frame is completely ready and fixed to the base, it can be transformed with paint or gluing paper, which will cover all unsightly joints.

The frame can play the role of fairly reliable shelves that will serve to store needlework items or other little things that are not used daily.

If the niches of the portal are planned to be used as shelves, then both the walls and the frame of the portal must be rigid, therefore they are also made of several layers of cardboard glued together.
Second option
The second version of the portal is easier to make than the first, since an ordinary box is assembled according to the dimensions established in the sketch. In this case, the back wall will be solid and it will not be possible to arrange convenient shelves in it.
 The second version of the portal is simpler, since it is an ordinary hollow box
 The box is also glued with masking tape.
The front part of the portal is formed from strips of cardboard cut to size. It will take three or four strips, depending on whether the lower part of the hearth will be closed by a few centimeters.
 Making the front wall of the portal "fireplace"
 In the next step, the finished shape of the fireplace is attached to the marked place on the surface of the podium, first tacked with glue, and then securely fixed with masking tape or paper slips and PVA glue.
Installing a mantelpiece
If you do not additionally strengthen the top panel of the manufactured fireplace structure, it will be impossible to put any decorative ornaments on it. Therefore, it is recommended to lay a fireplace mantel.

It must be remembered that this element should not be heavier than the base of the fireplace, as the whole structure may fall. The weight of the mantelpiece should be about the same as that of the podium, or even slightly less.
It is best to make a shelf of two or three sheets of cardboard glued together. For the top layer, you can use not corrugated, but ordinary dense material.
It is better to glue the mantelpiece on polymer glue or “liquid nails” - this way it will be securely planted on a frame structure or a fireplace arranged in the form of a box.
You can use plywood up to 10 mm thick as a shelf, or a thin board made of light wood. As an option - a laminate panel is quite suitable.
decoration
A very important step is the transformation of the finished structure into an almost “real” fireplace. This can be done in many ways, as the appearance of the fireplace will look as the master wishes.
First option
In this variant, decorative polyurethane foam elements are glued immediately onto cardboard. The mantelpiece from the front and sides is framed with a molding having a width of 10 ÷ 12 mm.
 Beginning of finishing - gluing decorative embossed parts
 - A thin molding divides the entire surface into separate zones, a niche of the hearth stands out.
- Further on separate sections of the surface, symmetrically to each other, individual elements of stucco molding are glued.
- In addition to them, decorative columns can be installed on the sides of the portal.
All elements are glued to "liquid nails" or polyurethane glue.
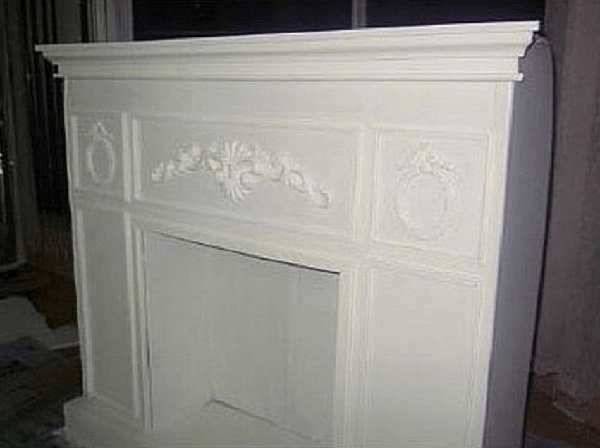
- At the next stage, the entire surface of the fireplace, including decorative details, is painted with water-based white paint. The work is carried out with a brush and a sponge, in order to paint over all hard-to-reach places well. The result is a completely white design.

- Then, additional work needs to be done on the structure, for example, to cover the moldings and stucco with gilding or paint of a certain color, which can be made from the same water emulsion with the addition of color.
- After the painting processes are completed, it is recommended to cover the entire gable and side parts with a water-based varnish. It will protect surfaces from various external influences, and also make it more comfortable for cleaning, since dust from a rough, water-based paint surface is removed very reluctantly.
Second option
Another option for decorating a fireplace with the use will give relief to the surface of the fireplace, under the structure of natural materials.
But, before applying the finishing mixture to the portal, it must be prepared and measures taken to decorate the hearth and mantelpiece.
- The front and side surfaces, as well as the niche of the hearth, are painted with water-based paint and left to dry.
 To begin with - also staining in the base color
 - Thin paper or newspaper is pasted over the mantelpiece - this is necessary for further decoration. When the surface dries, it is also covered with paint.
- The next step is to fix a molding imitating stucco molding under the mantelpiece on the “liquid nails”.
- Next, you can proceed to the design of the hearth of the fireplace. The required number of rectangles are cut out of corrugated cardboard, which will imitate brickwork. They are glued into the niche of the hearth, and the distance between the rows should be approximately the same and be 8 ÷ 10 mm. The details of this imaginary "masonry" must be glued to "liquid nails" or polyurethane glue.
 Formation of "brickwork" from rectangular pieces of cardboard
 - After the glue dries, the “brickwork” is covered with water-based white paint.
- The next step is painting the "bricks". To achieve the desired shades, the required color is added to the water-based paint. As a rule, they make several shades of color close to each other in order to make the hearth look more picturesque.
 Next, “liquid wallpaper” is used - they must convey the texture of the stone
 - Further, prepared “liquid wallpaper” is carefully applied to the prepared surface of the portal. To apply the mixture, a spatula is used, with which it is distributed over the visible areas of the fireplace. Very carefully you need to apply the wallpaper near the polyurethane foam decorative elements - the mixture should close the joint between the surface and the stucco.

- Having finished working with the walls, you can proceed to decorating the mantelpiece. In this case, ordinary crumpled wet paper was used - it will imitate a marble surface. Wet paper straightens out on the shelf, but the crumpled drawing will still remain.
 Relief figures can be toned "antique"
 - After the paper and “liquid wallpaper” have dried, if desired, you can apply tinting on the stucco molding with a soft brush, and on the mantelpiece with a sponge, lightly touching the surface, so as to touch only the protruding lines of crumpled paper.
 To create the appearance of a “stone base”, fragments of polystyrene foam are suitable
 - The last stage in the transformation of the fireplace is the decoration of the base. The role of "stones" may well be performed by ordinary foam, which is glued to "liquid nails", and is also covered with paint with the addition of the selected tone to it.
Video: an example of creating a cardboard wall fireplace
corner fireplace
It is even easier to make than wall-mounted. This will require, in principle, exactly the same materials, and you can decorate it as the master wants. The above-described polyurethane foam elements in combination with paint and liquid wallpaper, or simply self-adhesive film, are also suitable for decoration.

- Before making a corner fireplace, you need to make a sketch and drawing. In order for it to be accurate, measurements are taken from the corner where the decorative interior accessory will be installed. It is especially important to do this if the fireplace will be placed in a furniture wall or will adjoin it. In this case, it is recommended to make the legs of the triangle equal to the width of the side panels of the furniture wall.
- Further, according to the size of the box, the shape of the fireplace is mounted. If a large box is found, an even canvas is made from it, and the folds from the corners will help in making a triangle for a corner fireplace.
- A triangular shape is formed from the box, which is fastened with masking tape along the top of the corner.
- In order for the triangle to stand well on the floor surface, you need to give it additional rigidity. To do this, approximately 100 mm are measured at the corners above and below and cuts are made with a knife.
- Further, a straight line is drawn from the inside, which will connect the corner cuts, and then a shallow cut is made along this line. It will help you make an even fold.
- Exactly the same process is carried out with the other two sides of the triangle. Then the strips are bent, their excess part is cut off, and the joints are glued together.
- The bottom of the fireplace is made in the same way.

- Next, you need to make a pattern of the size of the hearth window from a separate piece of cardboard or paper. Then it is reduced from all sides by 70 ÷ 100 mm and the reduced part is cut out. It is superimposed on the large plane of the resulting "triangle" - the hypotenuse, outlined with a pencil and carefully cut out with a knife.
- Now it is necessary to make cuts at the corners of the window, for the same 70 ÷ 100 cm, and then they must be very carefully bent inside the window at a right angle. The corners of the bend must be immediately sealed with tape.
- In order to make the back walls of the hearth, you will need the corner of the box, and for the ceiling and bottom - two triangles. The inner part of the "firebox" is measured according to the resulting opening.
- According to these dimensions, the necessary parts are cut out and glued together. The finished inside of the firebox is mounted in a fireplace niche, attaching with tape to the bends that were made earlier.
- For the rigidity of the bottom of the firebox, stands can be arranged under it, glued together from several layers of cardboard in the form of columns. Two such details will be enough. They are glued between the lower plane of the fireplace structure and the bottom of the firebox.
- When the design of the fireplace is assembled, you can proceed to the decorative design. In this case, self-adhesive film imitating brickwork was used to transform the exterior of the fireplace.
- Pasting starts from the inside of the structure, i.e. from the hearth. The process must be carried out very carefully, trying to follow the pattern for laying bricks. Then the upper part of the portal is formed, then the side walls around the firebox, and lastly the film is glued in the lower region of the fireplace pediment.

- Further, a mantelpiece is cut out of cardboard or plywood, finished and glued to the surface of the structure, which will serve as an excellent surface for placing decorative figurines or candles.
Find out how, and also consider step-by-step instructions in our article.
decorative firewood
Having made a fireplace and setting it in place, you can think about accessories that can decorate it. Since the fireplace is not real, decorative firewood, which can also be made from corrugated cardboard, is also perfect for it.
 Such decorative "firewood" is easy to make on your own.
 In order for such firewood to decorate the fireplace insert, you need to prepare the material and the necessary tools - this is a knife, scissors, glue, paint, thin twine and corrugated cardboard peeled from an even top layer.
The work is carried out in stages, and it is quite simple to complete it.
- The size of the firewood depends on how large the firebox is so that it fits well into this space. The desired length and width are measured on cardboard, then strips are cut.
 Production of "logs" and "branches"
 - Next, the material is rolled up into a tube. Its thickness depends on the preference of the master - it can be a thick "log" or "branch", even or with "knots".
- After the tubes are rolled up, the edge of the cardboard is smeared with glue, pressed and tied with twine until completely dry. In this case, it is better to use polymer glue or “liquid nails”. Several pieces are made at once for poles.
- Next, thin “branches” are rolled up from the cardboard, which are marked out in such a way as shown in the top photo. After the glue dries, the “branch” is cut into several “knots”, which are then glued to the “logs”.
 "Logs" are complemented by "knots"
 - When the glue dries, the finished poles are covered with a thick layer of white paint, and then the logs can be tinted to look like any type of wood. For example, transverse black strokes of different widths on a white background will make them “birch firewood”, and dark brown stripes applied along the logs will show that "firewood is chopped" from "oak wood". Gouache is well suited for decorating logs - it is quite thick and goes well with water-based paint and, if necessary, thickly or translucently overlaps the white base.
 It remains only to paint the resulting "poles" in the desired color
 If you turn on the fantasy, then in the firebox you can make a safe backlight, consisting of colored LEDs, which will imitate smoldering or burning coals. “Tongues of flame” are also made from fabric, blown from below by a weakly powerful fan. They, illuminated with the right light, will perfectly imitate a burning fire.
 A decorative fireplace can be enlivened with lighting or "tongues of flame"
Video: tips for creating a decorative homemade fireplace
It must be admitted that all materials for making a fireplace and accessories for it are affordable, so do not be afraid to spoil them. You need to approach the process creatively and turn on your imagination, which, perhaps, will suggest additional design options. In the event that the master himself comes up with decorative elements, then it is quite possible to get an exclusive version of the fireplace, which cannot be distinguished from the real one.
The presence of a fireplace in the interior gives the atmosphere weight and a certain significance, style. In our imagination, a fireplace is usually associated with warmth and comfort. In addition, a fireplace is one of the decorative elements, indicating a certain level of prosperity and well-being of the owners of the house.
Important ! In the practical implementation of the idea of \u200b\u200bhow to make a fireplace out of boxes, viewing real buildings with your own hands of various options, simple and complex, helps a lot. If possible, look at what a real real construction made of cardboard and boxes looks like, this will make it easier to do it yourself.
Not every owner of a private house can afford a real stove, and one can only dream of a real fireplace in multi-storey buildings. In the conditions of a city apartment, this is often simply impossible for reasons that do not depend on the desire and capabilities of the owners.
In this case, the fireplace from the boxes, assembled with your own hands, will help out. With very little effort, you will decorate your house or apartment with an original design made of cardboard and boxes, which will be a great addition to the festive atmosphere.
You can be sure that making a fireplace out of cardboard and boxes with your own hands will not require a significant investment of time and money. To figure out how to make a fireplace out of boxes with your own hands, not only a person who is well acquainted with the rules of laying a real fireplace, but also an ordinary housewife, and even a teenager can. The main thing would be the desire to work with your own hands with cardboard and boxes. In this case, it is not a sin to participate in a similar event with friends or acquaintances, having received a certain master class and feeling like an expert.
What can a family give a master class in making a fireplace from boxes with their own hands?
With all the "lightness" of the idea of a fireplace made of cardboard and boxes, the manufacturing process gives a chance:
- Raise the mood of yourself and your household with another interesting idea;
- Refresh the interior of one of the rooms of the house or apartment on the eve of the holiday;
- Teach children to set themselves truly complex tasks and do them with their own hands;
Getting started, you need to decide on the place where the cardboard imitation will be located. It can be free space against the wall, or a corner of the room not occupied by furniture. With it, you can hide some construction defects in the corner of the room.
Having decided on the place, we measure it with a tape measure with our own hands and calculate the estimated dimensions of the future cardboard layout, whether it can fit in the space allotted to it. It is important to predetermine the dimensions of the cardboard fireplace to the smallest detail so that you do not have to redo the work.
After that, you should decide which option is best suited to the situation, to the style of the interior, view photos of fireplaces from boxes with your own hands on the Web and choose the option that you can make with your own hands from cardboard and boxes.

Make a drawing of the selected option with dimensions and a drawing of the external design of the finished product. Calculate with your own hands the need for cardboard and boxes, their sizes. This will allow you to think in advance how the appearance of the fireplace will be designed, what and where decorative decorations will be located.
Before starting, prepare the materials necessary for work:
- Several large cardboard boxes, the more cardboard, the easier it is to choose the optimal shape and size;
- Glue PVA, PVA-M and transparent "Dragon" or "Titan";
- Construction chalk putty;
- Water-based paints, necessarily - white, red and black;
- Long meter ruler, tape measure, corner and construction knife;
- Brush and paint roller for painting the finished product.
For your information ! Before starting work, tune in yourself and explain to your assistants, if any, that making a fireplace from boxes with your own hands requires the highest care and accuracy.
Making a fireplace out of cardboard and boxes
In addition to the decorative function, the wall-mounted fireplace from the boxes can be used as a watch stand, decorative candles or figurines, a bookshelf. Often such a cardboard oven becomes a full-fledged element of the interior of a room as a cabinet or bedside table.
For work, you need to prepare free space so that you can place a large sheet of cardboard and the box itself, transfer the necessary markings and draw the contours of the manufactured product.
If you are lucky to pick up or get hold of a large cardboard box from a TV, washing machine or refrigerator, the task will be noticeably simplified. Using a ready-made large cardboard box will allow you to refuse to manufacture a supporting frame-frame on your own, which will greatly simplify the work.
Otherwise, for a wall-mounted fireplace from boxes, it is initially necessary to assemble a frame from a building profile or wooden slats, fixing it on the wall at the location of the fireplace. Next, the frame will have to be pasted over with cut-out two or three-layer pieces of thick cardboard, butted together with glue and adhesive tape.
Advice ! Sometimes you have to glue two sheets of cardboard into one "sandwich" with a layer of tape or corrugated cardboard. The base sheet is laid out on level ground, the PVA layer is glued to the bottom and top sheet and the load is placed on top. Such a sandwich turns out to be durable, any element of the fireplace, including the back wall, can be easily made from it.

The design of the fireplace consists of several main parts:
- The body of the fireplace, or a portal of two pedestals, united by a superstructure;
- Fireplace insert - rectangular niche;
- Top shelf or countertop.
As the basis of the fireplace, we put a fiberboard slab, cut to the expected size of the fireplace sole with a margin of 7-8 cm per side.
Cutting the box and gluing the body of the future fireplace
As a basis for the formation of the future body of the fireplace, we use large boxes from household appliances. The cardboard wall of the box has a three-layer structure with layers of corrugated cardboard.

As indicated in the drawing, we mark with the help of a ruler and a corner the location of the firebox and side pedestals of the fireplace from the boxes. We make a T-shaped incision along the axis of the opening of the furnace, turn the formed flaps inward and glue them to the back wall. They will serve to form the inner surface of the opening.
We measure, cut and paste additional elements into the case from the boxes:
- The ceiling of the combustion chamber;
- Internal jumpers in the upper part of the portal and in the side cabinets of the case, this will strengthen the structure and make it more rigid;
All places of gluing cardboard and boxes are additionally glued with sheets of paper, PVA and adhesive tape. At the points of contact of the end surfaces of the jumpers and sheets of cardboard with the body of the boxes, we glue them with our own hands using Dragon glue.

If desired, the back wall of the fireplace can be turned into a storage of the necessary things. It is enough to carefully cut out the windows with a knife, bend the cut out fragment and glue it to the side wall of the box.

The top shelf can be made by hand in the form of a sandwich from two layers of thick cardboard and corrugated tape. Often, for reinforcement, plywood or a plastic cladding panel is put into the design of the countertop, which will allow the fireplace to withstand a significant weight of objects, a vase, or even a TV.
The finished cardboard case is installed on the prepared fiberboard base and glued with adhesive tape from the inside of the structure. The outer joint between the cardboard of the body and the cardboard of the base is glued with paper tape and PVA.
Assembly and finishing operations
After the formation of the main part of the fireplace body from the boxes, they proceed to rough pasting it with paper. At the same time, burrs and irregularities are leveled and trimmed. In places where the joints are glued, excess dried glue is removed and primed.
The next operation will be painting and preparing for finishing. The prepared fireplace body from the boxes is primed in two layers with white water-based paint. In places where the inscriptions of the packaging may show through, glue or apply an additional layer of primer.
The upper part of the portal, especially the attachment point of the top cover and wall cardboard, must be covered with decor. Usually, bovelacci, friezes or foam are used for these purposes. The sticker is made using the "Dragon".
The final operation is the final painting of the fireplace, usually white or beige. The inside of the combustion chamber is sealed with panels imitating embossed red brick. On the protruding part of the base of the fireplace, an imitation of rubble stone or molding brick is laid out.

One of the most popular types of fireplace textures is imitation of brick or marble facing material.
As a result, there is a reason to be proud of a do-it-yourself fireplace from boxes.
We all want the interior of our home to be stylish and beautiful. To achieve this goal, designers around the world have come up with a great variety of decorative elements. Not least among them is the fireplace. But what to do if the dimensions of the apartment do not allow you to install a full-fledged fireplace complex or you just don’t want to spend money? There is a way out - you can make a decorative (fake) fireplace from cardboard boxes with your own hands!
Yes, yes, you heard right - from the most ordinary cardboard boxes that often remain after buying household appliances. To make such an imitation of a fireplace, you don’t even need any special knowledge and building skills - it’s easy and simple to make it! How? Read on!

materials
To make a fireplace with your own hands from boxes, you will need the following materials:
- Naturally, one or more large boxes - depending on what kind of fireplace you want to get in the end;
- Wallpaper (one roll is enough) or white paper;
- Stationery glue or PVA glue;
- Three types of adhesive tape - regular, masking and double-sided;
- Paint brushes, sponges, rags;
- Stationery knife, scissors, ruler, pencil, as well as a tape measure and a building level;
- Sheet of drywall or plywood to create a mantel;
- Depending on the chosen type of decoration, you will also need:

photos
- a roll of wallpaper with a "brick" pattern or red cardboard - if you want to decorate your fireplace "like a brick";
- a roll of self-adhesive film with a pattern imitating natural stone, marble or malachite;
- a can of white paint, a ceiling plinth and foam plastic moldings (columns, capitals, rosettes, moldings, etc.) - to create a more classic, elegant decor;
- "liquid" volumetric wallpaper - to achieve the effect of embossed marble chips on the fireplace surface;
- bronze, silver or gold acrylic paint - for special decoration of fireplace decor elements.

Kinds
Surprisingly, you can make not only a home false fireplace from cardboard boxes, which can perform an exclusively decorative function, but also build a portal for an electric fireplace! Of course, such a portal excludes the installation of a gas burner, or a biofireplace, since there is an open flame there and a fire can occur. It is also impossible to install a heat-exchange fireplace with a water boiler and a casing in it - due to the bulkiness of this design and, of course, the danger of ignition of the cardboard from overheating. It is also impossible to install electric fireplaces with an open firebox and a built-in heating function - for the same reason. It is possible to insert an electric fireplace with a closed fireplace insert and flame imitation (on the LCD screen or with the help of backlight) into the construction of cardboard boxes.
In terms of style, the following types of fireplaces (fireplace portals) from boxes are distinguished:
- In modern style. This design style of the fireplace portal involves a variety of textures and colors, a combination of modern shapes and antique decor elements (stucco moldings, rosettes, etc.). Such a fireplace will fit well into almost any interior;
- Hi-tech style. It would seem that the hi-tech style implies a certain futurism, the use of such ultra-modern materials as steel, plexiglass - what does cardboard boxes have to do with it? However, even from them you can make a fireplace in this style - just make it an interesting geometric shape and paint it black or steel, and insert a mirror into the firebox. Alternatively, you can put the glass on the mantelpiece;
- In classic style. As you know, classic is always in fashion. Strict lines, a minimum of additional decorations - such a fireplace can be placed in absolutely any apartment;
- Country style. Loved by many "rustic" style. It differs in that such fireplaces are made of brick and natural stone. In order to give the fireplace from the boxes this look, it is enough to glue it with a self-adhesive film or wallpaper with a brick or stone print. Be sure to put firewood in the firebox.

photos
How to do it yourself: step by step instructions
- First, determine the location of the future fireplace. It can be either a wall (frontal location) or a corner (corner location). If you need to mask any defect on a wall or in a corner, a properly placed decorative fireplace will do just fine;
- At the installation site, perform all the necessary measurements to clarify the parameters of the future box using a tape measure and a building level;
- Design your drawing carefully. Apply a fireplace on it in as much detail as possible, with decor details, observing all proportions. Make the drawing in color, so it will look more natural and, as a result, it will be much easier for you to understand how the original result will look like;
- We prepare materials. First, we select a box or several boxes. The ideal option would be a whole box from a widescreen flat-panel TV, but if you can’t find one, you can use sheets of cardboard pre-cut from other boxes and fastened together with adhesive tape;
- We free up space in the room, lay out our materials. Carefully draw all the details on the box. Follow the rational use of materials - for example, it will be easier for you if the corners of the proposed fireplace coincide with the corners of the box;
- The main parts of the fireplace are the podium (base), the portal and the top shelf. Installation starts from the podium. Since he will have to withstand the weight of the entire structure, it is necessary to strengthen it. They do this by inserting special cardboard inserts (the so-called stiffeners) inside the prepared base. Place them perpendicular to the floor, securing with tape. The height of the ribs is equal to the height of the side of the podium. By the way, you can strengthen the sides by gluing them with a couple more layers of cardboard. The base is made, as a rule, a little wider than the portal, by about 8-12 centimeters;
- Next, we create a portal.

photos
There are two ways to assemble a cardboard portal - frame and with a back wall:
- to make a portal on a frame, we take a pre-prepared sheet of cardboard, which will act as the front panel of the future fireplace portal. We outline the inlet of the hearth, the upper part of which is cut using a clerical knife, and then we cut the window in the center. We bend the resulting sashes inward, these will be the side walls of the hearth. Next, we cut out a rectangular strip equal in width to the inner walls of the portal, and in length to the width of the hearth. We get the ceiling of our hearth, which we fix with adhesive tape. To strengthen the structure, we glue frame panels inside it, they must first be glued together from several layers of cardboard. We put the resulting portal on the podium, glue it with masking tape or strips of white paper coated with PVA glue. We are waiting for some time for the glue to dry and check the strength of the joints;
- as for the second version of the manufacture of the portal - with a back wall - it is much simpler than the previous one. Basically, it's just a big box. The hearth is formed as follows: we transfer the prepared drawing to the front wall of the box, cut out the window with a clerical knife, just as in the first version, the flaps are bent inward and glued to the back wall of the box. The upper part of the hearth is formed from a separate sheet of cardboard. Everything, the portal is ready for installation on the podium.

- Installing a fireplace mantel. For its manufacture, you can use drywall or a sheet of plywood, or glue it from several cardboard sheets. The shelf is attached to the portal with double-sided tape. Like the podium, the shelf may be slightly wider than the portal;
- We start finishing work. Carefully paint over all connections and unnecessary color spots on the surface of the box with several layers of paint. If it is not possible to use paint in a spray can, an ordinary water-based emulsion is suitable. If desired, you can pre-glue the resulting structure with white paper, or you can even putty it with a plasterboard solution;
- The last and, probably, the most pleasant step in the manufacture of a fireplace is its decoration. Here everything depends on your imagination. You can wrap your new fireplace with self-adhesive film or wallpaper in marble, brick or wood colors; overlay with elements of gypsum stucco. You can use liquid wallpaper - and then your fireplace will have a rough structure of marble chips. Decorate the hearth of the fireplace with fake firewood (they can be made from cardboard or twigs), use a garland or a flickering lamp to simulate a flame. You can also light candles there from time to time, however, this method of decorating the fireplace is not entirely safe, since cardboard is still not a refractory material. Keep this in mind and do not leave open flames unattended. Put photo frames, figurines and other nice decorative trifles on the mantelpiece.

photos
Making a corner fireplace is easier than a front one. The materials used are the same, only the way the box is formed differs. Plan for its implementation step by step:
- We draw a drawing and choose the corner of the house in which it is supposed to place the future fireplace;
- We will need a large cardboard box, from which an even canvas is formed, which is then joined in such a way that the side folds of the box ideally coincide with the corners of the future location of the fireplace. As a result, you should get a triangular structure, which must be fastened with masking tape;
- For stability and strengthening of the structure, stiffeners are formed at the top and bottom. They are obtained as follows: approximately 12 centimeters are measured from the top and bottom of the fireplace and small cuts are made with a clerical knife. On the inside of the box, lines are drawn that connect these marks. Further, along the drawn lines, they are lightly drawn with the same clerical knife to form an even bend of the cardboard, after which these strips are bent, cut off everything unnecessary and glued together at the junctions. Thus, stiffeners are formed at the top and bottom of the fireplace;
- In the center on the front of the fireplace we cut out a hole for the firebox, the bottom must be rectangular, the top can be rounded like an arch. We do not cut off the lower part of this rectangle, but bend it inward, forming a right angle and forming the bottom of the firebox. We cut off everything unnecessary, fix the bottom with masking tape;
- Creation of the side walls of the hearth. We take cardboard sheets, equal in height to the inlet of the furnace, in length - to its depth. You can install them in a triangle, simplifying your task, you can form a right angle on each side - then you will have to additionally glue the missing places of the furnace with sheets of cardboard. Using masking tape, we fasten the structure. To form the top of the firebox, we also take a cardboard sheet and adapt its shape to the existing structure, also gluing the joints well;
- Now we need to attach a mantel and a bottom to our portal. To make them, you will need two triangular sheets of cardboard, which must be glued with PVA glue;
- We give the designs to dry thoroughly and proceed to decorating our fireplace. His methods are identical to the methods of finishing the front fireplace, respectively, we will not repeat.
Upon completion of all work, we install the fireplace in the selected location.


If you wish, to decorate your fireplace, you can make fake firewood yourself from scraps of cardboard (corrugated is best). So let's start:
- To begin with, we prepare everything you need: sheets of corrugated cardboard, from which the smooth top layer is removed, a clerical knife, sharp scissors, white paint and a thin rope;
- In order for our future firewood to be in perfect harmony with the fireplace insert, it is necessary to measure its parameters and, based on this, calculate the optimal size of firewood;
- Measure the required dimensions of the “log” on the prepared sheet of cardboard, cut off the strip. Roll it up. The thickness can be different, it depends on what you want to end up with - a “log” or a “twig”. Firewood can be made "knots", this will give them naturalness;
- After folding the cardboard sheet into a roll, its edge is well coated with glue, tied with a rope and left to dry. Make several blanks of different sizes;
- To make “knots”, we form a thin “twig” from cardboard, glue and dry it, and then cut it with a clerical knife at an angle and glue it to the “logs” with glue and masking tape;
- After the glue is completely dry, our "firewood" must be painted. To begin with, they are thickly covered with white paint, and then you can tint them to match the color of any wood. If you don’t want to bother, then put a few black strokes on a white surface - and “birch firewood” is ready;
- For coloring "logs" gouache is well suited.
Winter celebrations are coming. So I want to create in the house an atmosphere of not just a holiday, but also a real winter comfort. How to do it? We suggest you make a fireplace out of cardboard with your own hands. To do this, you do not need any super expensive materials or transcendental knowledge, but the result will be amazing nonetheless. Do you remember the good old fairy tale about Pinocchio? After all, there, too, in the closet of Papa Carlo, a hearth was painted, while those around them did not even know that it was not real. Well, let's try to master this unusual art!
As you probably know, cardboard is an environmentally friendly material, from which various decorative elements, furniture and even houses have been made for more than a decade (although these are Western technologies). However, lovers of non-standard types of needlework also did not leave cardboard unattended. So, let's assume that things are moving towards the New Year. Well, a great excuse to turn ordinary cardboard into a real work of architectural art.
We make a cardboard fireplace with painted fire
This step-by-step instruction will not cause difficulties even for beginners, so you can safely prepare the materials necessary for work, namely:
- thick, even cardboard;
- ruler, pencil and centimeter;
- Styrofoam;
- paints and brushes;
- sponge
- stencil for brickwork;
- tape or glue.
Let's start our master class:
- To begin with, we cut out two rectangles measuring 110x60 centimeters from suitable cardboard density. The color of the cardboard in this case does not matter, because in the future we will decorate it. But, of course, the cardboard should have a smooth surface without visible damage and strong creases. It is very important!
- Further, along the narrow side of each rectangle, we perforate every 15 centimeters. In the future, along this perforation, we fold a square column with a width of both sides of 15 cm and a height of 110 cm, respectively.
- We proceed to the formation of fireplace racks. We will make them in a brick manner. To do this, draw a pattern on each of the columns that imitates brickwork. For greater convenience, we recommend using stencils. This will make it easier and faster. You can make such a stencil yourself, or you can buy ready-made.
- Now we take another sheet of cardboard and cut out two more rectangles from it. This will be the base of our fireplace and its top. Dimensions in this case should be determined individually.
- Please note that the parts cut out by us, placed on brick racks (those prepared in the previous step) must necessarily protrude on the sides. Ideally, they should be at least 2 times wider than the columns themselves.
- In order to give the bases greater thickness and volume, we thicken them with foam, and then paint the entire resulting structure (all parts) in a certain color. We recommend choosing a white color to match the foam.
- Now we fix the racks we have obtained to the bases. To do this, we use either glue or adhesive tape (whoever prefers). However, do not forget that the bonding material as a result should not be visible from the front of our false cardboard fireplace.
- Now cut out another rectangle from cardboard. This will be the back wall of our fireplace. Using a sponge, prime the resulting wall with black and gray paint. This coloring will perfectly convey the feeling of a few charred walls. It will be very effective.
- After the paint has dried, we draw a fire on the back wall of the fireplace, supplying it with cheerful tongues of flame. Here you can connect your imagination using different paints, felt-tip pens, etc.
- We wait for complete drying, after which we glue the wall to our bases and racks. It remains only to put a little dry firewood to the fireplace to give it even more naturalness. In the photo below you can see what happened:

Of course, the proposed scheme of actions can be supplemented by you with some other nuances and details. For example, you can paint the entire false fireplace to look like brickwork. Or even choose a different color that matches the interior of your home.
In addition, the fireplace can be decorated with various decorative elements: vases, figurines and other New Year decorations can be placed on the top shelf. And the deepening of the fireplace can be protected with a real forged fence, suitable in size. A DIY Christmas wreath would look great on the wall above the fireplace.

Craftsmen-professionals even make a backlight at the bottom of the fireplace, which will later imitate the burning of a flame, but this, as they say, is from the category of higher matters. In the videos below, you can also find a lot of useful information about this. Happy Holidays!
Related video:
Some interesting master classes and useful tips are waiting for you in this collection of video materials.
Most interesting articles:
 When finishing a false fireplace made of cardboard, putty from acrylic tape will crumble, and polystyrene foam or polystyrene foam moldings that imitate stucco will stick loosely.
Also, you can make an imitation of logs using the same corrugated cardboard. Knife designed for cutting drywall. Cardboard should be corrugated and most importantly dense.

It is better to glue the mantelpiece on polymer glue or “liquid nails” - this way it will be securely planted on a frame structure or a fireplace arranged in the form of a box.
Next, the box can be pasted over with wallpaper under a brick or pasted over with white paper outside and inside. Masking tape works well, as it is thin, but it holds details well, and besides, paint adheres well to it.
The last step before directly decorating the fireplace is to glue all the seams of the portal and the base with tape.
They can be made from pieces of cardboard glued together.
Another one is possible, but it should cut the cardboard well.
To make the "bricks" more textured, they are dotted with gold paint with a sponge.
The fireplace is primed in several layers so that all the details become the same color. Next, the installation is painted with brown paint, and the curbs are yellow.
The most commonly used water-based paint is white. If you plan to make a decorative antique fake fireplace, then instead of coloring compositions, use the usual putty for drywall.
Do-it-yourself fake fireplace - we create a New Year's atmosphere
As unbelievable as it may sound, you can really make a decorative fireplace portal out of cardboard boxes.
As you can see, making a cardboard fireplace with your own hands is very simple. After installing the fireplace in the place of your choice, you can start decorating it with various accessories. Now you need to decide on the method of attaching the portal to the base of the fireplace.
Having prepared the elements of the fireplace, we begin by creating the base of the fireplace.
Your fireplace will consist of three main parts: the base, the portal and the top shelf.
We note that the folds of the box can also be used rationally and they are quite suitable for the corners of the fireplace.
There are very few of them, so you do not need large investments to create a cardboard fireplace.
And here it is shown how easy and quick it is to make a New Year's false fireplace from a cardboard box. On the mantelpiece you can arrange little things dear to your heart. The final step in creating a false fireplace made of cardboard will be painting it with water-based paint.
The top mantel does not have to be installed. Next, cut out the layout of the fireplace. According to the previously prepared sketch, we draw the details of the fireplace on the spread cardboard.

But if you want to be creative, you can construct a false polyurethane fireplace with your own hands from semi-columns, platbands and moldings.
It can be photographs, vases, some crafts, and much more. You can make it either pure white, or add your chosen color scheme and highlight the tone of the stucco elements. Also, in the hearth of the fireplace, you can create an imitation of brickwork using rectangular pieces of cardboard.
These can be painted patterns or decorating the front of the fireplace by highlighting the niche of the hearth with the help of thinly sliced molding, after which stucco elements are also attached.
After that, you can add decorative elements.
How to make a fireplace out of a box with a solid back

Making a fireplace from cardboard boxes with your own hands is not so difficult - just find large cardboard packages from furniture or household appliances.
This easy process will take you a minimum of time, but it will wonderfully decorate your home. To create a fake fireplace, you will need a minimum of tools and an empty cardboard box.
In the niche of the hearth, you can place waxed candles or decorate it with diode bulbs. To create this shelf, we cut out 3-4 parts of the same size from the box.
According to the established dimensions, according to the sketch, an ordinary box is assembled, with a solid back wall.
We also start by cutting out the portal panels drawn on the box.
The second option is to install the portal on the surface on a fully sealed box.

If one of the adjacent walls is the side of the cabinet, then it is necessary to calculate the dimensions so that the finished structure is flush with the cabinet and does not protrude.
The thickness depends on your wishes, you can make it a small twig or a larger log. Their width can be made the same or slightly larger than the width of the portal. Otherwise, the whole structure will collapse. When installing the top shelf, remember that its weight should not exceed the weight of the fireplace base.
But if you're going to put heavy objects on it, like vases, for example, then just the top of the box won't be enough to hold it.
Then we install the prepared portal, fixing it securely to the base with construction tape.

The ribs can be assembled into a lattice, or they can be randomly glued to the bottom and lid of the box.
To do this, we make a thinner tube, after the bonding glue dries, the branch is cut into small knots, which we then attach to the logs. Next, we create knots for these logs. Strips of cardboard are cut, which are then folded into a tube.
It must be said right away that there is nothing particularly difficult in the manufacture of this decor element, and it can be performed not only by a man with skills in construction, but also by the owner of the apartment.
Making them is very easy. Therefore, it is desirable to make it still more rigid.
How to make a decorative fireplace with imitation fire
It should be noted here that there are also several options for the execution of the portal. There may be two options.
Having decided on the dimensions, we create a sketch, where we mark all the dimensions.
Before proceeding with the direct creation of a fireplace, it is necessary to carry out a number of preparatory work. By planning everything well, you will ensure the quality of the result.
For example, you can make a fireplace out of boxes with your own hands - let it not be able to warm the apartment, but it will definitely add comfort and cheer up your household.
It all depends on your imagination. We nurtured the idea with a fireplace for a very long time, went to all kinds of construction markets and shops, but since the real one didn’t suit us, we went through the options.
Great site. Thank you very much! Let's remember the happy childhood of the era of developed socialism together.
Fireplace from boxes for the new year

Do-it-yourself fireplace from boxes for the new year
A fireplace made of cardboard boxes with your own hands is not so difficult to make - just find large cardboard packages.
For example, a cardboard box from a plasma or LCD TV is well suited. The manufacturing work will take quite a lot of time - you need to cut out the details, paint, putty and decorate them. Nevertheless, the result will not leave you indifferent - it is difficult to distinguish a well-made fireplace from boxes with your own hands from the real one.
What you need for the specific example below:
- Large cardboard box
- Foam skirting boards (borders)
- Glue type "Moment"
- Decorative foam bas-reliefs
- White water-based paint
- Stationery knife
Preparing a fireplace from boxes with your own hands for the new year
- To get started, make a drawing of a fireplace - examples can be found on the Internet, peep in specialized literature, or come up with your own.
Do-it-yourself cardboard fireplace from boxes
Print the picture and calculate the dimensions of your product on the drawing, according to the size of your box and space in the room.

- Draw the layout on the box - use a ruler and a simple pencil so that the markup is clearly visible.
Auxiliary lines can be drawn with a pen.

- Cut out the window for the fire as follows - with a clerical knife, push deep grooves in the cardboard so that the edges can not be cut off, but bent inside the fireplace.

- Glue the resulting blades to the back wall of the fireplace with Moment glue.

The preparatory phase is over.
Now you can start decorating the fireplace from the boxes with your own hands. The master class continues!
Do-it-yourself fireplace decoration from boxes for the new year
- Cut foam skirting boards (borders) of the right size for the edges of the hearth, decorative elements - you can buy them at any hardware store. Cut the pieces at a 45 degree angle so that the borders can be folded into rectangles later.
- Glue the elements in the marked places.

- In the center of the side elements of the fireplace, glue decorative foam plastic bas-reliefs in the form of angels.
Decorate the top edge with a beautiful plinth, forming a future mantelpiece.

- From above, your product should look something like this.

- From Styrofoam or other similar lightweight material, cut a shelf to the desired size and glue it on top of your fireplace.

Painting can be done in different ways, depending on what effect you want to achieve.
If you need an aged surface with cracks, putty the entire surface with white putty for and dry with a hairdryer, after drying the surface will be covered with small cracks.
To achieve an even smooth layer, paint the product with water-based paint in 2-3 layers.

Show your imagination - the fireplace can also be decorated using all kinds of Christmas decorations.
Fire can be made from candles or garlands laid in the hearth. You can simply print out a large photo of the fire and stick it on the back of your fireplace insert.
Such a fireplace is perfect not only for decorating any home - many photo studios use such decorations when creating a home or holiday interior.
Fireplace from boxes for the new year (video)
Do-it-yourself New Year's fireplace from boxes
We often associate a fireplace with Christmas - it is with its help that Santa Claus, according to the beliefs of many Western peoples, sneaks into the house to put gifts under the Christmas tree.
Despite the fact that Santa Claus is closer to us, it doesn’t hurt to make a New Year’s fireplace with your own hands out of the box. So you can gather all your relatives near the family hearth, literally, on a festive night.
To make a fireplace out of boxes with your own hands, the step-by-step instructions assume that you have a lot of Christmas decorations for the house, which are also easy to make yourself.
- Take 3 boxes: wide and flat from the TV and 2 small rectangular boxes from the speakers.
Glue them together like in the picture. If necessary, cut the workpieces in height to achieve one level.

- Take another cardboard box and cut out the top border for the fireplace from it, equal in length to the two sides of the blank and the front.
- Glue the border. From above, decorate it with a patterned plinth, as in the first master class. Attach a foam board of the correct size.

- Cut out a lot of rectangles with rounded ends and glue them in rows on the workpiece with PVA glue - they will create a semblance of bricks.

- Prime the fireplace from the boxes with your own hands in 1-2 layers so that all its details become the same color.
If this is not done, when painting the fireplace, it may turn out different colors.
- After the primer is completely dry, paint the fireplace brown, the baseboards on it yellow. Also, dip a dish sponge into the yellow and lightly dab some paint on the bricks to give them texture.
- Decorate the fireplace with all kinds of New Year's toys, and put a glowing garland rolled into a ball - an imitation of fire - in the hearth.

It will be even better if you replace the yellow paint with gold or silver - thanks to it, your fireplace will simply shine!
Material taken from the page MEGAPOISK.COM
False cardboard fireplace: how to decorate the room yourself for the New Year holidays
Unfortunately, not everyone can afford luxurious houses and mansions with fireplaces and stoves. However, everyone wants to create a warm and cozy atmosphere in their small house or apartment. I especially want comfort and warmth when the New Year and Christmas family holidays are approaching.
We invite you to find out how you can easily and quickly make a fake cardboard fireplace with your own hands in absolutely any room.

Basic Tips and Tricks Before Starting Designing an Indoor Fireplace
Before proceeding with any actions and manipulations for the manufacture of a decorative fireplace in your room, you need to plan and prepare everything you need.
- Determine the future location of your cardboard fireplace.
It is best and more practical to place it along a large and free wall in your house or apartment. With this arrangement, this element of decor will look advantageous and spectacular.
- Decide on the desired dimensions of the cardboard fireplace. Make all the necessary calculations and measurements.
For the convenience of working in the future, draw a detailed drawing of your future cardboard structure.
- Prepare in advance all the material necessary for making a fireplace.
Collect large cardboard boxes from household appliances. It will be much easier and more convenient for you to work with such materials.
- To glue parts and corners of the structure, you will also need a large amount of PVA glue, as well as masking tape.
- Consider the look of your cardboard fireplace. If necessary, stock up on moldings, corners, wallpaper, paints or other decorative elements.
A simple option for making a wall-mounted fireplace with your own hands
We offer an affordable and detailed master class on making a cardboard fireplace for decorating a room for the new year.
Take a large sheet of thick cardboard and cut it out according to the template outlined in advance.
The entire structure must be cut. You should make a strong and reliable foundation for your future fireplace. Use stiffeners for this, which you place inside the cardboard frame of the false fireplace.
The base of the structure should be larger than the false cardboard fireplace itself, by about ten centimeters. More accurate calculations need to be made.

There are two main ways to make a base for a fireplace design:
- Cut out cardboard material with small sides, and use PVA glue to glue the stiffeners.
- Cut out two panels of the required size.
One will act as a surface, and the second in the form of a bottom, on which stiffeners are also glued.

New Year's fireplace from boxes: simple hastily, beautiful for a long time, and even with real fire
Open the marked cardboard and cut it out.
First you need to form the front part in order to fix the frame on it.
On the cut box, it is necessary to mark the window for the hearth. Cut it out with a utility knife.
The flaps should be bent inward.
It is also necessary to cut a rectangle out of cardboard, which will act as a ceiling. It is attached with adhesive tape. From the inside, the portal is attached using frame panels.
After that, it is necessary to glue the prepared cardboard on the gratings. The decorative portal is installed on the prepared base and fastened with PVA glue or adhesive tape.
If necessary, the craftswoman can paste over the frame with wallpaper or paint.

The most important and final stage is the decoration of the completed fireplace design.
Try to reproduce the design of stones or brickwork. Use a thin molding to divide the fireplace into several separate zones and sections.
Stucco elements glued to the structure with liquid nails look interesting and original. The columns placed on the sides will give a noble and complete look to your cardboard fireplace.
At the finishing stage, all decorative elements must be coated with white water-based paint.

Themed Video Compilation
We invite you to watch some interesting and useful videos on the topic of making a cardboard fireplace with your own hands.

