How to make an attic window? How to install a skylight with your own hands? Windows built into the roof.
For many centuries, the attic of a residential building has served its owners as an indispensable repository for all necessary and unnecessary things. In addition to its main purpose, wonderful libraries, living rooms and comfortable dressing rooms are obtained in the attic. But if you leave such rooms under the roof without sunlight and natural ventilation, all the things stored here will simply deteriorate from mold and the smell of dampness.
After all, all you need is three factors for mold to attack everything it can - it's heat, darkness and the lack of fresh air. Why and in any attic, regardless of its purpose and insulation, without fail, according to building codes and rules, an attic window is made - in all its diversity. And how to choose the right form, deal with the basic functions and install the window yourself, we will now tell you.
Attic windows have been around for a very long time, and they have a rich history. In Russia, all house owners tried to decorate such an element, paying attention to it no less than a standard window frame on the first floor.
You will also be interested to know why an attic window is sometimes referred to as a dormer window. It’s just that “hearing” has long meant in Russia a “hole”, “wiretapping”, “hole”, an opening for hearing; that is, the dormer window is a “hearing” in the roof. Such windows were always needed in order to dry the hay well in the attic and not let the wind blow off the roof. How? Now let's reveal all the secrets.
Here is a small overview of dormer attic windows:
And a little about the attic:
To begin with, let's figure out what functions modern attic windows already have and which of them are important, first of all, for you.
Types of attic spaces and their requirements for windows
So, attics are of two main types: cold and warm. And they are quite different from each other in matters such as ventilation, internal temperature and insulation.
In a cold attic, there is usually natural ventilation, which allows you to maintain a temperature at which condensation and frost do not form, and the free movement of air, in turn, relatively reduces heat loss from the lower rooms of the house. Those. a cold attic is a thermal cushion between the living rooms of the house and the roof. Such an attic is great for storing household and household items, and two windows for ventilation and a threshold amount of light are quite enough for it.
But in a warm attic, sloping walls are usually insulated. The residential attic is warmed through an uninsulated ceiling with warm air from the lower living rooms, and only occasionally the floors of the attic are specially insulated - if there is a bathhouse or sauna under it, and at night it is impossible to exist in such an under-roof dwelling due to heat.
Also, in addition to the windows themselves, special ventilation units are usually installed here. And therefore, there are already much more requirements for the attic window: light, design, ease of opening and closing. And all these chores make sense: it is quite difficult to do without a warm attic when there is not enough space in a residential building. And this is a matter of time.
Therefore, let's figure out for which specific type of attic which windows are needed.
Functions and purposes of attic windows
The main and primary function of the attic window is ventilation. And it doesn’t matter if the attic is residential, like an attic, or we are talking about a technical room. In principle, all types of attic windows are similar in this respect, the only difference is how convenient it is to open them and whether they will close at all.
Immediately, we highlight another important purpose of windows for a cold attic: not so much ventilation as equalization of pressure inside with the street during strong winds.
After all, when the wind flows around the roof, in the attic this air pressure will always be lower than on the street, and according to the law of physics, the wind will have a lifting force. It is she who in hurricanes rips roofs off houses. But properly organized dormers prevent the formation of such a nuisance.

The next destination is attic lighting. Moreover, it is important not only the fact that valuable sunlight penetrates under the roof, but also that it is not gloomy in such a room. For a residential attic, this is important in aesthetic terms, and for a cold one, in practical terms, because the same mold feels quite good in twilight, not only in darkness.
There is already a huge difference what shape the window you install: some give a little light, others are rich in direct sunlight, from which you have to protect yourself, and others, like a panorama or a skylight, are indispensable for creating a cozy bright attic without a single dark corner.

The attic window still sometimes serves as a way out to the roof, if it is installed additionally as a revision or technical one. But a stylish roof window has more than once saved someone's life in case of fire. Therefore, it is always better to make an opening through which you yourself can get out.
So what to choose?
Our verdict: if you are now faced with the question of whether it is worth installing small windows in the attic, or is it better to give preference to beautiful attic products, stop at the second option. The fact is that, as modern life shows, more and more often simple attics in residential buildings are being converted into living quarters.
It’s just that sooner or later the owners of the house come to the conclusion that under the roof it would be nice to arrange a personal office, put exercise equipment there or make a creative mini-library. Or even place a billiard room there or convert the attic into a guest room with a home theater.
Finally, a wonderful children's playroom is obtained under the roof, where you can scatter toys as much as you like, play noisily with the neighbors' children and not pester anyone from home. That's when the problem arises: there is a window, as it were, but there is very little light under the roof. And no one wants to climb to break walls and disassemble the truss system, and this is often fraught with new roofing problems. Therefore, if you are building a house now, but assume that for another five to ten years there will be only old things in the attic, let them gather dust in good lighting.


Forms and types of attic windows
Done with features? And now it's time to choose a good shape and design.
Attic windows can be of very different shapes, and even perform important decorative functions on the exterior of the house. In total they are divided into the following types:
- dormer, or technical window on a flat roof;
- roof window. A standard attic window gives slightly less light than a roof window due to its more compact size.
- semicircular window. The semicircular shape looks quite attractive on absolutely any home and serves as a designer decoration in itself.
- quadrangular window with pitched roof;
- a window with a hip roof;
- attic window with a flat roof. The flat roof attic window has a special design: it has additional gutters, thanks to which water does not linger on the top cover.
- with a trapezoidal roof or panoramic;
- oval window;
- rectangular window. A rectangular attic window looks like a regular flat-roofed window set. The only point: on this roof you need to make a slope of 15 degrees.
- triangular window. A triangular dormer window for the attic is most often built in country houses and cottages. This design does not have walls and a visor - these functions are performed by the roof slopes themselves. As a result, such a window has much fewer joints, which is valuable in itself: fewer problems with waterproofing. But, if the top of such a window is the apex of the triangle, then the illuminating functions will be slightly lower. But the most popular today can be called the design of the attic window with a semicircular shape, which is still funny called "bat" or "frog".
- window with a panoramic view;
- clerestory. If the attic window is designed to give more lighting, then the so-called anti-aircraft flashlight is installed.
See how simple and beautiful in practice the arched attic window is:

And now a little about the pros and cons of each type.
Standard windows: simple and unpretentious
One of the easiest options is to put the most ordinary windows in the gable walls. But this option is possible only if the roof itself is shed or gable. And if it has many facets and it is of complex architecture, then nothing will work out. In addition, just one window may not be enough for a residential attic, especially if the view from this window is not so hot.
See how easy it is in practice:

Panoramic windows: a lot of light and a beautiful view
Today, panoramic skylights are especially popular, which provide uniform illumination of the entire attic. The intensity of their illumination directly depends on the angle of the roof and the cardinal points - south or north. In general, in modern houses in Russia it is fashionable to install larger roof windows so that more light enters the attic.
Roof windows: a universal option
The roof window also differs from many other types in that it has a simpler design and can be placed directly on the roof slope - and at the same angle as itself. Installation is so simple that it does not require the entire roof structure to be redone, and it is this type of window that is most often preferred when remodeling an attic space.
Lucarnes: for a special aesthetic effect
Separately, we note such a type of attic windows as lucarnes. Lucarnes are dormer windows, which are decorated in the style of the Renaissance or in the style of Gothic architecture. Lucarnes are especially popular in Poland, and thanks to the well-known construction magazine of this country, there is a certain fashion for lucarnes in Russia as well.
The lucarne itself is one of the most important architectural elements of a house, the shape and design of which influences the style of the entire building (beautifying it or making it gaudy). Whereas the roof window is less noticeable on the roof, and its style decisions are not so important.
Lucarna is also different in that it forms such a niche in the attic, and most of the light is right next to it. And further from such a window, the darker. And already at a distance of 4-5 meters, the light is not enough. What can we say about the slopes of the roof, under which there is even partial shade. Therefore, the uniformity of illumination in the attic when using this type of windows directly depends on the width of the lucarne and the method of arranging the side walls. Of course, such a room, on the other hand, seems more comfortable, and some modern interior designers prefer this type of lighting rather than bright light, like in the operating room.
At its core, a lucarne is an additional extension on the roof with a vertical window. So, a narrow lucarne is often arranged when restoring old houses, or when purposefully styling them antique. But it is worth remembering that such an attic window has a specific shape, which entails some changes in the roof structure.
The simplest type of lucarne attic windows is the “beaver tail”, which is covered with flat tiles. A little more complicated is the “bull's eye”, but it also looks so impressive that it is hard not to notice it when passing by such a house. And you will be surprised to know that this type of window still has a lot of functionality in itself. Although at the same time their implementation is a very difficult task, even for an experienced roofer:

So, for the “beaver tail” window, more flat tiles are used. Roofing with a "bull's eye" will cost you, of course, more expensive, although it will stand out favorably among all other typical buildings. In addition, you will have to hire an appropriately qualified roofer, and the window itself will be made of glued wood - this is an expensive material, not to mention that you will have to make a special order.
According to the rules, the "bull's eye" must be designed at the stage of development of an architectural project. To begin with, a project is made, then the truss frame is modified, the base is made and waterproofing is laid. After that, the roofing is laid and aprons are mounted. L
Any errors at this stage will cause the doors to lock incorrectly or get stuck. Result: freezing of the walls around the entire perimeter of the window. Therefore, in the case of such a window, it makes sense to trust only a professional. Therefore, in most cases it is better to equip the attic window simpler, but with a clearer geometry. And the choice today is huge.
Attic window selection criteria
Now you should pay attention to the narrower parameters of attic windows: how much light they let in, whether it will be convenient to open them and what are the advantages of individual market offers.
Usability parameter
As for the choice of material for the manufacture of attic windows, there are many nuances. So, wood is a wonderful material that absorbs noise well, retains heat and gives irreplaceable comfort to the entire interior. But wood is also sensitive to precipitation, and therefore it is better to give preference to plastic structures.
For the rest, be guided by whether additional elements and insulation will be supplied with the window itself. It depends on how easily you solve the problems of waterproofing and repairs in the future.
Illumination parameter
A roof window illuminates the attic more evenly than a dormer window, although here too much depends on the angle of inclination. Standard skylights are good because, unlike lucarnes, they are tilted, so more light enters through them.
Their surface may be smaller than the surface of standard conventional attic gable windows. Therefore, their area most often ranges from 1/8 of the floor surface, and at the same time, the lower edge of the window should still be at a distance of 90-110 centimeters, and the upper one - 185-205 above the floor.
And this is the main drawback of modern skylights: a lot of direct sunlight enters the attic, and the things in it simply burn out and overheat. Therefore, it is customary to install special Roman blinds and awnings on roof windows, and this is a slightly different design and other costs.
That is why skylights are most often placed on the north side, from where more soft diffused light enters. Again, there is a minus here: snow lies longer on the northern slopes, and therefore such leaks are more likely, not to mention the seasonal inability to properly ventilate the room. But this does not mean that everything is bad from any side, just weigh the pros and cons.
Therefore, in terms of illumination, the shape of the attic window is of great importance: if it is horizontal, there will be more light, if vertical - a little less. But most of all, of course, light enters the attic through panoramas, especially direct sunlight, which can lead to overheating of objects.

There are certain studies that show that slanted attic windows let in 30-40% more sunlight than vertical ones. Therefore, if you are going to make a rest room, a SPA corner or a bathroom out of the attic, then it is better to put more windows.
constructability parameter
There is also a difference in at what stage of construction it is possible to install attic windows from different materials. So, metal-plastic ones are allowed to be installed even before finishing work has been done, especially wet ones. After all, plastic is resistant to moisture, but wooden ones can dry out after that.
Moreover, with wooden windows, if you already had to install them before such work, you will have to constantly fiddle around: ventilate, close-open, make sure that condensation does not fall on the inside. All of this is a waste of valuable time.
Comfort parameter
And now let's come close to the issue of opening attic windows. So, the most popular option is a design with an average rotary opening. Such windows are good because they can be left ajar or the sash can be rotated around its axis. This is very handy when you need to wash windows. Also note that the handle is placed on top of the frame, then you can put something else under the window.
If you plan to install attic windows and make an attic there someday, then choose those that are installed high enough and controlled with a remote control: they open and close. For example, attic windows are popular today, which close themselves at the first drop of rain - all thanks to a special sensor. Amazing, isn't it? And they are easy to install:

Staffing parameter
Modern manufacturers are also hard at work on the many disadvantages of attic windows. For example, skylights are always at an angle and look directly at the sky, and therefore, in the heat, the sun's rays penetrate in large quantities. Therefore, manufacturers produce a whole set of sun protection accessories, such as blinds and interior curtains, as well as create new glass, which partially reflects the sun's rays.
A finished attic window usually comes with an outer insulating flashing that will protect the window from rainwater and snow, forming an airtight connection with any roof covering. Mounting elements should also be included there: corners, plates and brackets. In addition, each of us has the opportunity to purchase an additional kit for high-quality installation, which will help the installation without disturbing the waterproofing layer of the roofing pie:
- Often, the kit may include corner aluminum profiles, internal corners and a special moisture-resistant adhesive tape for the membrane.
- Other manufacturers also offer a warming belt made of sheep's wool, which is distinguished by its special elasticity and thermal insulation qualities. And some modern windows are equipped with a special film for connection with a vapor barrier.
- The largest manufacturers also offer an additional polyethylene foam contour and a special polypropylene waterproofing apron to insulate their product. There is also a sealant and a special adhesive tape.
As a result, when using all these additional kits, you can increase the life of such windows by 5-10 years more. Here is a good example of how all this goodness is used in practice:


The subtleties of installing attic windows
And now we have come close to the question of how to properly install this roofing element. All attic windows do not have to be placed on the same line at all - this can be done in a semicircle, in a checkerboard pattern and in any other arbitrary shape. Just keep in mind: the higher you install them, the lighter it will be in the attic, which, of course, is only a plus.
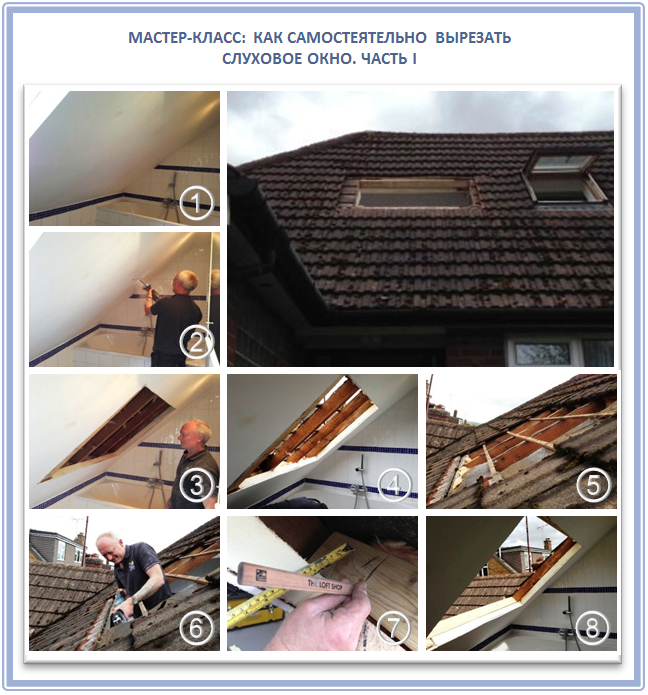
According to all the rules, it is necessary to equip the attic window in the process of creating the roof truss system itself, because it in itself is the same roof, only in miniature. Although at the end of construction work, the window is also cut in, however, already with many difficulties. But we will tell you how to deal with all these difficulties. Note that you will need to do some construction work on the ground, before installing the window into the truss system. For example, this is indispensable in the case of a dormer window:

Stage I. Calculation and design
The first thing you need to know when installing attic windows is the distance between the rafters, which is already there. Moreover, this parameter does not depend on the opinion or whim of the developer, but is determined even in the design process, depending on future loads and the shape of the roof itself.
For example, the smaller the slope of the roof, the more often you will have to install rafters. Moreover, it is impossible to change the pitch of the rafters at your own will, so initially count on the fact that it is better to choose windows according to the already existing distance between the structural elements.
The calculation criteria for roof and attic windows are the same:
- The surface of the window itself should be in the region from 1/6 to 1/8 of the floor surface, and if the slope of the roof is very small, then 1/5.
- The window sill should be above the floor at a height of 85-90 centimeters, and the optimal height of the window opening is 120-150 centimeters.
- The width of the lucarne or roof window should be more than half the width of the room - this is the only way it will be possible to properly illuminate all rooms, without dark corners. This is how the volume of the room visually increases. The important thing is that you can walk up to the window and not hit the roof.
The rule here is simple: the smaller the angle of inclination of the roof, the higher the attic window should be located.


Now let's figure out how to calculate the number of attic windows. If we are talking about a residential attic, then all the windows together should be a little more than half the wall. If you leave the attic cold, then at least one window at the opposite ends of the roof, for natural ventilation and to reduce the lifting force of the outside wind.
Sometimes it makes sense to install two windows side by side or one above the other - for more lighting. But keep in mind that heat escapes through any window. And be careful when designing a future attic with a solid row of windows.
Very often in practice it turns out that at the end of the work performed, the roof structure is slightly shifted, there are certain errors, and it will be impossible to make an even row of windows in such a roof. Therefore, in this case, it is easier to install vertical groups by placing additional windows in one line and using special elements along the entire length of the slope.
If the skylights are too close together, snow and ice will accumulate between them. And this is another additional load on the supporting structures of the roof, and it is important to consider it. In addition, the walls of such windows must be additionally protected from moisture penetration, because the snow and ice suspended on them will always melt a little.
And the last thing: in the insulation of skylights, many easily make mistakes, due to which cold bridges are formed - and all because of the complex design. See how many different moments are here:

Stage II. Preparing the truss system
So, in the process of building a truss system, gaps between the rafters are specially left in place of future attic windows. At the same time, taking into account the fact that around the attic windows the rafters themselves must be reinforced, because they will be subjected to additional load.
The main thing during the installation of the attic window is the waterproofing between the roof itself and the window, namely the need to protect the window from drips. Note that only one type of attic windows are mounted immediately in the plane of the roofing material - these are roof windows. And with them in terms of waterproofing, you will have to tinker the most.
In modern houses, the standard distance between the rafters usually ranges from 60 centimeters to 1 meter, and therefore windows are now produced most often from 55 to 134 centimeters wide. And the easiest installation is when the window itself fits perfectly under the distance between the rafters. If the dimensions of the windows with the distance between the rafters differ too much, special connecting structures will help you.
Therefore, we call the ideal situation when the distance between the rafters exceeds the width of the window box by only 2-5 centimeters. Thanks to this, you can leave a gap of 1 to 2 centimeters wide between the rafters of the window frame, which you then fill with heat-insulating material. If the window is too tight against the rafters, the insulation will be difficult to install.

But most of all, developers do not like to face a situation where the attic window is wider than the opening. Indeed, for proper installation, you will have to cut out parts of the rafters and insert auxiliary beams. These are fixed at a distance of 3-5 centimeters from the top and bottom of the window. The vertical beam must be fixed behind the window frame at a distance of 2-5 centimeters for the same insulation.
So, what if the attic window is smaller in width than the distance between the rafter legs? In this case, no preparation is needed for the window itself, but between the rafters you will have to build additional side walls and a roof for the future window. Then lay the roof covering with insulation.

Most often, attic windows, which are less than the distance between the rafters, are already inserted on the finished roof, and sometimes not alone. But what if the width of the attic window is much larger than the distance between the building legs? This is not uncommon when building new homes. And therefore it is better to design such windows even before the construction of the truss system, especially for a specific niche. Otherwise, you will have to compromise the strength of the future roof, because you can not do without cutting out part of the rafter legs.
True, for this purpose you can use crossbars and additional attachments that will take on all the necessary load that should have gone on the cut off parts of the rafters. But there is one thing: such work should be done only by an experienced builder.
Stage III. Selection of fasteners
If you are installing attic windows yourself, be aware that there is a required fastening for each type of window and you cannot pick it up by eye. So, anchor bolts, anchor plates and frame dowels with metal wheels are most often used. But usually all this fastening is supplied with the window itself and is calculated by the manufacturer.
After all, the same colored PVC windows cannot be installed with too rigid fixation, because of this they quickly deform and very soon the sashes will no longer fit tightly enough to each other.
But dowels are not used for mounting wooden windows, since they cause unnecessary stress in the frames, which is why modern manufacturers do not replace the window if it is deformed if the mounting method was changed by the owner.
Stage IV. Window frame installation
Next, after you have fixed the window, fill the shutter around the entire perimeter of the box with sealing clamped tape. Only in this way can you achieve the required level of sound insulation and wind protection. Be sure to seal the wooden windows with self-adhesive tape during the process to keep them clean. And remember that ordinary tape is not suitable here - the tape must be stable, with acrylic varnish.
Two more important rules: attic PVC windows are not sealed with materials with bituminous components (they heat up in the sun), and they are not sealed with construction foam, which can greatly increase in volume and thus deform the profile. Also remember that when installing PVC windows, the fastening needs to be more rigid, and the mounting plates themselves will take more.
As for cutting a window in inclined slopes, you can do this task yourself:


In fact, you only have to tinker with the attic window located directly under the ridge:

If you are working with frame dowels, be aware that there are strict guidelines for their diameter and hole depth. So, you need to make a hole even before you set the window formwork, and for this you will need an elongated drill so as not to damage the surface of the frame.
Problems can arise, first of all, with PVC windows that have been reinforced with special steel profiles. On such, the dowel head cannot rest - only on the wall of the PVC profile. Otherwise, the window will crack. Correctly do this: drown the mount completely into the window frame and close the hole above it with a plug.

Stage V. Finishing work
After removing the dried foam, you need to close all the fittings so that it is clean. Lastly, remove the protective film from the windows.
Most often, attic windows, which have a smaller width than the distance between the rafters, are already inserted into the finished roof, and sometimes not in any quantity. But what if the width of the attic window is much larger than the distance between the rafter legs? But this is not uncommon in the construction of new houses. That is why it is better to design such windows even before the construction of the truss system, planning to leave special niches for them.
Otherwise, you will have to compromise the strength of the future roof, because it will not be possible to do without cutting out part of the rafter legs. True, for this purpose you can use crossbars and additional attachments that will take on all the necessary load that should have gone on the cut off parts of the rafters. But there is one thing, such work can only be done by an experienced builder.


The main advantage of modern attic windows is that they are able to withstand fairly heavy downpours, gusts of wind and snow pressure no worse than the roofing itself. Plus, their competent installation, and your attic will be truly bright, dry and cozy.
In order to be able to lighten and ventilate the attic or attic, windows must be arranged in the roof. In this article we will tell you how to build windows for the roof of private houses, what they are and what are the main differences between them.
Types of roof windows
To understand what a roof window is called, you need to figure out what it can be. If it is located vertically and is built into the roof truss system, and also serves to illuminate and ventilate the attic space, we are talking about a dormer window. At the same time, skylights are built into the roof at an angle, which allows for better access to light. In addition, such windows are much easier to build. It is noteworthy that dormers first appeared at the beginning of the 19th century, and dormers - after the Second World War.
When determining which of the options is suitable in a particular case, it is worth considering some architectural features of the building. If the house is old, and it is undesirable to make any changes to its appearance, a dormer window would be the best option. At the same time, skylights are in great demand. You can turn to this option if you want to equip a residential attic above the house.

Let's take a closer look at what dormer roof windows are. To make such a window, it is necessary that there are special niches in the roof. The frame of the window must be joined in several places with the main truss structure, therefore, accurate calculations are necessary for its arrangement. The side walls and pediment will need to be sheathed with plywood and finishing materials. The place where the window opening will join the main roof must be insulated and waterproofed.
But the roof windows of the attic type are fixed between two rafters. As a rule, such windows are mounted in roofs with a slope of 15-20º, since they will be subject to precipitation. Currently, roof windows are produced that are reliably protected from leaks and cold air. However, you should not try to make them yourself, it is best to purchase a ready-made design from the manufacturer. Such windows in the attic roof will need to be fixed with a base plate. They are also equipped with a special flashing, that is, a metal frame, which can be opened with friction hinges so that the water that gets inside it flows onto the roof.
We mount a window in the old attic roof
Quite often, when the owners of private houses seek to equip a window in the attic, they still do not want to overhaul the roof. In this case, an acceptable solution would be the arrangement of the auditory opening. It is quite possible to make such a window in the roof with your own hands.

Location selection
According to the regulations, the width of the window should not exceed 10% of the roof perimeter. This is due to the fact that large openings lead to significant losses. Moreover, glazing is not able to fully protect the roof from external influences. It is best if the window opening is located in the center of the roof between the supporting beams.
Do-it-yourself frame installation
Before installing the window on the roof, it is necessary to cut a hole of the required size in the roofing material, such as slate. Next, a wooden frame made of 40 × 50 mm timber is mounted on the roof rafters, in which a window frame is installed. It is advisable to use stainless fasteners. The frame itself is fixed on the rafters with self-tapping screws. Alternatively, you can equip a frame window built into the roof, which will be parallel to the main roof, however, it is better not to carry out such work on your own.

For waterproofing, you can use the following sealants:
- acrylic;
- based on bitumen;
- silicone;
- self-expanding vapor barrier tape.
It should be noted that the latter option is the most acceptable. At the top of the gap can be filled with acrylic-based sealant. It is desirable to carry out all work in the dry and warm season. However, for those who still want to equip a dormer window in the attic roof with their own hands, we will describe this process in more detail.
Dormer types
If we are talking about a dormer window with a flat roof, it must be equipped with gutters. In this regard, the slope of its slope should be within 5-15º. A quadrangular window with a single or gable roof should have steeper slopes with a slope of 15º.
Triangular dormer windows are very often mounted in country cottages. This design assumes the absence of side walls, the function of which is performed by slopes. Although in this case less effort is required to perform waterproofing, the access of light through such windows is still significantly reduced. The exception is when the front part of the window is directed to the facade of the entire building. One of the new varieties of dormer windows is a rounded window opening.

The optimal choice among all types of dormer windows is a variety of skylight shapes. Along with the fact that this design does not weigh down the roof, it provides high-quality attic lighting. There are standards for dormer windows that are taken into account during design: the width of the opening should not exceed ½ of the attic width, the distance from the floor to the lower edge of the dormer window should be from 0.9 meters. Light quality improves as the height of the window placement increases.
Roof frame fastening
It is necessary to install a truss system for a dormer window simultaneously with the installation of a common roof frame. In the case of a gable window, such a frame will be a separate roof in miniature. It is noteworthy that reinforced rafters should be installed near the openings where the dormer windows will be located, which can withstand the additional load transmitted by their rafter system.

Crossbars are mounted on top of the rafter legs: the upper one will correspond to the dimensions of the window, and the lower one should be located at the level of the outer wall of the building. Vertical supports are attached to the lower beam, connected at the top by a transverse beam. As a result, a frame is obtained, which must be connected to the upper beam, placed on the rafters, using longitudinal bars. After that, rafter legs for the dormer window will be attached to this frame.
What frame is needed for a triangular window
Please note that when installing jumpers, you should not weaken the bearing capacity of the main rafter legs by making cuts on them. To fix the frame parts, it is desirable to use metal fasteners. When the levels are checked, you can proceed with the installation of the ridge and small rafter legs for the dormer on the roof. You can facilitate the work of making rafters if you first create templates. A moisture-resistant finishing material must be sewn on the side walls of the dormer window. The final roofing on the dormer window is laid simultaneously with the roof covering on the main building.
To avoid leaks and deformation of wooden roof structures, the joints between the main roof and the dormer window must be properly waterproofed.
Windows are not only the "eyes" of our home, but also a source of natural light and ventilation. The latter is very important for the attic or attic. Skylights come in different types. To install them correctly, you can hire a specialist, but doing it yourself is also a good option. About what windows are and how to install them with your own hands, we will tell further.
Types of roof windows
Windows for both walls and roofs come in a variety of shapes and sizes. Some of them are considered more decorative to give the roof a beautiful and unusual design - such windows are more often used for the attic. Other types are more focused on ventilation, provide high-quality ventilation of the room, and also for good lighting if there is no other source of light in the attic or attic.
Also, when installing a skylight, you should focus on which roof you need to install it on. The roof can be flat, single-pitched and gable. It happens that the roof has semicircular elements. All these nuances must be taken into account when buying a roof window in order to ensure not only the correct installation, but also the desired functionality. This is the ability to open a window, the right drain, and water does not flow into the structure, and moisture accumulates so that the right amount of light enters through the window.
Choosing a window for different types of roofing
There are two options for getting a window - make it yourself or buy it ready-made. The first option is cheaper, but the second is preferable, although it will cost more. But it was done taking into account all the nuances that a non-professional may not be aware of in order to embody them in his window.

What to look for:

- Triangular windows - this view is also placed on the roof with slopes. These windows do not have side walls; instead, the roof slopes themselves protrude. It turns out fewer joints of the roof with the window, therefore, there is not so much waterproofing material and, in general, there is less installation work. Typically, triangular windows are used for those attic spaces that have other types of lighting, as the shape of the window does not allow much light to enter from outside. In addition, it is rather problematic to provide them with convenient opening. But such windows look unusual and tasteful.
Roof with semicircular shapes - this type of roof in itself is quite original. But the frames for them are made only to order. It is necessary to take into account all sizes and shapes so that the frame fits snugly - this should be done by a specialist. Windows inserted into the openings of such roofs look like poured in, which gives the whole structure an image of fluidity. This type of roof windows is also considered decorative - they have an interesting design, they are often used for residential attics, as a source of soft and subdued lighting. Indoors, as in the case of triangular windows, it is desirable to have some other source of light.
Important: rectangular windows can be installed on a roof with a slope of 15°.
How to choose the right window

To make it easier to figure out which window is right for your roof, you must clearly define for yourself its further purpose. If the window is planned as an interior decoration inside and outside the attic, to create a play of light and shadow, then you can take windows of various non-standard shapes. They are perfect for any type of roof. But at the same time, do not forget to take care of another way of ventilation and lighting in the room, and you can also put a “blind” window that will not open.
Well, if you are thinking of putting a window on the roof for a practical purpose - that is, to be able to ventilate the room, create high-quality ventilation and good lighting, then it is better to take a standard quadrangular window. It should be convenient to open and close, including also have a ventilation mode. Of course, you need to take care of high-quality waterproofing. If you approach the matter creatively, then such windows can also look stylish and beautiful in the roof, create interesting lighting.
Important: windows come in two options - inclined and vertical. Experts recommend installing the first one for two reasons - more light and ease of installation.
Roof window installation
If we talk about the vertical option for installing a window, then it’s worth saying that many people don’t really like it, because for such a window installation in the roof, a separate truss system is needed. Then, due to the slopes formed, almost half less light enters the room than in the case of an inclined installation option. In addition, the sloping window from the side looks like a single structure with blood. Next, we will talk about how to install it in the roof.
What you need:
Tools - level, tape measure, chisel, pliers, saw, nails, as well as
Drywall;
Window frame - area for glass 0.7 m2
Material for waterproofing, insulation, as well as interior decoration;
Window flashing for sealing;
screw-cutting machine and corners for fastening.
Installation process:
First you need to prepare the roof and opening. At the same level as the batten, the roof must be fitted with slats where the installation will take place.
Using a saw, cut out the opening - its dimensions should be 45 mm larger than the window frame.
Then screw the mounting brackets into the slots in the corners of the box using self-tapping screws.
Before you fix the window frame in the roof opening, you need to lay a waterproofing layer and insulation on the sides. In this case, some part of the material should protrude outward, you will then remove all the excess with a knife.
Insert the window frame into the opening, lightly fasten it there on the sides, but not tightly.
After that, properly fix it and check all the gaps. If everything is correctly adjusted, fully tighten all fasteners.
Fasten the side plank and cut off the excess waterproofing.
Fasten the vertical bars.
Firmly press the flashings to the frame and close them with a lid.
The corrugation is attached to the outer part of the roof, and the vertical parts of the edges must be brought inward.
Depending on what your roof is made of, you need to remove the excess sealant along its line - just carefully cut it off with a knife.
The box is ready - insert the frame. Make sure that all sealing points are made correctly.
Important: be very careful and attentive when cutting the opening for the window. Its size should be about 45 mm, and this must be clearly measured. If you get too large an opening, then fixing it will not be easy. In addition, the appearance of the roof will deteriorate.


Triangular and semicircular windows are placed a little differently in the roof, but in general the system is the same. You can easily cope with this if you study the recommendations well. The differences depend on the shape of the roof, as well as on the type of window. But in any case, you can contact a specialist.
In conclusion, I would like to say that roof windows are installed not only for the possibility of ventilation and lighting of the attic space, but also as a beautiful design solution for the attic. Often it is used as a living room, and tastefully installed windows can be a great decoration for the interior. Unusual penetration of sunlight will create a pleasant atmosphere. Skylights are not only practical, but also stylish, so their choice and installation should be approached carefully.
VIDEO
Main types of skylights
Before you make a skylight, you need to understand what kind of window you need. Auditory are those that are located in the roof and are necessary to illuminate and ventilate the attic. Due to their vertical arrangement, the construction of a separate truss structure built into the roof is required. This is their main difference from the roof window, which is built into the roof at an angle. Dormer windows were invented in the first half of the 19th century, while dormers appeared after the Second World War.
In recent years, the use of skylights has become more and more widespread. In addition, occupying the same roof area, they give more light, thanks to the slope, in addition, they are much easier to arrange.
Yet the dilemma often arises: what to choose? If the house was built a long time ago and it is necessary to adhere to some architectural framework, then in this case, most likely, a dormer window will do. If the house was built relatively recently and you just decided to make a residential attic of your house, then an attic may also be suitable.
First, let's look at the auditory variety. For its device, special niches are needed, which the roof must have. The frame of the truss and side walls requires a large number of connections to the main roof, it is quite difficult to make it “by eye”. Therefore, you need a drawing created by a good specialist. The pediment and side walls are sheathed with construction plywood and sheathed with facade material. Roofing materials are laid on the roof at the same level as the main roof. The junction of the dormer window to the roof is waterproofed and insulated.

The roof window is fixed between two rafters. Mansards serve as a barrier to water flows, therefore such a structure is usually equipped mainly on roofs with a slope of 15-20 degrees. Modern roof windows are quite complex structures that have good protection against leaks and cold. It will be very difficult to make it on your own, so that it turns out to be of high quality and reliable. Therefore, you will make your life easier by simply buying it from a reliable manufacturer. Fastening to the roof is carried out using a base plate. To drain water, the frame has a special salary, represented by a metal frame, which is located around the perimeter. In order to open it, the design has friction hinges, which are located just above the center of the window. They open the window frame so that all the water that enters it flows onto the roof and does not get inside.
Window opening in finished roof
In private homes, there is often a need for a window opening in the roof. Completely redoing the roof is a rather long and expensive task, therefore it is possible to construct an auditory opening using several techniques.
Determine where the window will be
Window parameters should occupy no more than 10% of the area of the space below them. Large windows on the roof provoke a large loss of heat. In addition, their glasses are not strong enough and not as resistant to external influences as it is necessary. The best option is to position the window clearly in the center between the two roof beams.

Installing the window frame
Cut the desired opening for the window opening in the slate and begin assembling the window frame. It is installed on the supporting roof rafters using a special wooden frame 40x50 mm. It is better to fasten it to the rafters using stainless material. The frame is mounted with wood screws with tight fixation to the rafters. You can also mount a frame dormer window that will be parallel to the roof of the house, but such complex structures are best left to professionals.
Sealing and finishing the window opening
Sealants that are suitable for this:
- vapor-tight sealed self-expanding tape;
- acrylic;
- bituminous;
- silicone.
Self-expanding tape, laid in a layer around the perimeter, works best. From above, the gap can be sealed with acrylic material. Such actions are best done in warm and dry weather. If you decide to build a dormer window with your own hands, then let's talk about this in a little more detail.
Types of dormer windows

A flat roof dormer is usually mounted with gutters, so the roof should have a slope of 5 to 15 degrees. The quadrangular design with a single or gable roof is similar to a flat roof window, but it must have a slightly larger slope of the slopes, at least 15 degrees.
A triangular dormer window is most often found in cottages. This design does not have side walls, their place is occupied by roof slopes. This leads to a reduction in the amount of waterproofing work, but at the same time reduces the illumination of the attic if the front part of such a window is not directed to the facade of the house. Recently, an interesting solution has appeared in the form of a round shape. In the people, such designs are called "frog mouth" or "bat".
The most functional is a window in the form of a skylight. Visually, this is a lightweight construction that does not weigh down the roof, and it illuminates the attic perfectly. Specialists usually adhere to the following figures when drawing up drawings, determining the number and size of dormer windows: the total width must not exceed half the width of the attic, the lower edges of the dormer windows should be at a height of 0.9 m from the floor; the higher the location of the dormer window, the better the lighting occurs.
frame
The frame of the dormer window is mounted at the time when the roof truss system is being installed. If the roof is gable, the frame has its own crate and its own rafters. Basically it is a separate mini-roof. When a rafter system is being erected, in those places where dormer windows are planned, it is necessary to provide openings that enclose the rafter legs with increased strength, because they will have to take on the mass of the dormer window structure.

Then, transverse beams are laid on the rafter legs: the upper one - according to the size of the window, and the lower one - at the level of the outer wall of the house. Vertical racks are installed on the lower beam, which are connected by a transverse bar along the top. We get a frame, which we fasten with longitudinal bars with the upper beam, which was laid on. So we get the frame, but so far without the truss system of the window itself. The rafter system in the attic is made following the image of the main roof structure.
triangular window frame
When installing jumper beams, it is undesirable to cut into the rafter legs of the main roof structure in order to prevent a weakening of the bearing capacity. Fastening of all frame elements is carried out using metal fasteners. After checking the frame horizontally and vertically, you can install a ridge beam and small rafters of the dormer roof. The rafters are cut according to the template - this simplifies the work quite well. The side walls are sheathed with moisture resistant material. The roof of the window is mounted simultaneously with the execution of the roofing material on the main roof.
Properly waterproof the joints of the dormer window and the main roof so that there is no leakage.
It is believed that the arrangement of a residential attic is more complicated and more expensive than the construction of a conventional non-insulated roof with a cold attic. There are reasons for this:
- It is necessary to qualitatively insulate the attic.
- It is necessary to correctly mount the vapor barrier and the superdiffusion moisture and windproof membrane.
- It is required to install skylights, as required by the manufacturer.
The last point is often problematic. Errors in the installation of windows on the attic floor negate all the advantages of this room. As a result of jambs of illiterate builders, skylights leak in the rain, and condensate drips from the ceiling, damaging the finish. It is not surprising that many developers are distrustful of attics, believing that it is better to build a cottage in the old fashioned way. To avoid the most common mistakes when inserting a roof window into a roofing pie with flexible tiles, our video and photo instructions will help you, which tells you:
- How to calculate the size of a roof window depending on the area of \u200b\u200bthe room.
- How to choose a place in the attic roof for window installation.
- How to prepare a window opening for installing a skylight.
- How to install a roof window box and salary.
- How to install a condensate drain.
- How to make waterproofing at the junction.
- How to install the salary of a roof window and make heat and vapor barrier.
Roof window installation: planning
It is possible to mount a roof window both at the construction stage of the attic, and on a finished insulated roof with an already laid topcoat and layers of vapor barrier and hydro and wind protection. In the first variant, work is carried out sequentially, step by step, and usually does not cause difficulties. In the second case, you need to rack your brains on how to cut a window in accordance with the manufacturer's recommendations, going through the entire attic roof pie with flexible tiles.
The main difficulties of installing a roof window left “for later” will have to be carefully dismantled or cut through, moving from inside to outside:
- inner crate for finishing the attic;
- vapor barrier;
- insulation;
- superdiffusion membrane (moisture and wind protection);
- crate and counter-crate;
- sawing OSB boards under the opening;
- partially remove flexible tiles around the opening under the window.

The width of the roof window is set by the pitch of the rafters. If the developer does not want to install a narrow window, fitting it under the rafters, mounted at a distance of, for example, 60 cm from each other, then one rafter leg will have to be cut, strengthen the structure, etc. This increases the likelihood of errors by installers, the timing and cost estimates for the work. From here:
The installation of skylights should be planned at the stage of designing a house and calculating the truss system.

For reference, we are guided by the following figures:
- Skylights are recommended to be cut into roofs with a slope angle of 15 degrees or more.
- The window area is selected according to the formula: per 10 sq. m of the attic floor should account for 1 sq. m glazing.
- The upper part of the roof window (from the floor) is located at a height of about 2 m, and the lower part is about 1.2 m.
- The opening under the roof window should be at least 4 cm wider than it, optimally 6 cm.
- The length of the opening is approximately 4.5-5 cm longer than the length of the roof window.
Stages of installation of a roof window

alexnrg FORUMHOUSE Member
I decided to install a roof window in the house myself. Roof cake: rafters - a board with a section of 15x5 cm, a vapor-permeable moisture-windproof membrane, horizontal and vertical lathing, OSB, lining carpet, flexible tiles. Questions arose:
- How to properly install a skylight?
- How to prepare an opening?
- How to fix a window in the attic?
- How to remove condensate?
- What is a salary and how to set it?
Salary (metal frame) is a system of gutters for hermetic connection of a roof window with a roof covering. The flashing removes rainwater and moisture from the roof window when snow melts.

All work on installing windows in the attic is divided into a number of successive steps:
- Opening preparation.
- Assembly and installation of a heat-insulating contour.
- Installation of a roof window frame in a thermal frame.
- Installation of a shutter (double-glazed window).
- Adjustment of the side clearance and window rebate.
- Installing a condensate drain.
- Installation of a waterproofing apron.
- Salary setting.
- Insulation of slopes around the window and restoration of the vapor barrier circuit from the inside of the room.
Let's talk about the key stages of installing a roof window and how to avoid mistakes.
Preparing a window opening for installing a roof window
In the video instruction, the specialist tells how to prepare a window opening for installing a roof window if a roof has been built and roofing has been laid.
When driving vapor and waterproofing, the films are cut in an envelope (crosswise) and wrapped inside the room (vapor barrier) and out (wind protection).

The upper and lower parts of the opening are reinforced with lintels (between the rafters).

And batten bars, so that the edge of the OSB sheet does not hang in the air.

The lower support bar of the crate must be leveled in order to accurately set the roof window box and avoid, noticeable by eye, a height difference on the side slope.

Important! If OSB has not yet been laid on the roof- base for flexible tiles, then from above the opening is framed, made from striped OSB or plywood.

Assembly of thermal insulation and installation of a roof window box
The heat-insulating contour is mounted on a steel frame, which is easily assembled with latches.

The thermal insulation circuit is installed in the prepared opening.

Then disconnect the turnable part of the sash with double-glazed windows from the frame of the roof window.

Mount the mounting plates and install the box in the opening.

Important! Mounting plates(4 things.) are installed at the corners of the roof window, in the places prepared at the factory in the frame, into holes pre-drilled by the manufacturer for self-tapping screws.

With a large length of the roof window (more than 1.4 m), additional intermediate mounting plates (corners) are placed in the place of the pivot mechanism (hinges).
The roof window frame is installed in the finished opening. How to do it correctly, as well as adjust the side gaps and the rebate, is shown in the video.
Secrets of installing a condensate drain
The most important element of the roof window waterproofing system is a metal trough for condensate drainage.

The gutter is installed at a distance of up to 50 cm (optimally 20-30 cm) above the window in the same plane with a hydro- and windproof membrane.

In order for the condensate to flow down the chute, it is installed at an angle ( slope at least 3 degrees). Then the moisture will be removed to one of the sides (ventilation channel formed by the crate).

Difficulties with installing the gutter arise if it needs to be mounted on a finished roof. In this case, you will have to manually cut the openings in the crate, and do it carefully so as not to damage the wind protection film.

The easiest way to install a gutter is if the crate has not yet been installed on the roof, there is no base for flexible tiles and a soft roof has not been laid.
Preparing the site for the installation of the gutter consists of the following steps:
- In the middle of the rafter leg (on both sides of the prepared opening), a vertical cut is made on the film of the superdiffusion membrane.

- A chute is laid on the seat.
 I will lower the gutters, using it as a ruler, a horizontal cut of the film is made, so as to combine the vertical cuts.
The result is a windshield valve that slides into the gutter and catches all the condensate.

Steam and waterproofing at the junction of the roof window
At the end of the work, a waterproofing apron is installed, which protects the junction from moisture.

The waterproofing apron is glued to the frame going from bottom to top. Installation is simple - the protective film is removed from the adhesive layer (strip) and the apron material is gently smoothed over the top of the frame. Then the waterproofing apron is fixed around the window with staples.
Important! The upper part of the apron is wound under a gutter that drains condensate, and a valve cut from the windshield is wound onto a waterproofing apron. To prevent moisture from getting into places where they are made vertical cuts in rafters, them waterproofed with butyl sealant.

