DIY designer Christmas trees: interesting ideas and recommendations. What can you make your own Christmas tree from? DIY Christmas tree ideas for the New Year
New Year and Christmas are favorite holidays for children and adults. And it so happened historically that the New Year tree became the symbol of this holiday. On New Year's Eve, literally every home is filled with brightly decorated Christmas trees, and people can no longer imagine this fabulous winter holiday without its symbol with prickly green needles. Therefore, you can easily personify the Christmas tree in crafts, decorations and various interior details made with your own hands.
The main thing in the article
How to make a Christmas tree with your own hands: a variety of options
Mini Christmas trees will be a wonderful addition to the interior of any home or office on the eve of the winter holidays. There are a huge number of options for “hand made” Christmas trees and materials for them. Minimalism is still in fashion - the simpler the better. Perhaps it would never even occur to you to make Christmas trees by hand using some techniques, but when you see the ideas, you will be inspired to get creative.
Flat Christmas tree on the wall. Decorating the walls of a room has come into fashion quite recently, but is in great demand. Materials for decoration can be:
- boards,
- pages from old books,
- photo collages,
- live spruce branches,
- garlands, etc.
 Christmas tree made of coffee beans and burlap.
 You can also decorate a New Year's themed panel with the same materials.
Toys in the shape of Christmas trees. With such accessories you can decorate both the central Christmas tree in the house and hang it in prominent places in the room. It can also be free-standing mini-Christmas trees made of lace or fabric. It is appropriate to make a fabric Christmas tree in a house where there are children; the child will certainly not get hurt with soft toys attached to it.
 Creative Christmas tree on a leg or in a pot.


 Christmas tree postcard. You can create a New Year's greeting card yourself, using not only paper.


DIY paper Christmas tree: step-by-step master class
To make this Christmas tree, stock up on the following:
- Corrugated paper;
- Cardboard;
- Scotch tape (regular and double-sided).
You can choose not only green corrugated paper for the Christmas tree; on the contrary, a different color will only emphasize the uniqueness of the product. Looks expensive corrugated paper in gold and silver colors.
- Take a piece of cardboard and wrap it in a “cap”. Secure the cone with tape so that it holds its shape.

- Corrugated paper cut strips 2.5*10 cm. The larger the better, you will need a large number of them for the job. Twist each strip in the center into a kind of bow, bend it in half and place one layer on top of the other as shown in the photo.

- Stick the petals in a circle onto the cone in layers using tape.

- Secure the upper needles with double-sided tape so that all the errors in their fastening do not stand out. Be sure to place a bright decoration on the top - a star, a ball, a New Year's toy.

Volumetric Christmas tree made of paper: options with photos
- Take thick green paper . Draw a circle - use a compass or circle a vessel of sufficient size. Inside this circle, approximately in the middle, draw another circle, but smaller. Using a ruler draw the circle into 12 parts (sectors).
- Use scissors to cut each section to the length of the inner small circle.
- Make a cut along the lines, up to the depth of the inner (second) circle.
- Form a cone from each sector , the edges of which are secured with glue. The bottom tier of the Christmas tree is ready.
- Repeat the action with other layers, gradually reducing their diameter.
- In the center each part of the Christmas tree pierce a hole with a needle .
- Take wire And bend its bottom is a spiral.
- Pass all parts of the tree from large to small through this wire, cover the top of the tree with a cone made of the same paper.

Volumetric Christmas tree - star.
 Volumetric Christmas tree with hearts. Such decoration can also be created by...

 If you're interested, then this idea Christmas trees just for you!

- As you can see, there is no green color here, the Christmas tree can be made the way your heart desires.

- Bend and roll all the elements as indicated in the photo, use scissors to make cuts in the indicated places.

How to make a Christmas tree out of paper: options with magazine pages
- Take a magazine with many pages, so the Christmas tree will look magnificent. Perfect fit magazines - catalogs of women's cosmetics. They are small in height and thick in volume, which will allow you to make a stable Christmas tree.
It is very important that the magazine is secured with paper clips; magazines with glued pages will not work.
- Next, fold each page of the magazine as shown in the picture, the fold of the page will be the edge of the Christmas tree.

- Make a round base for the tree and glue it to it, it can be cardboard, or you can take an old disk. Attach a leg to the very base using a spray cap or a cardboard roll from toilet paper. The main thing is to choose a stable object.

- The colorful pages of the magazine already look elegant, but it’s better to further decorate the Christmas tree. Anything you can get your hands on will do: tinsel, buttons, shells, brooches, etc. Attach them with glue to the bent edges of the tree.
- A very small amount of decorations will be needed. These Christmas trees are made from things that are often thrown into the trash. And look how beautiful it turned out!

How to make a Christmas tree out of cardboard with your own hands
Make this Christmas tree from cardboard and burlap. This work will require a minimum of effort, but you will get maximum beauty.
- Roll a cardboard sheet into a cone Secure the edges with glue.
- Generously cover the top layer of the resulting figure with glue and wind the thread from top to bottom, pressing tightly, there should be no gaps.
- Decorate the Christmas tree with a garland of beads and secure it with needles.
 If you have a small child, help him make such a simple but very cute Christmas tree out of cardboard.

- Cut out a triangle from cardboard for the “body” of the tree and a rectangle for the leg. You can use a cardboard box as a material, so the product will look more impressive.
- Paint the parts and let them dry.

- Decorate the Christmas tree with multi-colored buttons. At the very end, attach a leg to the Christmas tree.

- On such a Christmas tree, made by children's hands, all the flaws will look very gentle and touching.
DIY Christmas tree made of fabric and felt
Christmas tree made of fabric:
- You can use the template below, or you can draw your own. Fold the fabric in half, right side inward and trace the pattern . Sew along the outline or sew by hand. There is no need to stitch the leg of the Christmas tree.
- Open the stitched part , without deviating much from the line. You can use zigzag scissors , then the edge will not need to be processed.

- Turn the Christmas tree inside out on the front side, iron , wrap the leg inward. Fill the product tightly with padding polyester.
- Finish the free hole with a hidden seam.

- Now start decorating. Make skirts from fabric and lace by gathering one edge of a piece of fabric onto a thread. Sew the upper and lower skirts, slightly retreating from each other. Do the same with bows and buttons. Or use a heat gun.

- Attach an empty spool of thread as a hemp.
 Felt Christmas tree:
Take:
- pieces of felt fabric of different colors;
- dense cotton or nylon threads;
- thick fabric for patterning;
- thread with a large eye;
- buttons;
- scissors.

- Draw a pattern the Christmas tree you want to sew. You can use one template for all scraps of fabric, or you can draw and then sew different Christmas trees.
- Buttons will serve as decoration , so to speak, “balls” on the Christmas tree.

- For one Christmas tree cut out two pieces same color. Sew buttons to one piece. Carefully sew both parts together on the front side and fill with filler.

- Instead of buttons, you can cut out multi-colored circles from felt. Attach loops to hang the toys on the real tree. All is ready!

How to make a Christmas tree from beads with your own hands: instructions with photos
- Even those who are just starting to weave with beads can make such a simple but exclusive Christmas tree. It can be used as decoration: earrings, brooch, keychain and more.
- This scheme uses parallel weaving technique. Cut the wire 50 cm long. Thread 4 brown beads into one end, thread the other end of the wire from the same side and fix in the center. Repeat this for the second row.
- In this way, weave 4 green beads in the third row. And then thread 7 beads through each end of the wire, this is the completion of the 3rd row.
- Make the fourth row from 16 beads.

- Weave like this, reducing each row by two beads , until there are 5 beads left on the wire.
- Weave rows of: four, three, two, and one beads.
- Finish the work by closing 4 orange beads into the ring - this is the star.

And more options for voluminous tabletop Christmas trees made from beads.

DIY crocheted Christmas tree
- 1st row: start knitting with 2 chain loops, knit 4 single crochets into the second loop in front of the hook.
- 2nd row: 4 single crochets.
- 3rd row: increase (2 sc in one loop), 1 sc - repeat 2 times.
- 4th row: from now on, knit even rows behind the back wall, and odd rows with regular knitting. In each even row, make an increase, and then knit a number of sc, 1 sc more than in the previous one. For example, in this row there is an increase, then 2 RLS - repeat 2 times, 8 loops should come out.
- 5 row: For each odd row, knit simple single crochets in the same amount as the previous row, for example, this row is 8 sc.
- Knit this way until the 19th row, you should get 22 loops, do not forget to alternate regular knitting and knitting behind the back wall of the loop.

The base of the tree is ready, now you need to make its spines:
- Do not rush to cut the thread, now move from the base to the top. Knit 3 VPs and fasten in the 18th row (where you knitted the back half loop), it’s just the turn to knit the second half of the loop. In each loop of this row, repeat the action - 1 RLS, 6 VP, 1 RLS.
- Now cast on 3 VPs again and secure them in the 16th row, repeating the previous steps, and then in the 14th.
- Knitting the 12th row, instead of 6 VP. perform 5 VPs, securing them with 1 sc on the sides.
- Moving to the top, in each subsequent row reduce the number of loops: 10th, 8th rows - 4 VP, 6th row - 3 VP.
- Now the Christmas tree is ready, decorate it with large beads.

DIY Christmas tree made of tinsel
- This Christmas tree looks expensive and elegant, although it is crafted very quickly.
- On whatman paper or a large sheet of thick paper (cardboard) draw a big circle. The diameter of the circle will be equal to the height of the Christmas tree. Try to draw by hand as smoothly as possible. It is not necessary to draw a whole circle, to form a cone just draw and cut out only half of it.
- Cut the fabric with scissors and roll up his into a cone , secure the product with tape. Now the frame for the Christmas tree is ready.
- Using glue, saturate it, and then in a spiral, starting from the top, glue the tinsel. Leftover “rain” from past holidays is perfect. For a Christmas tree 30 cm high you will need approximately 3 m of tinsel.
- Let the Christmas tree dry. It doesn’t matter if gaps are visible, they can be hidden with decorations.
- Now decorate the Christmas tree with toys, It is better to fasten them with a hot gun.
- Using available materials, make a stand on which the tree will be mounted and attach it to it.

How to make a Christmas tree from flower mesh and threads?
As has already become clear, a New Year tree can be made from anything. If you have leftover flower nets at home after gifted bouquets have wilted, this example is exactly what you need. The standard option is a floral mesh of green shades, but you can use completely different shades; fancy accessories are in fashion now.
- Roll up a piece of paper so that the cone comes out - this will be the frame of the Christmas tree. It is better to take thick paper. Attach the edges with a hot gun. The cone is white, which means it will be visible through the flower mesh. To avoid this paint his watercolor paints to match the mesh, or in a different color, creating contrast.

- Prepare strips from a flower mesh , 7 cm wide, the length will be the same as the length of the mesh fabric itself. The Christmas tree needs to be multi-layered so that it does not look too skinny. The first layer should be the darkest, and all the rest should be lighter.
- Start fastening from the top to the base , twisting the strips into curls, gluing them in a spiral.

- The beautiful Christmas tree is ready, but I want to add something to it. Take a piece of satin ribbon, cut it into pieces approximately 15 cm, and tie beautiful bows from the satin strips.
- Attach heat gun bows to the mesh . With such a Christmas tree you can please your loved ones, or you can decorate a festive table.
 Or decorate it like this, and attach the mesh with regular PVA glue.

How to make a Christmas tree from candies with your own hands?
A very original gift for the New Year is a Christmas tree made of candies. Do not be mistaken that such gifts are made only from expensive chocolates; lollipops are also perfect for this purpose. You can dilute the sweets in making a Christmas tree with tinsel, garlands or beads. And if such a Christmas tree is intended as a gift for an adult, then a bottle of champagne is a perfect base - a very symbolic gift.
Christmas tree made of chocolates.
- Make a cone; golden cardboard as its base will look beautiful.
- Then use tape or glue to secure the candies around it.
- Decorate the top with a large bright bow and star.
 Christmas tree made of gelatin candies.
There is no need to write off gelatin candies; such a tree will look very original. In addition, most people prefer such sweets.
For the frame, take foam plastic, and string the candies onto the Christmas tree using toothpicks. This design is easy to disassemble, so it would be appropriate as a decoration on buffet tables.

DIY ribbon Christmas tree
- Sharp scissors cut out the squares from tape 5*5 cm.
- Roll each one into petals as shown in the photo, solder the edges over burning candles.

- On attach cardboard cone glue gun "branches" of the Christmas tree . Then decorate the tree with ribbons of other colors.

DIY Christmas tree made of pine cones
A cone is a ready-made Christmas tree in a miniature version; you just need to figure out how to decorate it beautifully. Before starting complex compositions, practice with easy examples.

The best photo examples of DIY Christmas trees
Christmas tree made from tea bags- a useful gift.
 Fabric triangles - pendants for the Christmas tree.
 Stand or hanger in the shape of a Christmas tree.
 Christmas tree made of corrugated paper and large beads.
 Christmas tree made of coffee beans.
 “Puff” Christmas tree made of fabric.
 Flat Christmas trees made of burlap.
 New Year's “tabletop” Christmas tree made of acrylic threads in 2 execution techniques.
Making a Christmas tree with your own hands: video master class
You can make a Christmas tree with your own hands using any available materials. Use your imagination and enjoy the New Year holidays by making such wonderful things.
Useful tips
On New Year's Eve, many people decorate their homes and offices with Christmas trees.
Of course, nothing can compare to a real big Christmas tree, decorated with garlands and New Year's toys.
However, we do not always have the time or desire to buy such a tree. In this case, we can always create a festive mood with the help of small handmade Christmas trees.
1. DIY wooden Christmas tree for the New Year

If you want to add a modern touch to your home decor, try these stylish Christmas trees in pastel colors.
You will need:
· Wooden cones
· Paints and brushes
Liquid gold paint


Paint the cones in the color of your choice and leave to dry. Using a brush, paint golden tops on the cones and leave again until completely dry. You can also add small dots for decoration.
2. Herringbone made of balsa wood: master class

You don't need any serious tools to make balsa wood Christmas trees, as it's soft enough to cut with a regular utility knife.
You will need:
· Cork wood
· Patterned fabric
· Shiny braid
· Stationery knife
· Ruler

Cut out a Christmas tree shape from balsa wood and glue fabric to the piece.

Leave to dry. Use a utility knife to cut off any excess fabric.

Repeat the same with the other part. Glue the braid along the edge of the parts of your Christmas tree.

All that remains is to thread the two parts into each other.

3. DIY Christmas tree made from branches

Use twigs and trimmings from Christmas trees, fir or other trees and flat wooden disks to create fresh miniature trees.
You will need:
· Tree branches
· Hemp or wooden disks
Hot glue gun

Make holes in the stumps larger than the diameter of the branch. Place the twig in the hole and attach it with hot glue. Hold the twig until it dries.
Decorate the Christmas tree with toys and other decorations.
4. Craft-Christmas tree from book or newspaper pages

If you have an old unwanted book or newspaper, you can use it to make this miniature Christmas tree. For decoration, you can add glitter to the edges of the leaves.
5. DIY Christmas tree made from pine cones

Collect a few pine cones to make simple, cute Christmas trees for your home.
You will need:
· Craft paint
· Brush
· Sequins
· Pots
Wash the Christmas trees in soapy water and leave to dry for about a day.

Paint the pots the desired color. Then paint the ends of each pine cone scale green and leave to dry.
To create a snow-covered Christmas tree look, leave a drop of glue on the scales and apply some glitter. Place the pine cone trees in pots and decorate with a foil star.
6. Gingerbread Christmas tree
And such an edible Christmas tree will decorate any New Year's table.
7. Christmas tree made of beads

Use beads to create a unique and vintage Christmas tree that can be placed anywhere in the home.
For this craft you will need cones made of paper or cardboard. You can use scrapbooking paper, lace, or just beads to wrap the Christmas tree cone.
Use wire to string beads and wrap them in a garland around the cone. If you are completely covering the cone with beads, you can glue them in place using hot glue.
8. Christmas tree made of satin ribbons

These trees look fancy but are very easy to make by wrapping ribbon or fabric around a cardboard cone and attaching them with hot glue.

9. Christmas tree made of golden leaves

You will need:
· Golden artificial leaves
· Foam cone
Hot glue gun
· Scissors

Take the leaves and cut off the stems with scissors. You can attach each leaf using clear tape, starting from the base of the cone. Wrap the bottom leaves under the base and secure with hot glue.

Continue covering the cone with leaves so that there are no white gaps and secure the top with hot glue.
10. Original Christmas tree from books

If you have a large collection of books of varying sizes, stack them together to create a miniature book tree. Place the largest books at the bottom and the smallest at the top.
11. Christmas tree made of threads

If you don't know how to knit or crochet, then this Christmas tree is perfect for you. All you need is some thread and a hot glue gun.
12. Volumetric luminous Christmas tree

These simple Christmas trees look very stylish and will decorate any interior.
You will need:
· Paper cones
· Gold spray paint
· Glass balls

Coat the cones with spray paint and leave to dry.

Mark on the cone the places where you will attach the balls. Use a knife to make holes in the marked places. The hole should be of such a size that you can insert a glass ball or bead halfway. Apply glue to the edges of the holes and insert the beads.

Place the lights inside the cone and your glowing Christmas tree is ready!

If you have a lot of coffee filters that you don't plan to use, you can use them to create a holiday tree.
You will need:
· Foam rubber cone
· Pins
· 9-10 coffee filters
· Buttons
· Scissors
Hot glue gun

Fold the widow's coffee filters and cut out a circle in the center.


Open the filter and place it on the cone like a ring. Gather the filter around the cone and secure with pins. Repeat with other filters. As you move up, you will need to cut off the excess paper from the filter and use it to cover the cone.
Use decorative pins and buttons to decorate your Christmas tree.
14. Origami paper Christmas tree

You will need some patience to make this Christmas tree, but it is worth it.
15. Modern Christmas tree made from a cone

Paint several cones with green paint and decorate with pompoms and chenille thread.
16. Creative fluffy Christmas tree

You don't need any special skills to make this beautiful Christmas tree.

Wrap the millet foam cone in faux fur fabric and secure it with hot glue.

17. Unusual Christmas tree made of foil

Make a foil Christmas tree to make your decor unique. For this craft, you need to cut out a Christmas tree shape from thick sheets of foil and connect them.
18. Christmas tree souvenir made from branches

For a minimalist Christmas tree, collect branches of different sizes and simply attach them into a Christmas tree using hot glue.
19. Felt Christmas tree
You will need:
· Foam cone
· Marker and pins

Cut out felt circles and begin pinning them to the cone, starting at the base and slightly overlapping them.
20. Simple burlap Christmas tree

For this Christmas tree, wrap a piece of burlap fabric around the cone and pin it in place. You can decorate the Christmas tree with jute ribbon, thread and beads.
Small decorative Christmas trees are perfect for New Year's decoration of a shelf, cabinet, console, dining, work or coffee table. This tabletop Christmas tree is easy to make with your own hands. In essence, it is a handmade decorative topiary that is popular today. We bring to your attention three master classes on making completely different New Year's topiary trees: from pine cones, paper and exotic material - raffia fiber.
How to make a Christmas tree with your own hands?
Master class 1. DIY small Christmas tree made from pine cones
The peculiarity of this Christmas tree lies in its economy and extravagance. We use natural materials that are accessible to everyone. A small amount of tinsel and New Year's toys give the Christmas tree a festive elegance.
Pine cones should be collected in the summer. This came from experience. One day before the New Year, I decided to make such a Christmas tree and had difficulty collecting the required number of cones in the forest. From then on, when I went for a run in the morning, I collected beautiful, even pine cones into my pockets. Returning home, I put them in a box. Now, on the eve of the New Year, I have a sufficient amount of material. But if you wish, you can collect cones at any time of the year - they just, most likely, will not be as beautiful.
- Pine cones
- Whatman paper or A3 cardboard
- plastic pot
- scissors
- New Year's tinsel blue and silver
- glue gun
- several sticks of glue gun
- brown acrylic paint
- paint brush
- a piece of fabric for decorating a pot
- Christmas balls blue and silver
- small silver beads on a string

Progress
We make a cone from whatman paper.

We begin to paint over the cone from above.

Paint the cone completely.

You need to wait a little for the acrylic paint to dry. At this time, we weigh the pot down by filling it with plaster.
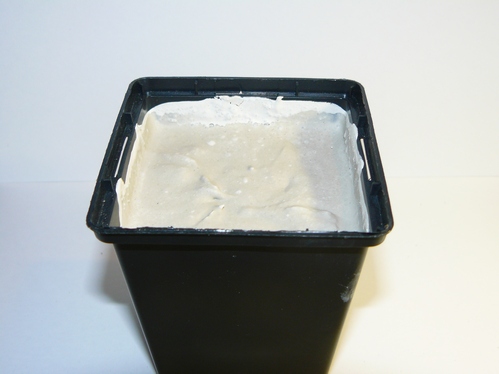
After the plaster has completely hardened, cover the pot with fabric.

Glue the cone to the pot.

We begin gluing pine cones from the bottom of the cone. It’s very convenient to glue the pine cones with a glue gun.
The glue gun works from a socket - a glue stick is inserted into it, and the gun melts the glue. The glue that comes out is very hot, we drip it a little onto the cone and glue it to the cone. The glue hardens instantly. You don't have to wait long, and the pine cones don't slide off during the process. This is what attracts me to glue guns.

We glue the cones as tightly as possible to each other.

This is how the Christmas tree looks like. As for me, it’s very “fluffy”.

We decorate the Christmas tree from cones with New Year's tinsel.

Then we glue the Christmas tree decorations and decorate them with beads on a string.

Our tabletop Christmas tree made of pine cones is ready!


Master class 2. DIY Christmas tree made of raffia
I'll tell you a little, what is raffia and where to buy it. Because for many, and especially for those who do not do needlework, this question will definitely arise. Raffia is a palm plant. It has fairly large leaves, which are cut and separated into fibers. To maintain the flexibility of the raffia, it is wrapped around the grass while drying. When raffia dries it has a nice creamy color.
Raffia is used by florists to decorate bouquets and compositions. Raffia fibers are quite flexible and soft. It is often used instead of ribbons. Raffia can be bought at any florist store or ordered from an online store for florists. Since it is painted in different colors, choosing the right shade for you will not be difficult.
So let's get started. For work we will need:
- raffia (I used bright green)
- Whatman paper in A4 format or cardboard
- scissors
- stapler with staples
- glue gun and glue stick (can be replaced with Moment Crystal glue, Titan silicone glue or regular Superglue)
- long skewers
- disposable cup 50g
- building gypsum
- wire
- scraps of napkins or old newspapers (to fill the cone)
- red table napkin
- decorative santa claus
- red Christmas balls
- red beads
- red pine cone
- small green decorative gift
The last six elements can be replaced at your discretion with similar ones.

Progress
From whatman paper we cut out a cone and a plug for the bottom of the cone. We secure the cone with a stapler.

We dilute the building plaster with water until it becomes thick sour cream and pour the mixture into a glass, insert skewers into the plaster. There is a more affordable option: an alternative to construction gypsum - construction putty. Putty is available in almost every home.
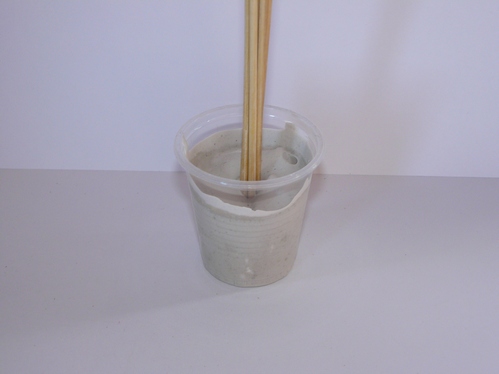
We make a hole in the center of the cone plug with scissors and put it on skewers.

Bend one end of the wire and thread it through the top of the cone.

We glue the cone blank with wire to the skewers and fill it with table napkins.

We glue the cone with the plug.

Take one raffia fiber. Glue the end to the wire and wrap the raffia around it.
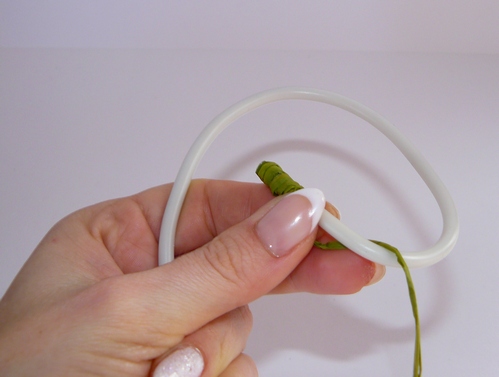
When the raffia fiber runs out, secure the end with glue.
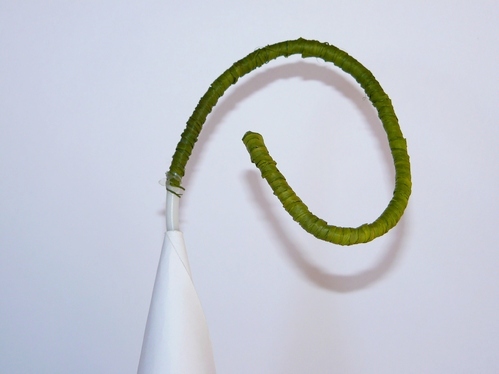
Then we take the next raffia fiber, secure the end and wrap the cone tightly.

We also wrap the cone cap and skewers with raffia.

We cover the pot with a table napkin.

We wrap the center of the pot with raffia.

Glue a decorative gift and a pine cone to the top of the pot.

We glue a decorative Santa Claus onto the raffia.

Now we decorate our Christmas tree with balls and beads.

That’s it, your DIY Christmas tree is ready!


Master class 3. Tabletop Christmas tree made of paper (from paper napkins)
Hooray, we know the cheapest and very original way to make a Christmas tree with your own hands! You don't need to work hard for this. All you have to do is go to any supermarket and stop at the stand with napkins. You can choose what color your future Christmas tree will be. Maybe even the most unexpected! Why not? By the way, you can use both multi-colored napkins and plain ones - it’s up to you.
So, we decided on the color, we buy napkins. Now all that’s left to do is figure out how to decorate the Christmas tree. First, we remember what items we can find at home: from boring jewelry with beads to bright buttons. By the way, plain buttons can be coated with any nail polish. Some of the decor can be picked up in the store. Let's go home, pour some hot tea or a glass of champagne to feel the New Year's mood, and get to work.
We prepare the starting materials. For work we will need:
- table napkins that you bought or just pulled out of the kitchen cabinet (I used soft pink and white napkins)
- scissors
- the decorations you found to decorate the Christmas tree (I had a small silver Christmas tree garland)
- cardboard or whatman paper
- skewers, or a simple pencil, or a twig from a tree
- glue gun and glue stick (can be replaced with any glue you have at home)
- stapler with staples
- disposable cup or something similar
- putty (if you don’t have it at home, you can replace it with a mixture of any cereal with PVA glue)
- simple pencil
- template in the form of a small circle (approximately 3-3.5 cm in diameter)
- satin ribbon (mine is pale pink)

Transfer the circle template to a napkin, redraw the circles as many will fit on the napkin.

We fasten the center of the circles with a stapler.

Use scissors to cut out circles from napkins.

We lift the first layer of the napkin upward, pinching it with our fingers against the staple.

We do the same thing separately with each layer of napkin.

Gently straighten it - you get a rose.

We repeat these steps with each of the circles. For a Christmas tree the size of whatman paper A4 you will need about 60 roses.

We fix the skewers in the cup with putty.

We create a cone from whatman paper or cardboard and cut out the bottom for it.

We install our “Christmas tree” on skewers.

We begin to decorate the Christmas tree with roses from napkins from top to bottom, placing them on glue.

Glue the roses tightly to each other.

Since my Christmas tree is two-color, I leave the bottom row for roses of a different color.

Glue them in one row.

We seal the skewers with satin ribbon. We cover the glass with a white napkin.

We tie the pot with ribbon. Glue the roses.

We decorate the Christmas tree with beads.

That's all, our paper Christmas tree is ready!
This time I was in a vanilla-marshmallow mood, which is why the Christmas tree turned out just as delicate.

What New Year can be imagined without the main symbol - the Christmas tree. Green beauties are sold on every corner on the eve of the holiday. However, for such a holiday it is not necessary to buy a live spruce. Try making it yourself. Therefore, in this article we will talk about what you can use to make a Christmas tree for the New Year holiday. It is worth saying that you can create the main symbol of the New Year from completely different materials. And today we will tell you more about this.
Mini Christmas trees made from pine cones.
If your children love making crafts just like you, then they can also take part in creating such crafts. The next craft - a New Year tree consists of cones and plasticine. All your child needs is to learn how to roll small balls from plasticine. At the same time, you can use plasticine of the brightest shades for this purpose. You can use regular spools of thread as a base for the Christmas tree. But you must wrap them in foil. The cones are attached to the coil using super glue.

If you like the next Christmas tree, then take acrylic paints and paint the cone with it. Remember that it is wisest to use green paint here. In this case, the tips of the tree are painted white. Make a base for the Christmas tree from brown plasticine. Use a star for decoration.

The next craft is a little more difficult to make. Here it is worth using beads. Therefore, if your child is small, then monitor this process yourself. Glue the beads to the pine cone using a glue gun.

All of the above crafts made from pine cones can not only decorate your home. It will be a pleasure to present such Christmas trees as a gift to your loved one.
The next craft looks more voluminous. And to create it you will need several cones. You should use a thick cardboard cone as a base here. After which, the cone is covered with cones on all sides. In this work it is customary to use a cool gun. Once the glue has dried, cover the tree with large beads.

Simple tinsel trees.
If you read this article, you can learn how to make an artificial Christmas tree at home. Above we offered you ideas for Christmas trees that were made from pine cones. Now we suggest using tinsel for this job. Naturally, for such a craft you must purchase the tinsel itself. For Christmas trees, make cones from cardboard. Then, glue tinsel to them. In this case, the tinsel should be glued to the cone in a spiral. While working, arm yourself with a glue gun.

Christmas tree made of candies.
The next Christmas tree may turn out to be not only a beautiful decoration, but also a very nice gift. To make this craft, make a cone. Secure the candies to it with tape, and then wrap the Christmas tree with tinsel.


A simple and voluminous Christmas tree made of paper.

The next craft is also very easy to make. It can be an excellent decoration for a child's room during the New Year holidays. To make it, prepare:
- thick green cardboard,
- markers, glitter, paints,
- scissors and glue,
- scotch.
Progress:
- We bend a sheet of cardboard in half and use scissors to cut it along the fold.
- We put the two parts that you got together and bend them in half again.
- Opposite the fold, using a marker, draw half of the Christmas tree.
- Now cut along the drawn line. As a result, you will get 2 Christmas trees that will not differ in any way from each other.
- Using gentle movements, bend each tree in half. Mark the center.
- Next, make a cut on one of the trees. The cut should be long from the very apex to the midline. For another tree, the cut should be from bottom to middle.
- Now we connect the trees by inserting them into the resulting cuts.
- To make the tree more stable, use tape.
- That's all, now start decorating your Christmas tree. Use your imagination and available materials here.

And here is another version of the Christmas tree, which you can make in the same way from an old cardboard box.

Elegant Christmas tree made of paper.

If you want to know how to make a beautiful Christmas tree, then the next idea was created especially for you. For such a Christmas tree, prepare:
- colored paper,
- scotch,
- glue and scissors.

 The most difficult thing is to cut strips of colored paper, which must have the same length and width. In this case, each strip must be glued together with tape to form a loop. After which all the loops are glued to a strip of tape.
You should wrap a thick cardboard cone with similar garlands.
How to make a glowing Christmas tree.
If you decide to learn how to make a Christmas tree with your own hands, then you are on the right track. Above we have described some simple crafts. Now it’s time to engage in serious creativity in order to do something original.
 For a creative Christmas tree, prepare:
- Flower floristic sphere. For this case, we recommend buying more than one shade of green.
- Scissors, PVA glue.
- Thick cardboard for the cone.
- Cellophane, pins, garland, floral wire.
- Various decorations.
Progress:
- First, we make a cone from cardboard.
- Wrap the cone in cellophane.
- We dilute glue with water in a container.
- We cut the floral mesh into pieces and place each piece in a container with glue and water.
- Now glue the pieces onto the cone. In this case, the joints are glued again for reliability.
- Use pins to prevent your craft from coming apart at the seams.
- As a result, you have the first layer of the tree. Make the second layer in the same way. Remember that after gluing the second layer, the structure must dry well.
- If the glue is dry, remove your tree from the cone.
- A garland is placed inside the tree.
- Now simply decorate the Christmas tree as you wish.
Christmas tree made of threads.
If you want to have something unusual in your home for the New Year, then in addition to standard decorations, decorate your home with various New Year-themed crafts.
Creating your next Christmas tree is also quite easy to handle. Take a sheet of Whatman paper and make a cone out of it. Coat the cone with glue and begin wrapping it with green thread.
When the glue is dry, separate the cone from the paper.
Decorate the finished Christmas tree with various accessories. You also glue the decorations to the tree using glue.

Finally
Celebrate your New Year brightly! Make many different Christmas trees that can make the atmosphere in your home truly magical.
Useful tips
To become the owner of a Christmas tree,you don't have to buy it- you just have to look at the useful tips and find out how you can do itbeautiful Christmas tree with your own hands.
Today you can findmany Christmas treesin shops and on the street.
You can put it in the house a natural Christmas tree or branches from a Christmas tree for scent, but you can decorate a house or a gift for a loved one if you know a few interesting tricks.
On our website you will also find:
- 20 small DIY Christmas trees that will decorate any home
- How to make a Christmas tree from pine cones
- How to make a Christmas tree
Find out how to make a Christmas tree frompaper, food, fabric and even pasta.
Make a craft like this not difficult at all, and your home will be decorated with unique decor, and friends and acquaintances will be happy to receive a Christmas tree made by you as a present.
DIY paper Christmas tree. Christmas tree made from scraps of magazine pages.

You will need:
Unnecessary magazine or book with bright drawings
Cardboard or thick sheet of paper
Glue gun or PVA glue
Shaped hole punch, optional
Pencil or pen
1. Make a cone out of a thick sheet of paper and secure it with glue.


2. Prepare pages from a magazine with bright pictures and cut out many circles of the same diameter from them. If you have a shaped hole punch (shaped like a flower or a large circle) it will be easier.
3. Wrap the cut circles around a pencil so that they curl a little.


4. Starting from the bottom of the cone, begin gluing the folded circles.
Make neat rows. The circles should be tightly glued to each other so that the cardboard is not visible.
5. Make a small cone from one circle and glue it to the top of the cardboard cone.
The Christmas tree is ready!
DIY Christmas tree made from pine cones and dried citrus fruits


DIY Christmas tree (master class). Christmas trees made of wrapping paper.


You will need:
Large thick sheet of paper
Wrapping
Double tape
Scissors
Decorations
1. Make a cone out of a sheet of thick paper.
* If your wrapping paper is quite thick, you can bypass step 1 and make a cone out of wrapping paper.

1.1 Fold the paper diagonally, holding one end to keep it sharp.

1.2 Secure the paper rolled into a cone with tape. You don't need to do everything too carefully, since you will cover the cone with wrapping paper.

1.3 Trim off the excess at the bottom of the cone to create a smooth base.

2. Prepare colorful wrapping paper and cover the cone with it. To do this, place the paper on a flat surface with the pattern facing down.

2.1 Using tape, attach the end of the construction paper to the top of the cone.
2.2 Begin to slowly twist the cone while wrapping it in the wrapping paper. You need to wrap the cone tightly.

2.3 Measure the paper and cut it before completely wrapping it around the cone. Glue double tape to the edges and connect to the other end. You need to cut off the excess at the base so that the paper is even.


3. All that remains is to decorate the Christmas tree as desired. You can make paper stars, use glitter, stickers, glue on beads and/or buttons, wrap with ribbon, etc.

Similar Christmas trees:


DIY fabric Christmas tree. How to make a Christmas tree from felt.


You will need:
Glue or double tape
Scissors
* Try using two colors of felt to make the Christmas tree even more beautiful. In this example, yellow and orange felt was used.
1. Make a cone out of cardboard. Secure the ends with glue or double tape.
2. Prepare felt and cut circles of different diameters from it, from small to large (see picture). You can use pre-prepared circle templates made from cardboard.


3. Glue Christmas tinsel to the bottom of the cone.
4. Now you need to make a crosswise cut in the center of each circle cut out of felt. Do not cut too much to prevent the felt garment from falling off. Make the cut just enough to fit the circle tightly onto the cone.
5. Start gradually putting circles on the cone. If you are using two colors, then put on the circles sequentially, first one color, then the other. Also worth noting. What to put on the next circle is not only on the cone, but also on top of the tips of the cuts of the previous circle.


6. We decorate the top of the Christmas tree. To do this, simply add tinsel, onto which you will need to add a pre-prepared small felt cone. Secure the tinsel and crown with glue.
* If you wish, you can hide a sweet gift inside the cone.


Original DIY Christmas trees. Glowing Christmas tree.
You will need:
Floral mesh (preferably several shades of green)
Scissors
Cardboard for cone
PVA glue
Cellophane
Pins
Garland
Floral wire
Decorations upon request

1. Make a cone out of cardboard.
2. Wrap the cone in cellophane.
3. Take any container and make a solution of PVA glue and a small amount of water in it
3. Prepare a floral mesh. Cut it into small pieces and place each one in a container with the solution.
4. Start gluing the pieces onto the cellophane-covered cone. Glue pieces of mesh of different shades in different directions. The joints should be coated with another layer of glue for a more durable attachment.
5. Secure the entire structure with pins and wait for the glue to dry.
6. You have now created the first layer of the Christmas tree. Now you need to make a second layer in the same style. After gluing the second layer, leave the structure to dry.
7. Now remove the Christmas tree from the cone - the glue should quickly come away from the cellophane.
8. Place a garland inside the tree, which must be secured with floral wire.
9. All that remains is to decorate the Christmas tree to your liking.
DIY Christmas trees (photo). DIY pasta tree.

You will need:
A cone made of plastic or foam (or you can make it yourself from cardboard)
PVA glue
Pasta of various shapes and sizes
Spray paint, acrylic paint or gouache
Brush.
1. Prepare a cone and paint it the desired color. Wait for the paint to dry.
*If you are using spray paint, you can skip this step.
2. Prepare the pasta. Start applying glue to each piece and gluing the pieces to the cone. Design your Christmas tree as your imagination dictates.
After applying the glue, press the piece a little and hold it so that it sticks well to the cone. It's okay if the glue is visible from under the pasta.
Continue until you have covered the cone with pasta. Wait for the glue to dry.

3. Start adding color to the pasta. In this example, acrylic paint was used. Try to paint all the parts carefully so that there are no empty spots.
* It is advisable to paint in two layers.
* If you paint it with white paint, the Christmas tree will look like a porcelain product.
Helpful advice: If you want to remove the craft, then put it in a plastic bag first, so you can immediately find the part that might have come off the cone.
We make a Christmas tree with our own hands. Bright paper Christmas tree.

You will need:
Colored cardboard or designer paper
Thick cardboard
Glue moment or glue gun (with hot glue)
1. Cut a square base for the tree from thick cardboard.
2. Insert the skewer into the cardboard and secure with glue.
3. Now you need to cut out circles of different diameters from designer paper or colored cardboard. You need to make 3 circles of the same size.
For example, if you want to make 10 different sizes of circles, then you will need to cut out 30 circles (3 for each size).


*If you don't feel like cutting out a lot of circles, just shorten the skewer and you'll end up with a cute mini Christmas tree.
4. Make a small hole in the center of each circle.
5. Before you start putting the circles on the skewer, lubricate the hole in the middle with glue.
6. Start placing the circles on the skewer, leaving a little space between them.
7. Cut out stars from paper and attach them with glue to the top of the tree. You can use another part for the crown and not necessarily paper.
Crafts. DIY Christmas trees made from thread.


You will need:
Thick yarn
Yarn with pile
Cone (cardboard or foam)
Pins
Decorations, to taste.
1. Make a paper cone or buy a foam cone from specialized stores.
2. Take both strands and pin their ends at the base of the cone.


3. Start wrapping the threads around the base of the cone, securing with pins approximately every 5 cm.
4. Now start moving towards the top of the cone, carefully wrapping both threads around the future tree. At this stage there is no need to attach the thread to the cone.
5. When you have reached the crown, pin the threads again by wrapping the threads around the crown several times.
6. Both yarns now need to be pulled down, also wrapping the cone in a second layer.


7. At the base of the cone, cut the threads and secure them.
You can leave the tree like this or you can also decorate it.

In this example, artificial berries were used for decoration, but you can use colorful beads, snaps, buttons, etc.


Try also making a decoration for the top of your Christmas tree. The top of the head can be decorated the way you like.
You can leave the tree like this, or you can also decorate it.
You can make just a paper hat or a star, or you can make something more complicated. If you chose the last option, then below are instructions for you.
You will need:
Flower wire
Nippers (for wire)
Sequins
PVA glue
Fine wire (calibrated wire)


1. Bend the wire into a star shape (see pictures) and cut off the excess.
2. Cover the star with glue and sprinkle glitter on it.
3. Attach a thin wire to the star, as shown in the picture:
4. Attach a star to your Christmas tree.
Creative DIY Christmas tree

If you want something original, or you simply don’t have enough space for a large Christmas tree at home, you can try making such a simple design.
It is worth noting that such a Christmas tree is suitable for any room. It can be done both at home with children and at work.
This tree can rise 1.5-2 meters and takes up almost no space in the house. In addition, it is a good background for New Year's photography.
You will need:
Foam base or matte cardboard
Scissors
Corrugated paper
Masking tape
Adhesive tape
PVA glue
Stationery knife
Marker, optional

1. Lay out foam or cardboard on a flat surface to create a large rectangle (see picture).
2. Use duct tape to connect all the parts.
*This example used black duct tape for better visibility, but white tape is better.
3. Mark the size of your future Christmas tree using masking tape.
4. Using a utility knife, carefully cut out the shape of the future tree.
5. Prepare corrugated paper, fold it in half and cut the fringe. You should have many sheets of fringed paper to cover the entire tree.
6. Begin carefully gluing the corrugated paper to the foam, starting at the base of the tree. The fringe should hang slightly below the base to cover the foam (or cardboard), and also slightly cover the top of the tree trunk, which we will make later.

7. Work your way up to the top, covering the entire tree with a bright green coat of crepe paper.
8. Add a hook to the back of the tree so the tree can be hung. Instead of a hook, you can use double tape to cover the perimeter of the tree.