How to decorate an old tree in the garden. Using tree stumps in garden design
Landscaping professionals know that it is impossible to create your own unique style in the garden using only purchased decorative elements. There must be some unique inimitable details. A decorated tree stump is just that. You can't buy it in a store, you can only make and decorate it with your own hands.
Root stumps or use to decorate the garden?
The appearance of stumps in a summer cottage is the most common thing. Sometimes they are initially located in the garden: they remain after the deforestation. Over time, in the process of growing and maturing the garden, you have to cut down old, sick or damaged trees. Not everyone can do heavy lifting with their own hands. In addition, there is a danger of damaging neighboring plants, underground utilities and even the foundations of buildings. This service is quite expensive for invited specialists.
Each tree stump in the garden can become a source of inspiration and find new life as a stylish art object of landscape design or a useful adaptation for summer life in the country.
A hat of a bright ampelous petunia blooming in a flowerpot made of a large stump can decorate a dacha for more than one month.
Blooming stumps
The very first idea that comes to mind after the decision not to uproot the stump is to decorate it with flowers. The use of stumps and tree trunks for garden design and planting of ornamental plants began in the 19th century in Victorian England. The fashionable hobby turned into a style of landscape design and even got its own name - stumpery (from the word stamp - stump). They tried to complement and decorate the compositions with various snags, roots, lying tree trunks.
It is especially easy to make a flowerpot out of hemp with your own hands if the core of the tree has rotted or crumbled. The cavity inside the stump is cleared and enlarged if necessary. Dense wood can be removed by burning. It is best to place a pot filled with fertile soil with a drainage hole in the hole. Or you can cover the inner cavity with a dense film, pour a layer of drainage material and fertile soil, ensuring the drainage of excess water.
What plants will grow comfortably in stump pots? First of all, these are succulents that are resistant to drying out of the soil - stonecrops, saxifrage, rejuvenated. You can decorate the stump with ampel varieties of annuals: petunia, nasturtium, lobelia. Elegant spring compositions in stumps can be created by forcing bulbous: crocuses, galanthus, muscari, tulips. They will revitalize and decorate the garden, will successfully compete with purchased elements of landscape design.
Do not plant flowering perennials in such pots. Most likely, their root system, located in a hemp above the ground level, will not tolerate winter frosts and will die.
In shady areas of the summer cottage, collectors can adapt the stumps for growing mosses, lichens, ferns.

A young tree planted directly in a stump is not afraid of a lack of moisture

Green and silvery sedum shoots are in harmony with the texture of the bark of the old stump

After flowering, tulip bulbs should be removed, dried and stored until autumn planting.
Fairy houses
The stump can become a center of attraction for the younger inhabitants of the dacha. If it is located near the playground or, conversely, in a corner of the garden hidden from prying eyes, you can make a magic house with your own hands, in which gnomes, princesses or other characters of children's fantasies will settle. The interest of this work is also in the fact that you can make and decorate a house or a castle with your children, turning this activity into a great exciting game.
A new wonderful world with its own miniature landscape, which will gradually fill with life, can emerge around the fairy-tale house built from a stump. It is possible that some new buildings will appear - a windmill, a well, a suspension bridge or something else, new inhabitants will appear.
An ordinary stump will serve as a real workshop for the awakening and development of children's imagination.

Fairy house with a roof planted with ground cover plants

The dwelling of the gnome. And here he is, standing on the balcony and examining the garden

A real watchtower with a door and a staircase inside

Fairytale castle built over a small hemp
Stump garden sculptures
If one of the inhabitants of the dacha has at least a little skills in using incisors, you can make a real sculpture from ordinary hemp with your own hands. In the garden, depending on tastes and skills, various animals and birds, mushrooms, fabulous creatures and abstract figures can settle.
For better preservation of the sculpture, it is necessary to treat it with protective equipment, and for the winter it is advisable to clean it or cover it in order to isolate it from contact with snow.

Adorable owlets peek out of a tree trunk carved in a tree stump

Under the tool of a skilled craftsman, the tree stump has turned into a family of cute mushrooms.
Garden furniture
Large stumps with healthy wood left over from large trees felling can be turned into chairs, armchairs and even whole sets of garden furniture with a unique design. If the size of the hemp allows, it is advisable to make backrests and comfortable armrests.
Having the necessary set of carpentry tools, it is easy to give the workpiece the desired shape with your own hands. Having made a preliminary sketch of the future landscape design object, using a chisel, saw, ax, remove all unnecessary, then carefully clean and process the surface. In order for a stump chair to serve for a long time, it is impregnated with an antiseptic and varnished for outdoor use.

The stump from which the chair is made has been processed and polished with great care. Light toning and matte varnish, revealed and emphasized the beautiful wood pattern

A sturdy board inserted into the cuts of two stumps will serve as a bench. It is only necessary to sand the roughness and round off the edges of the board
With no backrest or armrests, but with padded, waterproof seats, hemp can turn into comfortable stools. A large tree stump can serve as the base of a table. You can make a tabletop of the most unusual design for it with your own hands:
- glass;
- mosaic;
- from a stone slab;
- from a beautiful saw cut from a tree;
- from porcelain stoneware.
Bird houses, feeders, drinkers
If you leave a high stump when cutting a tree, you can make many interesting structures to attract birds to the garden.
- Several birdhouses of different designs can be fixed. In this case, do not remove the bark. The place will become even more attractive for birds, under the bark they will enthusiastically search for insect larvae.
- A small area with bumpers and a canopy, fixed on a high hemp, will become a real bird's dining room. If you organize convenient access to it, it will be possible to feed the birds not only in summer, but also in winter.
- A flat bowl, installed on a tree stump and filled with fresh water every day, will serve as a drinker and bathing bowl for the feathered guests of the garden.

Under the bark specially left on the stump around the intricate birdhouses, birds can get food for themselves

The birdhouses are expertly carved from the well-preserved timber of a tall tree stump

A small canopy protects the bird treats in the feeder from the elements

On a small stump from an old cherry or apple tree, there is a bathing bowl for birds
Hives
It is not often found in a summer cottage, and in a village house, such an unusual use of stumps as hives for bees. In fact, bee boards (logs) from stem scraps have long been used by people to keep bee colonies. Few people decide today on this method of beekeeping. But you can make not real, but decorative hives out of stumps with your own hands. They will easily fit into rustic landscaping. It is quite possible that they will be chosen by the garden's friends - bumblebees.

Elements of antiquity and ethnicity will bring hives hollowed out in stumps to the design of the garden
Design exercises with tree stumps have one very important advantage. Even a novice master does not risk anything, because he does not use expensive purchased materials. The object of his creative powers is just an old tree stump that can decorate the garden.
The place where you can show all your creative potential is in the garden decor with the help of old, seemingly useless things. You can experiment with such consumables as much as you like, they will always be found on the farm.
Everything will come in handy in the decor!
1. Inventory in a new role
Do you have “old age” shovels and hoes on your farm? Find a new use for "honorable retirees": for example, decorate a garden gate with them.True, there is one caveat: to protect the inventory from further corrosion, the tools must be coated with varnish resistant to adverse weather conditions, or painted. Old garden shears, sickles and hand shovels, suspended on wardrobe hooks, are useful for decorating the wall of the utility block.
Other ideas for non-standard use of garden tools can be found in the selection:
2. Here life is in full swing
The old galvanized one can be turned into a mini one in no time.Mini fountain from a watering can. Photo by Elke Borkowski
To do this, you need an electric one, which is usually installed in. The water will be pumped through a hose through the hole in the bottom of the shower head to the sprayer.
Advice: It is more convenient to turn the fountain on and off using the remote control. For the winter, the pump must be removed from the water, rinsed thoroughly and brought into a dry, frost-free room (more about winter storage of tools and equipment described in).
3. On a new path
The old ones do not have to be thrown away. They, or rather their fragments, can be a concrete walking path. To make it easier to work with the mosaic, the fragments can be laid out in a row and a strip of adhesive tape can be glued on top (to fix the pieces). Flip the "tape" over and apply metal and ceramic adhesive to the back of the mosaic. After you glue the tiles to the concrete base, remove the tape and fix the mosaic with mortar.Garden path with mosaic decor. Photo by Marion Nickig
Important: Stepping slabs must be at least 4 cm thick, otherwise they will break quickly.
Tired of the old gray slab track? Make creative sprinkles of herbs - resistant to trampling navel noble "Treneague" or herbaceous.
Herb path. Photo by Marion Nickig
And for those who have a garden path only in the project, a master class on.
4. Drovishki, step by step!
If you like to sit by or a fire, then you probably have a supply of firewood on your site. Most often, the logs are simply piled up in a heap, which, of course, takes up space and spoils the general appearance of the garden property. Let's fix this and make a woodshed (a frame filled with logs), for example, in the form of a covered semicircular rotunda.You can also build a remarkable landscape object - a woodshed with a window.
Advice: the structure is not stable enough, so do not use glazed frames.
You will find other options for unusual solutions in the selection. And the article will tell you what is important to consider in order to fold the logs not only beautifully, but also conveniently.
5. Paintings-flower beds
Rejuvenated ( Sempervivum) is so unpretentious that it grows without problems even on a vertical surface.Picture - flower garden
- Take a wooden frame and attach a coarse mesh on the back instead of glass.
- Then nail 4 strips around the perimeter of the frame - these will be the walls of the box for the substrate.
- Line the mesh with moss to keep dirt from spilling through the cells.
- Pour the substrate to the very edges of the planks, tamp and nail in a solid board - you get a box with earth in a frame, "glazed" with a grid.
- Turn the picture upside down, water the substrate and plant the young in the cells.
- Hang your masterpiece in a sunny spot and water your plants with a spray bottle.
You can choose planting material for succulents in our catalog, which combines offers from large garden online stores and collectible varieties. ...
8. Door handles are not just for furniture
Use ceramic doorknobs to make a flower garden accessory or an ornament to support herbaceous perennials.Place the handles over the bamboo sticks, making sure that the circumference of each stick matches the hole in the thread of the handle. However, since this is still an interior accessory, you should not count on the fact that such crafts will serve you for a very long time.
9. Vertical gardening
So, it is not necessary to buy hanging pots. There are many other interesting options. For example, you can hang a wire basket filled with plants from a tree branch. All you need is a thick branch and a strong rope. Just remember to cover the container with a non-woven material to prevent dirt from spilling out through the cracks.Another non-standard solution is to hang plastic basins between tree trunks dug in a row (be sure to dig deep into the supports).
You can hang plastic basins between tree trunks dug in a row
Important: Do not forget to make drain holes in the containers.
10. Rustic wooden pallet furniture
Previously, they were only used to transport goods. Nowadays, creative designers are increasingly making all kinds of pieces of furniture out of them. One of the options is in the photo.Fasten two pallets, cut one of the boards and insert the back pallet - done! Do not forget to saturate the "sun loungers" with special wood preservatives, as Euro pallets are usually made of soft wood. Paint your new furniture a bold color to make it even more attractive.
You will find other variations on the pallet theme in the selections.
I would like the site located next to the house or summer cottage to look like a piece of paradise. For a city dweller, after all, this is more of a place to relax, although, in the presence of beds, this vacation is very peculiar)) Nevertheless, the decoration of the site - a summer cottage, a garden, a backyard - worries all owners. The range of possibilities is wide. There are even different styles, so they all look different, expressing the personality of the wearer. True, this is if you decorated it yourself, on your own. Even if not everything is according to the canons of landscape design ... But it is precisely these areas, decorated by amateurs, for some reason are more comfortable.
Site planning
The first thing to do when getting a plot is to think about what and where you will be located. In spite of it, you decide where the house will stand - at the beginning of the site, in the middle, closer to its far edge. Then "arrange" the rest of the planned buildings. If you are planning to build, determine a place for a bathhouse, then place outbuildings - a shed-utility block, a chicken coop, vegetable garden beds and greenhouses, decide where the garden will be. Resting places follow - these are awnings, gazebos.
There are main buildings on the plan, now paths are being laid between them. Straight paths are needed only in one case, if the section is long and narrow. In this case, an even path to its far end will visually make it closer. For all other objects, it is better to make them sinuous, with smooth curves.
Site plan - we place the house and the main buildings
Now it's time to think about placing decorations for the lot. First of all, it is. They are built quickly, planted with annuals already in the very first season will delight you, while everything else is still under construction and beauty is still far away. Longer business - the device of rock gardens and rockeries. Cooking and laying a couple of tons of stones is not a joke, besides, they are planted mainly with perennials, they take the final look only after three or four years. And then, only on condition that you immediately chose all the plantings and planted correctly, that without experience - unprecedented luck.
Want to surprise your friends and neighbors? Paint the flowerpots with luminescent paint. As darkness falls, they will glow, giving your lawn an unusual look.

The second option for turning ordinary things into extraordinary is to use car paint with a chrome effect. Paint a few stones or the same pots, and you get mirror stones ...

Mirror balls are balls painted with chrome effect paint
Another traditional type of jewelry is. Very small ones are built quickly - from a tire, so in general in a couple of hours. It can take a couple of days to arrange more voluminous ones. But it is not worth arranging reservoirs before the house is built and paths are laid. Save this decoration closer to the finish line. Also, after the main construction, it's time to put arches, awnings. And already quite close to the curtain, they begin to play with backlighting, although there are very simple and original ideas. For example, take a tin can, make holes in it, but not just like that, but according to the scheme, creating a pattern. Inside, you can start an ordinary low-power lamp, and if there is no electricity yet, put a candle and so put / hang it near the house.

A completely unsightly jar turns into a wondrously beautiful flashlight….


Such decoration of the site can be hung in the garden or on the veranda. It's not difficult to do, it looks great, however, only in the dark))
A little about styles
The most common with us style "naturgarden", although many owners do not even know about it. These are the plots that have everything at once - the entrance-front zone, the garden-vegetable garden, the recreation area. Moreover, the areas are small and all, or almost all, zones are visible. Natural style allows, focusing on the existing relief and soil, to create areas with any landscapes. Is there a swampy lowland? Decorate it slightly by adding a pond or making a swamp, leaving natural plantings and adding decorative ones, ennobling the banks. You can make a dry stream or build a natural one. Is the plot flat? Organize the site as a meadow, you can - an alpine lawn. Put a gazebo, plant ivy.

For romantic natures, the same style is closer. It is characterized by rose-entwined, well-groomed lawns, flower beds, which are adjacent to thoughtfully overgrown secluded places.

Cozy places and arches, pergolas, flower beds, climbing roses are signs of a romantic style in the design of the site
Country style easily recognizable by the characteristic "household" decor elements. Internal fences - or picket fence, flowers - in tubs, cans, carts. and garden furniture are deliberately rough, if painted, then with a dark tint composition, and not covering paints.

English style can be chosen by amateurs. Any free area is sown with lawn grass. This type of garden can be described in two words "all in a heap". In English kindergartens, everything can really be mixed: a garden / vegetable garden is a single concept, besides, flowerpots are placed everywhere, all free places are occupied by grass. Another feature is ivy-covered walls, a large number of roses, figurines and funny figurines, placed in suitable places.

Lush vegetation interspersed with manicured lawns - signs of an English garden
Classic garden draw up strictly according to the plan. This is the option when everything is clear, borders, shapes, heights of bushes and borders. Everything is under the ruler and exactly. In strictly designated places, pretentious benches are installed, next to which they arrange, install decorative flowerpots with flowers, statues and columns.

Clear geometry in everything - a sign of a classic garden
Fences and fences
First of all, the site is fenced off. This is understandable: it is necessary to start building materials, but how to protect them? It's easier behind the fence. If possible, it is better to immediately put up a beautiful, capital, reliable fence. Not all of them cost a lot. Budget options can also be very attractive. The main thing in this business is the idea, and they are in the photo. So, from a combination of long and short boards, you can get an interesting fence, more transparent on top and almost without cracks on the bottom.

If the boards are placed on the edge, the effect is even more interesting. Now, if you don't see, you won't believe ...

With thin, fresh planks, you can make a beautiful fence that uses the principles of making wattle fence. The boards are passed between the posts and bent.


Slab fence - cheap and cheerful, however, there is a lot of work ...
If funds allow, you can put something monumental, such as a fence made of stone or brick. It will take a lot of work and money, but it will also stand for a long time.

My home is my castle…
For the internal division of the site, such solid fences are useless. For a garden-garden, you can put a lattice made of a thin bar, weave.

If you are "lucky" and a blank wall comes out into your garden, you can also decorate it with a kind of fence, on which to let climbing plants. An interesting option is presented below. When the ivy grows a little, it will be very beautiful. Instead of ivy, you can plant clematis. In winter, it looks like it's over, worse, but in summer ...

How to decorate your garden with flowers
This part in gardening brings the fastest results. Annual flowers bloom within a few weeks after planting, perennials also delight, growing more and more every week. Oh, and here we will post some interesting ideas that can give an impetus to the choice of the style of the garden.
Site decoration often consists of little things. For example, an ordinary wooden box easily turns into a garden decoration - interesting coloring and non-standard installation - to hang on ropes that you can arrange like hands. The pillar is used as a base for hanging ampel flower pots.

Sculptures are made from ordinary pots. They pick them up in different sizes, fasten them with wire, add a little paint or plants - everyone has their own fantasies ... marvelous figures are obtained.

Even leaky rubber gloves go into action. It's good that the colors are bright, and the base is dense. They poured soil, planted annuals, tied to trees or ropes, nailed to fences. Fun and bright.

Highlights of our garden: reservoirs
Perhaps, the second after the flower beds, the favorite decoration of the site is. The picturesque combination of water and plants is mesmerizing, gives coolness in summer. The design of reservoirs is a creative process and there are also many styles here. You can make plank flooring around. And in order not to suffer with their painting and impregnation, they may not be wooden, but composite - there is such a new material that looks very much like wood. The only difference is that it does not rot, does not change color. This material is called decking. It can be used for flooring an open veranda or terrace near the pool. You can see an example of its use around a pond in the photo.

Decking around the pond - it will be convenient to walk even after rain
You can also lay out the space around with stone slabs. Such arrangement will take more time, but many people like this option more. So that the whole finish does not "float", you will have to remove some of the soil, fill in crushed stone, tamp it, and on top - a layer of sand. You can already lay plates on it. The gaps can be covered with a mixture of sand and cement, carefully sweep the excess, and then either wait for the rain, or pour over the blind area - the cement will grab, securing the plates. The coverage will be reliable.

Using the same technology, you can lay out the edges with boulders collected on the banks of the river (or bought in the garden center).

Boulders are a great way to decorate the shore of a pond
If they are made of paving stones, it makes sense to arrange the shore of the reservoir as well. The technology is known, only the material is different.

Paving stones - you don't need to look for anything, everything is in the store
Decorating a garden or summer cottage with improvised materials
As you probably understood, you can make a garden decoration from any object or thing. The main thing is the idea, then a little imagination and work, and the decor is ready. For example, around a tree, you can make a table, a small terrace, and use this corner for relaxation.

Often stumps remain on the site. It takes a long time to uproot them, in the process they will trample everything around ... They stick out until they become rotten and crumble themselves. And very interesting things can be made from hemp. For example - use as a flower bed.

And even a stump on a spring day ...
Or make an interesting figurine for the garden out of it.

On the prosaic but necessary - toilets
These buildings sometimes appear before fences, because without them it is a disaster. The builders will master all the nearby nooks, and who, I wonder, will like it. So, perhaps the most necessary building. And why are we talking about toilets, in relation to the decoration of the site? But because this building can be made so that it will not necessarily be hidden. Displaying is also not an option, but you don't need to mask it. For example, a standard birdhouse can be made from logs. You will get a mini-hut.

There is little cost, it looks good ...
Plant around a plant, make it cute, and this corner of the garden will be attractive too. For example, such as but the photo below.

A few more options on the same topic. One and the same uncomplicated design can be designed in different ways. You choose the style depending on the one in which the dacha or the personal plot is decorated.

Well, if you need a stone toilet, why not decorate it in the style of a medieval castle. Only crowds of tourists will need to be driven away ...

Photo ideas for garden decoration
There are many ways to make your garden or summer cottage area bright and beautiful. Several of those who liked the eccentricity were collected in a photo gallery. Maybe some of them will help you decorate your corner.
Unusual gazebo - lawn grass is planted along the frame Swing made of large stones A cozy corner for rest - wooden benches covered with colored dermantine Even hemp can be useful on the farm - they made a bench out of them
If you decide to design your summer cottage yourself, it means that you are close to a creative view of things and, deep down, you are an artist. And the artist is able to see beauty in everything around him - in natural colors and shapes, in a beautifully curved branch or a crooked tree trunk ... It's all a natural garden, the very state of country design, when there is no pretense.

Natural garden in the form of a dry tree
If you want to make the design of your summer cottage unusual, photos of beautiful man-made summer cottages should inspire you!

These benches in the photos are made from crooked branches and roots, which you can easily find in any forest. Pine branches are distinguished by especially beautiful "curves" - they can be used to make unusual country furniture.

Also you can also use cuts of a dry tree trunk, from which very beautiful underframes and pedestals for container plants are obtained.
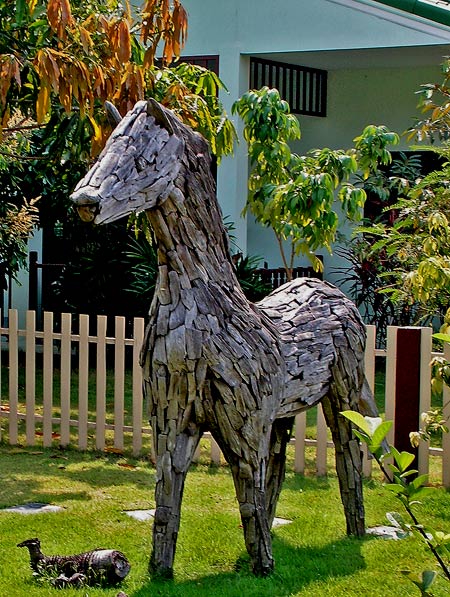
From splinters of dry wood you can make different funny figures. Such as this garden horse.
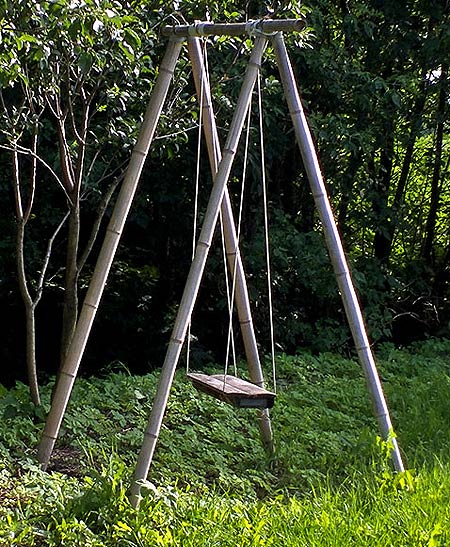
From dry trees or from thick bamboo trunks, you can make such a swing "without a single nail" with fasteners from ropes.
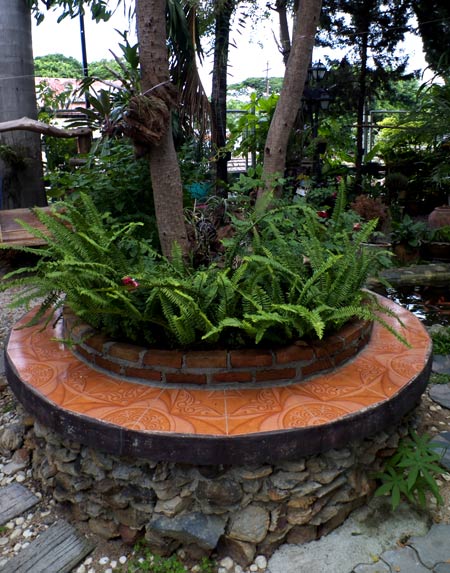
Can be applied in garden design and natural stones
In the photo you can see how stones are used as a plinth for a round bench made around a tree. You can decorate a flower bed, a flower garden, and an alpine hill with stones.

Large stones can be used to make the basis for a summer cottage. Stones must also be present in the design of a Japanese garden!
You can decorate a flower bed with small stones along the contour or limit the edges of the garden bed - this will give a finished look to both the flower garden and garden plantings.

Around the tree trunk you can not only make a round bench, but also break a fluffy flower bed from cereals. It will look especially original in contrast to the short-cut lawn.

Natural beauty lovers - try paint nearby buildings terracotta! You can also use two-layer painting, when you apply two shades of paint, applying them in layers so that one layer shines through under the other.

Shells and other seafood in country design
Other natural finds can also be used in the design of the cottage - not only stones and branches of dry trees. If you go to the sea, then you usually bring shells with you - you can also decorate a flower bed with them.

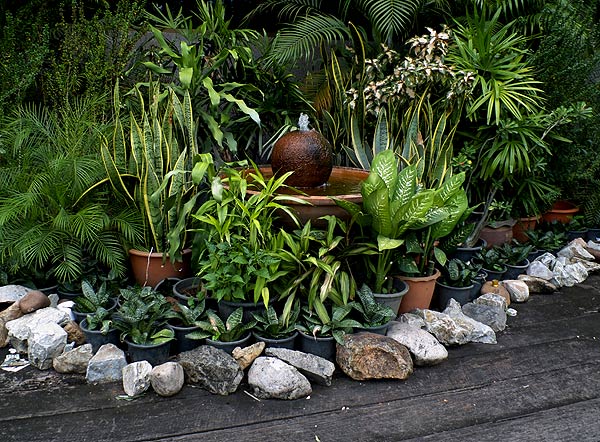
Another good idea is to use potted houseplants that can be "relocated" to your patio for the summer.

Personally, I like to arrange cactus gardens in bowls for the summer. You just need to make sure that they often do not fall under the rain, such gardens are best placed under a roof - under a canopy, on a terrace or in a gazebo.
That's all for now! Follow the blog updates, subscribe to mailings in the form below the article.

There comes a time when a tree that has been bearing fruit for many years or simply delighted you with its spreading crown has to be cut down. As a result, an unsympathetic stump is formed in its place, with which you need to do something. You can, of course, uproot it, but often such work requires serious physical effort. After all, the root system of an old tree remains branched and very strong. If you also don't want to dig a pit to extract the root, you just have to figure out how to decorate a tree stump in the garden with your own hands.
Of course, the old tree stump will not bloom by itself, but this does not mean that flowers cannot grow on it. This really happens if you plant low annual flowers, herbaceous or even ornamental plants on a stump. Their presence will greatly ennoble and revive the saw cut of a tree.

All these modest flowers look very impressive in a single bouquet, which, like a vase, holds the simplest stump.
To bring this idea to life, you need a minimum cost. We level the surface of the stump, after which we make depressions in the stump. They should be such that the root system of the plant you have chosen can develop unhindered. A landmark can happen, for example, a flower pot.
You can simply make one indentation in the stump by removing the core from it. This is easy to do when we are dealing with rotten hemp. From tools we will need a saw or chisel with a hammer. If the stump has appeared on your site relatively recently, it is better to use the core burning method.

Surely such a stump will become a real decoration of your garden at the very beginning of the last spring month and on the eve of summer
Drill a hole deep enough in the center of the stump so that kerosene can be poured into it. In this case, the side surface should not be less than 7 cm, so that after the removal of the core, our structure remains intact. Fill with kerosene and plug the hole in the hemp with a stopper.
After about half a day, add kerosene and plug the hole again tightly. Leave the tree stump alone for one to two weeks. Then remove the plug and light the core of the stump. When it burns out, the resulting flowerpot should be treated with an antiseptic so that the flower bed will last longer.
Drill holes inside the recess to eliminate stagnant water. Now we put inside the garden soil mixed with nutrients, after which we plant the seedlings or bulbs. When a lush cap of flowers forms on the stump, it will not look old and unsightly at all.

If you are not sure about the strength of the walls of your new flowerpot from a stump and are afraid that they may begin to crumble, you can reinforce them with a net.
You can see a variety of options for what you can do with your own hands from a stump in the country in this video:
Idea # 2 - tree stump as garden furniture
To make an interesting thing out of an old stump, for example, a piece of furniture, you need a good tool and some skills for such work. But tools are not a problem today. And about skills, you can say this: all great masters were once apprentices. So let's try at least. What are you risking in the end? Only with an old stump.
Option # 1 - stump as a chair
Let's say you just mapped out a tree for a saw cut. It would be nice if he had a thick trunk. We remove the branches, moving from the thin upper ones to the stronger lower ones. Now that you have a trunk in front of you, you need to mark it out.
If we want to make a chair, it is more convenient to place the seat at a height of 40-60 cm from the ground. Let's say it will be 50 cm. We put a chalk mark at this height. But the chair still has a back. Add another 50 cm to it.At a height of 100 cm, we also mark it with chalk. At this mark, the cut will pass, which is best done with a chainsaw.

It is difficult to say to what extent the chair shown in this photo has a natural origin, but it is it that well illustrates the result of the work described in this section.
Now we will shape the back of the chair. To do this, we need to make a horizontal cut at the level of the seat. That is where our first chalk mark is. We make a cut to a depth of 2/3 of the trunk. We saw through from the side into which the chair will be turned in the future.
To form the back, we will make a vertical cut from above until we reach the previous, horizontal one. We remove the piece of the trunk cut in this way.
The base has been created, you can proceed to the decorative finish. For this work, we will need different accessories from a grinder to a chisel. It all depends on how you decide to decorate the resulting chair. In any case, this will no longer be a stump sticking out in plain sight, but a comfortable chair, sitting on the seat of which, you can have a good rest.
Option # 2 - the original table
When you made the chair, you chose not to part with the bark. Now we have to make a garden table, the leg of which will be the stump itself. And this time it is better to get rid of the bark. For this we can use a chisel or chisel. We will work as carefully as possible: after all, we do not want to damage the wood at all.

This photo clearly shows how exactly you need to nail the holders to which the tabletop will be attached in the future.
We stuff two perpendicular wooden planks on the side of the stump. We fix on them in pairs perpendicularly fastened to each other four holders. We make the tabletop from boards, and fasten them together with planks.
The table top can be made round. To do this, it is enough to draw a circle, using an impromptu compass made of a pencil, rope and nail for this purpose. We drive a nail into the center of the tabletop, to which a rope with a pencil at the end is tied. We outline a circle and delete everything that went beyond its borders.

The tabletop, fixed on a leg, which was once a stump, needs to be treated with special protective compounds, and it is better to close such a table for the winter
We nail the finished tabletop to the holders with nails or fasten it with self-tapping screws. The finished product must be sure, which will prolong its life.
Idea # 3 - funny compositions
Implementing the following idea is not at all difficult. And now the dry skeleton of your tree is being sawed by little men, similar to green grasshoppers. It is easy to make such babies yourself, using wire, pieces of tin or plastic for this purpose. Similar fairy-tale characters can be purchased in a shop selling souvenirs and toys.

The figurines are made very cleverly, and the whole composition leaves an amazing positive impression: the people must be fixed securely so that they are not damaged by bad weather.
These funny figures can be screwed to the trunk using self-tapping screws, wire or clamps. Such a comic composition will decorate your garden and attract the attention of your friends and neighbors.
Option # 2 - decorative fly agaric
If you think that making a fly agaric from a tree stump is easy, then you are absolutely right. All that is needed for this is an old enamel or iron bowl and aerosol. The bowl needs to be cleaned and painted with red spray paint. After it dries, on a red background, draw white rounds, exactly like the specks on the cap of the fly agaric.

Numerous other objects can be placed next to the handsome fly agaric, which help to revive the composition, to make it complete
The stump also needs to be painted white. It would be nice to draw a funny grinning face on it. But here's how fantasy tells. It remains only to put on an elegant hat on the leg and boldly declare that the fly agaric is ready! By the way, it is not necessary to make a fly agaric. It can also be a porcini mushroom. It's just that the fly agaric looks more elegant.
To complete the picture, we suggest that you put pebbles, for example, green, at the foot of your mushroom. They, like a picture frame, will create a border for your work. However, you can do without them.

These porcini mushrooms are also made from hemp, only in a completely different way: both the leg and the cap of the mushroom are cut from the wood of the stump itself and painted in the appropriate colors
Option # 3 - fabulous teremok
If a person is not deprived of imagination, then even from a dry stump he is able to make a whole work of art - a fairy-tale castle or a small house, inhabited by the most amazing fairy-tale characters. Such a craft can become a source of pride for the owner of the site, if you work on it with soul.

A cute Japanese-style house, complemented by a small hut, most likely intended for a traditional tea ceremony
The stump itself can serve as the main part of the castle, on which all additional decor will be attached. In order not to miss anything, we propose to make a sketch of the future structure and subsequently try to follow it.
Decorating details can be cut from a piece of fiberboard or plywood. They should be attached to the stump with self-tapping screws. All components must be impregnated to protect them from decay. In addition, they can be painted in the desired color.
The material on creating plywood crafts for garden decoration may also be useful:

Children will really like such a cute house with figures, who will undoubtedly immediately adapt it for their fun games.
Sometimes in the trunk of a dry tree, very low from the surface of the earth, there are hollows, growths. All these details, despite their natural origin, are easily used in the composition. For example, small toy ladders with funny gnomes on them can hang from the hollow. And on the growth, you can place a toy grand piano with a squirrel pianist.
Do not forget to pay attention to the roof of the building. An old leaky bucket will do just fine for her. By the way, artificial or live plants knocking out of the hole in the roof of such a structure will look very attractive.
This video focuses on a wide variety of characters made from tree stumps:
Idea # 4 - decorate the tree stump with potted flowers
We have already described how you can decorate a stump with flowers that are grown in it, but there is another option for such a decoration. If several branches have survived on the stump, you can hang the same flowers on them, but grown in pots. They can look very impressive.
Even if there are no branches, the flower pot can be placed on the stump itself or around it, creating a special aura of flowering and continuing life. Hemp looks great as a decorative stand for plant pots if you polish them well to allow the wood to show its texture.

Despite the simplicity of this composition, it looks very impressive and emphasized in a rustic way: for the country style it suits perfectly
But at the same time, do not forget that a tree located in an open area needs protection - impregnations that will resist decay.
Idea # 5 - garden sculptures
Everyone can create garden figurines from tree stumps, but real artists produce wonderful works of art that are striking in their realism. If you are driven by the desire to simply decorate your site, then you can create a simple image that does not require special skills.

Surely this gorgeous deer who speaks in the spring forest is expertly carved from a regular tree stump by a high-level professional.
Making a simple figurine from a tree stump is not at all difficult. Those who sculpted snowmen in childhood can apply the accumulated experience in this case. Twigs will play the role of hands, instead of a nose and mouth we will attach knots, Eyes can be made from brown bottoms from plastic bottles. The cork from the same bottles will play the role of the pupil.
All this is attached to the hemp with self-tapping screws. On the horizontal surface of the saw cut, you can simply spread pine cones that will imitate hair. Here is such a caretaker for the garden, which we whipped up, is ready.

But any schoolchild can make such a funny watchman for a summer residence, and it is for this that such a garden sculpture is appreciated
If it happened that you had to cut down a number of country trees, do not be sad. This situation also has its positive side. But now you have a large number of stumps located close to each other. And this is not bad at all. Make them a fabulous country for your kids, putting into practice all the information that you have already received in this article.
It will be just a great place to play. First, you have to peel each stump from the bark. To do this, you need a chisel and a hammer. The chisel must be inserted between the bark and the trunk of the tree, and then gently knock on it with a hammer. The bark will move away from the trunk and soon the stump will completely lose it. It can now be finely sanded using medium-grit sandpaper.

Such an owl could easily become a companion of Baba Yaga herself and settle in her hut, flying out of her from time to time to hunt
Be sure to wipe off wood dust formed during work with a damp cloth. The tree prepared in this way should be treated with an antiseptic, which will protect it from decay.
Now you can start decorating the stump. Let's choose a big tree stump to turn it into a real Baba Yaga's house. Let's take chalk and outline the location of the future windows and doors of the grandmother's hut. Recesses in wood for doors and windows can be made using a chisel and hammer.
We need pieces of boards from which we have to make doors and shutters on the windows. These details of the future structure can be painted right now, while they are not yet nailed into place. Doors and shutters should be nailed to the places indicated on the stump with nails, from which the caps have been bitten off. Completing the decoration of the hut, you can collect twigs and driftwood of an unusual shape in the area to stick them around the house of Baba Yaga. Let them portray the dense years.
On smaller stumps, you can depict heroes of a variety of folk tales or funny cartoon characters. You can decorate these stumps and draw the planned heroes on them using paints for outdoor work. The images on the outside will wonderfully complement the flowers planted right inside the stumps. How to do this was described in detail at the beginning of the article. You can also limit yourself to pots with plants.

Another wonderful composition, made by a professional artist and sculptor, creates a great mood inherent in a small fabulous corner of your garden.
Let's turn a couple of stumps into children's chairs. To do this, we will not even cut out a massive back. If you still have old chairs, take their backs for this work. They should be carefully freed from the varnish, and then, using ordinary nails, nailed to the seats from the stumps. The only thing left to do is to paint the finished chairs in bright colors that children will surely like.
Simply turn the small remaining stumps into a flock of fly agarics, using bowls or basins of the appropriate size as their hats. Now you know exactly how such fly agarics can be made. Everything, the improvisation on the theme of a fairy tale is ready.
Idea # 6 - "green monster"
Another idea of how you can ennoble the stump may also interest you. For this purpose, you need a hefty stump with a powerful root system, which is lurking in a shady place. If you have one on your site, you can consider yourself lucky.

A large moss-covered tree stump looks mysterious, as if it got into your garden right from Twilight or some other saga
Buy a moss variety from the store that suits your climate. You need to plant the moss on a tree stump. To make it start, you will periodically have to spray it with water. Now it is important that the moss grows. When this happens, you will be able to fully appreciate the grandeur of the resulting creation.

