Homemade stoves for a bath: types of designs. Do-it-yourself metal sauna stove Homemade sauna stoves made of brick and iron
When creating a bathhouse, the question of heating it always arises. When choosing from ready-made options, it is better to give preference to the one that will not only be of high quality, but also economical. If you don’t have the funds to build a stone heating source, you can make a sauna stove with your own hands.
Requirements for metal heat sources
When making a stove yourself, it is important to keep on hand the necessary tools, a set of drawings for the construction of homemade sauna stoves, and have experience as a welder. When working with steel sheets, keep in mind that at a temperature of +150 degrees, a change in the properties of iron occurs, at +250 its endurance under constant loads disappears, and at +550 the steel becomes dark brown, which indicates a change in linear properties.
You need to work especially carefully when heating the metal to +900 degrees! At this temperature, unwanted deformation of the future furnace is possible.

Taking these nuances into account will ensure:
- long-term accumulation of thermal masses;
- warming up the bath and raising its temperature in a short time;
- high level of safety for people washing themselves.
In addition, these ovens do not require much space due to their small size.
Pros and cons of metal stoves
The bathhouse must maintain a temperature of +50 degrees. For this purpose, it is recommended to install homemade metal sauna stoves. Their use has the following advantages:
- small-sized structures, which is important for small rooms;
- you cannot suffocate, since such an iron “homemade product” removes combustion products through the chimney pipe;

- Due to the high heat transfer coefficient, the steam room quickly warms up. On average about 1.5 hours;
- shelf life, which directly depends on the quality of the work performed and materials;
- absence of smoke when lighting a bath with raw wood;
- low cost.
Such homemade metal stoves also have some disadvantages:
- small dimensions of the structure exclude use in spacious bath rooms;
- rapid cooling period. In order for the stove to heat, the heat must be constantly maintained;
- high probability of ignition of objects located near the walls of the structure.
Types of metal furnaces
There are 3 options:
- Open – with a small volume water tank and an open heater. To enhance the heat capacity coefficient of such a sauna stove, you will need to cover the stones with a galvanized lid.
- Closed. To increase the heat capacity, the outside and inside are laid out with refractory bricks using metal fasteners, and a special grate is placed.
- Combined. With this option, a complete set is formed: 2 valves, a firebox, a grate, 2 pipes (10 cm and 14 cm in diameter), a blower and 4 holes are provided for a pipe and a bypass elbow. For this, steel sheets about 0.5 cm thick are used.

Sauna stoves also come in cold and hot types. The first is suitable for heated rooms. It is impossible to get burned on its walls, since they only warm up to +50 degrees. The second option does not allow you to control the temperature in the bathhouse and is used when using the steam room irregularly.
Types of stoves depending on the type of fuel:
- electrical - housing with heating element and special elements for heat insulation;
- wood-burning A lot of wood is needed as fuel, a long time to warm up the room and constant monitoring;
- gas. They are convenient and reliable thanks to the presence of a safety device that reacts when the gas supply level decreases or when it is completely turned off.
 Metal wood stove
 Features of heating sources for baths and saunas
In a traditional Russian bathhouse, it has long been customary to provide a lot of steam and less heat. For this purpose, a closed heater is used, located above the firebox. It is lined with heat-resistant brick on the inside while maintaining a small air gap. For such a bath you need to heat the stones up to +500 degrees.
The Finnish sauna requires a low level of humidity - 5-15% and a temperature range of up to +85 degrees. The heater is used open, with slightly heated stones. To supply steam, just pour water on it.
Main components of metal furnaces
Their presence is provided in all bath structures.
Firebox
This is a two-chamber device. The upper part (furnace) is necessary for burning fuel, and the lower part (ash pan) is necessary for accumulating and collecting ash. These two compartments are separated by a grille, and each of them has a door. Often the lower compartment is left open for air flow, using it as an ash chamber. You can also make holes in the firebox door (dimensions 20x25 cm) with a damper to regulate the air supply.
Kamenka
Rods measuring 1 cm or more are fixed above the firebox door, located opposite the entrance. The door of the heater itself should “look” at the steam room. Next, stones without mica content are placed in it. It is undesirable to use granite. The more cobblestones, the larger the hot surface.  Firebox
It is better to mount a hatch in the upper part of a sauna stove made of metal with your own hands to create access to the bottom of the compartment and ensure maintenance of the heater. A chimney cover is installed above it. The last stage is the installation of a water tank.
Chimney
This is a pipe for removing the resulting smoke and heating the water supplied to the stones. The chimney must be insulated, as due to its high temperature it is easy to get burned.
Its dimensions must correspond to the dimensions of the iron stove. The thickness of the passages should be equal to half a brick.
It is better to purchase a chimney already assembled with an outer pipe, an internal chimney, and a deflector.
Tank
It is mounted above the firebox. A tap is built into its lower part to gradually supply liquid to the hot stones. On the chimney side, the tank is covered with a steel semicircle with a hole for the chimney pipe. A lid with a handle is mounted on the part of the container that will be filled with water. Just like the chimney, it is better to buy a ready-made tank.
Additional items
These include doors and grilles. To save time, they are purchased ready-made.
Making metal stoves with your own hands
There are many drawings and options, but the set of constituent elements is approximately the same.
Tools
To get started you will need to prepare:
Grate for the furnace
Important nuances
You first need to determine the location for the future structure. If necessary, a foundation and two rows of bricks are laid. A pit 70 cm deep is made under it. Its bottom is sprinkled with sand and broken bricks on top. Next, the frame and formwork are installed, after which the surface is filled with concrete.
 Foundation for a metal sauna stove
 Important to remember:
- the gap between the stove and the wall is at least 1 m;
- Foil must be attached to the wall near the structure;
- it is better to make a chimney from a sandwich pipe with a heat-insulating layer;
- at the junction of the roof and the chimney it is necessary to form a passage unit;
- It is better to surround the structure with bricks to prevent burns.
Stove-heater
This simple variety has several ways to create it.
Option 1
Using an iron barrel without a bottom or top. The resulting container is half filled with bricks placed on edge and a grate laid on top. Stones are placed in the remaining 2/3 of the space and a chimney is installed. At the end, such a homemade stove in the bathhouse is covered with a lid made of sheets of steel.
Option 2
Bricks are not used for the construction of the stove. Sequence of work:
- Prepare diagrams and necessary tools.
- In a long pipe, cut a hole for the blower with dimensions of 5x20 cm. Inside the pipe above it, fix the mount for the grate.
- For the firebox, make a hole 25x20 cm. Above it, mount fastenings for rods, the size of which is about 1 cm.
- On the other side of the oven, create a hole into which the liquid will flow. Place stones in the heater.
- Make a slot for the chimney. Install a tap at the bottom of the pipe.
- Form a lid on the heating tank with a slot for the chimney, a hinge and a handle.

Option 3
This stove has 2 heaters. It is made by analogy with the previous ones. The difference is that 4 plates are used to connect two heaters.
Other possible varieties
In addition to stoves, the following are relevant:  Potbelly stove
- a conventional horizontal oven. A propane cylinder and scrap metal scraps are used. Openings for the doors and chimney are cut, a grid of grates is fixed to the corners, and the lid is installed in its original place. Legs and doors are installed;
- vertical boiler for a bath. It consists of a firebox, a water tank and a closed heater. It will be necessary to pre-form blanks for the bottom of the lid and partitions, and carry out the process of welding round grates. The constituent elements are made according to the scheme described above.
Many drawings of sauna stoves made of metal provide for horizontal and vertical design options with the firebox opening into a separate room, with a closed and open heater. A homemade potbelly stove is also common. This is an ordinary metal box with a door and a pipe. It requires a lot of fuel with a low heat transfer rate.
Final finishing
Regardless of the type and size of the sauna stove, the structure must be treated with heat-resistant enamel. To do this, the surface is degreased, and then the organic composition is applied in several layers. 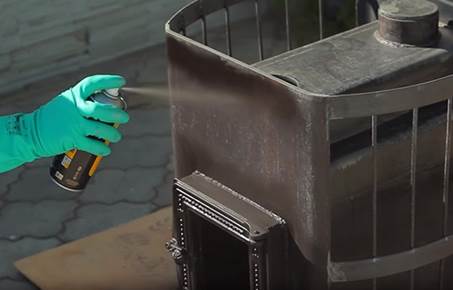 Application of heat-resistant enamel
Finished furnaces cannot be put into operation immediately. First of all, forcefully or naturally dry the bathhouse.
By following these tips and having experience in welding, you will get a stove that will bring you joy for many years. Choose an option that will optimally fit into the bath room and will not “eat up” additional space.
The selection and construction of a stove for a bath must be treated with particular close attention, since the stove is its most important element. In a bathhouse, it performs two very important functions: it heats water for procedures and warms up the air in the room. The stove comes with a closed or open heater.
A stove with a closed heater retains heat longer, but it takes more time and wood to warm up the steam room. If you plan to use the sauna not often, it is recommended to give preference to a closed heater. With an open heater, the steam room heats up quickly, but when watering the stones with water, it cools down faster. The stones located in the steam room must be solid and rounded.
If you want to build a homemade stove for a bath, consider the recommendations and advice of stove makers. Before building a stove-heater, you need to familiarize yourself with existing projects and choose a suitable design for yourself. Then a good waterproofing of the foundation is carried out, which must be poured 5 centimeters wider than the stove. Grate bars are installed in the firebox to sift ash into the ash pan. With the help of an ash pan, fuel combustion is improved, which makes it possible to heat the steam room faster. The distance between the firebox and the ash pan should be at least 30 centimeters. When venting the chimney, be sure to install a damper in the exhaust pipe to regulate the intensity of the draft.
Requirements for sauna stoves
- There should be a place under the stove separate foundation.
- The oven must be hermetically sealed, without any gaps or cracks.
- It is necessary to have wooden trim located near the stove, treat with antiseptic, but to protect against spontaneous combustion it is better to sheathe it with steel sheets.
- The metal elements of the stove must not come into contact with elements made of flammable materials (plastic or wooden lining, etc.).
- The ash pan should be at a distance above 15 cm from the floor.
- The distance between the ceiling and the upper edge of the stove should not be less than half a meter.
- Recommended near the stove sew up the floor metal sheet.
- The stove is installed near the dressing room door.
Homemade stoves for a bath must meet the following conditions:
- The oven should provide temperature in the upper part of the steam room not lower than 80° C, and 45° C in the lower zone.
- The stones on the stove should be fine warm up so that enough steam is generated when watering them.
- If the stove operates using solid fuel, it must burn evenly.
- The chimney and furnace firebox must be sealed.
- The oven must have high efficiency.
Options for a homemade sauna stove
Metal homemade stove made of sheet metal, has a lower firebox and a tank for heating water. Part of the oven is lined with bricks. The lower firebox and wall are also brick. The stove works in this way: water pours through the side door, from which steam is released.
Oven from sheet iron works the same as in the previous version: water and steam enter through the side door. The internal walls are brick. For the construction of such a sauna stove, sheets of iron more than 5 mm thick may be suitable.
Brick stove for a bath - this is one of the most popular options. It looks like this: the firebox is lined with refractory bricks, below the firebox there is an ash pit, and a cast iron or steel grate, which is designed for laying stones. A brick oven has a chimney and doors. Hot water is supplied using a coil. The furnace is built on a foundation. For this design, a solution made of sand and clay is used. It is unacceptable to use a mortar for laying bricks that contains cement, which is not resistant to high temperatures. The brick oven is fireproof. Laying such a stove is a rather labor-intensive and complex process.
Bath stove made of metal pipe
The most interesting option is a metal sauna stove made using a metal pipe. It can be erected in a short time without problems. Before starting work, you need to carefully consider the location of the future stove.
To build a homemade stove from a pipe, you will need:
- Tools- grinder, welding machine, electrodes diameter 3.4.
- Materials- a metal pipe with a diameter of 50 cm, a wall thickness of 1 cm and a length of one and a half meters, sheet iron 3-10 mm, fittings or rod 8-10 mm.
- Construction materials- sand and crushed stone 0.1 cubic meters, cement 150 kg, brick 300 - 400 pieces, clay.
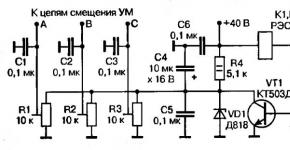
Below is a functional diagram of a metal stove made from a pipe for a bath.
 1) blower; 2) firebox; 3) heater; 4) door; 5) tap; 6) hot water tank; 7) chimney pipe; 8) platform for a brick pipe; 9) brick pipe; 10) gate; 11) upper part of the tank; 12) hole for the chimney; 13) lid with handle; 14) hole for pipe; 15) bottom of the tank; 16) a grid of reinforcing bars; 17) steel plate; 18) grate; 19) ears; 20) coupling made of steel tire.
In order to install a stove in a bathhouse, you must pour the foundation under it t. We knock down formwork measuring 1 × 1 m, 30 cm high. We lay the reinforcement in 20 × 20 cm squares in one layer, tying them together with wire. To prevent the reinforcement from lying on the ground, we drive four pieces of reinforcement along the edges and tie a lattice to them by weight. Next we fill the foundation. To the foundation didn't crack, when dry, place wet rags on it, which we wet throughout two weeks. For ventilation, open all windows and doors.
Step-by-step technology for making a stove from a pipe
Step I. Preparation of parts from which the oven will be made
We take a pipe length one and a half meters, diameter fifty centimeters, pipe wall thickness not less than one centimeter, and cut out the parts necessary for the furnace. We cut the pipe into two parts: one 60 centimeters, the second 90 centimeters. From a section of pipe that is larger, we will install firebox and heater, and use the smaller section for the hot water tank.
Step II. Building a furnace
 At the bottom of the larger piece of pipe, which is intended for the heater, a hole is cut for the blower. Its width is 20 centimeters and height 6 centimeters. Mounted above the cutout by welding round steel plate, the thickness of which is not less than 1.2 centimeters. Then a part of the metal for the grate in the ash pit is cut out separately. Four lugs are welded to secure it.
Next, we cut out a niche where the firebox will be located. From the rest of the pipe we make firebox door measuring 25 by 30 centimeters and hanging it on hinges. A latch is attached to the door. We make a heater from a piece of pipe 30 or 35 centimeters high. We weld it over the firebox and make another door, the size of which is 25 by 30 centimeters.
We fill the heater with rounded stones ( half its volume). We install a steel coupling in the upper part of the stove, which is needed to attach the water heating tank.
III step. We make a water heating tank
To make a tank we use section of smaller pipe(60 cm). We weld the bottom to the end of the pipe section, the thickness of which should be eight millimeters. It is necessary to cut a hole with a diameter of 15 centimeters in the bottom to install the chimney. It should be offset towards the rear wall of the tank.
We weld the chimney tightly to the bottom of the tank so that avoid water leakage into the firebox. The top of the tank is closed with a metal lid, in which there should be holes for the chimney and for water. To the chimney, 5 centimeters above the tank, you need to weld a steel square platform with sides of 30 centimeters to install a brick pipe, which is led through the ceiling and then through the roof.
We equip the brick pipe with a valve. Opposite the water hole at the bottom of the tank, we weld a valve with a tap.
IV step. Installing a finished stove indoors
 After assembling a metal stove from a pipe, you can install it indoors. When installing the stove, you must adhere to technological rules:
- Necessary strictly observe the size of the site on which the stove will be installed. The platform should have a square shape with a side of 70 centimeters and a height of 15 - 20 centimeters. The stove should be installed at a distance of 20 centimeters from the wall.
- A stove of this design is installed on concrete foundation, lined with refractory bricks, 20 - 30 centimeters high, using clay mortar.
- In places where the chimney outlet passes, it is necessary to make thickening brickwork- about 12 centimeters. Floors (wooden) are covered with cardboard, asbestos or felt, moistened with a clay solution. The span of the pipe from roof to ceiling should be plastered and then whitewashed with lime. The height of the outer brick pipe should be more than 50 centimeters from the roof level.
- The firebox doors should be directed towards the exit, and the heater door should be directed diagonally towards the corner of the bathhouse.
- The shelves in the steam room should be located near the wall where the stove is. It is necessary to calculate their height so that while sitting your head does not touch the ceiling. The heated air rises, and because of this the ceiling is very hot. You should not install lamps on the ceiling in the steam room for the safety of being in it.
- If the bathhouse is wooden, then a metal stove should be used for fire safety. cover with bricks. The height of the brick lining is 120 centimeters, the length is 80 centimeters on both sides of the stove. Now you can build the wall.
- The stove test must be carried out without anyone present in the bathhouse.
To build a homemade sauna stove from a metal pipe, use our instructions, which will help you make your dream come true. Good luck!
Today on the construction market you can buy different models of stoves that run on wood and gas. Their price is high, and there is no guarantee that they will last long. That's why many people make them with their own hands. After all, designing a stove is not difficult; the only thing you need is instructions and advice from experienced specialists.


Peculiarities
When building a bathhouse, the main attention should be paid to the stove. By constructing it, a person takes on great responsibility, especially if he builds it himself. Judging by the reviews, it is economical, profitable, and there is always the opportunity to do everything according to an individual project.
A homemade sauna stove produces heat and hot steam during fuel combustion. At the same time, it warms up not only the steam room, but also the dressing room. Therefore, having installed such a stove, all that remains is to heat it well and wash with pleasure.

Any stove, whether homemade or purchased ready-made, has a heater - a container where stones, a firebox and a container for water are stored.
The firebox has a door through which firewood is loaded., and an ash pit, where ash remains after fuel combustion. From the fuel chamber, hot air rises into a container for stones, where they are laid out on a special grid that connects the firebox and the heater. Then, having given up some of the heat to the stones, the hot air enters the container, where it heats the water.


Regardless of what material the stove is made of, it will have both disadvantages and advantages.
Advantages
First, it’s worth considering the advantages of homemade metal stoves:
- the product is lightweight, so it can be moved from one room to another;
- the material is durable, so it can last much longer than a factory stove, the metal base of which is much thinner;
- easily tolerates temperature conditions and has good thermal conductivity, which allows you to quickly warm up the room;
- easy to assemble and install.
Such a structure can be built by anyone who knows how to use welding.


Flaws
But everything cannot be perfect, so such a stove also has a number of disadvantages:
- Temperature change. Although metal heats up quickly, it cools down just as quickly.
- Also, the hot air emanating from the metal spreads unevenly throughout the room.
But these disadvantages are not so significant and can be tolerated, because there are many more advantages.


Kinds
Homemade stoves are often used to heat a room. They can be built from either brick or metal. Both materials are used equally often and are popular.
Made of brick
Such stoves have one drawback - they are heavy, so it is necessary to lay a foundation for them. Fire-resistant bricks are used for laying the heating chamber, and red burnt bricks are used for decoration. The solution is made from clay and sand. It holds the brick perfectly due to the use of clay and does not disintegrate at high temperatures. Cement cannot be used in the construction of the furnace, because it will spill out when heated.


Brick laying occurs in a certain order. A brick oven consists of a firebox, cast iron or steel wheels, a chimney and a hot water coil.


Made of metal
To construct such furnaces, types of metal such as cast iron or steel are selected. Metal structures take up less space compared to brick models. They have good heat transfer rates.
Modern stoves now have two combustion chambers, while they are very mobile. One is intended for the use of solid fuel, and the second is for flammable gas, which is formed in the first compartment.
Due to this design, the efficiency of the furnace increases by twenty percent.


The only drawback of an iron stove is that its surface has a large area and gets very hot. Therefore, you need to be very careful not to get burned. This type of installation is called a gas installation. When designing an iron furnace yourself, you must study the design itself and consult with experienced specialists in order to avoid emergency situations.


When it comes to choosing which stove to make for a bath, preference is given to a model made of metal. Because the air heats up faster if you heat a metal stove. The heating process takes only an hour or two, while brick units can take half a day to warm up. And in the modern world, no one likes to waste time waiting.
If we compare factory-made and home-made sauna stoves, they do not differ much. First of all, this is price, ease of installation and aesthetics.


Factory
Such stoves have a beautiful and neat appearance. Manufacturers are constantly conducting new research and developing new technologies. Naturally, they also have their disadvantages. This is a high price, thin material that quickly burns out in a bathhouse, and also the need to adapt to the factory design.
If this is a new room, then there are no special problems, but if the stove is simply being replaced, installation will become a problem, because you will have to redo the room.

Homemade
Homemade stoves are pretty good. They are not only reliable, but also cost less than factory units. They are made mainly of metal up to six millimeters thick. The external appearance, of course, is not very beautiful, but the stove can be hidden behind a screen made of brick.
There is no need to be afraid that stoves made by yourself will lag behind factory ones in technical terms. After all, real craftsmen just need to look at the finished product and they will be able to do the same.


If the question is about what to make homemade sauna stoves from, then the answer is ambiguous. After all, each material has its own advantages and disadvantages. By using materials such as barrels or cylinders, you can avoid one of the main problems - seams. It is because of them that metal destruction most often occurs.


Kamenka
This is the most suitable option. The advantage of this model is its small dimensions, so it can be installed even in a compact steam room. Its standard width is 52 centimeters, length is 103 centimeters, and height excluding the pipe is 140 centimeters. Such a stove can even fit in washing rooms, which will save steam room space.


Iron stove
This stove is also very good. Its design includes steel pipes, from which smoke channels are made, and a firebox made of heat-resistant brick. The advantage of this design over a completely metal one is that the brick takes a long time to heat up and cools just as slowly. Thanks to this, the room remains warm for a very long time.
Apart from the firebox, all parts are made of steel or other metal.

Wood burning
In such stoves, the space inside the firebox is made of durable steel corners, as well as strips. The firebox itself is covered with a sheet of high-quality steel, in which a hole of approximately 15 centimeters is made, through which waste after the firebox will be discharged. Doors and frames can be found ready-made in stores.

Manufacturing examples
Having decided to make a sauna stove on your own, you need to approach the matter thoroughly. Firstly, choose a project that is best suited for the bathhouse, and secondly, make drawings to make it easier to build. There are many options for sauna stoves, so anyone can create their own version, taking into account some basics.

Here are some examples of homemade projects.
Metal with a tightly closing heater
This option is possible for a steam room measuring 2 by 3 and 2.3 meters high. The material, namely metal, is taken as a sheet, three millimeters thick. The air supply goes to the top of the firebox. A metal plate is welded to the back wall of such a firebox, and air is supplied into the hole between the wall of the firebox and this plate using tubes. This helps cool the back wall and push hot air up where the flue gases are concentrated. When mixed, the substances ignite. Thanks to this, the stones are heated to high temperatures, although much less firewood is used.
Such models appeared recently, but quickly gained popularity.

For a compact steam room
It is not difficult to build such a stove. To build it you will need a metal sheet up to five millimeters thick. If you take a thinner sheet, the stove will quickly burn out. Its dimensions are 90 cm in length, 80 cm in height and 60 cm in width. To create a chimney, a piece of pipe with a diameter of 11.5 cm is suitable. At the bottom there should be an ash pit with a door; between this part of the stove and the firebox, cast iron grates and heaters are placed to remove waste remaining after combustion. To do this, one third of the back wall of the heater is welded with a strong sheet of metal, where a chimney pipe is welded in the center, lowered down 10-12 centimeters.
The top of the oven is covered with a metal lid up to one millimeter thick. It is this that prevents the stones from cooling down and also prevents waste and ash from entering the steam room. The lid opens only when needed, namely before going to the bathhouse.
At the end of the work, the seams are checked and anything that was done poorly is corrected. The stove is painted with a special heat-resistant varnish. Later the stones are laid.

Simple heater
This is the best homemade stove, which is suitable for both a sauna and a simple bathhouse. The high temperature is reached in about an hour and a half. During this time, the 50 liters of water needed for swimming can boil. Such a stove has not one chimney, but two. The first is suitable for heating the room. The second is for the release of carbon monoxide and acrid smoke. The structure consists of sheets of iron 3-4 millimeters thick, but the firebox itself is made later. It is made of metal up to 6 millimeters thick. The kit also includes a small and large valve and two metal grilles.
Hello! I'll tell you how I built a bathhouse at the dacha. Built alone. Sometimes only (when installing heavy or long parts) did he ask someone to help (when installing the frame and rafters).
Well, I'll start from the beginning. First, we determine the area where the bathhouse will be. We mark the location of the future foundation and begin digging.
We are digging under the foundation.
Since our site is located on quicksand, the foundation was made stronger. I bought pieces of reinforcement at a collection point for ferrous scrap metal. I welded a frame out of them and laid them on bricks so that the metal did not touch the ground.
Next, we make formwork so that the foundation protrudes above the surface. For the formwork I used chipboard from old cabinets. I placed the straight edges up and leveled it around the entire perimeter. This is necessary so that you don’t have to remove the level with a brick later. We lay a sewer pipe to drain the water.
Next we fill it with concrete. You can bring ready-made concrete with a mixer (this is if there are access routes for the mixer). In my case, it was not possible for a mixer to be accessible. I ordered 1 Kamaz OPGS (Enriched Sand-Gravel Mixture). They dumped it on the plot (by the way, my plot is small, only 4 acres). And all the hard work began. From one end of the site to the bathhouse, I carry 3 buckets of OPGS + 1 bucket of cement on a construction wheelbarrow. I added water on the spot and mixed it in the same wheelbarrow with a shovel, poured the finished mixture and leveled it. Since I did it all alone, it took me 2 days. At that time, I thought it was pointless to buy a concrete mixer, but later it turned out that it would be better to buy it, because then I would fill the paths and other little things. In short, if you have such an idea, buy a stirrer, it costs 7-8 thousand. For one thing, we fill the foundation for the stove.
We wait until the poured foundation sets and gets stronger and begins to lay out the base of red brick. Between the foundation and the brick I put a layer of waterproofing on it, 2 rows of brick. When laying bricks, I left 50mm sewer pipes for ventilation and one polypropylene pipe for cold water supply.
We bring the log house and lay out all the logs in order so that later we don’t have to look for the ones we need.
I already put 2 layers of TechnoNIKOL waterproofing material on the finished brick base and began to assemble the frame. I sanded each log using a grinder with a sanding attachment. I used jute to seal the joints. They were waiting to nail it with a stapler and when installing the log, they threw it in to crush the jute. The log house has been assembled. Immediately treated the outside with a bug and weatherproofing treatment.
The log house has been assembled.
Rafters and sheathing.
Pediments.
Waiting room.
Entrance door.
The ceiling is made of 40mm boards. I glued it with foil and covered it with aspen clapboard, and insulated it with ecowool on top.
Shelf frame.
The stove is fenced from the log house.
The floors in the dressing room were covered with yacht varnish.
Well, this is what happened in the end.
www.drive2.ru/users/malaika11/
There are currently many metal sauna stoves on the market, but they are all expensive. If you have good experience in metal welding, then you can make an iron stove for a bathhouse with your own hands. In this article we will describe in detail, attaching relevant photos, how to do this, having your own dimensions and drawings.
Differences between metal stoves for baths and saunas
Steam rooms in a bathhouse and a sauna differ significantly from each other. The sauna is accompanied by high temperatures - over 85 ºС. Such indicators make it impossible to greatly increase the humidity, since skin burns are inevitable. At the same time, the broom crumbles in such conditions in just 5 minutes. Therefore, the humidity is adjusted to 5-15%. The Russian bath has a temperature in the region of 55-65 ºС, which makes it possible to raise the relative humidity to 50-60%.
To create certain conditions in the steam room, different stoves are used, and different approaches to their installation are also used. If you are setting up a sauna, you will need to maintain the maximum area of contact between the stove body and the air and ensure rapid circulation of air flows along the walls.

It all comes down to heating the air in the steam room as quickly as possible. A small open heater, located above the firebox, can heat the stones to 200-250 ºС. It makes it possible to get a little steam - as a rule, this is enough for a sauna, because you only need to achieve 15% humidity.
In a Russian bath, a different microclimate is created - low temperatures are reached and a lot of steam is produced. Moreover, it should consist of very small droplets heated to 130-150 ºС - such steam is called “dry”. Such a microclimate gives the body lightness and strength. “Dry” steam can only be obtained by heating stones to values of more than 500 ºС. To achieve such indicators, stones are placed in a firebox, that is, in a closed heater.
Do-it-yourself stoves for Russian baths
The most important thing when making metal sauna stoves according to drawings with your own hands is to take into account that it is impossible to maintain the required temperature within 60-65 ºC with heated metal walls (read: “Drawings of a metal sauna stove - building a stove with your own hands”). You will definitely have to reheat it, which is accompanied by the emission of strong IR waves, which makes it quite difficult to be near the stove.
There are two ways to solve this problem:
- Lining the firebox. The process involves lining the inside of the firebox with refractory bricks. It is enough to lay it on edge, and the thickness of the lining will be 6 cm, although narrow fireclay, 3 cm thick, is also found. Be that as it may, the heating of the steel walls is insignificant; the heater warms up the most. Therefore, you should immediately design the firebox so that it is larger in size, since most of its volume is allocated to the lining. The disadvantage of this method is that it produces hot smoke, which reduces fire safety. It is best to cool it by installing a tank or heater on the pipe. It is a little more difficult to install a heating shield, passing through which the smoke cools down to 80-120 ºС.
- Install a brick screen around an iron stove for a bath. It is assembled from ceramic bricks, while windows are left in the wall for mounting doors, which will allow you to control the level of air heating in the future. We can conclude that this option is the best due to the ability to regulate the temperature, but it is less practical, since the back wall overheats very much, so it is necessary to include heat-resistant steel in the design. In this case, it turns out that for a longer service life of an iron sauna stove, you need to choose a fairly thick metal. As practice shows, it is better to install it in the upper and lower parts of the firebox.

Separately, it is worth mentioning the seams. A homemade iron stove for a bathhouse quite often begins to burn out precisely because of poor-quality seams. In production conditions, this problem is solved by using a bent structure. They try to minimize the number of seams on top of the stove.
When making a metal stove for a bathhouse with your own hands, it will be almost impossible for you to bend 6-10 mm steel, so, as a rule, all that remains is to make extremely high-quality seams.
What size is the heater and in what place is it better to place it?
The required volume of stones is determined by the size of the steam room and the quality of insulation. The value, as a rule, varies from 20 to 40 kg per 1 cubic meter of room. Naturally, the more there are, the easier it is to produce the required volume of steam.
Due to the fact that different stones differ in density, with the same mass they will occupy different volumes. It has been determined that for a steam room with a volume of 12-14 m 3, it will be necessary to install a heater 30x40x30 cm. These dimensions can be slightly adjusted in different situations.
When making a sauna stove from metal with your own hands, you will need to select the individual volume of the heater based on the size of the stove. To avoid mistakes, it is better to start from ready-made drawings. When using an experimental approach, it is worth considering that the volume of the firebox should exceed that of the heater by approximately 30-50%.

Before building a stove in a bathhouse, it is worth calculating the best location of the heater in the firebox. From practice it became clear that it is best to place it on top, near the back wall, where the temperature is highest.
It is worth remembering that the heater will need to be maintained, and it should be equipped so that water can be supplied there. The hatch is best positioned so that you can easily reach the farthest edge with your hand, and so that water can be supplied without the possibility of getting burned.
As a rule, tubes are added to the heater, placed inside the container, which would reach all the stones. On the water supply side, the tube is equipped with a funnel. After the tubes are separated, they are lined with stones. After water is supplied through the tubes, it hits the stones in the heater and turns into steam.
Drawings of homemade steel stoves for a bath
Let's consider a stove option that will be relevant for a steam room with a volume of 2 × 3 × 2.3 m. For its construction, 3 mm thick steel sheets are used.
To start the combustion process, the design provides an additional air duct, which originates from the street. To prevent the steel from bending during heating, stiffening ribs in the form of corners are laid at the top of the firebox to the sides.

Let's consider another scheme according to which you can make metal sauna stoves with your own hands. These are models with air intake from the top of the firebox. They are also called gas afterburning furnaces. A steel plate is welded to it on the back wall. Air enters the furnace from under the grate and is supplied through air ducts going into the gap between this plate and the rear wall of the firebox.
This interesting design copes with two tasks at the same time: it cools the back wall, preventing it from burning out, and also supplies already heated air to the upper part, where very hot gases in the form of smoke are concentrated. 80% of their volume is flammable.

After mixing with air, they ignite, which leads to an increase in the temperature in the firebox and heating of the stones to higher levels. If you use dry firewood as fuel, you will need much less of it. Many long-burning stoves have been built on this principle of operation, but it has only recently begun to be used for sauna stoves. There is also a similar model without afterburning. By studying its drawing, you can better understand the proportions and placement of different elements.
This design involves building a firebox with a volume 30% larger than a heater. The ratio can be considered acceptable. The chimney is located offset back, which sometimes causes difficulties during its installation - the ceiling beam may interfere with it. In this case, it may be necessary to bend the chimney, which is not recommended.
In addition, before making a stove for a bath, you should decide whether a tank for heating water is needed in the steam room. Some people adjust the humidity level by opening and closing the tank lid. Other experts claim that heavy steam is generated in this way, so they advise installing the tank in the washing room, and heating the water using a heat exchanger built into the firebox, connected by pipes to the tank.

Now let's look at the diagram of a metal stove with a water tank. The design is considered to be quite well designed. Thanks to the spark arrester, the smoke travels a slightly longer distance, thereby better heating the walls of the firebox. Instead of a tank, of course, you can lay stones.
It is worth considering the option of installing a tank behind the stove. The chimney is moved back, passing through the tank. Due to the large height of the tank, there will be effective heat transfer, therefore, the chimney will not overheat when leaving it.
The heater has a design that assumes its small size, which is quite sufficient for small steam rooms. It has a lid, but due to its location, it can be difficult to close after water is supplied. But this design is easier to maintain.
Making a sauna stove
The main task of furnaces is to bring the temperature to the desired level as quickly as possible and maintain it at this level. To speed up this process, fans are used, which, by blowing on the walls, speed up the heating.
The convector casing is also designed for these purposes. The gap between it and the wall of the firebox should be 1.5-2 cm. Through the gap, air is sucked in, which warms up during movement, while the walls cool down.

To make a stove for a bathhouse with your own hands as high quality and practical as possible, its body is made of thick metal and the casing is made of thin metal, because it is not subject to overheating.
When placing the heater above the firebox, holes can be made in the body for ventilation. In this case, a portion of the air rising along the walls will be directed into the heater, blowing the stones and increasing their temperature. This ventilated heater is perfect for saunas.
Schemes and drawings of furnaces
Sauna stoves have a slightly simplified design. The dimensions of the metal sauna stove, and the firebox itself, should be sufficient to accommodate large logs. The sides of the heater are welded on top of the firebox, the volume of which, as a rule, is from 20 to 25 liters. The ratio in size may vary; there are no specific rules for this.
To make a metal stove for a bathhouse as correctly as possible, you should not install a tank for heating water. Otherwise, you will not be able to control the humidity level in the sauna, which can lead to burns in extreme temperatures.
There is another option - install the heater inside the firebox. A lid can be provided, and such a stove can have two operating modes: with the lid open - to keep the steaming process dry, and with the lid closed - to produce a larger volume of steam.
How to make a stove for a sauna: do-it-yourself metal sauna stove, metal stove, drawings, how to make it from iron, how to build, dimensions of iron sauna stoves, photos and videos
How to make a stove for a sauna: do-it-yourself metal sauna stove, metal stove, drawings, how to make it from iron, how to build, dimensions of iron sauna stoves, photos and videos
Metal sauna stove: manufacturing instructions
Today there are many designs of metal stoves: wood, electric and gas. Wood-burning appliances require a lot of fuel and careful maintenance, but they produce a “live” fire. Electrical devices are housings equipped with heating elements and heat insulators. Gas furnaces are the most modern and reliable; they have thermostats for power control and protective devices that are triggered when the gas goes out.
Advantages and disadvantages of metal sauna stoves

Metal sauna stoves have significant advantages over other heating structures:
- The small dimensions and mobility of a metal stove make it indispensable for small baths.
The disadvantages of metal stoves are:
- Rapid cooling due to the oven's inability to retain heat. Constant support for fuel combustion is required.
Material for a metal stove in a bathhouse

To make the stove, metal with a thickness of more than 5 mm is used; with a smaller value, the device will not last more than 5-7 years. Reputable stove manufacturers offer ten-millimeter steel products for fireboxes and slightly thinner ones for water tanks and stone bins.
Design of a metal stove-heater for a bath

A metal sauna stove consists of three main parts, such as a fuel combustion chamber, a hopper for stones, and a tank for heating water.
- The combustion chamber. This is where the wood burning process takes place. To control it, the firebox and ash door doors are used. The latter serves to supply air to the firebox. Removal of combustion products from the stove is carried out through an ash pan - a metal grate. From the firebox, the heat from the burning wood rises to the bunker with stones.
If the design of a metal sauna stove is clear to you, let’s move on to the process of its manufacture.
Making a sauna stove from a metal pipe

We will make the stove from a pipe with a diameter of 700 mm, its height will be 1600 mm. For work we will need: a steel sheet measuring 2200x1000 mm and a thickness of 10 mm, a metal pipe 1600 mm long with a wall thickness of 7-10 mm, a chimney pipe with a diameter of 100 mm with a wall thickness of 5 mm, a metal rod of 10 mm, a cast iron grate (from the store), door hinges - 8 pcs., latches - 3 pcs., drain valve for the tank, tape measure, building level, grinder, metal scissors, welding machine.
- We cut the pipe into two parts: one of them is 0.9 m long, the other is 0.7 m long.
Installation procedure for a metal stove in a bathhouse

Activities for installing a sauna stove begin at the stage of erecting the entire building - to install the device, a foundation is laid with a slight depth. A masonry of two rows of bricks is made on it, and a stove is placed on it.
- The minimum distance between the wall and the stove is assumed to be at least 1 m. In addition, it is recommended to install additional protection in the form of thermal insulation of the wall with foil with a layer of insulation. This will prevent the wooden wall from overheating and catching fire.
After installing the stove, you can line it with bricks using clay mortar. This will improve the appearance of the device and save people from the possibility of burns. The stove with lining can be placed closer to the wall.
We hope that the above will convince you that making a metal stove for a bathhouse is not so difficult. If you have metal cutting and welding skills, you can use a simple drawing to make a homemade stove that will be no worse than a purchased one.
DIY metal sauna stove
Homemade metal stoves for baths have always competed with their brick counterparts. This is due to the fast heating and simple installation of such units. With manufacturing instructions
Assembling a sauna stove with your own hands from metal
A lot of do-it-yourself sauna stove designs made of metal have already been made and invented, but the topic has not been fully explored and is still relevant. You can make metal sauna stoves with your own hands from available metal materials; you just need desire and a little time.

DIY metal sauna stoves
After looking through this article and following the technology, as well as adding imagination, you can come up with something yourself. As a result, you will not only have a great time in the sauna, but also surprise your neighbors and friends with unique solutions. We'll tell you about some in more detail. We will figure out how a metal furnace can be made, what its dimensions and structure should be, and we will also tell you how to prepare the base (foundation) to install the assembled structure.

Stove with stone grate and water heating
What do you need for work?
If you are going to build a metal sauna stove with your own hands, then you first need to draw up a project, determine the dimensions of the unit, and also prepare everything you need.
Tool
- Welding machine.
- Electrodes with a diameter of 3-4.
- Bulgarian.
Material metal
If you are making a homemade sauna stove from a pipe, you will need:
- Wheels - 4 pcs.
- Pipe with a diameter of 100-150 mm.
- Sheet iron 2-3 mm thick.
- Iron fittings with a diameter of 8-10 mm or rod.
Construction material
- Brick - 300-350 pcs.
- Cement - 2-3 bags of 50 kg.
- Crushed stone, sand - 0.1 cubic meters.
Please note: draft is created by discharge, i.e. discharged cold air draws out warm air. Warm air, in turn, tends upward under the influence of Archimedes' force. The draft depends on the weather: in summer the air is warm and humid - the draft is naturally less, in winter the opposite is true. The draft also depends on the diameter of the pipe.

Drawing of a heater stove
If the pipe is thin, then gases and warm air will be slowed down by friction against the walls of the pipe and will not have time to leave the chimney. As a result, it is created smoke plug and the smoke follows the path of least resistance, i.e. into the room.
Therefore, when making a metal sauna stove with your own hands, always follow the principles of pressure, drafts, correctly choosing the dimensions of the chimney and firebox. If the pipe is wide- smoke and gases will slowly rise upward, the draft will be poor and the pipe will be very clogged, it will have to be cleaned very often. Since everything will settle on the walls of the pipe, the normal speed when exiting the pipe is 5-8 m/s.
For the first time, the Romans began to use chimneys (3-8 centuries BC) - famous roman baths.
Furnace construction work
So, let's start building a metal sauna stove with our own hands. First of all, you need to prepare the foundation, that is, the base on which you plan to install the structure. Despite the fact that an iron stove for a bathhouse made from a pipe weighs little, it is imperative to prepare a foundation for it. It is very important that the iron stove is installed on a level foundation.
We are building the foundation
- For the foundation for the stove, we knock down the formwork, its dimensions are 1x1 m, height 20 cm.
- We reinforce the future foundation in one layer, laying reinforcement along and across in squares 20x20 cm. We tie the reinforcement at the points of connection with each other with knitting wire. It should not lie on the ground; to do this, we drive it into the ground along the edges of the grate. 4 pieces of reinforcement and tie a lattice to them in weight. Before you start pouring the foundation, make sure the grate is in the middle.
- After pouring, we maintain the foundation about 2 weeks, open all the doors and windows in the bathhouse for better ventilation and lay wet rags on the poured foundation. This is done so that cracks do not form when drying. We wet the rags for 2 weeks.
Preparing and assembling the oven
An iron stove is assembled like this:
- Take the rear rim from the wheel, weld all the holes except the one in the middle.
- Let's take the next rim, cut off the convex top, insert the first rim into the second and brew. There should be no holes or cracks, the device must be airtight, after welding we beat off the slag and check the welding seam; if it’s not finished welding somewhere, we finish welding it, check it again by knocking off the slag.

Moments of assembling a sauna stove

Assembling parts of the 2nd stage of the furnace
Let's make a small digression here. If you already have a dressing room, then before installing a new stove, you will have to cut a square hole in the wall, because the stove will start from there - these are the doors of the vent and firebox, everything else is in the bathhouse.

Drawing of the oven interior
If you did not have a dressing room, then we will build it along with a stove for the bath. The corner in which the iron stove stands should be lined with a brick wall, this is done for the purpose of fire safety, because the inside of the bathhouse is always decorated with wood.

So, let's start making a stove; if you have no experience in stove making or have never laid a brick, then it is better to call a master who will build a stove for you according to all the rules. But if you want to try it yourself, which is not bad, then it’s time to try it, and I’ll tell you how to do it.

- We lay out the base completely from bricks, and in the second row we begin to lay out the ash pit (ash pit).

Ash pit, ashpit
After laying the stove should dry for at least 2 weeks, if you flood it immediately, microcracks will appear, which will compromise the integrity of the stove. We open all the blowers and entrances and exits so that the oven dries out. You can heat it with small wood chips for a couple of hours. The stove is considered dry if there is no moisture and the walls were all dry. You can run the oven fully for maintenance, and the oven is ready for use.
- Now let's look at the pipe; the figure shows the finished type of pipe that is placed on the stove we have folded.
- In an iron stove, the heater is located directly on the body itself, in ours it is located on the pipe, and there is also a hot water tank there.

The oven itself is assembled
I note that the design itself will be quite heavy, so it can be divided into parts and assembled indoors. A do-it-yourself metal sauna stove of original design is ready. If there is already finishing inside, cover it from welding with roofing felt or sheets of iron.
Attention. Don’t forget, when welding indoors, for fire safety purposes you need to have a bucket of water and a spray bottle. A sprinkler can be made from an ordinary one and a half liter plastic bottle by punching a hole in the lid. After welding, spray the seam and scale.
- Chimney top (see Metal chimneys) reinforced with two reinforcements for rigidity, weld it to the pipe and attach it to one wall and to the other. To attach to the wall, we use a corner or plate welded to the reinforcement and drilled on both sides.
- We drill the brick with a hammer drill with a drill with a diameter of 6 mm, 5-6 cm deep and attach it to anchors, so we have stiffness angle and stable design.

Full view: do-it-yourself metal stove for a bathhouse

Do-it-yourself metal sauna stove with stone grate
Options for assembling a furnace of a different design
DIY metal stoves for saunas come in different shapes. Consider the oven, assembled from a pipe, its components and assembly diagram. At first glance, a pipe bath stove has the simplest possible design, but it has its own tricks and design technology. At the beginning of the article, I indicated the operating principle of the stove, draft and chimney. In all cases these principles must be used, otherwise the oven will not work.

DIY metal sauna stove with built-in heater
If you independently implement the design and some original solutions so that you can create a metal sauna stove with your own hands, follow them, and you will succeed. Don’t forget that nothing is impossible for you and me, so we will dare, strive and surprise others by improving our skills. Then a do-it-yourself metal sauna stove or just a stove will not be an unread book for you. The oven in the photo above is a simple option, since the base is almost ready - a piece of pipe with a diameter of 525 mm and a length of 650 mm.
From below we cut a hole measuring 335 mm in length and 180 mm in width, this will be our grate, we weld on rods or an iron strip, about 1 cm apart from each other. Separately, we make a box from sheet iron 2-3 mm in size:
We weld the box and clean out the slag.
We weld the door to it and put the part aside for now. Let's work on the 525 pipe, we need to cut out the plugs and sidewalls on both sides.
- Our pipe diameter is 525, divide by 2, we get 262.5 mm.
- Using a compass, having measured 262.5, we draw 2 circles, although it could be simpler. Place our blank (525 pipe) on the sheet and simply trace it.
If you need to copy several parts, then you should always copy from the original, and not from their finished copies, since dimensional accuracy is lost. If you have marked a part and cut it out, it is better to take the measurement again and make another one than to copy from a finished one.

DIY metal sauna stove with a large heater
For now we will make the parts, but we will carry out the assembly in order. First, we will make the insides of the stove and assemble them inside the stove itself; we will layer and boil all the other parts one by one.
We cut two holes at the top. One is for the chimney, round, with a diameter of 110 mm, departing from the edge of the 525 pipe to the middle (of the chimney 110 pipe) 100 mm. The other is square, for a heater, stepping back from the edge of the 525 pipe 215 mm, cut the size along the 525 pipe 300 mm, across 250 mm. To maintain symmetry of the design, use a level(vertical, horizontal) or plumb line(vertical). For the cut hole, prepare a niche for the stones, cut out the parts from a 5 mm sheet of iron.
We weld all the parts, make a square box as shown, clean it of slag, coat the seams generously with kerosene and check for any leaks. We set the finished part of the furnace aside.
A plumb line can be made from any heavy load (bolt, nut, pebble, nail) and any rope, fishing line, thread. But the weight of the load must keep the ropes, fishing lines, and threads taut. Gravity will do the rest; a thread with a load hanging on it always shows the vertical in an ideal form, just as water shows the horizontal line.

Do-it-yourself metal sauna stove: drawings
Next step: cut out a 4-5 mm partition for the furnace shaft from a sheet of iron (separates the firebox from the chimney, thereby preventing the rapid leakage of heat into the chimney).

Partition for furnace shaft
As shown in the figure, we measure 180 mm from the top and in fact, that is, what the size will be, we will only find out as we progress. Measurements can be made using a tape measure and level. We set the level, mark from the top 180 mm to the top of the level. For the record, I’ll tell you how to make do with improvised means, if there is no level, and mark the horizontal line. We take a transparent glass vessel, it can be a glass, a plastic bottle or any transparent, but fairly solid object with a base.
From the bottom we mark the same distance on the sides and put marks with a marker. We pour water according to the marks - and there you go. level ready. We place it on the surface we need: the water should be at the level with the marks, then we will have a horizon level.
- We set the level itself, not forgetting about the size of 180 mm, it must be observed, press the level to the pipe so that it does not move around, and put marks inside along the edges, with a marker or chalk. We perform the same procedure on the other edge.
- Taking a measurement from mark to mark.
- Drawing a partition on a piece of metal and cut it out.
- We take a niche for stones, insert it into the prepared hole, make a couple of potholders on the side and turn the pipe over (the niche for stones should be at the bottom).
- We insert the partition according to the marks made, if everything fits, then we begin to scald the partition, if not, we make marks where exactly it does not fit or is in the way, pull out the partition, and trim it with a grinder. If there are gaps, it’s okay, it’s welded by electric welding.
- We also scald the niche for the stones.
So, a DIY metal sauna stove is the next stage of assembly. We have plugs or sidewalls. On one we make markings for the firebox door, departing 50 mm from the bottom, and cut it to the size of the door, which we have prepared in advance with one clarification: we make a hole along all edges less by 1 cm. If our door size is 220x320 mm, then we cut a hole 210x310 mm. And we cut out another hole for cleaning the chimney 70x130 mm.

Do-it-yourself metal sauna stoves with a tank for heating water
If a do-it-yourself metal stove for a bathhouse does not have a direct exit from the firebox into the chimney, but with shafts, then you should always make holes for cleaning the chimneys if it is impossible to get there. If this is not done, then ash sediments and small particles of ash and soot will soon reduce access to the chimney and the stove will begin to smoke. You will have to either cut a window, or cut down and weld the pipe permanently.
- First we install the side panel with the future door, scald the outside. Through the firebox window we weld the partition to the sidewall. We will install the firebox door at the last moment. Now we weld the other sidewall, which we have without holes, and clean everything with a grinder.
- Place the chimney in the cut hole, grab it, take a level and measure the vertical on both sides, not parallel, but at an angle. So that the chimney is not blocked. We scald everything, set the pressure for the chimney below.
- Next stage: put the ash pan- blow from below, closing the grate, and scald it.
- AND completion of assembly- We weld the doors to the firebox and to the hole for cleaning the chimney; the ash pan has a door. And weld the legs.
All that remains is to install the stove in its intended place. In this case, the installation is carried out so that the heater is located not in the stove, but outside, which makes heating the stones difficult. There will be stones take much longer to heat up than usual, but the effect will still be there. It is better to use stones for the stove maritime, they heat up faster, retain heat longer, and when they contain salt and iodine, they have a beneficial effect on the body. A very important detail. If you have made an iron sauna stove with your own hands, then you need to install it so that the floor under the ash pit is made of tin or tiles, generally made of non-combustible material.
Do-it-yourself metal sauna stove: assembly
Step-by-step guide to assembling a sauna stove with your own hands. Materials and tools required for the work. Detailed step-by-step description of actions when
DIY metal sauna stove
There are plenty of types of stove equipment: some prefer a brick heater built by a professional craftsman, while others prefer a metal stove constructed with their own hands.
The last option is economical, as it can be made from scrap materials with your own hands.
Advantages of the unit
The following main ones can be identified positive points, which a metal sauna stove is equipped with:
- Compactness and small parameters make it possible to install such a design even in a small room.
- There is no need to build a special massive foundation. A lightweight base is also suitable for such a stove. And this greatly simplifies the process of installing furnace equipment.
- In a metal sauna stove, a constant combustion process can be maintained, which allows you to maintain the temperature at a given value throughout the entire sauna procedure.
- An economical option for furnace equipment, the possibility of constructing the structure from existing materials.
Disadvantages of a metal sauna stove
Despite the presence of positive aspects, a metal sauna stove also has its own minuses :
- cools down very quickly, since there is no property of storing thermal energy. In order to maintain a high temperature in the bathhouse, it is necessary to maintain a constant combustion process.
- low ability to heat a large room;
- the need to provide special protection from fire situations, since the fire safety of metal structures is low. It is recommended to install additional casing trim.
Choosing a shape for a metal sauna stove
To many, such a parameter as the shape of the structure will seem unimportant. In fact, the configuration affects the performance of the equipment and the convenience of its use during operation. The furnace unit is:
The last type is the most common and easy to use. With this configuration, the furnace has corner zones that are subject to minimal heat. That is why many believe that a rectangular design best preserves the shape and frame of the stove.
The shape of the stove also affects the uniformity of heating of both the structure itself and the heated room. When one element of equipment is heated to maximum, the heating of another decreases. This, in turn, ensures uniform heating of the room and a stable balance of heat flows.
Proper heating of the structure affects its mechanical stability. Thus, a round or cylindrical oven is characterized by a low degree of resistance to heat, so it has denser walls. A rectangular oven is considered heat resistant because it has cold corners.
Options for a do-it-yourself stove structure
Metal sauna stoves, one might say, already have a long history, so over such a long period craftsmen have developed and proposed various types of designs.
The simplest option is a metal stove made from an iron barrel. To do this, the bottom and lid of the barrel are cut off, resulting in a cylinder. Up to half of this cylinder is loaded with bricks placed on edge. A grate is placed on top of them. The remaining half of the barrel is filled 2/3 with stones. After this, the chimney is removed and the lid is installed on the stove. This method of making a stove, although simple, is inconvenient to use.
For a small bathhouse, you can build a compact-sized stove-heater using sheet steel. The inner surface of this structure is lined with bricks. The firebox, its walls are laid out in half a brick, the chimney - in one quarter. This type of stove is easy to make and use. To warm up the room you will need some fuel raw materials. A comfortable room temperature will be achieved after a short period of time.
Manufacturing process
Whichever design option is chosen, You will need to prepare the following material:
- sheet steel, the thickness of which is not less than 8 mm;
- metal pipe with a wall thickness of 10 mm, a diameter of 50-60 cm;
- rod 10 mm thick;
- grate;
- latches and doors for the combustion chamber, heater and blower;
- water tap;
- two meters of pipe. Of this, 90 cm will be used for the firebox, 60 cm for the tank, and 50 cm for the manufacture of secondary parts.
By the way, you can make doors for structural elements yourself.
Concerning tools, then in our work we will use a grinder and a welding machine.
Option 1: stove design with a closed heater type
In this type of construction it is assumed closed view of the heater, therefore, to splash water to supply steam, you will need to open the door.
A design such as a do-it-yourself metal sauna stove has the following steps:
- We take a large piece of pipe, the diameter of which is at least 50 cm, and cut an opening in it for the blower. The size of the latter is 5x20 cm.
- Inside the pipe, on the side of the opening, we weld fastenings for the grate, using any metal plate with eyes.
- We move on to arranging the firebox: we cut a 25x20 cm opening, weld the fasteners for the heater rods. We will use rods 1 cm in diameter, or specially sold grates for a circular oven.
- On the opposite wall of the heater we cut a hole through which steam is supplied.
- We fill the heater with stones suitable for this type of construction. Soapstone and diabase have good properties that are combined with a metal surface; flint, granite, and mica-containing stones should be excluded.
- We cut a hole in the stove cover for the chimney pipe and install it.
This completes the manufacturing process of the stove structure. But still, the craftsmen propose to improve the design by adding hot water tank .
To do this, take a piece of large diameter pipe and weld in a water tap. We prepare the lid for the water tank: take the lid of the required size and cut it into 2 equal parts. In one part we cut out an opening for the chimney, and then weld it onto the tank. The second part will be removable, so we weld hinges and a handle to it.
Option 2: stove with an open type heater, constant heating
Having a metal sheet it is easy and simple to build such a unit. His the design is a pipe divided into two compartments using a grate. The upper compartment is the firebox, while the lower one acts as an ash pan. Each compartment is equipped with a door through which you can add fuel, provide air supply, and remove combustion products.
At the far, plugged end of the pipe we weld the chimney pipe, its diameter is 100 mm.
We weld a metal box on top of the cylindrical body, which is filled with stones. The curved chimney elbow allows for maximum heating of the stones, since this increases the contact surface of the hot pipe with the heater.
The described version of the furnace structure can easily be made in the form of a parallelepiped. In this case, you will need sheets of metal for the blanks, not a pipe.
As a rule, such a stove requires a water heating tank. In a rectangular oven ways to place the tank many, here are just a few:
- can be done on either side;
- attach on top;
- make a water jacket on several sides;
- install pipes for cold water supply and hot water intake.
A convenient way to obtain hot water is to install a special heat exchange tank on the chimney pipe. You can make such a water heater yourself, or you can buy a ready-made factory one, which has a pipe of a standard size and diameter. In the latter case, the tank crashes into the chimney, its vertical part above the stove body, and pipes for water supply and intake are connected. Such a tank, with sufficient volume, can serve as a water reservoir or simply be a heat exchanger connected to the main water tank.
Option 3: open metal stove with additional brick walls
This type of furnace equipment is complex to implement, but this is justified by the acquisition of the ability to accumulate heat.
This design is metal body with internal brickwork. At the same time, the requirements for steel thickness are reduced: you can take a sheet 2 mm thick. For brickwork you will need fireclay bricks and mortar. A special ready-made dry mixture for furnace work is suitable as a solution. It is mixed taking into account the requirements of the instructions for use.
A do-it-yourself metal sauna stove has the following manufacturing technology:
- Preparing the base: We weld the legs and heel pads to it. This will make the furnace structure stable.
Diagram of a metal sauna stove with an additional brick wall
- We lay the first continuous brick row on this base. For the remaining rows we adhere to the following parameters: near the firebox we place half a brick, in the area of the chimney ducts - a quarter.
- When the blower chamber is ready, install cast iron grate , placing it between the firebox and the ash pan. To create openings for the loading window and the blower, you can use metal corners measuring 20 x 20. It is important to ensure the evenness of the row seams.
- We place it above the combustion chamber metal grille made of rods , the diameter of which is 12 mm. We will then place stones on this grid.
- When the masonry reaches the level of the heater, you need to leave it on the right or left opening We will load stones into it, take them out for cleaning, and also splash water into this window during the bathing procedure to create steam.
- Chimney channel It is advisable to make it tortuous. This will ensure maximum heating of the entire furnace body and complete combustion of fuel resources. In the place where the pipe turns upward, on the back side, we create an inspection window. We install a valve in it, which allows us to retain heat for a long time after the end of the combustion process.
- We lay the top two rows of bricks solid, leaving opening for installation of a chimney pipe , through which combustion products will be discharged.
- After finishing the brickwork, give the mortar time to set and dry. After this, we proceed to welding the walls of the metal body. In our situation, this case resembles a kind of case. A corner, 20 x 20, placed along the joints, makes it easier to weld and make the seams airtight.
- Carrying out the workpiece anterior wall , do not forget to cut openings for the ash pan and the loading chamber of the firebox. We install the front wall in place and weld the hinges for the doors. We make the door leaves 10 mm wider on each side than the prepared openings - this will ensure tightness when closing. You can lay an asbestos seal around the perimeter of the door or along its entire inner surface.
- In the side wall blank we also provide an opening for the prepared part in the brickwork windows for steam generation . To do this, we install a metal door with sealing material. It is advisable to make it open downwards, install a cold handle for opening during the bath procedure, when there is a need to supply steam.
- Cut out on the oven lid hole for chimney pipe , after which we weld the lid into place. Next, we install chimney channel and scald it.
- We install a metal sauna stove with our own hands in the chosen place and load it with stones.
Rules for installing a metal sauna stove
- install a metal sauna stove with your own hands at a distance of at least 1 meter from the walls of the sauna;
- the structure must be located in close proximity to the chimney;
- making a special foundation, a base made of refractory materials for placing the furnace;
- the wall of the room near which the metal sauna stove is located should be finished with sheet fire-resistant material.
Do-it-yourself metal sauna stove: photo drawings
Metal sauna stove: advantages and disadvantages, drawings, photos, 3 options for making a metal unit with your own hands. Video instruction.