How I made a transformer table with my own hands. How to assemble a transformer coffee table with your own hands Do-it-yourself transformer dining table
Have you been dreaming about a folding table for a long time? Can't find a suitable model? Do not despair. After all, it is quite possible to do
Advantages of transforming tables
The modern world is full of technical innovations. This applies not only to electronics, but also to furniture. At the peak of popularity, it is the transforming furniture. This is especially true for tables. They can be placed in any room: living room, kitchen, dining room. Thanks to the compactness of this furniture, you have a great opportunity to save a lot of space. In addition, it can carry several functions at once. For example, a table-bed-transformer is in great demand today. You can also make it with your own hands. During the day, you can seat all your friends at it and have a meal, but at night this table turns into a bed on which you calmly rest. Interesting, isn't it?
Transforming tables for a small kitchen are especially relevant. Their functionality depends on the mechanisms, which are the most important aspect of such furniture.
Often, these tables change not only in size, but also in purpose. So, for example, a small box that doubles as a chair can easily turn into a festive dining table. Now you can organize a feast and not worry that you will have nowhere to seat your guests.
What is the secret of the mechanism of transforming tables
The mechanism for the transforming table is so simple that even a child can handle it. It works with special built-in iron parts that move certain parts of your table, thus making it powerful and large.
As a rule, shops today offer a wide selection of modern folding furniture. It is durable and can please everyone with its long service life. In addition, transforming furniture can please with its wide choice in color scheme. Thus, you can choose the shade that suits your interior.
The only drawback is the high cost. Not every average citizen of our country can afford to purchase this element of the interior. But for those who want to get it, we suggest making a transforming table with their own hands.

How to make a book table yourself: materials and tools
Before you make a do-it-yourself transforming dining table, you need to make all the calculations correctly and prepare a drawing. There are certain parameters of this product: height - 75 cm, width - 80 cm, tabletop length - 152 cm.Therefore, you will make a table of exactly these dimensions, or deviate slightly from them, but you need to build on these parameters.
For the basis of such furniture, you should opt for moisture-resistant chipboard, although non-moisture resistant is also allowed. The fasteners in this case are 12 pieces of butterfly loops in the size of 4.5 cm.
To attach the tabletop to the side parts of the table, 4 corners are required. In addition, here you also need 2 limiter corners.
Putting together a table-book
The first thing you should do is cut the cuts. To do this, use a simple iron. Remove the material that turned out to be superfluous with a sharp construction knife.

After that, start assembling from the legs. Attach the hinges using special modern screws. The mechanism for the transforming table is ready. For an aesthetic appearance, confirmations are closed with plugs.
Take the bottom rib, which should be at the bottom of the table, and the two side walls. Fasten them so that the rib is 10 cm from the floor. In this case, the rib should be between the walls. Take the second bar and fasten it to the side pieces parallel to the first. It should be about 40-45 cm from the floor. Here it is worth considering the fact that the distance from the ends of the inner ribs to the side ends of the side walls should be approximately 3 cm less. Otherwise, the wings of the table top will not fit snugly and freely against the base of the table when folded.

After that, on the sides, first attach a small one in the middle parallel to the inner ribs, and then two large parts of the countertop on the sides.
Strengthen the legs and twist all the mechanisms.
One do-it-yourself transforming table is ready.
What is needed for a folding table for the kitchen
The transforming table for the kitchen is a leader in saving space. It is ideal for small spaces as its base is fixed to the wall.
In order to make such a round transforming table with your own hands, you must have the following components on hand: a supporting part, 2 struts, shelves and a tabletop rounded on one side.
To begin with, also prepare a drawing with the dimensions you need. It is better to take laminated chipboard with a thickness of at least 1.5 cm for the material.But if you do not have one, then it can be replaced with or planed boards. But in the latter case, they must be wiped with fine sandpaper. In addition, such material requires painting or varnishing.
Putting together a kitchen folding table
The base is attached to the wall by hanging. For this, experts advise using special anchors. And its parts themselves are assembled using self-tapping screws. This process is less laborious than the previous one, but it still requires a lot of effort and attention.
So, the mechanism of the do-it-yourself transforming table, in this case, is enclosed only in fixing the movable elements to the base, which already fits snugly against the wall. After the ends are glued with the edge, provide the back surface with brackets and attach the shelf parallel to the upper small part of the tabletop, fix it with self-tapping screws. After that, follow the above instructions and continue to fix the table pieces one by one.
Choice of mechanism and design of a coffee table-transformer
Before making a transforming coffee table with your own hands, you need to decide on its functionality, which fully depends on which mechanism for the transforming table you choose. After all, its appearance (with a spring or a gas lift) directly affects how your table will fold and unfold.

The second stage of assembling folding furniture is designing it. As a rule, here you should be guided by the recommendations that are included with the mechanism itself. The coffee table design can be different. The simplest option is an ordinary small table, consisting of two halves of the countertops, which are later moved apart and another part of the countertop is inserted in the middle. Thus, the transforming coffee table, which can do almost everything with its own hands, increases in size.
Putting together a folding coffee table
After all the parts are cut from the chipboard, their ends must be glued with an edge. Then try on all the details. Make the markings with a pencil. If your product is dark in color, then it is recommended to use a sticker for this purpose. In this case, the marks made earlier will not be erased and will be clearly visible on the surface of chipboard of any color.
We assemble the transforming table with our own hands using a special drill for confirmation. After assembling the base, proceed with securing the mechanisms. To do this, make through holes in the right places and fix the parts with special bolts.
I saw the transformer table only in photographs or on video, I did not have to contemplate it live. But I really wanted such a folding table to be in our living room, because it has many advantages. When folded, it is a coffee table, and when unfolded, it is a full-fledged dining table, and it unfolds in a matter of seconds.
There is a decent assortment of such tables in online furniture stores, but the prices are somehow not particularly encouraging. Yes, and for me, as a person engaged in the manufacture of furniture on their own, it was interesting to make it with my own hands.
The main highlight of such a folding table is the transformation mechanism. Now it can also be found on sale. But why spend extra money. Therefore, I decided to make the table completely with my own hands without purchased transformation mechanisms.
I started my work by searching the Internet for the information I needed. Most importantly, I wanted to find detailed drawings of the transformation mechanism. Since I have been assembling furniture for more than one year, both for myself and to order, I had no doubts that I would be able to assemble a table, but I had never come across a transformation mechanism before. Therefore, the main efforts were aimed at finding information about him.
I devoted several evenings to this work, and finally, a general picture of the mechanism, what it should be, began to emerge. I wanted to make the transformation mechanism available in the assembly. So that during its installation it was not necessary to do specific work, for example, welding parts, or use parts made to order from a turner. All components must be commercially available.
It was decided that the mechanism will have its own case (box), which I will make of furniture chipboard. I will make the moving parts from a 20x20mm profile pipe. bolts with a diameter of 8mm will be used as the axes of rotation. Gas elevators for furniture facades will be used as auxiliary lifting elements.
Now it was necessary to design a three-dimensional model of the transformation mechanism (MT). The PRO100 program was not quite suitable for me for these purposes, so I had to quickly master another program for three-dimensional modeling. The easiest to learn for me was the Sketch Up program from Google. In it, I made an MT project for my desk.
And then a model of the entire table.
It was time to move from virtual modeling to real modeling. To test the functionality, I made a layout using construction chipboard. From it I made a box and almost all the details of the mechanism. This made it possible to make sure that the designed MT works. Unfortunately, the chipboard racks turned out to be fragile and after the model fell from the table, two of the four broke.
I have already worked with this model more thoroughly. Clarified all dimensions, slightly changed the initial design. It took a very long time to figure out how to arrange the gas shock absorbers so that they would help when unfolding the table. I have probably disassembled and assembled the transformation mechanism about eight times, while changing the position of the shock absorber mounts to achieve the desired result.
Now I had the exact dimensions of all the parts, I knew where and what holes to drill. In the PRO100 program I made a three-dimensional model of MT.
I bought all the necessary materials and started assembling.
For the manufacture of two transformation mechanisms, I used the following materials and accessories:
pipe 20x20 - 4 pm;
pipe 50x25 - 1.2 pm;
strip 20x4 - 1 megapixel;
bolt М8х120 - 6 pcs .;
bolt М8х60 - 2 pcs .;
nut m8 - 26 pcs.;
washer 30x8 - 24 pcs.;
intersectional coupler - 12 pcs.;
corner 45x25 - 0.06 pm;
bolt М8х50 - 2 pcs .;
bolt m4x20 - 8pcs;
gas shock absorber 120-140N - 4 pcs .;
Chipboard - 0.3 sq. m
The weight of each mechanism turned out to be a little more than five kilograms.
The estimated cost of materials is $ 33.
This is how the assembled mechanisms look like.
Now it was possible to start making the table.
I did not have any difficulties with designing the table, because this is a familiar thing. In the PRO100 program, I first made a project of several variants of the table.
I liked the first option more, and I decided to do it. In addition, I made a draft of this version of the table in the Basis-Furniture maker program, so as not to waste time calculating the dimensions for fasteners manually.
I got the necessary accessories:
eccentric coupler - 16 pcs.;
confirmation - 32 pcs.;
self-tapping screw 4x30 - 32 pcs.;
double plastic corner - 4 pcs .;
self-tapping screw 4x16 - 8 pcs.;
footboard D8 m6x13 - 12 pcs .;
bolt m6x30 - 2 pcs.;
bolt m6x20 - 8 pcs .;
bolt m6x15 - 4 pcs .;
hinges - 3 pcs.
Furniture chipboard in two colors, dark and light:
Chipboard light 16mm - 1.92 sq. m;
Chipboard dark 16 mm - 2.69 sq.m.
In total, the cost of materials and services for cutting chipboard and gluing edging was $ 75.
The assembly process did not take me very long, although at the final stage one nuance arose that delayed the work. But in the end everything worked out for me and, in general, I was satisfied with the work. This is how the table I made looks like.
The table turned out to be quite strong, it confidently withstands my weight, and this is a little over a hundred kilograms.
The transformation mechanism works well. I unfolded and folded the table many times, there was no backlash in the details. But if necessary, you can always make the necessary adjustments, free access to the transformation mechanism allows you to do this. The paint was scratched slightly on the metal strips towards the top. Probably, when folding, the racks rub against the edges of the support strips. But this is not critical, since it is completely invisible.
It is not difficult to lay out the table, although gas shock absorbers begin to provide tangible assistance only half way. The weight of the table is about thirty kilograms, it is quite stable.
Sitting at the table is quite comfortable, with my height 180cm, sitting in the middle of the table, I only lightly touched its underframe with my knees. By the way, the niche of the underframe between the two mechanisms can be used to store tablecloths, napkins and other items for table setting.
But the most positive thing is the reaction of others. What is the look on the faces of my acquaintances when, before their eyes, a coffee table turns into an elegant, but still a full-fledged dining table. Not to mention requests to do the same for them.
Now the financial side of the issue. The production of this copy cost me a little over a hundred dollars. The average price of such a table in online stores is at least twice as much. At the same time, the table looks exactly the way I wanted it. On the basis of such a transformation mechanism, you can develop a table of any design or design, for example, a desk to a desk.
If you are interested in the drawings and a detailed description of the manufacture of the transformer table, then read my proposal by clicking on the link.
| Created by 07 May 2014 | |||||||||
In a country house or in a country house, everyone wants to have only high-quality and multifunctional garden furniture, which will not take up much space, and at the same time will perform maximum functions on the personal plot. Therefore, a transforming bench will be an excellent solution for tea drinking with your family. Here you have a bench and a table at the same time, and most importantly, you can make such a structure with your own hands.
Bench-transformer - description of the design, principle of operation
Such a bench for a country house is a fairly simple structure that can be easily transformed into a table with two comfortable benches. And when folded, it is an ordinary bench with a backrest and handrails. It will not take up much space on the territory of the personal plot and at the same time will be able to perform all its functions in full.
Bench function and usability
This is a compact and practical bench that easily converts into a fairly roomy table and two comfortable benches. Due to the high degree of mobility, it can be installed anywhere in the personal plot.
The only drawback of such a bench is its rather large weight, since it will take a lot of wooden boards to make such a complex structure, but it will be quite stable, reliable and durable if everything is done correctly and accurately according to the developed instructions in compliance with all technological processes.
Preparation for the construction of the structure: project drawings with dimensions
Before you start building a bench - a transformer, you need to prepare all the materials and tools, as well as make a good drawing or find it on the Internet.
We offer you a typical drawing - a diagram of a bench - a transformer with the dimensions indicated on it. The most difficult action is the creation of a movable mechanism, therefore, it is initially necessary to prepare all the blanks, which will then be assembled together into a single transformational structure.
For making a bench - the transformer will need to purchase planed edged boards and beams. Larch, birch, pine, beech, ash or oak are best suited for such a structure (if possible, since it is very expensive).
The board must be well sanded, of high quality and meet all compliance standards. If you buy a board at a sawmill, be sure to ask for a quality certificate for their products, since under the guise of edged oak boards you may be sold a completely different product, and if you are not good at wood, then it is best to take a carpenter with you who understands the types boards and their quality.
Material calculation and tools
To assemble a bench - a transformer, we need:
- Two beams with a section of 90x45x1445 mm;
- Five bars with a section of 90x32x1480 mm;
- Two beams with a section of 90x45x1445 mm.
For work we need the following tools:
Stages of making a bench-table
- The first step is to make the legs of the frame. To do this, you need to cut 8 absolutely identical bars 70 cm long and make oblique cuts (also the same) on them at the bottom and top, so that you can get perfect balance during the further installation of the structure at a certain slope.
- Next, we make a frame for two benches from high quality sanded edged boards. We cut out four segments of 40 cm each and the same number of segments of 170 cm. On all boards, the corners must be cut so that then you can make two completely identical rectangles of a slightly oblong shape. For their docking, we use special prepared screws or nails. But first, we drill the same holes in the boards with a drill (the length of the boards is 1.7 meters).
- In the frame of the structure, several strong reinforcing elements must be made, which will further form a comfortable seat. To do this, we take a wooden beam and nail it in 500 mm increments. So we will divide the structure into sections and protect the future bench from lateral deformation.
- The legs must be screwed to the seat at a distance of 10 centimeters from all corners diagonally. We do this so that the joints are near the "seams" or a little further. It is very important here to make the highest quality structural elements, that is, fix them with 2 or 3 bolts that pass through the timber and the upper part of the prepared legs. In the timber it is necessary to make grooves in which we will hide the bolt heads. And under the nut, we cut off the excess with a hacksaw.
- Next, we make a rectangular element of 70x170 cm from a bar, which we connect from the inside with additional parts that ensure the rigidity of the structure. In the future, we will use this element for the device of the back or table top.
- At the moment, we do not cover the frame with shields, since it will be difficult to assemble the entire mechanism into a single whole. It will also complicate the transfer of the structure.
- We combine the three resulting elements into a common system. This work is quite difficult, since it will be necessary to work with large parts of the future bench - a transformer. It is best to do all the work on a flat floor or on a special large table. We make all connections movable and fasten them with hinges or ordinary bolts.
- We cut off two bars 40 cm long for attaching them between the bench and the table shield at the corners. They will be at the bottom of the backboard, but on the side of the bench itself.
- We cut off two more bars 110 cm long so that the back turns out to be inclined. We fasten them with self-tapping screws or other fasteners near another bench, but in this case the fasteners are not placed on the near side, but in the very center. Otherwise, we will not be able to correctly connect the two benches together.
- After we assemble the entire structure, and carefully check the operation of each movable element, it will be possible to begin to sheathe the frame from the outside. To do this, we take a well-polished edged board, but you can take a timber or chipboard (if the bench - the transformer will not constantly stand on the street). Thus, we have completed the technical stage of the work.
The transformer bench can be covered with wood stain and then water-repellent varnish, which is used to paint the decks of yachts. The varnish dries in about 36 hours. But still, it is not recommended to keep the bench covered with varnish outside in the rain and snow.
If the design is done correctly, and you take care of it, then it will serve you for at least 20-25 years. Very often, craftsmen replace wood with metal, which does not look so beautiful and aesthetically pleasing, but the service life increases significantly.
The second version of a transforming bench made of a metal profile and wood
Materials and tools for construction
A bench - a transformer made of a metal profile is made in the same way as a wooden one, but only with some changes.
To make such a bench, we need:

Stages of construction
- We clean all metal profiles from rust so that later it would be easy for us to work with the material - to weld pipes and paint them.
- And then, according to the drawn up drawing, we cut the blanks from size to size.
- We make a seat frame. To do this, we weld the pipes as shown in the figure and, if necessary, strengthen the structure.
- In the future, this design will serve as a table, as well as the back of the bench. We also had to change the angle a little.
- We weld one more seat.
- After completing all the welding work, we begin to drill holes and twist everything onto special furniture bolts (their length should be at least 60 mm). We then insert washers between the iron structural members to make it easier to unfold.
- Here we see the final version of the bench - a transformer, where an additional strong leg was added to one of the benches and the angle and lunge of the leg in the second bench was slightly changed, since the angle of inclination was changed in the back, and it became steeper. In order for the bench not to be thrown over, it was necessary to digest the structure.
- For the legs, we cut out "heels" 50x50 mm in size from a metal sheet so that the bench is more stable and does not "sink" into the ground if it stands on soft ground.
- Depending on the size of the structure, we cut off the boards and grind them well. These will be our bench seats and tabletop.
- The result is an excellent finished bench design. - transformer.
Shop decoration
Then we soak all the boards well with an antiseptic, fire retardant and let them dry. We paint with water-repellent varnish, oil or acrylic paint. We apply varnish or paint in several layers.
Most apartments cannot please with a wide area. Residents have to get out in order to deceive the space and not deprive themselves of the necessary items. Multifunctional furniture helps to gain additional square meters, and belongs to this group.
Convertible tables are well suited for the kitchen, living room and even for the bedroom. Such a piece of furniture can be made in different ways, depending on the functions that you want to endow it with.
Such a table is also called a folding table. It is classified by function:
- coffee-dining;
- coffee table - workplace;
- table - storage system.
The magazine-dining option can be found most often, because the number of friends and acquaintances who come to visit increases over the years, but the living area does not.
The dining transformer table is unobtrusive and does not detract from valuable space. On ordinary days it plays the role of a coffee table, and on holidays it turns into a real dining table. In order to seat 5-7 people, a few simple manipulations are enough. It is suitable when all the space is connected into one.
When creating a coffee table - a workplace, a different type of table top is used. It is not necessary for it to unfold completely or change its shape. This version of the transforming table turns into a desk, taking on the required height. Additionally, furniture is equipped with drawers to store office supplies. Depending on the fastening system, the table can be given several positions.

Models with smooth adjustment mechanisms are more convenient to use. With their help, you can organize a workplace in any corner of the apartment.
The storage table has an original design. It consists of two to three drawers and a table top. The table is opened by turning around its axis.
Folding device
You cannot skimp on it, because ease of use depends on it. The table should unfold with a few movements and not require much effort.
Folding tables with a sophisticated automatic mechanism provide a simultaneous change in the area and height of the table top.
Table frame
The duration of operation depends on its strength. Frameworks come in different materials:
- wooden;
- metal;
- with plastic parts.
Metal and wood structures are considered the most reliable. They can withstand repeated folding and unfolding cycles well. Frames with plastic components are cheaper, but do not withstand long-term use. But if the table is rarely transformed, this option can be considered.

Legs
They serve as a support, therefore they must withstand a large load, which increases when the table is unfolded. Supports made of thick glass have proven themselves quite well. They themselves are quite weighty and capable of withstanding considerable weight. Glass legs are perfect if you need a transforming table for the living room.
Wooden supports also handle the load well. This option is suitable for classic interiors.
Additionally, you should familiarize yourself with. The appearance of the product depends on the material from which the top is made.

Such furniture is of several varieties, which depend on the table transformation mechanism:
- Using inserts... It is considered the most popular species. A tabletop is built into the structure, which diverges along the guides at the time of transformation. The additional part of the table top can be placed in the center or on the sides of the table.
- Using an automatic mechanism... Has one or two additional surfaces located under the table top. When the main part starts to move, the additional parts move too. This type of table can have several layouts and have a gas lift or springs. The latter option is considered more reliable.
- Double expansion... The model consists of two surfaces stacked on top of each other. To unfold such a table, it is enough to fold back the upper part.
- Rotary table... An interesting option, in which the main top and additional tabletops do not form a single whole when decomposed. To create such a table, special metal guides are used.
What do you need to create a transforming table?
Many people decide to make such a piece of furniture on their own after getting acquainted with the prices of transforming tables in stores. A ready-made table will cost about 15 thousand rubles. If you do it yourself, you can save at least 5 thousand rubles.

Project cost:
- Transformation mechanism - from 3 thousand rubles.
- Chipboard panels for countertops and legs - from 500 rubles.
- Fasteners - from 50 rubles.
- A set of screws and self-tapping screws - from 200 rubles.
A folding table can actually be made for $ 100.
Manufacturing consists of several stages:
- The choice of a folding mechanism.
- Project creation.
- Cutting out parts from the chipboard panel.
- Original fit of items.
- Installation of the frame.
- Installation of table supports.
- Installing the countertop.
To make a high-quality transforming table, it is better to create drawings in special computer programs. They not only draw a layout of the future furniture, but also calculate how much materials are needed and create a cutting map. The programs are quite simple to manage, so the creation of a project will take one or two days.
The number of parts and their dimensions can be ordered in the same store where the laminated chipboard panels are sold. The cut strips will only need to be bolted together, after which the transformation mechanism is installed. For an even installation, it is necessary to mark with a pencil before drilling the holes for the screws.

The finished table will be no different from store exhibits if you choose a high-quality transformation mechanism and materials for the frame. Such furniture should be chosen if you do not know how to create
Make a transforming table- a great alternative to bulky furniture in small apartments.
Economical, functional and comfortable, they release space for various things (books, computer, etc.) and space for outdoor games in children's room.
Model a row of transforming tables so wide, what is able to satisfy the most demanding taste.
Types of transformers
Furniture, which most often acts as a transformer:
- sofa;
- table;
- curbstone;
- rack;
- chair(child, etc.).
Several examples transforming tables:
- -transformer

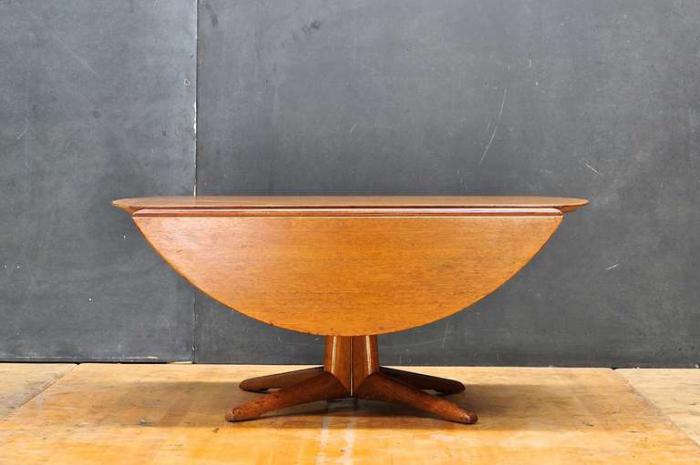
- Round transforming table
![]()
![]()
- Table- sofa bed

- Computer table transformer
![]()
Important! When choosing a transformer, special attention should be paid to the safety of the product in order to exclude any possibility of injury during assembly and disassembly of the structure. Sharp edges and protruding metal elements are not allowed.
What can you make a transforming table
![]()
- Wood
The most advantageous and easiest to execute are made of wood. For this, a simple solid wood and sheet wood panels (plywood, chipboard, MDF, fiberboard) are used. - Plastic
Possible for a transforming table, but not very aesthetic option. - Metal
The tables are strong and durable, have various decor options, and are made of hollow structures. - Glass
A more difficult option would be to use tempered glass for the manufacture of transforming tables. Such tables are aesthetic, safe and have an original appearance.
Chest of drawers
 For the manufacture of a small chest of drawers (4 drawers) necessary following:
Materials and fittings
- handles-staples for all boxes (including two fake ones) - 6 pieces;
- wheels furniture - 8 pieces;
- supports for wheels - 8 pieces;
- loops Lombard - 4 pieces;
- loops and hinges for countertops;
- guides ball (400 - 2 sets, 450 - 4 sets);
- dark wood panels for a table top, external side legs (on wheels), internal side legs, a middle wall (between drawers), the bottom of a chest of drawers, drawer walls and 2 long walls, along which the upper false drawers will move to the sides;
- light colored wood panels for the front side of the drawers (+ 4 false drawers on both sides) and the back wall of the chest of drawers. The length of the back wall is equal to the length of two boxes. The rest of the space on both sides of the chest of drawers is occupied by a long wall along which fake drawers move;
- thin wood board for bottoms all boxes.
Instruments

- pencil, square, roulette;
- jigsaw or a hacksaw for wood;
- screwdriver or screwdriver;
- hexagons;
- drill with various attachments (including the Faustner cutter 15 mm);
- minifixes(for eccentric couplers) - 40-50 pieces;
- euro screws-confirmations - 50-60 pieces;
- self-tapping screws(14 mm - 20 pieces, 30 mm - 50 pieces);
Dimensional Drawings

Stages of work
Step 1. We draw and cut out all the details of the future chest of drawers.
Step 2. On the side walls we draw and attach retractable ball guides(400). On the middle wall, fasten the guides on both sides.
Step 3. We fasten average the wall exactly in the middle of the bottom of the chest of drawers.
Step 4. We fasten the side internal walls, back wall and bottom of the chest of drawers.
Step 5. We collect all the walls boxes, we fasten the handles-staples to the front sides (including fake ones).
Step 6. On the inner (which will be inside the chest of drawers), we attach two corners of all drawers 2 balls from the guides (along which our boxes will roll).
Step 7. We screw the guides (450) onto the wall for false boxes and to the back of the false boxes. We attach long walls to the side internal walls.
Step 8. We fasten furniture wheels to the bottom of the chest of drawers and to the outer side legs.
Step 9. We fix the outside of the false boxes to the outer legs of the chest of drawers and push them into folded position (put to functional boxes).
Step 10. Let's get down to countertop. We attach the three parts to each other with loops.


For dining a table this design is enough complex. Most often, a chest of drawers is used in the absence of the possibility of acquiring a kitchen or dining table or in the manufacture huge transforming table (more than 2 meters long).
 Second option chest of drawers differs not only in size (700 x 900 cm when folded, 2100 x 900 cm when unfolded) and the number of drawers, but also mechanism transformation.
 Side inner walls maximally unfold to the distance of the length of the false boxes.
Table top in the unfolded state consists of them 3-part - left, middle and right. Folding down, the left side rests on average.
The table top turns 90 degrees.
Right part descends on the back wall of the dresser (hangs parallel her), and the parts folded on top of each other form the upper surface chest of drawers.
Wheels are attached for the convenience of moving our chest of drawers, but they are not required. When the table top is turned into working condition, it lies down in position
An interesting idea of a portable convertible folding table - an ironing board built into the wardrobe - is presented in this video:

