Do-it-yourself manual cultivator. DIY bicycle cultivator
A cultivator is a garden tool of varying degrees of complexity, designed for cultivating and loosening the soil. With its help, you can significantly simplify the pre-sowing work and reduce the time of your stay in the garden by several times. However, even the simplest hand cultivators, despite their primitive design, are not cheap and, having no extra funds, many summer residents continue to do with a shovel, turning loosening the soil into slave labor. But a way out of this situation is quite simple to find - you need to make a cultivator with your own hands. We will offer at your discretion several ways of making this garden unit, starting with the simplest hand model and ending with a tool with an electric motor.
A homemade cultivator can have a rather complex design - a model based on a chainsaw
There is often a product on the market that is very simple in design - the "Tornado" cultivator, which is a kind of corkscrew on a vertical stand with a horizontal handle.

"Tornado" - manual cultivator for easy soil loosening
Making such a manual cultivator with your own hands is as easy as shelling pears. To do this, get a plastic handle-shaped handle from the hardware store - they are used for both forks and shovels to make it easier to use the tool. Since the handle in the original "Tornado" is made in the form of a long horizontal tube, our nozzle will also have to be improved. To do this, we take a piece of plastic pipe about 0.5 m long.
Its diameter should be slightly larger than the thickness of the horizontal handle of the plastic handle we purchased. We carefully cut the pipe lengthwise so that you can turn it out and put it on the handle of the handle. It is advisable to fix the tube so that it does not slip during work and does not jump off the place allotted for it. The easiest way is to wrap it with duct tape. At the end of the work, we will get a handle, the edges of which will protrude to both sides of the handle by about 25 cm.

Now it's time to get to the fun part and give the pitchfork the necessary corkscrew shape. For this, an ordinary hammer is used, with the help of which the metal will bend in any direction. At the same time, it is advisable to have on hand a photograph of the original Tornado cultivator and try to repeat all the bends that exist on it.
Bicycle cultivator option
The next manual cultivator that we will present to your attention is more complex in design and to some extent mechanized. To make it, you need an old bicycle frame, as well as a bicycle wheel.

A cultivator head is attached to the bicycle frame - this can be a finished product from an old cultivator or made yourself from sharp steel rods. If desired, a small plow can also be used in this capacity. The handle for easy control of the tool is made of steel or aluminum tubes. For the cross member, take a small piece of pipe with a diameter of 2-2.5 cm. All nodes are fixed with bolts, but so that the connections do not dangle - the whole structure must be rigid.

It is better to take a wheel not small and not large - of medium diameter. It is fixed to the frame with special wing nuts or conventional locknuts.
Even though this cultivator is a homemade cultivator, you can easily remove weeds and weed the space between the beds with it.
Toothed hand plow
The next model of a homemade cultivator consists of five steel pancake discs that rotate on an axle with a length of 320mm and a diameter of 16mm. On three discs there are sharp curved teeth, which will be used as a working body for loosening the soil. At the ends of the axle there are trunnions with bearings, on which steel brackets are fixed, converging on a wooden handle.

Scheme of a toothed cultivator: 1 - discs, 2 - teeth from rods, 3 - axle, 4 - trunnion, 5 - bracket, 6 - wooden handle
Steel discs and axle are machined independently or ordered from local craftsmen who own work on a lathe. On the side surfaces of the three discs, five holes are drilled into which teeth are inserted from a steel rod with a diameter of 10 mm. The resulting discs with teeth are hung on the axle, then trunnions with bearings and washers are installed.
When working with such a cultivator, the teeth on the discs pierce the ground and turn the surface layer over. Sharp "claws" cut off the roots of weeds, loosen the soil and help to saturate it with air.
Rotary disc cultivator
You can also make a rotary cultivator with your own hands, with which you can harrow, break up large clods of earth and level the surface of the garden. The diagram of this model is shown in the figure and it is called a disc cultivator.

Self-made disc cultivator: 1 - disc, 2 - axle. 3 - bushing, 4 - large clamp, 5 - small clamp, 6 - stem, 7 - pipe, 8 - handle
The cultivator's working body is spherical convex discs. They are welded to the bushings, which in turn are fitted onto the axles. The axial ends are secured in brackets with a cotter pin.
A pipe with handles at the end and a crossbar passes through a special ledge made in a large bracket. A rod with a length of 250mm and a diameter of 24x2mm is welded to the small bracket. A 16mm thick rod is screwed into it, part of which protrudes above the crossbar.
The manufacture of steel discs can be a little tricky. They must be spherical, and it is rather difficult to give such a shape to ordinary metal plates with a thickness of 4mm. It is necessary to wield a hammer, "knocking out" the bowl in the center of the workpieces with strong blows.
Wing nuts on the bar allow you to adjust the angle of installation of the spherical discs in relation to the direction of travel of the cultivator. When the nut is turned clockwise, the rod rises up. At the same time, the large bracket will bend and the angle of the discs will change.
Electric version based on a meat grinder
At home, you can make not only a hand tool, but also an electric cultivator with your own hands.

The photo shows a cultivator made on the basis of a production meat grinder. This design is done quite simply. Two corners are screwed to the gearbox housing, to which two pipes are welded, the ends of which are bent to obtain comfortable handles. Another piece of pipe is placed between them for strength. Wheel axles are also welded to the corners. It is advisable to use medium-sized wheels, since too large ones will be uncomfortable, and small ones will fall into the soil when driving.
The structure shaft is turned from ordinary scrap. The nozzle of the production meat grinder is chipped with a sledgehammer and a cast-iron sleeve remains. A workpiece, turned from scrap, is placed in it, and a lug screw is welded. The engine switch is located, for the convenience of the user, on the handle.
When moving quickly with such a cultivator, the screw breaks the ground into large clods - rough plowing is obtained. If you move slowly, then loosening is more accurate - the soil turns into dust.
Here is another interesting video that tells how to make an electric cultivator with your own hands, using a frame, chain and sprocket from a bicycle, and an engine from a washing machine.
There are many more ways to make units for plowing the land at home, for example, you can make a homemade cultivator from a chainsaw. All that is required is the ability to understand the technique and a little imagination.
Landowners know firsthand the laborious process of land cultivation. The use of a shovel, boots, rake, of course, facilitates work, but is not very suitable for processing large areas, and does not require small physical costs.
But progress does not stand still - they invented to facilitate human labor. For female gardeners, this is a useful find.
This technique is used both in vegetable gardens and on plots, in vineyards and orchards. One machine can replace many fixtures and takes up little space.
The options for using a hand cultivator are as follows:
- processes land plots before planting or sowing;
- loosens the soil for oxygenation;
- copes with splitting large clods of earth;
- pulls out weeds;
- helps in the care of flower beds;
- used for weeding the site;
- spuds the ground.
In the article we will talk about what cultivators are, what they are intended for and how to make them with our own hands. We will also take a look at a few specific homemade hand cultivators.
Possibilities of hand cultivators
For hard-to-reach areas or where a more gentle approach is required, a hand-held rotary cultivator is well suited. It is brought to work by human effort.
Due to the "hedgehogs" copes with the furrowing and loosening of the soil. It also turns up soil layers to help control weeds.
There are also star cultivators that remove roots. They are usually easy to use, replace a shovel, and greatly facilitate digging.

The hand cultivator is intended for:
- loosening the soil;
- digging for further planting;
- removing weeds from the root;
- processing of areas under trees, bushes;
- enrichment of the soil with oxygen.
Mini cultivators are well suited for small areas, they do not take up much space, and they are easy to move due to their low weight. Suitable for loosening the soil under trees, bushes and in hard-to-reach places. Facilitation of earthwork occurs due to the correct distribution of the load on the muscles and the position of a person during work. 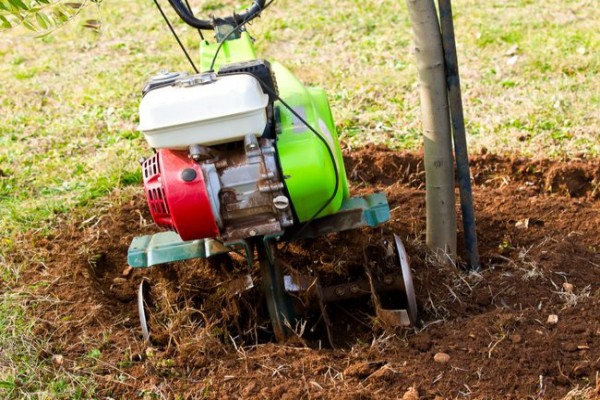
Varieties of cultivators
This technique is available in different models:
- disk
- paw
- rotary
- milling.
Almost all cultivators work according to the same principle: the mechanical part is started, which brings the device loosening the soil into motion.
Its classification depends on the purpose of the technique: difference in size, engine power, functioning, extensiveness of work. Given these criteria, they are:
- lungs
- moderate
- heavy.
For relatively small areas with soft soil, light equipment is suitable, usually flower beds, greenhouses. Medium-weight equipment is designed for clay soil. Heavy equipment is versatile and suitable for all types of soil.

Cultivators differ in the way they function:
- hand cultivators;
- electrically driven;
- on gasoline.
We will focus on hand-held cultivators, which you can make yourself to save money.
A number of advantages of handcrafted designs:
- They are economical and do not require refueling.
- Several devices are replaced: a shovel, a hoe, a rake.
- They take up little space.
- They help to distribute the load on all muscles.
Manufacturing technology
From pitchforks like "Tornado"
 It has the simplest design, somewhat reminiscent of a corkscrew. Consists of a vertical stand and a horizontal handle. Such a cultivator can be safely done independently from a conventional pitchfork.
To do this, you need a plastic nozzle, which is usually used for forks, shovels, in the form of a handle. We slightly modify the nozzle so that the handle would look like a horizontal pipe. Take a piece of a plastic pipe 0.5 m in size as it.
Note: in order for everything to dock, the diameter of the pipe should be slightly larger than the diameter of the nozzle.
- An incision is made along the pipe so that when everted it fits on the handle.
- For the reliability of the hitch and further practical use, fix everything with electrical tape.
- It remains only to give the pitchfork a twist in the form of a corkscrew. To do this, bend the teeth in the right direction with a hammer.
Bike-based
In order to make a homemade cultivator from available tools, you will need an old bike frame and  one wheel.
Assembly method:
- The cultivator head is attached to the frame, which is either ready-made spare parts from the old device, or made of steel rods independently. A small plow is suitable for the frame. And for ease of control, the handle is made of a steel pipe.
- The crosspiece is created from a pipe with a diameter of 2-3 cm.
- The whole structure is fixed with bolts, nothing should dangle.
- For convenience, the wheel is taken of medium size, securing it with locknuts.
- This type of cultivator is designed for weeding the soil between the beds.
Rotary disc

This type is intended for breaking up hard pieces and leveling the soil. The main working element is a sphere-shaped discs. The whole difficulty lies in their manufacture.
The order of work is as follows:
- Spherical plates with a thickness of 4 mm are made of metal. Bowls are knocked out with a hammer in the center of the plate itself.
- Discs are welded to the bushings, replacing them on the axle.
- The edge of the axle is secured with special cotter pins in the brackets.
- The ledge is made in a bracket, which is larger in size, a pipe and a handle are passed through it.
- In a smaller bracket, a rod with a diameter of 25 mm and a length of 26 cm is made. A rod 15 mm thick is also screwed into it.
- The convex corners of the cultivator are fixed with wing nuts.
- Due to the rotation of the convex corners, the large bracket bends, the rod rises, the angle of the elements is changed.
Chainsaw cultivator
 It is made on the basis of a chainsaw engine. It's good if you have all the components, if not, you need to buy in addition.
Materials needed:
- metal corner;
- fuel tank;
- a tube;
- rubberized wheels;
- star for intermediate shaft (41 teeth);
- moped sprocket.
First you need to weld the cube frame using metal corners for the walk-behind tractor. The frame size is 32 by 32 cm, the engine is mounted on top of the transverse corners, the fuel tank is installed on the brackets from below. Then, an intermediate shaft is attached to the vertically standing corner racks. For the travel shaft, the bearings are attached to the longitudinal corners. A walk-behind tractor comes out of this all with support on the surface of the wheel.
For the handles, pipes with a diameter of about 30 mm are used. Good wheels come out of rubberized ones. Here comes in handy a star for the intermediate shaft with 41 teeth and the main star (a moped one will do). It remains only to assemble all the parts into one mechanism, and you will get a garden cultivator from a chainsaw (by the way, you can read how to choose a chainsaw).
This can be dealt with even without blueprints. In addition, the cultivator is not very demanding on the materials for refueling, in contrast to the purchased models.
Cultivators greatly facilitate land work, help to cultivate the land before planting with high quality, fight weeds and are simply indispensable for large areas. And if there is no money to buy these expensive machines, then it is quite possible to make it yourself.
How to make a hand cultivator out of a bicycle tells this in detail video:
Every gardener cultivates land in the country. The word "cultivation" came to us from the Latin language. Translated, it means - to process, cultivate. But it is so. In the process of cultivation, the soil is cultivated, cultivated in order to get rid of weeds. But the goal of cultivation is not just weeding. After cultivation, the soil becomes loose and more oxygenated. The cultivator is used to cultivate the soil before sowing and after the crop is harvested. You also need to cultivate the aisles with a cultivator, huddle and replant the plants. The cultivator is a very convenient device, it will facilitate the work and reduce the time of tillage in the garden, flower bed and any other area.
A modern cultivator can be purchased at a specialist store. But such a technique can be easily assembled with your own hands. You just need to find clear instructions, the necessary parts and tools and get to work.
To begin with, you should know that cultivators are divided according to the type of food:
- manual;
- gasoline;
- electrical.
They are also divided by weight and power. There are ultralight cultivators, mini, they weigh no more than thirty kilograms, ideal for small garden plots and summer cottages.
There are light cultivators. Their weight is more than thirty, but not more than sixty kilograms. Such cultivators are used in large areas, in plowed fields and virgin lands. Medium cultivators weigh up to one hundred kilograms. Well, the largest cultivators are heavy. Their weight is over one hundred kilograms. Such cultivators are used on large fields and lands.

There is another classification of cultivators - by purpose:
- universal - used for tillage in any area, between rows, they are used for weeding;
- special - for processing a certain variety or culture;
- plant feeders - these cultivators are designed to cultivate the soil and gradually add fertilizers;
- pre-planting, steam - for harrowing any soil before sowing, suitable for summer cottages;
- row-crop - for weeding row spacings in fields where crops have already risen.
There are cultivators for cultivating one row, mini cultivators for summer cottages and cultivators for cultivating several rows at the same time. They differ in size, because for one row the cultivator is much smaller than for processing several rows.
But the most suitable for cultivating vegetable gardens and flower beds is a standard hand-held cultivator. It is lightweight and easy to use. It also takes up little space and is light in weight. There are garden cultivators, they are also small in size, ideal for giving.

Advantages and disadvantages of cultivators
Each type of cultivator has its own pros and cons. Electric cultivators are light and small in size. They don't need to be refueled as they run on electricity. They are also quite simple and convenient to use, but they are not suitable for a summer cottage that does not have electricity.
The disadvantages include the fact that they work only in the area where the power cord reaches. Also, electric cultivators are not very powerful. With such a cultivator, it is possible to cultivate flower beds and greenhouse soil, but in large areas they are completely useless. After all, the length of the cord determines the place where this cultivator can work the soil.
A cultivator that runs on gasoline (a petrol cultivator) has slightly more advantages. It is convenient to handle large areas with it, because such a cultivator has high power and functionality. Disadvantages include difficulty in maintenance, heavy weight, and refueling. And the more powerful such a cultivator, the more fuel is needed to refuel it. Gas powered cultivators are often referred to as star cultivators.

Hand cultivator - do it at home
Such a cultivator is the most useful thing in the household. It has a lot of positive sides:
- no stress on the lower back,
- ease of use,
- efficiency,
- availability,
- compactness.
With such a cultivator, you will not pull the weeds all over the site, but it loosens the soil very efficiently and does not turn it out. But the cultivator is designed for working on small areas and only on plowed land. It is ideal for a summer residence.
First, you should understand for what purpose you need a cultivator. Indeed, the choice of a particular cultivator is influenced by the set of crops that are planted on the site, and the structure of the soil of the site itself. If you have a small plot, then a powerful and spacious cultivator will take up a lot of space. He will only do harm, there will be no benefit from him.
It is best to create a cultivator with your own hands, so you will save your money and find an assistant on the farm. Some cultivators can be created from available tools, some require additional parts, but their cost will not exceed the cost of an entire cultivator in the store. DIY cultivators are ideal helpers in the garden and are suitable for giving.
The smallest cultivator
"Nimble kid" is a small home-made cultivator, it can be called a mini cultivator. It captures only twenty centimeters of the territory, but it is very convenient to work with such a cultivator. All you need to do is attach a few cut-out metal stars to the axle, and then attach a comfortable handle. So the new farm assistant is ready. With him, it is easy to process the aisles at a time when the crop has already risen. It is its mini size that will prevent damage to the desired plants. Also, if the sprockets are well sharpened, then they cut weeds without problems. At the same time, the weed does not cling to the cultivator and does not spread throughout the site. Suitable for a summer residence, because it is convenient to transport it.

Simple cultivator - "Tornado"
Another simple cultivator that you can make with your own hands is called "Tornado". This cultivator is ideal for cultivating light soil. And it is made from the most ordinary pitchfork or springy wire, it can also be called a mini cultivator.
- In order to make such a cultivator, you need a wooden handle-handle, which will need to be finalized. The wooden handle of your new cultivator should be reinforced. For this, a metal or plastic pipe is used, cut lengthwise. It shouldn't be much larger than a wooden handle. After the pipe is cut, put it on a wooden handle and rewind it. This will make the handle much tighter and easier to work with.
- Next, start making the main part of the cultivator. Take a pitchfork and a hammer, you also need a picture or drawings of the original Tornado cultivator, because you need to repeat exactly all the bends.
- A strong hammer blow will bent the forks in the direction you point them. But don't overdo it.
- Once the cultivator base is created, attach it to the handle and you can till the soil with your new cultivator.

You can also make cultivator tines from thick, springy wire. This option will take more time and effort. But the result is worth it.
Old bike cultivators
For another version of the cultivator, which you can create yourself, you need bicycle parts. So if you have an old and unnecessary bike - make your own cultivator and don't waste money on buying. This is the perfect assistant in the country.
- We attach the cultivator head to the frame of the old bicycle, it can be a part of an old cultivator, iron bars or a small plow, glanders.
- The comfortable handle for operating the cultivator is made from pieces of iron pipes or from another metal. A crossbar is attached between the handles.
- The assembly of all parts of the cultivator between themselves is carried out with bolts, the nuts on which are tightened as tightly as possible, so that the whole system is solid, or all the parts can be fixed by welding. This option is much more reliable than the previous one.
- After the base is ready, the wheel is attached to it, it should not be too large so that the plow fits well into the ground. And not too small, then you have to put more pushing force than is required with a medium-sized wheel.

If you have an old medium-sized wheel left, then you can make another version of the home cultivator. Simply attach the curved metal handles to the wheel, which also mounts the small plow, which is attached behind the wheel, closer to you. And now the homemade hand-made cultivator is ready.
DIY disc cultivator
There is also an option for a homemade hand cultivator, which is made from steel discs. There should be five discs in total, on three of them teeth are attached, with the help of which the soil will be loosened. Such discs can be made independently or ordered. After all, they are made on a lathe. Two discs will be smooth, and the other three will have special teeth or curved nails fixed. When the disks are ready, they are alternately put on the axle, then bearings and washers are put, and then the whole structure is attached to a wooden handle. The soil is cultivated with the help of these teeth, they alternately pierce the ground and loosen it. They also cut the roots of the weeds. Due to its weight, this hand-held cultivator does not require much power. The only drawback is that you have to periodically clean the teeth of weeds. After all, the cut grass clings to the teeth and spreads throughout the site.

A rotary cultivator can be made by hand, this type of cultivator is designed for harrowing, leveling the soil after plowing. It is somewhat similar to a disc cultivator, but the discs in it are of a different shape - they are hemispherical and convex. Also, there are not five, but only four. Moreover, each pair is attached to its own axis. Also, the base remains movable, which helps to change the angle of inclination of the discs if necessary. The base will be metal, it can be attached to a comfortable wooden or metal handle, which will have screws to adjust the angle of the discs. An all-metal cultivator of this type will come out heavier, so if you don't have the power, make a wooden handle. This cultivator is convenient because the grass will not cling to the discs.

Convenient chainsaw cultivator
If you have an old chainsaw that you have not used in a long time, do not rush to throw it away or sell it. From its serviceable parts, you can make an excellent manual cultivator with your own hands. This option is suitable for those who are versed in technology. You will also need to purchase some materials, lubricants and fuel. After all, this cultivator is gasoline, that is, it runs on gasoline or other fuel.
- First you need to make a frame for the walk-behind tractor from the corners. It will be cubic in shape.
- Then the engine is attached to the upper part of the frame of the future cultivator.
- The handles are made of metal pipes, with such handles it is very convenient to work the soil.
- You will also need two sprockets, one for the intermediate shaft, and the other will be the driving one. It is because of these details that the cultivator is called a star cultivator.
The disadvantage of this homemade cultivator is that it requires constant refueling.

DIY electric cultivator
If you wish, you can create an electric cultivator at home. But it should be borne in mind that he will break the ground in large pieces, this is with fast work. If you work the soil with such a cultivator slowly, then the clods will be smaller, and the soil will become softer and plowed. It should also be remembered that the area of work will be limited by the length of the electrical cord.
- In order to make such a cultivator, you need two metal corners that are attached to the gearbox. Curved handles are attached to them for greater convenience.
- The axle for the wheels is also attached to the same corners. The wheels for this cultivator are of medium size. After all, it will not be very convenient to work with large ones, and small ones will fail.
- Next, you need to connect the shaft to a conventional electric meat grinder. You will need to break off a standard nozzle and insert the prepared screw into the hole.
- Further, for greater convenience, you can transfer the power button from the meat grinder itself to the cultivator handle, and you're done.
- The power cord in the grinder should be replaced as the standard cord is usually very short and will not work.

There are many more options for making cultivators with your own hands. You just need to show a little imagination and ingenuity. After all, having an old, but working motor from a washing machine, you can also create a well-functioning electric cultivator. You just need to find the parts of the old bike and connect them together. You can also add batteries and you have a homemade cordless cultivator.
After all, not always all the work can be done with a large and professional cultivator. Sometimes it is much easier to process the row spacing with a hand cultivator without harming the plants.
As soon as spring comes and the snow melts, everyone begins to wait for warm weather. Many people want to quickly get to the cultivation of their plots in order to prepare the ground for bountiful harvests. And here a hand cultivator will come in handy for every summer resident and gardener. After all, if you loosen the soil before planting, then in the soil saturated with oxygen, the plants will germinate much faster. And when working with a cultivator, special efforts are not required, while the work is done much faster. Both adults and children can work with a cultivator that you made yourself. It takes a little time to learn. The main thing is to follow all instructions when making a hand cultivator.

With a hand-held cultivator, you not only plow the soil before planting, it also creates a comfortable harrow for planting seeds. Also, the cultivator can be used in weed control when everything has already risen. After all, there is not always a desire to pull out the grass by hand. And you need to process the garden often.
Any of the hand-made, home-made cultivators is ideal for giving. After all, they are quite small and very convenient to work with. In one mini cultivator, you will find an excellent assistant in the country.
It is not always profitable to buy vegetables and fruits. After all, there is no guarantee that store vegetables are grown in compliance with all technologies. And after all, it is much more pleasant to eat vegetables that are grown by you in your own garden or dacha. Moreover, if you do gardening correctly and wisely, then even your mood rises. Your physical health also improves, because constant physical activity appears. In order for it to be convenient to do gardening and horticulture, you should buy or make some tools yourself. If you understand technology, then there is nothing complicated, you can easily assemble a homemade tool for cultivating the land and removing weeds. If you are not particularly versed, choose a type of manual cultivator with a simple design. If you want to create a complex cultivator yourself, ask your friends to help you. Together with friends, it will be much more interesting and fun to create such useful equipment in the household.
The manual cultivator is a tool for gardening work related to the cultivation and loosening of the soil. We will talk about several design options for this tool, from the simplest manual option to the option with an electric motor.
Do-it-yourself manual cultivator
The simplest option is the Tornado cultivator
The Tornado cultivator, which is the simplest in its structure, is a bit like a corkscrew on a vertical handle, ending in a horizontal handle.
"Tornado" - hand-held cultivator for processing light soil
It is done independently simply, from ordinary pitchforks. Pre-buy a plastic attachment for the handle of a shovel in the form of a handle in the household store - they are used both on forks and on shovels for ease of operation. Since the handle of the original Tornado is a long horizontal tube, our handle also needs to be modified.
To do this, we use a piece of plastic pipe about half a meter long and with a diameter slightly larger than the thickness of the plastic shovel attachment we purchased. We carefully cut the pipe lengthwise, then turn the edges of the cut to the sides and put it on the purchased nozzle. It is advisable to wind the pipe to the handle of the nozzle so that it does not fidget during operation and does not move from its original position. As a result, our horizontal cultivator arm will protrude approximately 25 cm on both sides.
Making a handle for a hand-held cultivator Tornado
Now you can do the fun part and bend the forks into a corkscrew shape. To do this, we will use an ordinary hammer, from the blows of which the metal teeth will bend in any direction. At the same time, it is necessary to check the result with the photo of the original model of such a cultivator and carefully repeat all the bends of the teeth on it.
Cultivator option from bike parts
Another manual cultivator offered to your attention has a more complex device and one might even say that it is partly mechanized. To make it we will need a frame and a wheel from any old bike.
Manual cultivator from bicycle parts

We attach a cultivator head to the bike frame, which can be a ready-made head from any cultivator or a self-made construction from sharpened steel bars. If you have a cultivator head, you can use a small plow.
The comfortable handle for reliable control of the cultivator is made of pieces of steel pipes or aluminum. For the cross member, take a small piece of pipe with a diameter of 2-2.5 cm.

Structural diagram of a manual cultivator made of bicycle parts
The wheel of medium diameter is bolted to the frame with special wing nuts or conventional locknuts.
With this DIY cultivator, you can easily kill weeds by weeding the spaces between the rows of plants.
How to make a hand cultivator
The main part of this homemade cultivator model is five steel pancake discs, which are put on the axle and can be rotated on it. Three discs out of five contain sharp L-shaped teeth, which are working bodies for loosening the soil. At the ends of the axle, trunnions with bearings are installed, to which steel brackets are attached, which are connected on a wooden handle.
Toothed plower diagram:

- 1 - pancake discs,
- 2 - L-shaped teeth,
- 3 - axis, 4 - pivot,
- 5 - steel bracket,
- 6 - handle
Pancake discs and axle are either milled independently. or an order is made for their manufacture on a lathe. Five holes are drilled in the outer surfaces and in the lateral faces of the three discs to fix the teeth from a steel bar with a diameter of 10 mm.
The toothed discs are put on the axle, then we install the trunnions with bearings and washers.
Rolling on the soil, the cultivator discs pierce the ground with their teeth and loosen its top layer. Sharp teeth cut the roots of the weeds, crush the soil and help aerate it.
Rotary disc cultivator
With a homemade rotary cultivator, you can harrow, break up large pieces of land and level the surface of the site. The diagram of this model is shown in the figure below and is called a disc cultivator.
Homemade disc cultivator:

- 1- disc,
- 2 - axis.
- 3 - bushing,
- 4 - large bracket,
- 5 - small bracket,
- 6 - stock,
- 7 - pipe,
- 8 - handle
The working body of the disc cultivator is hemispherical convex discs welded to the bushings. Two hemispherical discs are put on two axles, the ends of which are fixed in brackets with cotter pins.
Pipe 7 with a transverse crossbar, into which the handles 8 are screwed in, passes through a special ledge welded to the large bracket 4. The end of the rod 250 mm long and 24x2 mm in diameter is welded to the small bracket 5 with a blind threaded hole into which a 16 mm diameter rod is screwed, the upper end of which ( with lambs) protrudes above the crossbar.
Steel discs 1must be hemispherical in shape, and it is not easy to make them with this shape from ordinary steel plates 4mm thick. It is necessary to hit hard with a hammer, "knock out" the bowls from the blanks.

The lugs at the end of the rod allow you to adjust the angular position of the hemispherical discs. When the thumbs rotate clockwise, the rod and stem move upward, lifting up the small bracket and the inner ends of the axles, as a result of which the angular position of the discs will change.
Hand cultivator video compilation
There are many more ways to make cultivators for loosening the earth with your own hands, for example, the designs of homemade cultivators from a chainsaw are known.
You just need to know a little about the details of machines and electrical engineering, as well as a little imagination. Here is an interesting video that shows how to make an electric cultivator with your own hands from a bicycle frame, chain and sprocket, as well as a washing machine engine.
Let's say you have a land parcel. You want to cultivate it with a cultivator that you don't have. Otherwise, you just wouldn't have come here. You probably want to make such a unit yourself for some reason you know, whether it's a lack of money for a factory motor-cultivator, or just an interest in making such a machine yourself. In this case, you are lucky, if you have a 1.5-2 kW electric motor, a gearbox, then you can easily make a cultivator with your own hands in just a day or two.
DIY motor cultivator: where to start and how to make
The main parts of a homemade motor-cultivator are a gearbox and an engine. First of all, we make the frame of the future cultivator, drill holes for installing the main units, and make handles for controlling the unit from two curved pipes with a diameter of 32 mm. Between the self-made handles, it is necessary to put another pipe, which will be like a spacer for us, increasing the strength of the structure. We will subsequently install a trigger button to one of the handles.
For the manufacture of the shaft, I used unnecessary scrap, welded an asterisk to it from the camshaft of a VAZ engine, and scalded the chain and both sprockets with metal, making a cover.
I connected the three-phase motor according to the standard "triangle" scheme, place the capacitor starter button on the handle to make it more convenient.
Grousers for a homemade motor cultivator
Our cultivator has to ride somehow. Select the wheels you want. Remember that small wheels will get stuck in the ground and interfere with your work. Too large wheels will be difficult for a homemade cultivator to turn. The selected wheels are fixed on steel corners, which are placed on the gear housing. Attaching the wheels to your homemade gear is not all. Secure the lugs to the wheels. With the help of them, the cultivator will better bite into the ground.

Take car springs or just corners and cut out the hooks of the desired diameter from them. For maximum effect, set the hook angle to 120 °.
When you finish the work with the connection of all the parts, you can use your own hand-made cultivator for several years. If you want the machine to simply smash the whole earth into large pieces, you will need to go with it quickly. Slower travel speed grinds the soil into smallest particles - it all depends on the speed of work with the cultivator. Before using it, lubricate the mechanism shaft with oil so that the homemade product will last longer without breakdowns.
By the same principle, you can also take an engine from a washing machine for a homemade cultivator. Disassemble the children's bike and fit the sprockets and bicycle chain to your unit. As a result, you will get such a self-made electric cultivator. True, if you decide to make this unit with your own hands, keep in mind that the wire will constantly get tangled under your feet and interfere. Due to the fact that the power supply of the mechanism depends on the network and the cable, you cannot go further than its length allows.
DIY cultivator: video selection
For a complete understanding of what awaits you after you decide to make a motor-cultivator with your own hands, you can watch the video compilation with a home-made unit.
How to make a cultivator with your own hands: simpler options
There is such a cultivator - "Nimble kid". Let's take a look at how you can make one at home.
Take the wooden axle. It will become the connector for the rest of the parts. On this axis it is necessary to fix a pipe 24 mm in diameter. It will serve as a handle, therefore, in order not to bend into three deaths, choose the length of the pipe for your height.

Attach wheels with a diameter of not more than 200 mm to the axle mentioned. the cultivator will rest on wheels, the height of the tool above the ground depends on the height of the wheels that we have adapted to it. By the way, the wheels need to be cut out of metal 2-3 mm in thickness. After you have all of the above connected, you can work on the ground.
The word cultivator does not only mean motor units. You can also use hand tools in your country house. It is much better than a standard boot and is much easier to make at home than a motorized cultivator. Have you heard of the Tornado cultivator? It looks like a defective pitchfork.

A round axle to which twisted teeth are welded in a spiral. The easiest way to make such a tool is from an existing pitchfork, if you don't mind. If you still need your pitchfork, buy others from the store and make a "Tornado" out of them. Trust me, it's cheaper to buy a pitchfork and rebuild it than to buy a ready-made cultivator. Take a hammer and go over the teeth, let them bend in a spiral.
Homemade cultivator "Tornado"
Tornadoes are easy to use thanks to a lever that the operator grabs onto when rolling the cultivator into the ground. For the lever, we need a pipe, which we need to attach to the handle. The pipe should be 50 cm in length. For fastening, you can take electrical tape. As a pipe, you can use the handle on the handle, which is usually equipped with shovels. Such a lever will protrude 25 cm to either side of the handle.

You can make a Tornado cultivator out of springy steel. We take a plate half a meter long, 1-1.5 mm in thickness and 2 in width. Bend the steel, make a loop out of it, which you will put on the handle. Watch the height of the cutting. It is important to observe the diameter of the resulting loop - it should not be more than 20 cm in diameter in order to freely enter the aisles.
There is another version of the cultivator - a rotary disc cultivator. We just warn you that you will need to exert a lot of physical strength to make the desired convex discs. place regular metal discs and hit them with a hammer. In the process, they should become bowl-shaped.
The main part of the mechanism - namely the discs, we put on the bushing, which we attach to the axle. We attach both ends of the axle with cotter pins on a large bracket.

On the large bracket we make a hole where we insert a pipe with handles and a crossbar between them.
We place the rod on the small bracket using a welding machine. It should be 24 mm in diameter and 25 cm in length. Then screw the 16-diametrical rod into the stem.

