DIY tree sakura do it yourself. DIY glowing trees
Bushes and trees glowing in the dark - a new fashion trend in lighting technology. Such lamps not only fulfill their main function - they illuminate the streets at night, but also decorate the city, emphasizing the peculiarities of the general atmosphere and placing necessary accents.
Luminous trees for the street - "useful" magnificence
LED trees can be installed almost everywhere, but most often such unusual lamps flaunt at the entrance to a cafe, shopping center, restaurant, cinema, boutique, etc. So they become the very attractive highlight that attracts visitors to these cultural places.
Luminous shrubs and trees are very similar to real ones, they completely imitate the shape of their prototype plants. The metal branches of the LED miracle are covered with artificial bark, plastic or silicone leaves and flowers in full size are attached to them. Small single-color or color LEDs crown this entire design.
Such decorative trees can work from the network, but more often they are equipped with autonomous power supply, which somewhat increases the cost of construction.
You can, of course, just decorate an ordinary tree with an LED garland (for example, you can use it), but the effect will not be good enough. What are the advantages of using LED trees?
In the photo - glowing trees against the backdrop of a winter landscape:

Advantages:
- Longevity, these lighting products last at least five years;
- Artificial trees do not require care, which is so necessary for the present;
- A small amount of electricity consumed, even to illuminate the largest giants, requires a maximum energy of 700 watts;
- Easy to install, here you can easily do without the help of specialists;
- The design is resistant to the effects of low temperatures, high humidity and dust;
- When one or more LEDs burn out, the rest of the lamp continues to burn, but the LEDs are easily replaced with new ones;
- Properly selected bushes and trees can favorably emphasize the landscape design, become part of the overall decor. Of course, you can just use ordinary street lights for giving. You can see the options with a photo.
You will find all information about waterproof waterproof LED wall lights.
Types and cost
We said that such trees need to be correctly selected, therefore, the conclusion suggests itself that there is a huge number of their species. LED trees can be of different colors and shapes, their size ranges from 0.8 m to 5 m. They are often set as Christmas decorations.
Palm trees

These exotic trees are usually made at least 2 meters high and can be painted in any color. Simpler models are made in such a way that the trunk smoothly passes into spreading branches and its structure and color is identical to the crown. For more expensive palm trees, the texture and color of the pillar is close to a natural tree, and the leaves completely repeat the shape of the real ones. Between themselves, such lamps can also differ in the number of branches, trunk thickness, the presence or absence of artificial nuts or fruits. Palm trees are most popular in sanatoriums, boarding houses, hotels and other recreational areas, because they successfully create an atmosphere of sultry fun and freshness of the sea breeze. The average price of luminous palm trees is 50-160 thousand rubles.
You will find out what are street lights.
Willow
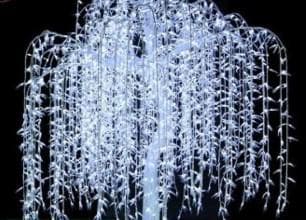
A weeping willow glowing in the dark gives lovers the opportunity to enjoy a date under a spreading tree at any time of the day, without taking their enchanted gaze from each other. This miraculous lantern is able to give an unusual romantic atmosphere to a park or square, illuminating long alleys and cozy benches. Here flexible long branches are attached to the massive trunk, dotted with small leaf shades that shine with white or any other color of the rainbow. Prices for willows are in the range from 16 to 50 thousand rubles.
Fruit trees

In order for spring to bloom 24 hours a day and 365 days a year, it is enough to install street LED fruit trees in the garden, in the country or just somewhere on the street. Peaches, apple trees, cherries, apricots, pears will delight others with their lush flowering shades of lilac, white or pink. On such trees, flowers and fruits are made in full size and look like inflorescences and fruits of real plants like twin brothers. The cost of such lamps depends on the selected tree, its size and the number of branches. This amounts to 12-80 thousand rubles.
Read also about ground LED lights.
Maple
Stars glowing in the dark can be found not only in the sky, but also on the LED maple that illuminates the square or park. Five-pointed silicone or plastic leaves of different sizes on mighty branches are a good solution for decorating a public place, and the paths are visible and the view is pleasant. The price range of maples is 15-50 thousand rubles.
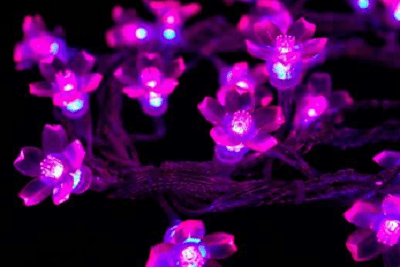
Sakura
This tree can be placed in a special category, since it is sakura that is especially popular. Such trees are especially beautiful, they are able to turn a simple everyday atmosphere into a fairy kingdom. The branches of these trees are covered with either special high-strength plastic or aluminum alloy, and are designed in such a way that they are very similar to real ones.
The lantern is strewn with large silicone flowers and leaves, while their density and shape are as if copied from real Japanese sakura. Although such trees are made in small sizes, they give no less light than tall palm trees and spreading willows. The color scheme of sakura LEDs is very soft and delicate in gold, white, pink and purple colors. Such oriental beauties cost from 5 to 80 thousand rubles. Fairly high prices for luminous trees are largely due to the price of LED street lighting lamps (in more detail), which are used in their manufacture.
In the photo - a luminous sakura:

How to make a luminous tree for the street with your own hands

- Draw a detailed diagram. On a piece of paper on a scale, draw a sketch of the future tree, marking with numbers its height, the length of the branches, the number of luminous elements on each of them and other necessary sizes.
- We measure the trunk. Cut a part of the required height from the metal-plastic plumbing or any other pipe - this will be a tree trunk.
- We make the frame. From the wire, cut the required number of medium branches and many smaller branches. Bend them in the shape of the letter “G” so that they can easily be wound to the base. Using black or brown tape, fasten small branches to medium ones, then fasten the latter to the trunk with the same adhesive material.
- Go to the LEDs. Armed with a soldering iron, solder the resistors to the LED. Keep in mind that the latter have two legs - one longer, the other shorter. Make sure that all LEDs are soldered either to the elongated or only to the shortened contacts of the resistor. To protect against moisture, it will be a good solution.
- We isolate the LEDs. Take an insulating tube, the color of which coincides with the shade of the electrical tape, and the diameter is sufficient so that the LED easily fits inside it. Cut the tube, taking into account that the place of soldering and the resistor itself must be hidden from the observer, but at the same time you need to leave space for connection to the power cable. Put the tubes on the LED bulbs and lightly heat the lighter so that the insulation completely braids the parts.
- We mount the LEDs. Each of the LEDs is wound on small branches to the wires of the corresponding polarity and wrapped with insulating tape. Now connect the wiring from small branches to medium wires, one wire to one branch. A bunch of the resulting wires are again connected so that all the pros are together, and the cons, respectively, were connected exclusively to each other. The resulting bundles can be immediately soldered to the main wire and run along the trunk, or pre-thread the wires from each branch into the holes pre-drilled in the pipe, connect them together and solder to the main wire so that it is later located inside the pipe. Do not forget to observe the polarity, and then insulate all bare conductors. Ensure smooth operation in all weather conditions will help.
- Decorate the branches. With the help of leaves and flowers cut out of plastic, decorate the resulting tree, carefully wrap all branches with electrical tape, maximally approximating the appearance of the tree-lamp to the natural one.
- Install. The basis for the resulting tree is a barrel, a large pot, a container hidden in the ground, etc. Install your luminous structure into it and connect it to a power source.
Such a tree will delight you especially, like everything that is done with your own hands. You can do many useful things for your site, such as.
The video shows how to make a small luminous spruce. By the same principle, you can make any other tree:
Do-it-yourself LED tree is a great opportunity to create a fabulous forest yourself, guided only by your imagination and imagination. At the same time, money is also saved. But if you are not very “friendly” with a soldering iron or do not have free time, the best way is to purchase a ready-made representative of the LED flora.
You completely in vain remove the luminous garland after the winter holidays. There are many interesting ways to decorate her home interior.
1. Lay a garland in the office of a mirror of some interesting shape.

2. Wrap paper lanterns with a garland around the branch and hang over the bed.
3. Create a drop-down lamp by decorating the garland with large bulbs.

4. Create an original tree from a garland.


Draw a contour on the wall, drive along the perimeter of the carnation and wrap a luminous garland around them. As easy as pie!
5. Attach photos to the luminous garland with clothespins.


6. Create your own canvas with a pattern of glowing lights.


7. Insert the garland into the flower baskets or place it directly there.

8. Fill bottles of wine with lights so that they effectively highlight them from the inside.

9. Create an angel wreath from paper napkins.

Using wire cutters, form a round snowflake holder and wrap it with an electric garland with small bulbs. Then glue decorative snowflakes onto the holder.


10. Or use napkins to make a wedding wreath.

Just make small holes in the napkins and thread the lights through them.
11. Tape the disposable cardboard cups with unusual paper, this will help to create interesting light shades using the LED garland.
12. Crochet the glowing rug with a rope and a garland.

13. Decorate the Christmas garland with tulle bows.

14. To create a festive mood, decorate the garland with old decorations.

15. Create colorful twine balls and decorate them with a luminous garland.
16. Make burning snowflakes from bouquet holders purchased at the store.

17. Bind the rope with a garland to decorate a room in a marine style.

18. Create a network of luminous garlands in the bedroom.

19. Hang the air clouds with a hanging luminous garland.


In the photo there is a two-dimensional version of the cloud.
20. You can also use cardboard boxes from eggs to create the effect of flowers.

21. Write a letter-by-word message on pendant lights.
Make letters by piercing holes in the paper.
22. Create a romantic headboard.

Shoot down a simple wooden frame and add traverses. Drill small holes and insert sockets at the bottom of each niche. Paint the frame and screw it to the wall. Fill each niche with a garland and plug it into outlets. Cut transparent panels from polycarbonate sheets and attach them to the frame using fasteners.
23. Use shiny wrapping paper to create giant glowing candies.
 Necessary materials and tools:
- disposable plastic container with a lid;
- electric garland;
- scissors;
- wire or brush for cleaning tubes;
- nippers;
- multi-colored wrapping paper;
- scotch.
Preparation method:
- Cut a piece of brown paper measuring 45x45 cm from the roll.
- Wrap the garland with wrapping paper. Do not forget to leave both ends of the garland outside in order to connect it to the network and connect the element to other candies.
- Put the wrapped garland in a plastic container and close it. Wrap the container with wrapping paper and secure with tape.
- Use a brush or wire to shape the candy container in the garland.
- Decorate the entire garland in this way, leaving free space between the links (20-40 cm).
- Connect the finished bunch of sweets to the network.

24. Insert flashlights into tiny jars for conservation.

Take special covers with a hole for the garland. Close each jar with a lid and insert a garland bulb into it.


25. Insert the LED garland into the old toy.
 You will need:
- old toy (from cotton fabric);
- pVA glue;
- brush;
- scissors;
- threads
- light garland.


26. Write a light message.


27. Arrange the luminous garland in a wave-like fashion.

28. Cut black cat figures to make this cute garland.

29. Wrap a garland around a wire wreath.

Probably one of the easiest options for creating home-made wreaths.
30. Light the canopy above the bed with a garland.

31. Cut the paper into strips to make the same fringed flashlights.

32. Use muffin foil as a decoration for a garland.

This is a great idea for any party.
33. Make brilliant decorations with mirrors and lights.
 Take:
Take:
- brushed aluminum bar;
- hooks for hanging;
- garland with mirror pendants;
- electric garland.
Instruction:
- Attach the bar to the wall with two hooks.
- Hang a mirror garland on the bar. To enhance the visual effect, part of the threads with pendants can be cut so that the finished curtain is of different lengths.
- For the pendants, extend the light garland and plug it into a power outlet.

34. Use twigs to create a rustic chandelier.

This idea can easily be realized with a luminous garland.
Take:- dry branches;
- hemp twine;
- stain (optional to darken the color of the tree);
- wood color paint;
- lampholders for lamps with a removable cardboard cover for painting;
- plastic ties;
- glue gun;
- black and white electric cable;
- black electric wire with plug;
- branching clamps "nuts".

35. Make a garland of geometric lanterns.

You can make your own flashlights from black wire or natural straw.
Take:The creation of this creation was inspired by the movie Avatar. Remember the fluorescent trees that filled the night with colorful light, indescribable beauty.
Surely you have ever seen bead trees, man-made creation of an analogue of natural beauty, less affected by time. The advantage of such trees in a more “faster growth" and the ability to set a unique shape, accurately recreating the mental image.
Not so long ago, “eternal flashlights” appeared on the market, in particular, devices with LEDs and solar panels.
We combine the above, and coupled with zeal, we can get a luminous bonsai from beads, which looks like this:
in the dark,

at night.

Manufacturing technology
Energy collection for recharging can be carried out in one of two directions:
1) Placement of photodiodes in the branches of a tree;
2) Installing one solar cell next to a tree.
Creating a tree.
It all depends on your imagination, skill and diligence. For the given example, it was necessary to purchase about 60 meters of copper wire with a diameter of 0.3 mm and 2160 beads with a diameter of 3 mm. There can be any beads, but in his desire to recreate the effect of the leaves, he used transparent green, 80 grams.
The very first stage, we make twigs with leaves.

Next, you need to create a solid wire frame with a diameter of about 2 mm, it will be a tree trunk. When placing LEDs on the branches, leave a margin of length, as shown in the photo. So it will be more convenient for further assembly. A root margin is also required to assemble the circuit.
Installation of the LED on the branch frame:

If you want to use the placement of photodiodes on the branches, then the design will look like this:

I used branches with photo and LEDs and five leaf branches. To create a natural effect, we place dark photodiodes in the center, and the LED at the beginning of the points with leaves, this will allow them to illuminate the entire branch.
One finished branch:

Half finished wood:

Same thing in the dark:

Now you need to hide the electronic filling, there are many options: solder the roots, thread through the holes, pin down, etc. In this case, holes were made in the bottom of the pot, roots were passed through them, and after placing the electronics, the container was filled with decorative stones.
Pot with pebbles:

The electronic side of the issue
BPW34 photodiodes were used, if you decided to use this direction of energy supply, then you need to use about 10 pieces together to ensure charging the lithium-ion battery. We place them in the branches and post to the roots.
Due to the location “in the foliage”, photodiodes cannot work at full power due to the light flux reduced by the leaves.
Consider a different solution to the power supply problem. Keychains with solar panels have long been sold in stores, their price is not high.
Solar LED Flashlight Keychain:

At the first stages of the calculation, the use of a capacitor as the main battery was assumed. But when I used the solar cell from the keychain, I felt sorry for leaving the rest of the keychain out of work, including a 3.7V and 40mAh lithium-ion battery. Using these parts simplified the recreation of the circuit.
Scheme:

If you use BPW34 photodiodes, then you need to use blocks of 10 series-connected photodiodes assembled in parallel.
The solar battery is connected through a diode D1 and a resistor R9, which allows the transistor Q1 to play the role of a dimmer control LEDs based on information about the illumination coming from the solar cell. Thus, the backlight turns on only in the dark and does not take power during the day, making it possible to recharge the battery. It remains only to assemble the LEDs and resistors connected in series to them.
When hiding the electronics with stones, leave the solar cell unclosed, otherwise it will not work.
The list of materials required to create:
2160 beads (about 80 g)
60 m of copper wire with a diameter of 0.3 mm
1 bonsai pot
8 super bright 3mm green LEDs 8000mcd
1 solar panel (or 10 BPW34)
1 lithium-ion battery at 3.7V 40mAh
2 m of copper wire with a diameter of about 2 mm
8 resistors 1 kOhm
1 resistor 1MOhm
1 diode 1N4148
1 transistor BC327
P.S .:
Such luminous trees will be a great decoration for your windows and interior, bringing a little magic to your life.
Natalia Korpilyova
In the previous entry, you drew attention to the design of the hall for the New Year holidays in our kindergarten.

Our friendly team discussed the design in advance and all groups began to prepare 100 snowflakes per group for the planned curtain of snow-white snowflakes. Soon they were ready.

Educators of the senior and middle groups set to design wonderful curtain of snowflakes.

We also planned to make two carved multifunctional tree for decorating the hall with christmas lights and welt patterns.

I took up this business. For making wood we need:floor insulation(the thicker the better, because it keeps its shape well, felt-tip pen or a blue marker, stationery knife or scissors, a bucket or any pot, a piece of a thick plastic pipe 1.5 meters, colored tape. transparent adhesive tape, double-sided adhesive tape, some cement and water, a needle and white thread, a ruler, New Year's garland, wonderful mood and fantasy.

Preparing the barrel in advance tree: wrap the pipe with colored tape, fill the pipe in a bucket with cement diluted in water and leave it to harden for a day.

Draw on heater crown of the future treeby attaching a trunk.

Then cut out the second part.

Here's what happened.

We draw beautiful patterns with a marker.


Carefully cut out the patterns with a clerical knife.

Fold and circle the patterns with a marker on the other side.

Cut pieces can also be used to decorate the band.

I carve patterns.

Here's what happened.

We cut out such a detail.

Sew like this.

Glue the pieces of double-sided tape.

On a double-sided tape we glue the part that we will put on the trunk tree. And we fix it with transparent tape garland on one side of the crown.

We fasten it to tape and the other half of the crown, sew two sides on the sides and put it on the trunk.

We make the bucket beautifully and here’s what a carved the tree turned out as a result.

Two carved tree They fit perfectly into the interior and complemented the New Year's decoration of the hall for the holiday.

During the holiday.

I have tree in a suit of the night.

You probably already noticed that at the very beginning of this post I wrote that wood It is a multifunctional decoration for the holidays. Its versatility lies in the fact that the crown wood is removed, turns inside out and one side of the crown will be painted orange (to use wood during the fall holidays and the other side will be painted green (for use on spring and summer holidays).This is wonderful tree we got!

Thank you for your attention! I would be very glad if my idea and mine master-class will come in handy for you at work. Happy New Year to all Maamans! I wish you success!
Related Publications:
I bring to your attention a tree by the seasons. I took the idea from the Internet. In a hardware store I bought plastic that can be cut.
Dear colleagues, at the beginning of each academic year the question arises of how to decorate the group. The Maamans, ideas and drawings helped me a lot in this.
Good day, dear colleagues! Everyone knows how nature is transformed in the fall. Autumn – artist paints all the trees and bushes bright.
To create our tree of happiness, you need to prepare a blank. For her, I cut a 2 cm thick heart out of ordinary polystyrene and put it on.
We need: 2 liter bottle of lemonade, hay, sawdust, twigs, mounting foam - 2 pcs, brown paint, SNOW spray or snowflakes.
The purpose of the lesson: 1. To promote a good atmosphere in the group and a friendly attitude of children. 2. The formation of cognitive activity.
You can add unusual lighting to your home or festively decorate the hall for a celebration with the help of LED trees and bushes. Such an unusual decoration will be a worthy replacement for the usual artificial flowers and other decorations. In addition, it will become an additional source of lighting and will look good both in the daytime and in the evening.
LED trees will delight everyone with their radiance and transform the space. You can use such trees both on the street and indoors. Such trees are often used in landscape designs as decoration and additional lighting.
Of course, the LED tree, developed by professional designers and produced in a serial way in the factory, looks very different. And you can install it already on the day of purchase. But this time, the main thing for us is to realize our creative impulse and make such a lamp with our own hands.
We make a LED tree
 This article is intended for those who are thinking about how to test themselves and devote several weeks to the mystery of scientific and technical creativity. Creating an LED sakura tree is not an easy process, which involves the development of every detail. The luminous crown of the tree is created from many LED petals that are securely attached to the wires of the tree, and the frame is made of metal.
The whole process of creating a luminous tree with your own hands can be divided into stages:
- Draw a diagram. We make a sketch of the future tree on a piece of paper and designate its height, the number of branches, diodes.
- We make the trunk. To create it, you can use a metal-plastic plumbing or other pipe. We measure and cut the required length.
- Create a wireframe. From the wire we cut the required number of branches of different sizes. We bend them with the letter "G", so that it is more convenient to mount them to the trunk. We fix small branches to large ones with black or brown tape, and then we firmly wind the resulting branches to the trunk with adhesive material.
- We take on the LEDs. At this stage, we need a soldering iron to solder the resistors to the LED. Make sure that all diodes are soldered only to the long, or only to the short leg of the resistor.
- Insulation. Matching in color with the electrical tape, the insulating tube must have a diameter sufficient for the passage of the diode. This tube must be cut so that the solder place and the resistor itself are hidden from the audience, but at the same time leave a place for connection to the power cord. Put the tubes on the diode bulbs and heat with a lighter so that the insulation braids on the parts.
- LED mount. Wind each LED on small branches to wires of the corresponding polarity and wrap with electrical tape. Wiring from small branches must be connected to the wiring of large branches (one wire per wire). As a result, the resulting bundle of wires should be divided into plus and minus. Ready-made bundles of wires can immediately be run along the trunk and soldered to the main wire.
- Decorating branches. You can decorate the branches with leaves and flowers cut out of plastic. All branches of the tree must be wrapped with electrical tape, bringing its appearance closer to natural.
- Installation For the base under the LED tree, you can use a large pot or other container. After choosing the base and installing the tree, it can be connected to a power source.
The main advantage of such trees is their economical energy consumption. In addition, this design has a long service life and is quite easy to install, and small diode bulbs are not afraid of moisture and direct sunlight.