Wood aging at home. Methods of artificial aging of wood at home
Wood processing is carried out in order to increase the service life of this material. Impregnation with special oils, staining, waxing, varnishing prevent the processes of decay and deformation, as well as damage to wood by insects. Brushing brings out the texture of the wood, giving it the look of old wood. How to process a tree is up to you, each of these methods has its own advantages and disadvantages.
Oil and wax treatment
You will need:
- linseed oil;
- beeswax;
- flutes (wide flat brush);
- rags.
Wood processing methods are different, but they have the same goal - to prevent rotting, mold, drying, insect damage, and also give the surface a beautiful finished look. The use of special oils (drying oil) and beeswax allows you to preserve the structure of the material, gives it shine and strength, and increases the service life.

The depth of impregnation of linseed oil is 2 mm, which is sufficient for the formation of a protective layer.
You can process wood with minimal costs using linseed or hemp oil. Before starting work, it is necessary to clean the wood from dirt and dust, completely remove the previous coating, sand the surface with fine-grain sandpaper. Experts recommend heating linseed oil in a water bath, but you can do without this procedure. Oil is applied either with a flute, or rubbed into the wood with sandpaper. It is important to follow the direction of the brush, apply oil only along the grain. The work is left for a day, after which the oil is applied again, the procedure is repeated until the desired result is achieved. Small items are dipped in oil for several days.
There are other treatments, such as coating the wood with a mixture of linseed oil and beeswax. All components are melted in a water bath, then applied to the surface with a brush or cloth. In order to give the wood a certain shade, a color scheme of a suitable color is added to the composition. This method has a significant drawback - very slow drying. You can speed up the process by adding a desiccant (sold in art stores) or purchasing ready-made oil (drying oil), which contains polymerization accelerators and antifungal additives.

Wood can be treated with only one wax. Modern industry offers colored, colorless, matte, semi-matte, glossy compositions that not only strengthen, but also favorably emphasize the texture of wood. To treat a large surface, it is necessary to warm up the wax in a water bath (in this case, it is applied with a wide brush). Cold wax is rubbed into the wood with a thin layer with a cloth, left for about a day, then the surface is waxed again. You can combine colorless and tinted wax, for example, treat the edges with a dark compound, and the middle of the product with a transparent one. After the wax dries, it is necessary to polish the surface with a woolen cloth (felt).
Wood brushing
You will need:
- gas-burner;
- metal brush;
- work gloves;
- flutz.
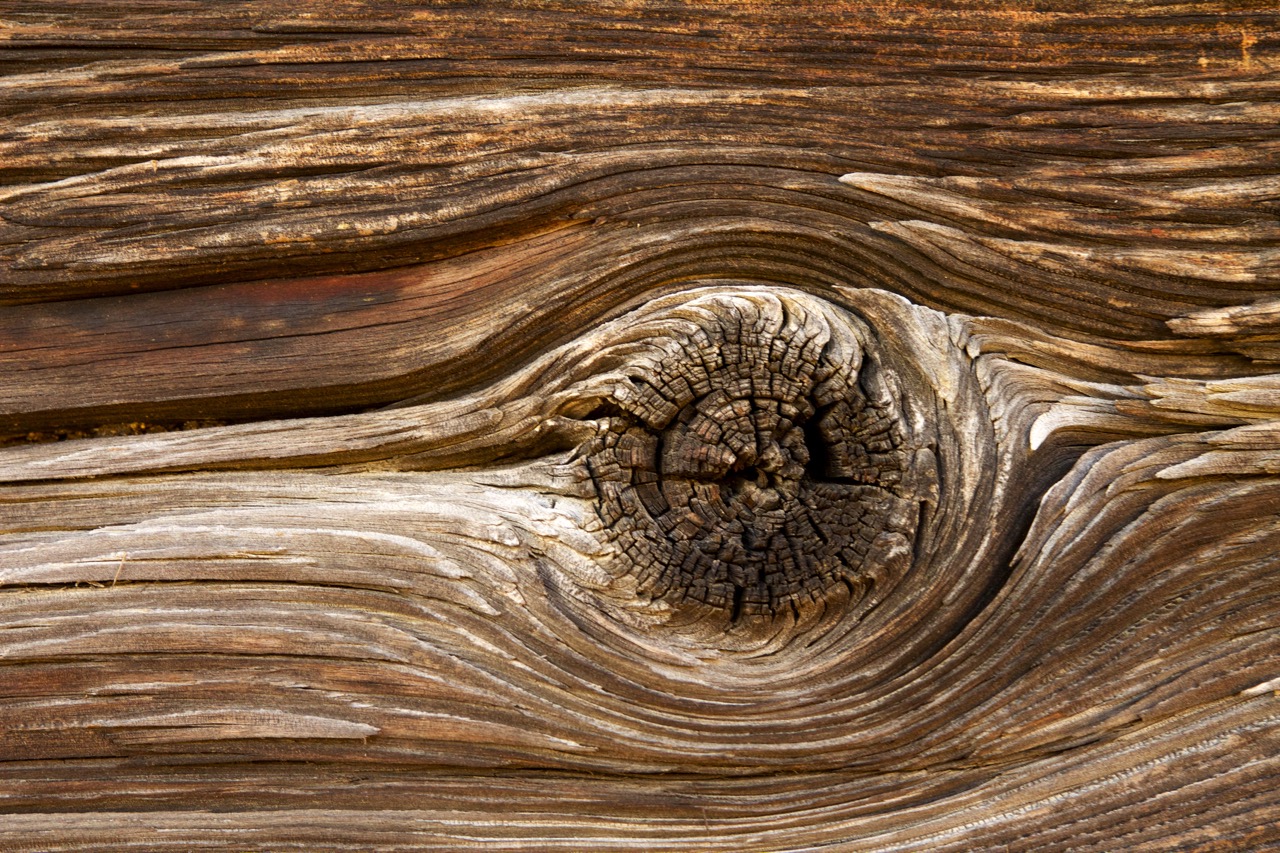
The brushing method allows you to favorably emphasize the structure, give the wood a touch of antiquity, it consists in removing soft fibers (from the top layer) using a stiff metal brush. For this purpose, a tree with clearly defined growth rings is selected, the presence of knots, eyes and other shortcomings is only welcome. Such types of wood as pine, spruce, oak, linden, walnut are best suited for brushing. Considered unsuitable: cherry, pear, alder, juniper, teak, beech.
Brushing is shallow and deep, with or without firing. At home, it is much easier to apply the non-fired method. The wood is cleaned of dust and dirt, moisten the surface with water, after about 15 minutes they begin to comb out the fibers with an iron brush.
You need to move along the direction of the fibers, while it is advisable to repeat the pattern of annual rings (the grooves should not be perfectly even).

This work is quite dangerous, so it is important to observe safety precautions. The remaining debris is cleaned with a flute (wide brush), moving against the fibers, otherwise the dust will be nailed to the surface. This is followed by treatment with stain or wax.
For processing by the method of firing, you will need a gas burner, with its help, the surface of the wood is charred. Sometimes there are so-called resin pockets in wood, which can catch fire when fired. In no case should such places be allowed to burn for a long time; the fire must be extinguished immediately. The degree of charring depends only on your idea, it can be light or completely blacken the surface layer. After that, the fibers are combed out with a metal brush. It is better to work outdoors as a lot of black dust is generated during brushing. At the final stage, the surface is sanded with fine sandpaper. In some cases, firing (followed by combing) is repeated several times, thus achieving the effect of aged wood. If necessary, apply a stain or patina, but you can do without it. The result is fixed with furniture wax.
Wood treatment with wood stain
You will need:
- stain;
- wide brush;
- fine grain sandpaper;
- rags.

The stain is applied parallel to the wood grain, avoiding contact between the layers.
Wood staining is one of the most popular finishing methods. Stain is water or alcohol based, the latter gives richer tones. An alcohol-based composition is applied to a cleaned and sanded surface using a flute (wide brush), moving along the fibers in one direction. At the same time, they try to apply as much stain as possible. After that, the product is allowed to dry, if necessary, the operation is repeated. By using stains of various tones (by layering), interesting color effects can be achieved. After the stain dries, the stage of washing begins. It is necessary to remove the surplus of the product, for this the product is placed at an angle of 30 º, then the brush is dipped in acetone and passed over the surface (with light up and down movements).
To give the wood an antiquity effect, use the following method. First, the main background color of the stain (water-based) is applied, after it dries, they are passed over the surface with fine sandpaper (strictly along the fibers, otherwise the transverse stripes will be visible after processing). As a result, you should get a heterogeneous toning with scuffs and bald spots. Then they take a water stain of a different color, cover the wood with it, allow it to dry, and then clean it again with a sandpaper. The operation is repeated until the desired tone is achieved. If you plan to make a monochromatic coating using a water stain, then it is applied in several layers with obligatory intermediate drying and processing with fine sandpaper. The excess stain is washed off immediately after its application. The excess is simply wiped off with a damp cloth.

When applying water stain, do not return to the stained area, otherwise dark spots will form that will be difficult to remove.
At home, you can make a stain that will give the wood an aged look. Small nails or metal shavings are placed in a glass jar, poured with table vinegar (it is better to use wine vinegar), left for a day, after which the liquid is filtered. If it is necessary to obtain a darker color, then the exposure time is increased. The resulting solution is used for wood staining. Strong infusions of black tea, coffee, cinnamon and even potassium permanganate can be used as a stain. Fix the result with nitro varnish. If a water stain was used for processing, then it is better to take an alkyd or acrylic varnish.
Coating wood with varnish
After applying the stain, the surface is treated with a quick-drying nitro varnish - this is done in order to raise the pile. The varnish is applied in a thin layer (with quick movements). After drying, the wood becomes rough to the touch - this is due to the raised fibers. The surface is sanded with fine sandpaper, moving along the wood fibers. The main task is to clean the wood from the raised fibers and make the surface smooth. After that, you can use another furniture varnish. It is not recommended to continue processing with the same nitro varnish, as it will dissolve the previous layer.
Next, the main layer of varnish is applied, allowed to dry, and then passed over the surface with sandpaper. Then the dust is removed with a damp cloth, and the varnish is again applied with a thin layer. The operation is repeated until the surface is perfectly smooth. In order to achieve a mirror-like shine, the surface is polished with a piece of felt dipped in oil and alcohol.
To treat wood with varnish, it is very important to use a high-quality brush made of dense synthetic bristles, which does not crumble during application and does not leave traces in the form of stripes and bald spots. Aged items do not require careful processing of each layer, since the polished surface does not match well with the old texture. In this case, it is enough to apply 2-3 layers of matte furniture varnish or wax.
Alcohol-based wood varnishes (shellac varnish) are applied with a cotton swab or brush. A cotton swab is moistened with varnish, then it is drawn along the surface along the fibers (only 1 time), the next smear is made next to it so as to slightly capture the previous one. At the junction of the strips, the varnish spreads quickly, so no stains are formed. Do not use too thick shellac varnish, otherwise dark streaks will form. Processing wood with shellac with a brush is performed in the same way as with a swab. The varnish is applied in 3 layers with obligatory intermediate drying. By following these tips, you can easily process wood without the help of specialists.
Despite the variety of glossy facades, interior elements made of semi-antique wood remain in demand. The purchase of such furniture will cost a pretty penny. In the case when you don't want to spend too much, you should not give up the idea of having an aged chest of drawers or a table. You can try aging the furniture yourself. Let's try to figure out what technology is used to process semi-antique wood with our own hands. After all, natural conditions age the tree for many years. And to get the result quickly, you have to artificially age the tree.
Semi-antique furniture is not found in every home. It should be used where appropriate. The design of the room should be thought out in the appropriate style so that the semi-antique products look worthy.
Usually, the procedure for aging a tree is performed with a specific purpose, namely:
- Satisfy the taste of the dwellers.
- Save money on antiques. It is much cheaper to buy inexpensive furniture and artificially age it.
Using certain methods of aging wood, you can get exclusive items. Both the entire product and its individual parts are processed. Particular attention should be paid to items such as dressers, sideboards, book shelves, mirror frames. They are aged more often, because it is difficult to imagine a vintage-style interior without these items.
Aging methods
The process of processing semi-antique wood with your own hands is performed in several ways. The main ones are:
- Chemical treatment- used for hardwood.
- Firing or heat treatment- a universal option.
- Machining or brushing- this method can be used to process oak or pine needles.
Furniture for aging is selected massive, with a rough texture, so that it looks like hand-made objects of past centuries. Before processing, it is better to disassemble the furniture into separate parts. This will make it possible to process even hard-to-reach places.
To facilitate the achievement of the aging effect of the tree, it is better to purchase material that has already been damaged by a bug, with the presence of minor chips, cracks and knots.
If the process of aging a tree with your own hands is performed for the first time, then it is better to practice a little on separate unnecessary bars. The quality of the result depends on how well the solution, stain or varnish is applied. It is recommended to carry out work in the open air, so as not to harm your own health.
How to make new boards or furniture look like old products? Now you know that several techniques are used for these purposes. Let's consider each of them in more detail.
Mechanical restoration
It is possible to mechanically age a tree in products from such species as pine, spruce, larch. It is these types of wood that have a pronounced texture, the presence of layers of fibers with varying degrees of hardness.
The main task during mechanical processing is the formation of various kinds of chips, potholes, cracks in an artificial way. This can be achieved by the following actions:
1. Wooden surfaces are processed with an ax or a special grinder. Potholes of various depths and widths are randomly applied to them. The bar is trimmed, and you should not achieve special accuracy and symmetry.

2. Then proceed to sanding the surface with a metal bristle brush. It will be easier to do this with a grinder and an appropriate attachment. During processing, grinding is carried out along the fibers until the applied potholes and chips take the form of naturally formed defects on the wood.

3. Then proceed to the second stage of grinding. At this stage, we work with a brush with soft bristles and sandpaper. During this treatment, soft fibers are removed, but coarser ones remain. Thus, we get an uneven tree structure. In the same way, knots and cracks can be additionally distinguished.

4. The next step is to work on the color of the wood. It is necessary to bring light new wood as close as possible to the shade of a board that has darkened with old age. Here you can apply a stain or a dark shade of acrylic-based paint.

5. When the applied agent is completely dry, we process the surface with fine-grain emery paper. At the same time, we try to perform all actions carefully. The paint should be removed from hills and ridges, but it remains in potholes.

6. At the final stage, open the treated surface with colorless or light yellow varnish and dry completely.
In the video: a method of mechanical aging of a wooden board.
As for the question of how to age wood on small items, such as small pieces of furniture or wooden dishes, the process is simplified here a little. The surface to be treated is thoroughly cleaned with a brush from wood dust until the desired effect is achieved. Subsequent staining and opening with varnish is identical to the process described earlier.
Brushing should only be done by hand using a metal bristle brush until small indentations and ridges are reached.

Heat treatment
Wood can be aged by heat treatment. A feature of this aging method is the complete absence of mechanical processes. The disadvantage is a certain danger to human health during work. Therefore, they should be performed in the fresh air, while protecting the skin, eyes and respiratory organs.
Heat treatment or firing is carried out by exposing the wood to direct fire. Either a torch or blowtorch should be used. It is necessary to fire to a depth of about 3 mm.
If heat treatment is performed superficially, the aging effect will not be as pronounced as with a stronger firing.

After finishing the heat treatment, perform the following actions:
- With the help of a metal brush or a grinder with a bristle nozzle, they begin to scrape off the carbon layer to the desired degree of antiquity. There is no need to paint the surface. The soot will highlight the entire structure.
- Sanding is carried out with sandpaper.
- A final layer of clear varnish is applied to the aged wood.

Chemical method
Chemical treatment of wood can be aged by means such as alkaline compounds or ammonia. You can use household chemicals that contain alkaline components.
The essence of the process lies in the fact that when the product enters the wood, it burns out its soft tissues. The structure of the tree is distinguished by the presence of hard and soft tissues. By processing semi-antique wood, soft tissue is removed in various ways.

In this case, the surface layer of the wood is burned out with alkali, which simultaneously paints it gray.

The next step is the process of washing off alkaline residues. You can use vinegar or citric acid for this. A solution of citric acid is prepared in the proportion: 1 teaspoon of acid in a glass of water. If vinegar is used, it should be a 9% solution. Do not use acetic acid. Further, the treated surfaces are well dried, sanded and varnished.
It is quite easy to age a tree using all of the above methods, if you make a lot of effort and effort. You can give the desired effect to any surface. It can be aged as small household items, furniture or even a wooden floor.
Recent fashion for vintage products, cars and retro clothes has not spared the design of wooden products. Semi-antique wood processing allows creating an interior in new buildings that looks like the owners inherited the apartment from their great-grandfathers. The owners of country houses decorate the facades and internal space with old wood. Artificially aged wood is used to make decorative false beams on the ceiling, stairs, doors and other design elements that make the house look like a medieval castle or a fabulous forest hut.
The high cost of artificially aged wooden objects makes home craftsmen want to do the necessary things with their own hands, immediately achieving both a cheaper product and its true uniqueness. Doing the work of aging a tree is not at all as difficult as it might seem from the outside. You just need to know about the main ways to achieve a beautiful textured surface on ordinary lumber, which can be purchased at any company that sells building materials and wood.
How to prepare for work?

There are 3 methods of wood aging: chemical, thermal, mechanical.
There are 3 widely used:
- chemical, which is only suitable for hardwood products;
- thermal (firing) - applicable for wood of any species;
- mechanical (brushing) - suitable for softwood and oak.
To work with wood, the following tools and materials are required:
- axe;
- drill or grinder with attachments;
- brush with metal bristles;
- hair brush;
- paint brushes;
- stain, acrylic paint, colorless varnish, wax;
- sandpaper.
When purchasing boards or timber, from which it is planned to create an artificially aged thing, you can choose specimens that are already damaged by a bug, have chips and potholes on the surface, small cracks and knots. After processing, they will give a special charm to the "antique" object.

Ready-made furniture for aging is selected massive, a little rough or in a rustic style, similar to hand-made piece furniture of the last century. Before decorating in any way, it is best to disassemble the piece of furniture into its component parts. This will allow you to process all surfaces without leaving unprocessed areas in hard-to-reach places that will be conspicuous.
Before you start decorating an object for the first time, it is worth practicing and getting your hand on various junk pieces of boards and any wood. The master will act more confidently, with knowledge of many of the nuances that may arise during work. On the same tutorials, it is convenient to select the tone of paints or wood stains, to estimate in advance what will turn out as a result.
Many operations (brushing, painting and drying after it, firing) should be carried out in the open air.

The most affordable materials for purchase are materials from coniferous wood: pine, spruce, larch. They have a pronounced structure and pattern formed by fibers of different hardness. This makes them suitable for mechanical decoration.
By using tools that destroy the upper layers of wood, you can achieve the aging effect much faster than if it happened naturally. All scuffs, potholes and cracks can be imitated by 2 methods:
- On the surface of a board, bar or log with a sharp corner of an ax, apply potholes of different depths and widths in a chaotic manner. Cut the corners of the bar a little with an ax, without worrying about the accuracy or flat surface. After that, all surfaces treated in this way must be carefully sanded with a stiff brush with steel bristles. When grinding a large product, it is better to use a drill or grinder with a special attachment. It is necessary to grind until all the sharp edges that have arisen during cutting with an ax acquire the outlines of natural damage smoothed by time. It is important to remember that the movement of the brush should always be directed along the grain. The next step will be sanding with a sandpaper to remove protruding fibers and processing with a steel brush with softer bristles than the first time. In this case, some of the soft fibers are removed, forming shallow depressions between the ridges of the harder winter wood fibers. The same brush can additionally highlight knots and cracks.
- After sanding the light surface of a new product, it is required to give a resemblance to old wood that has darkened from time to time: paint it with wood stain or dark acrylic paint. After drying with a medium-grain sandpaper without strong pressure, rub the wood a little, removing paint from protruding ridges and hills. At the same time, the dark color remains in the potholes and between the fibers. For the final finishing, the product is covered with acrylic transparent or light yellow varnish, dried until completely dry.
A more "humane" way. Suitable for small items and furniture, wooden dishes and other small surfaces. Brushing is done by hand, with a metal bristle brush. In this case, as in the previous case, soft fibers are removed, leaving ridges of hardwood. They sweep away wood dust with a hairbrush, controlling the process by eye and achieving the desired degree of abrasion of the surfaces. After that, the product is painted and decorated as described above.
Thermal and chemical treatment of wood

These methods can be called related, since the destruction of the top layer of the tree occurs almost without mechanical stress. These are more dangerous methods than the previous ones, so processing should be done in the air and in compliance with safety measures.
The essence of firing lies in the fact that soft fibers are destroyed when exposed to open fire. For this, the surfaces of the workpiece are fired with the flame of a blowtorch or a special gas burner to a depth of 3 mm. With superficial firing, the aging effect will be negligible, with deeper firing it will be more pronounced. At the same time, the master adjusts the process depending on his taste and needs.
After charring the top layer, a metal brush or a drill bit is used, scraping off the carbon deposits until the desired color and texture is obtained. Such wood need not be dyed, because it will already have dark and light areas. The final treatment consists in sanding and varnishing the product.
With the chemical method, antique wood decoration occurs in the process of exposure to alkalis or ammonia. To do this, you can use sprays for cleaning stoves or a drainage agent. It is necessary to familiarize yourself with the composition of the product before use, it must contain alkali. Particular attention should be paid to precautions when working with it.
Once on the surface of the wood, these chemicals "burn out" some of the soft fibers, while at the same time staining the wood gray. After processing, all surfaces are washed with water and covered with a weak solution of vinegar or citric acid (1 tsp per 200 ml of water), removing alkali residues.
When using vinegar, pay special attention to the fact that it should be 9% table vinegar, not acid.
The dried products are subjected to brushing and staining, if necessary.
Wood processing by the listed methods will help the owner himself decorate the interior of the apartment semi-antique, without investing a lot of money and not spending a lot of time on it. The availability of materials and tools for processing allows to engage in this type of creativity and a sophisticated master carpenter, and a beginner, and even a woman with imagination and skillful hands.
Brushing is a unique technology that allows you to age and structure wood. This solution provides an opportunity to give new wood products an aged noble look. More and more people prefer to create a unique interior in a house or apartment using wooden finishing materials. As a rule, wood, which has a more aged look, looks very noble and luxurious. But not many people know that even new wood products can be given that luxury and nobility that wood acquires after many years of exploitation. In this article, we will take a step-by-step look at a master class on brushing.
Increasingly, when decorating the interior of a house, they use wooden products, beams, ceilings, doors with the appearance of aged wood.
Tools for stitching wooden products:
- Grinder or electric drill with attachments;
- Iron and abrasive brushes;
- Bulgarian;
- Wide brush for varnish and oil.
Stage 1. Rough wood finishing
We take a piece of wood, in our case a board made of soft wood. Next, using a grinder and a special disk on wood, we make shallow notches, as shown in the photo below.
As a rule, this wood treatment with a grinder will already be sufficient for its further use on ceilings or in places where a person cannot touch it with his hand, since in this case, during the initial processing, burrs remain on it.
Stage 2. Fine finishing
In the event that you plan to use wood after the stitching process for window sills, doors, furniture and other interior items, then additional surface treatment of the wood will be required. First of all, you need to slightly smooth and level the surface of the wooden product. For this We will use a metal brush. It is worth noting that it is necessary to work with such a brush on the surface without much effort, so as not to spoil the already finished wood structure.
First of all, it is necessary to install an iron nozzle with a large fraction on an electric drill. As shown in the photo below, we carefully go through the entire processed rough surface of the wooden blank without undue effort.
It is worth noting that iron brushes are used to smooth the surface of a wooden product, and burrs are removed with the help of abrasive nozzles. Thanks to this, the aging of wood looks not only believable, but also safe for humans, since the surface of the wood product will be perfectly smooth without burrs.
Stage 3. Surface treatment with abrasive brushes
After the entire surface has passed with an iron nozzle, we proceed to finishing with abrasive nozzles. When working with abrasive attachments, apply firm pressure to thoroughly remove any burrs on the piece of wood.
Stage 4. Finishing
After preparing the wood for finishing, you can use glazing or treat the surface of a wooden product with linseed oil, oil, stain, varnish.
In the photo below, the wooden facade of the house has been glazed.
Coating with oil gives the effect of "aged" wood. To do this, we need a regular brush and oil for wood in the interior. It is best to choose oil of dark shades, in this case, wood products will look more noble. We carefully cover the entire surface of the product with oil.
Stage 5. Giving the effect of "aged" wood
In order for the dark recesses to remain dark and the light ones to be light, we will need to treat the surface of the product immediately after the oil impregnation. For this We take an ordinary cotton rag. By carefully wiping the entire surface of the product with a rag, we create the visual effect of "aged" wood, as shown in the photo below.
Brushing (or structuring) is a method of decorative wood finishing by artificial aging. The process of processing the material is not particularly difficult, so every home craftsman can brush wood with his own hands, using the step-by-step instructions of specialists and a tool suitable for the procedure.
Technology and applications
A brushing procedure is used to give the wood a vintage look
The main purpose of brushing is to give ordinary wood the appearance of an old material by processing with tools. During the surface treatment, soft fibers of a light shade are removed. After that, the surface becomes embossed, which is inherent in old wood.
During treatment, the degree of soft tissue removal varies. Depending on the purpose, the depth of the roughness imparted can be from 0.5 to 2-3 millimeters. Deep processing is carried out when you want to give the effect of deep aging. The hard surface of the wood is exposed, and a beautiful texture is visible on it. The optimum is surface treatment to a depth of 0.5 to 1 millimeter.
Natural aging of wood reduces the strength of the wood. Artificial brushing helps to increase the strength of lumber, prevents rotting and the formation of fungus. Such properties are given to the tree by processing during the process with special antiseptic compounds.
To accentuate the relief, after removing the soft fibers, the surface is coated with color-imparting compounds. The tree is painted over in shades of two tones so that the relief becomes as prominent as possible.
Brushing is a popular way of processing interior wood. Designers use it in the following cases:
- in the manufacture of stairs;
- in the manufacture of furniture;
- when processing floorboards;
- in the manufacture of finishing lining.
Only wood species with a multilayer structure are subjected to such processing. An excellent result is obtained after brushing larch, spruce, oak. The structure of these species allows you to get unique rich patterns of living wood.
Unsuitable for brushing varieties with an implicit structure: cherry, maple, beech, alder, birch, teak. The fine-fiber structure of the wood of these tree species does not allow obtaining the effect of layering, therefore, decorativeness cannot be achieved by brushing.
Types of brushing
To obtain a more embossed surface, a mechanical method of brushing is suitable.
There are two ways to process a tree to reveal its structure:
- Mechanical. The wood is treated with a special tool that removes soft fibers and surface polishing devices.
- Chemical. It consists in processing wood with special compounds (alkalis, acids, etc.) that corrode soft fibers.
Using these types of brushing can achieve different results. The mechanical method allows you to get a relief surface, the chemical one - smoother.
One of the techniques used by the craftsmen is a combination of chemical and mechanical processing. Rough wood processing is carried out by chemical method, removing soft fibers. Further finishing and polishing is done mechanically.
Burning
Annealing brushes give the surface greater strength
One type of brushing is wood burning to remove soft tissue. The wood is fired with a blowtorch or gas torch, then washed and coated with oil polishing compounds.
With this option of brushing, there is no need for subsequent toning of the product, since the wood acquires a dark shade. If desired, the burnt wood can be coated with a colored stain.
Wood that has gone through fire and water becomes not only beautiful, but also more durable. It practically does not rot or deteriorate by insects, therefore it is often used for finishing facades and building fences. It is not necessary to paint such a fence, since burnt boards do not change the quality for more than a dozen years.
Modern designers use fire-treated wood for interior decoration and furniture making. Things that look like after a fire are not to everyone's liking, but they look stylish and very unusual.
DIY brushing tools
The process of artificially structuring wood is not difficult if you use the right tool to carry it out.
Brushes
When choosing a mechanical method of brushing, brushes are indispensable
The brush is a special tool for manual mechanical brushing. These are rough metal brushes with steel or brass bristles. It is preferable to choose a tool with a wide end part, close in shape to the roller.... This shape will allow you to evenly process the surface.
The thickness of the wire is chosen depending on the type of wood. The pile should be 7-10 times thinner than soft fibers. Brushes with straight bristles are preferred over curly ones. If necessary, the ends of the wire are cut off - this technique allows you to make the brush more rigid.
The brushes remove most of the soft fibers from the wood. The roughness of the surface is removed with special nylon brushes with abrasive powder pressed into the bristles. Sanding with synthetic brushes removes the hairiness of the wood, preparing the surface for subsequent polishing and painting.
The cost of synthetic brushes for brushing is quite high, but it is advisable to purchase them. They allow you to carefully prepare surfaces for finishing polishing and to do the job efficiently.
For final polishing, brushes with woolen or sisal bristles are used. They give the surface maximum smoothness and a finished look.
After rough processing, before finishing cleaning and polishing, the wood must be dried. Polishing a wet surface will raise and break down fine fibers, which will ruin the appearance of the material.
Machine tools and machines
A brushing machine is needed if a large volume of wood is to be processed.
If it is necessary to process large volumes of material, it is advisable to use machines for brushing. Specialists who carry out mass processing of wood use stationary brushing machines. Round brushes are supplied with them for the stage-by-stage processing of the board:
- from steel wire - for primary processing;
- from synthetic bristles - for intermediate cleaning;
- from sesal - for finishing polishing.
The most popular models of machines and special machines:
- Milling cutter FESTOOL RUSTOFIX RAS 180 with a set of brushes.
- Makita 974 clipper equipped with nylon and abrasive brushes. The disadvantage of this model is the difficulty in handling corners.
- Grinding machine Felisatti AGF 110 / 1010E. Better model for smooth and uneven surfaces. This model is supplied with a metal and nylon brush.
When choosing a specific model, it is necessary to take into account the possibility of purchasing additional brushes of a suitable design.
The purchase of a special machine for performing one-time work is impractical, since home craftsmen use grinding machines for smooth surfaces and angle grinders for processing joints for processing wood. To equip grinding machines, special brushes are purchased, similar to those intended for machine tools.
Brushing steps: step by step instructions
The consistency and correctness of actions during the structuring of wood is a guarantee of obtaining the desired result. Violation of the recommendations will lead to damage to the material. In general, the process consists of metal brushing the board, sanding and polishing.
The scheme of the home wizard is as follows:
- Preparatory stage. Before starting work, the surface of the board is checked for moisture level. If it is too wet, then dry it. Too dry - moisturize.
- Processing with a hard brush-karting. At this stage, it is important to evaluate the selection of the stiffness of the bristles. For the efficiency of processing, it is important to ensure that the brush removes only soft wood tissues without disturbing the structure of hard ones. Having selected the optimal hardness, depending on the type of wood, you can start roughing. The surface is processed along, in the direction of the fibers. If machining with a grinder, adjust the rotational speed on a separate sample.
- Sanding with a synthetic brush. The abrasive brush is designed for high-quality wood processing. With its help, all fibers and roughness remaining after rough processing are removed. As a rule, one or two surface passes are sufficient. Movements, as in roughing, are performed along the fibers. At this stage, you can make the surface more decorative by deepening some of the grooves with a chisel.
- Wood polishing. The final stage of grinding is making the surface smooth. Carry out the work with a sesal brush or fine-grained sandpaper. Careful polishing makes the surface perfectly smooth.
Video: DIY tree brushing
Staining is the final touch in the wood brushing process
Coating the surface of brushed wood with paint or tinting compound gives a special decorative effect. Coloring is carried out with a brush or sponge. During the process, carefully monitor whether the fibers are rising. If villi are seen on the surface, it is additionally sanded with fine-grained sandpaper.
The easiest painting option is staining... It quickly penetrates into the soft layers of wood remaining on the surface, without affecting the hard fibers. The result is a relief structure with a special decorative effect.
Wood, covered with a golden or silver dye, has an original look. Pigment particles are clogged into depressions and microcracks, which subsequently glare in the sun.
An interesting coloring technique is a tonal arrangement that repeats the play of light and shadow on the relief. The grooves are painted in a dark tone, the ridges are painted in a light tone. Painting is carried out as follows:
- A richly dark varnish or paint is applied to the entire surface.
- The covered surface is wiped with a sponge or rag, removing paint from hard fibers, where it has not had time to be absorbed.
- If large areas are painted, wait for the applied varnish layer to dry, and then treat the surface with a flap disc with a grain size of 400 to 800. The bulges after this treatment are lightened, then they are covered with colorless or light varnish.
Another color option is to cover the upper tier with a dark varnish, and the depressions with a light one. In this case, a dark varnish is applied to the surface and dried well. Then apply a light composition and remove its excess with a rubber spatula. As a result, a dark substrate appears on the ridges.
With the right woodworking skills and the right tools, you can brush yourself with your own hands and get great results. Structured wood products have an increased decorative effect and give the interior an exclusive, expensive look.

