Potbelly stoves on the wood with hands drawings. How to make a stove stove in a garage on wood and working off
Very often, it is the stove stove that is used to heat the garage. And you can do it yourself, but you don't need to spend money for this. It is enough to look for unnecessary metal parts in the bins.
Advantages and disadvantages of a potbelly stove for a garage
A stove-stove is considered to be the most practical way of heating in winter. This is a small structure, which is practically portable, capable of heating any room in terms of area, regardless of the temperature outside and other climatic conditions. This is its main advantage. However, in modern conditions, a stove-stove is used exclusively for heating outbuildings, for example, a garage. And this is due to a large number of disadvantages:
- the stove cools down quickly, which means that in order to maintain a constant temperature in the room, it must always burn;
- uneconomical for the same reason;
- is fire hazardous, therefore, when installing it, you need to take care of protecting the nearby wall and floor.
However, its omnivorous nature allows you to save a little on the purchase of fuel, especially if you take into account the almost 100% efficiency of such a device.
The potbelly stove has a special design, thanks to which you can get high efficiency.
Design and principle of operation
The peculiarity of the potbelly stove is that it does not require the construction of a foundation and the arrangement of a capital chimney. In most cases, it is because of this that it is chosen for use in the garage. This room does not always have electricity or a gas pipeline, which means that a stove-stove is the only solution to the heating problem.
Potbelly stove does not require the construction of a foundation
This design is a metal box with a door and a pipe, which is brought out of the heated room.
The pipe can also serve as a heated element, if it is slightly modified. Make it stepped, not straight, which will allow hot air to linger a little in it.
Calculation of the main parameters (with drawings and dimensions)
The high efficiency of a stove-stove can be obtained only if all the basic parameters of the structure are correctly calculated.
Pipe
In this case, the diameter of this element is very important. The throughput of the chimney should be less than the capacity of the furnace, which is the main distinguishing feature of the potbelly stove. This will allow warm air not to leave the stove immediately, but to linger in it and heat the surrounding air.
It is very important to make an accurate calculation for it. The diameter should be 2.7 times the volume of the furnace. In this case, the diameter is determined in millimeters, and the volume of the furnace in liters. For example, the volume of the combustion part is 40 liters, which means that the diameter of the chimney should be about 106 mm.
If the installation of grate is provided in the stove, then the height of the furnace is considered without taking into account the volume of this part, that is, from the top of the grate.
Screen
It is very important to make the hot gases not cool down, but burn out completely. In addition, the fuel must be combusted by partial pyrolysis, which requires an extremely high temperature. A metal screen, which is located on three sides of the stove, will help to achieve this effect. It should be placed at a distance of 50–70 mm from the walls of the stove, so that most of the heat will return to the stove. This movement of air will provide the required high temperature, and will save you from fire.
Red brick stove screen is able to accumulate heat
Litter
It must be there. There are two reasons for this:
- some of the heat is radiated downward;
- the floor on which the stove is standing heats up, which means there is a risk of fire.
Litter solves these two problems at once. It can be used as a metal sheet with an offset of 350 mm (ideally 600 mm) beyond the contour of the furnace itself. There are also more modern materials that do an excellent job with this task, for example, a sheet of asbestos or kaolin cardboard, at least 6 mm thick.
For the litter under the stove, you can use an asbestos sheet
Chimney
Despite all the calculations, gases sometimes go into the chimney not completely burned out. Therefore, it must be done in a special way. The chimney consists of:
- the vertical part (1–1.2 m), which is recommended to be wrapped with heat-insulating material;
- hog (slightly inclined part or completely horizontal), 2.5-4.5 m long, which should be 1.2 m from the ceiling, which is not protected by heat-resistant materials (1.5 m from the wooden surface), from the floor - by 2.2 m.
The chimney must be taken out into the street
Photo gallery: diagrams of a potbelly stove for a garage
 On the diagram, you need to indicate all the exact measurements.
  The chimney must be brought out to the street
  The potbelly stove can be round or square
  The volume of the firebox depends on the presence of grates
  The potbelly stove scheme depends on the material used
Required materials and tools
To make a potbelly stove with your own hands you will need:
- welding equipment (or any other welding machine, if you have relevant experience);
- chisel;
- soft cloth (you can use a rag);
- hammer;
- sandpaper (fine-grained).
The list of materials depends on what container the stove will be made from. This can be a gas bottle or a milk flask. If you have some experience with metal, then a potbelly stove can be made from sheet material. However, you definitely need to take care of the availability:
- refractory bricks;
- steel pipes;
- metal wire;
- grate bars (in some cases, you can do without them);
- a branch pipe with a weather vane;
- door hinges.
Preparatory work before assembling the oven: choosing a place
The use of a stove in the garage, like any other heating device, requires compliance with safety rules. First of all, this concerns the place of installation of the device. Ideally, the corner of the garage is suitable for this, which is located near the walls opposite to the door of the room.
Remember not to put the stove in the immediate vicinity of the car. The distance between them should be at least 1.5 m. There should be a similar distance from objects that are easily flammable, for example, from barrels of gasoline.
The walls near the stove must be protected with fireproof material
The distance from the stove to the wall depends on what material the garage is built of. If it is a tree, then there should be at least 1 m from the stove to the wall. Additionally, it is recommended to protect them with asbestos plates.
DIY step-by-step instructions for making a potbelly stove for a garage
The method of making a stove-stove depends on its shape and the material used.
Classic stove-potbelly stove
For the manufacture of such a structure, it is necessary to have certain skills in working with a welding machine. All work consists of several steps:
- Make 5 blanks from sheet metal.
Blanks need to be cut from sheet metal
- Weld the side surfaces to the bottom. Make sure that they are located strictly vertically relative to each other, which will help the use of a level or construction square.
- Weld the back wall.
- The internal space is conditionally divided into three parts: the smoke circulation, the furnace part and the ash pan. Install a grate in the last two. To do this, at a height of 10-15 cm, the corners must be welded to the entire length. For the grating itself, it is recommended to use 25–30 mm thick sheet steel from which strips must be cut. The distance between the plates should be 5 cm. The rods themselves must be welded to two rods, which give rigidity to the lattice.
- From above, it is necessary to weld two metal rods, which are needed for the location of the reflector (the sheet that separates the firebox and the smoke circulation), the reflector must be placed in such a way that a channel for smoke is formed.
The grate and potbelly stove are optional elements.
- Weld the stove cap, not forgetting about the hole for the pipe. Cut and weld the top link. Do the same with a narrower part.
- Make a door. It is recommended to do it over the entire width of the stove, so that the grate and reflector can be removed without problems during cleaning and repairs. Do not forget that the door must be equipped with a handle, latch and curtains.
- Install the structure on the legs, which can be made of a metal pipe with a diameter of 2-3 cm. You should not make them too high. 8-10 cm will be enough. If desired, you can equip them with bolts, which will allow you to adjust the height.
- Make a chimney from a pipe with a diameter of 15-18 cm. For its outlet, you need to make a hole in the wall of the appropriate size. The pipe consists of three parts, which are interconnected at an angle of 45 °.
The pipe must not have horizontal parts
- At the lower end of the chimney, it is necessary to make a rotary damper. You can also make it from sheet metal, but the diameter should be slightly smaller than the hole in the pipe. It is also necessary to provide for a handle that would move this damper.
- The pipe must be fixed on a sleeve 15–20 cm in size, which is welded along the hole to the top cover.
- Install the stove, adjust its height.
When using sheet metal, you can make a stove of any size
Video: do-it-yourself original potbelly stove for a garage
Milk can oven
It is quite easy to make such a furnace, you just need to follow the step-by-step instructions:

Video: stove stove for a garage from a gas cylinder
Features of operation
During the operation of a homemade stove, it is very important to follow certain rules. This is necessary not only for the safety of its use, but also for a long service life. These rules are:
- it is necessary to maintain a safe distance between the walls of the furnace itself and the walls of the room (a distance of 50 cm is considered ideal);
- the chimney must be brought out to the street, in no case should it be coupled with the garage ventilation system (very often this desire arises when the stove is installed in the basement of the garage), since this is the only way to guarantee sufficient traction for full combustion;
- places where the pipe is taken out into the street must be insulated with asbestos or other non-combustible material;
- it is possible to increase the efficiency of a potbelly stove by insulating the room itself;
- next to the potbelly stove, it is necessary to install a box with sand and a fire extinguisher, since this is required by fire safety rules.
How to improve oven performance
Such a furnace has one significant drawback - it cools down very quickly. However, it is very easy to fix this with a brick screen that is installed on three sides of the structure. This will allow you to accumulate heat and give it to the room even after the stove stops burning.
It should be positioned at a distance of 5–7 cm from the walls of the stove, in no case right next to it. In this case, you need to take care of the presence of ventilation holes.
The screen should not be close to the walls of the stove
A structure with a brick screen will weigh much more than an ordinary metal stove-stove, therefore it is recommended to first build an individual foundation.
In some cases, it may be necessary to install an individual foundation. It's very simple to make it:
- Dig a hole about 50 cm deep. All other dimensions depend on the dimensions of the stove itself and the screen.
- Fill the bottom of the pit with sand (usually it takes about 3-4 buckets), after which it needs to be tamped. Cover the sand with a layer of crushed stone 10-15 cm, also tamp.
- Level the backfill, fill it with the prepared cement mortar. Leave it for a day (it is possible for a few, the foundation will only benefit from this).
- Cover the base with several layers of roofing material.
- Now you can start laying the screen on the brick floor. In this case, the first two rows should be laid out with continuous masonry directly on the roofing felt. In rows 3-4, it is necessary to make ventilation gaps. Continue solid masonry.
- It is recommended to make the screen without top overlap.
How to properly clean a stove stove
The design features of such a stove make it possible to clean it quite rarely.
This is one of the advantages of a potbelly stove. However, from time to time, the chimney must be cleaned of soot residues. For this, you can use a special brush. You can do it yourself. Attach a cylindrical brush to the rope. It is recommended to take a brush with plastic or iron bristles. In this case, you need to pick it up in such a way that it squeezes into the narrow chimney pipe without any problems.
The cleaning process itself takes place in the following sequence:
- Close the opening of the firebox and plug it with a rag.
- Make several movements with the brush (you need to stop when the brush began to move without resistance). Wait.
- Remove all food that has gone down to the sump.
All this must be done extremely carefully, since the chimney of the stoves is not very strong.
A homemade potbelly stove in the garage can be a reliable and effective assistant in the fight against winter frosts. And if you do it yourself, then the efficiency of the device can be increased many times.
The stove-stove is a faithful companion of summer residents, security guards, and those who like to repair cars in their own garage. Owners of small private houses also often use this heating option as the most economical and mobile.
Such a stove is quite capable of heating a small room in a matter of minutes, and thanks to modern design solutions, it will not spoil the interior of a country house at all. Almost everyone who sets himself up with such a goal can make a potbelly stove with his own hands. We will look at how to do this in this article.
Tools for the job
In order for the manufacture of the heating device to take you a minimum amount of time, you need to prepare the following tools:
Welding machine (not less than 200A)
Welding electrodes and protective mask
Bulgarian
Cutting and grinding wheels for metal
Slag hammer
Metal brush
Pliers, simple hammer, chisel
Drill with drills
Measuring device (tape measure, meter)
What are homemade potbelly stoves?
 The appearance and technical characteristics of the stove-stove may be different. For each room, its own stove is suitable, which can both heat it and harmoniously fit into the interior. As a basis for the future of the stove, you can take sheets of metal or use an already finished product: a medium-sized metal pipe, a barrel, a gas cylinder or a tank. In any case, the wall thickness should not be less than 3-5 mm.
If you need to heat the garage, then almost any option will do, since such a stove only requires heating a small room. For the potbelly stove, which will be in the house, the aesthetic side is also important - the appearance of the unit, so it is better to refuse some options right away. An important point is also the type of fuel that is used
Do-it-yourself potbelly stove
This is an option that is just not suitable for heating residential premises. Due to the pungent smell that is emitted during the combustion of oil waste, it is not very pleasant to be in such a room for a long time. Even if a good hood works, all things in the house will be saturated with this specific "aroma". This stove is perfect for heating a garage and other non-residential premises.
 To make it, you will need a 4-5 mm metal sheet, which will be cut into pieces, and a chimney pipe. All elements of the stove are cut out using a grinder. The edges of the pieces are trimmed. Before cutting, it is necessary to make the correct marking of all parts, according to the drawing.
Round holes are made in the pipe of the required length. This pipe is designed to connect the upper and lower potbelly stove tanks. It is also necessary to drill two round holes in the upper tank: one for the chimney pipe (top left), the other for the connecting pipe (bottom right). The lower tank of the stove is done in the same way, only a cutout for the pipe is made in the center of the container. For filling fuel, it is necessary to provide a filler neck, which is equipped with a sliding cover.
The lower part of the tank is made flat, four or three legs are welded onto it. In order to prevent the lower and upper parts from loosening, they are reinforced with additional stiffening brackets. Weld seams must be thoroughly cleaned, and the oven must be covered with high-temperature enamel, which will protect the metal from rust.
How does such an oven work?
The potbelly stove produces heat as follows: a long thin stick or curled paper ignites the used oil in the lower container. When the mining has caught fire, the filler cap should be closed. Combustion air will flow through a pipe that is connected to the top tank. Rising up, hot air heats the top of the stove to a high temperature. It gets so hot that you can even heat the kettle on it.
Such a stove is ideal for a garage, as it successfully heats a small area, and used materials for the firebox will always be found by car owners.
Stove stove from a pipe or barrel
If you are planning to construct a heater from a pipe or barrel, you need to choose a suitable diameter. It directly depends on the size of the room that needs to be provided with heat.
A potbelly stove from a barrel can also be used in a living room, provided that it is made accurately and correctly. This type is most popular for heating country houses.
 Two rectangular holes are cut in the barrel, which will be connected to the firebox and ash pan. The cut pieces are used for the doors. They are cut to the desired size, framed with strips of metal and attached to such improvised doors with handles and a latch.
Inside the barrel (pipe), two angle-shaped brackets are welded. These are grate holders, which are located just below the doors. As a grate, you can use welded fittings or buy a ready-made one in a store.
A piece of pipe is welded tightly, and supports are welded to its lower part. A hole for the chimney is cut out on top of the pipe, into which the pipe is inserted and welded.
Only then are the doors installed. They are attached to door hinges and a latch hook is installed, having measured the required level in advance.
To make the stove aesthetically pleasing, it is necessary to thoroughly clean the welding seams and paint the product with heat-resistant enamel. If you do everything carefully, such a heater will look no worse than the factory counterpart. After the paint has dried, the stove is connected to the chimney pipe that enters the street.
This is the easiest and most practical option. Despite the fact that such a potbelly stove takes up quite a lot of space, it is used for heating more often than other models. It is also very convenient that on the surface of the tank you can heat water in a kettle or a saucepan, as well as dry your laundry.
Potbelly stove from a gas cylinder
The used gas bottle is very suitable for the stove. This is an almost ready-made form for a potbelly stove, which requires minimal modifications.
 The upper part of the cylinder, where the tap is located, is cut off, and a plug is welded in its place. A square cutout is made in the bottom of the cylinder - this will be a firebox. The cut piece must be turned into firebox doors. To do this, it is scalded with metal and a handle is attached to it to open it. Subsequently, you will need to weld metal hinges to the hole, on which the door will be put on. It is better to install the door leaf itself at the very end, when the stove is already completely ready.
In order for air to enter the firebox, several holes are drilled in the bottom of the cylinder. They will give thrust and serve as grates. In order to prevent burnt firewood from falling to the floor, a metal box is welded to the bottom of the cylinder - an ash pan. It can be made from thinner sheet metal. The ash pan is also equipped with doors.
After that, legs from a metal corner or pipe scraps are attached to the cylinder.
At the back of the stove, there will be a smoke exhaust pipe. To do this, cut a round hole in the upper part that matches the diameter of the pipe and weld it there.
From above, you can equip an impromptu cooking stove. It can be made from a metal grid or reinforcement by welding the frame to the top of the cylinder.
Such a potbelly stove is an excellent option for heating a summer cottage, garage or change house. It is versatile and does not take up much indoor space.
Potbelly stove rectangular
Of all the possible options, such a stove is the most compact and neat look. It is used in residential premises, where, due to its rectangular shape, it is easy to decorate the stove and make it almost invisible.
 The most popular is the factory model "Gnome". Its structure is quite simple, and the heat dissipation is very efficient.
This stove consists of just a few elements: swamps, ash pan and chimney. The stove is installed on four legs. The second figure shows a more complex firebox design, which retains heat for a long time.
It is quite possible to build such a structure yourself. Let's take a closer look at how to do this.
To do this, you will need the following consumables: a sheet of metal, at least 4 mm thick, a chimney pipe and a steel corner. In addition, you need to purchase a burner cover.
You need to cut out four walls, the bottom and the upper hob. In order for the fuel to completely burn out in the firebox, it is necessary to use special plates that are located inside the stove. Thus, more heat will be produced in the combustion chamber.
 The holes for the firebox and blower are cut in the front of the structure. Subsequently, hinged doors with handles and locks will be attached to them.
An opening for the burner is cut out from above, corresponding to the dimensions of the part, and a hole for the pipe, through which the smoke will come out.
Legs from the prepared corner are welded to the bottom of the stove.
The place where the grate will lie is marked on the side panels. Sections from the corners are welded here, which will serve as supports for the grate. The grate can be made by yourself. To do this, it is necessary to drill a large number of holes in the steel sheet so that it becomes like a sieve, or weld a grid from steel rods.
At a short distance (at least 15 cm) from the hob in the upper part of the potbelly stove, a plate is welded. It should correspond to the size of the stove, but not reach the end of 8-9 cm. The second same plate is placed just below. It should also not reach the end of the container, only in the front of it. These plates form additional ribbon-like passages inside the stove. Heat from the burning fuel will enter the formed corridor and heat the plate. Thus, more heat will remain inside the tank, rather than flying straight into the pipe.
Safe rules when using a potbelly stove
Fire safety rules are very important when using a homemade heater. In order for a potbelly stove to bring warmth and comfort to the room and not pose a threat to health, it is necessary to remember the following safety measures.
It is necessary to place the stove on a fireproof base. This can be tile, sheet metal, or brickwork. Walls near the stove must also be protected from overheating. You can paste over them with fireproof material or use non-combustible drywall. In no case should you place furniture and any other flammable objects near the stove.
The slightest spark or too high surface temperature of the stove can cause a fire.
In order to exclude the possibility of accumulation of combustion products in the room, use ventilation. Think in advance where your potbelly stove will be located, and how you can ensure the flow of fresh air into the room, and the outflow of carbon monoxide from it.
Install the stove in a place where there is less traffic of people, do not allow children to play games near the appliance. By following these simple rules, you will provide yourself with inexpensive heat during the cold season.
For most people, the word "garage" is simply associated with a box for storing a car. However, there is a fairly large category of car owners for whom the garage is truly a "second home". They are ready to spend all their free time in it - fortunately, there will certainly always be work here. In addition, the stable reputation of a kind of "men's club" is rightly entrenched in garages, where the uninitiated, especially women, are not recommended to enter.
But only winter is trying to make adjustments to an active garage life - it is extremely inconvenient to work in a frozen room and it is very uncomfortable to just talk with friends. However, inventive craftsmen always find a way out - they install home-made stoves, constructing them on their own or using the advice of comrades on how to make a potbelly stove in the garage.
We will also make our contribution to this noble man's cause. The publication will consider several ways how to make a potbelly stove with your own hands.
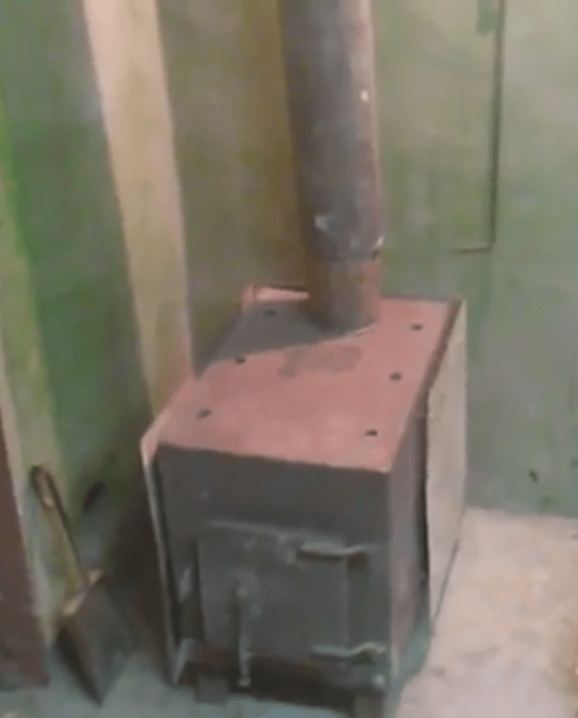
Wood stove stoves from scrap materials
The basic design of a simple stove burning on solid fuel is very straightforward. In fact, it is a thick-walled metal container, divided into two main compartments.
Firewood or other fuel is placed in the upper furnace, for which a loading door must be provided. The grate separates the firebox from the lower compartment, much smaller - the ash pan, which also often plays the role of a blower. Here it is also recommended to install an appropriate door through which the stove is regularly cleaned from ash. In addition, opening the door to a certain width regulates the flow of air into the combustion chamber, and, consequently, the intensity of firewood burning. A branch pipe is welded in the upper combustion chamber for the removal of combustion products into the chimney.
Such a scheme gives scope for the independent design of simple stoves, and a wide variety of materials or out-of-date objects and devices are used as blanks. There is probably no need for real masters to learn how to cook a potbelly stove in a garage - perhaps it is better to just give a number of interesting ideas that can be taken as a basis and supplemented with your own modifications, based on the available opportunities and preferences.
1. One of the simplest options is a potbelly stove from an old metal barrel.
The design shown in the figure has been simplified to the limit. The master manufacturer decided to abandon the two separate doors, combining them into one common one. A metal frame is welded on top of the barrel, which allows placing a metal sheet on it, which becomes a kind of "hob" - on it, for example, you can warm water.
Potbelly stove from a barrel - the design is simple, but with a lot of disadvantagesThe advantage of such a design is, perhaps, only one - the simplicity and speed of manufacture, available to almost everyone. There are many more disadvantages.
- Firstly, the barrel itself is not the best option for a potbelly stove - the walls are thin, their heat capacity is low, and they will not last long - they will quickly burn out.
- Secondly, it is rather difficult to regulate the intensity of combustion.
- Thirdly, the design is bulky and takes up a lot of space. You can, of course, consider a vertical arrangement, but the main problem is the subtleties of the walls, thisall equal not will eliminate
- And, fourthly, such a potbelly stove is very unsafe in terms of fire safety.
It is better to have such a stove not in the garage, but somewhere on the street for garbage disposal.
2. Something similar, with the same main disadvantages, but more compact, can be made from a standard 40 liter can.
The scope of work, including welding, is even smaller here. In fact, only the legs (3) and the chimney (2) are welded to the body (1). The door is already ready - it remains standard, only two rows of holes (4) are drilled in it for air access. Inside, a homemade grate made of a metal rod is laid, conventionally dividing the can into two compartments - and the mini-stove is ready.
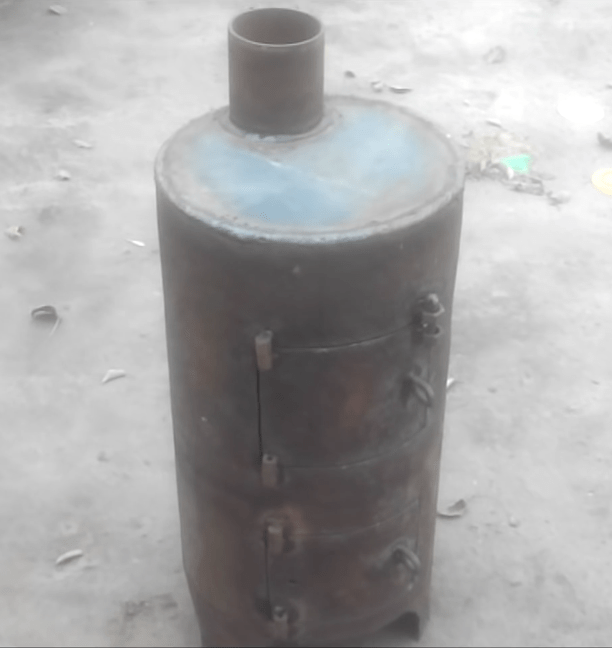
3. The use of old gas cylinders... These vessels have thick sebaceous walls that are easy to weld and themselves have a good heat capacity.
The main difficulty is to properly prepare the cylinder for further work, since even with the neck removed, vapors of an explosive concentration can remain in it. You can find advice to fill the bottle with water overnight, and then, after draining the liquid, start cutting it. However, as practice shows, this does not give a complete guarantee of the safety of work. In this light, the following approach seems optimal:
- Dig a vertically placed cylinder in the ground so that it is securely fixed for cutting with a grinder.
- Fill it with water to the very neck, let it stand for 2–3 hours.
- Draw a line around the circumference of the future cut.
- Start cutting along the marked line until a through hole appears. Water will begin to flow out. It is necessary to wait until its level drops to the level of the cut, and then carefully continue working with a grinder and remove the cover completely.
- Now the water can be drained and further work can be continued - the cylinder will no longer present any danger.
There are a lot of options for stoves-stoves from cylinders.
- It is often made horizontally. The container capacity itself is, in fact, a finished combustion chamber. To divide it into two with this orientation is irrational, it is better to make it from sheet metal and weld a box-shaped one from below ash pan with its own door.
In this case, the grate can be rows of holes drilled in the cylinder body:
If a real cast iron of the appropriate size was found, then you can do otherwise - cut out a window in the wall of the cylinder, which will ensure a snug fit of this part:
Another option is a window for installing a conventional cast iron grateThe furnace door can be made independently using a fragment cut out under the firebox window, or you can weld on a finished part that can be purchased at a hardware store.
The structure is installed on their welded pipes or corner legs at a height convenient for operation. At the rear, a branch pipe is cut in for connection to the chimney.
- In order to save garage space, the cylinder can also be placed vertically. In this case, it is divided into two chambers, brackets are welded inside, on which a self-made round grate is placed, made of a steel bar with a diameter of 10 - 12 mm. Two two rts are made - furnace and blower.
The upper cut-off part can be drowned out - in this case, a kind of hob will appear. Another option is to purchase a cast-iron cauldron of the required diameter, which will exactly fit as a "plug" and turn into a container for heating water or even for preparing a variety of dishes.
An original solution - a well-fitted cauldron is used instead of the top coverFor the outlet of combustion products, a standard 90-degree outlet with a diameter of 100 or 110 mm is welded in from the back, and then the vertical part of the chimney is connected to it.
Another craftsman offers an original design. As a finished part for the stove, he used an air tank-receiver from the brake system of a truck.
The master did not install ordinary doors. For the blower, a pipe is welded in, equipped with an adjustable damper that restricts the flow of air. There is also no loading hatch on the side wall of the stove - it uses the principle of top loading of solid fuel. The top cover is hinged, for convenience it is equipped with an arched handle.
The inner space of the cylinder into the firebox and the ash pan is separated by a homemade grate:
The design itself is simple to manufacture, but during operation it requires caution when laying firewood. In addition, the process of cleaning such a potbelly stove from the accumulated ash will also not be entirely convenient.
Potbelly stoves of similar design can also be made from scraps of thick-walled pipes with a diameter of 300 - 500 mm.
4. Steel sheet- an excellent material, a potbelly stove can be made from it with your own hands, the drawings of which are easy to find on the Internet.
For example, we can give a drawing of an efficient solid fuel stove, for which you need sheet metal with a thickness of at least 4 mm (the walls of a thinner one will simply burn out quickly).
All dimensions are indicated on the drawing presented to your attention, and it will not be difficult for any master to embed the parts necessary for work. The main "highlight" of this design is the presence of two partitions (1). They create a kind of labyrinth for the exit of combustion products, which do not immediately fly into the chimney, but provide maximum heat transfer from the stove.
A metal plate (2) with rows of drilled holes 12-15 mm in diameter is used as a grate.
It is advisable to "dress" the stove in a metal casing, using sheet metal 2 mm thick for it. The plates (3) are cut to the dimensions of the side and rear walls and are attached to the stove body either on threaded posts or using 50 mm bushings (4).
Such an addition to the design of the stove will solve three problems at once:
- The likelihood of accidental burns from the hot walls of the stove will decrease.
- The impact of hard infrared radiation from it, which is far from always pleasant and necessary, will decrease.
- The resulting gap of 50 mm between the walls of the stove and the screens will create a powerful convection flow of heated air, due to which a quick and uniform heating of the garage room will occur.
These are not all possible options for solid fuel garage stoves. and detailed technology of their manufacture can be found on other pages of our portal dedicated to this issue.
Video: homemade metal sheet garage stove
Now, it probably makes sense to get acquainted with the design of the stove, which uses such common in garages, practically "waste" material, like used engine oil.
Find out and also learn a step-by-step process that is understandable even for beginners, from our new article.
How to make a potbelly stove for mining
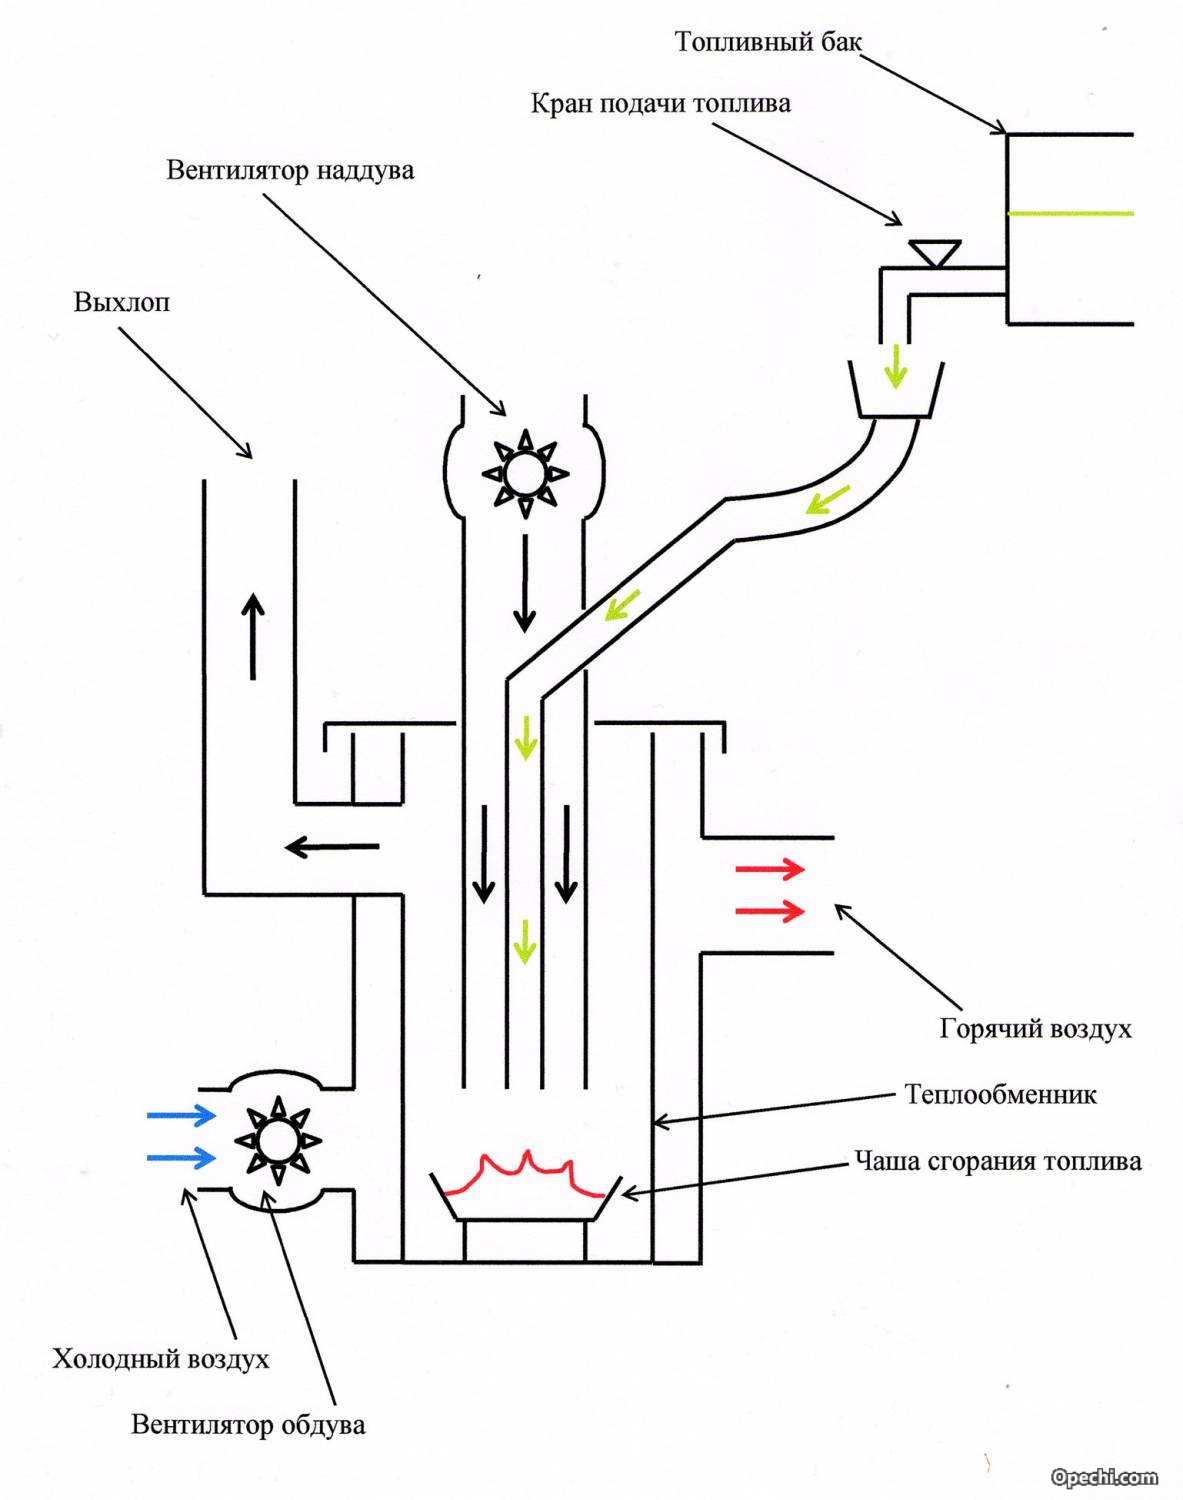
In fact, it is not always convenient to have a supply of firewood in the garage for a stove stove. But working off is available almost constantly or it is not difficult to find it. This becomes especially important in large garage cooperative partnerships, where, often, special containers are installed for draining old oil, or in auto repair shops. So why not take advantage of the opportunity to use virtually free fuel for heating?
The design of such stoves and their layout can also be very diverse - from compact stoves designed for a small room to large and bulky devices with high heat transfer, capable of heating already significant areas.
Nevertheless, the principle of operation and basic structural elements are similar for all of them. They consist of two containers. The lower one is intended for filling with used oil - there it is superficially ignited and brought to a boil. Oil vapors go up through a pipe with perforation for oxygen access. Here, the process of afterburning of rising vapors begins, and their final oxidation and combustion takes place in the upper chamber, which is already connected to the chimney system.
If you look at a photograph of a working one, then the temperature distribution in this heater is very clearly visible from the intensity of the infrared radiation spots. The lower container with oil does not heat up very much: a light spot is only a visible area of an open flame on the surface of the burning oil. The main afterburning begins in the upper third of the vertical perforated pipe, and the temperature reaches peak values in the upper chamber - even its thick-walled body literally gets red-hot. It is this part of the potbelly stove that gives the maximum heat exchange with the air in the room.
It is necessary to know the principle of operation of such a stove. This will help to correctly determine the materials necessary for its manufacture - it is obvious that the parts of the vertical pipe and the upper chamber should be the most heat-resistant.
Below are the drawings of a do-it-yourself potbelly stove, working according to this scheme. They contain almost all dimensions, but nevertheless, for the manufacture of such a heater, a number of explanations are required, having considered this process in more detail.
So, the work on the manufacture of such a stove begins with the selection of materials. First of all, it is necessary to have two lengths of pipe for the bodies of the lower and upper chambers (pos. 2 and 8). The drawing shows the diameters of 352 mm and 344 mm, but such a standard simply does not exist. It is easier to change the data a little and apply 355.6 x 6 or 325 x 6 mm pipe trims.
The thickness of the steel sheets used for the manufacture of other parts is 4 mm, with the exception of the top cover (pos. 10) and the baffle (pos. 9), which require 6 mm metal.
For a vertical chamber, a pipe with a diameter of 100 mm with a wall thickness of at least 4 - 5 mm is used. The same pipe is required for the chimney pipe.
The process can be started by making the lower chamber. To do this, a circularly cut bottom (item 1) is welded to the cut of 355 mm pipe with a height of 115 mm (item 2). All seams in the construction of the stove must be absolutely tight.
The top of this container must be removable. This means that it is necessary to have a cylinder (pos. 3) which would fit tightly, almost without a gap, on the lower one. It will not work to pick it up according to the standard pipe sizes, which means you will have to make it yourself. A 60 mm wide metal strip is cut out, which, by heating with a gas burner and using clamps, is bent around the body of the lower container, and then welded with a vertical seam.
Now, according to the resulting ring, you can accurately measure and cut the cover for it (pos. 4). Two holes are immediately cut out on it - the central Ø 100 mm (item 4.1) for welding a vertical perforated pipe, and shifted to the edge, Ø 60 mm - it will be used for refueling, igniting and adjusting the supply of primary air for burning oil. A sliding cover (pos. 4.3) is being prepared, which will be fixed in the hole (pos. 4.4) with a rivet or bolt (pos. 4.5).
Then the finished cover is welded to the ring.
A piece of pipe 100 × 5 mm with a length of 360 mm is marked for drilling holes in it. The top row should be 55 mm from the edge, the bottom 20 mm. It is necessary to evenly place 6 rows of 8 holes in each, so that they are staggered. Hole diameter - 9 mm. Both ends of the pipe are immediately chamfered for further welding during assembly.
The next step is to mount the upper chamber. To begin with, prepare two covers, which have the same dimensions, but differ in metal thickness - the lower (pos. 7) - 4 mm, and the upper (pos. 10) - 6 mm. In each of them, a hole of Ø 100 mm is cut out - so, as shown in the drawing. The diameter of these covers, of course, must exactly match the diameter of the thick-walled pipe used, from which a cylinder with a height of 100 mm is cut (pos. 8).
Immediately it is necessary to prepare a jumper (pos. 9), which will serve for a more complete combustion of rising vapors, preventing them from quickly leaving the chimney, thereby creating an additional afterburner.
Assembly begins by welding the upper, thicker cap to the cylinder.
After the airtight seam is made, a jumper is installed with its maximum displacement to the flue hole, and boiled on three sides.
Now you can weld on the bottom cover as well. Its hole should be located strictly diametrically to the top.
Very accurately checking the square, achieving perpendicularity in all planes, install, grab, and then scald the perforated pipe to the bottom cover.
Then you can weld the flue pipe (pos. 11) to the corresponding hole in the top cover.
Welded chimneyFrom the opposite end of the perforated pipe, also, observing perpendicularity, the cover of the lower fuel tank is welded.
This O-ring is then welded to the bottom of the pot.
... and fixing it to the walls of the "pan"In fact, it remains only to weld the legs (pos. 6) and the stove can be considered ready. For greater stability of the stove, you can weld a stand (in the diagram - III), which will add rigidity to the structure.
You can, if desired, after stripping it, cover it with heat-resistant paint and safely operate it.
It can be refilled through the neck of the lower container, but this can be done safely only when the previously filled oil has completely burned out. To avoid such inconveniences during operation, it is recommended to supplement such a potbelly stove during testing with one more "option" - a device for monitoring the oil level in the combustion chamber and safe refueling during operation.
To do this, you will have to make another open container, about the same height as the lower "pan". The shape of this vessel does not really matter. Both of these containers will be located on a common stand of two parallel metal corners.
Both containers are welded to the guides - corners ...In the bottom of both containers, holes of the same diameter are cut, which are connected by a curved tube.
... and connected by a tubeSo, we got two communicating vessels. According to the laws of physics, the liquid level in both is always the same. Thus, the owner of the stove always sees the level of oil production remaining in the combustion chamber, and can replenish the fuel supply without any problems by pouring it into an open container.
True, in order to ensure greater safety, it is better to provide also a protective screen that will cover the open vessel from the direct thermal radiation of the combustion chamber.
Now we can say with complete confidence that we are ready. It remains only to install it in place, connect it to the chimney, refuel and carry out a test ignition.
For ignition, liquid for fireplaces (stoves) is usually used, about 100 ml is poured over the oil into the filler neck. A lit wick is lowered there with a rag or paper soaked in the same liquid. Surface combustion should begin, which in a few minutes will lead to oil boiling, vapor formation and the transition of the entire potbelly stove to its "normal" mode of operation - this is usually accompanied by a characteristic hum.
In the model under consideration, ready-made parts were used - cuttings of thick-walled pipes. If it was not possible to find them, then quite the same stove can be made from steel sheet, with box-type chambers for refueling and afterburning, simply observing certain proportions of their volume in relation to the parallelepiped. The efficiency of the stove will not suffer from this. The thickness of the material used is the same, 4 and 6 mm.
Video: mining stove with box-type chambers
Prices for popular models of welding machines
Welders
And what about those garage owners who already have a conventional solid-fuel stove stove, but are interested in the possibility of using oil processing as fuel? It's okay - and there is an acceptable way out for them. You can make a special "attachment" that will make the stove universal.
Such a "attachment" will be able to turn an ordinary potbelly stove into one that runs on waste oilIn fact, this is the lower tank of the stove for mining, also with a perforated pipe, but only bent at an angle of 90 degrees (by welding a standard bend).
She is in a different angleBut instead of the final afterburner chamber, an ordinary wood stove is used, where this curved pipe is connected using an adaptation device. For example, in an ordinary potbelly stove, you can make the firebox door removable and replaceable. One, the usual one, will be installed using firewood, and the other, having the appropriate pipe insertion hole -at the use of a "prefix" during testing.
In this case, a round plug with a hole for the pipe entry is used as an "adapter". The standard firebox door is simply tilted to the sideAnother option is to weld the pipe from the side, into the wall of the stove - then the stove will generally turn out to be universal. You just have to provide a damper so that when using firewood and the flame does not spread, and the ash from the firebox does not fall into the perforated pipe and the container with oil.
Advantages and disadvantages of bourgeois for working off
So that the operation of a potbelly stove during mining does not deliver any special xlots, it is necessary to know its features, advantages and disadvantages, which must be taken into account when using it.
The advantages include the following qualities:
- The stove is unpretentious, does not require intervention in its work - the main thing is to correctly adjust the air gap on the filler neck (usually it is 10 - 15 mm). It has good heat dissipation, is able to quickly heat an enclosed space.
- With proper operation, such a potbelly stove does not smoke, no burning is emitted from the chimney.
- To a certain extent, the furnace can be considered fire-safe in the sense that the fuel (mining) itself never burns under normal conditions, and only afterburning of the vapors emitted by it occurs in the chamber.
However, there are many disadvantages of such a scheme:
- It has already been mentioned about the noise of the stove. In addition, you cannot get rid of the characteristic odor. However, for garage conditions, this should not matter much. Sometimes craftsmen find another solution to a similar problem. For example, an additional air heat exchanger is installed on the upper chamber, through which air is driven by a fan to heat the adjacent room.
- Both the combustion chamber (perforated pipe) and the chimney quickly become overgrown with deposits of combustion products and require frequent preventive cleaning.
- Burning oil in the lower chamber always leaves a coked layer that is rather difficult to clean.
Video - Stove on working off
During the operation of the stove, a number of mandatory rules should be observed:
- The use of oil processing with combustible impurities, for example, gasoline, is not allowed. The working off must be filtered so that it does not contain solid suspensions.
- Working with water is also dangerous - this can lead to boiling of the liquid and splashing of the oil with possible ignition. The collection of waste for further use in the form of fuel should be carried out in conditions excluding the ingress of water.
- In no case should such a stove be placed in a strong draft - this can cause the flame to throw over to surrounding objects. There should never be any flammable substances or materials around the stove. Reliable thermal insulation of the walls of the room must be provided.
- The room must necessarily have reliable ventilation, since the operation of the stove is associated with the intensive absorption of oxygen from the air and the release of carbon monoxide hazardous to health and life.
- It is strictly forbidden to use any other flammable liquids as fuel - this may result in an explosion in the upper chamber or chimney.
- You should never leave such a potbelly stove unattended. It is strictly forbidden to go to bed in a room with a working stove. Before leaving, you should make sure that the oil is completely burnt out, the process of afterburning its vapors has ended.
- It is forbidden to water the stove with water to cool it, use water to extinguish the fire - this will only aggravate the dangerous situation.
- the stove should not have horizontal sections. An inclined section is allowed to change direction at an angle of 45 degrees. The minimum chimney length should be 4 m, and the recommended length is 5 to 7 m.
- The recommended filling level for the initial filling of the stove is up to ⅔ of the volume of the lower container.
- When using such a potbelly stove in the garage, there must be a powder fire extinguisher or a box of sand nearby.
So, probably everyone who has stable skills and locksmith work can make a potbelly stove in a garage. It is enough to show imagination or use the drawings of ready-made developments - and everything should work out. The main thing, both in the manufacture and in the operation of such stoves, is the constant observance of elementary safety measures so that the heating device does not become the cause of great trouble.
A compact stove for heating a small room, in the common people simply called a potbelly stove, will soon celebrate its 100th anniversary. Having appeared in the 1920s, such metal stoves with a chimney became simply irreplaceable during the Great Patriotic War. The stove-stove does not give up its positions to this day, remaining a necessary attribute of a garage, greenhouse or country house. Such a stove is needed wherever people need to warm up and cook food, despite the lack of central heating.
Potbelly stove has its advantages and disadvantages. The undoubted advantages of such a heater include:
- energy independence and autonomy;
- cheap fuel in the form of coal, firewood, sawdust, wood chips, peat, waste industrial oil, diesel fuel, paint waste, etc .;
- quick warm-up;
- small size;
- installation without foundation;
- no capital needed;
- ease of use;
- low financial costs in the case of making a stove with your own hands.
However, the stove-stove also has disadvantages:
- good ventilation in the room is required;
- high fuel consumption;
- the need for constant monitoring of the fuel level;
- rapid cooling (however, we can fix this drawback - to increase the efficiency, the stove can be overlaid with a brick).
Note: If you feel the need for such a device, then you have two options - to buy an industrial-made metal stove or to make it yourself.
First, let's talk about purchased stove-stoves, the cost of which starts from about 4,000 rubles (for example, the Ugolek stove) and rises to 40,000 rubles and above (this cost is typical for stove-stoves with beautiful names "Bavaria", "Baron" and NS.).
With heat exchanger 
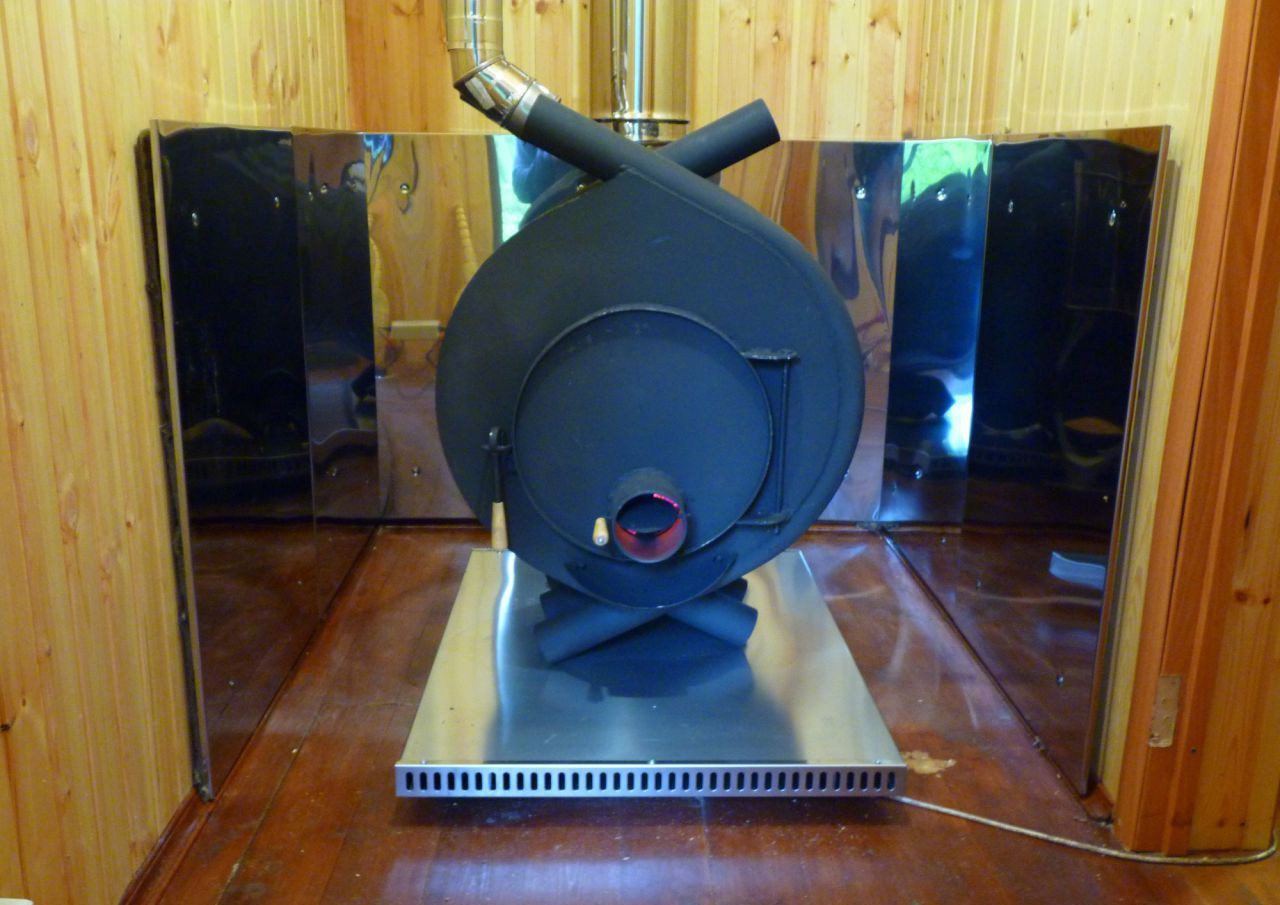
In the middle of this price range there are, for example, stove stoves with a water heating circuit and a heat exchanger, an army cast-iron stove, and a long-burning stove of the Klondike type.
Materials for stoves and fireplaces-stoves, made in workshops, usually become stainless steel and cast iron. The standard drawing assumes the presence of a bunker with a firebox door, an ash pan, a chimney pipe. However, it happens that a stove stove is equipped with a hob, burners and even an oven. At the enterprises, they also make heaters-heaters, as well as stove-stoves, in which a ceramic or steel casing is installed to increase the efficiency, which significantly increases heat transfer. If you wish, you can buy a stove-stove or just a stove with a gas generator for your home.
Homemade potbelly stove
Making a potbelly stove with your own hands is not difficult even without a drawing. The materials at hand are suitable for work, be it a gas cylinder, a milk can, a barrel, a piece of pipe or sheet metal lying around in the garage. Having decided what can be used, choose a drawing of a rectangular or circular section of the combustion chamber for the stove with your own hands.
For example, you need to make the heating in a country house yourself and you have an unused milk can (for arranging the stove itself), a bent piece of pipe (to create a chimney) and a piece of metal fittings with a diameter of at least 6 mm (for a grate). To make a stove out of all this, it is enough to be friends with the tools, and also apply a little ingenuity.

The can is installed on its side - this is the basis of our handmade potbelly stove, its combustion chamber. A rectangular blower is cut out under the neck, the edges are processed with a file. The blower can be left in this form, or a damper can be attached to it, having received a stove with an adjustable draft at the output.
In the upper part of the bottom of the can, you need to make the markings for the chimney yourself (it should be 2-3 mm less than the diameter of the pipe). We cut out a hole and tightly drive a piece of pipe adapted for a chimney into it. Half of the work is done.
Next, we are engaged in the insides of the stove-stove. With our own hands we make a grate in the form of a "snake" from a metal rod. We insert the rod into the neck of the can and place it so that the grate stands horizontally in the future combustion chamber. That's all! If you wish, you can put the resulting stove on an iron pallet and a brick rack. This will help to avoid heating the floor and will also minimize the likelihood of fire.
Note that a similar algorithm of actions can also be applied if you want you to have a potbelly stove from a barrel. Such stoves cannot boast of long burning, but they cope well with the function of quickly heating the room.
The second life of a gas cylinder
A good idea for a small stove is to recycle containers that can withstand high heat. We have already talked about barrels, but how do you, for example, a potbelly stove from a gas cylinder or even two? These containers are good because they allow you to make a stove yourself for a country house or garage, both vertically and horizontally.
To create such a stove-stove, you will need the following tools:
- welding machine;
- grinding machine with wheels;
- drill with drills;
- brush with metal bristles;
- tape measure and construction pencil for marking;
- hammer, chisel, pliers.
Materials for making do-it-yourself stoves are needed as follows:
- 1 or 2 gas cylinders;
- Metal sheet for ash pan and hob (thickness must be at least 3 mm);
- cast-iron doors (old ones are suitable, for example, from a wood-burning stove, or made by hand from sheet metal);
- chimney pipe;
- thick metal fittings for making legs and grate.
Before starting work in a gas cylinder, open the valve and leave it in this state for at least 12 hours to ventilate the container. Another way to clean the bottle is to fill it to the top with water and then empty it completely.

For a vertical stove-stove, the gas cylinder is placed in a standard position for it, the neck is released and the markings are made for the future firebox and blower. The marked pieces are cut out with a grinder. The grate is made separately - for this, the fittings cut to the required dimensions are welded in the places marked on the bottom of the cylinder.
Hinges are welded to the cylinder, on which the doors are hung. Further, the latches are equipped, which are designed to secure and increase the efficiency of the stove. A pipe is welded to the top or side of the cylinder to remove the smoke.
For a horizontal stove-stove, the cylinder is installed on the "legs" sideways. A square hole for the door and a round hole for the chimney pipe are cut in it. Instead of a grate, a number of holes are drilled at the bottom, and a rectangular container for collecting ash is welded below the cylinder. The stove is almost ready, it remains to hang the door with your own hands and install the chimney.
If desired, the complete set of vertical and horizontal stoves from gas cylinders can be expanded with a hob made of a sheet of metal attached from above.
Free fuel
Note: If you want to minimize the cost of fuel for the stove-stove, consider making a homemade structure for heating with car oil drained from the car.
The potbelly stove for mining is especially good for garage owners. The design drawing includes two tanks connected by a pipe, as well as a chimney.
To create a working stove, you will need the following materials:
- Metal 4 mm thick for a potbelly stove.
- 6mm metal for the top tank lid.
- Metal rods for stove legs (3-4 pieces of suitable thickness).
- A pipe made of heat-resistant material for connecting tanks (diameter not less than 100 mm, length about 400 mm).
- Chimney pipe (length at least 4 m).
Work on the formation of a potbelly stove during mining is carried out in the following order:
- Legs are welded to the lower tank.
- A lid with holes for oil and air is welded onto this tank from above.
- At least 50 holes with a diameter of 9 mm are made on the connecting tube.
- Weld the tube to the bottom tank lid.
- A second tank with a filler neck and a chimney pipe is welded on top.
It is easy to use such a stove-stove. Oil is poured into the cold apparatus through the filler neck almost to the top, just a few centimeters short of the reservoir lid. Firing material in the form of rags or newsprint is also laid there. It remains to ignite, and soon you will enjoy the warmth.
As a rule, such stoves "consume" from 700 to 2000 ml of waste oil per hour. Potbelly stoves on working off allow you to boil water and cook simple food. However, their operation presupposes the obligatory presence of good ventilation in the room for the removal of carbon monoxide, as well as adherence to fire safety rules (you cannot place combustible materials near the stove, use flammable materials such as gasoline, acetone, etc.). The waste reservoir must be protected from water ingress. Refueling with oil is carried out only after the stove has completely cooled down.
Sheet metal
How to make a potbelly stove from metal? You can implement this project yourself if you have experience in welding, as well as the necessary tools. From the materials you will need the following:
- sheet metal (its quantity determines the size of the stove);
- steel corners 5 mm thick;
- metal tube about 30 cm long;
- pipe with a diameter of 180 mm.
To obtain a stove-stove, you need to weld a rectangle of metal sheets joined end-to-end (so far without a lid). On one side, place the blower and the furnace door. The internal space of the stove is divided into smoke circulation, firebox and ash pan.

In the last two compartments, a grate is installed, which will hold solid fuel. To do this, steel corners are welded inside the stove on the sides at a height of up to 15 cm. A pre-welded grid is laid on them (it can be made from steel strips welded to thick metal rods at a distance of about 5 cm). It is better to make the grate removable so that later, when it burns out, it would be possible to replace it without any problems. In addition, the removable structure of the grill makes it easier to clean the heating appliance.
Let's go back to the construction of the stove. For the sake of increasing the efficiency of the stove, you can make mounts for a removable reflector (a metal sheet with a thickness of at least 12 mm), which will separate the firebox and smoke circulation. For this, two metal rods are welded on top. After installing the reflector, you should get a smoke channel.
Having equipped the insides of the potbelly stove, you can weld on the upper metal sheet, which will become the cover of the structure. In advance, a hole is made in it to fix the chimney. Further, jumpers are equipped in the stove, delimiting the doors, made for the ash pan, reflector and grate. As a rule, a small door is equipped under the ash pan, but two steel ones are made in the full width of the stove, so that it is convenient to get the reflector and the grate.
The next stage is welding to the structure of latches and legs (metal pipes with a diameter of up to 3 cm and a length of 10 cm are suitable for them), as well as chimney pipes from a curved pipe with a diameter of about 18 cm (note that the chimney is placed on a 20-cm sleeve ). The sheet metal potbelly stove is ready.
Warm brick
A potbelly stove fired with wood, coal and other types of fuel can significantly increase its efficiency. To do this, it is enough to erect a screen of fired clay bricks around it with your own hands. If you look closely at the drawings of such a mini-building, you can see that the bricks are laid at a short distance from the walls of the stove (about 10-15 cm), and, if desired, around the chimney.
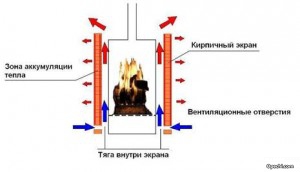
Bricks require a foundation. Do you want the masonry to last a long time? Then fill the base at a time to form a monolith. It is better to take concrete as the material for the foundation, which should be reinforced with steel reinforcement with your own hands. It is advisable to make a layer of reinforcement approximately 5 cm from the surface of the concrete pad.
At the bottom and top of the brickwork, holes are made for ventilation, which will ensure the movement of air (heated masses will go up, and cold air flows from below). Ventilation also prolongs the life of the metal walls of the stove, postponing the moment of their burning due to cooling by circulating air.
The bricks laid out around the stove accumulate heat, and then give it away for a long time, warming the air in the room even after the stove has gone out. In addition, brickwork additionally protects the objects surrounding the stove from fire.
If desired, the stove can be completely laid out of bricks. Such a structure is beneficial in that it will last for many years without additional efforts on the part of the owner. However, there are also certain disadvantages. The disadvantages of this option include the following:
- the process of laying out such a stove is quite laborious and is suitable only for those people who have experience in masonry with their own hands;
- a brick stove is quite expensive, since it requires the use of refractory materials, including special clay for mortar.
In order to get a small potbelly stove on wood, it is enough to lay out a cone measuring 2 by 2.5 bricks, 9 bricks high. In the combustion chamber 2-4 rows are laid out of fireclay bricks. Ordinary fired clay brick is suitable for a chimney, into which you must remember to insert a stainless steel sleeve.
Whatever the method of making a miniature stove or a stove-stove with your own hands, you make them according to a drawing or by eye, the main thing is that at the output you get an effective heating device, and in the extended configuration there is also a hob for cooking. Look around in search of suitable materials (barrels, sheet metal, etc.) and forward to your own homemade stove or even a stove-stove!
An excellent budget option for a heating and cooking stove is a potbelly stove. It is incredibly convenient and easy to design and operate. It is good to have such a device in the country, in the workshop, and in many other places. A water stove can heat several rooms. There are many different models on sale today, from unassuming functional to sophisticated retro. But their price cannot be called low. Therefore, craftsmen who have some experience, have tools and a suitable metal, you can try to make an effective potbelly stove with your own hands.
 We cut out from the balloon
 The simplest version of a potbelly stove can be made from scrap materials. A thick-walled barrel, an old industrial can or a gas cylinder (of course, empty) is suitable for this.
Resourceful folk craftsmen use pipes of a suitable diameter, disks from overall wheels and sheets of metal.
When choosing a starting tool for work, it should be borne in mind that too thin metal is deformed with strong heating, and the product from it will lose its shape. The optimum material thickness is 3-4 mm.
For convenient and efficient work on making even a small potbelly stove with your own hands, you will need the following:
Events with balloon # 1
Several rows of holes are drilled in the bottom of the potential firebox (the sidewall of the cylinder), which will play the role of a kind of grate. An ash pan is located along it - in our case, a box made of thick metal. It should be equipped with a sealed door that prevents ash and hot coals from getting out.
On the sides of the ash pan, the legs of the structure should be welded. A round hole is made on top of the lying balloon.
The vertical part of the potbelly stove will stand on it. It is convenient to make the door from the head of the second cylinder; a branch pipe with a valve is not welded in - to regulate the intensity of combustion. If the door hinges are placed at the top, then the cover, under its weight, will fit snugly against the firebox opening, which will reduce air suction to a minimum.
Events with balloon # 2
A special screen, panels of which are installed on the rear and side surfaces, will not only increase the operational safety of the system, but also, due to the formation of an additional convection flow, will significantly increase its performance.

