How to lay paving slabs step by step, photo and video. The technology of laying paving slabs in the courtyard of a private house The procedure for laying paving slabs with your own hands
Paving slabs are ideal for finishing garden paths, areas near the house, garage or recreation area. The cost of laying paving slabs is quite high, by doing this process with your own hands, you will be able to save a lot. We will talk further about how to lay paving slabs with our own hands.
Manufacturing technology of material and photo of laid paving slabs
For the manufacture of paving slabs, concrete is most often used. The composition of the mixture for the production of tiles contains cement, water, plasticizers and other fillers. There are certain requirements for the manufacture of tiles, due to GOST.
In order for the tile to ultimately turn out to be of high quality and serve its owners for many years, it is necessary to strictly observe the technological process of its manufacture and the dosage of materials. In some expensive tile options, there is also clay, granite chips or polymer sand.

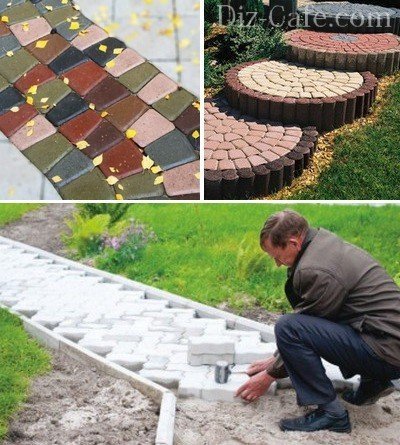
The shape of the tile depends on the preferences of the customer, it can be rectangular, triangular, square, rhomboid, hexagonal, etc. The color of the tile is determined by the coloring pigment included in its composition. Most often, tiles are produced in sand, olive, brown or beige.
How to lay paving slabs: the advantages and disadvantages of the material
Paving slabs are a fairly popular material for sidewalk finishing. The scope of its use is quite diverse. With its help, they decorate not only alleys, parks and squares, but also private houses and cottages. This material is distinguished not only by its attractive appearance, but also by good performance characteristics.
Among the advantages of using paving slabs, we note:
- frost resistance - the excellent quality of this material, which ensures its long-term operation;
- environmental safety - in the production of tiles, substances that are harmless to the human body are used, which do not emit toxic substances during heating;
- durability of operation is another important advantage that ensures the popularity of this material in the finishing process, the technology of manufacturing tiles involves the use of special pressing, which makes the tile highly durable and resistant to mechanical damage;
- the tile does not need additional care, it is easy to clean and clean with water;
- resistance to moisture and other environmental irritants provide the ability to lay tiles on the street;
- aesthetic appeal is another important advantage of this material; tiles of different sizes, colors, textures are distinguished, while it is used for both domestic and industrial purposes;
- affordable cost is ensured by the cheapness of the materials that make up the tiles.

However, this material has the following disadvantages:
- the presence of seams between the tiles leads to the accumulation of dirt in them, which worsens the appearance of the coating;
- ice that accumulates on the tiles in winter makes them slippery;
- if you do not follow the technology of laying the material, the tiles sink in certain places, you have to dismantle it and lay it again;
- if a tile with high porosity is selected, then moisture accumulates in it, which further destroys the material in severe frosts.
The main varieties of paving slabs
Before you lay the paving slabs yourself step by step, we recommend that you familiarize yourself with the varieties of this material, since the laying technology for each type of tile is individual.
First of all, paving slabs are solid and pressed. The scope of use of each of these tile options is diverse. Cast tiles are used in the process of arranging the territory in front of private houses, and pressed tiles are used in the decoration of city parks, squares, paths, etc.

In the technological process of making tiles, the processing of a dry composition with a vibropress or vibratory casting is used. We suggest that you familiarize yourself with these processes in more detail:
- Vibration casting involves placing a concrete composition in a special form, installing them on a coating that is constantly amenable to vibration. After tamping the composition into a mold, it is removed from the surface and installed in the oven for twelve hours, holding there at a temperature of 385 degrees. To improve the quality of the tiles, various plasticizers are added to the concrete composition.
- The second method of processing the material involves vibrocompression. The concrete composition is placed in molds, which are installed on a constantly vibrating table. Initially, the die is influenced by the press, then it is compacted under the influence of vibration. After giving the composition the required shape, the matrix rises, and the tile remains on the table.
For further use of the tile, it is necessary to wait until it has completely solidified. The molding method of making tiles is cheaper and easier; it does not need additional equipment and technological processes. Therefore, cast products are distinguished by a variety of colors, shapes and colors.
Please note that overly saturated tiles involve the use of a large amount of dyes in the production process. This factor negatively affects the performance of the material.

Vibro-pressed tiles are more expensive, as their production requires specialized equipment. This version of the tile is more frost resistance, moisture resistance, there are practically no pores on it, however, such a tile does not differ in a variety of colors and shapes.
How to properly lay paving slabs - general information
The method of laying paving slabs depends on its purpose:
- functional - laying material on office roads, footpaths, in front of private houses in places with increased operational load;
- decorative - making beautiful patterns from tiles, original designs, etc.
In relation to the base on which the tiles are laid, it should be noted:
- sandy base - needs careful compaction, is used on pedestrian paths, is not suitable for vehicles to move along it;
- the use of a dry - cement-sand mixture, as it hardens, it contributes to the formation of a solid foundation, is suitable for finishing parking lots;
- the use of cement-based adhesive mortar - this method of installing paving slabs is the most expensive, but also the most reliable, initially the base is poured with concrete, then the tiles are laid on a special glue.
How to properly lay paving slabs on the sand
Most often, the shape of the paving slabs is rectangular. There are many schemes according to which the tiles are laid - the most popular of them are: herringbone, brick or stacking in the form of columns. Paving slabs have gained popularity due to the ease of installation. Correctly laid tiles will serve their owners for more than a dozen years.

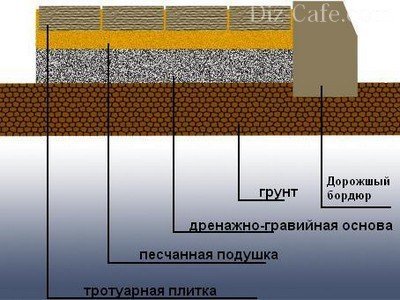
The type of base on which the tiles are laid is determined by its thickness and purpose. In any case, it is initially necessary to remove 15 cm of soil into the base, level it and equip a slope for water drainage.
This is followed by the process of tamping the site with sand. For this, the sand, as it falls asleep, is moistened and well rammed. Pay special attention to the thickness of the material, if the tile is intended only for the movement of pedestrians, then a thickness of 2 cm is sufficient, otherwise, this value increases to 4-6 cm.
Before laying paving slabs on the sand, prepare materials in the form of:
- sand, the amount of which depends on the total area of installation;
- paving slabs;
- curb elements;
- cement;
- hammer and rubber;
- steel peg
- shovels;
- level;
- grinders.
After the formation of the slope of the area of the site on which the tiles are laid, the area should be divided into strips. However, the stripe must equal the width of the rule. Use pegs and string to divide the area. Next, the site is leveled using sand.

After that, the process of direct laying of the tiles follows. In order to prepare a sand-cement mixture, sand and cement should be combined in a ratio of six to one. Please note that the sand must be moist. It is recommended to carry out work in the autumn-spring period. The prepared composition is evenly distributed over one strip, carefully compacted. Further, under the thread that delimits the site into zones, a steel pipe is installed. After careful leveling of the site with a sand-cement composition, the tiles are laid. Install the first tile starting from the corner, carefully align it in relation to the markings. Tap it with a rubber mallet. Lay the second tile in the same way. Start working on your own, thus, when laying the tiles, you will move along it.
If there are any obstacles on the site, it is bypassed with whole tiles, and then adjusted at the end of the work. After completing the work, the tiles are swept away from the sand. To fill the gaps between the tiles, the same mortar of sand and cement is used in a six to one ratio. All gaps must be carefully filled.

It is easiest to lay square paving slabs. Use a grinder and diamond disc to trim and fit tiles. Install borders around the edges of the tile. A thick concrete solution is used to fix them. In the presence of areas that are subject to special stress, for example, near a gate, it is preferable to lay the tiles on a concrete base.
How to install paving slabs on a concrete base
Sometimes there are situations when you have to lay paving slabs on a pre-poured concrete base. This method of stacking provides greater strength of the material. Vehicles and heavy equipment can ride on the tiles laid on the concrete base.
Initially, the site is marked for laying. Next, you should initially install the curbs, having previously calculated their location. If the height of the curb is about 50 cm, then it is placed in a 25 cm trench, while 10 cm of the trench should be covered with gravel, 15 mm of the trench is filled with concrete mortar, then the curb is mounted in such a way as to facilitate the removal of moisture from the tile.

If the base will be subjected to a high operational load, then it is recommended to reinforce it before pouring the concrete layer. Laying concrete paving slabs should be in compliance with all technological nuances. For surface reinforcement, a mesh is used, the thickness of the cells of which is 15 cm.
For additional drainage of moisture from the tiles, it is recommended to equip special drainage holes. For these purposes, an asbestos pipe cut into sections with a height of about 150 mm is suitable. One piece of asbestos pipe is installed per square meter.
This is followed by the process of preparing a concrete solution, which covers an area of 15 cm, if there is no reinforcement on it and 20 cm, if there is reinforcement. When pouring a large area, after three meters, it is necessary to leave gaps for the expansion joint. For this, boards are installed, then after the concrete has set, they are removed.
24 hours after pouring, the wooden formwork is removed and the drainage holes are filled with rubble. In order for the tile to adhere well to the surface, it is laid on a mixture of sand and cement.

To mix them together, use a concrete mixer. The thickness of the sand layer is about 10 cm. A vibrating plate or treadmill is used to tamp the composition. Watch for a slope on the surface to ensure water drainage. A rubber mallet is also used to fix the tiles. Work should start from the curb, gradually moving to the top point of the site. Using a level, the surface is checked for evenness, if necessary, the tiles are adjusted using a rubber hammer. The same mortar of sand and cement is used to fill the joints between the tiles. Through these seams, moisture will get to the drainage holes and will accumulate in the tile.
How to lay paving slabs video:
Paving slabs in the country or in the courtyard of a country house are capable of performing not only a decorative function, but also a utilitarian one. In order for it to look beautiful and to withstand the load falling on it without any problems, it must be correctly laid.
Many homeowners prefer to have a hired specialist handle the process, believing that they will do the best job possible. But some do not trust hired workers, and prefers to do all the important manipulations on their own.
How much is it possible to do the laying of paving slabs with your own hands? It is quite possible to do this, the main thing is to have step-by-step instructions at hand. It describes in detail the sequence of all upcoming operations and the order of their implementation.
Laying the yard with paving slabs: preparation
Before starting work, you need to think over them carefully and draw up a plan. This will be a guarantee of a long and reliable service of the manufactured coating. Laying out the entire yard with tiles is not very rational and cost-effective. 
But the paths are necessary on any site - it can be quite difficult to do without them. Therefore, it is necessary to calculate the required number of paths, their size and configuration, so that they connect the residential building with various outbuildings and other buildings.
Then, in any weather, the homeowner and his household will move along neat clean paths. And green spaces will suffer much less.
Why paving slabs? This material is increasingly being used, both in industrial construction and in private construction.
The advantages of such a road surface are obvious. Installation work is not particularly difficult. The tile does not "float" during the heat and does not burst from severe frost.
She looks beautiful and is not capricious in leaving. The tiled area is moisture-permeable, which is useful for both the soil and plants.
Step-by-step instructions for laying tiles
Important notes to help you lay the tiles correctly

You should not start working immediately after rain, especially during it. The soil and pillow should be well dried. In order for the tile not to begin to creep after a while, the humidity indicators should be minimal.
Laying paving slabs: work progress
To carry out the work, you will need - cement, curb, sand and tiles directly. Required tools are pegs, usually a rammer, broom, nylon thread, rubber mallet, trowel and a level.
We start by marking the site, or rather, by defining the contour of the future path. 
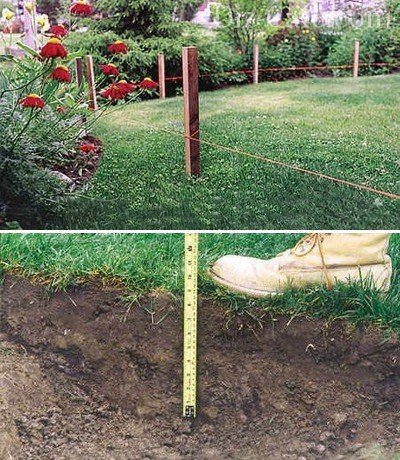
The site is marked with wooden pegs, which are connected with a nylon cord. It must be correctly tensioned exactly in level, as it will become a reference point when laying tiles.
To properly equip the base, you will have to cut and remove the sod layer, then level the resulting surface, moisten and tamp with a special rammer.
- If the soil is dense enough, then often it does not need such manipulations. Plant roots and stones trapped in the ground must be removed.
- If the soil is not removed, then the path will be, as it were, slightly raised above the surface of the site. The consequence of this may be its undermining by rain or melt water.
- The resulting compacted bed is covered with gravel or crushed stone 15-20 cm high.
- If the path is intended for the movement of cars, then this indicator should be increased to 40 cm. (Geotextiles can be laid under and on the gravel).
- For leveling, sand is poured on top - its thickness should be about 2 cm.
Curb for paving slabs
What is the curb for? Its purpose is to prevent the tiles from spreading and highlight the path. Is it obligatory to use it?
No, often, when laying out the path with tiles, they do without additional finishing. The base under the curb must be carefully leveled. It is best to place it on a special concrete lock. For paving slabs on a private plot, it is quite possible to use a plastic curb.
Preparation of the base: options for laying paving slabs
The bases for paving slabs can be different - there are only three types of them. Depending on the type of base chosen, the method of laying the tiles also changes.
On the sand. The space between the stretched cords or curbs is covered with sand. The thickness of such a pillow should be 5-6 cm. The sand is well soaked and left to dry, after which it is leveled and tamped. The tiles are placed on slightly damp sand (never wet).
On concrete. There can be two options: when a concrete base is already available, and its device specifically as a substrate for tiles. This method is considered not too rational. 
The point is that the cement monolith retains water (does not let it through). It accumulates between the tile and the base - in severe frost it freezes, causing deformation of the track.
On a cement-sand cushion. On the prepared base (with removed soil, leveled and tamped), another sand layer of 3-4 cm is poured, a reinforcing mesh is placed on it. Next, a mixture of cement and sand is placed on it in a ratio of four to one.
Paving slab laying technology
The tile should be placed from the lowest point in the upward direction. Competent laying should be carried out in a way "from oneself".
In other words, while doing the work, the specialist moves along the already laid path so as not to endanger the prepared base from being damaged. If you use the circular method of installing tiles, then the activities begin in the center of the picture.
The individual tiles should be placed diagonally, not in even stripes. This will make it easier to align them along the way. First, a rope is pulled along the width of the future path, along which the initial row of material will be aligned. Every two to three times the correctness of the horizontal line is verified by the level. 
The tiled element is placed in the place prepared for it and brought to the correct position by gentle tapping of a hammer.
If necessary, sand can be added under it. A 2-3 mm gap left between the tiles is usually sufficient for moisture to escape. In order for the gap to have the same value over the entire distance, special crosses can be used. But in practice, they usually do without them.
Turnkey tile laying: grouting
In order for a self-made track to be beautiful and durable, you will have to take care of the correct processing of the seams. They are usually filled in two passes.
First, dry sifted sand is applied to a freshly made path. With the help of a brush or broom, it is leveled over the surface and swept into the seams.
The next layer that should be poured onto the track is a sand-cement mixture or sand. They do the same with him as with the first.
Then, with a sprayer or with the help of other available means, the path is moistened quite intensively - until puddles appear. If there is a curb, then the distance between it and the tile is filled with a mixture too. Factory-made joint mix is available.
In order for a paving slab track to serve for a long time, you need to know how to properly care for it. Such a coating does not need any special procedures: it should be swept regularly and washed occasionally.
Then she will retain her original appearance and remain elegant for as long as possible. In winter, you should protect it from damage by not using rough metal products - shovels, ice axes and crowbars.
When ennobling the adjoining territory, many owners often wonder how to cover the paths, the front and back yard, the recreation area ... The sidewalk slab is perfect for these purposes. The functional coverage in landscaping is unmatched. The price of the material is far from fabulous, and laying paving slabs with your own hands is quite simple to perform. So the design of paths and areas on the site will not be too expensive, and at the same time it will be a worthy frame for the garden and decoration of the local area.
Variety of colors, shapes and textures
This allows you to create a harmonious ensemble, combining all the elements of the site into a complete picture, and to embody any design and architectural ideas.
Due to its aesthetic appeal and excellent performance characteristics, paving slabs are indispensable in landscape design.
Environmental friendliness and comfort
Paving slabs do not emit harmful volatile substances when heated and do not soften under the scorching sunlight. Sand-filled inter-tile joints allow excess moisture to seep out after rain, preventing the formation of puddles.

The tiled path does not violate the natural need of plants on the site for water and gas exchange
Ease of maintenance and durability
Paving slabs are an ideal coating in frosty winters, they have high strength and low abrasion.

With high-quality installation, the tiles can last more than 15 years.
Both the technology of laying paving slabs and their subsequent care are quite simple. In case of damage to the coating, it is always possible to restore the site by picking up and replacing just a few tiles.
In order for the paved paths and platforms on the site to become not only an original addition to landscape design, but also to serve regularly for many years, it is important to take into account a number of basic points during the work, how to properly lay paving slabs. For example, depending on the location and purpose of the coating, paving slabs can be laid both on mortar and on sand or crushed stone.
For arranging garden paths and recreation areas, it is enough to use a sand-crushed stone "pillow"
Tiling work step by step
At the stage of preparation for laying paving slabs, it is extremely important to correctly select products and the necessary tools from a wide range of goods that will be simple and convenient to work with. When choosing a tile, it is necessary to focus not only on taste preferences, but also take into account the operational characteristics of the material. So, when equipping a recreation area or a covered carport, you should ask the manufacturer: is the tile capable of withstanding heavy structures or is it designed only for human weight.
Attention is drawn to the roughness of the surface, the shape of the product: are there any rebounds, will it be necessary to trim it
To carry out the work, you will need tools:
- Master OK;
- wooden or rubber mallet;
- manual ramming;
- metal or wooden pegs;
- cord-ordering;
- building level;
- I-beam or pipe of any diameter;
- watering can or garden hose with a spray;
- rake and broom;
- cement M500 and sand.
To determine the number of tiles and raw materials for the base, it is necessary to think over the layout of the site, taking into account the location and size of its paths and sites.
One of the basic rules for laying paving slabs is the need to arrange paths at a slight incline at the rate of 5 mm per meter so that water flows freely from them into wells or lawns.
Arrangement of the base
The success of the entire construction directly depends on the reliability of the base surface. When arranging the base along the edges of the location of the future track, stakes with notches at a height of 5-7 cm are hammered, at the level of which the cord is pulled. A layer of sod, stones and debris is removed from the construction site.
In order to lay any paving slabs with your own hands, the first step is to carefully prepare the base
To level the surface of the delineated area in elevated places, an excess layer of soil is removed, and on the contrary, it is poured on depressions, pits and hollows. The rake-leveled base is carefully tamped. When working with soft soil, it is advisable to moisten the leveled soil surface with water before compacting. Careful compaction of the base will prevent uneven subsidence of the sidewalk.
The depth of the base is calculated with a margin of a couple of centimeters, taking into account the fact that shrinkage always occurs during compaction. On average, for laying a layer of sand and the tile itself, it takes from 20 to 30 cm.

After excavating the soil, the face of the tile should reach the desired level
The entire surface of the future track is given a transverse, longitudinal or longitudinal-transverse slope. At this stage of the arrangement of sites and paths, work is also carried out on the laying of communications. Laying geotextiles before sanding will prevent weeds from growing between the tiles.
Creating a "pillow" of sand or rubble
Sand can be laid on the prepared base layer of soil, which will not only increase the stability of the sidewalk, but will also act as a drainage system. The dumped sand must be leveled with a rake and watered with water until puddles form on its surface. Already after 3-4 hours in sunny weather, the "pillow" can be given a smooth, even shape using a profile, which can also be a regular pipe or beam.

To level the surface of the sand layer, you can use inch PVC pipes.
The pipes are placed like rails at a distance of 2-3 meters from each other. The gaps between them are filled with sand to the same height, providing a flat surface throughout the site.
To give greater strength to the coating, paving slabs can also be laid both on a crushed stone base and on a mortar. To do this, it is necessary to prepare a dry sand-cement mixture in a ratio of 3: 1. The mixture is laid out in an even layer on the base, the screed is performed with a channel. When working with "difficult" soils, it is advisable to use a combined laying, consisting of a layer of cement-sand mixture and concrete.
Installation of paving stones
Before laying the paving stones, it is necessary to pull the ordering cord along the chamfer. It is better to start laying paving slabs with your own hands from the curb. The first row is laid out strictly along the cord. The tiles are laid out in the direction "away from you".

Place the "bricks" in such a way that they fit snugly together
This will avoid increasing the width of the seams. The use of crosses will make it possible to set equal intervals of 1-2 mm between the tiles. If the tile does not lie flat, you can use a trowel to remove or add a layer of sand under it and then tamp it again.
It is necessary to level the paving slabs using a building level and a mallet. Upon completion of the laying of the tiles, the seams are covered with a layer of cement-sand mixture and poured with water.

To give the track a neat and attractive appearance, the tile joints can be "rubbed" with quartz sand
If the tile does not fit well with other buildings or elements of landscape design, you can trim its edges with a grinder.
Upon completion of the work, garbage and sand remains are swept away from the finished track. Installing the curb on the M100 liquid solution will prevent the tiles from loosening and "creeping" of the track.
Video master classes with examples of styling
In the future, it is enough just to renew the sand washed out by water in the seams of the paving stones. The path, decorated with paving slabs, will be an excellent decoration of the site.
If earlier all the paths were poured with concrete solution or asphalt was rolled on them, now paving slabs are becoming more and more popular. It is very affordable, you can find any options among different textures and colors. Most often, we trust professionals. This is not a complicated process and even beginners can handle the job with step-by-step instructions for laying paving slabs.
 In this article, we will consider three methods of laying (on concrete, a cushion of sand and a mixture of concrete and sand), as well as give some tips on how to choose and which paving slabs to buy for your site.
The choice of tiles is huge, there are cheaper and more expensive options. The first will serve you for many years, but the second is not so interesting in terms of variety, and it serves much less years.
For production, use natural hard or artificial stone, ceramic materials or soft rocks (flagstone, sandstone), colored concrete or polymers of sand mortars.
Good tiles are made by vibration pressing. It becomes more durable and withstands frost well, but it loses its color and becomes not very bright.
Stamped tiles are of poor quality, most often they are made at home.
For home use, take tiles at least 4 cm thick. If a car parking is supposed to be on the site, then we take from 6 cm.If you suddenly decide to lay out a road with tiles near your house, then consider tiles from 8 cm.
Preparatory work
We prepare the necessary materials to start laying paving slabs with our own hands.
We need :

We notice our future paths on the site plan. Be sure to take into account the location, relative to buildings, flower beds and other structures, as well as the direction, drains and possible slopes. If we cover a place for a car, we provide a width so that a person can safely walk alongside.
Using a tape measure, pegs and a cord, mark out according to the plan. Do not forget to leave 10 cm on each side for the borders.
We start work on the ground
If you plan to start land for flower beds and beds, then just level the surface under the paths.
 But if you are satisfied with the existing soil, then be sure to remove 30-35 cm of land for all markings. We fill the bottom with sand and tamp it well. In order to efficiently drain water, as well as protect against the growth of weeds, we lay geotextiles on top. Lay out taking into account the fact that the next layer would go 15-20 cm over the previous one. Tuck around the edges, about 20 cm.
Depending on the type of soil, we choose one or another method of laying. For example, for moving soil, it is best to use a concrete base, and denser layers allow for a sand-cement option.
Drainage
 On top of the geotextile, we pour crushed stone at a level of 15-18 cm. Thawed and surface water will flow here, and water will not accumulate on the path, which will protect it from freezing in the cold season.
We compact everything well and sprinkle with sand. We cover another layer of textiles that will allow water to pass through, but will not let it seep back.
If you are using a concrete base, then we provide slopes for effective drainage of water (1 cm per meter). Provide gaps between the tile and the curb.
 Various materials are suitable for borders, ranging from slate to stones. Traditionally, most people choose a ready-made concrete curb.
However, plastic options can now be found on the market. They are cheaper, easy to install, and will last a long period of time.
We carry out the installation immediately after laying the drainage layer.
Additional tile processing and installation options
 Under such a solution, it looks more attractive, and also salt deposits and molds do not appear.
Set aside the tiles with defects, dip the rest in a hybrid liquid, dry and repeat the procedure.
Remember that larger tiles weigh more, so this is immediately reflected on the surface, the surface must constantly be adjusted to the overall level.
It also causes inconvenience when moving.
Laying options for paving slabs
As we mentioned, there are three tile bases.

Think over communications in advance, otherwise you will have to dismantle and lay everything from scratch. You can lay gaskets; for this, a pipe with a diameter of 5 cm is mounted in the structure.
So, let's consider all three options in more detail.
Laying paving slabs on a concrete base
We start with reinforcement with a 10 × 10 cm metal mesh. You can also use the remains of pipes, wire, fittings and other unnecessary materials.
 Just remember to wire them together. The mesh must be raised by 3-5 cm, for this you can build metal coasters or put stones.
We prepare the solution: we mix cement 400 with sand and crushed stone in proportions of 1: 3: 5.
The filling must be carried out at a time, if a large amount of work is planned, then the easiest way is to order a ready-made solution in place. The cost will not increase much, and the process itself will be faster.
After 3-5 days, you can start laying the tiles.
The process itself is very similar to working with tiles.

Remember that during the rain or after it, it is not necessary to carry out the installation.
Laying tiles on a sand-cement base

Features of laying paving slabs on sand
We make the base three-layer.

The main subtleties of laying paving slabs
As we mentioned, each base has its own technology for laying paving slabs. We will now talk about the features.
 When using a concrete base, each tile is placed on a mortar, cement should fill as much as possible all joints, the thickness of which is not more than 0.3 cm.
In this case, the installer spreads the mortar in front of him, stepping on the already strengthened tiles. Be sure to check the level of the correct installation, and at the end of the work we rub the seams.
With a cement-sand or sand base, the same laying work is performed. The installer, in this case, puts the material in front of him, and he himself moves with his back back, without stepping on the finished canvas. You can add or remove unnecessary sand. The tiles are well knocked to each other with a rubberized hammer.
We fill the path well with water, and after a couple of days we repeat.
Here are some tips to help you work efficiently and efficiently:

Correct grouting
After laying the slabs, be sure to grout the joints in several stages:

Now in stores you can also buy a ready-made mixture and not make it yourself.
Remember to sweep and wash the paths, this will help the tiles stay as beautiful and last much longer.
In winter, clean the snow with a wooden shovel, without using ice axes. Do not sprinkle with products that contain salt.
Do you have a desire to improve the yard? In this case, you should figure out how to organize the laying of paving slabs. It may seem to you that it will take a lot of time and effort, however, in fact, everything is quite simple. You can pave the paths literally over the weekend, and you don't even need an auxiliary. Today there are many types of paving tiles, so choosing the right color and texture will not be difficult.
We decide on the tiles. Assembling the tool
When choosing a tile, focus not only on your preferences, but also on the operational properties of the material. What part of the yard do you need to furnish? Ask the manufacturer: can paving slabs withstand heavy equipment, such as a car? Or is it designed exclusively for the weight of a person? This is important because the path on which your car will drive must be especially strong, unlike a regular garden path, on which only a person's foot will tread.
To successfully pave paving slabs, you will need the following tools and building materials:
- Cord-ordering.
- Master OK.
- Mallet made of wood or metal.
- Manual or mechanical ramming.
- Building level.
- Any diameter pipe or I-beam.
- Wooden or metal pegs.
- Broom and rake.
- Sand and cement.
- Watering hose or watering can.

Before purchasing the required number of sidewalk tiles, calculate the size of future paths and areas, and also think over the layout of the site. For this you may need a drawing of the tracks. The easiest way to create it is to transfer the plan of the area adjacent to the house to graph paper, and then draw the intended paths on it.
It is very important that the paving slab paths are paved under a certain slope, with a calculation of 0.5 cm per meter. This will allow water to flow freely onto the lawn or wells.
We mark the paving area

After the drawing is ready, and the necessary building material and tools are purchased, you can start marking the tracks and sites.
Try to stick to the created project as closely as possible. If we are talking about paving paving slabs in the garden, it is better to make the path winding.
To avoid cutting the tiles, make the length and width of the paving plane multiples of the tile itself. This will help you create a more durable pavement surface. Then mark the tracks. When doing this, use pegs, tape measure and cord. Remember to leave a margin that matches the width of the curb. Now you should dig a small ditch around the perimeter.
Walk along the planned route and think if you are completely satisfied with such moves around the site. Then you can proceed to the next step.
We proceed to the arrangement of the base

First of all, it is necessary to remove debris, stones and a layer of turf from the marked area. To even out the area of the outlined paths, you should remove excess soil in elevated places and add it to the depressions. In the process, do not forget about the slope necessary for the drainage of rainwater. Better to do it towards the street, and not towards the house. Level the base using a rake. Then tamp it down. If you have to work with soft soil, dampen it with water before tamping. This will help you avoid uneven subsidence of the paving slabs.
Calculate the depth of the base with a margin, because during the compaction process, the sidewalk will shrink. Usually, a 20-30 cm depression is made for paving tiles, based on the layer of sand and the thickness of the tile. The angle of the track can be longitudinal, transverse or longitudinal-transverse. At this stage, if there is such a need, carry out all communications. To avoid weed growth, lay geotextiles on the base before filling the sand.

Now you need to measure the height of the sand embankment, which cannot exceed 7 cm. Pull an ordering cord between the stakes. Pour sand over the entire area of the path, and then level it using a rake. Fill it with water, and so that puddles form on it. If you are lucky and it is sunny on this day, then you can start leveling the surface after 3 hours, do it with a profile. In gloomy weather, alignment should be started only after a day. As a result, you should have a smooth and even surface.
In the next step, you need to prepare a sand-cement mixture in a ratio of 8: 1. The stacking height of this mixture should not exceed 4 cm. For convenience, measure the indicated height of the mixture on the pegs and pull the cord again. Fill it and level the plane using a channel. As a result, you should have a flat surface again. Tamp each layer thoroughly!
Installing the border. Laying sidewalk tiles

Even at the marking stage, you had to dig a trench around the entire perimeter of the track. In this way, you can emphasize the precise geometric shape of the laying area. The ditch should accommodate 40% of the entire height of the curbstone, which also takes into account the five-centimeter layer of sand at the base of the trench. To improve the strength of the curb, install it on a concrete mortar, carefully pouring the base.
And again, before proceeding with the laying process, you should pull the cord along the chamfer, at a predetermined height. Start paving stones from the curb. Pay special attention to the first row, strictly adhere to the height of the cord. Stick to a diagonal direction. In order to avoid trampling the base by the paver itself, start the work "on your own".

Strictly observe the tightness of the tiles, gaps of more than 2 mm are unacceptable. Of course, it is impossible to comply with these requirements on turns and bends, however, here, too, you need to make minimum clearances. Press each tile firmly to the base, you can use a rubber mallet to do this.
When paving paving slabs, you can use crosses, this will allow you to create perfectly even gaps between them. If in the process you notice irregularities, then using a trowel, remove or, conversely, bring a layer of sand under the tile and tamp it. To carry out these processes, use a mallet and a building level.

When finished, check the treadmill for unevenness. If they are, then immediately eliminate the deficiencies. Now remove the crosses from the gaps and sprinkle them with a mixture of sand and cement. Sweep the paths and pour water over them. Re-inspect the masonry, and if the mortar has subsided in the seams, then add it until it is completely filled.
It is unacceptable to use sand with salt impurities, because during operation, white stains will appear on the paths and sites, which will spoil the appearance of the masonry.
Now the laying of paving slabs is complete! After three days you can start active exploitation of new tracks! Now you can think about starting a business, because you have already received a certain amount of knowledge on paving paths from paving slabs!
Experienced with sidewalk tiles? Do you have any difficulties in the process of work? What helped to cope with them? Have you come up with an innovative laying method that simplifies the process? Share your experience with us! We appreciate your skills and work! Write your comments to the article.
Video
You can see below how to lay paving stones along a string:
Photo


