Making an apron for a kitchen set with your own hands. MDF panels for an apron in the kitchen - an inexpensive and practical solution
So that readers do not have disagreements about the word apron, the authors consider it their duty to tell respected visitors to our portal that the article will focus on the surface of the wall between the desktop and wall cabinets, and not about a piece of clothing. Although not a single modern kitchen and not a single modern housewife can do without one or the other.
When repairing an apartment or building a house, people experience the greatest experiences not from the fact that they have to part with significant amounts, but from the incredible pangs of choice. The number of offers of materials, color and design solutions, various services is so huge that their choice takes much more time than the actual repair itself. This also applies to the kitchen apron. But the authors can immediately answer the main question of readers - what is the best apron? The answer is unequivocal: the best apron is a hand made apron, regardless of what material. About how to make an apron in the kitchen with your own hands, and there will be our article. And, of course, attention will be paid to "insignificant little things" in the form of a review of materials and technologies for their installation.
Requirements for kitchen aprons in terms of combining functionality and beauty
If we consider the etymology of the word apron (translated from Polish and German it means an apron or hem), it becomes clear that it was originally conceived as an item of work clothing needed to protect against pollution that inevitably accompanies the cooking process. Polish and German linguists are still arguing over who rightfully owns this word, although this convenient thing was used not only by them, but by most peoples in the world. Therefore, let the etymological battles pass by the world of reasonable people, that is, you and me. The main thing is to understand that the first and main purpose of the apron is protection.
However, who said that protection should be rough and ugly? It can be beautiful, it can please the eyes of its owners, while not forgetting about its main function. And the modern variety of materials and technologies allows you to harmoniously get along with both functionality and beauty. But if suddenly there is a choice of what to sacrifice, then the unequivocal answer is this - you can sacrifice a little beauty in favor of functionality, but you can’t do the opposite.
What is a kitchen apron for?
Glass kitchen aprons
Most people have a subconscious fear of glass. It is associated with something extremely fragile, brittle and sharp. However, glass to glass is different. Now tabletops, chairs and even stairs are made from it. Not bypassed this wonderful material and kitchen aprons.
Glass for aprons is not used ordinary, but tempered, 6-8 mm thick, which is several times stronger and can withstand heating up to 300 ° C. Triplex glass is also used, where two layers are glued together with a special film or laminating liquid. Glass can be either glossy or matte, painted in any color, or colorless, with or without a pattern.

It is best, of course, to use all the possibilities of a glass kitchen apron and order it with a pattern. Such aprons are also called skinali. But it should be noted that it can be performed in different ways:
- Firstly, transparent glass can be used, which is fixed on a wall pasted over with photo wallpaper. This is the most budget option, but it should be noted that moisture can penetrate into the gap between the wallpaper and glass, which will ruin the wallpaper or contaminate the glass, which will ruin the whole look.
- Secondly, the image can be printed on a vinyl film, which is glued from the back. This solution is better, but the film can also peel off over time.
- Thirdly, the image can be printed on the glass itself from the back of the apron using UV (ultraviolet) printing technologies.
- Fourthly, the image can be printed with UV ink inside glass - triplex. This is the best, but also the most expensive option.
- And, finally, modern technologies make it possible to print three-dimensional 3D images on kitchen aprons as well. These aprons look very unusual, they are very expensive.

Glass aprons can be "revived" by competently using LED lighting mounted both outside and inside the glass. Illumination can be either monochrome or color. You can arrange different lighting scenarios for different moods. The modern market of materials for the repair and design of premises offers so many options that you can implement both a beautiful and competent solution, and any design madness. If only there was enough money for everything.
The advantages of glass aprons are obvious, they are moisture resistance, chemical inertness, strength, ease of cleaning, beautiful and original look. Of the shortcomings, it is worth noting the high price and the fact that this is still glass, which can collapse under shock loading. Aprons made of tempered glass or triplex do not form sharp traumatic fragments when broken. But it still will not return the spent a lot of money.
Glass kitchen aprons can also be fastened both through fasteners and with the help of special elements. When taking measurements and planning the working space of the kitchen, it is always worth considering everything that will be installed on the backsplash. It can be several sockets, switches, holes for attaching railings - a hinged system for placing all kitchen utensils. Just like with MDF panels, it is better to entrust the entire range of services for measurements, manufacturing and installation to those who have done this many times, that is, professionals.
Metal kitchen aprons
For those who intend to create for real, metal aprons are specially offered. They look very unusual and in some cases even beautiful. Fans of the "techno" or "loft" style may well use metal in the kitchen, but for this you need to really have a subtle artistic taste or invite a designer with such qualities, which is rare. The line between harmony, beauty and madness in metal aprons is very thin, about the same as in mirror aprons.

Metal aprons can be made as large sheets of stainless steel, as well as tiles and even mosaics. The functional qualities of the metal are questionable. With good hygiene, the metal has excellent adhesion to all types of kitchen dirt and is very capricious in choosing cleaning products. It does not tolerate abrasives.
It was previously noted that it is better to completely entrust the installation of an apron from MDF panels or glass to those who, in fact, will manufacture them. Therefore, we will consider other options that the owner can do with his own hands. But before installation, you need to decide at what stage you need to make an apron, and what requirements the room must meet.
Room and surface requirements
Installation of aprons made of MDF, glass or plastic panels can be done even when the kitchen set is installed. Not only is it possible, but even necessary, since a very high measurement accuracy is required, which will allow you to perfectly fit the apron into the workspace. The only thing is that during installation you just need to move the furniture away from the wall, and with through installation, you won’t even have to do this.
If the apron is made of ceramic tiles, porcelain stoneware, mosaics, natural or artificial stone, then wet processes are indispensable here. Therefore, the furniture should not be next to the walls where the backsplash will be, but the exact dimensions of the furniture and how it will be installed (the height of the countertop, the height of the cabinets, the distance between the work surface and the lower plane of the cabinets) should be known.
What are the requirements for the kitchen for the installation of an apron.
- Windows should be installed in the kitchen.
- Must be mounted, all sockets installed.
- The walls must be plastered and leveled. On the wall where the apron will be mounted, the use of gypsum-based putties is unacceptable; only polymer-cement mixtures can be used.
- The floor must be leveled with the topcoat already applied. Naturally, it should be flat and horizontal.
- The temperature in the kitchen should not be lower than +5°C and not more than +30°C, humidity should not exceed 60%.
In other words, the room must be completely ready for finishing - wallpapering, applying finishing decorative plaster or painting. The surface on which the apron will be mounted must be dry and perfectly flat. If glass, glass or smalt mosaic will be used for the apron, then the surface must be puttied with polymer-cement mixtures based on white cement.
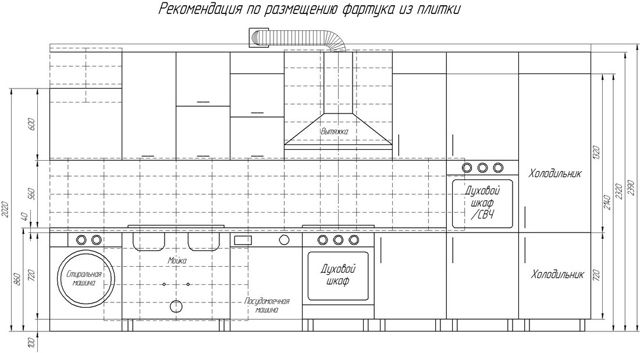
Kitchen apron layout
On a wall completely ready for facing, it is necessary to mark the position of the future apron. But for this, there must be a clear idea of \u200b\u200bthe placement of the kitchen set. It is best if it is already purchased and a scheme for its placement is drawn up. What you need to consider when marking a kitchen apron.
- First of all, the apron should be located in the space between the countertop and the lower plane of the wall cabinets, and it is desirable that the apron go beyond the countertop and cabinets by at least 2 cm. Most often, the distance between the countertop is 60 cm, but it is permissible to do it in the range of 45 -70 cm, it all depends on the height of the people who will use the kitchen.
- The height of the countertop of a kitchen set also depends on the height of people, but in the same family there can be people of different heights, and household appliances are often built into the set: washing machines and dishwashers, freezers. Therefore, in most cases, a height of 88-90 cm is made, and people with “outstanding height” (more than 200 cm and less than 150 cm) will not have to bend over or bounce, there will just be a slight inconvenience that they get used to very quickly.
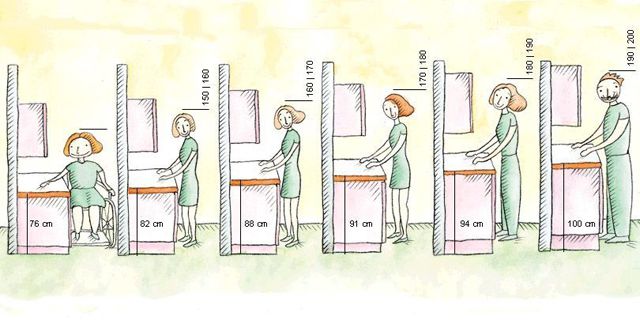 Most of the manufactured kitchen sets are made for the convenience of people of average height.
 - If a standard dome hood is used, then the apron should continue in height across its entire width and reach its lower edge, and it is better if it goes under the hood for a distance of at least 5 cm or, even better, reach the ceiling. At the same time, for the side surfaces of the cabinets, it is recommended to start the apron also at a distance of at least 5 cm.
- The height of the lower edge of the hood dome above the countertop must be at least 65 cm for electric stoves, and 75 cm for gas stoves.
- The standard width of gas or electric stoves or hobs can be 30 cm, 45 cm, 50 cm or 60 cm. There are sizes and more, but this already applies to stoves for professional use. The most commonly used slabs are 60 cm wide. The dimensions of the hood dome should not be less than the width of the slab, but it is better if they are one step larger. For example, for a stove or hob with a width of 60 cm, an hood should be selected at least 80 cm. The distance between the wall cabinets should allow the hood to fit freely.
- The apron in the kitchen does not have to be located only between the countertop and the upper wall cabinets. Sometimes it needs to be done with a call to the side walls, this is especially true in the area where the sink or stove is located, if they are located at the edges. It can also be influenced by nearby window or door openings.
To mark the position of the apron on the wall, you will need either a laser or a hydraulic level. Laser, of course, is more convenient to work, but hydraulic also gives very high accuracy. It is desirable that the kitchen set has already been purchased, but not yet installed on site. As a last resort, you can measure the future kitchen in the store where it will be purchased or have documentation indicating all sizes. For markup you need:
- On the wall where the kitchen set will be installed, a mark is made from one of the edges of the position of the upper plane of the countertop.
- The level mark is transferred to the other edge of the wall.
- With the help of a paint cord, the horizontal line of the countertop position is beaten off.
- If necessary, if the kitchen is angular or the apron will go to other walls, then similar markings are made on other walls.
- A mark is made on the position of the lower edge of the wall cabinets based on the dimensions of a particular kitchen set, which will subsequently be installed in the kitchen.
- The position marks of the lower edge of the wall cabinets are transferred to all walls where the kitchen apron will be installed.
- On the marked parallel lines, the location of the stove or hob is marked.
- The position of the lower edge of the hood dome is marked (at least 65 cm for electric stoves, 75 cm for gas stoves from the countertop).
- The position of the side surfaces of the wall cabinets is noted at the location of the hood dome, it should freely enter the space between the cabinets, it is better if there is a gap of 1-3 cm on each side.
- The upper edge of the apron located in the hood area is marked. The apron should go at least 5 cm under the hood, but it is better to do it up to the ceiling.
After these actions, the location lines of the future kitchen set will be marked on the wall. But, as noted earlier, it is desirable to make an apron so that its surface goes a little under the countertop or set. For the countertop and the lower edge of the wall cabinets, it is advisable to deepen the apron to a distance of at least 20 mm, and in the area where the hood is located on the left and right, the apron must be deepened under the cabinets to a distance of at least 50 mm. Therefore, parallel to the horizontal and vertical lines of the position of the kitchen furniture, the lines of the position of the apron are beaten off
When planning and marking the apron, the size of the tile or mosaic to be used should also be taken into account. For example, if the tile is 20 cm high, then it is completely logical that it is beneficial to make three rows of tiles of 20 cm each, and make the gap between the table top and the lower edge of the wall cabinets 56 cm, taking into account that 2 cm from above and below will go under furniture. If tiles of other sizes will be used, then this must also be taken into account. If decorative elements are used - friezes and borders - then it is necessary to ensure that they are visible. What is the point of using expensive items that will be hidden from view under the furniture. Each case is individual and requires its own differentiated approach.
After applying all the marking lines indicating the position of the kitchen furniture and the apron, you need to calculate the area of the apron. The authors of the article recommend using a calculator in which you only need to indicate the clearance between the countertop and the lower edge of the wall cabinets, as well as the distance between the vertical surfaces of the cabinets and the height of the apron above the lower surface of the cabinets in the hood area. All entries of the apron under the furniture (2 cm on the horizontal section of the apron and 5 cm in the area of the hood) the calculator automatically takes into account.
The kitchen has a zone that gives the hostess the most trouble: this is the part of the wall adjacent to the working equipment - stove, sink, work table. Usually kitchen cabinets are hung on the same wall.
And the open section of the long-suffering wall tends to overgrow with fat, water splashes leave unpleasant traces on it.
To protect it and facilitate the kitchen cleaning procedure, an “apron” is arranged - a decorative finish made of easy-to-clean materials: tiles, natural and artificial stone, MDF.
MDF is a fibreboard made from shredded waste from the woodworking industry. The role of the binding material in the product is played by lignin, a substance contained in wood. This composition makes MDF an environmentally friendly product that does not emit harmful substances into the surrounding space.
MDF boards are produced for operation:
- in dry conditions;
- in wet conditions.
Each of these groups is divided into two subgroups:
- main purpose;
- for the manufacture of heavily loaded structural elements.
Advantages

Why do many choose MDF for an apron in the kitchen?
- Panels are inexpensive and always available.
- The device of a kitchen apron made of MDF does not require professional tools and special skills.
- The design is easy to dismantle, so in case of damage to some panels, they can be replaced.
- Under the MDF apron mounted on the frame, you can hide engineering communications.
Do not miss your chance to buy an MDF kitchen for a promotion - https://fkm-anons.ru/catalog/kuhni/mdf/ hurry up
Choice of base material
For the manufacture of an apron for the kitchen, you can take MDF sheets with a thickness of three to ten millimeters. They must have a special coating that protects the base from moisture, steam and other external influences. The above requirements are met by the MDF wall panel - furniture board. Its thickness varies in the range of 6-10 mm, and the overall dimensions of the MDF panels used for the kitchen backsplash are 3000x600 mm.
Successfully replaces a furniture board: thanks to a special lining, it is not afraid of food acids, it does not leave traces of coffee, wine and even ink.
As a coating for MDF panels, high-pressure plastic, polymer films applied in several layers are used. The color range of MDF panels is very diverse: "Gray Stone", "White Oak", "Cappuccino Oak", etc.

Manufacturers offer products with a glossy or matte surface. Facing can be plain or with a pattern. Many firms produce aprons for the kitchen and countertops in the same color. This makes it possible to create a harmonious composition or, conversely, a combination of contrasting colors and patterns.
Some manufacturers produce MDF panels for an apron in the kitchen with photo printing. This technology opens up wide possibilities for the design of your kitchen.

Mounting order
To install an MDF apron in the kitchen, no special skills are required if you properly prepare for work and carefully perform each operation. Sometimes the apron is mounted before the installation of kitchen furniture. So that later you do not have to redo the work, when marking the wall under the apron, follow these recommendations:
- the lower edge of the apron should be 85 centimeters from the floor level - this value corresponds to the standard height of the desktop;
- any height of the apron can be made, but it must completely cover the space between the floor and wall pieces of kitchen furniture. Therefore, you will have to pre-mark their location;
- the height of the backsplash depends on the type of hob:
- If it is, then this size is from 60 to 75 cm.
- If available, the height of the MDF kitchen apron should be no less than 70 or even 80 cm.
- For - height is set from 65 cm
Wall preparation
All old finishing materials are removed from the wall surface - wallpaper, ceramic tiles, peeling paint, etc. If there are protruding nails in the working area, they should also be removed.
The cleaned surface is treated with an antiseptic to avoid the development of columns of microorganisms under the MDF panel. Wooden mounting strips can also be treated with the same composition.
 If the wall is flat, the apron can be mounted directly on it. If the surface of the wall is far from ideal, then a crate is preliminarily arranged.
It can be wooden or metal. The wooden crate is attached to the wall with dowel-nails or self-tapping screws with a diameter of 6 mm.
Apron attachment
How to fix an apron from MDF? There are several ways:
- By means of fasteners.
Ears are attached to the wrong side of the panel (such elements are used in hanging cabinets). The panel, equipped with hanging parts, is simply hung on the wall.
- With the help of the adhesive composition "liquid nails".
 Liquid nails are applied along the perimeter of the sheet (avoiding gaps) and over its entire area of the wrong side in increments of 5 to 15 mm.
The panel processed in this way is pressed against the prepared wall surface using spacers.
With this method of fastening the apron, it is necessary to install a temporary support for the MDF panel: at the level of the lower edge of the panel, a wood or metal profile is screwed to the wall. It serves to control the position of the panel and facilitate the gluing operation. Upon completion of the installation of the apron, the profile can be removed.
- With the help of self-tapping screws.
 Holes are drilled along the top and bottom edges of the panel through which it is attached to the wall.
Holes with self-tapping screws spoil the appearance of the apron, so they are covered with decorative plugs.
If the edge of the apron is obscured by kitchen furniture, you can not use the plugs - they will be inaccessible to the eye.
- Through aluminum profiles.
To do this, a connecting profile is attached to the wall, and an MDF panel is inserted into it. This method is suitable for a techno-style kitchen: an aluminum profile, in addition to the function of a fastener, also plays the role of a decorative finish.
Finishing touch
 After completing the work, put the kitchen furniture in place and carefully seal the joint between the panel and the worktop. Silicone sealant is suitable for this purpose.
First, at a distance of 1-2 mm from the joint, glue both surfaces with construction tape. Now apply sealant, run a wet finger along the seam, and then remove the tape.
As a result, you will get a neat strip of sealant, and you do not have to peel it off the backsplash and countertop surfaces.
You can close the joints between the furniture and the apron with special skirting boards made of plastic. They are fixed either with glue or mounted on self-tapping screws. The ends of the apron can be decorated with end rails.
What to do if sockets get into the installation area
Double or triple sockets are usually mounted above the worktop. To display them on the front surface of the apron, you must perform the following steps:
- Remove the plastic housing from the socket block.
- With the help of a ruler, a square and a pencil, we transfer the borders of the block to the countertop with an allowance of 2 mm per side. As a result, the distance between the marks will be 4 mm larger than the size of the socket block.
- Measure the distance from the countertop to the bottom of the metal housing of the sockets and from it to its top. We increase the first size by a couple of millimeters, the second, on the contrary, we reduce it - this is necessary so that the socket body subsequently lies on the panel. Write down the resulting dimensions.
- Put the MDF panel in place and transfer the risks from the countertop to it.
- Remove the panel and use a square to mark the rectangle of the future window under the sockets.
- Drill holes in the corners of the drawn rectangle.
- Insert a file with a small tooth from a jigsaw into the holes and carefully cut out the window.
- Attach the apron to the installation site and, loosening the fasteners of the metal cases of the sockets, pull them out of the boxes through the window. Now you can fix the loose fasteners - the details of the sockets will fit snugly against the apron.
- Reinstall the plastic housing of the socket block.
If a comparison is made between different facing materials, MDF panels are the most economical. But the quality of the finish of the kitchen apron does not get worse from this. A high-quality coating makes MDF panels invulnerable to cleaning products, they are scratch resistant.
The apron contains mechanisms that convert the rotational movement of the lead screw and the lead shaft into the translational movement of the caliper.
Kinematic scheme of the apron
Rice. 241. Kinematic diagram of the apron of a screw-cutting lathe 1A62
Rotates the worm wheel z = 30, sitting on the shaft VII. On the splined part of this shaft, you can move the gear wheel z = 24, engaging it either with the wheel z = 50 of shaft VI to obtain mechanical longitudinal feed, or with the wheel 2 = 65 of shaft VIII to obtain mechanical transverse feed.
When the gear wheel z = 24 is engaged with the wheel z = 50, the wheel 2 = 23 also rotates. From it, the rotation of the wheels z = 69 and z = 12, sitting on the shaft V, is obtained. The gear wheel 2 = 12 rolls along the rail attached to the frame, and thus communicates the mechanical longitudinal feed to the caliper.
In the longitudinal direction, the caliper can also be moved manually by turning the handwheel located at the end of the IV shaft. This handwheel through the wheels z = 15 and z = 69 rotates the shaft V with the rack and pinion wheel z = 12.
If you couple the wheel 2 = 24, sitting on the splined shaft VII, with the wheel 2 = 65 on the shaft VIII, the wheel 2 = 20 and the cross feed screw IX will begin to rotate, as a result of which the caliper will receive a mechanical cross feed.
It is also possible to carry out the transverse feed of the caliper manually, by rotating the handle attached to the end of the screw IX. In this case, the wheels z = 65 and z = 24 are preliminarily disengaged.
To turn on the longitudinal feed when threading, you need to close the split nut on the lead screw I and when it is rotated, this nut, together with the apron, will move along the axis of the machine.
A feature of the apron device in the 1A62 machine is that its four-start worm automatically turns off when the resistance to movement of the caliper increases excessively, for example, at the moment it comes into contact with the longitudinal or transverse stops, due to a sudden overload of the cutter, from random obstacles, etc. This device is called a falling worm, because when overloaded, the worm disengages (falls out of the teeth of the worm wheel) and further movement of the caliper stops.
The device of the falling worm is shown in Fig. 242. Worm 2 sits freely on shaft 9, which is connected to shaft III by means of a swivel coupling 1 (see Fig. 241). At the end of the worm is the left half of the 3-cam clutch, which is engaged with its right half by 5 beveled end cams. The right half of the clutch can move along the splines of the shaft 9. The spring 7 presses the right half of the clutch to the left half, due to which the worm 2 is driven by the rotating shaft 9 and the right half 5 of the clutch.

When the caliper encounters any obstacle in its path, the load on the worm wheel 2 = 30 increases greatly. In accordance with this, the resistance to rotation of the worm 2 will increase. When this resistance goes beyond the permissible range, the right half of the cam clutch 5, which continues to rotate, will begin to rotate relative to the left half 3. At the same time, it moves to the right, compressing the spring 7 (see Fig. 242 , b). Moving to the right, the clutch 5 will move the bracket 8, which, with the help of the strap 6, supports the worm in engagement with the worm wheel 2 = 30 (Fig. 242, a). When the bracket 8 is moved to the right (Fig. 242, b), the worm, which is no longer supported by the bar 6, falls down under its own weight, disengages from the worm wheel, and the feed stops.
To turn on the worm, use the handle 4, with which the bracket 8 rises along with it and the bar 6.
blocking
To prevent incorrect inclusions,
which can lead to breakage of the machine, tool or injury to the worker, there are usually locking devices in the mechanisms of screw-cutting lathes. For example, you can not turn on the feed mechanism, driven by the drive shaft, and at the same time connect the halves of the split nut on the drive screw, as this can lead to machine breakdown; it is also impossible to simultaneously turn on the longitudinal and transverse feeds of the caliper.
The design of the locking devices of screw-cutting lathes is very diverse. On fig. 243 shows a diagram of a mechanical feed lock in the apron of a 1A62 screw-cutting lathe. The blocking mechanism is arranged as follows. Handle A, mounted on screw 1 with a large thread pitch, serves to move the nut B with the fork B. This fork, moving the gear wheel z \u003d 24 along the shaft VII (see Fig. 241), engages it either with the wheel z \u003d 50 at turning on the longitudinal feed, or with the wheel z=65 of shaft VIII when turning on the transverse feed.
With the middle position of the wheel z = 24, as shown in fig. 245, neither longitudinal nor transverse feeds are included. In this case, the nut B is in such a position that the protrusion of the bushing D passes freely through the slot of the nut B.
and thus the shaft 2 can be rotated in any direction. By rotating the shaft 2 with the help of the handle D, the split nut is switched on and off. When the feed from the running shaft is turned off, it is possible, by rotating the handle D shaft 2, to turn on and off the lock of the split nut. When the lock is locked, the protrusion of the sleeve G enters the cutout of the nut B and does not allow

Rice. 243. The locking mechanism of the screw-cutting lathe 1A62
move it in either direction, i.e., do not turn on the feed from the drive shaft. When the lock is open, the protrusion of the sleeve G comes out of the cutout of the nut B and allows, by moving it, to turn on the feed from the drive shaft. At the same time, the protrusions of the displaced nut B do not allow turning the handle D to the left and closing the lead screw lock.
An apron in the kitchen is, first of all, a high-quality protection of the walls of the room in the area where the stove and sink are installed. It can be glass, MDF or tile, but its main purpose is to protect the wall from greasy stains, steam, boiling oil. Of course, the kitchen apron also plays a decorative role, and therefore can be made from any materials - durable, resistant to extreme influences and pleasing to the eye. And if designers are not limited in choosing a finishing method, then the dimensions of this work surface are strictly standardized.
Distance from floor to apron
The height of the kitchen apron depends on factors:
- Slab dimensions;
- Type of hob;
- The height of the furniture in the kitchen;
- The design of the hood;
- Dimensions of the upper part of the furniture set;
- The height of people who most often use countertops and stoves.
It is important that the protective coating (whether or from a tile) comes under.
And here a lot depends on the principle by which kitchen furniture is chosen:
- Tables are selected based on the height of the person who most often cooks and uses the kitchen. With the right furniture chosen for height, the hostess will not experience discomfort in her back or in her arms, and all cooking activities will take place in a natural position.
- The height of the tables corresponds to the dimensions of the stove installed in the kitchen.
- The dimensions of the countertop are selected in such a way that a washing machine fits under them.
- Is the kitchen set of standard height purchased.

The standard height of the furniture corresponds to the dimensions of the stove in the kitchen - 85 cm, which means that the apron should start at least 84 cm from the floor.
Determining the Width
The width of the kitchen apron also matters, that is, the distance between its upper and lower edges (often this parameter is called the height of the apron).

What are the maximum dimensions allowed? If a washing machine is built under the countertop, then the height of the lower cabinets of the headset together with the countertop is no more than 90 cm. In this case, the distance from the table to the bottom of the wall cabinets should not exceed 110 cm, respectively, the maximum width of the apron should be within 112 cm (with allowance for 2 cm overlap). This option is suitable for rooms with high ceilings and for fairly tall owners.
For a standard-sized kitchen, the lower modules of which are 85 cm, the apron should not exceed 117 cm.
Thus, the width of the backsplash should be between 47 cm and 117 cm (therefore, the distance from the countertop to the upper cabinets is 45-115 cm).
There is another important point that must certainly be taken into account when designing and manufacturing kitchen cladding - this.
A little about the nuances of installation and materials
An apron in the kitchen must be arranged according to preliminary markings.
Advice! Here it is important to check the marking line by level by measuring the distance to it from the floor level at several points. If the kitchen floor is not level, the beginning of the work surface may “diverge” from the level of the installed furniture. So you need to carefully check both the tile surface and the glass apron - after all, it will take a lot of effort and money to correct such shortcomings later.

It also matters what material the kitchen apron will be made of. So, a tile backsplash is easy to fit if its height is 60 cm. It is easy to choose tile sizes for such a design (as a rule, most offers in modern collections are 30 or 60 cm).

But glass is often a solid canvas, made to order. And any work surface can be made from MDF - the main thing is that MDF matches the color of the main interior concept and is highly resistant to moisture.
Hood wall protection
The kitchen cladding area in the hood area needs increased attention. Here you can not do without a preliminary project, which will take into account the size of the equipment, the method and location of its location.
The maximum height of the apron depends on the type of design of the hood and on the location of the furniture in this area:
- The dome (chimney, wall-mounted) hood is mounted without an additional top cabinet, and then the apron can be installed up to the top edge of the headset, hood, and even up to the ceiling.
- A built-in device with a retractable surface necessarily includes a wardrobe - here the height of the kitchen apron is 70-75 cm.
- Suspended structures can be installed with or without furniture.

It is important that the tile or MDF surface exceeds the working part of the hood by 5-10 cm on each side. Such a prudent approach will save you from shortcomings due to errors in the process of installing the hinged part of the headset.
-
Each homeowner strives to make his house different from others with its beauty and originality. How the house will look externally sometimes depends on such details that you won’t notice at first glance. But it is they who form the uniqueness of the external appearance of the dwelling.
Parapet for flat and pitched roofs
One of the seemingly minor details on which the reliability and aesthetics of your home depends is the parapet on the roof. This is not a very high element, resembling a small wall, it serves to protect and enclose the roof. This design is suitable for any type of roof - both flat and pitched. In the latter case, it starts from the cornice, covering part of it, and at this time the other part rises on the cornice and is perfectly visible, but the parapet completely hides the roof of a flat type. The shape of such a fence in the upper part - and can be horizontal or pitched. In any case, you need to keep in mind that the parapet on the roof can also have a non-standard shape.

To protect the fence from the destructive effects of atmospheric phenomena, a so-called apron is installed on top of it, which is made of a metal profile, galvanized or copper. In its design, the presence of special droppers is mandatory, through which water will be drained from the building. Thanks to the drippers, the ingress of water on the fence structure is practically excluded.
Often, for concrete or brick fences, a metal apron is replaced with concrete slabs or decorative stone laid on top of them.

In any roof structure, there are areas that are especially dangerous in terms of water leakage and corrosion. For example, the installation of a steel apron is carried out through fixing crutches, so all attachment points must be processed, the junction of the roof to the parapet, as it is especially prone to water leakage, must be reliably sealed. Sealing is also required for joints between concrete slabs laid on top of the enclosing curb.
Attachment of the roof to the parapet

Such an abutment is performed by joining the roof and the parapet with a side or front connection.
Along the fence, niches and curtains are provided for the installation of aprons, for example, from galvanized sheets of roofing metal, with subsequent fastening. The upper part of the metal sheets is inserted into these recesses. It is possible to use black roofing steel for these purposes, but only if it is painted twice on both sides using hot drying oil. The need for niches and blinds in the connection device arises due to the fact that, as a rule, one roofing sheet of one type or another is not enough to ensure a reliable and tight fit. For example, due to its not quite flat vertical part or due to the destructive effects of precipitation, temperature changes and others, the material may lag behind the curb.
Connecting device

The technology for arranging these sections, depending on the presence of curtains or niches, is somewhat different.
When the top of the galvanized or black sheet for roofing is installed in a niche, its height must be at least 10 cm.
In the case of installation in a curtain, it is sealed with a solution of cement and sand, which serves as a reliable protection against precipitation, for example, protects the curtain from snow.
Joint leaks are usually covered with roofing material.
At a distance of 100 cm from each other, antiseptic corks made of wood are installed along the enclosing structure, and an apron is laid on them. Pressing the edges of the apron more tightly will help wood bars, having a triangular section, previously fixed to the corks
The laying of the elements of the apron is carried out in the direction in which the flow of atmospheric precipitation is directed with a minimum overlap of 0.10 m. The reliability of the assembly increases if the joints of the folds. The sections of the interface between fences and flat roofs must be additionally waterproofed, and in several layers. The main waterproofing, made of mastic, is covered with reinforcing glass material. It is mounted with an overlap of 15 cm, pressing through the intermediate side to a vertically directed plane. Then, this whole layer is covered from the bottom up with mastic or emulsion. After allowing the mastic or emulsion to cool, the surface of the first layer is covered with the second. To prevent the layers of mastic from slipping, they are fixed and protected from moisture with a metal apron.

To fix the mastic layer of mastic, a metal clamping bar is used, which is nailed with dowels. Before that, the upper edge of the protective apron is brought under it, the elements of which are connected by a single fold.
The junction with the parapet is also equipped on the roof with slopes, forming a valley. First of all, the base is primed and rolled fiberglass is spread over it. The rolled canvas is laid in the following sequence: the top of the pitched side, part of the valley horizontally. A layer of mastic or emulsion is applied to the inclined slope of the valley with at least a strip of 10 cm.
Connection on the example of a soft roof

Reinforced is required at the junction points. Between the fence and the roof at an angle of inclination of 45⁰, an additional concrete rim is arranged. This greatly facilitates the laying of roll materials for waterproofing. A simple roofing material is glued to the required areas using hot bitumen mastic. After the first layer has hardened, the second layer is applied to it. At the same time, the outer one is fixed with a metal bar, a special apron is attached to it.
Dowels are used to fasten it, and after sealant treatment, paint is applied, which must be weatherproof, providing protection for the assembly.

Modern technologies make it possible not to use rolled materials for waterproofing. Special mastics form, after application, a seamless surface that acts simultaneously as a waterproofing and roofing.

