Do-it-yourself oven masonry with an oven. DIY brick ovens: craft secrets
Despite the modern abundance of heating and kitchen equipment, many owners cannot imagine a private house without a stove - and this is absolutely correct. Even if it is planned to create an autonomous heating system, then the stove will also be useful. For example, in order to save money in the spring or autumn, when full-fledged heating is no longer needed, but you do not want to breed excessive dampness in the house. By heating the stove once a day or every two days, you can maintain an optimal balance of humidity and heat indoors.
To fold the stove with your own hands, the step-by-step instruction of which has intricate configurations - it will be quite difficult for a beginner. Therefore, if there is no experience in stove business, then it is better to choose an affordable ordering option, which will be easy to figure out.
When choosing a model, one must take into account not only the simplicity of the circuit, but also the heat transfer and functionality of the oven, since there are ovens in which not all functions are provided. Heat transfer is selected depending on the area to be heated by the heating structure.
There are a lot of stove models, since experienced stove-makers, working on one of them, make their own adjustments to its design, and thanks to this, new and new variants of the heater appear. And in order to dwell on one of the types of ovens, you need to know what they are in terms of functionality.
Prices for fireclay bricks for laying furnaces
fireclay brick
Types of brick ovens
There are T The main types are heating and cooking, cooking and simply heating without additional built-in elements.
- A heating and cooking stove can have not only a hob, but an oven and a tank for warming water, as well as a drying niche. In addition, such a structure is capable of heating one or two rooms of a certain area.

Such ovens are often built into the wall, turning the hob and firebox towards the kitchen, and the back wall towards the living room. Thus, the oven performs a triple function - it acts as a partition, food is cooked on it, and it provides dry heat to the bedroom or living room.
- work only for heating, and most often have a compact size. Such a stove is installed precisely in order to maintain a balance of moisture and heat in the house in autumn or spring, when it is too early to turn on the autonomous heating or have not yet turned on the central one.
It is good to install such an oven, for example, in the country, if there is a device on which you can cook food. If the power supply in the holiday village is often cut off, then it is better to choose a building with a hob for installation.
- The cooking version of the oven can also be used for heating, if you need to heat a small area. The device is perfect for a country house or for a small building for permanent residence.
Having such a stove and a supply of firewood, you don't have to worry that the house will be cold and damp, and the family will be left without dinner or hot tea in the event of a power outage or gas outage.
It should be noted that any type of oven can be compact or massive. The choice of the size of the stove structure depends on the area of the house or room, as well as the place that is allotted for the construction.
Choosing a place to install the oven
When choosing a place for the construction of a furnace, it is necessary to provide for nuances that are important not only for creating comfortable operating conditions, but also for reasons of fire safety. It is especially important to consider location stoves in an already built house, since the chimney should not stumble during its erection on the beams of the attic floor or on the rafter legs of the roof.
The stove is installed against an internal load-bearing wall, in the middle of a room, or embedded in a wall located inside the house.
- It is not recommended to erect the stove near the outer wall, as it will quickly cool down, and the efficiency from its use will be significantly reduced.
- In the middle of a large room, a stove is installed if it is necessary to divide the room into two zones. Moreover, with a beautiful decorative finish, it will become a decoration of the house and can become one of the elements for the interior that will emphasize a certain style.
- When building a stove into a partition between rooms, it is imperative to provide for its isolation from combustible wall materials using heat-resistant sheets of asbestos or special drywall.
- The space allocated for the stove should be 120 ÷ 150 mm larger than its base in each direction, since the perimeter of the foundation always slightly exceeds the size of the stove.
- In order to make it easier to determine the size, you need to choose the model to which the ordering diagram is attached.
When the model is selected and the installation site is determined, you can proceed to the purchase of materials and the preparation of all the necessary tools. The number and range of materials for each of the models is selected individually, but the tools used for masonry are always the same.
Tools to get the job done
For the process of erecting the furnace, you will need the following devices and tools:

A) A pick is used to cut and split bricks.
B) The kiln hammer has the same functions as the pickaxe, but, in addition, it is convenient for them to remove the dried solution protruding from the masonry.
C) The rule is used to level the concrete on the surface of the foundation. Often it is made independently from a perfectly flat planed board.
D) A wooden spatula is used for grinding and mixing the clay solution.
E) Level is a necessary tool, as it will help maintain the evenness of the rows, both horizontally and vertically.
E) A bristle brush is used to remove sand and hardened mortar from the inner surfaces of the oven.
G) Pliers are used to nibble and bend steel wire when installing and fixing cast iron structural elements.
H) Lead scribe is used for marking when decorating the stove with tiles.
I) Stukalese - a piece of pipe used to fit tiles.
K) Scribe-rod for marking.
K) The rasp is used for lapping lumps and removing sagging from finished masonry.
M) The building angle is required to bring the inner and outer corners to 90 degrees.
H) A plumb line is used to check the verticality of the walls.
O) A rubber hammer is used to tap in a row of bricks.
P) A chisel is needed for parsing old masonry and splitting bricks.
P) Trowels or trowels are used to remove excess mortar and apply it to the rows of bricks when laying.
C) Joining will be needed if the stove is not lined with finishing material, and the seams between the rows will be neatly shaped.
In addition, you will need two containers for the solution and water, as well as a sand sieve if the solution is to be made independently.

The laying of the upper rows will be easier if there are "goats"
For the convenience of work, you need to have a scaffold, which is also called "goats". It is convenient to stand on them, laying the masonry at a height, especially since the size of the working platform provides a place for installing a container with a solution.
Arrangement of the foundation for the furnace
- The foundation for the furnace is usually laid along with a common foundation for the entire structure, but they should not be interconnected, since during deformation or shrinkage, one of them can damage the other.
- If the stove is to be erected in a house already built on a strip or columnar foundation with a wooden floor, then the cover will have to be opened and the base for the stove must be erected from the ground.
- If a compact stove model is chosen, and a slab foundation is arranged under the house, then the heating structure can be erected directly on it by making a waterproofing gasket.

If the foundation sun after all, you will have to equip "from scratch", you need to remember that it should have the same shape as the base of the furnace, but protrude beyond it by 120 ÷ 150 mm in each side.
- On a wooden the floor is marked the contour of the foundation, part of the boardwalk is cut out according to the markings.
- Further, a foundation pit of the required size, 450 ÷ 500 mm deep, is dug in the underground soil.
- The soil at the bottom of the pit is well compacted, and a sand bed is made on it, which is moistened with water and also compacted to a thickness of 80 ÷ 100 mm.

Pit for the furnace foundation with a sand and gravel "pillow"
- After that, roofing material can be laid along the perimeter of the pit, which will perform the function of waterproofing and formwork, if temporarily reinforced with boards or bricks. After the concrete solution has solidified, the formwork is removed from the foundation.
Instead of roofing material, you can use formwork from boards, covered from the inside with a polyethylene sheet.
It should be noted right away that it is better if the concrete base for the furnace rises above the floor by 70 ÷ 100 mm. Thus, you can save bricks and simplify the joining of the floor surface and the side walls of the foundation.
- On top of the sand, a layer of crushed stone of the same thickness is poured and also compacted well.
- The next step is to install a reinforcing grid made of metal wire or finished mesh at the bottom of the pit. The lattice elements are connected to each other using wire twisting.

Foundation reinforcement - option
- The first layer of mortar is poured into the prepared foundation pit. It can consist of rubble, sand and cement- 1: 2: 1 or gravel and cement 3: 1. This layer should occupy about ⅓ of the space to be filled.
- After pouring the first layer, immediately knead and pour in the second, consisting of sand and cement in proportions of 3: 1.
The second layer is poured to such a height that 50 mm remain to the top, which is required for the upper leveling layer of the foundation.
If necessary, for the top layer of concrete, the formwork can be expanded, and then a reinforcing mesh with cells of 70 ÷ 80 mm can be laid on top of the poured mortar.

- Then the last top layer of the mortar is poured and leveled using the rule.
The foundation is left to cure the concrete for 27-30 days. It is advisable to moisten it daily with water and then cover it with plastic wrap - this will help make the concrete more solid and durable.

After removing the formwork, two or three layers of roofing material are laid on the finished foundation, which will protect the brickwork of the furnace from capillary moisture coming from the ground or from the underground.
After that, you can proceed to the main work - laying the stove.
Several recommendations for carrying out masonry work
- Before starting the brick laying on the mortar, the entire structure rises dry from the brick, but each of the rows must be laid out strictly in accordance with the ordering scheme.
Experienced stove-makers advise to carry out preliminary laying dry to all the craftsmen who take up the construction of the stove for the first time. This event is necessary in order to understand the location of all internal channels and not make gross mistakes when adjusting the bricks in each of the rows.
To carry out the masonry dry, you need to stock up on wooden slats, which will determine the thickness of the seam between the bricks. Usually their thickness is 5-7 mm. The same rail will need to be used for the main laying, already carried out with mortar. Such "calibration" of the seam thickness is especially necessary if the laying is done "for joining", and must be flawless.
This process is carried out slowly, thoughtfully, since it is very important to understand how the smoke will be removed from the firebox and how it will get into the chimney.
- Having lifted the structure dry before laying the pipe, it is carefully disassembled. If the bricks were adjusted in size at the same time, then each row can be folded into a separate pile by placing the number of the row and the place in it on the bricks with a marker.
- Performing the main masonry, each of the rows is also first laid out dry, and then, after carefully fitting all the parts, it is mounted on the mortar.
- When the main laying will be done, two measuring strips are placed on the edges of the previous row to maintain the exact thickness of the seam. Then the solution is applied in a layer of 10 ÷ 12 mm. A brick is laid on top of the mortar, pressed, and, if necessary, tapped with a rubber hammer until the brick rests against the measuring rail. The excess protruding solution is picked up with a trowel.

- The slats are pulled out of the masonry after installing the third to fourth row above them, and then used again. Therefore, you need to prepare several pairs of these auxiliary elements.
- Having pulled out the slats, the seams are carefully filled with mortar and immediately "embroidered".
- Carrying out the masonry on the mortar, each of the rows is checked using the building level for compliance with the horizontal and vertical planes.
Compliance with these nuances will help to simplify the process of erecting any furnace, to avoid "fatal" mistakes that can lead to the need to redo the entire work.
Heating and cooking oven with a drying chamber designed by Yu. Proskurin
As mentioned above, there are a large number of different oven models. In this publication, one of the compact and functional options will be considered, which can be installed in a small house, since it does not take up much space, but is capable of heating a room with an area of 16 ÷ 17 m².
The design of the Yu. Proskurin oven is a double-turn heating and cooking version, equipped with a single-burner stove and a drying chamber designed for drying vegetables and fruits, medicinal herbs, mushrooms, etc.
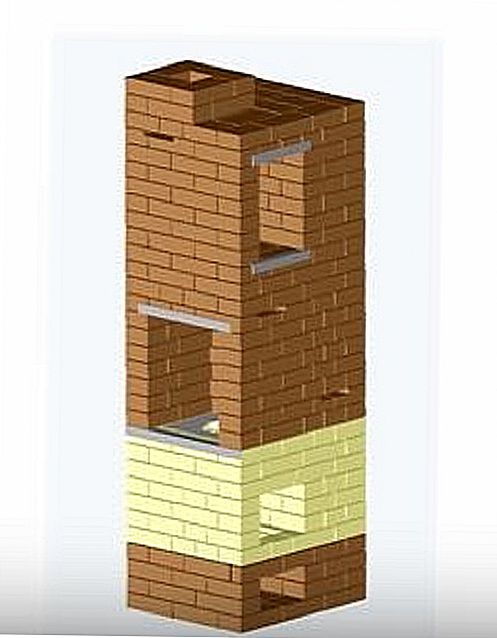
If desired, an oven box of a suitable size can be installed in the niche of the drying chamber.
The furnace has dimensions (excluding the height of the chimney) 750 × 630 × 2070 mm. Its heat transfer is 1700 kcal / h. The design provides for two operating modes - summer and winter, which is very important both for saving fuel and for the ability to heat the stove and cook food, without heating the whole constructions in the summer.
List of required materials
In order to build such a heating structure, you will need the following materials:
| Name of materials and elements | Quantity (pcs.) | Element dimensions (mm) |
|---|---|---|
| Red brick M-200 (excluding pipe laying) | 281 ÷ 285 | - |
| Fireclay refractory brick, grade Ш-8 | 82 ÷ 85 | - |
| Furnace door | 1 | 210 × 250 |
| Doors for cleaning channels | 2 | 140 × 140 |
| Blower door | 1 | 140 × 250 |
| Summer gate valve for chimney | 1 | 130 × 130 |
| Firebox shutter | 1 | 130 × 130 |
| Hob latch | 1 | 130 × 130 |
| Grate | 1 | 200 × 300 |
| Single-burner hob | 1 | 410 × 340 |
| Steel strip | 1 | 40 × 260 × 5 |
| 1 | 40 × 350 × 5 | |
| 1 | 40 × 360 × 5 | |
| Steel corner | 1 | 40 × 40 × 635 |
| 3 | 40 × 40 × 510 | |
| 4 | 40 × 40 × 350 | |
| Roofing iron | 1 | 380 × 310 |
| Pre-furnace metal sheet | 1 | 500 × 700 |
In addition, for work, you will need clay, sand, cement, crushed stone, gravel, marl and an oven box, if decided, install an oven instead of a drying niche.
Scheme-order of the construction of the furnace designed by Yu. Proskurin
| Illustration | Brief description of the operation being performed |
|---|---|
 | The first row is laid out with a solid plane, observing the location of the bricks. It is very important to put this row perfectly exactly in all parameters, since the quality of the masonry of the entire structure will depend on it. |
 | In the second row, a blower (ash) chamber and the base of two vertical channels are formed. On the same row, the doors of the blower and cleaning chambers are installed. |
 | There are special lugs on the metal doors, into which pieces of steel wire are threaded and twisted - they will then be embedded in the seams between the bricks. Temporarily, until they are fully secured, the doors are propped up with bricks on one or both sides. |
 | On the third row, the formation of the blowing chamber and the lower part of the chamber of the vertical channels continues. At the same time, the installed doors are fixed on both sides. |
 | On the fourth row, the doors of the blower and cleaning chambers are completely covered with bricks. The common chamber of vertical channels is divided in two, therefore, instead of one large hole, two are formed, having a length of ⅔ bricks and a width of half a brick. |
 | The fifth row is completely laid out with fireclay bricks. Above the ash chamber, an opening is formed with a seat for the grate. For this, a part of the brick is cut out, from the side with which it should be turned to the hole above the blower chamber. |
 | The grate is also mounted on the same row. It is planted on a clay solution or laid loosely, without solution. A distance of 4-5 mm should remain between it and the brick. |
 | On the sixth row, the formation of the combustion chamber and vertical channels continues. |
 | In addition, a furnace door is installed on the same row, the frame of which must be wrapped or covered with asbestos before installation, which, when the metal is heated, will allow it to expand without stress or damage. |
 | The seventh and eighth rows are laid out according to the order, the formation of the firebox and vertical channels continues on them. |
 | On the ninth row, the furnace door is covered with bricks. Moreover, in order to remove the load from the overlap from the door, the side and third bricks from the edge are grinded from one side and a brick is installed between them, hewn from both sides. |
 | On the tenth row, the fuel chamber and the first vertical channel are combined - this is done so that hot smoke from the firebox is directed exactly into this created hole. For a smooth flow of smoke, the protruding corner of the solid brick enclosing the second vertical channel is cut off. |
 | On the eleventh row, the masonry goes according to the scheme, except that cutouts are made at the edges of the bricks framing the combustion chamber, which will form a recess for mounting a single-burner hob. |
 | Then, on the same row, asbestos strips are laid on the cuts made on bricks, and a slab panel is mounted on them. A steel corner is installed on the side of the brewing niche formation. |
 | The 12th row is laid out from red brick, and in the future, all the masonry comes from it. Two vertical channels are formed again, and a niche is formed around the hob. |
 | The 13th row is laid according to the scheme, but in front of the first vertical channel a place is formed for installing the summer-winter valve. After that, a valve is mounted on the clay-sand mortar. |
 | From the 14th to the 17th row, the laying is carried out according to the same principle - the cooking niche and channels are formed. |
 | On the 18th row, steel corners overlap the cooking niche. One of them is mounted on the edge of a niche, the second is at a brick distance from the first, and the third is pressed against the second with the back side. This is done so that it is convenient to lay the next row. |
 | On row 19, the cooking niche is completely covered, with the exception of the formation of the opening of the steam exhaust channel and the place for installing the valve. For this, cutouts are made on the bricks, into which the valve is mounted. |
 | Row 20 is laid out according to the scheme. The formation of two vertical channels and a steam outlet continues on it. Moreover, if you look closely, you can see that one of the bricks forming the first vertical channel is shrinking. |
 | On row 21, the first vertical channel and the steam exhaust channel are combined with the help of the hollow space left. In this row, almost all bricks are placed only along the walls of the perimeter of the structure. Only the second vertical channel is fenced off. |
 | In the same row, the formed cavity is overlapped by metal strips, which are laid according to the diagram shown in the figure. |
 | Further, a sheet of roofing iron is laid on the steel strips, with the help of which a chimney hole is arranged, located on the opposite side of the steam exhaust hole. |
 | On the 22nd row, laying is done on top of the roofing sheet. A chimney hole and two vertical duct holes are left. In the place where the drying niche will be formed, a piece of corner is laid, which will protect the brick at the edge of the chamber from damage and make the edge of the niche more neat. |
 | 23rd row - a drying chamber is formed, and its rear wall is made of bricks installed on its side. He will isolate the chamber from the opening of the chimney. |
 | On the 24th row, the walls of the drying chamber, chimney and two vertical channels are formed. |
 | 25 row - work continues according to the scheme. The second brick of the rear wall of the chamber is installed in the same way as the first one. |
 | On the 26th row, preparations are underway to combine the two vertical channels, so the internal bricks in both holes are grinded at a slight angle. |
 | 27 row - the first and second channels are combined with masonry. A common cleaning door is installed for them. The rest of the work follows the scheme. |
 | On the 28th row, the drying chamber is overlapped with three pieces of corners according to the same principle as the overlapping of the cooking niche was done. The vertical channels are combined into one wide one, and the cleaning door is fixed with side bricks. |
 | On the 29th row, the drying chamber and vertical channels are completely blocked. The opening of the chimney is left, which is lined with bricks with cut out mounting slots for the chimney valve. After laying the row, a frame with a latch is installed on the clay-sand mortar. |
 | On the 30th row, the entire surface of the furnace is completely covered. Only the chimney hole is left, which should be half a brick in size. |
 | Row 31-32 - the formation of the chimney begins. |
This figure shows a sectional view of the oven. The diagram shows well all the internal channels through which the heated air will circulate.
In late autumn and early spring, there is not enough comfort at the dacha - it becomes damp and cool in the house. The problem can be solved with an electric heater, but in a suburban home it is better to give preference to a traditional wood-burning hearth. The heat from the stove or fireplace warms not only the body, but also the soul, filling the room with a special aroma and comfort. To build a mini-oven with your own hands, you do not need large costs - the cost of a home-made unit will cost much less than finished devices.
Heating and cooking country stove: where to start and how to build
Small-sized furnaces, despite their small dimensions, are installed on a solid foundation. Only in some cases can you get by with reinforcing the floor. Experienced craftsmen work without diagrams and drawings, and beginners are advised to take the order of reputable stove-makers as a basis.
Construction diagram and materials
Ideal for a small house, this square mini brick oven is simple, compact and efficient. The design includes a low chimney with a channel section of 13 * 13 cm. The stove has an oven that allows you to cook and warm up dishes. The cabinet is made of sheet steel, but if desired, it can be replaced with a ready-made oven of suitable dimensions.
The appearance and structure of the furnace
A fireproof mortar is required for laying a mini-oven on wood. You can make it yourself from clay, but it will take more time, and the result will depend on the quality of the clay and the correct determination of its fat content. It is much easier to trust the manufacturers and purchase a ready-made heat-resistant mixture in the store - in this case, the product will remain to be diluted with clean water in the proportions indicated on the package.
The dimensions of the compact structure are 51 * 51 cm, the height of the hearth is 175 cm. To strengthen the firebox, fireclay bricks must be taken - it is not afraid of direct contact with the flame and does not crack. The walls of a mini-oven for a country house are laid out with red brick.
Consumption of materials:
- ceramic bricks - 170 pieces;
- refractory masonry mortar - 35–40 liters;
- door for the firebox measuring 23 * 25 cm;
- blower door (13 * 14 cm);
- cleaning door (13 * 9 cm);
- grate (25 * 18 cm);
- latch (12 * 34 cm);
- steel sheet;
- steel wire - about 2.5 m;
- roofing material for waterproofing.
Masonry diagram and oven drawing
The first row, as always, is laid out without mortar. On the second row, a blower door is mounted using steel wire for fastening, and an ash pan is laid. On the fourth row, a grate is laid, providing a gap of about 4 mm between the grate and the masonry.


Laying the fifth row begins with the installation of a combustion door. The door frame is wrapped with an asbestos cord, and the door is walled up in the masonry using steel wire. This is followed according to the scheme: an oven, a chimney, a pipe are formed.

Baby stove with stove and oven
Another mini-oven for a summer residence has dimensions at the base of only 51 * 64 cm, while the depth of the firebox is 50 cm. The model is perfect for a country house or a summer kitchen. Firewood, coal, peat, briquettes can be used as fuel.
Design features and materials
Despite its small dimensions, the compact stove is quite functional and is equipped with a hob and oven, which allows it to be used not only for heating the room, but also for household needs. According to the reviews of those who have already built this assistant in their country house, the kettle on the stove boils in literally minutes.
The compactness was preserved thanks to the vertical arrangement of all elements. The chimney has a cross section of one brick. The exhaust gases pass through the channels located behind the cooking chamber, then enter the horizontal chimney, bypass the oven on both sides and go into the chimney.

Diagram of a mini-oven for a country house or summer kitchen
For construction you will need materials:
- red brick - 220 pieces;
- clay masonry mortar or ready-made - about 50 liters;
- grate;
- steel sheet (pre-furnace) with a size of 50 * 70 cm;
- steel strip 4 mm thick with parameters 350 * 25 cm;
- slate sheet 51 * 30 cm;
- gate valve - 2 pieces;
- firebox door;
- 3 cleaning doors;
- blower door;
- oven (32 * 38 * 42 cm);
- stove (38 * 35 cm) with one burner.
Masonry order
The first row of a brick mini-oven is laid without mortar. After the second row, a blower door is installed, the next row is placed and the firebox begins to form. The grate is laid without mortar. The sequential diagram clearly shows where and how the doors, stove, oven and latches should be installed.


To protect the ceramic bricks from fire, a lining is carried out - fireclay refractory bricks are laid in a separate row. It is important to remember that different types of bricks cannot be tied together - they have different expansion temperatures. Failure to follow this rule leads to cracks.

Option for novice stove makers: a stove with a cast iron firebox
A brick mini-oven can be built with your own hands on the basis of a finished cast-iron firebox. Cast iron fireboxes are durable - they do not crack or burn out. This option is more suitable for beginners, since all the main elements are already provided for in the design. The combined oven heats up quickly and cools down for a long time, due to which the efficiency of the hearth is significantly increased. If you wish, you can choose a fireplace-type hearth with a fire-resistant glass door - such a model will not only warm, but also decorate the room.
Before starting work, prepare a solid and even base. To do this, you can fill in a small concrete podium. The lining of the cast-iron firebox is made in half a brick, leaving an air cushion with a thickness of 1 to 10 cm between the walls and the cladding.In addition, it is necessary to provide small ventilation holes in the lower part of the building - they will provide the outlet of heated air and improve heat transfer.

Example of lining a cast iron firebox
You can start building a mini-oven with your own hands only with firm confidence in your knowledge and skills. Any doubts are a good reason to postpone independent work and entrust the construction to a professional stove-maker.
Video: do-it-yourself masonry of a small summer cottage stove
© When using materials from the site (quotes, images), the source must be indicated.
The stove is a crude source of considerable confusion. The point is that “rude” or “rude” is not a well-established term. In the West and, partially, in the South Slavic languages, this is either just a house heating and cooking stove, or a wood stove for a summer kitchen with 150-200 bricks. Well, according to acc. Dutch women, Swedes, bath (!), bell-type (!!) stoves and others fly out to a request in Runet. You can even find statements, they say, there was once an outstanding designer of Grub stoves somewhere.
In fact, a stove with a rough, or just rough, is a compact heating and cooking stove with a heating shield, separate from the stove for a heating cycle, but technologically combined, i.e. they are built together (see also below). Hence the conclusion that the bell-type can not be rude - the heating shields to the stoves are always ducted. Do-it-yourself coarse construction is easier than a channel furnace of equal thermal power with a single thermal cycle, requires less materials and weighs less. However, its thermal efficiency (analogous to the efficiency for furnaces) is lower. Therefore, they are roughly built in seasonally inhabited premises or small houses with good thermal insulation, where some excessive fuel consumption in absolute and monetary terms does not hit the budget.
Note: a heating and cooking brick made of 12 kW of heat requires up to 1200 bricks; of the same power without a hob - 1200-1350, - 1800-2000, - 2500-3500 bricks.
Varieties
A do-it-yourself pipe can be built with a shield built into the body (structure) of the furnace, and then it looks indistinguishable from the stove, pos. 1 in fig. The rough-plate is compact, the least material-intensive, the lightest, requires a minimum amount of additional construction work, but its thermal power is limited to 10-12 kW, and then with great stress. Therefore, rough-slabs are placed mostly in seasonal dachas (spring-autumn) with occasional trips there in winter, hunting lodges, etc. An important advantage of a rough slab is that it can be built without a foundation directly on the floor, if its bearing capacity is at least 500 kgf / sq. m.
A coarse with an attached shield (pos. 2) is structurally more complicated and heavier, although a simplified foundation (see below) is also suitable for it, but its thermal power is potentially greater. Rough on wood with an attached shield is capable of developing up to 16-18 kW; on coal - up to 20-22 kW. The flow diagram of the flue gases in the rough with the shield is given in pos. 3; this is how the popular Galanka oven was built. However, you need to know that it makes no sense to build a rough for more than 3 turns: such a furnace with a single cycle will be simpler and cheaper. In addition, during construction, it will be necessary to pay particular attention to some of the features of rude furnaces, which are discussed in a significant part of the article's material.
Note: wood-burning can also be done with a stove bench, see below. It is undesirable to heat such coal, the bed overheats.
Why is rude - rude
Visually, a rough stove can be distinguished from a stove with a later attached shield by the integrity of the structure (pos. 4), but in essence they are one and the same. The calculation of a heat-efficient furnace is very complicated and requires a fairly deep knowledge of heat engineering, and the development of a furnace design based on its results also requires solid practical experience. It is much easier to develop and build a rough because its furnace (fire) part and the shield are calculated separately, and then "stitched" together according to the rules of conjugation of building structures, taking into account the requirements of heating technology. Naturally, the thermal efficiency of the resulting device will be lower, because the interaction of the thermal cycles of the firing section and the shield is not taken into account, namely, due to its accounting, it is possible to increase the efficiency of the furnace of a single cycle. That's why, if you live in an area with a harsh climate, being rough may only make sense to you as a seasonal stove for temporary use.
Firebox, flap and chimney
The main differences are rough from the solid fuel stove - a more powerful firebox and the absence of a pass (smoke tooth) in the furnace part. The tooth retains hot gases under the hob, which in the summer stove reduces fuel consumption for cooking. In rude it is not needed, tk. excess heat will be used for heating.
A coarse stove should have a more powerful firebox because the shield provides additional resistance to the flow of flue gases. A chimney with enhanced draft will not help here: the gases in the flap will immediately expand, cool down. Their thermal energy will be converted into mechanical energy, which will successfully fly into the pipe. Figuratively speaking, a firebox with a chimney in a stove with a shield works according to the push-and-pull principle, and “push” here is a firebox of greater power. This explains the special requirements for the firebox and stove fittings. Rough, see below.
Shields
Depending on the purpose, coarse heating shields for them are made of different types. Diagrams of heating shields for stoves are given in Fig. below; the fuel part is shown conventionally everywhere.

- Sequential stroke with short vertical channels. Least material-intensive and easiest to build. The resistance to gas flow is greatest. The compactness and heat efficiency of the furnace are average. Most often used scheme;
- Sequential stroke with horizontal channels. The weight and dimensions of the stove are the same as in the previous one. case, but building a shield with horizontal channels is much more difficult. Resistance to gas flow approx. 1.5 times less. As a result, the heat efficiency of the oven is higher. Perhaps the device of a couch, i.e. the upper channel is not very hot;
- Consistent stroke with long vertical channels. Thermal efficiency is the same as for a flap with horizontal channels, technological complexity is the same as for a flap with short vertical channels. It occupies the smallest area, but requires a lot of materials and a good foundation (see below) due to the high specific pressure on the support. The best option for a home heating stove for 2-3 rooms, see below;
- Parallel move. Highest thermal efficiency, lowest weight per unit of heat output. The occupied area and technological complexity are the greatest. It can be used with a reduced power firebox. Optimum for an extension to an existing slab without reworking it.
Note: there are also shields of a series-parallel circuit or chess. The most difficult, but also the lightest, have the least resistance to the flow of gases. The only possible option for a rough house with a heated attic, see below.
Special Requirements
We repeat: the advantages are crude - compactness and the possibility of building in an existing house without major construction work. But it is not so easy to place a more powerful firebox in the structure of a furnace of the same dimensions, it will quickly become unusable from an excessive heat load. If special requirements are not met:
- Furnace foundation.
- Masonry mortars.
- Methods of laying the structure of the furnace.
- The choice and methods of installing oven fittings.
Foundation
The construction of the foundation for roughness is shown in Fig. A crushed stone pad without sand filling is leveled into the horizon before pouring. Grouting mortar M150 - cement M300 and sand 1: 2. The gap between the rubble foundation and the flooring is 30-40 mm. Do not forget to support the trimmed logs! Leaving their ends dangling is a common but gross mistake. The dimensions of the foundation in the plan should protrude at least 100-150 mm onto the contour of the furnace.

Note: a brick bed on the foundation for the furnace is laid out with dressing in the rows and between the rows in the same way as the first 2 rows of the masonry of the furnace structure, see below.
Solutions
To fold coarse, 3 types of solutions are used, see fig. below. The bed on the foundation and the chimney are laid out on a lime mortar that combines sufficient heat and moisture resistance, but the quarry should be laid only on a completely moisture-resistant cement-sand mortar. It is highly desirable to take sand for clay mortar from mountainous or ravine, with rough grains. Ordinary clay - purchased from the oven, of guaranteed fat content and, most importantly, purity. Self-excavated clay, brought to the required fat content with sand, is not very suitable for coarse masonry.

Masonry
For rough masonry, an oven brick is used and, if the order (see below) is provided, fireclay brick; the red worker is of the highest quality - light red (completely annealed), without spots of burnout, distortion and swelling. Dry-formed bricks are absolutely unsuitable. The masonry of the structure is roughly carried out on the trail. rules:
- If you are an inexperienced stove maker, each row of masonry is first laid out on dry; detected defects of cutting / chipping of bricks are eliminated.
- Before laying on mortar, each brick is soaked until the release of air bubbles stops. Plump all the bricks in a barrel indiscriminately!
- A layer of 5 mm mortar is applied to the bed and the poke of the brick to be laid.
- The brick to be laid is laid with a smooth movement slightly inclined and moved to the previous one so that there are no air bubbles in the seam.
- Press the brick until the seam converges to 3 mm; you can’t knock!
- Between fireclay and ordinary masonry, the initial seam is 8-10 mm; after pressing - 6 mm.
- The seam between bricks and metal embedded parts (see below) is 10 mm.
- Excess mortar squeezed out of the seam are removed with a trowel (trowel).
- The recesses in the seams found after removing the excess mortar are filled with the mortar by indentation without transverse movements, but not by rubbing!
Those who prefer to study visually a video tutorial on laying heating and cooking stoves can see below:
Video: laying a heating and cooking oven
Fittings

Fittings and grates for rough need cast iron; doors and latches - with a mounting skirt and holes in it for diagonal wire whiskers. Steel welded or cast iron fittings with lugs for straight whiskers (laid along the corresponding walls of the furnace) are unsuitable in this case. However, place doors / latches as shown in fig. on the right, you can't be rude; it is not at all by the stove rules. For a dacha Dutch woman for 2.5 bricks in the plan, which is heated once or twice a season, maybe it will do, but not for the rude.
It is necessary, firstly, to squeeze the mustache (wire - galvanized 2-3 mm) with a wrap so that they do not move. Press down at first not tightly, put it at the desired angle (at least 12 mm should remain from the far end of the mustache to the inner side of the masonry). Then tighten gently, shake the door / latch slightly. Didn't leave? Good. Then, secondly, you need to tightly wrap the skirt with an asbestos cord (or from basalt fiber), and only now put it in place. You can also watch the following videos about installing fittings in the oven.
Video: installing the door in the oven
Video: grate and stove
Examples of constructions
The figure below shows the order of a simple rude for a seasonal dacha or a temporarily inhabited house. A feature is the minimal use of fireclay bricks (highlighted by textured filling), which, generally speaking, is difficult to do without, and a niche above the hob. In cold weather, it speeds up cooking, and if it is already warm enough outside, it does not allow the stove to overheat the room during cooking.

On the trail. rice. - the ordering of a single-burner rough is also compact and light, but more complicated, with a combined channel system. This is an option more for a hunting lodge or summer cottage, where they spend their weekends in winter.

Further in Fig. - ordering of the house heating and cooking coarse with switching over to winter and summer running (two-way). This stove is rather complicated, but it is quite economical both for winter and summer running. Option for a permanently inhabited summer cottage or a one-room house.

On the trail. rice. - ordering and drawings of heating coarse - fireplace stove (furnace door can be glass) for a house of 2-3 rooms. In a 2-room one, this rude is placed in a wall, and in a 3-room one - with a facade in the living room and in the rear in 2 adjacent rooms; the partition between them falls on the back side (back) of the oven. Agree, 650 bricks for a heating stove for a 3-room house is not much.

Now - in fig. below the diagram and ordering are rough with a stove bench: a cooking part in the kitchen / hallway with a bathroom; lounger - in the living room. This is already a very complex construction for an experienced stove-maker. For the firebox, in warm weather, the stove bench is covered with a feather bed, etc., so that the room does not overheat, but then the windows in the kitchen / hallway will have to be kept wide open, because switching to summer running is not provided.

And finally - rough, so to speak, aerobatics, see fig. below: for a house with a heated attic, where an additional shield with checkerboard channels is located (in the inset at the bottom right). This stove can also be a fireplace stove if you take a glass door of the firebox. It is 2-way; ZLH in the drawings - summer run valve.

About chimneys
The chimney for rough must meet all fire safety rules. It should only be noted here that the best chimney for a coarse one is a sandwich one, because it also does not require additional capital construction work.
Finally
If rough is your first oven (which is quite possible), take your time to build, model first on the table. Suddenly there is a little extra money - you can buy a set for modeling furnaces with ordering diagrams and plastic bricks on a scale, these are sold. No - bricks can also be cut to scale from Styrofoam. Then it is convenient to imitate the seams of the masonry using strips of thick paper or thin cardboard, depending on the selected scale.
A brick stove in a private house or in the country can always perform several functions, for example, heating and cooking. But most often the construction of a brick stove is carried out with one purpose - to constantly maintain heat in the house. So that the heating of the room is carried out efficiently (regardless of its size), and the fuel consumption remains moderate, you should know not only the design features of the brick stove, but also the correct order of its construction. Also, special attention should be paid to the choice of building material. You can learn more about how to fold a simple brick oven with your own hands.
It is necessary to accurately distinguish between ovens according to the principle of use, which are divided into:
- Red brick heating stoves. They are used most often, since they can be used to heat up to 100 m 2 of the room. The dimensions of the oven can be quite large.
Heating stove
- Cooking ovens. They are used exclusively for cooking, of course, while spreading a certain heat around.
- Combined brick version. This brick oven can be used for both cooking and heating. It is very convenient, for example, in the country or in a country house.

Combination oven example
- Fireplace options. The brick fireplace stove is not widespread, but some owners are trying to give the old stoves exactly the look of a fireplace, saving space. It is used for space heating or as a decorative version of a fire source.

Fireplace version of a brick stove
To find out the main structural elements and dimensions of a red brick stove, for example, you should take the most popular option - a combined one (a hob and a brick stove for heating a house or summer cottage).
The structure of the combined brick oven:
- Firebox. This is the place of the Russian stove in which the fuel is burned. Since the temperature in this place is constantly high, then the materials should be selected accordingly.
- It blew. A free cavity, which is laid out of bricks directly under the firebox. The main function is the accumulation of ash and small unburned residues. Also, air enters the furnace through the blower, which improves the quality of fuel combustion.
- Ducts for removing smoke from the oven. One of the most difficult parts of the oven. Passing through the channels, the combustion products give off part of the heat to the brick, which subsequently heats the room.
- Chimney. Releases exhaust gases into the atmosphere. It also provides the traction necessary for combustion in a Russian stove.
- Tile. Located in a place above the firebox and only in cooking or combination ovens.
- Cleaning holes. For greater convenience, they are mounted in the upper part of the chimney, this place allows it to be quickly and efficiently cleaned.
The foundation is the basis of any structure
Like every solid building, a brick stove for a home should have its own foundation. The weight of a brick oven is on average 1.5 tons, no more. Therefore, in the ground it will be enough to dig a trench up to 15-20 cm deep, which is approximately equal to one bayonet of a shovel, and you can start building a furnace with your own hands from bricks.
After the foundation trench is ready, formwork can be installed in it. The formwork is made from boards of any category with their own hands, the only condition is the absence of traces of decay. The structure should rise 10-15 cm above the ground. According to the rules, the base of the foundation should be level with the floor, but many home owners make it a little higher. The walls of the formwork can be fastened together using knitting needles.
A sand cushion is poured into the bottom of the trench. You don't need to use a lot of sand. A cement mortar can be poured over the embankment, which requires the following materials:
- 1/3 bucket of cement.
- 8 bayonet sand shovels.
- Water (add until thick cement slurry is formed). In case of accidental overflow of water, a little cement and sand should be added.
The first layer of cement will be 7-8 cm. Materials such as pieces of reinforcement or pre-welded mesh should be laid on it. Next, the second layer is poured and the reinforcement is also laid. The reinforcement will reliably bind the entire structure and add strength to it. After the end of the pouring, the solution must be allowed to dry, this can take up to several weeks.
2 layers of waterproofing should be laid on the finished foundation. It is not necessary to fix it, the brickwork will qualitatively press the waterproofing to the foundation.
Do-it-yourself brick laying of a brick stove, step by step
If you know the sequence of laying a simple brick oven and have the required tools and building materials at hand, the work can take several days. It takes no more than one day for the craftsmen to build a brick oven.
- The most important in the oven is the first brick row, which is laid with a solid surface, without any cavities or technical holes. To set its level and correct angles, you should use: a square, a building level and (if necessary) a tape measure. After finishing the laying of the first stove level, it can be checked using a plumb line fixed to the ceiling in the room.

Construction of the first row of brickwork
If you do not follow these recommendations and do not use a measuring tool, then the result may not correspond to the desired: a row with curved walls, disproportionate angles, an uneven surface. Then the oven will have to be shifted, which will lead to additional waste of funds.

A whole oven brick is not always necessary here, sometimes halves are enough. In order to prepare such pieces, you should use a grinder with a diamond wheel. The brick cannot be beaten with a hammer, it is too fragile and the pieces will turn out to be uneven.


You can see the whole process described above in more detail in the video:
The above sequence clearly shows that it is possible to fold a simple oven (which will withstand an increase in degrees) or a brick slab with your own hands, and this does not require complex tools or expensive building materials.

Ordering for a brick oven
Preparing the mortar for laying the stove
Most often, for laying a stove (or firebox) made of bricks, an earthen solution is used, which can be prepared with your own hands (for example, for a cooking stove), it does not take much time for this. The following materials are needed for the furnace: clay, water, sand. Clay, before preparing the mortar for laying the oven, must be soaked for at least 24 hours. After that, pure water should be added to it, without mineral impurities. The resulting masonry mortar should be thick enough and resemble sour cream in consistency. The last ingredient is sand, it is added in small portions, constantly stirring the solution.
If the bricklaying of the brick is made according to all the rules, then the clay mortar is not suitable for the first row (the junction of the brick and the foundation), as well as for the chimney. This is due to the accumulation of moisture during continuous operation of the oven. Clay is prone to water absorption and cracks in the event of sudden changes in temperature. Therefore, it is better to use lime mortar for these places.
The procedure for preparing a lime mortar for a brick oven:
- Materials: quicklime, water, sand. Prepare a mixture of water and lime in a 3: 1 ratio. In this case, it is necessary to add water to the lime and constantly stir the solution until the dough is formed. It is very important to use a face shield and gloves when working with quicklime.
- After preparing the dough for laying the oven, it should be crumbled and sieved with high quality, getting rid of too large particles.
- Sand is added to the sieved solution, the amount of which should be 3 times more than lime.
- Adding water will allow you to get a thick mass for laying a stove or a separate firebox. Now you can start building a real Russian stove. Some masters, for greater strength, add a small part of cement to the solution.
A qualitative, but more expensive substitute for kiln clay and lime mortar is cement mortar. Cement is characterized by increased strength, as well as resistance to temperature extremes; it is most suitable for laying a stove used to heat a room, as well as a chimney or oven.
To prepare such a solution, sifted sand and cement will be required. The ratio should be 1 portion of cement to 3 portions of sand. Having prepared a dry mortar (it is enough to mix the cement and sand), you can gradually add water to it, but only in small portions. Having achieved the required consistency (the solution should become creamy), you can start laying a brick oven for a house or summer cottage. The main disadvantage of cement mortar for creating a brick oven with your own hands is that it should be used within one hour after preparation.
And another useful video for novice stove-makers
Not a single private house is complete without a traditional brick heating and cooking stove. And although today many houses are equipped with gas heating, most owners are in no hurry to give up a brick stove, as it gives a special warmth - the warmth of the hearth, filling the home with coziness and a sense of tranquility. In addition, in regions rich in forests, you can significantly save on natural gas consumption by acquiring firewood.
The desire to make redevelopment in the house, including the transfer of the heating and cooking stove, can often run into the nuances and subtleties of the stove business. You will learn how to fold the stove with your own hands in this material.
There are many types of stoves, but not all are used in private construction.
Types of stoves for private houses:
- Heating(fireplaces, sauna heaters);
- Brewhouse(oven exclusively for cooking);
- Universal(heating and cooking).
The latter type is considered universal, therefore it is most common in private construction.

Furnace device and its properties
After reviewing the sketches and projects of brick ovens, and choosing a specific option, you should pay attention not so much to its external design, but to the internal structure. The device of the heating and cooking oven determines its performance, and ultimately, the service life.
The internal design of the heating and cooking stove does not depend on the location of the device itself in the house. The kitchen stove can be located in the middle of the room, in the corner or against the wall.
The main structural elements of the heating and cooking furnace:
- Shants (warm air ducts);
- Ash pan (or blown);
- Grate (for connecting the firebox with the ash pan);
- Under (slope to the grates);
- Furnace chamber;
- Burnout (smoke exhaust);
- The arch of the furnace (separates the combustion zone from the afterburning zone in the combustion chamber);
- Air vent (a hole through which heat enters the heated room);
- Outer wall;
- Smoke circulation (Channel connecting the combustion chamber with the chimney);
- Overlapping;
- Chimney;
- Indent (space between the chimney and the stove);
- Smoke dampers;
- Heat dissipating walls.

The heat output of the stove is determined by the amount of heat energy released by the stove per hour and depends on the amount of fuel used. Heat capacity (the ability to retain heat from the burned fuel) is measured in hours. Different stoves have different levels of heat capacity, which also depends on the degree of insulation of walls and ceilings, windows and doors of the house.
The location of the stove in the house affects the amount of heat. A house with a stove in the middle will be warmer.
Russian stove and its device
The Russian brick stove is installed on the foundation, since its device is quite massive. In its design, the Russian stove includes a preheater used for storing fuel, which dries up in it and easily flares up when the stove is melted. The subheat is closed with a vault-trough, onto which a bedding on a solution of clay is poured. The bottom of the cooking chamber is installed on top of the bedding.

The Russian stove has a special design that significantly differs from the traditional heating and cooking stove in the heat transfer coefficient and other parameters. During heating, even for a short time, the Russian stove accumulates heat and is able to give it away for 24 hours.
In order for the Russian stove not to consume an excessive amount of fuel, not to smoke and not to cool down in a matter of hours, when installing it, it is important to observe the exact masonry technology and dimensions that the diagram includes. The bricks that form the inner structure of the furnace are hewn and polished so that the walls inside the high are even and smooth.
Also in its design, the Russian stove includes a combustion chamber, which is its heart. The firebox is divided into a cooking chamber or bakery and a firebox (crucible). The floor of the crucible has an inclined structure, which must be made exactly according to the drawing when constructing a Russian stove.
The crucible is the main secret hidden in Russian cuisine. After cooking, some dishes must simmer for a long time in the cooking chamber. It is not possible to achieve such an effect or create similar conditions for the preparation of Russian cuisine using a familiar hob or electric oven.
The main secret that distinguishes the Russian stove from the traditional one is the smoke channel of the simplest design, which surpasses in its efficiency the devices of the smoke channels of other stoves.
DIY Russian stove device (video)
Choice of design
The choice of the type of oven depends on the conditions of its operation:
- Heating and cooking stove. If you plan to use the stove intensively in your home, it is better to choose a heating and cooking stove with a massive device and regular heating. In the device of such a furnace, its structure, consisting of many cold bricks, is first warmed up, then heat transfer begins.
- Heating furnace. For a house in the mountains or a summer house where permanent residence is not planned, a fireplace will be enough. Although it has a small heat capacity (2 - 3 hours), it is able to warm up a room much faster than a massive stove. This design will allow you to quickly warm up in the cold season.
The brick heating stove can be installed with or without a foundation. The lightest structure is assembled in a quarter of a brick (the brick is placed on the edge). In order to give it strength, a frame made of metal corners is used. A massive furnace requires a foundation that should not be associated with the building support. In the case of a separate chimney, it also needs its own foundation.

Determine the size and power
The level of heat transfer of the heating and cooking stove must exactly fulfill the possible heat losses, which depend on the temperature outside the house, as well as the degree of insulation of walls, windows, doors, and also ceilings.
The size and design of the future furnace determines its power.
Furnace device. Where to begin?

The laying of any stove cannot be started without a project or drawing, which must include the location and dimensions of the structure, as well as the outlet of the chimney without disturbing the load-bearing elements of the structure. It is also necessary to calculate the heat transfer coefficient of the furnace. The scheme or design of the future furnace is drawn up on the basis of this calculation.
It is quite difficult to create a project or drawings of a heating and cooking stove on your own, so you can use the services of a design organization or information on the Internet.
Tools and materials
When the design of the stove is approved, it is possible to prepare for its laying.
To fold the stove with your own hands, you must have on hand:
- Stove-maker's hammer (trowel);
- Master OK;
- Building level and plumb lines;
- Measuring tape;
- Cement-sand mortar;
- Hand-held power tools (hammer drill, grinder, etc.);
- Red brick;
- Refractory bricks (fired);
- Facing brick;
- Masonry mortar made of clay and sand;
- Heat-insulating and moisture-proof materials;
- Furnace fittings and appliances.
Do-it-yourself oven masonry. All stages
Like any construction process, do-it-yourself stove laying is done in stages.
The scheme of this process includes the following points:
- Arrangement of the foundation. The foundation can be laid not from a whole brick, but from a battle. The foundation is not used for all furnace structures, but if you are building a Russian or massive furnace, you cannot do without its device.
The support of the future furnace should in no case come into contact with the foundation of the building, since they have a different draft, and in case of distortion, the furnace may crack and its operation may be disrupted, and this is fire hazardous.

The depth of the foundation depends on the weight of the furnace structure and its design, and the support area must exceed the overall dimensions of the furnace by at least 5 cm around the entire perimeter. The foundation is leveled with fired brick masonry in two rows on cement mortar to the floor level. When forming the first row of masonry, it is necessary to achieve a flat horizontal surface in accordance with the level, since the quality of the construction of the entire furnace will depend on it. This is followed by a layer of waterproofing, as a material for which you can use ordinary roofing felt or roofing material, the material is laid in two layers.
- Furnace masonry. The first row is laid on top of the waterproofing. Brickwork from each row should be started without mortar, leaving gaps between the bricks equal to the future seams (3 - 5 mm). Next, a mortar is laid in place of the corner brick and leveled with a trowel. The brick itself is immersed in water and kept there until all the air is released. The “recessed” brick is removed from the water and placed correctly on the mortar, tapping it with a trowel to level it. The excess solution is removed with a trowel.

