How to make a carbon filter for the aquarium. Aquarium filter do it yourself
Each aquarium should have a filtration system that will purify the water, ensuring the health of the fish and plants. As it is known, wastes that are left behind by the inhabitants of the reservoir, as well as the remnants of food, suspended particles of soil are very harmful for fish. Not eaten feed is oxidized, turning into toxic ammonia. In order for the water to pass through all the steps of cleaning in a timely manner, it is better to make an external filter for the aquarium with your own hands. It will prevent the appearance of harmful substances that can poison living beings.
Quick transition on the article
How to design an external filter?
Before you make an aquarium filter with your own hands, you should understand how the filtration system works. The biological filtration method in an aquarium is the process by which ammonium is converted to nitrites, then to nitrates. Biofilation is carried out thanks to beneficial microorganisms that live in the aquatic environment. This process depends on the amount of oxygen absorbed, so it is important to maintain a constant supply of aeration in the tank using a filter and a compressor.
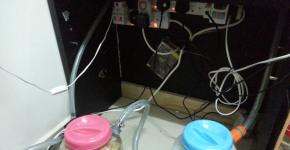
See how the homemade external filter made of plastic bottles works.
To make an external biological filter with your own hands, you should prepare the following materials:
- Plastic bottle of mineral water 0.5 l;
- A plastic tube with a neck diameter of this bottle;
- Sintepon;
- Compressor and hose to it;
- Aquarium pebbles with a diameter of up to 5 mm.
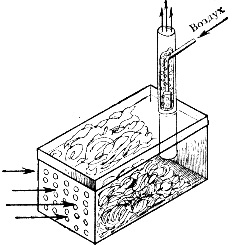
A plastic bottle should be divided into 2 parts so that fragments of different sizes are obtained from it. It should make a cup with a neck and a big bottom. The bowl should be directed with the side of the neck up and firmly planted in the bottom. In the outer circle of the bowl you need to make several openings through which water can flow into the filter. The recommended diameter of the openings is 3-4 mm, their arrangement is in 2 rows, with 4-6 holes in each.

Next, the tube should be inserted into the neck of the bowl so that it entered into it tightly. After the procedure, you should not notice any gaps or holes between the tube and the neck. The length of the tube itself is chosen taking into account the projection above the structure by 2-3 cm. At the same time, it should not touch the bottom of the bottle. If the step is done incorrectly, water will not be able to flow into the mechanism.
Take the gravel and put it on top of the bowl with a layer of 6 cm, and cover it with a piece of padding polyester. Install a hose in the tube from the aerator, and fix it. When the mechanism is ready, it must be placed in the aquarium. Then you should turn on the compressor in order for the filter to start its work. In the existing equipment, beneficial microorganisms will appear that process ammonia into nitrates, which forms a useful microbiological environment in water.
How does a hand-made external filter work?
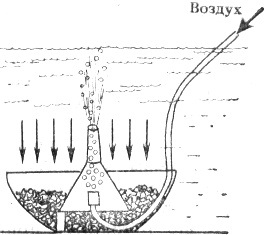
The self-made external filter is constructed on the basis of aerolifting: air bubbles that come from the compressor, rise to the tube, from which they come to the top, and lower with them the water flow from the filter. Clean and oxygenated water enters the upper compartment of the glass, and passes through the gravel. Then the water enters the bowl through the hole, goes down the tube, and enters the tank. Synthon here functions as a mechanical filter. This material prevents the silting of the gravel substrate.
Chemically and mechanically purifies water. It is better to install such structures in a large aquarium with a volume of 200-400 liters. For more spacious aquariums with a capacity of 500-1000 liters will need several such devices. Branded external water treatment systems are expensive, so it's best to do it yourself. Materials are inexpensive and accessible to everyone.

Another way to make an external filter
For the following external filter you need to prepare the following details:
- Plastic container with a tight lid (you can take a box for storing cereals);
- Sponge or thick material of porous structure;
- The tight water pump and the union for fastening to a capacity cover;
- Material for biological filtration (medical cotton, ceramic granules);
- Several suckers, resin adhesive texture.
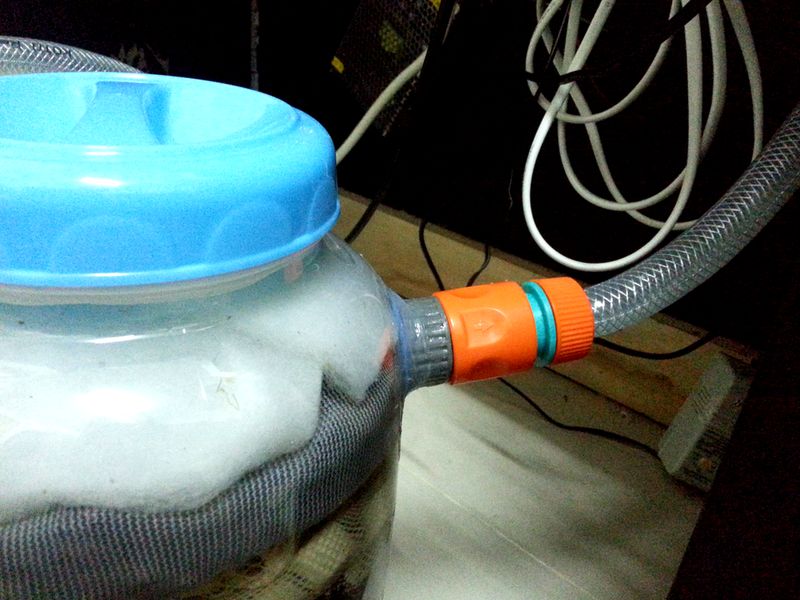
See how to make an external filter with your own hands.
Instructions for making the filter:
- It is necessary to take a thin file, and make cuts along the entire perimeter of the lower compartment of the plastic container. The cuts will pass the water.
- Put a sponge in this plastic container, on it - cotton wool or another element for biofiltration.
- On the cover of the tank, make holes that will correspond to the diameter of the pump nozzle.
- Insert the fitting into the hole made, and secure it with resin or aquarium silicone.
- At the nozzle should screw the pump, which can create pressure inside the container.
- On the side of the container, which is wider, you should attach a few household suction cups.
- The internal filtration system can be considered finished. Suckers can hold the device on the wall of the aquarium.
Such a homemade filter can be mounted not on the wall, but put it on the bottom of the tank. The soil will also play the role of a biological filter. A plastic nozzle can be attached to the exit hole of a plastic in the form of a long tube that goes outside. Then after cleaning, the water will be saturated with oxygen.
Instead of a small plastic container, you can use a plastic canister or a canister of stainless, non-toxic metal. This design is suitable for large aquariums, you can put in it large cassettes and cartridges with filtering elements. You need to maintain homemade filters with the same frequency as the branded ones.
If the filter is leaking, check all its elements:
- Whether clips of the mechanism are densely closed. You may have inattentively secured the parts with glue or resin. You can solve the problem by securing the clips again.
- A sponge or suction cup may become dirty in the running filter. Mucus and debris can be cleaned with water. Check the cleanliness of the design every month.
- Damage to the plastic container, which will have to change, tinkering with the filter itself.
Beginners aquarists, as a rule, buy small aquariums and very quickly become convinced that in such aquariums they grow poorly, adult fish feel uncomfortable, and the height of the water for plants is small. Such aquariums have to be changed to other, larger ones. In large aquariums, the population grows evenly, and more and more often you have to clean the aquarium from accumulating dirt.
As a rule, to maintain the cleanliness of the aquarium, various mud tappers are used, they regularly remove dirt from the bottom with a hose, and also use special filters. Via filter You can clean the water in the aquarium from dirt particles (dregs,) and at the same time saturate the water with oxygen, which is necessary for respiration of fish and other aquatic inhabitants.
As required, activated carbon is put into the filters, which absorbs from the water, dissolved harmful substances, peat for acidifying water, various pharmaceutical preparations that can have a beneficial effect on the inhabitants of the aquarium.
Filter designs
Functionally, the filters are divided into internal and external.
The constructions of the internal filters are ordinary. They tend to have small sizes and poor performance. They function using a microcompressor that supplies air through a tube. Air bubbles rising in the tube capture water after themselves and raise it above the water level in the aquarium. The flow of water formed passes through the filtering material and thus the aquarium is cleaned of dirt. Such filters in accordance with the mechanism of operation are called airlift.
External filters most often used for large aquariums. They are put into operation by means of an electric pump, which drives the aquarium water through the filtering material in the filter housing. Such filters are complex, relatively large in size and installed near the aquarium or hung on its wall.
The performance of filters, in other words, the volume of water that passes through a certain stage of time depends on the volume of air transferred by the compressor, as well as the size of the filter. Internal filters put on the ground (day), the wall and under the soil of the aquarium. During feeding, the inhabitants of the aquarium is better not to supply air, so that the food does not get into the filter and does not decompose inside it. The filter must often be cleaned of dirt, so that it does not divorce harmful bacteria.
In the form of a filtering material used fine or large quartz river sand (pre-washed and boiled), as well as synthetic fabric and thread (capron, nylon, and others). Also, waterproof foam is used as a filtering material, in large pores of which dirt is well accumulated.
Aquarists can offer several options for very simple, but very effective internal airlift filterswhich are used for water purification in aquariums up to 100 liters. They can be easily made. do it yourself from scrap materials.
As a filter housing, a box with a tight-fitting lid can be used. To do this, you need to find a finished box (made of plastic). You can use a trimmed plastic bottle or glue it out of plexiglass.
In order to be able to observe the accumulation of dirt in the filter and timely clean the filter material from it, it is better that the body or the filter cover are made of a transparent material. A plastic tube with a diameter of 15-20 mm and a length of 150-200 mm is tightly inserted or glued into the housing cover. Air spray should be used ceramic purchased. In the side wall of the hull, a series of holes of such a diameter are made so that snails or fry cannot get through the inside of the filter. The filter housing is filled with filter material is not too tight. It should be noted that the efficiency of the filter largely depends on the operation of the sprayer, since the smaller the size of the air bubbles, the greater their total surface that comes into contact with water, in other words, the water is much better saturated with oxygen, therefore the water flow through the filtering material increases .
Another internal filter is possible do it yourself. A standard glass jar with a capacity of 0.4 to 1 liter is used as the filter housing. Its body is closed with a conventional plastic cap, in which holes are made for the entry of aquarium water, as well as an opening for the installation of the tube. From a similar cover, a partition is made (between the cover-partition, filter material is settled).
Does not require a lot of time to build and the following filter. Its body is a clay bowl, in which a regular funnel is installed on the filtering material. In order that the funnel does not go deep into the filtering material, pads are placed under its edges. The filter is made of two-layer quartz sand and nylon filaments. Sand should be used medium-grained with a size of sand grains 1.5 - 2 mm. Air spray as well as in the manufacture of other models should be used ready, purchased in the store.
Aquarian filter - do it yourself., 3.6 out of 5 based on 26 ratingsBeginners aquarium enthusiasts usually acquire small aquariums and very soon make sure that fry do not grow well in such aquariums, adult fish feel uncomfortable and even the plants have low water height. We have to replace such aquariums with other, large ones. But in large aquariums, the population is gradually expanding, and more and more often there is a need to clean the aquarium from accumulating dirt.
Usually, to maintain cleanliness in the aquarium, various mud tappers are used, systematically removing dirt from the ground (bottom) with a hose, using special filters. By the way, using a filter, you can purify water from dirt particles (dregs), while simultaneously saturating the water with oxygen from the air necessary for breathing to fish and other aquatic animals.
If necessary, activated carbon is absorbed into the filters, absorbing harmful substances dissolved in water, peat for water acidification, drugs that have a beneficial effect on the inhabitants of the aquarium.
Filter designs.
Structurally, the filters are divided into external and internal. External filters are more often used for large-capacity aquariums. They work with an electric pump that drives water from the aquarium through the filter material in the filter housing. These filters are relatively large in size, complex and are installed near the aquarium or hung on its wall.
The design of the internal filters is simple, such filters are usually small in size and performance. They work with the help of a microcompressor supplying air to the tube. The bubbles of air that pop up in the tube carry the water along with it, raising it above the water level in the aquarium. The generated water flow passes through the filtering material and is cleaned of dirt. Such filters in accordance with the principle of operation are called air-lift.
The capacity of the filters, that is, the volume of water that passes through the filter for a specific period of time, depends on the volume of air supplied by the compressor and the size of the filter. Internal filters are installed on the bottom (ground), the wall and under the ground of the aquarium. During feeding, it is desirable to stop the flow of air so that the feed does not get into the filter and does not start to rot. The filter should be regularly cleaned of dirt, so that no harmful bacteria are divorced.
As filtering materials, small and large quartz river is used: sand (washed and boiled), synthetic threads and fabric (nylon, nylon, etc.). Waterproofing foam is also used as a filtering material, in large pores of which dirt accumulates. We offer fans a few options for very simple, but fairly effective internal air-lift filters, suitable for water purification in aquariums with a capacity of up to 100 liters. Which can be made "in haste" of scrap materials.
Bottom filter housing (fig. 1) serves as a box with a tight-fitting lid. The box can be found ready (from plastic), you can use a cut plastic bottle or glue it out of organic glass with a thickness of 1.5-2 mm.
Fig. 1 Bottom filter with plastic box housing.
To monitor the content of dirt in the filter in order to timely clean the filter material from it, it is desirable that the housing or filter cover is made of a transparent material. A plastic tube with a diameter of 15–20 mm, a length of 150–200 mm is glued in or tightly inserted into the housing cover.
Air spray ceramic-purchase. A row of holes of such diameter are drilled in the side wall of the casing so that through them the fry or snails cannot get inside the filter. It is recommended to fill the filter housing with a filtering material not very tight. Note that the efficiency of the filter largely depends on the operation of the sprayer.
After all, the smaller the size of the air bubbles, the greater their total surface in contact with water, that is, water is better saturated with oxygen and increases the flow of water through the filter material.
Another simple internal filter is shown on rice 2 The filter housing is a standard glass jar with a capacity of 0.4-1 liters. The case is closed with a conventional polyethylene cap, in which the holes for aquarium water supply and the hole for the installation of the tube are drilled. A partition is usually made of the same lid (filter material is placed between the partition lid).
Fig. 2 Bottom filter with glass jar housing.
The filter spent on rice 3 The filter housing is a ceramic bowl, where an ordinary funnel is placed on the filter material. So that the funnel does not sink into the filtering material, the liners are installed under its edges. The filter consists of two layers: kapron threads and quartz sand with sand grains of medium size 1.5 - 2 mm.
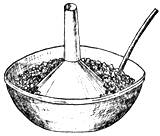

Fig. 3 Simple bottom filter.
For a medium-sized aquarium (100-200 l) an air-lift filter is suitable. (Fig. 4).
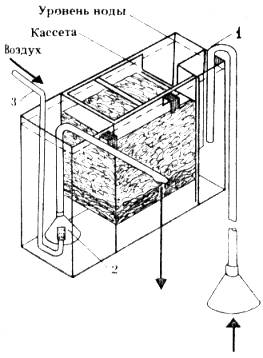
Fig. 4 Hinged filter with insert cassette: 1 - overflow tube for lifting water; 2- tube for lifting water; 3- air tube.
A filter of this type can be hung on the side wall, inside or outside of the aquarium, but so that the water levels in the aquarium and the filter match. The filter consists of a housing with an insert cassette in which the filter material is placed.
To clean the filter material, the cassette is removed, and the filter housing remains in place, which is very convenient. The manufacture of such a filter start with the body (Fig. 5) and then a cassette is assembled for its dimensions. (Fig. 6).
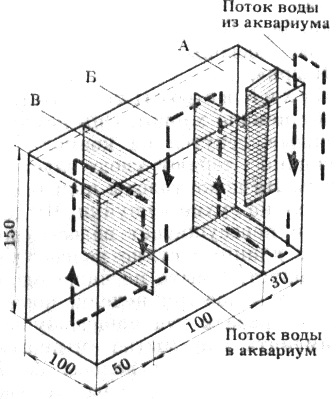
Fig. 5 Scheme of water movement in the hinged filter: A, B, C - compartments through which the treated water passes successively.
The gaps between the case and the cassette should be minimal so that the current of the water passes through the cassette, and does not leak through the gaps. The body and the cassette are made of transparent Plexiglas 2–3 mm thick. They glue the parts with chloroform glue with chips or plexiglas chips dissolved in it, as well as with BF -2, Mars glue. It is undesirable to use dichloroethane - it is very poisonous.
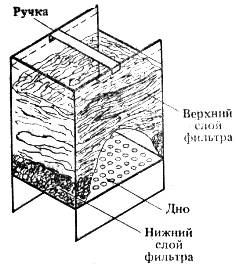
Fig. 6 Device plug-in cartridge filter.
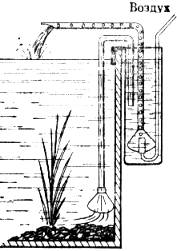
Fig. 7 Mounted filter mounted on the wall of the aquarium.
Tubes (overflow 1 and for lifting water 2) can be either glass or plastic. At the lower end of the overflow pipe located in the aquarium, the cone with the net is strengthened (the cone will fit from a small watering can) so that the inhabitants of the aquarium would not get into the water filter (see Fig. 4). In tube 2, the lower end should be in the form of a funnel into which air enters through the atomizer.
The diameter of the hole of the tube 3 for the supply of air -3—4 mm. By means of a piece of rubber tube in red (black rubber is poisonous!), An air diffuser is attached. The compartment B of the filter housing is covered with a Plexiglas plate with holes for fastening the tubes 2 and 3 (on rice four not shown). The upper layer of filter material for the initial purification of water from large particles of dirt (made from nylon or nylon thread, scraps of fabric, old stockings).
To purify water from turbidity, a layer of washed and boiled quartz river sand with a grain size of 1–2 mm is placed in the bottom of the cassette. To activate the filter, the U-shaped tube 1 is filled with water, the holes are closed with fingers and the tube is installed at one end into the aquarium and the other into the filter housing.
As a result, the water from the aquarium will begin to fill the filter, and after a while, both in the aquarium and in the filter the water will settle at the same level. In order for the filter to start working, air must be supplied through tube 3. Water that flows from the aquarium into the filter first goes to compartment A, then through the partition into the cassette (compartment B), where it passes through the filter materials, is cleaned and passes under the partition into compartment B .
From here, the elift water rises through tube 2 and, purified and saturated with oxygen, is poured into the aquarium. Filter media should be washed systematically with warm water.
In fig. 7 shows a mounted filter mounted on the wall of the aquarium.
Aquarists, especially beginners, are bound to face the challenge of filtering water. An aquarium, a living organism, and if you let it run free, it will die. The most effective filter is sandy. How sand grains manage to destroy harmful substances-metabolites and leave necessary for the life of fish and plants is not known. Usually, a sand filter is made portable, i.e., a place outside the aquarium is determined for it. The schematic diagram of his work looks like this:
Water from the aquarium is pumped using a special pump or airlift. In the airlift, air bubbles from the compressor serve as a vehicle for water. Making such a filter is a laborious business and not everyone can do it. But, as practice shows, the problem has a solution and the effect is quite acceptable. The schematic diagram of the simplified filter looks like this:

Such a filter is good because it constantly pumps water through the soil in the aquarium and does not allow it to silt. For plants it is very useful.
Now, after a brief theoretical introduction, let's get down to business.
Three basic things are needed to make a filter:
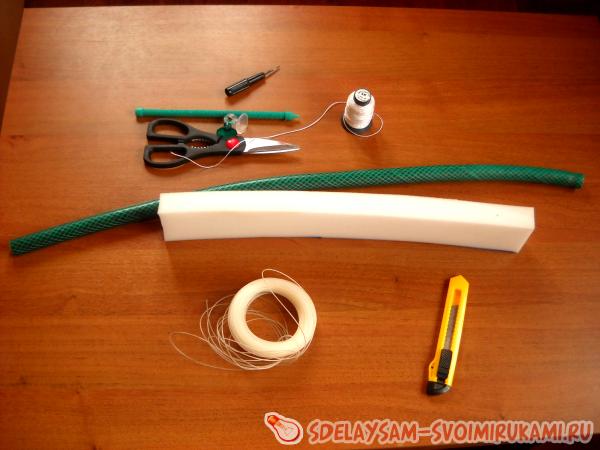
- not very dense foam rubber;
- a piece of garden PVC hose;
- tubular aquarium sprayers.
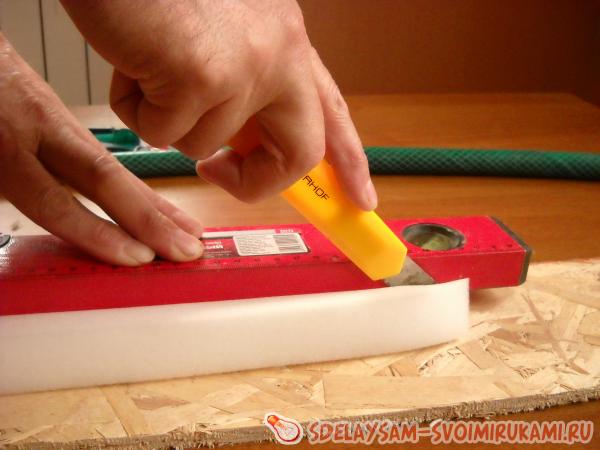
We cut a strip of foam rubber 3x3x45 cm in size. The length may be different and depends on the size of the nozzles and the overall design of the aquarium. And the section length x width should be 1.5-2 cm larger than the diameter of the hose.
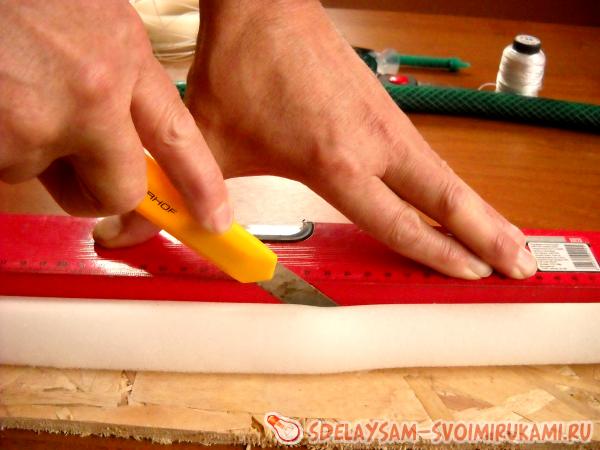
In a strip of foam rubber we cut a groove under sprays. We make cuts to a depth of 1-1.5 cm.
![]()
Foam from the groove is convenient to cut with ordinary scissors.
![]()
The result should be such a blank. In the future, in the groove take their place sprayers.
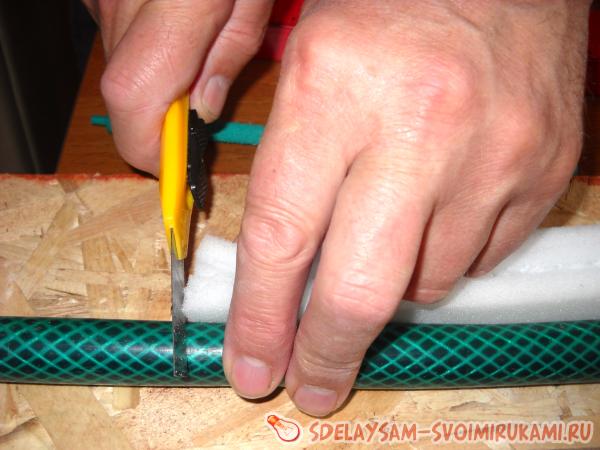
Now the largest foam blanks cut a piece of garden hose.
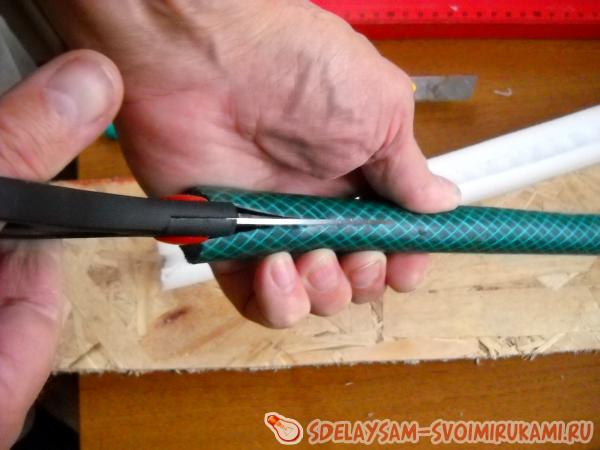
Cut the hose along the entire length. Make it convenient and safe with scissors.

From above the filter can be decorated with aquarium soil. Soil (coarse sand) will be the main element of the biofilter. On the edges of sand grains with time, bacteria will settle. These bacteria feed on metabolites harmful to fish and plants. Thus, the biological balance of the reservoir will be maintained for a long time. In small aquariums, filters of similar design work perfectly and do not spoil the landscape, since they are practically invisible. Air bubbles in the background create a fabulous screen, making the whole picture of the underwater world only wins.
No experienced aquarist will dare to breed fish without the necessary equipment to equip the aquarium. And a special role here is played by the filter, which is used for mechanical and biological cleaning of water, as well as for enriching it with oxygen.
Today, a large selection of filters presented on the shelves of pet stores. You can buy both internal compact filters for small aquariums and external ones for installing outside and cleaning large volumes of water.
But it is not at all necessary to buy an expensive device, it can be done on its own. The list of necessary details will depend on the type of filter, as well as on the size of the aquarium.
And if you're interested, how to make a silent filter for the aquariumThis article is for you.
Consider one of the options making a homemade external filter for aquarium.
The scheme of construction works as follows:
- the filter takes a cylindrical shape, the device will be positioned vertically,
- the electric pump is responsible for the movement of water, which must be installed at the top of the structure
- water flows from the bottom of the structure through the fillers, and then goes back to the aquarium,
- filter materials - various filler options are possible.
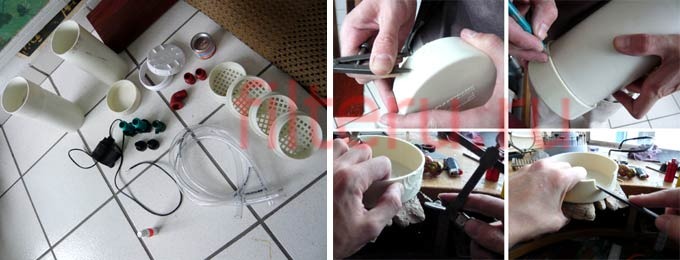
For the manufacture of the device will require:
- two plastic pipes joined together with a rubber cuff inside,
- two plugs for pipe ends,
- choke,
- tap,
- electric pump,
- nuts
- FUM tape,
- wrenches in the set.
The following materials can play the role of filtering fillers:
Sinteponovye and foam elements: the cheapest and most affordable. They can take any form, and also play the role of a biological and mechanical filter. There is enough space in the pores to settle the bacteria. Periodically, the material should be flushed from clogging mucus.
Also, sludge particles will linger in the pores; in no case should it penetrate into the filter and interfere with its operation.
- Ceramic Rings: used to evenly distribute water streams that will ensure the delivery of oxygen to bacteria
- Bio-balls: plastic material, roll in water and help to wash all filter materials evenly. In addition, it is a good substrate for the settlement of bacteria.
- Sintered glass: it is convenient to use in the form of sharks with a diameter up to 14 mm. Thanks to the special technology of roasting, the balls acquire pores, in which beneficial bacteria, processing nitrates and nitrites, are actively populated. The efficiency of sintered glass is significantly higher than that of other materials of biological cleaning.
- Zeolite: cheap, but very effective sorbent, quickly absorbing ammonium from water. Allows you to quickly get rid of nitrates in the aquarium.
- Activated carbon: the need to use this filler is still being debated. For use in aquariums, only coal with small granules is suitable, and the number of pores is important, because the absorption efficiency depends on this indicator. Also, the quality of coal can be ascertained by the presence of dust and characteristic luster. Rinse thoroughly before placing material into the filter. It can only be used in a newly launched aquarium.
- Peat: a natural filtering material donated by nature. It is inexpensive and effectively copes with a number of tasks - reduces the growth of fungi, has a positive effect on the condition of the inhabitants of the aquarium, lowers the pH level.
Filter wool: inexpensive filler that can be used several times, easy to rinse, tightly fills the entire space, eliminates leakage. It is optimum for use as the final stage of mechanical cleaning.
Ceramic tubes: used for colonization of bacteria in small pores.
All these fillers can be purchased in any department of pet products.
VIDEO INSTRUCTION
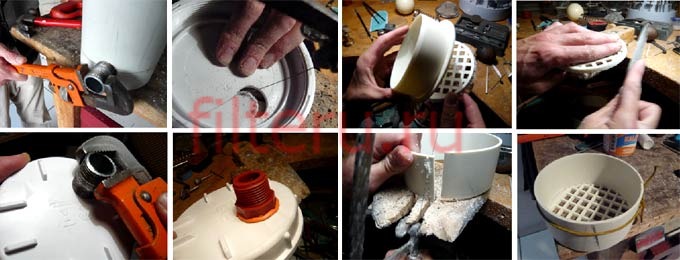
Step 1
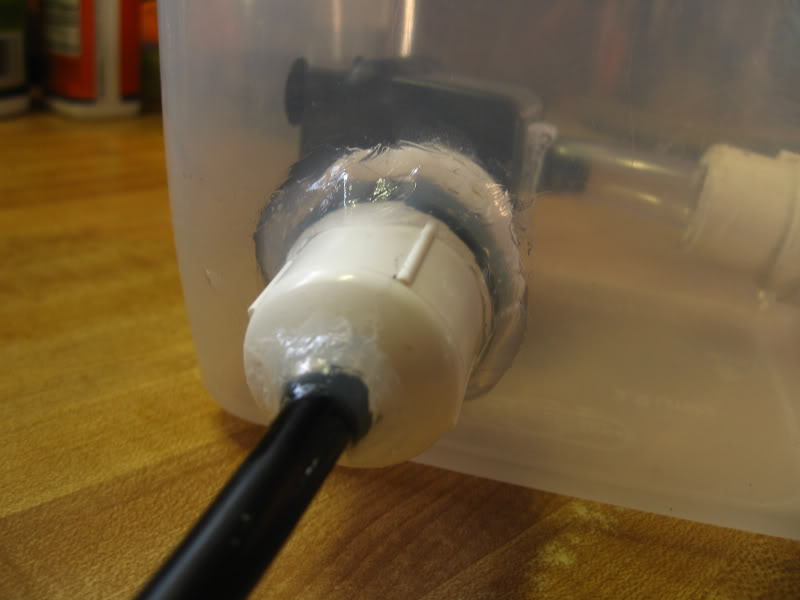
In the lower part of the pipe it is necessary to make a hole for screwing the nozzle. It is necessary to wind its thread in advance with a FUM tape. From the inside you need to twist the nut.
To ensure that the water inlet opening is always free, it is easy to make a cap with small holes from a plastic bottle, and to attach a grid with holes from a CD over the top.
Step 2
On the grid you need to put the fillers in two layers each, alternating with each other.
To hold the pump fit a piece of hose that attaches it to the water outlet fitting.
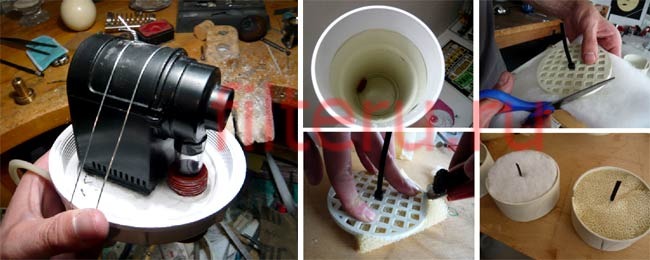
Step 3
The water intake tube must be fixed with a sucker on the back wall so that one end rests on the bottom. It is enough to hang up the tube for bringing water to the aquarium to the aquarium, slightly lowering it into the water.
In this model, a homemade filter practically doesn’t catch the eye of the tube, the place in the aquarium remains completely free for its inhabitants.
This filter with a height of about 40 cm, a pipe diameter of about 10 cm, a volume of about 3 liters passes 5 liters in just one minute, while not creating a strong movement of water flows.
VIDEO OPTION 2
Internal filters have a simplified structure, so making them with your own hands will not be difficult even for an inexperienced aquarist.
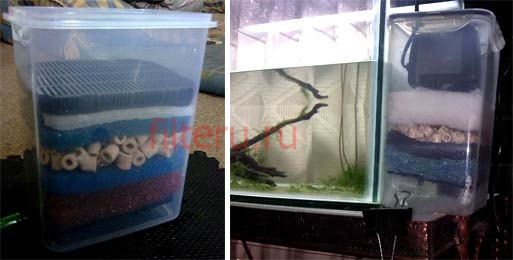
For making an internal filter for an aquarium required:
- a plastic bottle, for example, from a soda, with a volume of 0.5 liters,
- piece of sintepon,
- plastic tube that matches the diameter of the neck,
- pebbles for filler,
- hose and compressor.
VIDEO ON THEME
- The bottle should be divided into two parts, but so that one is smaller than the other. A smaller part should remain with the neck. The bowl must be directed upwards with the neck and with force, so that the construction is dense.
- Then along the outer circumference it is necessary to make holes for the entry of water. Their diameter should be about 3-4 mm, it is better to place in two rows of 6 holes in each.
- Next, in the neck of the bowl you need to insert a pipe. At the same time between the neck and the pipe can not leave gaps.
- The length of the tube should be enough for it to protrude slightly above the surface. But the design itself should not lie at the bottom, so as not to impede the flow of water.
- On the bowl on top you need to fill a layer of gravel, and then a layer of padding polyester. Next in the tube you need to install the hose and secure. This design should be placed in the aquarium. After the compressor turns on, the device will work. After some time, live bacteria will appear in the device, which are necessary to dissolve ammonia into nitrates.
The principle of operation of the filtering device is as follows: it is completely based on airlift. Air bubbles penetrate into the tube, and then move up and sinking water flows.
Oxygenated water penetrates the upper layers through the gravel, then moves through the holes made downwards and goes down the tube to the aquarium. The task of cleaning is performed by the sintepon, it will help the gravel not to silt.
Consider several options for bottom filters that are suitable for small aquariums up to hundreds of liters. You can also make these schemes bottom filter for a round aquarium.
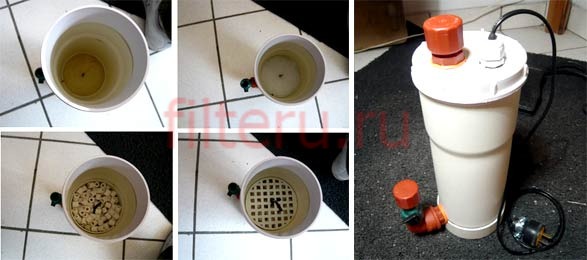
Bottom filter from plastic box
The body of the device will be performed by a durable plastic box with a lid that tightly closes the box on top. In this case, it is desirable that either the body itself or the cover is well viewed so that the level of pollution can be monitored.
A plastic tube should be glued into the cover. On the side wall, you need to make a few holes, but such that through them the small inhabitants of the aquarium are not sucked into the filter.
Inside the body you need to place a pre-prepared filler for filtering water. It is recommended to use ceramic as a water dispenser, it is not difficult to buy it in the store.
Bottom jar filter
As a body for the future construction, a conventional glass jar with a volume of up to 1 liter will be used. It must be tightly closed with a plastic lid and a hole must be made in it so that the water goes inside and also a hole for the tube.
From one more cover it is necessary to make a partition and to lay filtering material.
A ceramic vessel filled with quartz sand and nylon filaments can replace a glass jar.