Types of decorative processing of birch bark and types of birch bark products. Birch bark processing technologies
The work took
4th place

I live in the Komi Republic - this is a rich and beautiful northern region. In the east of the republic stretch the ancient Ural Mountains, in the very north there is the mountain tundra. Komi land is endless forests, generous waters and rich mineral resources, cozy cities and villages. Hardworking, talented people live here, among whom there are Masters with golden hands. They create a variety of traditional artistic products that continue to preserve and transmit the memory of our ancestors. In many regions of the republic, traditional folk crafts and arts crafts based on manual labor and descended from grandfathers and great-grandfathers have been preserved. The greatest development has been achieved in artistic processing and wood carving, weaving from birch bark, wicker, pine root, traditional wood painting, patterned knitting and weaving, fur processing, various types of women's needlework - patchwork, embroidery, lace making, etc.
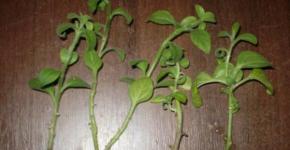
All these crafts undoubtedly deserve special attention, but to complete my course (and now competition) work, I settled on studying the birch bark craft... About it a little later, but first I will tell and show you how I made my “birch bark” tuesok )))))

To do this, we will need a white landscape paper (it will be the background, but you can do without it if you make the tuesok as a separate element for future compositions), office paper in pastel colors (light yellow, mustard, brown), scissors, a simple pencil , glue, brown marker (felt-tip pen, pencil or paint, depending on what you are more used to working with)))))

We draw a sketch of our tueska on light paper...

We cut out the template itself and additional parts from mustard paper - the upper and lower rim, as well as the handle... If desired, you can immediately punch holes in the rims - through which we will “sew together” our spare parts)))))

We glue all the parts together, use wax chalk (pencil, marker) to make light strokes that imitate the pattern on birch bark... On top I sprinkled some more crumbs from a brown pencil and shaded it with vertical movements, now our birch bark has become even more like the real one)) )))

Now we pass a “birch bark” cord through the holes, simply cut the light paper into small strips, round one edge, glue them over the holes... The tuesok is almost ready... In this version, it also has the right to exist, but we will not rest on this and decorate it with some kind of patterns - in my case it will be Komi ornaments...

Using a simple pencil we mark out a simple ornament...

Next, we draw out our ornament with paints, markers or pencils and now the piece is finally ready!!! It turned out very similar, it seems to me... You can safely proceed to the next stage - processing real birch bark))))))

And now a little about the craft itself... Since ancient times, birch bark has attracted the attention of folk craftsmen because during processing it retained its properties - softness, flexibility and strength. Birch bark is the top thin layer of birch bark of a delicate pinkish-cream color. Its ancient name “birch bark” has been known since the 15th-16th centuries. Later, “birch bark” and “birch bark” appeared. These names are still used today. Tuesa (buraks) - vessels for storing food and drink - were made from birch bark before and are now being made. When leaving to work in the field, the peasant took with him a container of water or kvass, and on the hottest day the drink in the container remained cold. On his back he wore a birch bark - a wicker backpack, and on his feet were bast shoes, often woven from birch bark. Bodies, birch bark boxes - boxes for flour and honey, baskets, shepherd's horns, ropes for fishing gear - all this was made from birch bark. Based on the nature of the ornament, northern carved birch bark can be divided into several types associated with other areas of folk art - embroidery and bone carving.

Manufacturing technology. Birch bark is harvested at the beginning of summer, at the end of May - June, when the birch tree is full of juices, and the birch bark easily lags behind the rest of the bark. If it was removed skillfully, without damaging the next layer of bark - the green, then it did not harm the tree, and after a few years elegant white clothes grew on it again. The first known information about the technology of processing birch bark dates back to the 18th century. Birch bark carving requires the simplest tools: a knife and an awl. First, the outline of the design is drawn, which is then cut out with a sharp knife. Carving and embossing on birch bark were sometimes combined with shotting. By hitting the kanfarnik (a tube-shaped embossing) with a hammer, the craftsman “selects” the background of the object and obtains a grainy surface. This technique has long been known in metal processing. Since the 19th century, it has also been used in birch bark products.

Products made from birch bark were painted with picturesque plant patterns. As a rule, craftsmen filled the surface of the products with floral patterns (a thin winding stem with leaves and branches, smooth curves). Craftsmen usually applied through, openwork “lace” (carving) from birch bark onto a bright background made of fabric, foil or paper, which made it possible to achieve a high decorative effect. Birch bark tues (buraks) are often ornamented. The process of making tues itself is quite complicated: you need to carefully remove the bark from the tree without damaging it. This will be the inside of the tues. It is solid, even water will not leak out of it. The chips on the front side are wrapped in a “shirt”, i.e. birch bark, cut on one side. The shirt is slightly smaller and has a zipper closure. Then a wooden bottom is hammered into the steamed hammer, wrapped in a shirt. A lid with a handle is cut out from above. Tues is ready. The master, at his own discretion and in accordance with the tradition existing in the area, before covering the cleavage with a shirt, can decorate it with a geometric or zoomorphic (image of animals) ornament. Sometimes the shirt of the tues is cut out with a floral ornament or a geometric pattern.

And in conclusion, I would like to say that despite the fact that art is constantly developing, more and more advanced technologies are constantly layered on top of old ones, old forms are used more and more whimsically, birch bark production remains almost unchanged... Of course, in souvenir shops you can find birch bark objects with some modern heroes, but this is more the exception than the rule... Basically, the craftsmen adhere to traditional methods of making birch bark products, they pass on their skills and experience from generation to generation, so this craft has survived to this day almost in its original form. And I’ll finish here and thank everyone for your attention!!!
Sources of information: website of the All-Russian public organization "Russian Geographical Society" and the official website of the Ministry of Culture of the Komi Republic.
Birch bark is harvested during the hot summer period: from mid-June to mid-July. At this time, the bark peels off well from the trunk, while in winter it completely sticks to the cork layer. However, you can do the harvesting at a later time. Until the month of October, in swampy areas, birch allows you to remove the dark brown bark with some effort.
Ribbon
In the forest, a smooth birch without knots or cracks is selected. A vertical cut of 4-6 cm is made on it with a knife to remove the tape. Next, the bark needs to be peeled off in a spiral downwards around the trunk. An experienced master removes a continuous tape 100 meters long. It is important to ensure that the depth of the cut is small, within the cork layer, so that the birch tree does not dry out and after 10-15 years the protective bark appears on it again.
Plast
To remove the layer, you need to make a vertical cut to the entire reachable height of the tree and peel it off in layers of the same size, depending on how you plan to store the birch bark. You can first clean the barrel from the top white layer, thereby reducing the amount of work in the workshop.
Skoloten (cylinder, stocking)
It is more convenient to cut down a tree at a height of 1-1.20 meters. Next, identify all potential places for yourself. To remove the chips, the same white-trunked birch with the least number of knots, cracks and irregularities is selected. Required tools: two-handed saw, axe, knife, sword (saw blade). To remove chips, cut the tree into 2.50-3 meter logs. For ease of work, it is better to organize a place for removing birch bark at the level of the abdomen. The birch bark is removed by chopping from the butt to the top (but it can also be done the other way around). To begin with, an incision is made along the entire circumference of the trunk to indicate the length of the future chip. Next, the sap is inserted between the trunk and the cambium, and movements are made along the trunk, and the birch bark gradually peels off, this process is accompanied by abundant sap eruption. When, after difficult moments of peeling, it seems to you that this is it, now it should completely come off the tree, clasp the trunk with both hands and roll the birch bark a little in a circle. If the birch bark gives way, then you need to carefully remove it from the trunk. And be careful because there may be sharp protuberances on the trunk under the cambium that will tear all the work done, or thickening of the trunk can also ruin the chipping.
Storage
Birch bark is stored in dark, dry and ventilated areas (attic, basement, barn, storage room). Birch bark, immediately after being removed from the trunk, is rolled into balls with the white side up. A tape that has been left uncurled for several hours becomes unsuitable for use. A good rule when twisting is one ball per birch tree. This will help when weaving in the workshop. However, if the birch bark is thin and the number of knots and cracks in the birch does not allow removing the birch bark at full height, then balls can be twisted from ribbons of different trees.
Birch bark, removed in layers, is laid between two wide boards or sheets of plywood, and a load is placed on top so that during storage the layers do not curl and are suitable for work. It is necessary to ensure that there is some space between the layers for drying. Birch bark can be stored in balls and layers for years. There are no special conditions for storing chips.
Birch bark stored in damp rooms becomes covered with mold, causing spots to appear on it. When birch bark is stored in light for a long time, it changes color and becomes light. In such conditions, birch bark gradually loses its properties. Therefore, old birch bark is soaked in water for a certain time, after which it can be used in work.
Treatment
The first stage of processing birch bark is removing the thin upper thin white layer from the bark on the rough surface of the tree immediately after harvesting in the forest or in the workshop using a regular brush and knife.
The second stage is the separation of birch bark into layers. Birch bark has many layers, and not all layers can and should be used in weaving. Therefore, it is necessary to peel off the fragile top layers to the required thickness for each specific product, since a small salt shaker cannot be carefully made from thick strips, and vice versa, a large pester will look like a paper envelope with thin-layer material. From this we conclude that birch bark delamination is a rather complex and important stage in preparing the material for weaving.
The third stage is cutting strips (straps) of birch bark. You can cut material (birch bark or paper) in several ways: using scissors, using a knife and ruler, using a tape cutter. It is important to note the following point - the smoother the material is cut, the more convenient it will be when working with it.
Weaving
There are two types of weaving: oblique and straight. The names are explained by the angle (in degrees) the intersecting ribbons form with respect to the horizon. Straight weaving is more difficult to work with than oblique weaving. The main type of weaving is oblique weaving, due to its better manufacturability and strength.
Working with formation
To work with the formation, it is necessary to select birch bark with the least amount of heterogeneity, with a minimum size of lentils (dashes). Required tools: knife, awl. Additional material: coniferous tree roots (pine, spruce), willow twig, bird cherry twig, birch bark tape.
Making tues
Making tues is considered one of the most difficult in the birch bark craft.
Tues are made sheathed and reversible. The sheathing tues, as a rule, consists of 4 parts of birch bark: a clapper, a shirt and two belts - upper and lower. The reverse tues consists only of the first two. As a rule, the shirt is connected with a lock, although they also made ties without a shirt, only with belts. The lock connecting the layer into a cylinder has many forms and principles of fastening. You can braid the tues with tree roots, birch bark, a strip of willow twig, rope, and wire. In the villages, tues were braided only from above. The bottom held the belt from below. For beauty, the lower belt is also braided.
When making a reverse shirt, the height of the collar should be greater than the height of the shirt. To fold the edge of the chip, you need to hold one edge in boiling water for a few seconds, and then fold it onto the shirt. Do the same with the other edge. In fact, everything is not so simple, and without a visual sequence there is no way to explain the entire process of turning out the chip. Let this remain not the master’s secret, but a task for the authors for the future.
The bottom and lid are made in both round and oval shapes. There are many ways to make lids, depending on the location of the craft and trade. Suitable wood species, for example spruce, pine.

To make it more fun, embossed drawings are made on the tues, as Grandfather Martyn said, depicting funny scenes from his village life on the Mezen. But embossed designs are also made for beauty, so that a bowl of buckwheat can stand on the kitchen shelf and show off. Embossing, first of all, is beauty, appropriateness, completeness of ornament. Ornament is the basis of the design. In this regard, you can look at the ornament on the clothes of M. F. Fatyanov, A. V. Shutikhin and others, and also look through books on ornament.

Birch bark carvings are divided into geometric and floral carvings. The cutting technology is determined by the hardness of the hand, the quality of the material and the quality of the tool. The pattern is cut in different ways - along the layer of the shirt, or along the finished piece, although the second option is not technologically advanced. The most famous slotted birch bark is Shemogodskaya.
scratching
Birch bark is scratched, as a rule, with a metal tool - a knife, an awl, a needle. Autumn birch bark is used, which is removed from the tree with considerable effort. On such birch bark a thin layer of cambium remains, which is removed with a scratching tool during work.
Main tool
Everyone who works with birch bark uses a specific set of tools. Is it the same for everyone? His list? Why are there differences in names, shapes, materials, etc.? Let's try to answer these questions.
The set and number of tools depends on what specific processing the master is doing. The minimum kit for a braider is scissors (knife) and clamps (clothes clips). If you want to simplify the process of processing the material, a knife, a ruler (slat), templates for cutting tapes, and a tape cutter appear. When weaving, a cat (kodochik, kochedyk, etc.) made of bone, wood or metal is used. With its help, the gaps between the woven tapes widen, making it easier to pull the outer layer tape through.
The master's tool kit for working with layered birch bark is expanding. This is an awl for piercing holes for stitching layers together, and a tool for harvesting and processing pine roots - a metal hook/bracket for pulling roots out of the ground, a tool for cleaning roots (several types of such tools), a tool for delaminating roots.
The set of the master who makes the tues is supplemented by a punch - a tool for punching locks, a tool for working wood, a mallet is used to hammer the bottom into the bevel, hammers for emphasizing the beauty of the tues and some other specific tools. As a rule, each master has his own special tool, so it is not possible to list all the devices.
List of main tools:
- scissors
- clamps
- ruler
- rail
- square
- compass
- pencil
- ball pen
- tin templates
- knife tape cutter
- washer tape cutter
- tin templates
- punches
- mints
- bracket
- chisel
- mallet
Images of some tools:


Birch bark is best processed immediately after removal. First of all, you clean off the black growths. By careful rubbing with a cloth you remove the white layer from the surface. If you need thin birch bark, you immediately stratify it, because later it hardens and the procedure becomes difficult. When delaminating, it is best to hold it across the fibers, then it is easier to give in and does not tear. In the old days, birch bark was processed in a special way, and birch bark became elastic, like rovduga, and durable. I will give three ways to process birch bark:
- 1. Having thoroughly cleaned, processed, rubbed with fat or warm oil until completely absorbed. Horse fat is especially good for this purpose. Birch bark becomes soft, pliable for a needle or awl.
- 2. Cook birch bark in the ear. Birch bark becomes much stronger. The birch bark boiled in the ear was used to make a boat. The famous sturgeon glue was made from the swim bladder of the sturgeon. The broth of fish soup gives birch bark special strength, this has long been known to our ancestors.
- 3. Birch bark is heated in skim milk diluted with water and this gives elasticity and softness.
- 4. Stale dry birch bark is kept in warm water or steamed hot water. Birch bark becomes soft.
The processed birch bark, tightly rolled up with the outer side, was stored in a dark and cool place: a milk cellar, in a manger under the rumps. The birch bark was rolled into a tube along the grain; in this case, when making vessels, the edges were not bent and the walls were not wrinkled.
When storing a large supply of birch bark for urasa, it is laid in layers crosswise, pressed down with a heavy log and covered with all sorts of rubbish - garbage.
Having cut the birch bark into layers, it is kept in the shade. When the birch bark begins to curl, roll it into rolls, sequentially winding the layers with the light side out. In this case, you should make the ends of the layers, pressing the bottom layer with the top layer so that they do not curl when drying.
Having wound 8-10 layers into a roll (the number depends on the length), it is wrapped in paper and tied with twine or wire.
Harvesting birch bark from dead trees. In the forest, you can often find fallen birch trees, whose wood has rotted, but the birch bark remains intact, or dead birch trees damaged by the fungus - tinder fungus. In such trees, birch bark is easily separated at any time of the year. Its inner layer has various shades of red-brown and is used to decorate products.
Safety precautions - When in the forest, you must be extremely careful. You cannot appear on the plot during deforestation - this is very dangerous. Collective trips to harvest birch bark are carried out only under the guidance of a teacher. You must have a first aid kit with you to provide first aid.
Birch bark storage.
To work with birch bark, prepare a blunt and sharp knife, scissors, a dry rag and sunflower oil. Birch bark is laid out on the table, preferably in the fresh air in the shade; where it dries.
Do not unroll the roll completely. First, take one layer, wipe it with a dry cloth and place it on the table with the white side up. Birch bark needs to be divided into several layers; First, the top rough white layer is separated. The layers are removed using a blunt knife with an oval end or by hand.
If the birch bark is thin, taken from young birch trees or from the upper part of the trunk, it is not stratified into layers. Such birch can be braided on both sides - on the white and dark sides, all thickenings and sagging, as well as places where there were knots, are cut out with a knife or scissors. The treated birch bark is dried in the shade in separate layers. At the same time, it should not dry out, otherwise the material will become hard and brittle. It is no longer possible to work with such birch bark. When the birch bark layers begin to curl slightly, they are collected into rolls, after wiping them with a cloth soaked in sunflower oil.
All that remains is to sort the birch bark by color, wrap it in paper and indicate on it what color the birch bark is and the date it was harvested. In a cool, dark room or in a pantry at room temperature, birch bark can be stored for years. In a damp room, birch bark becomes covered with mold and stains. Poorly dried material also cannot be stored for long. To prevent birch bark from losing its softness, elasticity and natural color, you should periodically check whether it is dry or damp.
If you find stains of dampness on the birch bark, you need to carefully check the room, then dry it and wipe it from the wrong side with a cloth moistened with sunflower oil.
Soak the dried birch bark in warm water or hold it over steam. After which all operations are repeated, as when harvesting from wood - drying and rolling.
Birch bark for elegant, artistic products must be stored especially carefully. For this purpose, a cool, dry, dark room is required. When exposed to sunlight, birch bark changes color after 3-4 days and becomes reddish. Birch bark turns white from prolonged exposure to light. Any change in color is accompanied by a loss of strength, flexibility and extensibility.
For storage, birch bark is folded into bundles and placed between two boards, pressing them with a weight on top.
Nowadays, birch bark can be folded under a press of thick boards, bolted together and stored in a dark and damp place. Birch bark preserved in this way becomes smooth, like cardboard or thick paper, and is convenient for making any utensils. Birch bark intended for gluing and painting is not impregnated with oil or grease and is stored in its original form. Oil gives birch bark a certain color and prevents it from sticking together.
Organization of the workplace - The room should have natural and electric lighting, running water, a storage room for storing materials, a low table and a chair. birch bark product birch bark Yakut
Safety precautions and fire prevention - birch bark is a highly flammable material, so the use of open fire near its storage is prohibited. The main causes of fire are smoking in an unspecified place, the use of open fire indoors, increasing the rules for operating electrical appliances, including the operation of faulty electrical appliances. The workplace must be kept clean. After finishing the birch bark trimming sessions, they take out a special place designated for this. Classrooms, workshops and workplaces must be equipped in accordance with sanitation, hygiene and safety requirements. There is a place on the desktop for tools, but it is better to put them in a special box. A cluttered table or scattered tools can cause injury. A knife, an awl, knives, and a lector cutter should have a smooth oval handle made of hardwood. When sharpening knives, special care must be taken (12-15-16-17-19)
Chapter 1
And there is nothing more beautiful and subtler,
Than that birch expanse,
Where it smells like bread, where it smells like a grove,
Our house on the lake shore
And the birch bark, turning white everywhere,
The Russian landscape protects
Reminiscent of the past,
Where happiness awaits at the origins,
She both heals and heals,
Saving the soul from adversity,
And bestows its beauty,
And he maintains his purity.
NOT. Belyakova
Birch in Rus' is both a symbol and a poetic image of the country. She warmed, and treated, and gave water, and nourished the soul of a person
Birch buds and young shoots are still used today for medicinal purposes; birch sap is used to quench thirst; birch logs are used in fireplaces: they give off intense heat. The essential oils released by birch have a diuretic property and, when rubbed, relieve joint pain. The tar obtained by dry distillation, called tree resin, has healing properties and is used in pharmacology.
Birch bark was used in housing construction to protect against cold, rot and dampness. Boats were lined with birch bark, floats and other fishing accessories were made from it. The birch bark letters that have come down to us are called the birch bark mail of centuries.
Birch bark (the top layer of birch bark) is an excellent material for making various products. It is environmentally friendly, moisture-resistant, beautiful and durable, and easy to process. Soaked birch bark easily separates into many translucent white-pink films and remains flexible and durable. Products made from birch bark are not afraid of moisture. Birch bark combines perfectly in artistic crafts with other natural materials.


Birch bark varies in its qualities. According to the observations of birch bark specialists, its quality depends on the age of the tree, on the area where the birch grows, on the health of the birch.
On young birch trees (3-4 years old) there is no birch bark at all. On birch trees for 15-25 years, the birch bark is thin, clean and soft. On very old birch trees and near the butt of the birch bark there are growths, cracks and dark lines. The best birch bark is found on medium birch trees, 75-100 cm thick in girth.
Birch trees growing in very damp, swampy places produce birch bark that is weak, rough, and has many small and large lines.
In open, sunny places, birch bark has little stretch and is weak. It is better to take birch bark from birches growing in moderately damp places, in moderately shady forests.
Birch trees affected by diseases, insects, and fungi produce very poor birch bark. Perfectly healthy trees provide good material, and the birch bark should be removed at a certain height from the ground.
Birch bark is removed from trees in various ways, depending on its purpose: with narrow strips, sheets or plates, and chips.
The age of birch for removing birch bark is 20-40 years.
a - removal of layer from birch bark
b - storage of birch bark in a roll
c - storage of birch bark in glazing beads
Since ancient times, working with birch bark has occupied a leading place in the folk crafts of the peoples of the north of Russia. Objects dating back to the 10th-17th centuries have been preserved. They wrote on birch bark, made light and comfortable shoes (bast shoes), dishes, toys and jewelry from it. Birch bark craft was especially widespread in the European territory of Russia: in the Vologda, Novgorod, Arkhangelsk regions, and in Veliky Ustyug.
And nowadays, on Sundays and holidays in the markets you can get acquainted with the rich and original art of craftsmen, buy homespun table runners, towels embroidered with colored patterns, wood products, but most importantly birch bark: wicker boxes, baskets, bast shoes, salt shakers, toys, garlands of beads , vases, pieces, birch bark collections.
Birch bark is harvested at different times depending on the climatic zone (in the middle zone - in May-June), for which it is necessary to obtain permission from the forestry department or forester. Harvesting birch bark is a labor-intensive task that requires a lot of physical activity, because... Often you have to make long walks.
There are signs among people for starting the harvesting of birch bark: when the first mosquitoes appear; when the first thunder thunders; when the leaves on the birch tree become the size of a five-kopeck coin. The best birch bark is smooth, with a beautiful pattern of narrow stripes, which is observed in one of the most common varieties - downy birch. It grows in most of the territory of our country. A peculiar feature of the downy birch, which makes it easy to distinguish it from another species - the warty birch, is the small dense fluff that covers the young shoots and leaves. Downy birch forms the second layer in pine or sparse spruce forests and is found in low-lying and floodplain areas that are flooded with water in the spring.
The strongest and densest birch bark is produced by birches grown on dry and rocky soils. Trees growing in peat bogs and swamps have brittle bark, with knots, its surface is uneven and as if eaten away by a bug.
It is better to take birch bark from a forest clearing site, for example, where a road is being laid. From a sawn or felled tree, you can easily remove birch bark not only from the bottom, but also from the top of the trunk. In large clearings, material is stored for many years. Birch bark should be smooth, smooth, without painful thickening or sagging. The best birch bark - dense, layered and elastic - is obtained from birch trees growing in mixed forests. Material taken from swampy areas is not at all suitable for work.
Snow-white birch bark is easily removed, for which you only need to slightly cut the trunk from top to bottom, without making a horizontal cut. The width of the layer can be 35-40 cm, and the length can be in accordance with the diameter of the tree.
The tool for removing birch bark is an ordinary sharp knife. To harvest stratified birch bark, horizontal cuts are made on the trunk; to harvest strip (bast), spiral cuts are made around the trunk. If large and solid pieces are needed, then the birch bark should be removed from cut trees with a diameter of at least 20 cm, if possible choosing areas that are smooth and without knots.
The entire outer (white) side of the bark is cleaned with a knife or sandpaper and freed from dirt and overgrown fungi and moss. The inside is freed from any remaining porous brown bark and wiped with a damp cloth. Thick birch bark is also suitable for making large products. For small ones, thick birch bark is steamed and layered into two or three layers by hand, without additional tools. The work must be done carefully, without rushing. Young and freshly cut birch bark does not need to be steamed, but only slightly moistened with water.
Birch bark removed by any of the above methods must be dried and stored in a dry, dark and cool place. It is better to store large plastic birch bark under a load, stacking the layers on top of each other.
Birch bark layers are well colored with aniline dyes. First, tannins are extracted from birch bark. To do this, soak it in a soap solution or baking soda solution. Then the birch bark is placed in a hot solution with dye for 2-3 hours, depending on the intended tone. To dry, the painted birch bark is attached to a string, hooking the tip of the sheet with paper clips or clothespins. You should not wait until it is completely dry; it is better to work with slightly damp birch bark. If you need to straighten birch bark, then thin layers can simply be ironed.
The color of unpainted birch bark, coated with colorless alcohol varnish, which is preheated and applied with a soft hair brush, is also very beautiful.
They cut along birch bark with the tip of a very well sharpened knife, a razor or scissors. In places where there are curves, you should use small scissors with rounded ends, and for cutting holes, on the contrary, use sharp ends or a knife. Repeating circles can be punched with a punch.
In order for the birch bark to be better attached to a base, for example to thick cardboard or another piece of birch bark, you need to glue thin paper onto them and only then cut out the design. It is better to glue with liquid wood glue or PVA. When using PVA glue, it is advisable to then iron the glued birch bark through thick paper with a not very hot iron.
In any case, the glued product or its parts should be placed under a press for leveling for some time to prevent twisting and deformation of the birch bark.
The tree for removing birch bark is chosen depending on your creative ideas. For small products, thin, soft material is required: it is taken from young birch trees of small diameter. But in any case, the age of the tree must be at least 15 years.
Having cut the birch bark into layers, it is kept in the shade. When the birch bark begins to curl, it is rolled into rolls, successively winding the layers with the light side out. In this case, you should combine the ends of the layers, pressing the bottom layer with the top layer so that when they dry, they do not curl up.
Having wound 8-10 layers into a roll (the number depends on their length), it is wrapped in paper and tied with twine or wire.
To make tuesk-buraks, in which liquid or perishable foods can be stored, you need a seamless inner part, which is completely removed from the tree. It is called differently - duple, skoloten or birch bark cylinder. Such solid, seamless birch bark is removed only from cut trees. Procuring material for Tuesk-buraks is particularly difficult.
Not every birch is suitable for removing chips. You need to choose a barrel with a clean and smooth surface, without sagging or cracks. The trunk is sawed, then sections with branches are removed, circular cuts are made on the even parts and the birch bark is gradually separated using a thin probe wedge or thick steel wire. Then it is pulled off and a solid cylindrical chip is obtained.
The chips are removed simultaneously from both ends, starting from the thin end of the trunk. The removed chips are also wiped with a rag.
Harvesting birch bark from dead trees
In the forest you can often find fallen birch trees, whose wood has rotted, but the birch bark remains intact, or dead birch trees damaged by tinder fungus. In such birches, the birch bark is easily separated at any time of the year. Its inner layer has various shades of red-brown color and is used to decorate products.
Safety precautions
When in the forest, you must be extremely careful. You cannot appear on the plot during deforestation - this is very dangerous. The knife should be used skillfully and carefully. Collective trips to harvest birch bark are carried out only under the guidance of a teacher. You must have a first aid kit with you to provide first aid.
Birch bark is the top layer of birch bark - an excellent material for making various products. Products made from birch bark occupied an important place in folk crafts; toys, dishes, bast shoes were made from it, used for birch bark letters, boats were made, and used in construction as waterproofing. Currently, birch bark is used to make souvenirs, jewelry, dishes, various baskets, etc.
Preparation of birch bark
Birch bark is harvested from mid-May to the end of June. At this time, the bark peels off well from the trunk, while in winter it sticks to the cork layer. Timing may vary depending on the geographical area, place of growth, time of onset and nature of spring. The best birch bark for the manufacture of all types of products for birches aged 20-40 years with a smooth, even trunk with a diameter of 150-350 mm. The branches of the birch should be above the middle of the trunk and stretch upward. The most suitable birch bark is for birches growing in moderately damp and moderately shady places.
Before harvesting birch bark, you must obtain official permission from the forestry department indicating a specific harvesting location, as a rule, these are areas for deforestation.
The period of birch bark harvesting coincides with the period of tick activity, so vaccinations against tick-borne encephalitis and protective clothing are necessary.
The outer layer of birch bark is white; in products it is hidden inside and is called the inner or back layer.
Wrong side of birch bark
The inner layer of birch bark facing the trunk has different shades from yellow to brown; in products this layer is called the front layer.

Front side of birch bark
There are several ways to remove birch bark from a trunk: with a layer, with a tape, with a slab.

Types of birch bark blanks: a- plastic birch bark; b - birch bark tape (bast); in - bower
Preparation by layer
To remove the layer, you need to make two horizontal cuts approximately 200 mm long at a distance of 500-1000 mm (depending on how you plan to store the birch bark) and connect them with a vertical cut. By bending the edge of the birch bark, separate it from the trunk; if the time is chosen correctly, the birch bark will separate from the trunk without effort. You can first clean the barrel from the top white layer, thereby reducing the amount of work in the workshop.

Removing a giant layer of birch bark from a fallen birch tree
After removal, the birch bark is dried for 30 minutes in the shade with the front (facing the trunk) side up. The dried layers are laid with their faces facing each other and tied with a rope. If this is not possible, then the birch bark is rolled up, face up, into 8-10 layers and tied. The layers are stored unfolded in a stack folded in pairs with right sides, with a sheet of plywood placed on top. It is better to store in a dark, dry place, in a cool, ventilated area in summer.
Preparation with tape
In the forest, a smooth birch without knots or cracks is selected. A vertical cut of 4-6 cm is made on it with a knife to remove the tape. Next, the bark needs to be peeled off in a spiral downwards around the trunk. The knife is held so that the index finger lies on the edge of the blade, and the thumb rests against the birch trunk, limiting the width of the tape. The resulting tape is rolled into balls or rolls with the white layer facing out. An experienced master removes a continuous tape 100 meters long. It is important to ensure that the depth of the cut is small, within the cork layer, so that the birch tree does not dry out and after 10-15 years the protective bark appears on it again. To remove the tape, you can use a special cutter with a limiter.

Birch bark harvesting technology: a - birch bark cuts; b - removal of layered birch bark; c - packaging of layered birch bark; g - birch bark cut; d - removal of birch bark tape; e - position of the hand and knife when removing the birch bark strip; g - packaging of birch bark tape; h - removal of birch bark strip using cutter G.Ya. Fedotova
Skoloten (cylinder)
The trunk of a cut tree is marked into sections; the length of the section should not be less than 1.5-2 trunk diameters plus 100 mm to the height of the planned product.
Having determined the length of the wedge, make a circular cut and peel off the birch bark using a sapling (a tool resembling a bayonet). The flat side is hammered between the birch bark and the bast, and carefully peeled away from the trunk along the circumference with progressive movements. Then, clasping the ankle with your hands or a belt, remove it, making rotational movements.
After removing the first slab located closer to the top, saw off the freed end of the trunk and begin removing the next sklot. The dried pieces are inserted sequentially into each other.

Technology for harvesting sklotneys: a - marking areas for harvesting sklotneys; b - separation of the stem from the trunk using a scraper; c - packing of sklotneys
Necessary tools for harvesting birch bark: saw, axe, knife-cutter, sword (saber).

Tools for harvesting birch bark: a - knife-cutter; b - sochalka
Tools and accessories
The work table should be well lit and, for ease of work, equipped with drawers for storing tools, fixtures and pieces of birch bark.
To protect against damage, place a sheet of plywood 6-10 mm thick on the tabletop. Size of at least 800x500 mm.
The following tools and devices are used to work with birch bark:
A jamb knife - for cutting birch bark, a knife with a curved blade for stripping birch bark, a cutter knife, sharpened on one side, for working with slotted birch bark.

Tools for working with birch bark: a - jamb knife; b - knife for stripping birch bark; c - knife-cutter; g - straight awl; d - awl with a square section; e - awl - kochedyk; g - clamp; h - round punch; and - a triangular shaped punch; k - embossing in the form of a cross
Scissors with thin blades 60-70 mm long - for weaving, tailor's scissors, with a thick blade and comfortable handles - for cutting birch bark strips.
A round straight awl, with a blunt polished tip - for marking on birch bark, a shoe awl with a square cross-section - for piercing holes when sewing products made of birch bark, a stud awl, a flat spatula awl with a hook-shaped bend - used for weaving.
Wooden and metal rulers of various lengths and squares - for marking and cutting birch bark.
Measuring and drawing compasses for marking.
Tweezers are used for weaving.
Clips - used for temporary fixation of birch bark strips during weaving and in the manufacture of products from layered birch bark; they can be made from birch rod; clothespins, paper clips, office clips, clamps and a rubber band can be used.
Cutters - used to make incised ornaments, they are sharpened grooves of various sizes; semicircular wood chisels of a suitable size can be used as cutters.
Punchers can be of various diameters and shapes, used for locking joints and standard perforated figures. The inside of the punch should be hollow; cut sections of birch bark will be removed through it using a thin rod.
Punchers are made from tubes of various diameters; it is possible to turn punches on a lathe; it is better to make punches from carbon tool steel (for example, U8A).
Embossing - designed for applying an embossed pattern on birch bark, made of dense wood, metal, bone, with a design made on the end of the embossing. For small coins, you can use medical drills.

Wood engravings
Tape cutter F.F. Trapeznikov, designed for cutting birch bark strips of a certain width. The tape cutter consists of two halves that clamp the oblique knife, one of the halves corresponds to the width of the tape. A layer of birch bark is pressed against the edge of a wooden corner, running a tape cutter along it to obtain an even tape. Tape cutters can be made for tapes of various widths.

Tape cutter F.F. Trapeznikova
Templates are devices corresponding to the internal dimensions and shape of future products; they are usually made of wood. Bowls, vases, boxes and other objects and containers can be used as templates.
Frame boards are needed for temporary storage of birch bark strips. They are a piece of plywood measuring, for example, 500x300 mm. Elastic bands are stretched over a certain distance to hold the cut strips unfolded.

Board-frame for storing birch bark strips
A scoring board is necessary for working with slotted birch bark; it is made from linden, aspen, and beech wood, size approximately 250x250 mm.
To create various products, you may need materials such as willow twigs of various diameters peeled from bark, steel wire with a diameter of 0.2 to 3 mm, planks of various wood (birch, pine, spruce), linseed or sunflower oil, adhesives such as Moment, PVA, medical glue BF-6 (recommended for the manufacture of birch bark utensils).
Birch bark processing
The first stage of processing birch bark is removing the thin upper thin white layer from the bark on the rough surface of the tree immediately after harvesting in the forest or in the workshop using a regular brush and knife.
The second stage is the separation of birch bark into layers. Birch bark is multi-layered and not all layers can and should be used in weaving. Therefore, it is necessary to peel off the fragile top layers to the required thickness for each specific product; small products are made from thin strips, and larger ones, such as baskets and boxes, are made from thicker ones.
The third stage is cutting strips (straps) of birch bark. You can cut birch bark in several ways: using scissors, using a knife and ruler, using a tape cutter.
During long-term (more than a month) storage, it will not hurt to oil the prepared strips. You can use sunflower oil. You should soak a flannel cloth in oil and wipe both sides with it at the same time. Roll the strips back into balls and preferably put them in plastic bags for long-term storage.
Without oil, birch bark becomes brittle and brittle and must be soaked in water if it has not been stored wet in a plastic bag. After a few hours in water, dry birch bark becomes elastic, flexible, and ready for weaving. It is necessary to soak the entire ball or package of strips so that the strips (ribbons) do not curl. Good material is not soaked, but moistened with a cloth just before starting and during weaving, using soapy water.
Weaving
There are two types of weaving: oblique and straight. The names are explained by the angle (in degrees) the intersecting ribbons form with respect to the horizon. The main type of weaving is oblique weaving, due to its better manufacturability and strength.
Direct weaving is suitable for creating flat products - napkins, book covers; three-dimensional salt shakers and boxes can also be made.

Straight weave basket
Oblique weaving is used mainly for the manufacture of three-dimensional products - baskets, vases, boxes, and flat ones such as straps.

Birch bark boxes made using the oblique weaving method (the work of S.V. Ivanov)
For straight weaving, any number of ribbons are used; for oblique weaving, an even number is used.
The first stage of weaving the creation of the bottom is obtained by interlacing strips until a square with a checkerboard pattern is formed, the dimensions of which are determined by the number of strips 4x4, 6x6, 7x7, etc. The number of tapes is respectively taken as 8,12,14, etc.
To fix the strips during weaving, weights (for example glass) and clamps are used. Having received a clear square, mark the bottom of the future product; it can be square or rectangular. With straight weaving, the corners of the bottom are indicated by the letter - c; with oblique weaving, the projection of a square bottom is indicated by the letters - g, rectangular - d.

Making the bottom of the product: a - beginning of weaving; b - finished canvas; c - places where the corners of the fabric are connected with clamps and the placement of the bottom of the product with direct weaving; d - projection of the bottom of a product with a square bottom with oblique weaving; d - projection of the bottom of a product with a rectangular bottom with oblique weaving; 1-6 - horizontal stripes; 7-12 - vertically woven stripes
Next, the walls begin to form. When weaving directly, it is better to form the volume around a template of the appropriate size. All strips protruding beyond the volume are bent one by one at a right angle upward and tied with a rope. Then, from any angle, they begin to introduce additional horizontal stripes, gradually intertwining the vertical ones with them. The number of horizontal stripes determines the height of the product.

Manufacturing a product using the direct weaving method: a - bringing the strips into a vertical position; b - fixing the strips with a rope and weaving horizontal strips; c - formation of the edge of the product; g - finished product
With oblique weaving, an angle is formed at the marking site by crossing and interweaving adjacent strips. After braiding all four corners, the products are brought to the desired height. To obtain a product with smooth walls, you can use a template around which the product is formed. During operation, the strips are constantly pressed against each other to obtain a dense wall without gaps.
After forming the inner part of the product, the tapes are folded outward and downwards and weaving of the outer layer begins. Any product consists of two layers, and the inner face layer of birch bark will be visible both inside and outside the product.
If the length of the cut strips is not enough, they are increased: they are inserted under the previous layer, lifting it with scissors or an awl. Finish weaving on the outside of the bottom.

Manufacturing a product using the oblique weaving method: a, b, c, - stages of forming the corner of the product; d, e - stages of formation of the edge of the product; e - finished product
Making tues
Making tues is considered one of the most difficult in the birch bark craft.
Tues are made sheathed and reversible. The sheathing tues usually consists of 4 parts of birch bark: a clapper, a shirt and two upper and lower belts.

Scheme for making a sheathing tues
The reverse tues consists only of the first two. As a rule, the shirt is connected with a lock, although they also made ties without a shirt, only with belts. The lock connecting the layer into a cylinder has many forms and principles of fastening.

Locks for sewing shirts
1 - stitching the tues with birch bark tape, 2-8 - options for locking joints
The tues can be braided with tree roots, birch bark, a strip of willow twig, rope, and wire. In the villages, tues were braided only from above. The bottom held the belt from below. For beauty, the lower belt is also braided.
When making a reverse shirt, the height of the collar should be greater than the height of the shirt. Having put the finished shirt on the knee, steam its protruding edges in boiling water. Then bend two hoops from a willow rod and fasten their ends with threads. The hoops should fit snugly to the joint. Now wrap the steamed edges of the pin around the willow hoops, placing them on the shirt. The hoops give the edges of the walls a rounded shape and make the structure rigid, securing the bottom and holding the lid of the container.

Making a reverse tuise: a - bower with a shirt; b - lid with handle and bottom; c - the lower edge of the fold is wrapped after softening in hot water; g - finished product
Cut the bottom out of spruce or cedar wood. The diameter of the bottom should be several millimeters larger than the diameter of the inner wall of the tube. Before inserting the bottom, steam the edges of the walls again. After this, the bottom will be easily inserted, and when the walls are dry, the bottom will be firmly fixed in the frame, and at the same time the gaps between it and the walls will disappear.
Cut the lid from a spruce or cedar board with a small margin. Then, carefully cutting off the edges with a knife, bend it to the tuesk. Make sure that the edges of the lid fit snugly against the walls of the container. The lid should fit into the unit with some effort.
The handle can be made in the form of a poke. Cut the poke with a knife or turn it on a lathe, insert it into the hole drilled in the lid and hammer in a short wooden wedge on the bottom side for strength.
If the container is intended for carrying food over long distances, it is necessary to make a handle-bow. A simple bow is made like this. Drill two holes in the lid at an angle to each other. Then steam a willow twig lightly trimmed on one side in boiling water. Having bent the rod in an arc, insert its ends into the holes. After drying, the rod will become rigid and firmly fixed in the lid. For reliability, the ends of the handle can be wedged.
But the most reliable and beautiful is the handle-bow with a lock. Regardless of the size of the tool, such a handle has fairly constant proportions and dimensions. Most often it is done on the hand of an adult.
Plane a handle blank from willow wood.
Drill two rectangular holes in the lid. When marking the holes, make sure that the wood grain on the lid runs across the line where the holes are located. In the drawing this line is shown in red.
Steam the handle-bow blank in boiling water, carefully bend it into an arc and insert the ends of the handle into the holes in the lid. Drill two holes in the ends of the handle protruding from below and use a chisel to shape them into a wedge. Cut a wedge out of spruce and hammer it into the holes of the bow. The wedge will firmly connect the lid to the handle. But it also has another purpose - being located across the fibers of the lid, it will prevent it from warping, especially if liquids are poured into the container.

Making handles for tues
Peasants know well that salt stored in a container will never disappoint, and pickled mushrooms and cucumbers are not only stored for a long time, but also acquire such an aroma that it is sometimes difficult for the uninitiated to believe that no spices have been added to the pickling.
But still, another advantage of the tuesk is most valued - water, milk or kvass remains cold in it for a long time, and hot water, on the contrary, does not cool down for a long time. That is why from time immemorial he was a frequent companion of the reaper, plowman, hunter, and fisherman. The peasant had to notice more than once that even on the hottest days, when the sun mercilessly scorches, the birch sap coming out of the trunk is always cold. This means that birch bark reliably protects the birch trunk from overheating. This property of birch bark is explained by its structure. It consists of many thin layers that do not allow moisture and air to pass through, and the top layer is covered with a white coating that reflects the sun's rays.
Working with plastic birch bark
To work with the formation, it is necessary to select birch bark with the least amount of heterogeneity. Required tools: knife, awl. Plastic birch bark is used to manufacture a wide range of products. These are sewn items, boxes, souvenirs, dolls, dishes and much more.

Box decorated with slotted birch bark

Birch bark dolls
A unique and interesting new direction of birch bark products developed by Vladimir Makhnyuk - birch bark utensils, these are teacups, samovars, in a samovar with titanium steel for kindling you can even boil water (you can get acquainted with the work and technology of the master in his book).

Tea set by V. Makhnyuk
Products made from plastic birch bark and planks are often additionally decorated in one way or another.
Methods of decorating birch bark products
Embossing
A method of decorating products made from plastic birch bark using embossing and stamps. Mints are made from various materials: wood, metal, bone. A pattern is formed at the working end. Embossed ornaments are applied to the product with a certain rhythm, pressing on the embossing with a hand or hitting it with a hammer.

Tuesa decorated with embossing (work by A.V. Shutikhin)
Hot stamping is also used, when the embossing or stamp is heated before pressing, and the imprint at the points of contact with the birch bark will have a brown tint, butthe saturation of which will depend on the temperature of the stamp, the exposure time and the thickness of the birch bark, the main thing here is not to overdo it, the birch bark may burn.
In the factory, you can make various stamps with complex patterns.

Tuesa decorated by hot pressing
Burning engraving
You can apply a design to birch bark by burning it. To do this, use an electric burning device; the main thing when burning on birch bark is to use minimal heating of the burning pen.

Burning on birch bark (work by T. Kozlova)
Burning can be divided into contour, silhouette and pictorial (see the burning section).
Laser cutting and engraving
Cutting and engraving on birch bark can be achieved using modern laser equipment. On a laser machine you can carve birch bark and any type of burning. This method allows you to produce a large number of identical elements or products with high productivity.

An example of engraving on birch bark made on a laser machine
Scraping or Scratching
Scraping is used on dark-colored birch bark, usually with a metal tool - a knife, an awl, a needle. Autumn birch bark is used, which is removed from the tree with considerable effort. On such birch bark there remains a thin layer of brown cambium, which is removed with a scratching tool during work. Brown birch bark can be obtained by removing the bark from dead birch trees, holding freshly removed birch bark for 4-5 days in bright sun, periodically wetting it with water, holding the birch bark in a swamp at a depth of 10-15 cm for 14 days, painting the birch bark with a decoction of alder bark, painting it with an organic dye .
The design is applied to the birch bark with an awl by piercing tracing paper with the image or by tracing a stencil. Then the birch bark is slightly moistened and with the sharp side of a knife-cutter I scrape out the elements of the ornament, removing the dark layer. You can do the opposite by scraping out the background, leaving the ornament or image black.

The lid of a box with an image of swans, made by scraping. XIV century
Application
An applique is a decoration made from patterns cut out of birch bark, which are glued onto a product made of birch bark or other material.

Glass vase with glued slotted birch bark (work by S.V. Ivanov)

Painting made with birch bark applique
Thread
Carving is usually done on birch bark taken from young birch trees. The design is transferred to a piece of plastic birch bark of the required size with an awl, through tracing paper or a stencil. Use a knife-cutter to remove areas of the background. Carving is done on a wooden board, usually made of linden. Elements of the same type can be cut out with a punch of the appropriate shape. Slotted birch bark can be additionally decorated with embossing.

Making an incised ornament

Tues decorated with slotted birch bark
painting
An ancient method of decorating products made from birch bark, it was very often used to decorate birch bark tues or beetroot. The primary colors are red, green, blue and their shades when mixed with white. Sometimes the entire body was covered with background paint, and then a drawing was applied. Before painting, the surface is primed; it can be a mixture of chalk and wood glue, or you can use PVA glue. For painting you can use gouache, tempera and oil paints. To fix the painting, I cover it with oil varnishes.

Example of painted birch bark products
Finished birch bark products are lubricated with linseed or sunflower oil, this adds shine to the product.
Literature:
1. Klevtsov V.I. Birch bark weaving: 50 useful products. - St. Petersburg: Lenizdat, 1996. - 158 p., ill.
2. Makhnyuk V.G. Birch bark: Technique. Prima. Products: Encyclopedia. - M.: AST-PRESS BOOK. - 168 p.: ill. 2008
3. Finyagin V.V. Products from birch bark. - M.: Astrel Publishing House LLC, AST Publishing House LLC, 2001. - 128 p.: ill. - (Learning from folk masters).