Completion of the attic in an old house. Attic construction stages, materials used, rules and regulations
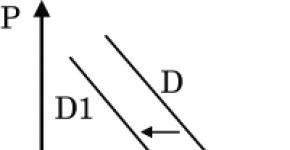
Diy mansard roof project. Drawings, according to which you will build an attic above your home, which will make it possible to increase your living space, while the whole thing will not be financially costly. The gable sloping roof is one of the popular construction options due to the low complexity of the technology.
The construction of an attic roof in your own house is a rather frequent phenomenon, because this method of construction makes it possible to reduce the cost of space, while making a rather curious dwelling under the roof. In order to properly arrange the attic floor, it is very important to thoroughly study all the requirements for this floor, as well as choose the right type of roof itself, along with its slope.
 According to regulatory documents, the attic floor is the volume under the roof covering, which is used to accommodate utility or living quarters there. In this case, the height of the outer walls is needed no more than one and a half meters in general, otherwise this space is considered a whole living room.
Making an attic with your own hands is an extremely profitable activity both during construction and during the use of the house itself. In the case of construction, costs are reduced because the height of the vertical fencing structures is also reduced. This is all because the attic itself takes on the function of the enclosing structure, while it continues to serve its original purpose.
Attic floor
Attic - a room under the roof, from which it will be possible to make a separate living room. During use, costs may decrease due to the following points:

Making an attic: preparation
It is necessary to start the construction of the attic roof with the preparation of a schematic project; this project should display the attic roof, or rather its drawing, its complete structure. Usually, the roof used for the attic floor is gable, which makes it possible to provide full-fledged windows in the gables, but it is possible to use a four-pitched hip roof.
If you are going to use the hips in order to illuminate the premises, then there is the possibility of installing window openings for the attic exclusively. This method is more difficult during the installation of the elements of the attic roof, as well as during the construction of interiors inside. However, costs are reduced during such roofing due to the lack of gables. In a brick building, the savings will be much more noticeable, because the cost of the construction work itself for the installation of wall fences, as well as the cost of materials in such a house, is quite high in itself.
Mansard roof device in the house occurs from the moment the roof is measured, its shape and size... There has already been a mention of the selection of the type of rafter systems (hip hip or gable). After that, you need to make the choice of a slope, straight or broken. Among the disadvantages of a broken slope are such as an increase in cost, as well as the complexity of the process itself. However, the use of this method can be easily justified by the need to increase the height of the room itself due to the fact that the angle of inclination of the attic roof will change.
During the design phase, it is necessary to determine the optimal slope of the attic roof. This choice will depend on the restrictive roofing material used, as well as on ergonomic considerations.
Before starting the construction of the attic:
- It is very important to make calculations of all its supporting elements for strength and bending.
- In addition, you need to choose the composition from which the roofing cake will be made.
- It is necessary to make calculations for heating engineering and select materials.
Design
List of structural components of the main load-bearing elements:

Do-it-yourself construction of a mansard roof of a house should take place with the selection of sections for all structures of the roof frame. The material must be selected, taking into account the following conditions:
- The tree must be coniferous, i.e. larch, pine or spruce will do.
- There should be a first or second grade of materials.
- More than fifteen percent humidity is not allowed.
- It is necessary to process all boards, as well as bars, with antiseptics before starting the construction process.
Heat engineering calculation process
In order for the warmth in the house to be preserved, it is necessary to select the insulation and its thickness. Mineral wool is often used for rooms with an attic. You can also use polyurethane foam, ecowool, polystyrene foam or expanded polystyrene foam. As soon as you decide on the material for thermal insulation, you need to choose its thickness.
 When choosing a thickness, it is necessary to take into account the rafter height. This rafter height must be greater (or equal) to the thickness of the thermal insulation layer. In the case of mineral wool, it will be necessary to provide a ventilation gap of fifty millimeters between the roof covering and the thermal insulation surface. In the event that the rafter sections are small, in order to fulfill this requirement, it is necessary to mount the counter-lattice.
Before the process of building an attic with your own hands, there is the possibility of manual calculation of heating equipment, with the help of a joint venture thermal protection of buildings. However, it is best to use special programs.
You should be very careful with the design of the attic of the house, because flaws in the calculations, together with the incorrect parameters of the structures of the rafter system, will lead to damage to the roof itself and, along with it, the walls of the house during its operation.
It is advisable to provide the design of the attic of the house to professionals. In addition, you can use specialized programs on a computer, with their help to perform calculations of rafter systems, the optimal angle of inclination of the attic, as well as many other parameters. All these calculations are made according to SNiP of loads and impact.
In the process of choosing an attic project, it is very important to pay attention to the dependence of the angle of the attic slope and the parameters of the room itself. The premises of a residential building should not be higher than two point two meters. If a mansard roof has straight slopes, the angle of inclination of these roofs will have a serious impact on the overall width of the room itself.
Skylights, their heights and roofing pie
 A broken attic allows for a strong expansion of the room, while setting the desired height at the ceilings. In this case, the rafter bottom is at a sixty-degree angle, and the angle of the rafter top can be selected at will.
Taking on the attic roof with your own hand, it is very important to foresee what materials will go to the installation of the roof pie, this must be done at the design stage. These materials will include:
- Steam isolation
- Waterproofing
- Roofing material
- Insulation
Insulation. His choice will affect such an important parameter as the rafter step. To save the material of thermal insulation, it is recommended to lay the rafter systems so that the mat or slab fits very tightly between these systems. The type of your lathing will depend on what kind of roof coverings you choose for yourself - it will be sparse or solid, as well as the step of the lathing, if it is sparse. What is important is the device of the attic roof on the floor, which involves the addition of high-quality good insulation, as well as a properly functioning ventilation system in the attic roof.
Required tools and materials
Materials and tools
In order for the construction of the roof and rafter systems to be safe, it must be carried out using clean, environmentally friendly and fire-safe materials. The processing of wooden materials is carried out using fire protection and biosecurity. For that in order to build a rafter system in your house with your own hands, you will need:
- timber timber, section 50x100mm;
- wooden board 150x50mm;
- unedged wooden board;
- 80 nails, as well as screws and other fasteners;
- annealed wire with a diameter of three or four millimeters;
- level;
- plumb line;
- roulette;
- hacksaws;
- axes;
- hammers;
- carpentry knives.
If you use quality tools during construction, it will significantly speed up and make the installation of wooden structures much easier. You can also find various video instructions on how to conduct such work step by step.
Stages of erecting an attic with your own hands
The hand-made construction of a mansard roof has some differences from an ordinary pitched roof only by the presence of heat-insulating elements. Protective layers for insulation also go into the pie. Here is the procedure:

In order not to make mistakes during construction, you need to consider in detail the instructions for each item, you can also find video instructions.
The construction of an attic is a very important process that is carried out both at the design stage of the entire house and after its construction. This room provides its owners with additional square meters of living space. We will consider the features of the construction of the attic below.
Attic construction: project and its development
The attic is a rather difficult part of the building to construct. It is preferable to design it at the stage of building the house itself. Because the construction of a residential attic on a finished building is not always possible. First of all, due to the fact that the attic room has considerable weight, and therefore loads the foundation.

The construction of an attic consists of a certain kind of stages, such as:
- attic construction drawings;
- dismantling of old roofing materials, in the event that the attic is being erected on an already finished building;
- strengthening the walls on the top floor, strengthening the foundation, if necessary;
- erection of the walls of the attic room;
- roof erection, insulation, waterproofing and finishing;
- installation of window structures;
- interior finishing work.
Compliance with all technological nuances in the construction of the attic will allow you to get a reliable and durable building.
The first and most important stage is the drafting of the attic space. At this stage, you should take into account such features as the size of the room, the material used in its construction, the roof and the level of its slope and many other nuances.

There are three ways to design an attic. The first is the most budgetary, drawing up a project by hand. However, to carry out this operation, minimal design experience is required. The second way is to use ready-made project documentation, however, it is not a fact that someone's attic project is completely suitable for your home, so you still have to make some adjustments to it. The third way is to contact specialized organizations, which in the shortest possible time will help you draw up an attic project for you, which is ideal for your home.
In the process of self-design, one should take into account the wall loads on the building, its appearance and finishing materials used both inside and outside the premises. In addition, it is imperative to take into account the load from the building on the foundation, it may need to be strengthened. If the attic is too heavy, there is a risk of deformation or cracks in the house.
Experts will help you choose the optimal building materials that, on the one hand, will provide the attic with durability in operation, and on the other hand, will help to reduce its load on the base of the entire building.
In addition, after drawing up the project, it should be coordinated with special government agencies. If you have a competent project, this process will take place quite quickly.

Do-it-yourself attic construction in the house
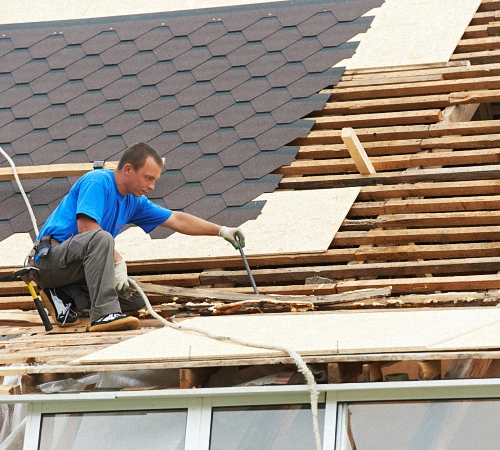
We suggest that you familiarize yourself with the option of building an attic in an already built and commissioned residential building. In this case, the first step is to dismantle the old roof. Thus, it will be possible to expand the roof space and increase the safety of the building under construction.
To dismantle the roof, it is not necessary to hire specialists, all the work can be done by hand. To do this, you must first get rid of the external roofing finishing material. Next, you need to completely remove the crate and rafter system.
After that, it is necessary to strengthen the walls on the adjacent floor, since the attic will exert a certain pressure on them. The design features of the attic exert pressure not only on the surface of the base of the building, but also on its walls. Therefore, first of all, before erecting an attic, it is necessary to strengthen the walls close to it. To do this, you should use special calculations, according to which this process is performed and the level of strength of the old walls is determined.
The next stage is insulation and waterproofing of the attic floor, which is also the ceiling on the previous floor. With the help of these actions, it will be possible to ensure a healthy indoor atmosphere. To insulate the attic, you can use various thermal insulation materials in the form of foam plastic, mineral wool, etc.
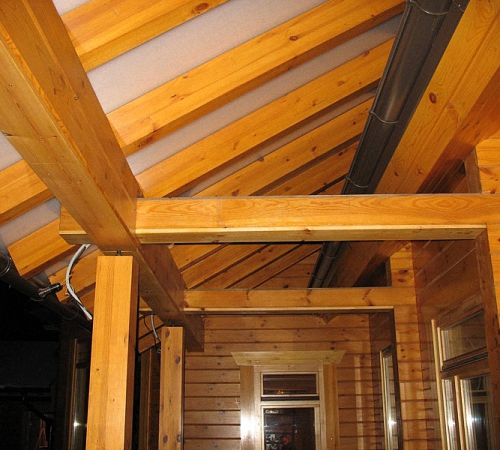
Attic construction photo:
This is followed by the process of erecting walls in the attic. The walls are made in relation to the project developed in advance. Most often, wood or timber is used for the construction of walls. For insulation of the attic, it is recommended to use mineral wool or expanded polystyrene. When choosing material for external and internal wall decoration, try to give preference to materials with a high level of fire safety.
The next process is the erection of the roof. In this case, calculating the correct angle of inclination of the roof is very important. Since a too sloping roof will adversely affect the ease of use of the attic. Please note that the roof must be waterproofed with high quality, since in the presence of the slightest leaks on its surface, moisture enters the attic.
In addition, the shape of the roof should be as simple as possible, the presence of broken and shaped elements will only complicate the process of their construction. Also important is the issue of warming the attic room. For these purposes, various kinds of building materials are used. When choosing insulation for the attic, try to give preference to materials that do not absorb moisture, are resistant to frost, temperature changes and rodents. In addition, the thermal insulation material should not allow heat to pass from the room.

It is best to stop at carrying out internal thermal insulation work. To form it, follow a number of steps:
- install a plasterboard or plywood finish;
- form a layer of vapor barrier, special films are used for these purposes;
- lay insulating material - the ideal solution is mineral wool;
- ensure proper waterproofing of the roof using a special kind of membranes;
- Install the outer finishing roofing material.
To erect a roof, you will also need to install a rafter system, mount a crate, the installation step of which depends on the type of roofing material. After completing the installation of the roof, the windows should be installed.
In order to provide high-quality lighting in the room, several windows should be installed in it, the size of which directly depends on the size of the attic itself. The window in the attic ceiling must be of high quality. It should be resistant to precipitation, wind, temperature changes. In addition, with the help of window structures, high-quality ventilation of the attic is ensured.
Further actions for the construction of the attic are associated with the implementation of interior finishing work, the organization of heating, the decoration and design of the premises. Strict adherence to all recommendations for the construction of the attic will help ensure the long-term operation of this room.

Frame attic construction technology
A frame attic is an excellent solution for any home, garage and even a bathhouse. Among the advantages of frame type attics, we note:
- lightness of the structure, therefore it does not load the main building, there is no need for additional strengthening of the walls and base;
- affordable cost of the attic - in comparison with its stone options;
- high level of thermal insulation and sound insulation;
- the possibility of constructing an attic of almost any shape and configuration;
- simplicity of construction work, since the materials for the construction are quite light and no special equipment is required to raise them to the surface of the house.
The construction of a frame attic allows you to get a finished building with excellent heat and sound insulation performance. In addition, the roof will remain completely intact, and the useful area of the room will increase significantly.
A simpler process is the construction of an attic on a building that has not yet been erected. The construction of an attic on an already finished house requires the dismantling of the old roof covering. Work should begin by studying the characteristics of the soil on the site and determining the bearing capacity of the foundation. If the foundation is not able to withstand the attic, then a number of work will be required to strengthen it.
Next, you should inspect the walls of the house for their susceptibility to additional loads. In this case, it is necessary to reinforce the walls if necessary. After that, the old roof is dismantled and the ceiling is reinforced.
The construction of a wooden attic consists of the following stages:
- fabrication of a frame system;
- installation of walls;
- insulation of the attic walls;
- installation work related to the installation of the roof;
- attic finishing with roofing materials and roof insulation;
- interior decoration of the attic.

In addition, the construction of an attic involves the installation of window and door structures, the manufacture and installation of stairs, etc.
In order to carry out the construction of an attic from a bar, you should prepare an edged board, plywood, self-tapping screws and the bar itself. The frame structure should be convenient in height for the movement of the average person. The optimum attic height is at least two meters. The height of the ridge area should be about 350 cm.
The easiest way is to assemble the frame on the ground and then lift it to the roof. The top beam or frame frame will act as a hearth in the attic. To fix the frame structure on the surface of the house, special plates or plywood are used. Thus, it is possible to obtain a special platform. The knots and quality of fastening depends on the material from which the attic walls are made. Self-tapping screws are used to connect the timber in the upper part of the structure. After the manufacture of frame walls, the roof should be insulated and waterproofed. After that, the external and internal wall cladding is performed, windows and doors are mounted, and internal finishing work is carried out.

When planning an attic, you should carefully analyze the general condition of the main building. The attic can be one room or it will consist of several rooms. At the design stage, the structure and shape of the windows, as well as their location, should also be taken into account.
The attic should be built of lightweight, but at the same time durable materials. Since the materials should easily rise to the roof and provide minimal load on the base of the building.
The most optimal materials for the construction of the attic are wood or steel profiles. A stone or concrete attic will load the main building. Roof finishing materials should also be lightweight, but at the same time strong and reliable. It is preferable to use shingles or piece metal for roofing. We recommend using drywall for interior wall decoration and leveling.
Since the attic is located above the main building, it is more in contact with cold air. Therefore, proper thermal insulation of this room should be ensured. The heated air in the room should not penetrate through the insulation. In addition, in order to prevent moisture from entering the room, it is necessary to ensure its waterproofing.
In relation to the design features of the attic, it consists of a rafter system, which is installed in compliance with a step of sixty centimeters. To fill the gaps between the rafter system, it is recommended to install thermal insulation materials such as mineral wool inside them. It is possible to lay the insulation in one, two or even three layers. To calculate the total thickness of the insulating material, the total heat loss factor in the room should be taken into account. To protect the roof from inside the room, a vapor barrier should be installed. Next, you should finish the roof with drywall, lining or finishing panels.
Do not forget to leave a ventilation gap, the main function of which will be to get rid of excess moisture in the under-roof space. The width of this gap directly depends on the type of roofing material. A vapor-permeable wind shield should be installed on the outside of the insulating material.
An excellent vapor barrier material is a polyethylene film, glassine or roofing felt. The insulation is laid with an overlap of 15 cm. For gluing the seams, construction tape is used. Please note that foil waterproofing is laid with a foil coating inside the room. In this way, the foil will reflect the heat that emanates from the room.
Attic construction video:
This is the most popular type of premises, since most structures are constructed in this way - the attic requires much less funds for construction, and is erected very quickly. The rafter leg should be made of 150x50 mm timber, this is a calculation for an ordinary house of 7x10 meters. With such dimensions, you do not have to come up with anything superfluous - the usual rafter system of the structure will do. The angle of inclination of the leg will be from 45 to 60 degrees, it is advisable to make the angle smaller so that the parameters of the room are suitable not only for life, but also for normal rest.
The rafter's leg length will be about 640 centimeters, while the width of the living space will be 450 centimeters and a height of 230-250. Such parameters will satisfy the requirements of most builders, but if more space is required, then sloping roofs should be preferred, but they will cost much more. Consider the simplest and most effective drawing of an attic under a conventional gable roof.
The extension board can be exactly the same size as the leg to make it easier to build, but the vertical supports can be reduced so as not to overpay. A beam of 80x80 centimeters will be quite enough, taking into account the fact that the crossbar is laid 120x80. It is better not to save on the crossbar, since it serves as a supporting element, it will hold the suspended ceiling, chandeliers and other decorations. It is advisable to install the racks more often, since this will greatly facilitate the finishing work later. The construction of an attic under a gable roof is simple, inexpensive, practical.


How to make an attic with your own hands under a sloping roof
Despite the fact that the roof itself is quite expensive to manufacture, it requires a little more labor for its installation, building an attic with your own hands will take much less time here. You get a ready-made box for its construction, you just need to sheathe everything with finishing materials, insulate and an excellent, spacious room is already ready. A prerequisite for construction is that the width of the house must be at least 5 meters. Since for a comfortable stay in the attic, you will need a height of 220 centimeters or more, and a width of at least 3 meters, preferably even more.
The upper harness is made of 80x80 timber, 60x60 mm ridge rafters. Such small bars are the result of the fact that there are a large number of them and they are installed every 70 centimeters ( see drawing). The side rafters are fastened with brackets, the attic floor beams should be at least 50x50 centimeters, preferably a little more so that there is a margin of safety. The calculation is made for a house of 6x6 meters, with an increase in the width of the structure, the strength of the materials will proportionally increase, since the load on the supporting elements will be much greater.
The cladding is made from lining boards, plywood, fiberboard or OSB boards. These are the cheapest materials that, with proper insulation, will in no way be inferior to European building materials. They can be installed on profiles, in the same way as when creating frame structures. There is no need to install heavy load-bearing structures - the pressure will be minimal on the walls. If it is necessary to make heavy units (for attaching a plasma panel, under an aquarium, etc.), it will be possible to install reinforcements precisely at the points of attachment of the object, thus saving a lot of money on arranging the room.


Warming the room
If you initially want to make a house with good thermal insulation, so that a 400 W heater is enough to heat the attic, then you need to give preference to roofs with a solid crate. Let's take a closer look at how to make a truly "profitable" roof that will save you money for all the years to come.
- We make the top of the attic. There must be a vapor barrier, since the temperature in the room and in the air chamber above the ceiling will differ by 15-20 degrees in winter, the heat will "escape" from the room. From below, you tighten drywall, on which you can then apply finishing materials (plaster, stretch film, etc.), on top of the tightening place a foil to isolate the steam, insulate it with any roll insulation that you like. Such a system will eliminate condensation and increase thermal efficiency by 35%.
- Before you make an attic, you need to decide how you will cover the roof. The ideal option is slate, roofing felt, OSB sheet and crate. Such a system will significantly save the cost of heating the house, although the installation of building materials itself is expensive. It is better to make the crate thick so that the OSB board does not "play" on it, it is perfectly flat. Next, we cover it with resin, lay a thick roofing material, it is advisable to choose the most flexible one. It will already be possible to simply nail the slate onto it. Some builders also use a 0.5 cm insulation gasket so that the slate adheres more tightly to a hard surface and does not loosen over time. Thermal efficiency is, of course, also significantly improved.
- We insulate from the inside. One of the most important aspects of home insulation is the installation of fiberboard and insulation boards. Between the rafters, the entire space (without "windows") should be occupied by insulation, the joints of which should be glued or tightly knocked down (depending on the type of material). If funds allow, you can apply liquid polyurethane foam, directly along the crate and the inside of the OSB. The cost of one square meter will be about 200 rubles, but it's worth it - you will eliminate possible condensation and insulate all roof slopes without seams.
When insulating, you can use ordinary foam - its effectiveness is small, but with a solid thickness of the material (up to 8-10 centimeters), it will be no worse than alternative building mixtures. The only big drawback is that it is not suitable everywhere for dense insulation, it also takes up a lot of space.
Insulation of the floor is a very important point, since a lot of heat goes away precisely through it, especially in brick houses, where a concrete slab plays the role of overlapping. But even a wooden blockhouse must be insulated between floors. To do this, it is enough just to put roofing material in two layers, and fix a fiberboard plate on it, mainly PT-100 or M-20. Then you can already lay the usual floor, for example, warm linoleum. With minimal heating of the room, it will be very warm to walk on it, it heats up even when the first floor is heated.


How to build an attic the first time or the main mistakes of beginners
When we build an attic with our own hands, the main task is strength and few people pay attention to thermal efficiency, durability, practicality. But after a few years, or even months, these "shoals" will be gradually shown, and their elimination will be very costly. Let's take a look at the typical mistakes newbies make.
- No anti-corrosive treatment... All materials, especially natural wood, must be treated with impregnations, special insect repellents and moisture-repelling suspensions. If this is not done, the life of the wood will decrease many times.
- Fastening of different boards of one rafter leg "by eye", without level, without taking into account the natural load on the roof in a snowy winter. As a result, the deflection of the rafters by 15-20% is ensured, therefore, the entire roof will be "walked".
- The insulation is laid with gaps, there is no obligatory bandaging of the layers. Some masters initially lay a layer of insulation, which is not at all suitable for our climatic zone, so the thermal efficiency of the room immediately decreases significantly.
- No air cushion between the top layer of insulation and the roof... Thus, fungi can form, as well as condensation, which will not lead to anything good.
- The use of overly "light" materials. The strength characteristics of the walls are not a primary goal, but they should not be relegated to the background. It is better to install an OSB plate with a thickness of 15 mm or more - it is not much more expensive, but the strength qualities will several times exceed the material with a thickness of 0.5 mm.
Pay attention to the environmental safety of materials, purchase wood, insulation materials only from well-known suppliers, since a poor-quality product can do a lot of harm to your health. Also, you can not use anti-corrosion agents for outdoor work, which have a lot of hazardous chemicals in their composition. It is necessary to use suspensions intended for interior decoration, having a hazard class 3 (non-hazardous to humans). Preference should be given to well-established manufacturing companies.
It is not uncommon for a situation when, for one reason or another, a house that seemed quite comfortable until recently becomes cramped or the dacha needs to be turned into permanent residence, while increasing the area. Also, often the need for major reconstruction and expansion arises when buying a house with "experience". There are two ways to get an increase in quadrature - to add a room or build on it. For many, the addition of a residential attic floor is a preferable option, since it is not required to additionally fill the foundation, and there is not always enough space under the annex on the site. And among the craftsmen of the portal, the superstructure of the attic floor is quite popular, and they share the experience gained in this article with those who are just deciding how to be and what to do.
- What is an attic in a house
- Features of the construction of the attic floor during the reconstruction.
- The experience of the members of the portal.
What is the attic of a house
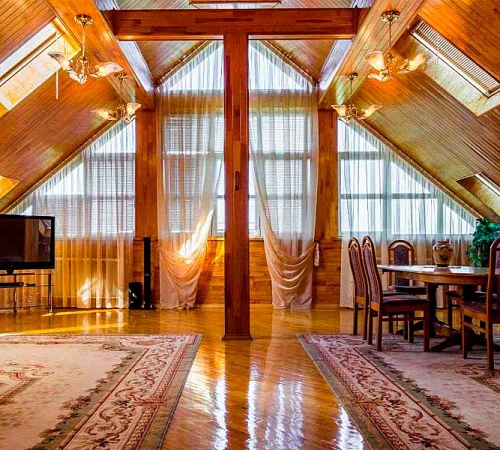
By definition, an attic is a residential or non-residential premises in an attic space. However, in practice, only cold attics remain uninhabited, and the attic is a residential (all year round or seasonally) space, under an insulated roof of a special configuration. Unlike the full-fledged second floor, at the attic part of the walls are formed by the slopes of the roof, which somewhat limits its functionality. Attic floors have been popular at all times, have not lost it until now and are unlikely to lose it in the future.


Modern technologies make it possible to organize premises for any purpose in the attic, as well as in full-fledged second floors - these can be bedrooms, offices, children's or guest rooms. Today it is not a problem to arrange a full bathroom in the attic if necessary, not to mention a bathroom with a shower stall. Kitchens in attic rooms are a rather rare phenomenon, they mainly appear when it comes to the residence of two families and a separate passage from the street.
Perhaps the main condition for a comfortable existence under the roof is a height of 2.5 meters at the central point.
The permissible minimum for the attic floor according to sanitary standards is 2.3 meters, although in practice there are other sizes.

Features of the attic superstructure
Whether to build on the attic is decided based on two factors:
- availability of technical capability;
- expediency.
The main question is whether the walls of the living house will withstand the weight of the proposed structure, even if we are talking about the lightest, frame version. Therefore, the first step is to draw up a plan and make an approximate calculation of the bearing capacity of the walls and foundation. It is not the type of wall material that will play a role here, but the condition of the walls. Other log cabins with a half-century history are much stronger than the "youthful" stone buildings.
The feasibility of such a global reconstruction depends on the dimensions of the house - if it is too compact, then the residential attic, taking into account the design features, will turn out to be tiny. If the width of the house is less than five meters, then it makes no sense to build on such a structure as an attic floor. However, with all the restrictions, sometimes a small interesting attic room is better than nothing, the main thing is that the walls withstand and the wallet pulls.
But even if the walls are strong, the load that has increased many times must be evenly distributed, for which an armo-belt is poured along the perimeter of the stone base.
When the armopoyas is poured into it, fasteners are immediately laid under the Mauerlat (studs), which will firmly fix the entire structure in place.

Without sufficient insulation, it is impossible to build an attic even for a seasonal stay, since without insulation in the summer, there will be a steam room in the attic. The attic in a residential building is insulated along the entire perimeter to form a closed circuit - floors, inclined and vertical walls, pediments. Insulation today can be anything from typical slabs, rolls and mats to blown, backfill and spray. However, regardless of the variety, its thickness must be sufficient to ensure the standard coefficient of thermal resistance of the wall (tabular data by region).

If we are talking about mineral plate heat insulators, which are used most often, then 150-200 mm is enough for most regions. It is more efficient to lay this thickness in several layers with overlapping seams to minimize heat leakage. Since the attic belongs to heated rooms, great importance is attached to the construction of a vapor barrier so that warm air does not provoke condensation in the insulation or roofing cake.
For the free removal of moisture, which, despite all the barriers, will accumulate between the insulation and the roofing of the attic floor, a ventilation gap of at least 5 cm is required, and ideally a ridge aerator.

The simplest option is a vertical window installed in the gables, but for full illumination, special skylights are also needed, mounted directly into the roof.
The number of windows is calculated based on the permissible minimum - for every 10 m² of 1 m² of glass.
If the plans include dormer windows, then even when assembling the rafter system, it is worth calculating the step of the rafters for their dimensions, taking into account the seam.
In most cases, frame and timber attics are built on top, since they are both lighter and cheaper, and the construction process is faster. Considering that the house is residential, the sooner it is under the roof again after dismantling the old one, the better. If they choose a more capital, stone option, then they prefer lightweight materials (gas block, foam block, expanded clay concrete).


The experience of the portal members
Major reconstruction of the house of one of our craftsmen with a nickname Soboleff underwent twice - first from a summer cottage it was turned into permanent residence, and then the attic room was built on. Our user comment:

Soboleff
The long-awaited warmth came, and with it - the beginning of the realization of an old dream - the replacement of the old roof with an attic. Throughout the winter they were doing calculations, drawing a plan, designing in "ketchup", saving money. I think this report will be of interest to those who do not have a very large, in terms of square, rather old and built house from what was. In my case, this is a former summer kitchen, which was converted 30 years ago into a residential building with an area of about 60 m².
The arrangement of amenities and active changes in the layout in order to increase the level of comfort have been engaged in the last few years.

The walls of silicate bricks are folded somehow, the foundation also touched the technology sideways, so the craftsman decided not to risk it and make a frame superstructure. The height of the walls of the building is 1200 mm, from the finished floor to the ridge - 3500 mm, a gable roof with a corresponding pie, as a roofing covering - metal tiles. According to the layout, on the attic floor there are a couple of children's rooms of 16 squares each, a common corridor, a bathroom above the existing ground floor and a low storage room.
 Attic floor, layout.
Dismantling revealed buckled rotten beams and the deplorable state of the masonry in the upper rows, not only these rows were replaced, but also the wooden beams above the window openings with a corner.

A crate was stuffed onto a brick-lined perimeter, reinforcement was laid, studs were inserted to fix the Mauerlat and an armored belt was poured.


In the second stage, the internal partitions were brought up to the level of the external walls, the floor beams were laid, the subfloor was hemmed and the frame was assembled. All wooden materials were pretreated with fire protection.


The role of the jibs for stiffening was assigned to the slab sheathing - OSB 3, all joints of the slabs and the frame were foamed. The thickness of the stone wool insulation on the ceiling is 200 mm, along the walls - 150 mm, plus further 50 mm along the perimeter of the entire facade.


For ventilation left at the very top of the "cold triangle". Along this flat area of the ceiling, the craftsman put the insulation in four layers with an overlap. Roofing "pie" according to all the rules - with waterproofing, wind protection and counter-lattice.
A counter-lattice made of a 50 mm bar with a step under a sheet of insulation was also stuffed on the walls of the attic room from the outside, slabs were laid, and the contour was closed with wind protection. The slabs were fixed to the house on hangers and plastic disc dowels. On top of the windscreen there is a galvanized profile 60 × 27 mm, resulting in a ventilation gap and a subsystem for siding.


The mansard roof makes it possible to significantly increase the total living area, while the investment of funds will be minimal. The most common option is a gable broken structure, which is easy to build on your own.
How to make a mansard roof yourself
Living rooms can be arranged under the attic roof. The shape of the building can be different, but in most cases the attic is set up under a roof with two slopes. The optimal solution, which allows you to obtain a significant area of living space, is a broken structure.
A sloping roof is the best option for arranging an attic
Attic roof drawings and calculations
The first step is to decide on the frame scheme. Rafters can be of a layered or hanging type. Slabs rest on the walls of the building. They are mounted in structures where the distance between the walls is less than 6.5 m. Hanging rafters are placed on filly and Mauerlat. If the width of the spans is large, then the rafter system will need to be reinforced with auxiliary bundles.
The main condition for the comfortable construction of the attic is the level of the ceilings - it must be higher than 2.5 m.To ensure a similar height, the break line should be located at a height of more than 2.8 m, taking into account the thickness of the layer of material for insulation and sheathing of the structure. It is also important to consider the thickness of the floor.
An example of a drawing can be seen in the image:
 The minimum height of the mansard roof ceilings is 2.5 m
 To calculate the expected snow loads, you need to apply this formula: S = Sg x µ, where S is the snow load, Sg is the weight of the snow cover per 1 m2 of area, µ is the value that depends on the slope of the roof (1.0 - for a flat design with an inclination of 25 °, 0.7 - for a design with an inclination of 25–60 °).
Parameters Sg and Wo can be found in the corresponding SNiP, in the section "Rafter systems". If the roof has a steep slope, the snow load can be ignored.
Roof device
The frame structure includes the following details:
- Mauerlat - a support bar that transfers the load from the rafters to the walls of the building;
- racks - supporting parts that support the rafter system in an upright position;
- floor beams - planks that form half of the attic and the ceiling of the lower floor;
- rafters - slats that form the main contour of the roof;
- girders - horizontal support parts for rafters;
- lathing - slats or plywood sheets, which are intended for laying roofing material;
- filly - strips that are attached along the axis at the bottom of the rafter legs.
 The frame consists of a Mauerlat, posts, purlins, floor beams and other elements
 The sloping roof differs from the usual construction with two slopes. The difference is that the slopes, which are placed opposite each other, have a special shape: they do not form a straight line, but consist of several slopes, which are fastened to one another at an obtuse angle. The design is also symmetrical.
The edge of the rafters is generally set at an angle of about 60 °. The support posts, which support the rafters, form the frame structure of the inner walls. The upper part of the rafters is mounted at a small angle, it can be from 15 to 45 °. This makes it possible to reduce the consumption of materials, while maintaining the functional properties of the roof and resistance to snow loads.
Vertical uprights, which abut against the floor slats, purlins and crossbars holding them together, form a parallelepiped. The design limits the dimensions of the attic from the inside. To give the product additional rigidity, you should install struts between the floor slats and the lower rafter legs.
 If the span of the roof is more than 8 m, then you will need to install struts
 After the installation of the upper elements to fix the truss and eliminate the sagging of the crossbars, you should install the suspended support elements - the headstock. For the auxiliary fixation of the lower rafter legs, they must be pulled together with the racks using tacks. The parts are fastened with nails and bolts.
Stages of independent construction of the attic
If a decision is made to make such a structure yourself, it is important to provide for the use of such materials in the project:
- roofing material;
- vapor barrier;
- waterproofing;
- insulation material.
The choice of insulation affects such a parameter as the step of the rafters. To reduce the amount of heat insulator, it is best to place the rafters so that the slab or mat fits snugly between them. The type of lathing and its step will depend on the choice of material for roofing. You need to pay attention not only to the choice of high-quality material for insulation, but also to create an effective ventilation system.
 Ventilation is equipped by preparing technological gaps
 The construction of the rafter system must be carried out using fireproof materials. All parts should be treated with fire protection agents. You will need to prepare the following elements:
- wooden bars with a cross section of 100x50 mm;
- slats 50x150 mm;
- unedged boards;
- building level;
- self-tapping screws;
- nails;
- steel wire with a diameter of 4–5 mm;
- plumb line;
- roulette;
- hacksaw;
- axe;
- a hammer;
- sharp knife.
Drafting a project
One of the most important parts of the job is drawing up a project. It is very important to analyze the features of the layout of a private house. It is necessary to determine the dimensions and shape of the structure being erected, as well as provide for the placement of windows and a balcony.
 All structural elements should be indicated on the project.
 In the process of drawing up a project, the following requirements must be taken into account:
- It is important to determine in advance what height the attic should be. It should be remembered that the distance from the floor base to the highest point of the structure must be at least 0.5 m.
- It is recommended to take into account the heating area and the main elements of the interior.
- The attic layout must be expanded. If you plan to install windows, then they must be indicated on the drawing.
Drawing up a drawing must begin with the choice of the shape, determining the section of the rafter legs and the step of their placement. To determine the dimensions of the rafters, the following parameters must be taken into account:
- bias;
- roofing material;
- features of the climate in the region of construction.
It is also important to provide for the required number of rafters in the project. They can be of a layered or hanging type.
 Rafters can be hanging or layered
 At the end, you should determine the number of parts to fix. In the figure below, you can see some of the data required for the calculation, but drawing up a project is a complex process. It is recommended to entrust this work to qualified specialists.
Installing Mauerlat
The device of the attic roof rafter system should be selected based on the type of roof, as well as on the prepared attic project. A simple option is the double slope design.
The main parts of the double slope roof rafter system are:
- linear elements (column, bar system, beam);
- plane details (slab, flooring, panel);
- spatial elements (vault, shell, volumetric detail).
Before performing work, you will need to thoroughly dry the wood. The first step is to mark and install the Mauerlat. It is fixed to the walls of the building. The part can be made from a bar or a powerful lath. If you plan to build a roof with two slopes, then the Mauerlat fits on the long walls of the building. The element is necessary not only for reliable fixation of the lower part of the rafters, but also for the correct division of the load on the walls and the main part of the structure.
To fix the Mauerlat, you should use metal studs, which are attached to a beam made of in-situ concrete.
 To fix the Mauerlat, you need to install metal studs
 The beam should be in the upper part of the wall. It is also possible to use steel wire embedded in brickwork.
To fix the Mauerlat to the upper crown of the wooden wall, you need to use wooden pins. Auerlat requires high-quality waterproofing of wooden beams. Therefore, it is necessary to use roofing material or other material with a water-repellent property.
 Before installing the Mauerlat, the base must be covered with roofing material
 The installation of a Mauerlat is required if it is planned to erect a roof frame, the rafters of which abut against the upper part of the wall with beveled ends or prepared cutouts.
If you plan to make an attic, the width of which corresponds to the width of the building, the rafter legs should rest with the lower ends against the taken out supporting parts. As supports, it is possible to use powerful beams laid across long walls. The number of supporting elements corresponds to the number of rafters. The beams must be fixed to the walls in the same way as the Mauerlat.
Sequencing:

Frame construction
 The mansard roof frame consists of floor beams, rafters, purlins and uprights
 As a material, coniferous bars 200x100 mm are often used. The slats are placed on top of the Mauerlat with a 30-50 cm indent behind the wall surface or in the prepared grooves in the masonry. In the first case, the parts are fixed with corners and self-tapping screws.
 Fixing the timber to the Mauerlat can be done using steel corners
 To make an even overlap, the planks should be installed in this sequence:
- The first step is to fit the extreme details in terms of level.
- Next, you should pull the cord and install intermediate elements along it.
- The spacing of the beams should be from 60 to 100 cm. A distance of 60 cm makes it possible to mount insulation boards without notching.
- To level the beams in height, you can hang them. Another option is to use plank liners.
- If the beams are inserted into prepared pockets, their extreme parts must be treated with liquid waterproofing and wrapped with roofing felt.
It is necessary to set the racks on the extreme planks:

After the installation of racks, crossbars and girders, you can get a reliable structure that will limit the interior rooms of the attic. To increase its strength, in the future it should be secured with struts and tacks.
Installation of rafters
At this stage, the installation of the lower rafters is carried out:

After that, the top elements are installed:
- The first step is to mark the central part of the roof. This can be done using a post that was previously attached to the Mauerlat and tightening from the end of the roof. The edge of the board should be in the center of the roof. On this board, you need to align the rafter legs.
- Next, you need to prepare a template from a 150x25 mm rail. It should be applied to the extreme part of the mounted rail at the required level and to the girder on which the lower rafter legs will rest.
- Mark the top and bottom cuts and cut out the template. The fixture is applied in turn to both sides of the roof. This will make it possible to check the accuracy of the marking of the central part. If the rows of racks are placed in parallel, then there will be no difficulties in securing the upper elements - they will have identical dimensions.
- According to the workpiece, you need to prepare the required number of rafters. The parts are placed on the girders and tied in the upper parts using iron overlays or trim strips. In the latter case, self-tapping screws are used as fasteners. In the girder, the rafter strips rest on the cuts and are grabbed by the iron corners. In order for the parts to stand straight, they are fastened using struts mounted with the lower part for tightening. This method is used to install all the rafters.
- Fixation of hanging racks is carried out - pieces of slats 150x25 mm. The upper part of the rail is fixed in the place of fixing the rafters, the lower one - to the tightening.
Video: mansard roof rafter system
Installation of struts and gables
Sequencing:

Construction lathing
Sheathing is needed for:
- distribution and transfer of the weight of the roofing material to the rafters;
- performing additional fastening of the rafter system;
- bases for fixing the roofing material.
The lathing can be made in one or two layers, solid or thinned.
 The lathing can be solid or with a discharge
 The installation method depends on what material is planned to be used to cover the structure. If a roof is to be erected from slate or metal, the lathing should be made of slats, which are attached to the rafter legs with nails. In this case, the step of installing adjacent strips can be 27-30 cm.
Solid lathing is used in case of fastening soft material in rolls.
Solid sheathing is required for soft roofing
In this case, moisture resistant plywood sheets or particle boards can be used. It is allowed to use pine wood material - edged planks.
It is important to take into account the fact that when constructing such a crate, the material that will be laid must repeat the contours of the outer base. Therefore, the frame structure must be strong and leveled.
In the process of laying out the material, a cord should be used with which the slats or plates will lie flat. Parts should be placed parallel to each other. Before fixing, the material must be treated with an antiseptic composition in order to protect it from rotting, the appearance of fungus and dampness. The workpieces must be even and of high quality. It is recommended to give preference to wood of the 1st and 2nd grade. There should be no knots on it. To prevent the boards from warping, they must first be dried.
The sequence of steps for installing the crate:

Mansard roof waterproofing
The material for the roof does not have thermal insulation properties, so you will need to prepare a high-quality material that will be environmentally friendly for human health. Mineral wool or glass wool is often used. Both materials have excellent sound and heat insulation parameters. It is also important to take into account that if the roof is made of metal, when the insulation gets wet, all its qualities can be reduced to zero. Therefore, it is important to carefully consider the design device.
It will not work to insulate the attic without laying a waterproofing material, so the process should be considered together. A step-by-step guide to waterproofing a structure:

Practice has shown that it is better to protect the insulation with the help of modern materials, for example, Tyvek or Izospan. The use of ordinary polyethylene film gives poor results, as condensation may appear. Experienced craftsmen believe that the structure should not be waterproofed with roofing material.
Before proceeding with the work, you need to decide on the thermal insulation material.
 Mineral wool is a fairly popular material used for roof insulation.
 The following heat insulators are most commonly used:
- glass wool;
- mineral wool;
- Styrofoam;
- foamed glass;
- wood shavings;
- straw.
The choice of material should be based on four parameters.
- Thermal conductivity index. For roof insulation, 0.05 W / m * K or lower is optimal.
- Water resistance. The higher the score, the better.
- Resistant to fire.
- Environmental Safety.
The insulating qualities of mineral wool deteriorate significantly after a while. Also, the material can be damaged under the influence of mechanical stress. However, mineral wool has a low cost, so the material is used quite often. Polyfoam is not afraid of water and has excellent thermal insulation characteristics. If you plan to build a house only from environmentally friendly materials, then you can use foam glass or straw.
Roof Insulation Step-by-Step Guide:

Laying of roofing material and installation of window openings
As an example, the installation of metal tiles will be considered, since this material is used quite often:

The number of windows is determined by the ratio of the usable glazing area to the base of the floor 1:10. For example, if the area of the attic is 100 m 2, then the glazing should be about 10 m 2. When installing windows, you must take into account such nuances.