Garden paths made of wood: features of the arrangement, examples in photos and videos. Step-by-step instructions on how to make a garden path from tree cuts A path from logs
What could look more natural among flowering flower beds and a cozy garden than a path made of wood cuts? It is the naturalness of the material and its natural, but original appearance that determine the popularity of such paths in home gardens.
Garden paths from wood cuts: all pros and cons
Walkways are an integral part of any landscape design. The presence of paths in the territory of the garden and vegetable garden allows you to move without injuring the plants and without getting your shoes dirty. The decorative role of the tracks is no less important than their functional purpose. With the help of correctly selected materials for the path, you can emphasize the elements of the flower bed or garden and even brighten up some of the imperfections of the territory.
The choice of material for a garden path must be made based on several factors: the material from which the house and the main buildings are made, the general style of the site, garden, flower beds and other decorative elements. If the main buildings are made of bricks or insulated with modern materials (polystyrene, polystyrene foam), then paths lined with paving slabs are suitable for this area. And if there are elements such as a sauna from a bar or a wooden gazebo, then the paths to them can be made from wood cuts.
A path made of wood cuts has a number of positive and negative points that you should familiarize yourself with before you start sawing trees on the site.
Advantages:
- environmental friendliness is one of the main advantages of wooden paths. Today more and more people strive to equip their home in an eco-style, so the tree is becoming more and more popular;
- availability. Cuts are practically waste, they can be cut from trees and branches felled on the site, or bought as wood preparation for the winter;
- originality. The pattern on the cuts of different trees is different, and you will never get two identical paths, so your neighbor will not have the same path as yours;
- ease of use. No special tools or skills are required here, as, for example, in working with paving slabs.
Do not forget about the disadvantages:
- fragility is a significant drawback. It is exposed to environmental factors: rots, burns, insects start in the tree;
- the specificity of the application. The saw cuts do not always harmoniously fit into the overall design of the site.
Wood saw path: the preparatory process
The production of the track is carried out in two stages: preparation of cuts and their laying. First of all, it is necessary to ensure the availability of cuts. The easiest way is to buy ready-made circles. You can buy "raw" blanks - just straight cuts, or you can immediately buy those impregnated with special means from rotting, fungus, etc. The second purchase will cost more, but the circles will already be ready for styling.
A more economical option is to make the cuts yourself. To do this, you need an electric or chainsaw. The cuts must be made of the same height (10–12 cm), for this you can make a template or make a markup on the log in advance. It is necessary to cut cuts both from the trunk of the tree and from its branches. As a result, circles of various diameters (7–45 cm) should turn out, the number of which will depend on the length and width of the future path.
To make cuts of the same height, you can use a strip with a jumper at a height corresponding to the height of the circles (10–12 cm).
For making saw cuts, you can use soft and hard types of wood. The strongest and most durable wood in hardwood: oak cuts will last 8-10 years, aspen and alder - 5-7 years. Pine is also a good option and will last up to 6 years. Cuts can even be made from a bar. For these purposes, it is better to choose an asymmetrical thick bar (for example, 15x25 cm).
When making a path from wood cuts with your own hands, you need to remember about the special treatment of wood with antiseptic agents that will protect the material from insects, decay and fungi. Wood can also be treated with an aqueous solution of copper sulfate (10%) or hot drying oil. After impregnation, the cuts should dry well.
Next, dry cuts must be covered with waterproofing. This can be done with molten bitumen. For this procedure, you will need bitumen (preferably in briquettes), a metal container (for example, a bucket) and a couple of bricks for an impromptu hearth. Circles should be dipped into molten bitumen only with the lower side, which will be laid on the ground. After that, the cuts must also be thoroughly dried.
Diy step-by-step scheme for laying a path from tree cuts
The most crucial and final moment has come - the laying of the path from the prepared cuts. You need to start this process by marking the site, i.e. you should choose where the path will go, how long and how wide it will be. It is also necessary to prepare tools and materials so that they are at hand at the right time, and then follow the installation scheme.
Laying a path from wood cuts with your own hands - a step-by-step scheme
Step 1: Prepare the trench
First of all, along the outlined contour, you need to dig a trench 20-25 cm deep and a width corresponding to the width of the future path. The lane markings can be done using pegs and a string stretched over them.
Step 2: waterproofing
In order for the tree to interact less with the soil, you need to take care of the presence of a waterproofing layer. As a material for insulation from moisture, you can choose geotextiles or a dense polyethylene film, which are placed on the bottom of the pit.
Step 3: Arrangement of the drainage system
Drainage is necessary to drain rainwater, which will protect the wood from rotting. For the drainage device, you can use medium fraction crushed stone. Crushed stone is poured to the bottom, slightly moistened with water and carefully compacted. The drainage layer should be 10-15 cm.
Almost every home owner thought about how to make a garden path with his own hands, whether it is worth creating it for his site and how to choose the right design option. Of course, this design deserves a location on your site, because they will not only play a decorative role, but also help you navigate comfortably in the garden area. And for the rest of the questions, you will find the answers directly in the article itself.
Why are saw cuts or lumber paths so popular?
The question to this answer is very simple, people are attracted by the advantages of a wooden path:
1. Available to everyone. Of course, prices for wooden products are very high and are growing rapidly, but wooden walkways are an exception. Their cost is several times lower than that of other options (for example, stone paths, brick from sidewalk tiles, etc.). Plus, there is an opportunity to use lumber left over after other repair work or trees that have been felled on your site.
2. Unique texture. It allows you to create extraordinary track designs without any extra effort. In particular, such designs are loved to be used in an eco-style.
3. Ease of use. The construction of this type of track does not require possession of special construction skills or the presence of special tools.
4. Ecological cleanliness. The tree is completely safe for human health, and also perfectly combines and interacts with the environment
It would not be annoying, but this type of track has disadvantages. First of all, it is worth noting the susceptibility of the material to the appearance of mold or mildew. Also, wood can be damaged by insect activity.
Some point out the short service life as a disadvantage. But, in fact, how long the track will last depends on many factors. For example, the type of wood, the correct processing of workpieces, their installation, the reliability of the base. Therefore, if the rules are followed during the execution of work and further use, the tracks can last up to 40 years.

Preparing the base
Often people encounter problems such as heaving, sinking, weed overgrowing and garden path crumbling. All these are the consequences of improper preparation of the foundation.
Step-by-step instructions for preparing the bed:
1. We mark the contours of the future path. This stage does not carry any complexity, but nevertheless the process itself is laborious. To create a markup, you need to do the following: on the site, using a cord stretched over hammered rods, we outline the boundaries of future paths. If the territory has a flat surface, the rods are installed in increments of 2.5 m, in the case when there are bends, the rods will have to be driven in very often (approximately every 40 cm). Sometimes people have difficulty with this method of marking (especially if the path is rather winding), then you can use sand, chalk or lime. When planning a track with curbs, it is necessary to calculate the width of the base in accordance with the required indents even before marking.

2. The next step is to dig a trench about 25 cm deep. We constantly check that the created ditch does not go beyond the boundaries of the marking, and its level is the same everywhere. Please note that this stage must be performed exclusively in dry weather, because if the trench is flooded with water, the quality of the bed will noticeably deteriorate.
3. If the installation of curbs is planned, then it is necessary to fill in sand, preferably compacted, and install them, leveling them using a building level.
4. We tamp the base and line it with geotextiles or a polyethylene film may be suitable. This process will protect the path from overgrowing with weeds, and also prevent subsidence.
5. Over the entire area of the bottom, we settle a drainage layer of gravel or gravel (with a fine fraction and having a height of 5-11 cm, the value of which depends on the stability of the earth). It is also allowed to use a sand-gravel mixture (8: 2). We tamp the drainage layer using a vibrating plate, a roller or a hand-made (hand-made) tamping machine.
6. There are types of paths that require a sand cushion that fits over the drain and is of the same height. It is poured in stages, layer by layer. In this case, it is necessary not to forget to moisturize and properly tamp them.

Where can I get cuts
Of course, you can buy ready-made cuts from any breed in a building materials store. Some manufacturers even offer their products already treated with special solutions, which can only be installed, observing the installation rules. But this option is only suitable if the budget allows it. After all, the purchase is not going to be cheap.
Let's give an example from the price list of one well-known manufacturer: cuts from larch, without preliminary processing, having a diameter of 25 cm and a height of 15 cm, cost 150 rubles apiece. That is, one meter of a track (50 cm wide) made of this material will cost 8,000 rubles, not counting the cost of delivery and solution for processing. But do not despair, because the cuts can be made by yourself.

Making cuts with your own hands
To reduce the cost of the process, you can make cuts yourself. Ideally, if you have a fallen tree on the site or someone you know, which does nothing but clutter up the place. Then the blanks will be practically free. But not everyone has such an opportunity. In this case, you will need to purchase round timber.
Any type of tree is suitable for cuts, but larch, of course, will be the best option. Also, blanks from pine, oak, alder, hornbeam, acacia will last a long time. But keep in mind that processing larch and oak is very difficult to make on your own. Another important factor when choosing a tree is its dryness. If the wood is wet, the cuts can warp, crack and the path will simply fall apart.
After the purchase, we proceed to the preparation of the necessary tools. Of these, you will need an electric or chainsaw, a tape measure, marking pencils, templates and a plow for skinning.
To make cuts, you will need to perform the following steps:
1. We clean the trunk of all branches that are present on it.
2. Sand the trunk using a plow or a scraper (you can sand already finished cuts, depending on personal preference).
3. Using templates, we mark the trunk in equal parts of 15-25 cm (depending on the thickness of the log, the greater the thickness, the greater the height of the cuts, respectively). Keep in mind that at a height of less than 15 cm, the path from the cuts will not be stable.
4. We dissolve the trunk according to the marks.
At this stage, the cuts are ready.

Processing of workpieces with special solutions
Before you start laying the trail, you need to process the blanks. It will protect the future track from the appearance of fungus and mold, as well as from harmful insects. For processing, you can use different types of solutions. For example, you can use special antiseptics, impregnations (in this case, you can use only those that have deep penetration and you must follow the instructions for use).
Also, it is possible to independently prepare a solution for processing. To do this, you need to mix copper sulfate with water in a ratio of 2: 8, leave to settle for 2 days, and dry it in the shade for the same amount of time. When using this solution, one important detail must be taken into account: copper sulfate, when interacting with a tree, makes it darken. This will create the effect of "aged" cuts. If this design solution is not to your liking, use another option.
The solution can be prepared with your own hands using drying oil, for this we bring it to almost a boil. And you can also use the old-fashioned method: to brew larch bark and soak the workpieces with this solution, this will allow the wood to obtain antiseptic properties, as well as a wonderful dark red shade.
In addition to applying the treatment solution, it is necessary to cover the lower part of the workpieces with a waterproofing layer. It is not so easy to do this: we melt the bitumen (the melting temperature reaches 200 degrees Celsius), always in a metal vessel, and dip the saw cuts into it. To the complexity of the execution, the insecurity of this operation is also added. But there is another way: we place the bitumen briquettes in a metal vessel and fill it with gasoline. Next, you need to leave the solution for a couple of days, before the liquefied bitumen mass is formed. We dip the lower part of the blanks into it.

Installing a track from saw cuts
We proceed to the most creative stage of all our work - the creation of the trail. Many are worried about how the track from the cuts of the photo will look like we posted at the end of the article. So that you will not only get rid of your worries, but also be able to choose the design you like.
Instructions for making a path from wood cuts:
1. Check the readiness of the cuts and the level of the stock.
2. We start paving.
3. We install each part in its rightful place, while pressing it into the sand cushion and level it, gently tapping with a hammer with a wooden or rubber firing pin.
4. We control the evenness of the cuts so that they are at the same level.
5. We lay out the cuts according to the planned scheme, which depends solely on the intentions of the performer and the appearance of the blanks.
6. In places of gaps between the cuts, it is necessary to get rid of the void. To do this, we fill in these places using sand, screening out gravel or small stones mixed with the ground.
7. We decorate our path by planting ornamental plants or moss in between.
8. We decorate the edges: decorate with a decorative stone, fill it with gravel, gravel and tamp it well.

Creating a lumber walkway
Sometimes the preparation and laying of saw cuts for people seems to be a rather difficult and too long process, but the idea of making a wooden path on their own is still to their liking. In this case, a lumber path will be the way out. The time for its creation is much shorter, and the materials used do not need additional processing.
The lumber for the track can be very diverse: beams, boards of various lengths, etc. The easiest and most affordable option is panel boarding, it does not require laborious preparation of the bed. That is why we will consider this version of the track.
Instructions for creating a panel board:
1. We prepare all the necessary elements: edging boards, of the same length, if possible equal to the width, wooden beams, nails. The main tool for a lumber track is a hacksaw, but you also need a hammer.
2. We mark the trail.
3. We level the ground in the places where the future track will be located (fill up the holes, cut off the hillocks, tamp the soil).
4. Saw the beams into pieces of equal length.
5. Let's trim the boards.
6. We cover all wooden parts with an antiseptic.
7. We process the lower parts of the boards with bitumen putty, or cover them with Kuzbaslak, wait for it to solidify completely.

8. We put the bars on the base every one and a half meters, we pin boards to them, sinking the heads of the nails. The best option would be galvanized nails.
9. In places located between the boards, we leave gaps of up to 6 mm, this is necessary to ensure ventilation, as well as water drain.
10. Shields are sewn together with the help of beams.
11. Sand the joints using sandpaper.
12. We paint the resulting track, using paint used in outdoor work.
Another simple construction of the trail is a wooden stepping path. In addition to the simplicity of execution, it is famous for its low cost of materials. To create this option, you need to do the following:
1. We prepare the base according to the above principle. The only difference is that the depth of the trench for such a track is 6-8 cm.
2. We cut out segments that have a length equal to the width of the path from the beams.
3. We process them according to the same principle that was used during the manufacture of panel decking.
4. We place the boards over the entire area of the bed at intervals of half a meter, pressing them into the backfill.
5. We paint.

Track maintenance
In order for the wooden path to be pleasing to the eye and convenient to use for a long time, it is necessary to take proper care of it:
1. Once a year, clean the dirt using a metal scraper, then treat the wooden parts with an antiseptic and cover them with linseed oil.
2. Get rid of weeds in time, which have the ability to destroy the base of the coating.
3. It is imperative to prevent the possibility of flooding or erosion of the coating. To prevent this from happening, you can use the services of special grooves or dig ditches on the sides of the track.
4. In the winter season, clean off the snow and do not allow ice to form on the wooden surface.
5. Do not use salt or other ice-cleaning agents that can destroy wood.
After reading this article, each owner of a summer cottage will be able to independently make a path from saw cuts or lumber, while not ruining his wallet, without asking for outside help and without applying excessive effort. Also after the article there is a photo of various variations of the design of the tracks. You can choose the one that will harmoniously fit into your garden design.
It is difficult to imagine a comfortable suburban area if there are no garden paths on it. The paths not only connect the house with a gazebo, pool or garden, but also play a key role in landscaping. If you don't want to spend a lot of money, try make paths from wood cuts... A simple and original way to decorate the territory and make it convenient to move from one zone to another.
Step-by-step instructions: how to make tracks from cuts
Before starting work, prepare all the necessary materials:
- Cuts from hemp or trees
- Sand
- Gravel
- Waterproofing fabric
- Hammer
- Level gauge
- Sand wetting water
- Shovel
- Buckets

Before starting work, it is necessary to carefully prepare the original wood material. For this, hemp slices are suitable, in general, any part of the tree that you have in stock. Since wooden paths in the garden will be exposed to moisture and high temperatures, you should carefully consider the choice of wood species. So oak cuts will last about 10 years, pine cuts up to 5, and larch trees will not lose their original attractiveness for several decades.

If you have already prepared a log, then saw it into cuts up to 20 cm high. Keep in mind that the wider the width of the log, the more the height of the cut is made. This is necessary to increase the strength of the track. So that the saw cut does not rot for a long time and is not affected by insects, it must be well processed.

Most often, for these purposes, they use drying oil, which should be boiled, and then coated with saw cuts. Processing linseed oil requires special skills, so work with it carefully or buy ready-made compounds to protect wood from decay. Another option for high-quality processing of cuts is to cover the lower part with bitumen. With the help of copper sulfate, you will be able to artificially age the wood.

Now you can start preparing the track itself. Think over the route and the optimal size to get around comfortably. It is also important to make a small trench so that it is convenient to fix it. The depth of the trench should be 5-10 cm more than the height of the saw cut, the width of the trench depends on the width of the track. At the bottom of the trench, you need to lay a waterproofing material, and then drainage from gravel, crushed stone. This will help protect the wood from moisture. Use a level when laying the pillow, then make it much easier for yourself to install wood cuts.

Photo of cuts for a garden path
If you plan to make curbs to separate the path from the site, they must be installed before installing the tree cuts. It is best to use wooden posts as curbs, however, iron sheets, stones and bricks are also suitable.

When the curbs are installed, sand is poured onto the path, leveled and watered. Thus, it will turn out to completely tamp the pillows and prepare the path for the installation of wood cuts.

Beautiful path from log cabins

Photo of tracks from cuts
After all the cuts are installed, you can fill the space with sand or earth. Some summer residents add ground cover seeds to the ground so that they later decorate the path. You can also paint the tree cuts with different colors to make the garden path more attractive.
How to maintain a saw-cut path in a garden
A sidewalk path made of wood cuts needs constant maintenance, otherwise after a couple of years it will lose its attractiveness. You will have to use a metal scraper to scrape off the dirt from the cuts every year, and then treat them with an antiseptic or paint them.

If you are making a cuts path with your own hands, then set aside some good cuts in case you need to repair the path. In this case, you do not have to look for a saw cut of a suitable diameter or type of tree.

Garden path from saw cuts has undeniable advantages, because you can do it with minimal cost with your own hands. An original path is a good way to give a country house a touch of originality.
One can only envy those who have the opportunity to make paths out of wood. Wooden paths are eye-catching even in the most prestigious property. Walking on them barefoot is an unspeakable pleasure: pleasant tactile sensations arise both in heat and cold. Of course, the paths must be appropriate for the terrain and be suitable for the conditions of use.
Path of saw cuts in the gardenFeatures of paths made of wood.
We have already noticed that, unlike other materials for paths, wood has a low thermal conductivity, and it is pleasant to walk on it barefoot. Let's note other positive qualities of country paths of this kind:
- available material in some cases;
- ecological cleanliness;
- low complexity and labor intensity in manufacturing;
- unique appearance of each track;
- available and limited list of required tools.
Unfortunately, there are also disadvantages:
- cracking under the influence of the sun;
- rotting under the influence of moisture;
- destruction by insects;
- instability to fire;
- wet surfaces become slippery.
Note that the fragility of the tree is balanced by the ease of repair. Of course, wooden country and garden paths will last longer in dry climates and subject to laying technology.
Wood saw paths
 Options for laying wood cuts
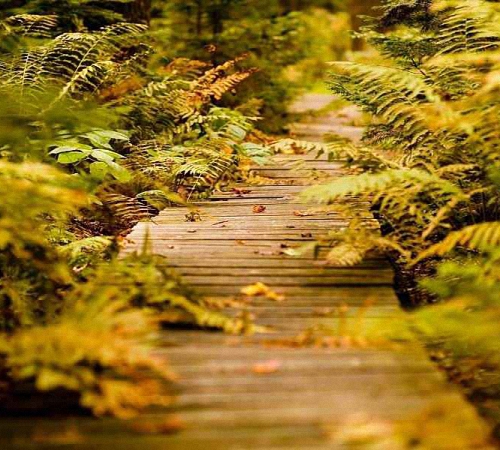
 Garden paths made of wood cuts are popular and attract attention with their uniqueness. When using this technology with your own hands, you can easily create variations with a change in width and direction, and without using a border. The saw cut paths are especially appropriate in a rustic and eco-style landscape.
As you can see, the gaps between the wood can be filled with fine rubble, gravel, soil, closed with pine needles, or be planted with grass. On a decorative path, as well as with its rare use, cuts are laid at a step distance.
Wooden paths can have steps and serve as retaining walls when the ground level changes.
Material preparation
When preparing wood and paving the path, you will need the following tool.
 It is recommended to use the following wood for the saw cut track:
- larch;
- Pine;
- Birch.
 Preparation of cuts for the track
 Whenever possible, it is best to use larch as the most durable option. She can serve for thirty years. Pine service life is 5-10 years. Small diameter cuts are placed between large diameter workpieces, ensuring maximum blade density. The logs are cut into pieces 10-20cm high. A lane of hemp, peeled from the bark, will last longer. If the surface of the saw cut is perpendicular to the log, installation of the cover will be easier.
 The cuts are processed and ready for installation
 To protect against decay, the workpieces are processed in two stages. First, they are impregnated with hot linseed oil or a special ready-made antifungal impregnation. Dipping cuts in boiling drying oil is cheaper, but more dangerous than antiseptic treatment. After complete drying, the lower parts of the pieces of wood are covered with hot resin. In this case, it is also more convenient to use bitumen diluted in gasoline, which is called automotive anticorrosive. The upper planes of the cuts can be forcibly "aged" by treating with copper sulfate.
Laying the track
 Trench ready for paving
 Before paving a path from cuts, it is necessary to carry out preparatory work on the site:
- mark the track;
- remove the fertile layer and dig a trench;
- equip waterproofing and base.
It is convenient to mark the contours of the path with pegs and a cord, or sprinkle it with sand. The groove is dug in depth by 10 cm more than the height of the wooden blanks.
 Geotextile, crushed stone and sand are laid in the trench
 The bottom of the trench is leveled and geotextiles are laid on it, which allows water to pass from the upper layers, but does not allow the rubble to mix with the ground. Then they fall asleep and lay a layer of crushed stone with a height of 5-10 cm. On top of the gravel, 5-10 cm of sand is poured, which is moistened and tamped. Ideally, another layer of geotextile should be laid between the sand and gravel.
 The cuts are set by level
 Sections of logs are sequentially installed on a sand substrate and hammered into it a little with a rubber hammer. You can draw a picture from the cuts or mount them, focusing on the ease of installation. The job is easier to do, starting with the larger elements. The upper planes of the pieces of wood are set according to the level. The gaps between the tree are filled with fine gravel, gravel, soil or sand.

Board tracks
A path made of wood in the country can be made with your own hands using edged boards. This work is much easier than laying saw cuts. At the same time, the quality of the material used and the level of its processing determine whether these will be the simplest paths or paths with high decorative properties.
As in the case of using saw cuts, larch is the best wood, and pine is the most popular option. Lumber flooring can be made above the ground at a height of about 10 cm, laid on the surface of the ground, or it is in the ground. The recommended coating thickness is at least 40mm.
 A winding path made of boards
 To extend the service life, the flooring material is first treated with an antiseptic and then painted. If you want to preserve the structure of the wood, the wood is covered with wood stain and yacht varnish. To organize paths in a country house of complex shapes, boards of different lengths and with a variable width of one element are used.
Experienced builders always leave a gap of 5-10mm between the boards to compensate for the expansion of the material when wetted.
 Flooring and joists made of identical planks
 Before installing the flooring, it is recommended to equip the base for water drainage. To do this, a trench with a depth of about 15 cm is torn off, into which geotextiles, 5-10 cm of crushed stone and 5-10 cm of sand are sequentially laid. Crushed stone and sand are compacted in turn. The frame for the flooring above the ground is mounted on logs made of timber or boards. They must be sequentially treated with an antiseptic and resin, you can wrap it with roofing material.
Between the lags of the boards, crossbars are installed through each running meter. This will prevent the lags from falling to one side. The flooring is attached to the supports with nails or screws. To ensure the same gap of 5-10 mm between the boards, tabs made of thin strips are used.
 The track is laid directly on the ground
 Wood flooring is easier to lay directly on the base. To mount the track, the boards are put on two cables through the pre-drilled holes. Between the individual elements, pieces of plastic pipe are put on the cable to ensure the same gap.
 The board path is convenient to use on the sand
 Flooring elements can be attached to a fire hose or garden curb tape. In this case, the screws are screwed in from the side of the tape, and then the finished track is turned over. Such a path can be rolled up and hidden from bad weather for the winter.
 Comfortable walking on wood laid in the ground
 The track made of boards laid at the level of the soil surface looks original and easy to use. In this case, the material is in high humidity conditions. This means that it is imperative to arrange the above-mentioned preparation from sand and crushed stone. The gaps between the individual elements are covered with rubble. Wood must be pretreated and carefully sequentially treated with protective impregnations and coatings.
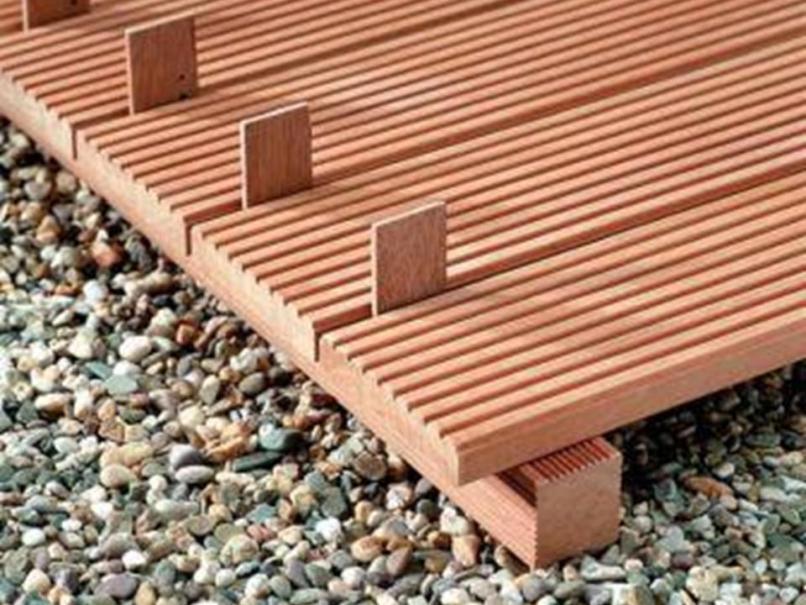
Laying the decking
Wooden paths are very attractive in appearance, but short-lived. To solve this problem, a synthetic material has been developed - decking. It consists of shredded wood and plastic. Decking made of this material is very stable in atmospheric conditions and does not need additional coating. Of course, decking is significantly more expensive than regular lumber, but its appearance and reliability are worth it.
 Decking on the lawn looks decent
 Note that with noticeable bends, the decking can crack, so for laying the decking, you will have to equip a sufficiently flat and reliable base. The best preparation is in the form of a cement screed. Installation of the coating is carried out on logs made of the same material, with a step of 0.2-0.3 m. When laying them, it is necessary to provide a gap between the individual elements of 3-10 mm for water to drain.
 The look and stability of the decking is undeniable
 Along with the decking, you should purchase all the necessary components for assembly: corners, plugs, connecting brackets, end strips and hardware. Self-tapping screws should be tightened with sufficient force, however, excessive diligence can lead to the destruction of the material. Fasteners are closed with plugs or painted. In the case of a closed connection, no mounting elements are visible. The material must be unpacked a day before use. Do-it-yourself assembly of decking flooring is carried out only at a positive temperature.
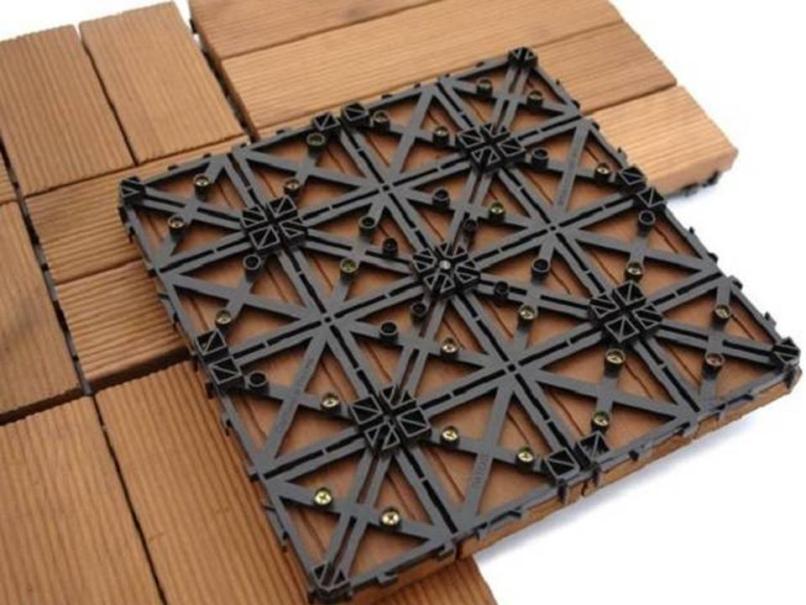
There is an option of decking in the form of tiles for garden paths. Such elements consist of several planks fixed with screws to a plastic base. Individual tiles are fastened together using special locks on a plastic lattice.
 Tile cover is eye-catching
 A tile garden path looks flawless, but it costs even more than a conventional decking. Plastic locks will fail in case of significant distortions, so it is necessary to prepare a fairly flat base for flooring.
Photos and examples
Of course, any job is easier to do if you have interesting role models in front of your eyes. Sometimes it is better to see once than hear a hundred times. We tried to find for you the most interesting examples of photos with comments.

Often, the cuts are laid without removing the bark. From a perfectly flat calibrated log, you can make paths of a geometrically regular shape. The hemp path in the garden makes it surprisingly cozy. A path made of wooden saw cuts fits organically into the surface of the lawn.

If there is no opportunity and time to lay paving slabs or natural stone in the country, but there is a desire to build original paths, you should pay attention to wood. A garden path is being built from tree cuts with your own hands as soon as possible, it does not require the skills of a builder and the purchase of expensive materials.
Obvious advantages and hidden disadvantages
Natural wood products are durable and environmentally friendly. For a price, they are usually affordable for well-off segments of the population. But every third consumer can afford paths made of hemp and remnants of beams, which can be found in any household. On top of that, there is an opportunity to lay out a path from old lumber and fallen trees in the country. Other advantages of this technology, experts include:
- expressive wood texture with its characteristic inclusions, strokes and multi-colored spots;
- simple installation, possible without any skills and special equipment;
- the thin-layer structure of the material contributes to the manufacture of large and small products with embossed carvings;
- the suitability of sawn timber for fast and high-quality processing with cutting tools and the leading positions here are taken by pear and alder.
Wood cut paths look equally good on large and small areas. Their only drawback is low resistance to moisture, insect attacks and mold. But this problem can be solved. Building material needs to be treated from time to time with antiseptic agents that double the strength and resistance of wood to natural destruction processes. As for the service life of such coatings, 30 years is the minimum indicator.
Video "Do-it-yourself path from oak stumps"
From this video you will learn how to make a reliable path from oak hemp with your own hands.
Preparatory stage
It happens that the already laid elements of the garden path fall through or, even worse, become overgrown with weeds. These are the consequences of improper foundation preparation. To avoid such errors, you need to correctly:
- Make a markup for the future path. To do this, on a flat area, you need to install stakes and mark the boundaries with tightly stretched cords. In this case, the distance between the pegs should not be less than 2 m.
- Dig a hole 20-25 cm deep within the markings. This is best done in dry weather, as a flooded trench can weaken the foundation.
- Compaction of sand for subsequent installation of curbs.
- Cover the bottom with geotextiles so that the path does not sag and overgrow with weeds.
- Prepare a drainage layer of fine stones or sand and gravel mixture in a ratio of 7: 3.
- Place a sand cushion of the same height on the drain.
When calculating the number of blanks, experts recommend making a 15 percent markup to the initial number of hemp. After all, some chocks may simply not fit into the overall picture of the site or crack when processed with cutting tools. As for the location of the paths, the starting point for planning should be the house. It is important that the main routes are not interrupted by bends, and the main paths connect the most important objects: the entrance to the main building, the gazebo and the garage.
 Prepared cuts of a tree can be bought without any problems at a hardware store
Where to get ready-made cuts
Finished cuts can be ordered at any hardware store. Many manufacturers offer products that are well dried and already treated with antiseptics. The consumer only has to install them, taking into account the size of the site and the width of the future coverage. However, such a purchase can result in a significant amount.
A finished linden cut with a length of 40 cm and a width of 14 cm costs at least 70 rubles. A large saw cut of an oak with a thickness of 3.5-4 cm - from 900 rubles and more. Saw cut of elm 7x8 cm in size and 2 cm thick will cost customers 20-25 rubles. And since for one track with a length of 8-10 meters, at least 70 cuts will be required, for everything about everything you will need to pay 10,000-15,000 rubles. And this is not even the limit.
How to do it yourself
If there are old and practically unviable trees on the site, the blanks will get almost nothing. Otherwise, you will have to buy a large round timber. Larch is ideal for sawing. This material tolerates physical activity well. Its other advantages include good compression and shear performance along the fibers in the tangential direction. According to the latter parameter, larch bypasses pine and high-strength oak at times.
 Larch cuts are best for the path.
 Cuts from pear, apple, acacia and hornbeam are of good quality. It is important to remember when choosing materials: pre-processing of hardwood requires special knowledge. It will be more convenient for amateur builders to work with walnuts or Karelian birch. These species lend themselves better to carpentry, and in structure they resemble rosewood and rosewood.
It is important to use dry materials in business. Otherwise, the cuts will quickly crack, and the track will fall apart within a week after installation. In the work you will need pencils, templates for markings, an electric saw and a tape measure.
Getting started making cuts with your own hands, you need:
- remove branches from the trunk;
- carefully treat the surfaces of materials with plows or staples;
- make a marking of the trunk, taking into account the rule: the greater the thickness of the log, the greater the height of the cuts;
- in order for the track to serve at least 3 years, their height should not be less than 18-20 cm;
- dissolve the main material according to the marks.
 When preparing the cuts for the track, they must be marked and sanded
 Technological sequence
Softwood lumber is a low-budget option. Of course, if possible, it is better to choose beech or oak. When properly processed, such surfaces do not absorb moisture and serve for decades. Antiseptic solutions protect wood from the harmful effects of insects. If you need to increase the resistance of the material to mechanical stress, it is better to use varnish or paint.
When using solid boards, preference is given to products of the same length. For difficult paths with drops, combinations of boards of different sizes are suitable. When working with wood, you will need a plane, nails, a hacksaw, self-tapping screws and a sander.
For rough surfaces, a belt sander is more suitable. It can cut parts as accurately as possible along the marking line. Due to the rotating belt, the wooden surface can be shaped to any shape.
Preparation of the base
Depending on the type of soil and the expected load on the track, the depth of the trench varies between 20-25 cm. In this case, its width should coincide with the width of the path. Polyethylene film can be used as a waterproofing material. This material has high tensile strength and elasticity. It is better to lay polyethylene in a continuous layer. If one part of it is not enough, you will have to glue several film canvases with an overlap of 30 cm. To do this, you will need to use construction tape or electrical tape.
 The burial depth of the logs depends on the type of soil
 To prevent the wood from swelling from moisture, it is better to fill in fine gravel on top of the waterproofing layer. Filling of sand and crushed stone must be done according to the building level. Otherwise, instead of the planned straight-line path, it will turn out to be wavy.
Workpiece processing
It is best to soak the logs in an antiseptic solution. This is the most economical way to prepare compact workpieces. The surface of larch or oak can also be coated with a protective coating using a roller. It is advisable to apply 4-5 layers of the substance, and take the already processed material to a well-ventilated place. The minimum drying time is 48 hours. With more protective layers - 72 hours.
The cut logs must be sorted by size, barked off and the destroyed parts discarded. High-quality material can be treated with linseed oil. For this purpose, it is better to use a boiling substance that clogs wood pores. Such treatment will prevent the attack of pests, and the ability to absorb moisture will not exceed 2%.
Wood can be treated with antifungal agents using a spray bottle. If you don't like its natural color, try artificially aging the material, for example, painting light cuts of alder with copper sulfate. After that, they will take on a dark shade. The lower part of the products must be properly impregnated with hot bitumen.
Laying the path
At this stage, the logs can be laid in accordance with any pattern or in any order. They are usually installed on a sandy base. Then they are tamped a little and leveled. The gaps between the lumber are hidden by rubble. Sawdust and moss are suitable for processing seams on top.
 There is nothing difficult in laying the track, the main thing is to adhere to simple rules
 In order for the garden path to last at least 5 years, it is important to adhere to the rules during the installation process:
- along the entire length of the path, large cuts are first laid, and only then small ones;
- small trimmings from pear branches will help hide voids;
- stone fences will make the contours clearer and with their help, construction debris will remain in the depths of the seams, and will not be spread throughout the site;
- the optimal distance between the cuts is 1-1.5 cm, since in this case the path will take on a more natural look, which is especially important for areas equipped in an eco-style.
Paving paths from boards provides for preliminary waterproofing of the trench, strengthening the frame and installing the flooring. In this case, building materials can be laid not only on a perfectly flat base, but also on a hill.
Exquisite decor
Jasmine, lilac or weigela can be planted along the paths. A unique feature of the latter shrub is the riot of colors and aromas during the flowering period. The opened corollas change colors ... every few hours! The most popular gardeners are species with ash, red and beige bells. Coniferous and bulbous plants can also be used as decoration. For a grassy border, blue fescue and Italian setaria, more popularly known as "chumiza", are suitable.
 You can plant flowers, shrubs, garden figurines along the path
 Considering that wood goes well with sea pebbles, glass, boulders and plastic, you can bring the most unexpected decor options to life.
Maintenance to extend service life
Over time, any materials and coatings deteriorate. However, with proper care, irreversible processes can really be stopped. To do this, wooden surfaces must be cleaned every six months, treated with protective compounds and varnished. So you will be able to increase the shelf life of materials by almost 2 times.
The base of the pavement is often destroyed by weeds. To prevent this from happening, it is necessary to apply the poison from sow thistle and thorits in time. It is better to dig ditches on the sides of the path. So you will protect the coating from the destructive effect of melt water. In winter, the paths must be cleared of snow in a timely manner.

