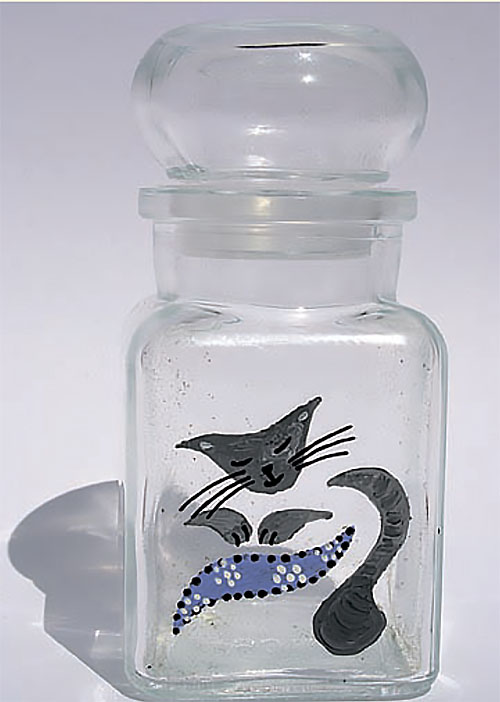
Decorating bottles with their own hands master. Stylish decor in the kitchen: turning bottles into a work of art
Let's touch on such a popular direction of creativity as painting on glass. Nowadays, she has many admirers, and many who want to learn such art.
What to work
So, consider the technique of painting.

Draw contours
The bottle (washed, peeled from labels and degreased with alcohol) will be decorated with decorative curls. You depict them in any form you like, which will be prompted by your imagination.
Using the white outline, draw the first curl on the bottle (the nozzle is not used yet, it will come in handy later). The hole in the contour will not allow thin curls to be obtained, but so far this is not required. Fat curls "gather" more spangles.
Without waiting for the contour to dry (and it dries for about half an hour), sprinkle it with glitter gently. They should stick well to the fresh contour. Some of the sparkles will inevitably be scattered around the contour, but now it is not necessary to remove them - you can smear the borders of the curl. They are removed only after drying of all the curls, made successively in the same technique.
When you buy the contours, you can advise those in the composition of which already have sparkles. But there they are already mixed with the main paint, so they will not overflow and shine so brightly.
Thus, the contour is better to choose without sparkles, and to put them in the process of work is already on top.
Little by little, the picture will cover the whole bottle. It will not happen too quickly - in several stages. After all, to turn the bottle over and start painting its reverse side, you should wait for the final drying of the already treated surface.
Apply paint
When the drawing is transferred to the glass completely, and everything is dry, rinse the unnecessary glitter under the stream of running water and carefully blot the product with a rag. And only after that we start working with paints.
Typing paint on the brush, fill in the bottle of curls. Paint color choose your own taste - one or more. It is better not to paint over all curls, since a monotonously painted bottle will not look spectacular.
Apply paint as carefully as possible, evenly spreading over the surface. Obvious smears should not be overlooked. This process is also phased, with breaks for complete drying.
Finishing touches
At the final stage, the nozzle on the contour is useful. With its help put the final touches, or rather the point. They will be framed on the edge of each curl. The grace and extraordinary refinement of the final result is attached to the bottles, the stencil of which is selected taking into account the unity of the overall composition. You will immediately see how the product will play and become "bulk".
Currently, painting with acrylic paints is extremely popular, and exactly the dots are a fashionable and winning option.
In conclusion, I would like to say that this beautiful type of decorative art from year to year is gaining more and more fans. Creates the most real masterpieces of applied art. And most importantly - the creators of their provided the joy of creativity and good mood!
Glass bottles in the interior
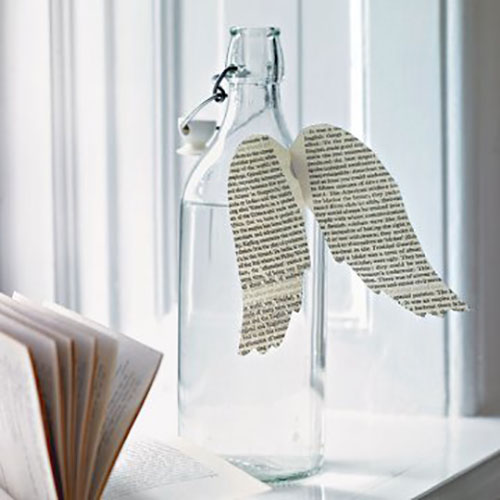
Anyone who has a creative streak, it is a pity to throw away the empty "glass container." And this is a correct regret, because even the simplest glass bottles look magically in the interior. Doing your own hands with glass bottles made of transparent or colored, rare or ordinary glass is a pleasure if you know exactly what you want. Look at these photos - lamps, vases, candlesticks, decorative compositions, chandeliers from famous designers, as well as exquisite and simple decor solutions from talented home craftsmen and be inspired.
What to make from an ordinary glass bottle?
This question does not give rest to many talented people and here they are - extraordinary solutions from industrial designers.
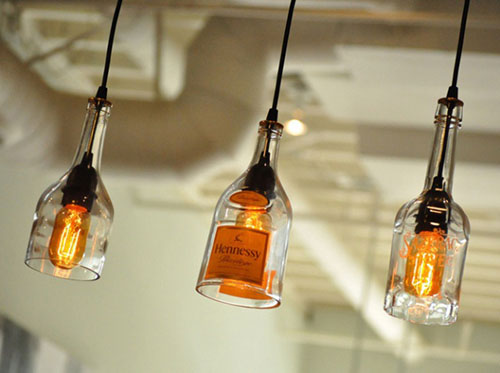
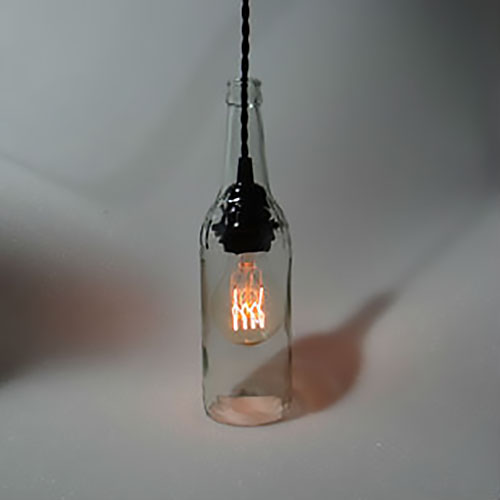
Lamps from designers
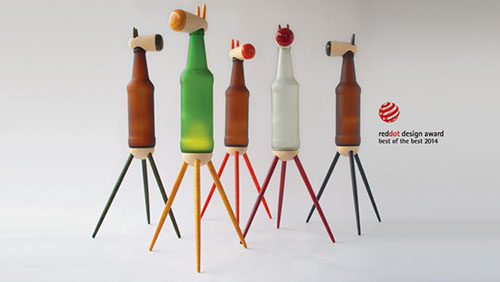
1. The works of artist designer Nishi Chauhan from Karnataka, India. All she needs to create her lamp sculptures is wood, lacquer and lathe craft, well, of course, except for the bottle itself. The series is called "Animal Farm" (Animal Farm). The designer received an authoritative design award as the best of the best in 2014.

2. Plugs with LED bulbs, rechargeable via USB (I saw them sell on aliexpress), make it easy to create design projects.
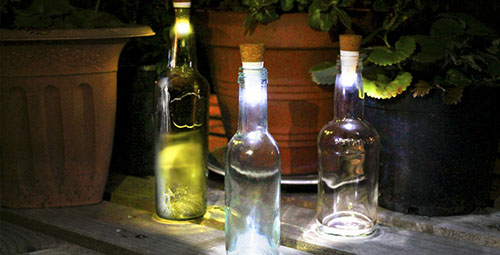 Glow plugs
 3. Zal Creation presented a series called bottles and tubes.

Zal Creation also sells amazing chandeliers that can add character to any interior.

4. And these are their brutal copies.
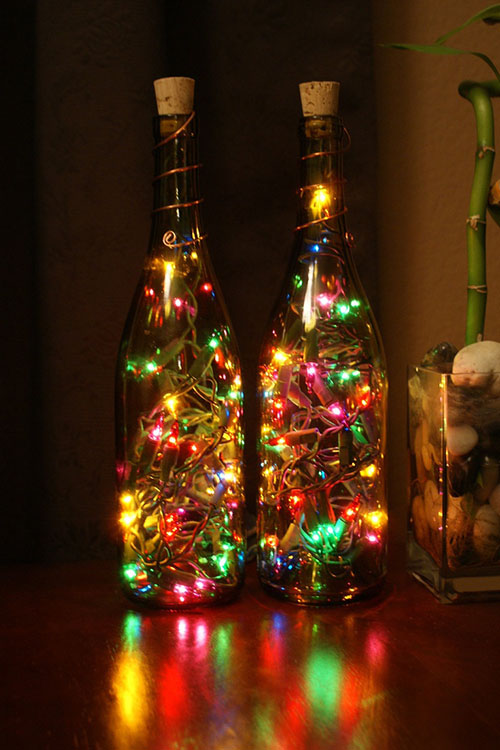
5. lamps from garlands on batteries or working on the network.
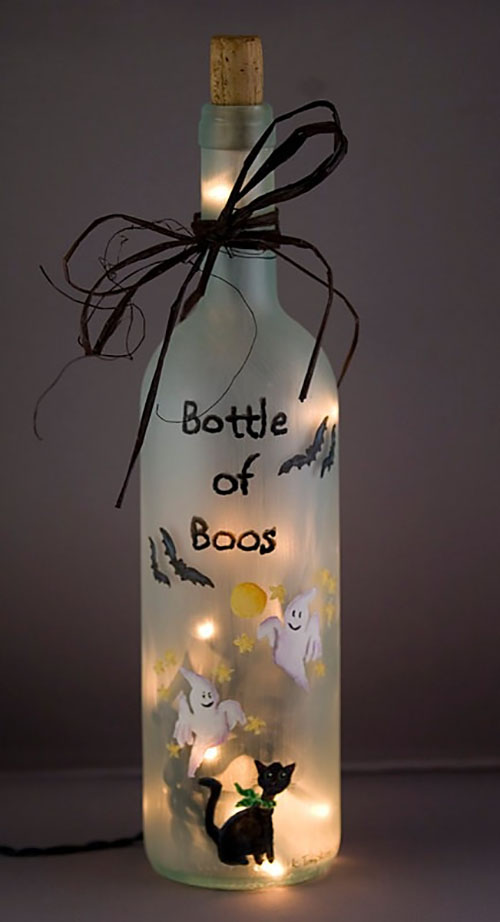
Still ideas how to decorate the house on Halloween, how to issue gifts look.
Candle holders
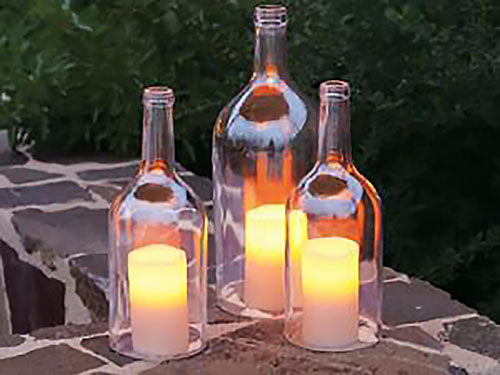
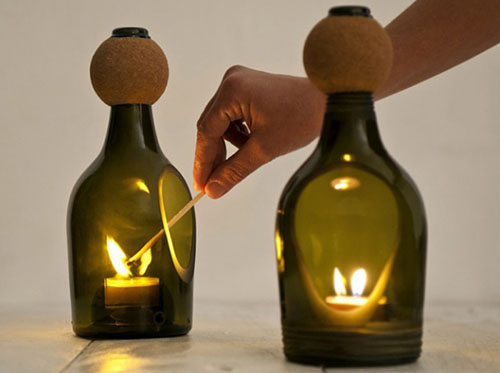
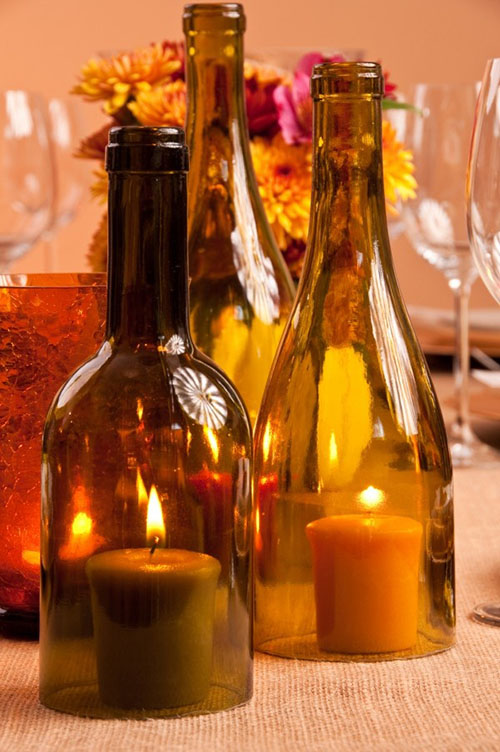
For such candlesticks it is necessary to cut glass bottles. Yes, sometimes the do-it-yourself bottle decor seems boring, I also want to tinker with glass.
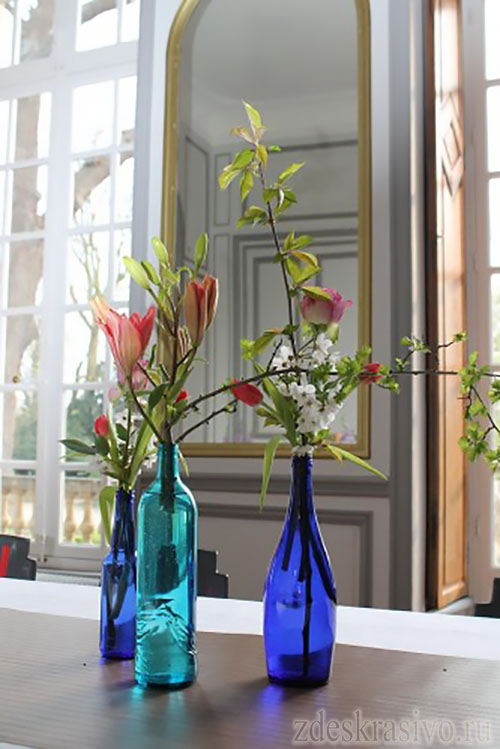
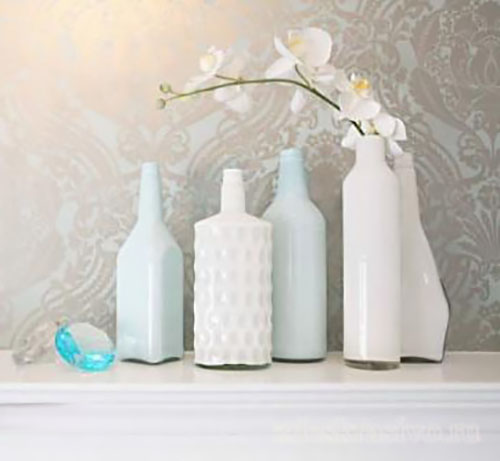
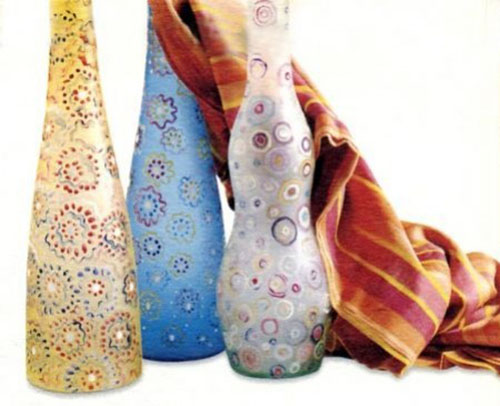
Vases
Luxury vases in Provence style. A detailed master class from blogger Nancy, with step-by-step photos, you will find.
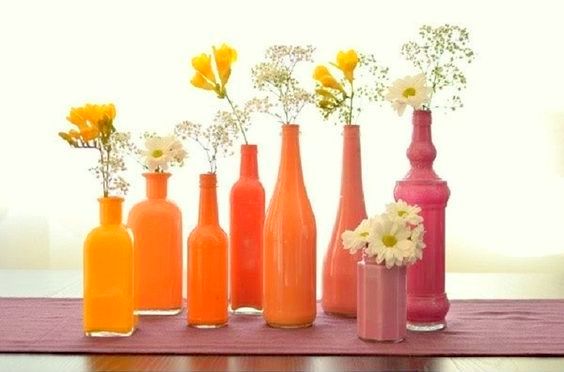
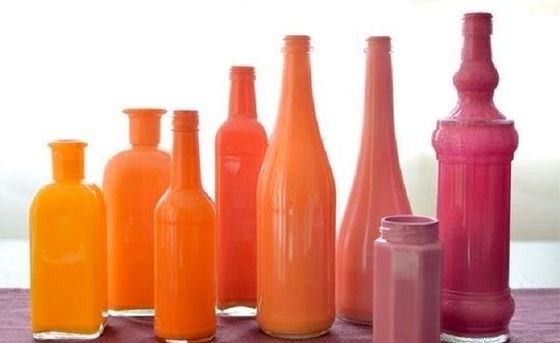
Well, if you have a collection of colored glass. They can not decorate and make compositions, picking up the color. And if the color composition does not add up, the water painted in the desired color will come to the rescue.
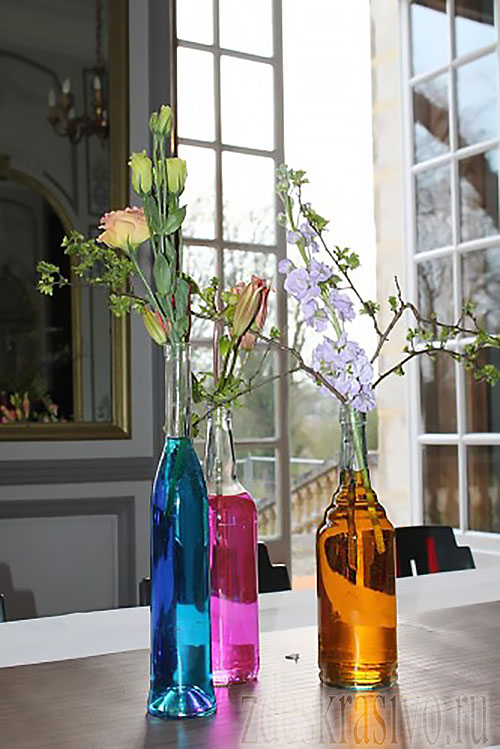
This is how colored and painted bottles look on the balcony:
See the full version HERE.
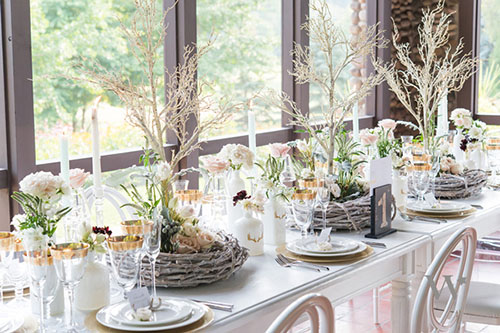
White bottles decorated the wedding table.
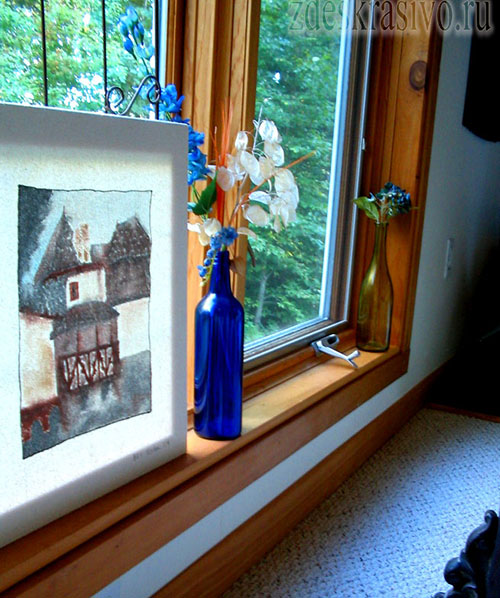
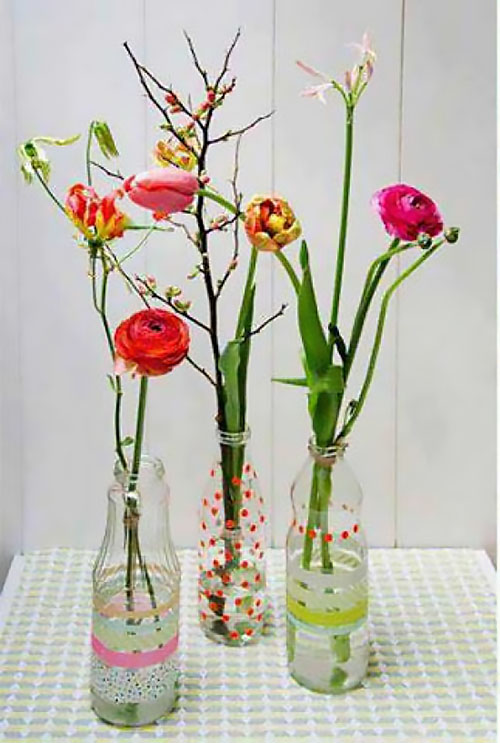
Very simple, but clean and cute vaz decor.
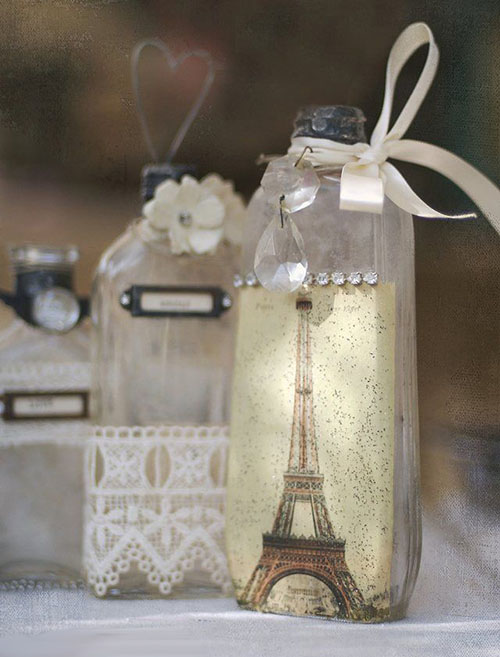
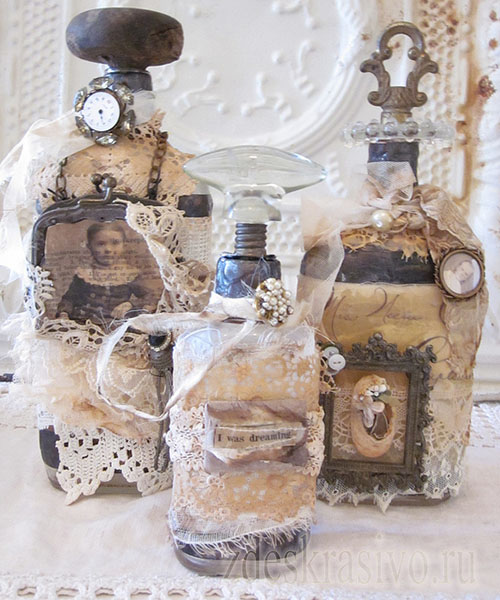
Luxurious decor
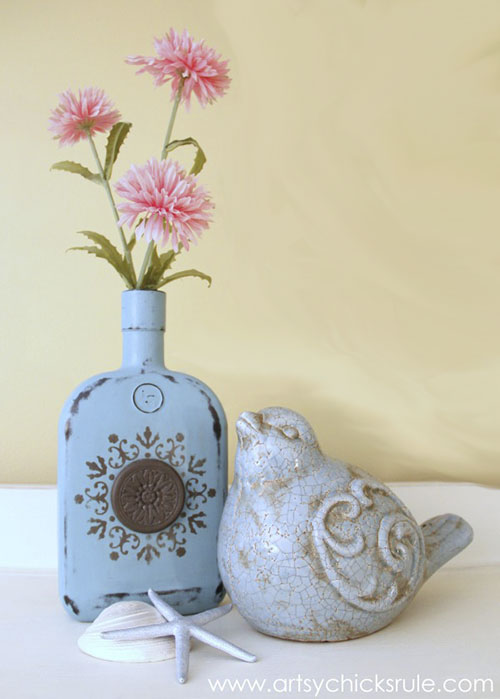
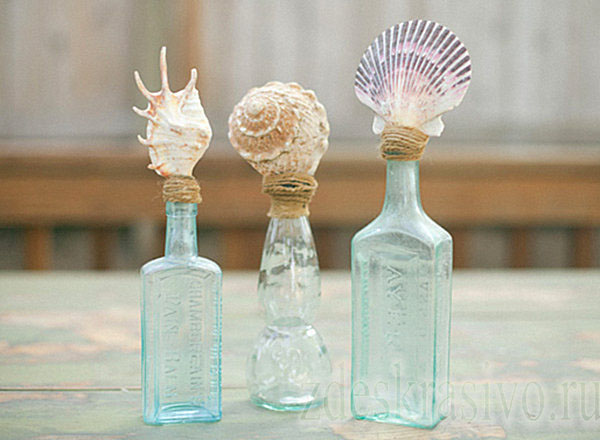
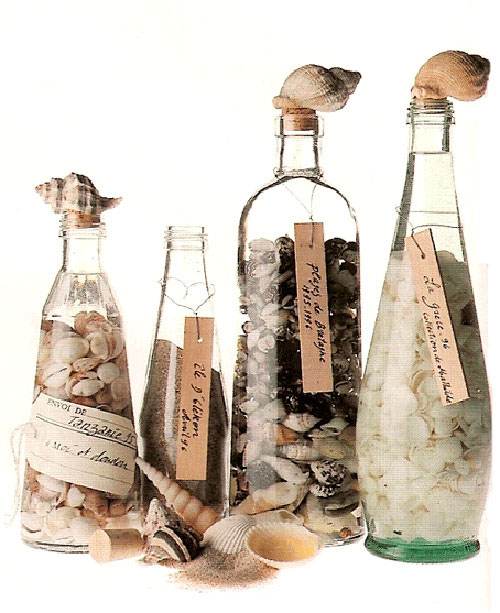
Beautiful compositions with shells.
Every person who has ever rested on the sea, there will always be a couple of imported shells. Well, do not leave the same beauty on the beach, in fact. Seashells outside, inside and near the composition.
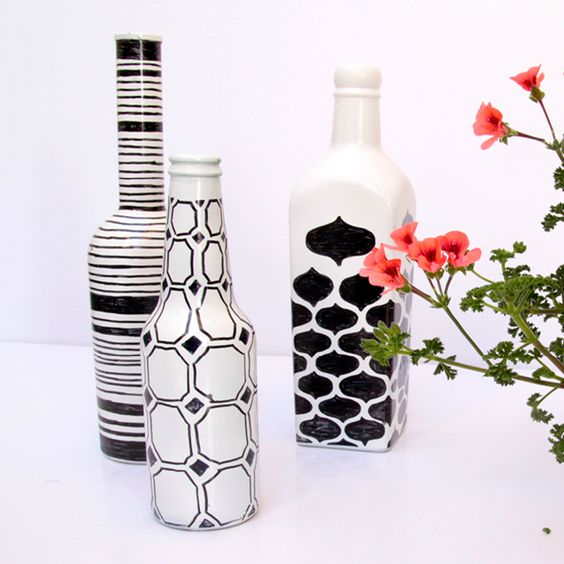
Just paint?
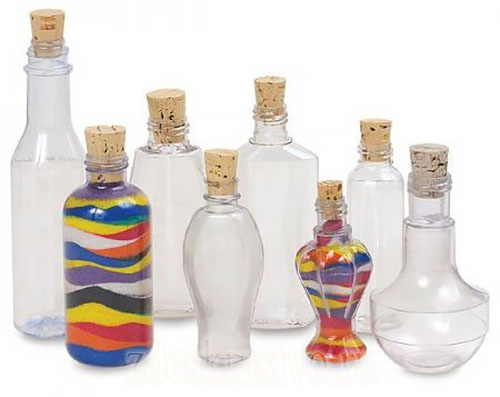
Painting is simply not possible, because painting is the most exciting process. Paint it from the inside, paint it from the outside, paint it in whole or in parts, just paint it in strips or put in different colored sand (You can buy colored sand or pebbles in the stores, or paint it yourself or make up the remains of beads) - everything is in your hands. Here are the ideas!

Painting on glass.
Write silicone glue from the glue gun, let it dry and paint.
In Indian style (found on the site www.nelsen.it), very difficult work, using gold foil.
And at the end the simplest, most budget and the most touching version of a glass bottle in the interior.
Glass and plastic bottles are an excellent material for making various original handicrafts that can be easily made with your own hands. You can decorate the interior of any apartment or house with such unique, stylish and very beautiful things, making them even more comfortable :.
And such crafts will be a great gift for loved ones. To create various original gizmos from glass or plastic bottles, you can leave them in their original form, but they will look much more advantageous if you pre-paint the bottle.
What can be made from such bottles:
When such beautiful bottles come in handy:
- How - see here
For this technique, you can paint any glass: glasses, cans and wine glasses
You should be very careful about the choice of paint, because the final result will depend on it.
- Good fit ordinary waterproof paintas well as acrylic paints that are matte and glossy, transparent and dense, they are sold in cans and sprays
- Acrylic paints can be used in the form in which they are sold, and can be diluted with water, it all depends on what effect you need to achieve.
- Also available for sale universal paintswhich are perfect for painting glass and plastic bottles.
What paint to choose for a plastic bottle
How to paint a plastic bottle for crafts? For the decor, you can use exactly the same paint as for glass. Best of all, they are not aggressive.
- Acrylic paints Perfect for painting plastic bottles, but to protect the surface, you need to cover them with a still clear acrylic varnish.
- Color acrylic lacquer is the perfect way to paint plastic bottles for crafts.
- Paint in cans Also suitable for decorating a plastic bottle.
- The most stable and beautiful effect give car paints, plastic bottles painted with such paint will not change their color for several years.
- Can also be painted with ordinary ones. enamel paints.
What to paint: sponge, brush or spray
- In order to paint a glass or plastic bottle, you can use nylon brush, but in this case it will be very difficult to achieve a perfectly flat surface.
- Can use a sponge, and dipping it into the paint with dotted movements applied to the surface. So the traces will not be visible, but you will have to cover the bottle with several layers of paint, each of which should dry out, and it will take some time.
- The quickest and easiest way to achieve even painting - This is to use paint in cans, which dries very quickly.
But in the apartment the paint should not be sprayed, because it has a strong smell and long disappears.
5 coloring techniques
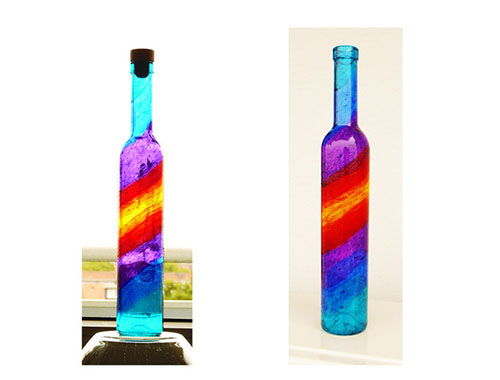
All types of painting can be divided conditionally into several techniques. Two of them are basic: it is applying paint from inside the bottle and outside. Each method has its own advantages and disadvantages. For example, painting from the inside makes it possible to achieve a beautiful glow from the inside, but limits the combination of colors and textures. And the surface color gives the full will of your imagination: here you can apply stencils, make gradient color transitions, create textures. Choose the technique that you like.
Workshop number 1: Paint the bottle from the inside with acrylic
In order to paint the bottle for the decor from the inside with acrylic paint you will need:
- Syringe.
- Acrylic paint.
- Liquid for dissolving paint.
- Unnecessary capacity.
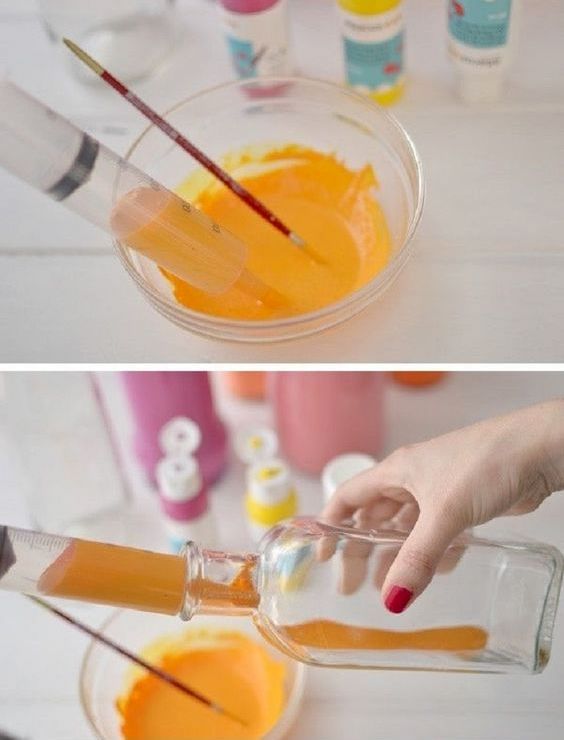
Use the syringe to inject the paint into the bottle and distribute it evenly along the walls.
- Before proceeding to staining, you need to wash and dry the bottle. In order to get a uniform tone of paint, and there were no stains when painting, the paint should be poured into a container and mixed well.
- Then you need to type in the syringe paint insert it into the neck of the bottle and squeeze it inside.
- Now slowly it is necessary to turn the bottle so that the paint covers the walls and the bottom over the whole area. In order for the excess paint to flow, you need to put the bottle upside down for a while.
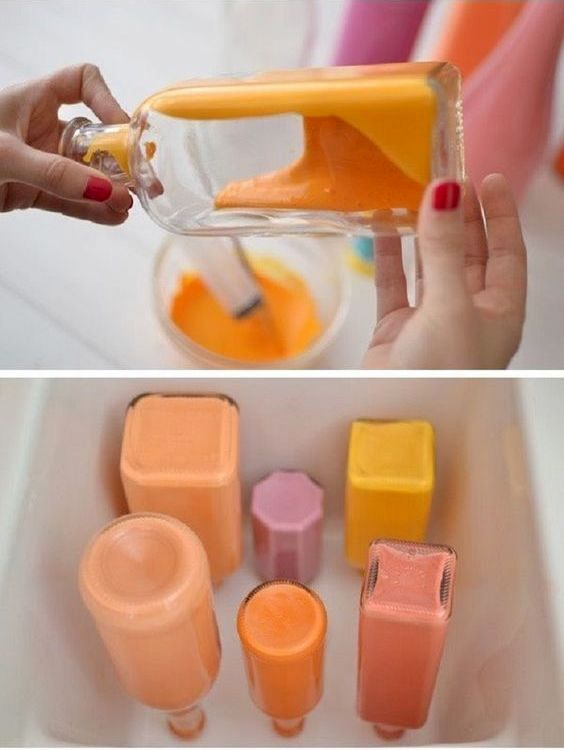
Turn over the bottle and let it drip off excess paint.
If you paint the bottle outside, it can be easily cleaned with a solvent.
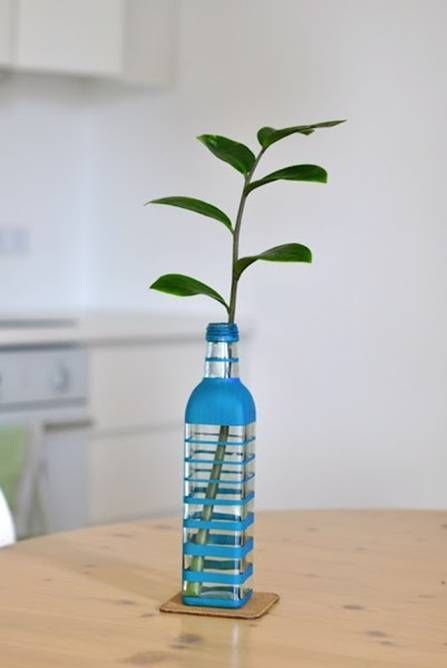
Bottles painted with acrylic can be used as original vases, besides they do not lose a beautiful reflection of glass, enlightening the bottom.
The original vase for the house is ready
Technique # 2: Coating outside
Coating with paint outside gives a lot of opportunities, for example, to create beautiful stripes or other stencilled patterns on the surface.
Stencil non-application of paint
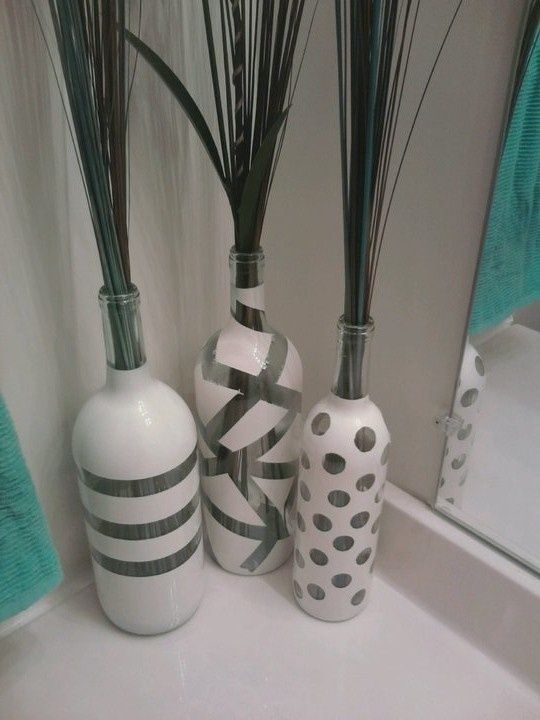
Painting with tape
To paint the bottle outside, you will need:
- Paint (acrylic or water-based).
- Degreaser (you can use any alcohol solution for this).
- Brush or sponge.
- Newspaper.
Process:
- To begin with, the bottle should be washed well, cleaned from paper labels and dried.
- Then degrease the alcohol solution, if this is not done the paint just will not hold.
- Now you can start painting using a brush or sponge, in any case, you need to start from the bottom.
- Put the bottle upside down and leave to dry. After the paint is dry, turn over and paint over the top of the bottle.
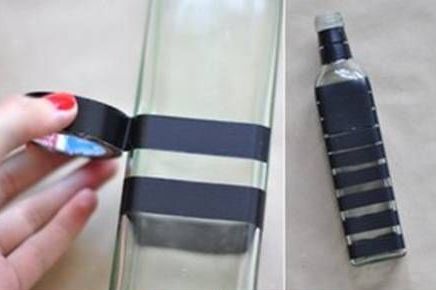
Apply tape to the surface of the bottle
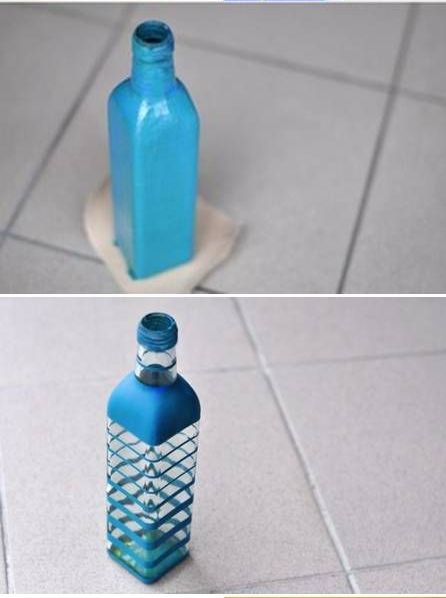
Apply paint using a brush or sponge. After complete drying (1 day), remove the tape
Ready vase for decor
In order to paint all the gaps, you need to apply at least two layers of paint.
Technique number 3: How to paint from a can
This method is the easiest and fastest, but it is recommended to use it outdoors.
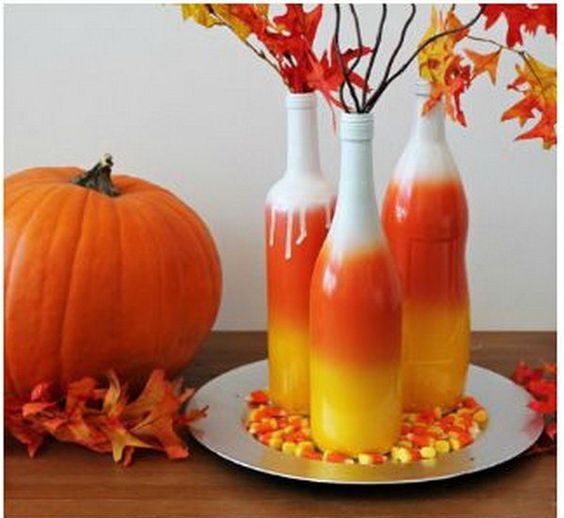
Gradient color paint from balonchik
It will require:
- A can of paint.
- Alcohol based solution.
- Newspaper.
Before painting the bottle must be well washed, remove labels and traces of glue from them. After which they need to be dried and treated with a degreaser. The bottle should be placed on the newspaper and at a distance of 30 cm, begin to spray paint on it.
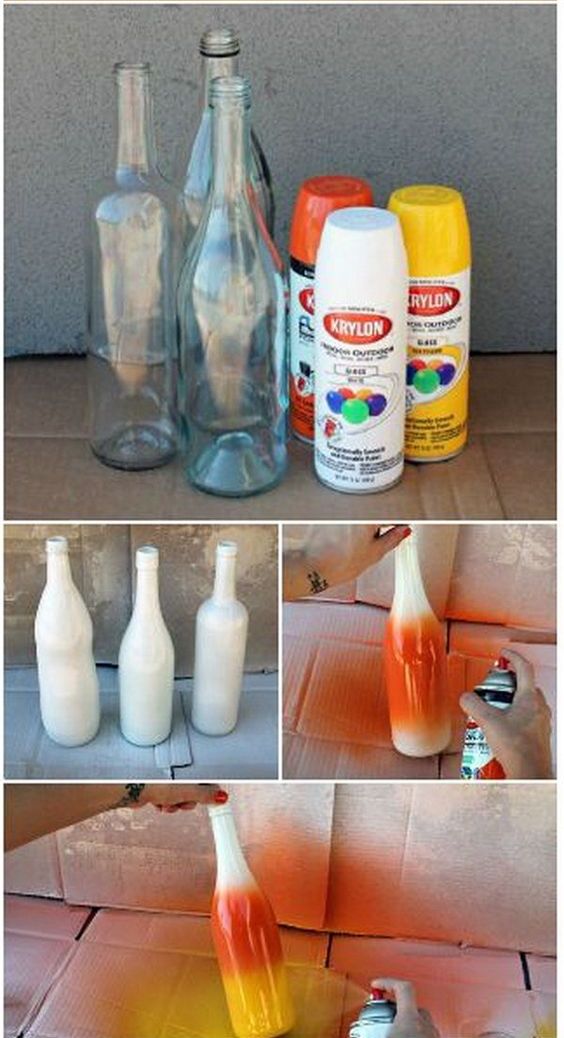
Color principle: the darkest tone is first applied, and then lighter shades over it
If one layer is not enough, the procedure must be repeated. When painting bottles with spray paint, you can use different stencils or tape, as a result you get unique, original patterns. Bottles painted in gentle light colors in combination with gold or silver paint look very impressive.
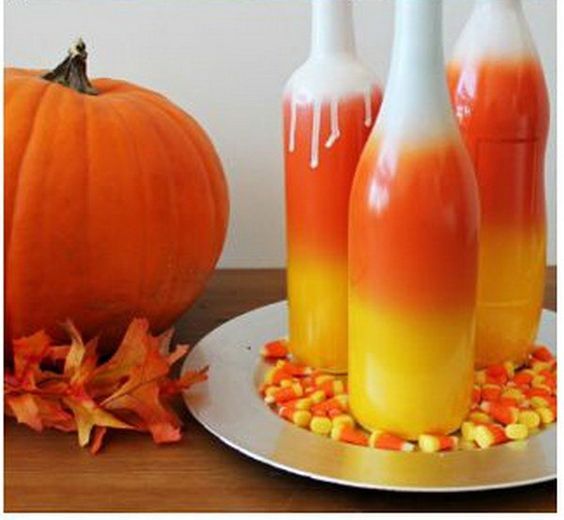
Great autumn decor
Technique number 4: Painting glitter
Very nice is painting with glitter or sparkles. This is especially appropriate for a wedding or other celebration. The champagne bottles painted by this technology look very solemn and spectacular.
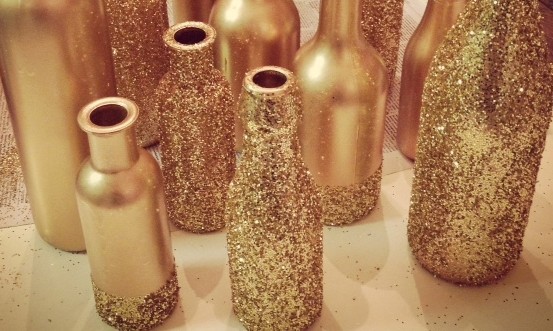
Painting bottles with glitter and glitter
Details on this decoration technique can be found in the “Champagne Decor” material. Click on the button!
Technique number 5: Textured painting technique
Everyone knows that, according to the tradition at the wedding, newlyweds are put on the table two bottles of champagne, which the young people pick up after the banquet and drink one bottle on the first anniversary, and the second on the birth of the first child. Therefore, the bottles must be beautiful and original. In order to make them such as in the photo apply textured painting technique.
Painting the bottle with acrylic paint and a sponge
Paint application technique:
- Clear the bottles, leaving paper labels leaving the foil on the neck.
- Wipe with an alcohol solution to degrease.
- We start painting, for this need white acrylic paint and a sponge.
- Then everything is simple, we dip the sponge into the paint and with a dotted movement we paint over the whole bottle.
- Leave 15 minutes, and in the same way apply a second coat of paint. After complete drying of the paint, you can proceed to the decoration of the bottle.
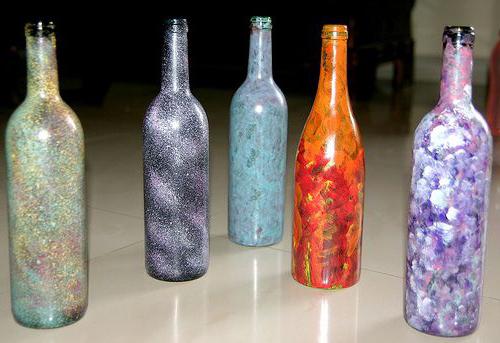
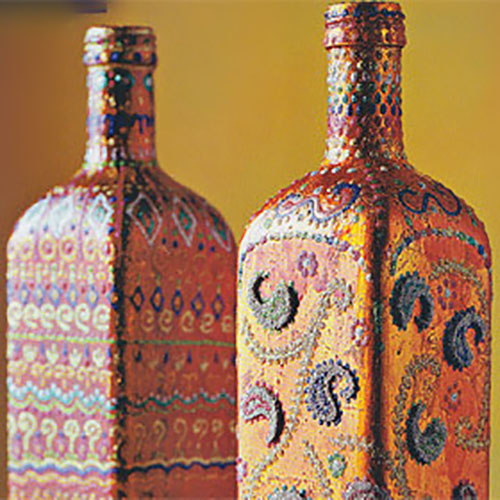
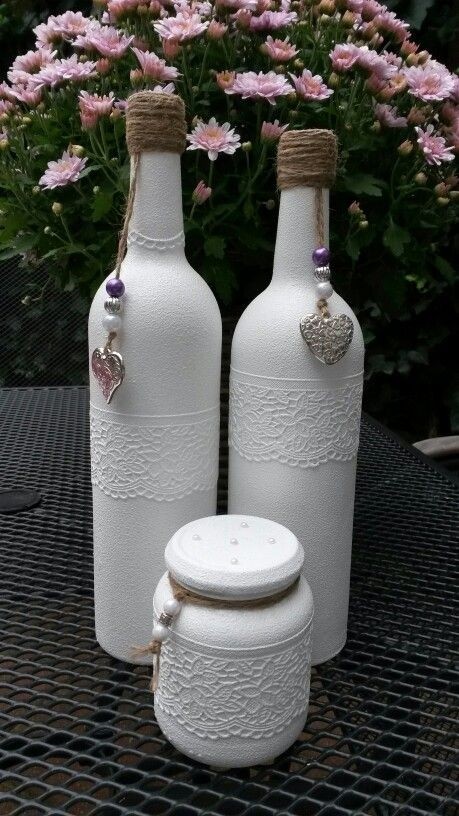
As the basic components for creating beautiful things that will complement the interior of your home, completely different things can be represented. For example, a regular glass wine bottle. It can be decorated in completely different ways, techniques and materials, that it can turn from a simple glass vessel into a work of art.
A variety of bottle decoration options - room for your imagination
Competing glass manufacturers have always strived to make their products unlike other products. Various bottles were invented in shape, multiple differences appeared according to their purpose, color and volume. You yourself can create something to remember, using the old waste material. Bottle decor will help you find an enjoyable experience that will reveal your creative start. How to decorate a bottle with your own hands is outlined below.
Option 1. Composition "Flowers".
To decorate the bottle in this way, we need only glue and chocolate foil.
To begin with, the foil should be straightened, therefore it should be laid on a flat surface and straightened with a flat object. If there is no such thing nearby, the foil can be smoothed with just hands True, this will take much more time.
Then the bottle is carefully wrapped in foil. Folds will form around the neck - this is normal. Only they should be distributed neatly around the entire radius of the bottle.
The main part is to create a composition of foil, which will display a bouquet of flowers. To do this, the remaining foil should be cut into narrow long strips of different sizes. Then these strips roll into a bundle - home-made foil tapes are obtained.
Then everything depends on your imagination and sleight of hand. From the harnesses made on the table flowers are twisted, which are very similar to roses. The stem is a single strand line. To make the leaves, the strands need to be cut into small pieces and connect the two ends. Each created item is individually glued to the bottle.
The advantage of the foil is that it is very elastic in the hands, and the harnesses resemble plasticine. From it you can create not only floral arrangements, but also natural landscapes.
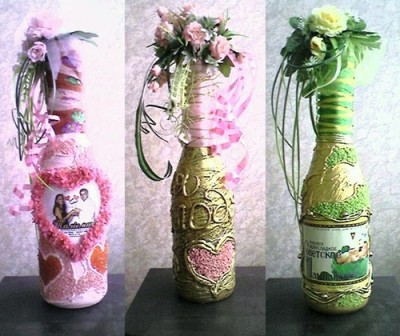
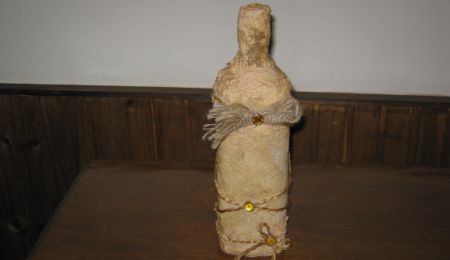
Option 2. Decoration with tissue paper, fabric and tow.
The shape of the glass bottle is already there, you only need to decorate it. All you need is a desire to do something very pretty. You just have to choose the material with which you will decorate the bottle. For finishing materials used aerosol and acrylic paints that can create an impressive choice of colors palette. Methods of applying varnish on the bottles are different: with a brush, swab, spray. In any case, you will get your unique surface of various colors.
Before painting the surface of the bottle must be decorated with tissue paper. It creates artificial folds and has an embossed effect. Textiles will give you great opportunities for combining fabrics of different textures under color. Even without artistic inclinations, you can make your own bottle decoration with glue and twine (natural fibers). You can gradually twine the twine tightly to each other on glue, and then paint the bottle with spray paint. As an ornament of a bottle the old napkin from lace will fit even. Her only need to pre-paint in tea and starch.
Option 3. How to decorate the bottle with your own hands using coffee beans or peanuts?
This is the easiest way, requiring virtually no special skills. Suitable even for someone who has never done anything with his own hands. You will need a glass bottle, glue, coffee beans. The label on the bottle may remain. If you have PVA glue, you can cover a small section of the bottle with it and stick the grain on it in small groups. If you use the glue moment, then for each grain you must separately apply a drop of glue and glue them one by one. It is also recommended to pre-sort the coffee beans by size and shape - with the same beans the pattern on the bottle will look better. Such a bottle can be no problem.
Option 4. Decoration of glass bottles with semolina.
In order to create a bottle decorated with semolina, it is necessary to practice a little. After a couple of attempts, you have to cope with this task. You will need a glass bottle, glue, semolina, a disposable syringe, a stencil for a picture, a varnish in an aerosol. First remove the paper label. Then the bottle should be washed, dried and degreased. Then you draw the PVA glue into a syringe without a needle and, using a stencil, apply a pattern. The stencil is best attached to the bottle with masking tape. Sprinkle semolina on wet glue. The pattern should not be applied all at once, but in small areas. When put a little glue and sprinkled with semolina you have to wait until the glue dries completely. It usually takes three to four hours. Then we put the next pattern. After the final drying of the glue, varnish is applied in three to four layers. If you are already an experienced person, you can apply drawings without a stencil at your discretion.
Option 5. You can decorate a bottle of champagne with your own hands with newsprint.

Bottles decorated with various paper
To do this, you will need: newspapers, PVA glue, acrylic paints and varnish. Paper label must be removed necessarily, and the bottle should be washed and dried. Then you need to tear the newspaper up into several pieces and put the next step to a good wrinkle - spray the bottle with PVA glue. Then carefully cover the bottle with paper and make sure that the transitions are not sharp. There should be no air under the paper, but wrinkles and bruises should form on the bottle. Next, you need to make patterns from the newspaper. Cut the paper into strips about three to four centimeters wide and fold it into bundles. The area of the bottle on which the newspaper cord will be applied is smeared with glue and the pattern is carefully glued. As soon as the glue dries, you need to paint the bottle with acrylic paints. In what color - is yours.
If you find an error, please highlight a piece of text and click Ctrl + Enter.
DECORATIVE KITCHEN BOTTLEProbably, every hostess thought: how can you decorate the kitchen, bring a special highlight / peppercorn in the interior. For example, for the kitchen the most important is the decoration of the shelves with original decorative bottles. Bottles are filled with all sorts of ingredients ... more on that more ...
The ingredients, indeed, can be the most diverse: they are colored salt, bright vegetables and fruits, pasta, spices, coffee, even flowers.
Of course, such decorative bottles can be purchased in gift stores, but much nicer to make such a masterpiece with your own hands. Moreover, it will not take too much time, labor. And you will enjoy the creative process.
These bottles are not ashamed to donate and put in your kitchen on the most prominent shelf.
Let's get started
There are many options, except for the flowers and vegetables listed above, you can use grain, seeds and various cereals:
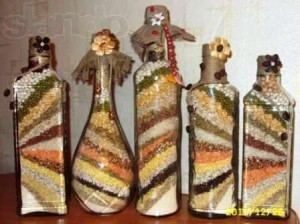
Millet, millet,
In addition, very beautiful decorative bottles are obtained from spices. To do this, you just need to go to the bazaar, at the spice dealer to collect everyone little by little and at home, very carefully, pour them in layers in jars.
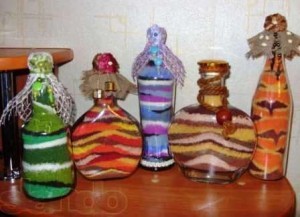
Decorative bottles with salt
Moreover, the spices can be used as ground or not. And of course, if this is work at home, and not a hobby, you will need quite a lot of spices. So do not hesitate to ask for a discount from the seller.
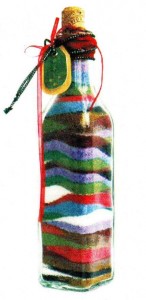 Decorative bottle with salt
For creativity we need:
For on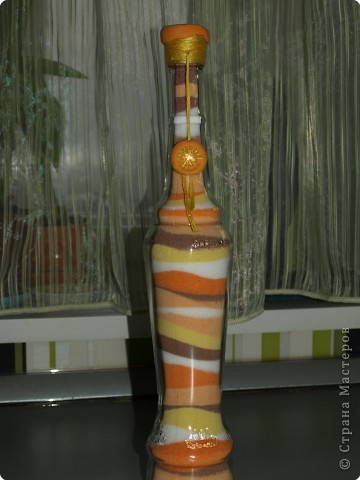 chala bottle wash well, sterilize (about 3-5 minutes), dry.
Next, prepare the bottle filler: scatter the fine salt into containers, paint in different colors (that is, the salt in each container will be its specific color), leave the salt to dry. About a day, while not forgetting to mix and break up lumps.
Now, after the salt is prepared, proceed to the most interesting. Fall asleep different colors of salt in the order that you think of yourself. We advise you to use the funnel when falling asleep.
Then close the cork and decorate with ribbons.
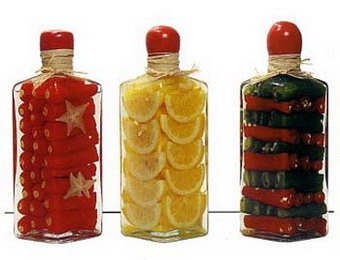
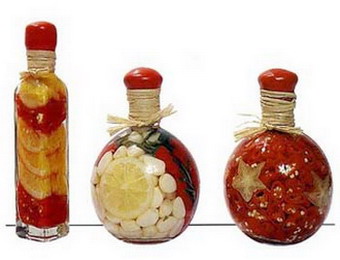
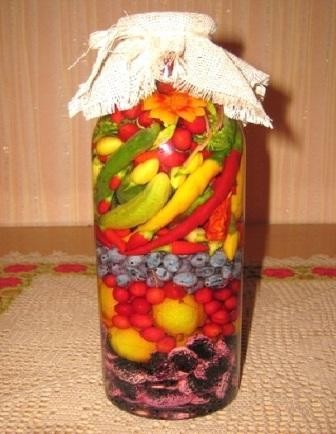
Decorative bottles luki with vegetables and fruits
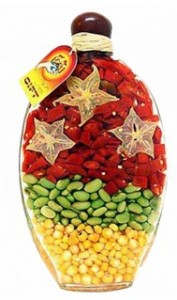
For such compositions, you will need all the same as in the previous version, but instead of salt and gouache, various fruits / vegetables are used.
We also thoroughly wash, sterilize and dry the bottle.
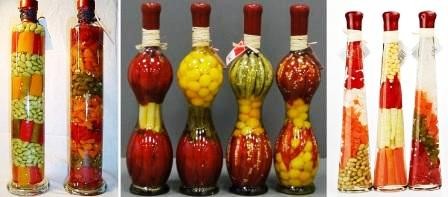
We fill with ingredients (as examples we present you photos of ready-made decorative bottles). Use knitting needles or Chinese chopsticks to carefully decompose everything.
![]()
Corked with wax or sealing wax, cork and fantasize with the design of the neck of the bottle.
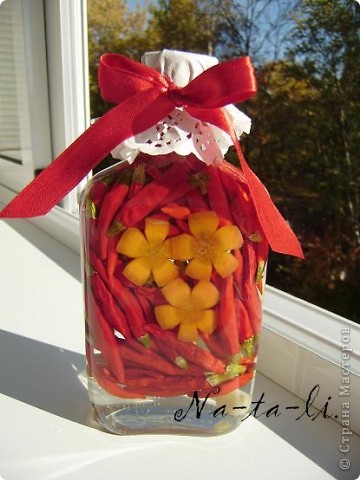
Very elegant look not to the brim full of bottles, and lonely herbal twigs, or hot Chilean peppers. They are filled with oil.
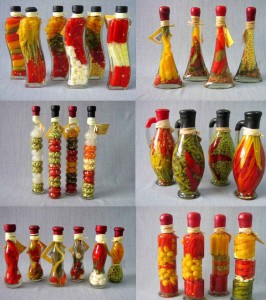
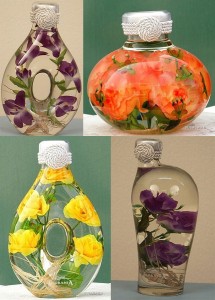
Also look beautiful and bottled flowers
The service life of such decorative creations is 2-3 years.
Be extremely careful if there are small children in the house. Keep away and taller decorative bottles for safety.
- Decorative bottles with cereals
- Corn - white, red, yellow,
- Rice - peeled, unpeeled, dark, long, round,
- Wheat - whole, peeled, shredded, semolina,
- Sorghum,
- Lentils
- Peas - whole, halves,
- Chickpea,
- Buckwheat,
- Oats,
- Beans - red, white, brown, variegated, small and large,
- Seeds - pumpkin, sunflower, watermelon, melon.
- A glass bottle, preferably some interesting exquisite form.
- Fine salt.
- Paints "Gouache".
- Brush or spatula.
- Original cork.
- Tapes.
A few guidelines for making decorative bottles with fruits and vegetables.
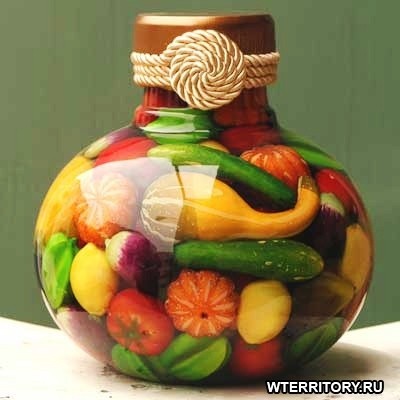
You can preserve everything. But banks with home-made products are unlikely to be able to decorate your home, even if you really try to give them a presentation. Still, food is food, and place it in the pantry. And what if you try to make canned food, the only purpose of which is to add comfort to your kitchen, and maybe even to the living room
Look for dishes, or 4 rules of rolling
Rule number 1. To roll up for beauty can not any food product. Excluded: cucumbers, tomatoes, zucchini, sweet peppers.
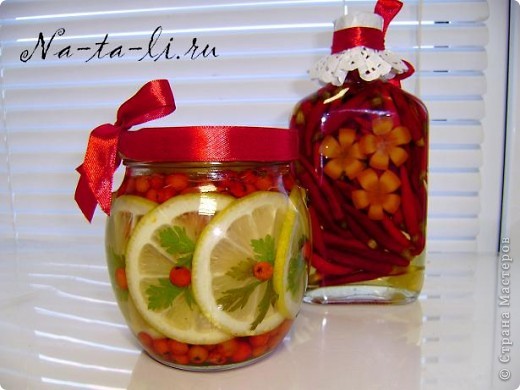
What is the "roll" can and should be? For example, flowers. Yes, yes, flowers, including roses left over from festive bouquets! Still very beautiful looks like a small multi-colored bitter pepper, small mushrooms, tinted garlic, beans, tiny immature carrots, paradise apples, oranges, lemons, radishes.
Rule number 2. As a preservative should not use vinegar. It changes the color of the raw material, it seems to fade, it becomes yellowish or greenish, in general, it looks like something boring. Try to get medical formalin. The perfect thing! Vegetables and fruits will remain bright, juicy, and the banks will never explode. The main thing is not to heat the solution and work with it in a respirator and rubber gloves. Instead of formalin, 70 percent ethyl alcohol is quite suitable, but over time your canned food may fade.
Another option is a strong solution of gelatin with sugar, about 1/1, but it can be used only for fruits and flowers, the vegetables in this solution look bad.
Rule number 3. Do not use ordinary glass jars. You are not going to later discover and have your creations. Get the original packaging! Every little thing like garlic or mushrooms can be gently placed through the neck in a beautiful bottle of clear glass. Find fancy chemical flasks - great! They look unusual and immediately attract attention. For sliced oranges and lemons, low thick-walled honey jars with a pneumatic cork lid are suitable (honey in such containers is often sold in large supermarkets). In general, look for dishes! The more original it is in itself, the more interesting your canned food will look.
Rule number 4. You do not need special tightness, but, nevertheless, it is worthwhile to prepare in advance more colored wax or paraffin in order to fill it with a cork or cap. This will hide any flaws (for example, that the lid looks cheap) and will give the blanks a noble vintage look.
Layer by layer
We put the necessary raw materials into cleanly washed and dried containers. You can uniformly or in layers, but not mixed. It looks beautiful if the layer, for example, lemon slices alternate with a layer of rose petals or garlic.
When laying in the final container, try not to leave free space, your "blanks" should not float in the bank. If you use formalin, pour each layer separately. In other cases, you can act as in conventional canning. Flowers, on the contrary, cannot be firmly laid, they should hang inside the vessel, as it were. Some masters recommend a very strong saline solution for them, but this is rather risky.
After pouring, close the lid and gently, heating the wax in a tablespoon, pour it. You should not be afraid of picturesque flows, they will only decorate the product. After the end of the bank’s work, it should stand for at least a week in a dark cool place.
And now the most important thing: where to put your decorative canned food? The counter question is: why should it be set? You can do otherwise. Buy in a hardware store more metal "clamps" for water pipes, the diameter corresponding to your dishes. The “collar” is carefully wrapped in parchment or a piece of sackcloth, tightly tightened on the neck of a can or bottle and fastened to the wall with a screw. True, if the plate is very pot-bellied, it is better to put it on a shelf or cupboard, as it will look bad in a hanging form. The ideal thing is flat brandy bottles, you can hang them all walls at least!
If you did everything right, your canned food will serve you indefinitely. They cannot be eaten, but even in fierce winter they will remind you of summer and make your home warm and cozy.
Ekaterina Postnikova