Seed onions in one season through seedlings. About the world of plants and country life
Onion plants include such common as onions-batun, bulb onions, and shallots. They are grown for the first spring greens rich in vitamins and phytoncides, as well as bulbs, which are used in the preparation of various dishes and canning. Most onions are unpretentious crops, and even a novice gardener will be able to grow a good harvest with some simple rules.
On one place to grow onion more than 2 years is not recommended. The best predecessors for onions are cucumbers, cabbage, potatoes and legumes. In addition, you can plant onions and garlic after beets, zucchini, squash. Carrots and tomatoes are bad predecessors.
Pests. The main onion pests are onion flies. To combat them, dig up ridges in the fall, on which the onion or garlic grew, before planting, treat the seed material with insecticides, and warm the onion sets for 24 hours at a temperature of + 40-45 degrees. A good result is the use of ash or tobacco dust, if you sprinkle the beds with onion, as well as watering the plants with a solution of water and salt (200 g per bucket of water).
Major diseases. Of the diseases affecting onions, the greatest damage to the crop can cause neck rot, as well as downy mildew. To combat and prevent immediately after harvest, it is recommended to dig up the soil and add slaked lime or ash into it. Damaged plants are recommended to burn.
How to grow onions
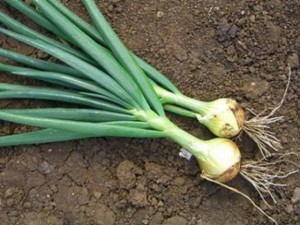
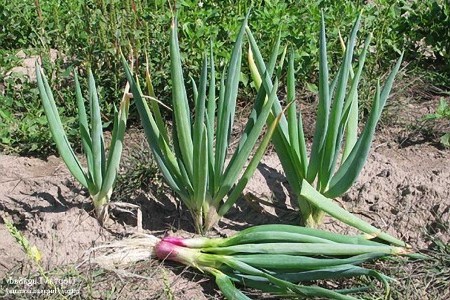
Onions - a familiar crop grown for bulbs and feathers (i.e., greens). There are several varieties of onions, which differ in terms of ripening, onion color and taste. A good harvest of this crop can be obtained several times a year: in spring and summer in the garden, in autumn and in winter in greenhouses. A small amount of greenery can be grown even in the apartment on the windowsill.
Temperature mode. Onions - quite cold-resistant culture, its seeds germinate well at + 3-5 degrees. And the optimum temperature for growing a plant is 23-25 ° C, hotter weather can negatively affect crop yield.
Landing methods
To produce bulbs, plants are planted in the ground, using seedling and seedless methods, and onions can also be grown from seedlings.
Seedless cultivation. The easiest way of planting onions is seedless. Sow the seeds directly into the ground, plunging them into the soil by 1-1.5 cm (so that the seedlings appear faster soak the seeds).
Onions can be harvested 23-24 weeks after planting, which makes this method of cultivation suitable only for areas with a mild climate in which the planting can be carried out in early spring. In the middle lane, when planted in open ground, onions may not have time to ripen, so in order to get a good harvest, use the subwinter planting or seedling method.
Sub-winter seeding is carried out after the onset of persistent cold so that the onions do not have time to germinate. Prepare the beds in advance, until the soil is frozen. Sow the seeds in the furrows to a depth of 5-6 cm, sprinkle 2-3 cm above with a layer of humus.
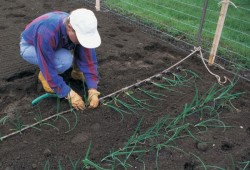
Growing onions through seedlings.For strong seedlings, sow seeds in March in shallow boxes or special cassettes. Use for ready-made soil mixtures or fertile garden soil. After sowing, cover the boxes with film and maintain the temperature within 18-25 ° С, when shoots appear, move the boxes to a cool place (10-12 ° С) so that the shoots do not stretch.
After a week, you can raise the temperature by 6-8 ° C. Take shelter for a few hours a day for airing. Water onion seedlings in 2-3 days. You can feed it 1-2 times min. fertilizers (20 g of ammonium nitrate, 15 g of potassium chloride and 40 g of superphosphate per bucket of water).
Planting seedlings in open ground. Before planting seedlings in open ground, it is a good idea to harden it.
Seedlings are best planted in the distance between the rows of 10-12 cm, between plants in a row - 6 cm. In order not to damage the roots of plants when planting, it is best to transplant the onions with a clod of earth. Before planting, pour soil abundantly on previously prepared ridges.
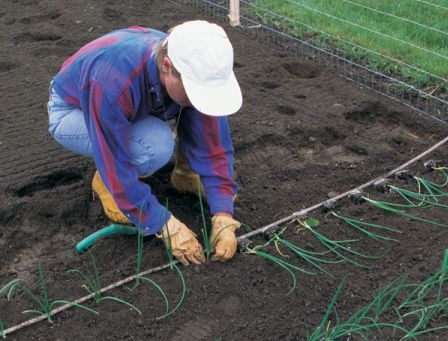
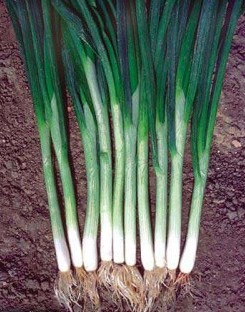
Planting onion seedlings.
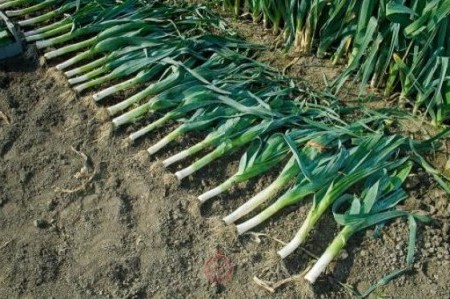
The easiest way to plant onions. A less troublesome method of growing onions in areas with a temperate and cool climate is planting a seed (small onions grown from seeds). Landing in the first decade of May, pitting with a scoop or peg and deepening the onions by about 1 cm (try not to sprinkle the neck with earth). Planted sevok at a distance of 20-25 cm between the rows and 5-10 cm between the onions. It is convenient to use a two-row belt landing at a distance of 20-35 cm between the rows and 5-10 cm between the onions.
Indoors, when growing onions on a feather (on greens), use planting as a planting material.
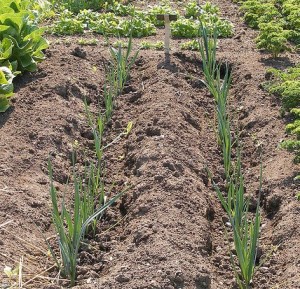
Soil preparation for onion planting
A good harvest can only be obtained by planting in well-lit, sunny areas with rich soil. Onions do not tolerate stagnant moisture, so this culture works best on drained sites. The soil on them should not be clay.
Land for the cultivation of onions is best prepared in the fall. Dig the earth to the depth of the spade bayonet, remove the roots of weeds, apply rotted manure, and mineral fertilizers. In the spring, break the upper layer of soil, then smooth everything with a rake.
How to water
Podzimnaya planting onions.
Onions during the formation and growth of leaves should be watered regularly (in May - once a week, and in June - once in 10 days); between irrigations, loosen the ground between the rows and carefully weed out the weeds. However, remember that a completely different moisture regime is needed for the ripening of the bulbs, therefore, 3-4 weeks before harvesting, completely stop watering.
When growing onions on greens in a protected ground, water the soil as it dries and loosen it in between waterings.
How to feed and fertilize onions
When growing onions in open ground, conduct top-dressings per 1 m2 according to the following scheme: in the fall, when preparing the soil, add 4 kg of compost and 100 g of potassium sulfate; spring before planting - 25 g of nitrogen fertilizers; after the formation of the first leaves - 20 g of nitrogen-phosphate fertilizers, and 5-7 days after that, fertilize the plants with manure diluted in water (in a ratio of 1:10) or bird droppings (in a ratio of 1:20).
To get a good harvest, spend another additional feeding during the formation of the bulbs: apply more phosphate and potash fertilizers at the rate of 15-25 g per 1 m2.
If you notice that the onion grows slowly and its leaves are white, add a mixture of 200 g of mullein and 20 g of urea dissolved in a bucket of water. After 15 days, feed the plants with another solution of nitrophoska.
Onions grown by sowing seeds (chernushka) are fed for the first time in the phase of appearance of the fourth leaf with infusion of mullein (1:10) or chicken manure (1:20), consumption - a bucket of 3-4 square meters. m. Between rows, make grooves 6-8 cm deep, pour them with fertilizer infusion and close up with soil. Two weeks later, a second feeding is carried out: a teaspoonful of urea and potassium sulfate, 2 teaspoons of superphosphate per square meter. m
When growing onions in a pen in the open or closed ground, apply complex fertilizers (1 time in 10 days).
Planting and growing leeks
Leek is a relatively new culture in our country, which is found in vegetable gardens less often than other bulbous ones. This type of onion is more common in the southern regions (this is due to the rather long period from germination to harvesting).
Leek is grown to produce a thickened white base of the stem (this plant does not form bulbs), if desired, you can also use young green leaves for food. The main conditions for obtaining a good harvest of this crop is the correct choice of a site for planting and timely fertilization.
Temperature conditions
To get a good harvest, the average temperature during the growing season should be 17-23 ° C, although in general the crop is cold-resistant and can withstand short-term frosts down to -7 ° C.
When growing leek seedlings, plant the seedlings in the ground when the soil warms up to +10 ° C.
Planting leeks
In the southern regions of our country, leeks can be grown by sowing in open ground, in regions with a cool climate, a seedling method of cultivation is recommended - in this case, you can get a crop in the year of sowing (approximately 45-60 days after planting seedlings in the beds) . The ripening terms depend on the early ripeness of the variety, on the weather conditions and the fulfillment of the agrotechnical requirements.
To speed up the emergence of seedlings, pre-wet the seeds and germinate. Caring for seedlings is about the same as when growing onions: water the seedlings regularly. You can apply liquid complex fertilizers once. The optimum temperature for the growth of leek seedlings is 18–25 ° C before seed germination and 14–16 ° C after germination. If the temperature is higher and the lighting is insufficient, the seedlings will be drawn out.
Planting seedlings in the soil spend in late April or early May. Plant in furrows with a depth of 10-15 cm (the distance between individual plants is not less than 10 cm). After 2 weeks, fill the furrows with fertile soil.
The soil should be fertile and necessarily loose, preferably neutral. On sour soils a good yield of leek will not succeed.
How to water a bow
Planting leeks.
The leek plant is moisture-loving, so do not forget to water it regularly from the time the seedlings are planted until the end of the growing season, increasing the frequency of watering in the dry months. After each watering, loosen the row spacing.
Hilling onions
In order to grow juicy bleached stems and high yields, 3-4 times per season, pile up leeks. And of course, apart from this, do not forget to weed out the weeds and loosen the soil.
Top dressing
Regularly feeding leeks - without this, you will not be able to get a good harvest. Especially important for leeks are nitrogen fertilizers - they are especially needed in the second half of summer, when greens are actively formed.
The best will be the alternation of liquid organic fertilizers, for example, an aqueous solution of mullein 1: 8 or bird droppings 1:20 at the rate of 3 liters per 1 square meter. and mineral fertilizers (for example, ammonium nitrate solution and potassium sulfate at the rate of 15-20 g per 1 m2).
Planting and growing shallots
Shallots or family, mnogognezdovy onions, valued for precocity and taste. This species is less common than onions. In one nest several medium-sized bulbs are formed, which have a less pungent taste than regular onions. Shallot can be grown in open ground on the bulbs and feathers, in closed ground - on the feather. The leaves of shallot do not grow coarse for a long time and remain juicy
Temperature conditions
Shallots tolerate low temperatures well. If you leave it to winter, it will easily withstand the freezing of the soil to -20 degrees, and in spring the greens will appear earlier than in other types of onions. The optimum temperature for shallot during the growing season is 20-24 ° C.
Planting shallot onions
Cultivation of shallots.
Shallots are easiest to propagate in a vegetative way - planting bulbs, and for growing new varieties it is preferable to seed propagation.
Bulbs before planting soak for 20-30 minutes in a pale pink solution of potassium permanganate, and then rinse with cold water.
Landings are carried out in the spring (from late April to early May) or in the fall (from late September to early October). For spring planting, use medium bulbs (3-4 cm in diameter), for autumn - smaller ones (about 2 cm in diameter).
Plant the onions to a depth of 2-4 cm, during autumn planting, grind them with peat or ground 3-4 cm.
To obtain large shallot bulbs, experienced gardeners suggest planting in spring, planting onions 15 cm apart, and between rows 30 cm. In the process of growing, periodically tear out one bulb from each nest (they can be used as food) so that by fall 1-2 bulbs left in each nest.
When growing shallot on a feather in a protected ground, plant from the second half of February, then in spring you will harvest the first crop of greenery.
When forcing the shallot on the feather of the bulb, it can be reused. To do this, after cutting the greens, remove them from the soil, cut them across and plant them again in boxes or pots with a fertile soil mixture.
Tillage
When growing shallot onions in the spring in the spring, remove the covering material from the beds as early as possible so that the soil warms up faster. In this case, you will speed up the harvest of greenery.
After the emergence of seedlings, soil the soil between rows and rows, and thoroughly weed.
It is recommended to loosen the aisles 2-3 times over the summer to a depth of 5-6 cm, after each watering it is enough to pierce the earth to a depth of 3-5 cm. During loosening the soil is not recommended to be added to the plants themselves, since this slows down the maturation of the bulbs.
If you grow shallots in a greenhouse, loosen the soil not deeply, but after each watering.
Watering
In the first half of the growing season, water shallots regularly: from May to mid-July - 3-4 times a week, in hot and dry weather, you can increase the number of irrigations. In the second half of the summer, you need to water less, and 2-3 weeks before collecting the bulbs you can stop watering.
In shallow water, shallots are watered regularly but moderately. Loosen after each watering.
How to feed shallot
During the entire growing season, it is recommended to feed 1-2 shallots 1-2 times (this is enough to get a rich harvest in both open and in the green field). Use an aqueous solution of mullein (in a ratio of 1:10), bird droppings (in a ratio of 1:15) or complex mines. fertilizers (at the rate of 20 g per 10 l of water).
Planting and cultivation of onions - batuna
Onions - a batun is a perennial plant, it can be grown both in open ground and in greenhouses. At one place the plant can be successfully grown for several years, but in the third year its yield decreases, the leaves become more rough.
In culture, there are several varieties of onion-batun, which can be divided into two main groups. Early ripening peninsula produce harvest in early spring, late ripening sharp ripen 30-40 days later. Growing onion batun is not difficult, especially if you plant varieties that are resistant to diseases.
Temperature conditions
The onion-batun is a winter-hardy culture, it tolerates frosts down to -45 ° С. The optimum temperature for vegetation is 19-23 ° C.
Sowing onions - Batuna
Batun can be propagated by seedling and seedless. Planting seeds in open ground begins at the end of April at a depth of 2 cm. The easiest way is to lower row at 40-50 cm between rows, but you can also use a ribbon sowing scheme: sow seeds 2-5 lines at a distance of 10 cm between rows and as much between plants.
Onions - the batun easily breeds in the vegetative way. To do this, simply divide the bushes and plant each onion separately. It is best to do this in the spring or late summer. Arrange the bulbs in rows.
For a good harvest, plant a bamboos in spring, at least in summer or early autumn.
For distillation in the winter, dig up several plants in the fall and transplant them into boxes, place them in a warm, bright place and water 2-3 times a week.
Early onion harvest
For early greenery in late February - early March, plant a onion-batun in tunnel-type film greenhouses. This method will allow you to get a harvest two or even three weeks earlier (at the same time it will be 1.5-2 times higher than when growing onions in open ground).
You can also use frameless cover: sow the seeds of a batun on the open ground and cover it with a perforated film, sprinkling it along the edges with earth.
For forcing the feather on the bat-onion can be grown in a greenhouse. In the fall, plant delenki in rows, and as early as March, when the leaves of the onion grow 15-20 cm, harvest the first crop.
When growing onion batun in the greenhouse, make small furrows on the ridges, plant onions and fill them with soil. To obtain a good harvest, keep the temperature in the greenhouse + 10-15 C, gradually increasing it to 20 C. The optimum humidity of the air is 70-80%. 7-10 days after planting, add mineral fertilizers to the soil.
Loosening
Loosening the row spacing is a guarantee of getting a good harvest of onions. A few days after the first weeding, break the soil between the rows of plants.
Watering
To get fresh juicy greens do not forget to water the onion-batun (with a lack of moisture, its leaves grow coarse and become bitter). The recommended rate is 3-4 times a week for 10-20 l / m2. 3-4 hours after watering, make a row between the rows.
How to feed a bow - batun
To get a good harvest of onions, do not forget to feed him with mullein, diluted 1: 8 or bird droppings (1: 20) just one additional feeding per season. After harvesting, it is desirable to introduce liquid mineral fertilizers (50 g of ammonium nitrate, 3 g of superphosphate and 20 g of potassium chloride per 10 liters of water).
Hello, dear gardeners!
There are many methods of growing onions. And there are several types of onions. In this article I will tell you about the cultivation of turnip onions.
It is planted in spring sevke (annual heads made of turnip onion seeds). And although this is the most trouble-free type of cultivation, I stopped using it because of poor-quality planting material infected with an onion fly. Even disinfection does not help against it.
It is better to use for seed cultivation of turnip seed sowing technique. Very productive and not too troublesome method. In March, I take 5 liter bottles and, at a height of 10-15 cm, I sort of cut off the lid. But not until the end. So, we open the lid and fill the container with earth. We spill, and in 2-3 days we sow seeds.
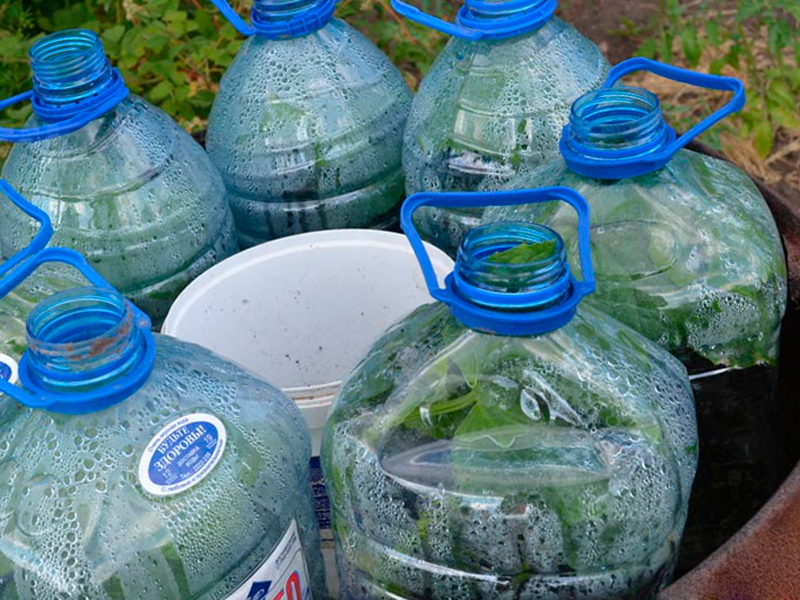 Before that, during the day, I keep the seeds in a germinator. After planting, I sprinkle the seeds with earth and return the top cover to its place. Fix the cut tape. So the bottle and go to the cottage. Watering is not particularly necessary, since there is almost no evaporation. But if the need arises, I pour a large enema through the neck of the bottle. And on the walls!
In early April, I bring the bottles to the cottage and put them in the sun in under the acrylic, but not on the ground, but on the board above the ground.
 Planting seedlings in early May in the ridge. 2-3 hours before planting, I take the derninka with onions from the bottle and put it in a basin of water. There it is very easy to wash out and understand the roots of the seedlings.
My landing method - under the heel (that is, the leg from the sofa). Ploskorezom do on the ridge grooves and squeeze out the holes in them with a 15 cm heel. I place the root in the small hole, slightly deepening, pour in a glass of water and slightly pull out a sprout to spread the roots. With the other hand I fall asleep the hole with humus. I dig to the core.
Before landing, I put the universal “AVA” into each well. And in water for watering I stir a handful of ashes and.
As soon as the onion lifts its head (within 10 days), immediately the bed and constantly shed with the “Radiance” fertilizer. Add mulch twice per season. Onions do not shovel, because the ground under the mulch is loose, and the onion itself will find a comfortable place.
When the feather on the bow begins to wither and lie down, I put on the bed of the arc and pull the film from the rain. And, of course, stop watering.
In the second half of July, onions can be removed.
Tried for quick use of onion varieties "Music" , "Exhibition" , "Ecstasy" , "Bonus" . And for storage go bulbs more dense and smaller diameter, for example grade "Farmer" .
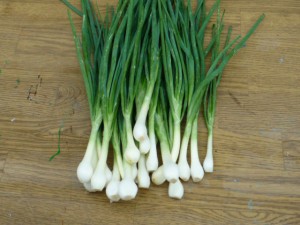
Most often onions are grown from onion sets, which can be purchased in stores for gardeners or grown from seeds themselves. Personally, we, with my husband, did not manage to grow a good harvest of onions from a sevka for several years, the onion was small, and the harvest was insignificant. As in the joke "put the bucket and collected the bucket."
We tried and switched to growing onions from seeds through seedlings in one year.
If you decide to try this method of cultivation, decide on the varieties, purchase seeds and forth.
We will need:
- onion seeds
- mini-greenhouses (this is a one-piece tray and a transparent cover)
- cassettes with small cells, approximately the size of each cell is 2.5 x 2.5 cm. There is 40 cells in such a cassette.
- soil mixture for seeds.
All this can be bought at a regular garden store.
Important point: although it is believed that nigella (as the onion seeds are also called) retains its germination without loss for 2 years, but I advise you to use annual seeds (i.e., fresh).
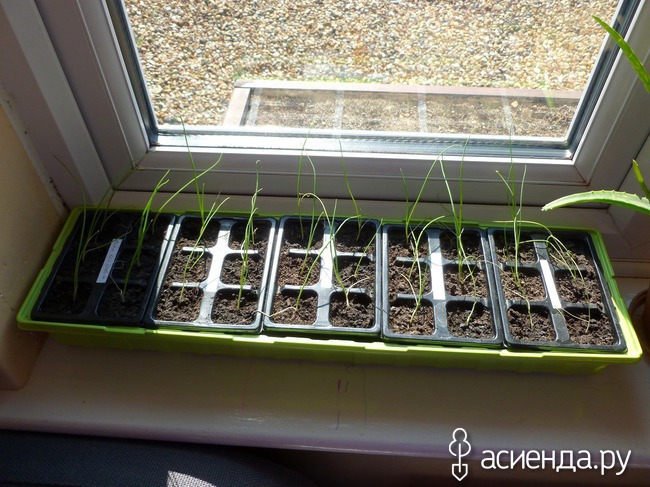
We fill the cassettes with soil mixture almost to the top, if the ground is brought from the street, let it warm up, do not sow the seeds in the cold ground. We put each cassette in the mini-pan tray. And start sowing. I put 2 seeds in each cell, if both sprout, that's okay, they will grow together before transplanting to open ground. Sprinkle seeds on the ground quite a bit. If you prefer to water the seeds from above after planting, then you should not cover the seeds with earth on top, they will fail along with the water to the desired depth. I put the cassettes in pallets filled with water and each cell is soaked from the bottom through the holes of the cassettes, so I sprinkle earth on top. After the earth is saturated with moisture, I drain the water from the pallets and wipe the pallets dry.
An interesting point: if the pan of your mini-greenhouse has no convex reflux, then it is better to put an old plastic grid or grid on the bottom of the pan. This is necessary to create a drainage, onions like water, but avoid stagnation of water.
We close each lid with a pallet and put mini-greenhouses in the warmest and sunniest place to create a "greenhouse effect". I have this sod window south window. You can use a phyto-lamp for lighting if there is no suitable place.
Important point: mini-greenhouses should be in the light for full seed germination. I do not touch 7 days at least. Shoots should appear within 7-14 days. If after 2 weeks there is no germination, the seeds are bad. Throw out, sow fresh.
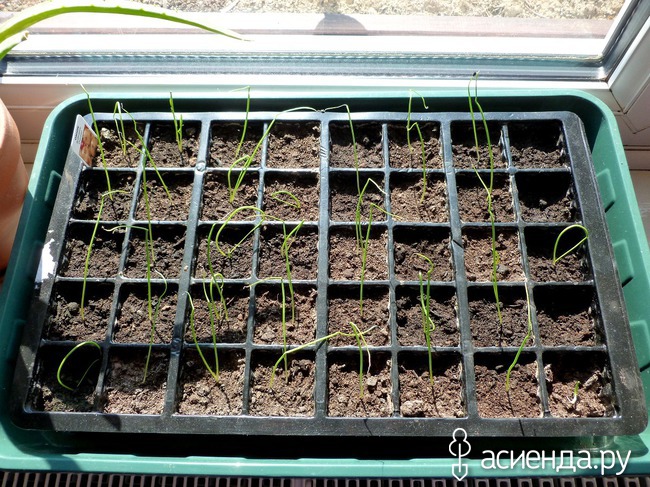
After seed germination, I remove the covers, it is desirable to rearrange the mini-greenhouses from direct sunlight to another place, otherwise the seedlings will stretch, and the root system will not fully develop by the time of landing in the exhaust gas (open ground). It will be enough table, for example, next to the window sill, you can use the phyto-lamp on cloudy days. If you use a stitch or shelves on the windowsill, put the seedlings on the topmost "floor".
I water regularly in pallets, but not on top, I grow seedlings in the usual mode. I feed with complex liquid fertilizer diluted in water after the 4th week after sowing, i.e. since the end of March, through irrigation.
I do not cut the seedlings and do not add anything to the ground. Last year, I decided to cut some of the onion seedlings for the sake of the experiment, and leave some of them "uncut." According to the theory (it is not known whose!) Trimmed onion seedlings better form the root system. No difference noticed. Both the one and the other onions grew the same.
My bow cassettes at the end of March
In the first half of May, I would say more precisely after Victory Day, when the threat of recurrent frosts has passed, I plant it in open ground.
Here I want to distract and pay attention to the following:
The onion beds are best done in those areas of your site where cucumbers, cabbage, tomatoes, and potatoes were grown in the previous season — those crops under which we usually apply large doses of organic fertilizers.
In no case can not plant onions on the site, which was occupied by any of the types of onions, because:
- firstly, various pathogenic bacteria and other microorganisms can remain in the ground, as well as those pests that “specialize” in this culture;
- secondly, the soil in these places is already depleted of those nutrients that are necessary for the growth of onion plants.
And onion is not desirable to plant after such plants as: garlic, carrots. At the same place, onions can be planted not earlier than in 3 years, and best of all in 5 years.
In addition, onions do not like to grow on acidic soils, because in this case the plants assimilate food much worse and are more often affected by such a formidable disease as downy mildew (peronospora). Although, this is not the only reason for onion lesion with peronosporosis.
So: planted in open ground. What method?
Using a wooden board or a beam, I move the earth away, making a long hole / trench no more than 3-4 cm deep. I take the seedlings out of the cells with a whole lump (for this purpose, I plant the seeds in separate cells at once) and put it on a prepared treadmill. And from above I cover with the same ground that I pushed aside the board. This method allows you to avoid damage to seedlings (especially its root system) during transplantation. Gently water from a watering can with a spray. Everything. After 2 weeks, all the seedlings take root and get up from the barrel in the "rack".
The influence of the moon on planting can be treated differently. Someone is guided only by national signs and own experience, considering that everything else is nonsense and obscurantism. Someone is very serious about the influence of the moon on all processes occurring in plants, and prefers to know exactly when to plant onions before the winter in 2016 according to the lunar calendar.
You may have your own opinion about this, unlike any other opinion, but I would like to hope that the information below will be useful for you. Important.
Onions on your site
Onions are probably one of those plants that grow everything, regardless of the size of the plot, their own experience in cultivation of cultivated plants, etc. And it is natural! It is believed that onions specifically, as they say, "in culture", began to be grown more than five thousand years ago. This plant has almost a thousand varieties that grow in a variety of climatic and natural conditions. The most used onion varieties can be called onion, Bulgarian, shallot, batun, slizun, leek, branched, chives, etc. Onions vary in taste, color, size, rate of ripening, long-term storage, resistance to diseases and pests.
Tip! To give onions good yields, carrot and beetroot, all kinds of lettuce and spinach, cucumbers and radishes, strawberries are considered the best neighbors in the garden. But spinach and legumes near the onion planted is not desirable.
At the same place onions are not recommended to plant more than 2 years in a row. It is fraught with infection of onion flies, nematodes and other diseases and pests. Because of this, do not plant onions after alfalfa and red clover, potatoes, celery or parsley. Abundant is the harvest of onions, which are planted after legumes, tomatoes, any kind of cabbage, tomatoes, lettuce, cucumbers, corn, beets, grains (but not after oats!).
When to plant onions before winter in 2016
If in gardening works you are guided by the phases of the moon, then the recommended numbers when planting onions for the winter in 2016 according to the lunar calendar are September 19, 24 and 30, October 3, 4 and 13, as well as November 24. The most experienced gardeners are guided by the average daily air temperature. If the street thermometer persistently shows about +50 C for several days already - it's time to plant onions before winter!
Important! Before the onset of stable cold weather should have time to grow the root system, but at the same time should not give abundant "chords". Plant earlier - it will have time to collect greens, but in the spring it is guaranteed to “go to the arrow”.
How to prepare the ground for planting winter bow
Onions can not boast of a powerful root system. Therefore, you need to think carefully before you assign some piece of the garden a future garden bed for onions for the winter. The most suitable for planting onions is light soil with a high content of humus and sand, a low clay content is acceptable. In the wet area, from which the water of a poor harvest of onions does not go well, we should not expect. It is good, if at least on one side an onion bed from high winds will be protected by tall plants or bushes. Prefer that piece of land on which in spring the snow begins to melt first.
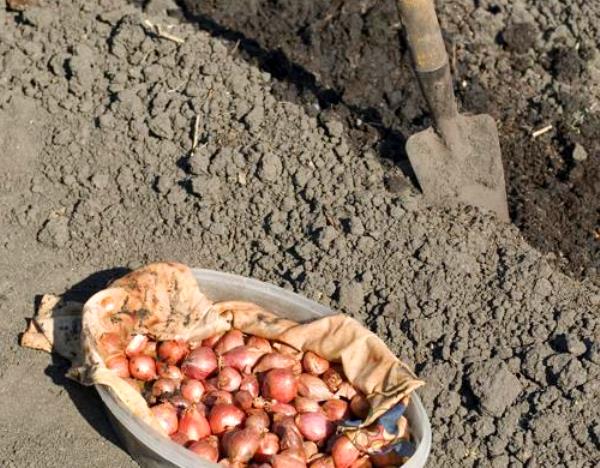
The soil under the onion bed digging, preferably with humus or mineral fertilizers (observe the dosage!). Immediately just before planting the onion, it is not bad to sprinkle the area slightly with ash (10 g of ash per 1 m2 of soil).
How to prepare onions for planting
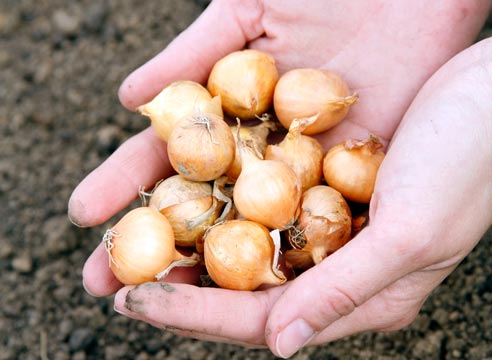
Bulbs before planting need to sort and calibrate, that is, sorted by size. This is done so that on the beds the development of the bulbs takes place more or less evenly. Bulbs on which mechanical damage is observed, or there are traces of fungus or mold are not recommended.
Planting options
Planting onions in grooves with a depth of 5-7 cm is considered optimal. The distance between the bulbs is 7-10 cm. The distance between the rows of onions is at least 20 cm. After all, in the spring you will have to weed it, removing weeds and loosening it. It is important from the garden.
Winter onion after planting
Furrows with a bow are covered with earth and “slapped” a little. If it didn’t rain on time, then after 10-12 days you can wet the area with onions a little. With the first frost you should take care of onion plantations: cover with dry plants or straw, hay or pine needles, spruce branches or dry leaves. Top can be applied branches, cut from the trees in the garden. On the one hand, this will not allow the wind to sweep away what the bow is covered with, on the other hand it will serve as snow retention, which will prevent the bow from freezing in extreme cold, and will give sufficient moisture in the spring.
As soon as the snow melted and the earth began to warm up actively, the bow immediately released the first green arrows. From this time on, it is possible to remove what the ground was mulched (covered) on the beds, sprinkle them with ashes and loosen the soil. After each watering or rain, it is advisable to loosen the onions in the beds, he likes it very much.
Do not forget to remove weeds. In order to protect onion crops from pests without using chemicals, plant marigolds (chernobrivtsy) around the site and even between the rows. Their peculiar smell drives away a malicious onion fly.
Important! Onions planted before winter matures a month and a half before their counterparts, planted in the spring.
What varieties of onion is better to plant in the winter
When planting onions for the winter in 2016 according to the lunar calendar can be important. But even more importantly, which grade are you using for this purpose. The main thing that it was a zoned variety, that is, the one that is most often grown in your area. For Central Russia, give preference to the varieties Arzamas, Ruby, Mouzon, Tamara, Robin, Strigunovsky, Black Prince, Stuttgart, Buran, Siberian Annual, etc.
Planting time of spring onions. Compacted onion planting, mulching onions with sawdust, onion care. Cleaning and drying onions. Storage of onions. Growing onions on a turnip of sevka.
I have the same approach to growing any crop in the garden - to get a big and healthy crop from the minimum area. It does not use any chemicals (mineral fertilizers, insecticides - preparations for controlling plant pests, fungicides - preparations for treating plant diseases, herbicides - chemicals used to destroy vegetation). And also - do not dig, loosen, do not weed, do not use manure.
Maybe?
It turned out that it is possible to get a wonderful harvest not only onions. You can read about it:
I grow onions Stuttgarter Riesen. Sevok buy.
When spring plant onions on a turnip?
What time in spring to plant onions? Our country is large, the climatic zones are different, so I will not write even a month of planting onions, I will write, as I do.
In the spring, when the snow is gone, I look at the garden bed with winter garlic. If the garlic has not yet sprung up - plant early.
The first shoots of winter garlic made their way through the mulch - it's time to plant spring onions.
At this time, the soil is already warm enough, and it still contains a lot of moisture, so necessary for the growth of onions. Therefore, you can avoid unnecessary work by pouring onions.
Planting onion Sevka on the "turnip", or on the "head".
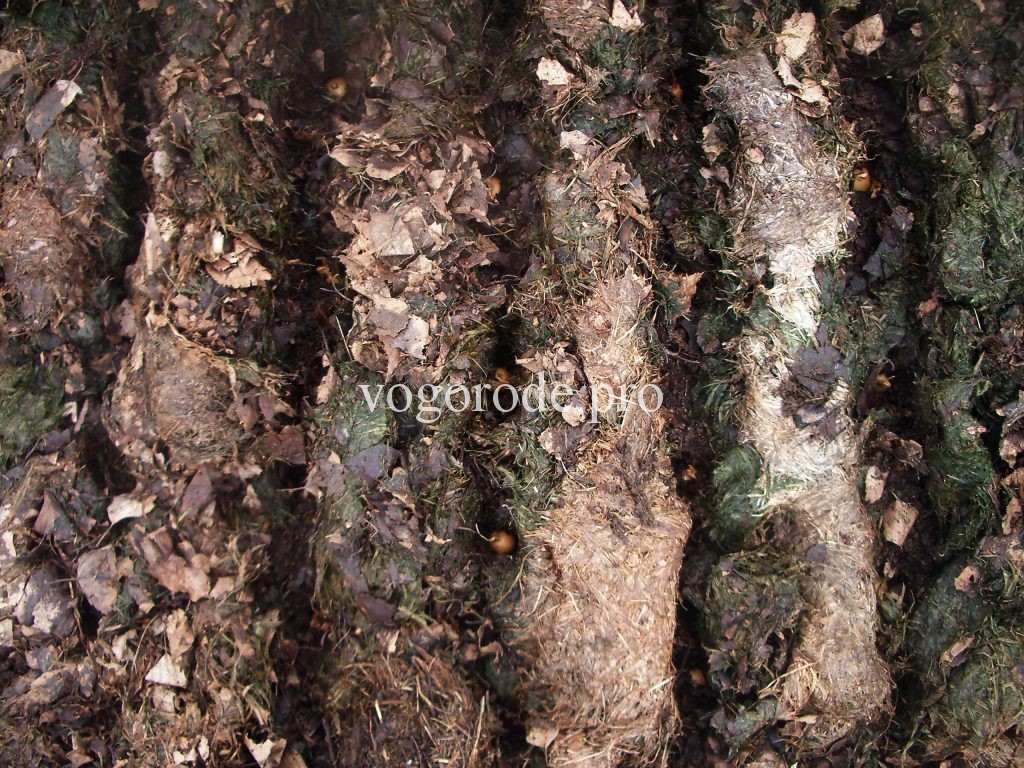
All my cultures grow in the beds-boxes. In winter, the beds go under the mulch. In the spring, when planting onions, I do not remove the mulch, but do the grooves in the mulch manually.
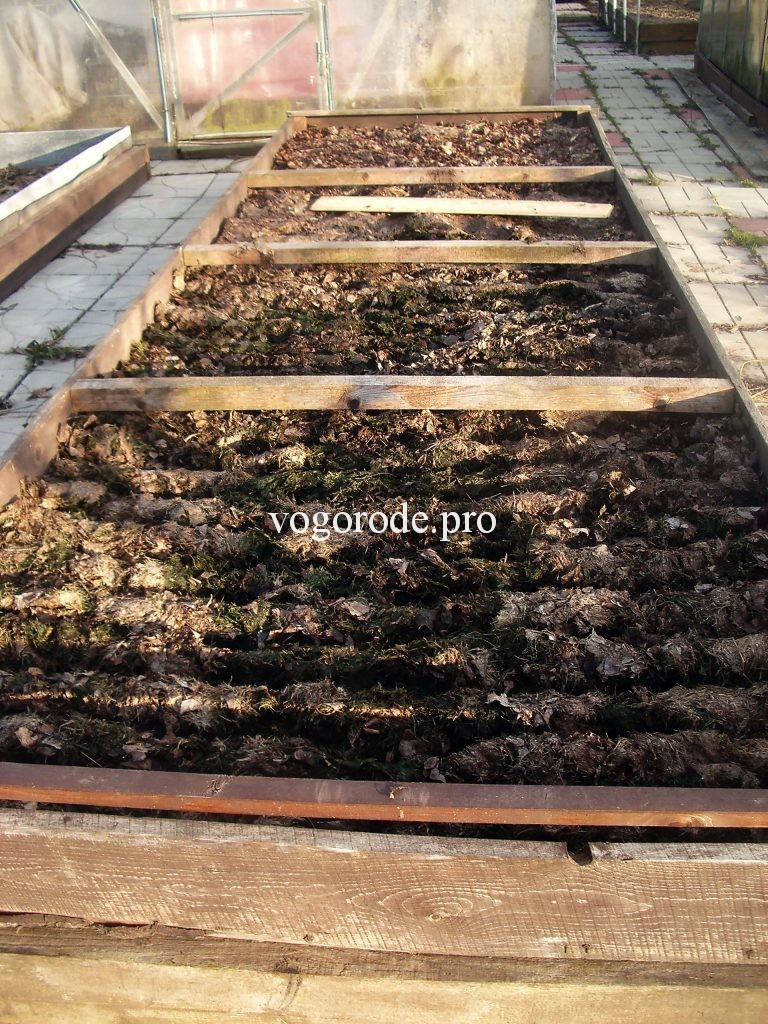 Grooves through mulch for sevka onion.
 Compacted planting onions on a turnip.
The distance between the grooves and the bulbs is the same, about 10-12 cm. When planting, I try to stick to the chess order.
This distance is quite enough to get bulbs of commercial size.
Bulbs just press into the ground (not in mulch). The mulch at the same time serves as food for soil inhabitants and protects the earth from evaporation of moisture.
For normal growth onions require a lot of moisture. We all know that if you put an onion in a jar of water, the onion will very quickly move into growth and give fresh greens, which is why we press the onion into damp earth.
If you plant a bed before planting, as most gardeners do, then you cannot achieve the desired result. Then the planted sevka will cling the roots to the air in the soil, and not to moisture, and the crop will eventually decrease.
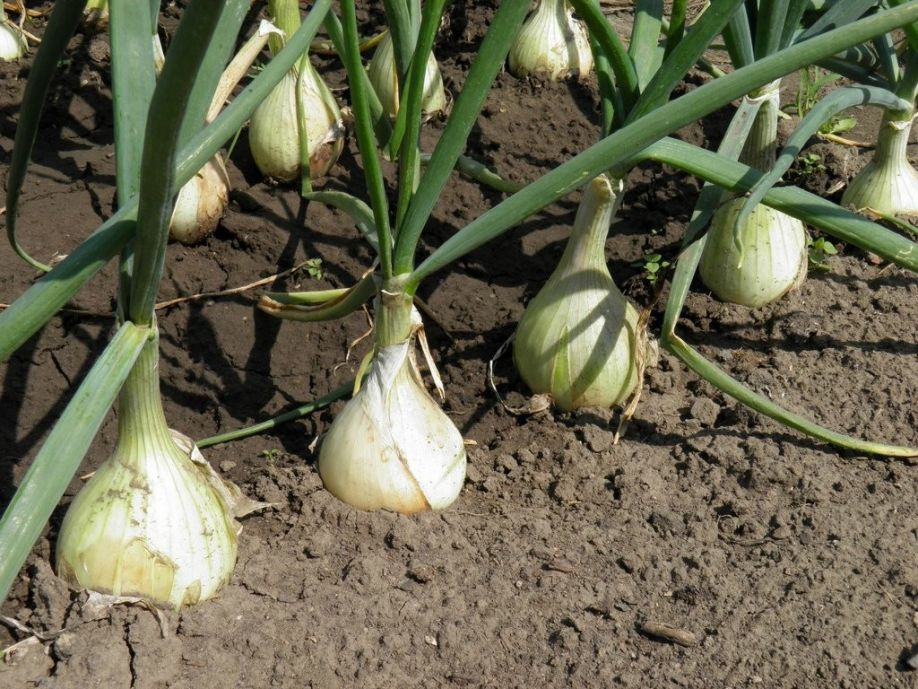
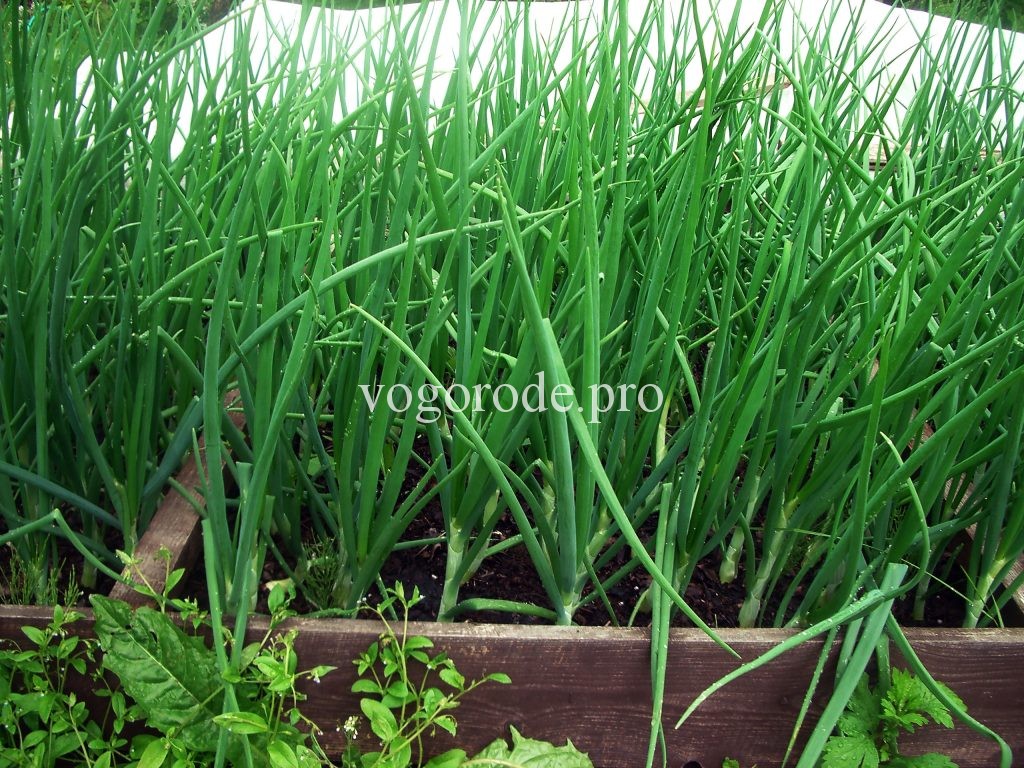
Growing onions on a turnip. Care for onions.
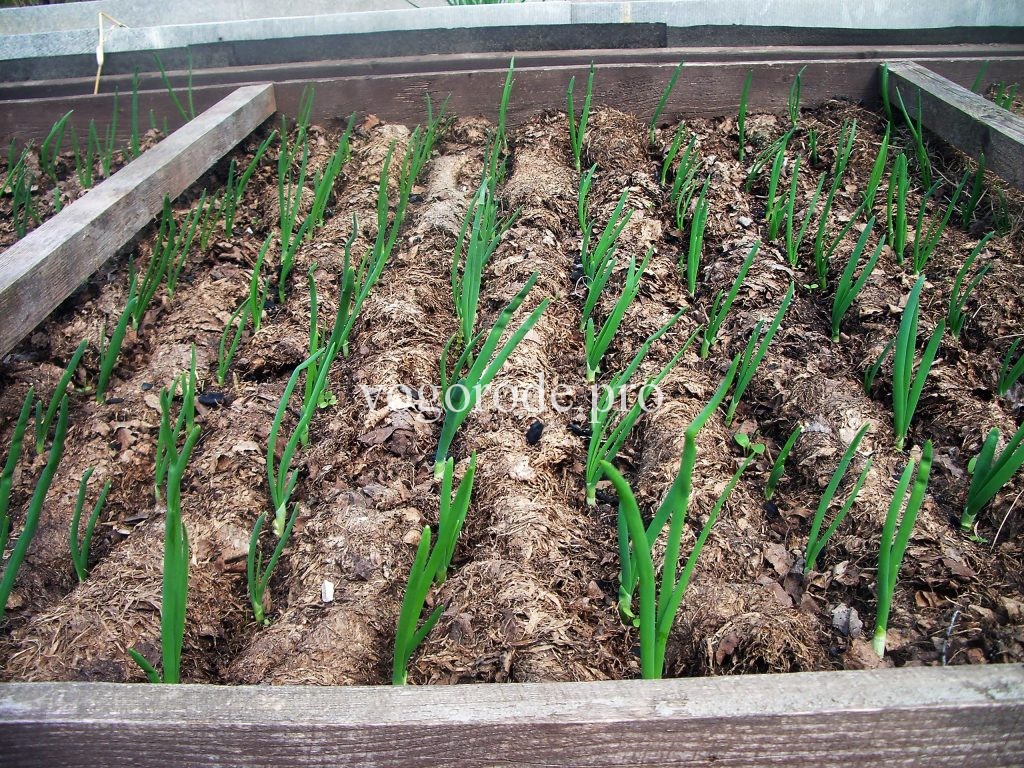 Onions rose quickly and amicably without watering.
 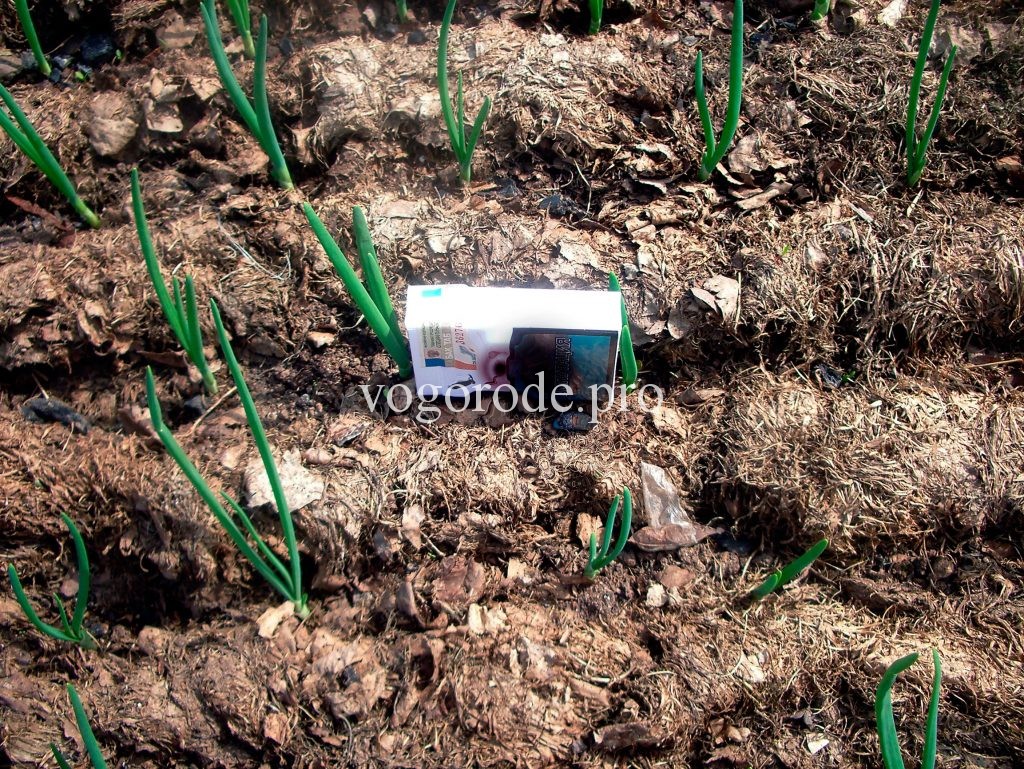 The distance between the grooves and the bulb is the same, about 10-12 cm.
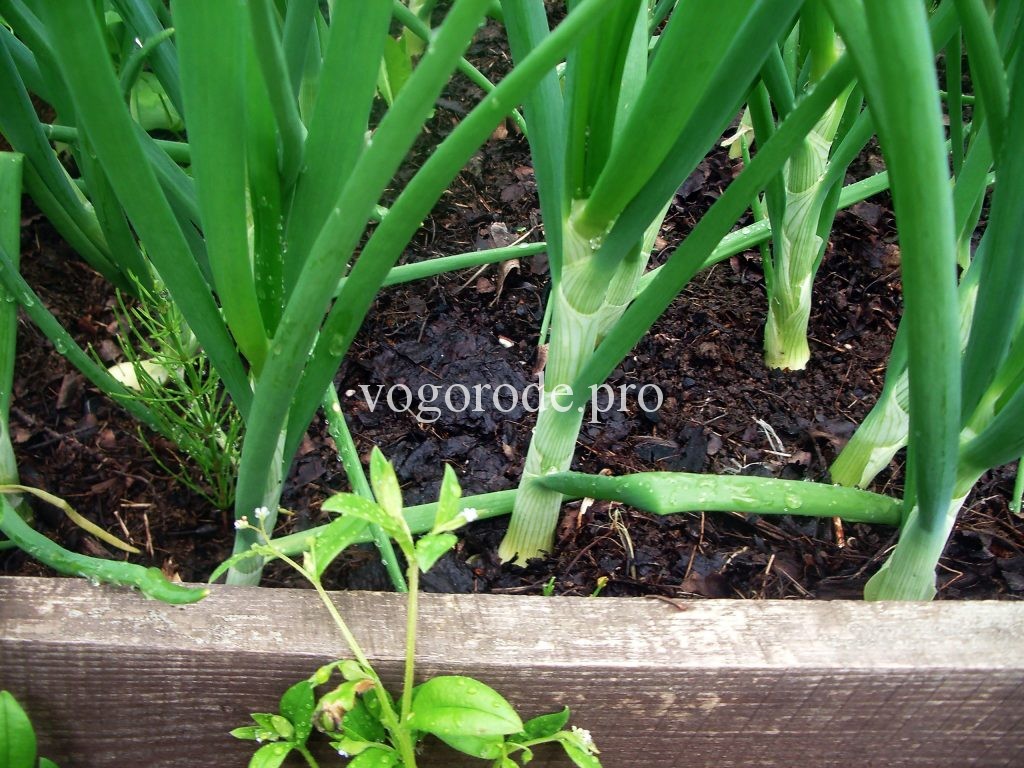
The mulch in the onions has not yet been eaten, the mulch has not decayed, but nevertheless, it is already possible at this stage to mulch the onion with sawdust.
The end of spring and summer were rainy, they poured onions until June 9 only once, and there was not enough time to grind with sawdust.
 All last year’s mulch soil residents have already “eaten”, this year I'm late with mulch sawdust.
This should have been done 2-3 weeks ago.
 However, the onion feels great, it can be seen in the thickness of the stem.
Onions are mulched with a layer of 1.5-2 cm. For what?
First, light sawdust protects the ground well from overheating, and, like any other mulch, protects against moisture evaporation. Secondly, I think they are protected from onion flies. At least we never had one. Thirdly, do not allow to grow weeds.
What kind of wood sawdust, I do not know what is on the sawmill, such and use, most likely, coniferous.
 By the time the onions are harvested, there is almost no sawdust, especially if the onions are mulched on time.
All care for the onions consisted of two irrigations and one mulching. It was unpleasant that the purchased dog gave a lot of arrows. In other years, this did not happen, I broke off the arrows.
Harvesting onions.
Onion lays down, dries slightly, but not completely - you can remove.
For cleaning it is better to choose sunny weather.
After harvesting the bulbs should lie in the sun, the ground on the roots will quickly dry out and fall off by itself.
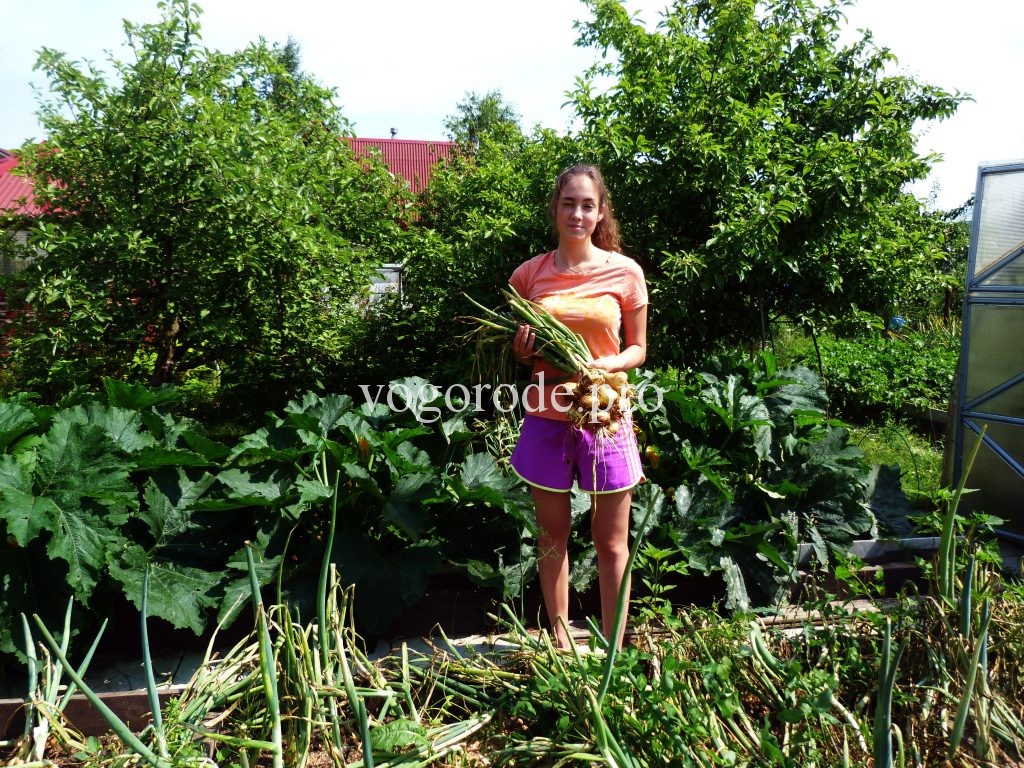
Onions grew on a bed of 5 sq.m.
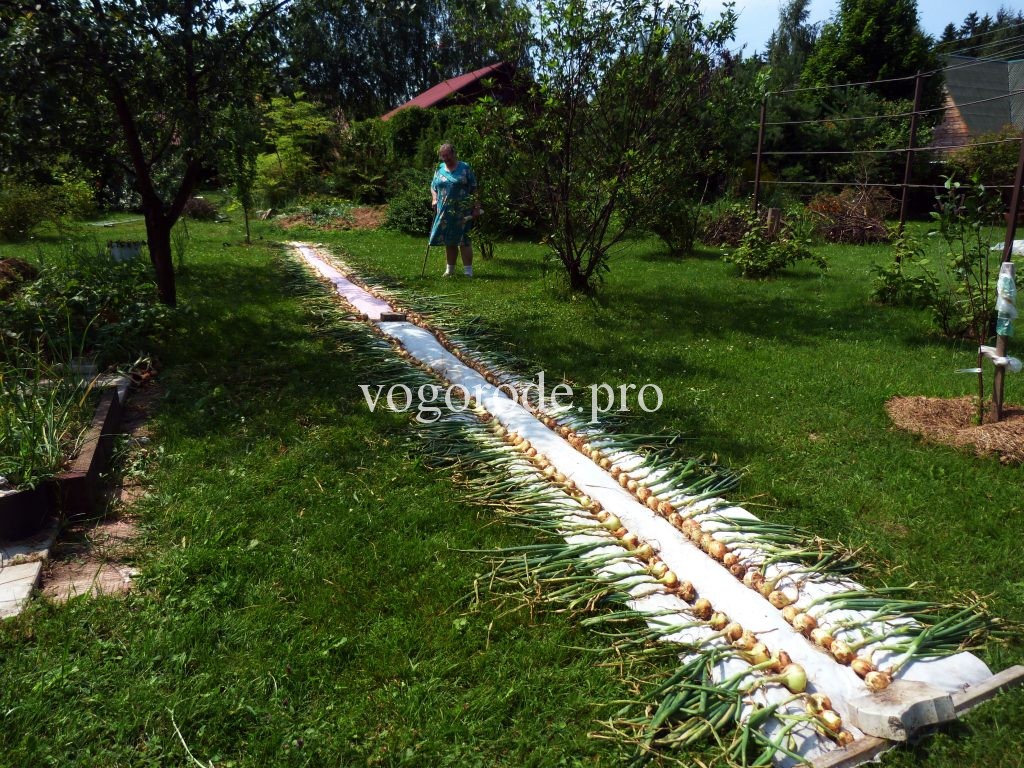
I weighed the onions after it dried, it seemed to me that it would be more honest, it turned out 34.5 kg. Of these, 3 kg of onions, which went to the arrow, these bulbs were immediately used for winter harvesting.
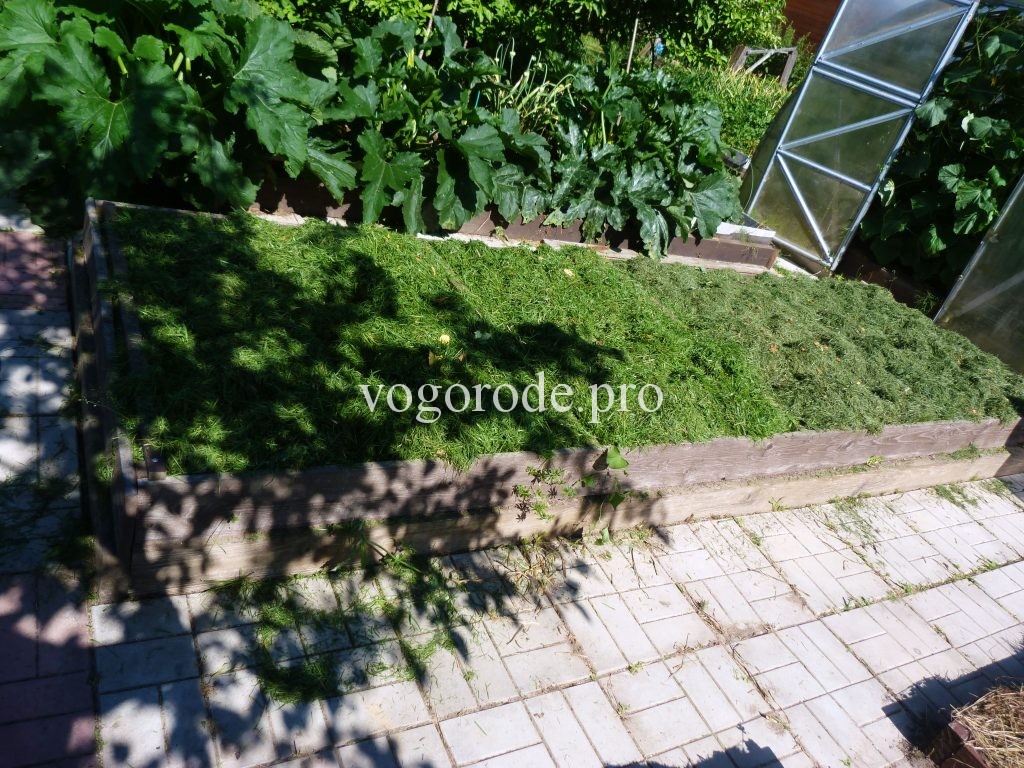 After harvesting the onion, the whole bed is laid with freshly cut grass. Grass layer 25-30cm.
Drying onions.
Onions I dry in greenhouses, in plastic boxes. It is comfortable, the bow dries well. I put a plank on the mulch, and put boxes of onions on them. Between the trunks of peppers, eggplants, tomatoes, there is enough space for a box.
 Drying onions in a greenhouse. In order for the onions to be well kept, they must dry 3 layers of upper flakes.
 Storage of onions.
Since this onion is grown for food, and not for planting next year, it can be stored both in the apartment and in the country. The temperature, of course, should be above zero.
Strict requirements for the temperature storage of onions exist for sevka and family onions, which will be planted in the spring. Bow for planting should be stored at a temperature above +18 degrees, or at a temperature of +2 +3 degrees. If you store sevok and family bow, which will be landing, at a temperature from + 3 degrees to +18 degrees, then the bow will go to the arrow.