DIY furniture from wooden boxes - the imagination is limitless. Decor from wooden boxes Crafts from fruit boxes DIY
New or old wooden crates are a great find for lovers of handicrafts. If desired and with a little imagination, you can build many non-standard furniture options from ordinary boxes.
site collected for you some interesting ideas that will help you create functional and original furniture for your home.
Coffee table
Drawers will help you organize extra storage space in your living room.
Bedside table

A practical drawer unit on casters made from a pair of old wooden boxes painted in a bright color. Ideal for a girl's bedroom.
Shelf for shoes

Wonderful soft bench with shelves for shoes in the hallway. Your guests will certainly be surprised!
Colorful shelf in the nursery
For your child's convenience, arrange storage by purpose, color or function.
Pet bed
The original version of furniture for dogs and cats, will perfectly fit into your interior!
Stylish pouf

Great project for the weekend! Add a little more functionality and comfort to your living room.
Bookshelves
Saw a wooden box in half and you have two original wall shelves.
Another simple project for your home! Ideal for storing blankets and pillows.
Shelving in the hallway

Such a rack with wicker baskets will adorn any hallway.
Storage in the bathroom

An ingenious idea for storing towels, personal care items, cosmetics and more.
Ladder shelf

How to instill in a child a love of reading? Use wooden crates to create an adorable ladder for books and games.
Interior design ideas can really surprise you. There are many creative solutions, how to create an amazing thing from simple materials at hand, for example, some furniture from boxes. Much can be done with your own hands.
Old unnecessary boxes usually accumulate in the country or on the balcony in huge quantities. It's a pity to throw them away, but there is no point in storing them. Such material can be used with great benefit if you come up with pieces of furniture that will add convenience and become a decoration of any room.

Best of all, tables, cabinets, shelves fit into a rustic style. With minimal costs, you can make a functional room. For work, you only need the boxes themselves, self-tapping screws, as well as furniture fittings and the desire to create.
Unique furniture doesn't have to be expensive. Any person who has imagination and can do something with his own hands is easily able to create the interior of his dreams literally from scrap materials.
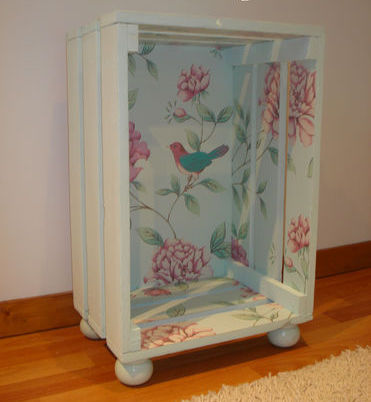
Wardrobe
A dressing room is every woman's dream. However, standard wardrobes for this room are expensive, and custom-made prices are sky-high. The issue of storing clothes and shoes for the whole family is especially acute, because it is important to think over the most convenient option that would look attractive at the same time.

Furniture made from old boxes can easily be both beautiful and functional. For a start, many are limited to small details of the interior, but some risk making this particular project the basis of the room.
First of all, you need to understand what can be done. There are practically no restrictions with this material. In the event that there is a shortage of boxes, it is easy to put together them yourself from unnecessary boards.
When you no longer want to make simple crafts, you can take on a dressing room project. A lot of small lockers are necessary in the storage space. This will help you sort your clothes and shoes and keep them in top condition at all times.

The dressing room can be austere, when solid-colored wooden boxes are simply stacked on top of each other along the wall, or very unusual, in the event that the assembly is carried out in a checkerboard pattern or individual modules are installed. Furniture made of wooden boxes is easy to paint in any shade.
The most important thing when assembling such a large-scale project as a dressing room is to show imagination and realize all your wishes. Additionally, you can add furniture fittings, cover the back wall with a beautiful fabric or decorate the drawers in some other way.
Rest zone
A recreation area must be in every home. At least a small corner where you can relax, chat with the whole family or meet a guest over a cup of tea. It is necessary to think over an interior that would calm and relax, give an opportunity to escape from problems. When choosing furniture for this corner, you should not focus on sophistication, it is better to add simplicity and a little creativity. This option is easy to do on your own.

When choosing a product for making with your own hands, you need to really evaluate your strengths. If there is no specific experience and practice in this matter, then it is better to make a table from boxes. Such work will require a minimum of time and skills, as well as a small amount of materials.

A coffee table from drawers requires only four drawers, in addition you need to cut out 4 legs. They are arranged in such a way that the open part is outside, in the future it will serve as a substitute for a bedside table, newspapers, books and much more can be put there. In order for the table to look whole, it is necessary to match the wide and narrow edges, a semblance of a checkerboard pattern will create an excellent model. The hole in the middle is occupied by a flower pot or other nice addition.

She makes furniture from boxes with her own hands very quickly. It is somewhat more difficult to give it a designer look. For a tea table, the best option is to simply cover it with varnish to protect it from moisture and put it on four legs. If desired, you can use wheels instead of them, then the furniture will be mobile.
Additionally, a bookcase can be made for the recreation area. In this case, the boxes are simply mounted one on top of the other and fixed with self-tapping screws. Books, frames with photographs, figurines are put into the shelves formed.
Decorative elements
In order for the apartment to feel coziness and comfort, it is necessary not only to correctly furnish it and make repairs, but also to think over pleasant beautiful little things that characterize the owners and create a great mood for them. Examples include decorative shelves, stands, various paintings and figurines.

Items for interior decoration are often made from wooden boxes with their own hands. A shelf painted in a bright color or an original box on wheels for children's toys will add zest to any room. Each person can come up with their own design. Perhaps it will be an antique option, with a natural varnish coating and preserving the natural color of the wood, sometimes they decide to add bright shades and use colors, and some upholstery boxes with fabric, in which case they look very cute and home-like.
Advantages
Self-production of furniture from wooden boxes has attracted many lately. Rustic style is back in fashion, and skilled men prefer to create something special with their own hands, rather than purchase standard options in stores. There are several main advantages to such a solution:
- Profitability. To create, things are used that almost everyone has in the house and are not needed by anyone. They get a second life.
- Creation. There is an opportunity to show imagination and realize all your wishes.
- Simplicity, for the manufacture of furniture from wooden boxes you do not need to have special skills and tools, any person can easily cope with this task.
- Environmental friendliness, wood is a natural material, so there are never any questions of toxicity and other harm to health with it.

If you look back, everyone has the material at hand. All that remains is to come up with an idea and start implementing it. This process brings pleasure, because it is very pleasant when a designer unique thing comes out from under your hands. All guests will definitely appreciate this furniture, and the owners themselves will be extremely comfortable using it.
Everyone should try himself in the role of a master and create furniture from wooden boxes with his own hands, which will completely suit him.
Beautiful, stylish furniture is an integral part of a modern interior. Nevertheless, it does not have to be too expensive. Moreover, many interior styles involve the use of unusual materials to create original furniture. These can be pipes, pallets, and even the simplest boxes. They are easy to use and do not require a lot of money and time. 


DIY drawer rack
Perhaps the most ideal material for creating an original shelving unit with your own hands is simple wooden boxes. Unlike the classic version, they have a number of advantages. Firstly, they are quite cheap, so everyone can try to implement such an idea. Secondly, it is an environmentally friendly material that can be used in any room and even in a children's room. But still, it must be cleaned of dust and clues. In addition, drawers allow you to create a fairly large structure, which is ideal for storing things.


As for the style, such furniture looks best in an interior with country, loft or rustic elements. After all, it is for them that simplicity and the use of natural materials are most characteristic. Therefore, wood in this case is an ideal option for creating shelving and other furniture.
A rack made of wooden boxes is often used as a partition. Due to this, you can make the zoning of the room and visually highlight the accents.
 To make such a structure with our own hands, we will prepare the following materials:
- wooden boxes;
- sandpaper or sander;
- white paint (optional);
- brush;
- screws;
- screw gun;
- rag or napkin.
First of all, you need to clean all the boxes of dust and dirt. Use a damp cloth or tissue if necessary. Only after that we proceed to the surface treatment with sandpaper or a grinder. This is necessary in order to remove all irregularities, roughness and clues. Therefore, in any case, do not skip this step.

If desired, paint the entire surface of the boxes with white paint and leave to dry completely.

We connect the structural elements to each other using a screwdriver. Please note that the boxes may face in different directions. Due to this, the rack is even more original and functional. In addition, it can be used on either side of the room.

 By the way, designers often leave boxes unpainted. In their opinion, the disadvantages of wood, which are obvious to many, in the form of scratches and irregularities, are in fact advantages. After all, it is they who give the furniture a special charm.


 These racks are very convenient to use, so they are placed in a variety of rooms. Most often, of course, similar wooden structures can be seen in the living room. Since they are open, they look great with decorative elements, plants or books. In general, all the little things that help create a cozy atmosphere.


 Also, wooden shelving is used in the bathroom. This is a great option for storing towels and various body and face care accessories.


In the kitchen, shelving is a little less common. This is often due to the fact that everything in this room should be as functional as possible. But if the size of the kitchen allows, then we still recommend trying to make such a structure out of boxes. It is ideal for a variety of glasses, tableware and decorative items.


If desired, you can install a small rack in the hallway. It will look no less stylish than the usual shoe rack or wardrobe. 


Ottoman and shoe box
In small apartments, the hallway needs to be organized as functionally as possible. Therefore, we propose to make a very unusual design. That is, to connect the pouf and the shoe rack together. This will significantly save space and allow you to organize it correctly.

To work, you need the following:
- wooden box;
- a piece of dense fabric;
- sandpaper;
- filler;
- plywood sheet;
- wheels - 4 pcs. (if desired);
- screwdriver;
- bolts;
- acrylic paint;
- brush;
- construction stapler.
Cut the plywood to the required size. We attach a piece of fabric on both sides using a construction stapler. We fill the space with filler, evenly distributing it. We fasten the fabric on the remaining sides. This will be the seat for the future ottoman.


Be sure to sand the wooden box with sandpaper. This will help get rid of various surface irregularities and holds. Only after that we paint the box with a suitable paint. This is not necessary at all. If you like natural wood, then just varnish the surface.

After the surface is completely dry, we attach the wheels to one of the sides of the box. We use bolts and a screwdriver for this. 
We attach a soft blank to the surface of the box and, if desired, decorate it with buttons. A beautiful, unusual ottoman with a shoe rack is ready.

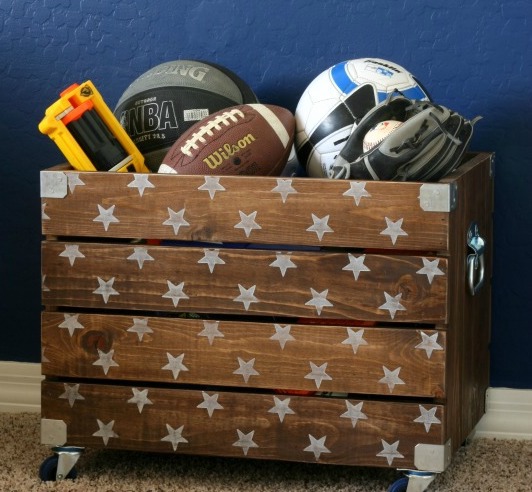
Box for small items or toys
Drawers are great for creating furniture, of course. But nevertheless, they can be used for their intended purpose. To make them more original, we suggest adding unusual elements and decorating.

Let's prepare the following:
- boxes;
- wheels;
- sandpaper;
- white paint;
- brush;
- glue for wood;
- bolts;
- screwdriver;
- chalk board.
First, we process the entire surface of the boxes with sandpaper. Only after that we apply paint and leave them to dry completely.

We attach the wheels to the bottom of the boxes using a screwdriver and bolts. Turn the structure over and glue the chalk board on the side. The result is a simple, but at the same time original box for toys and various little things.

Furniture from boxes in the interior


 Simple wooden boxes are a great base for creating amazing home furnishings and functional furniture. Experiment, get inspired and create unique designs that will decorate your home.
To make it, it is enough to connect 4 ordinary wooden boxes. They can be painted, simply varnished or impregnated for wood to emphasize the natural color and texture. By the way, the table will also come out with shelves for storage, and if you attach the wheels to it, you can move it around the apartment.
2 Shelving unit with storage boxes
Such a rack can be placed in any room: living room, hallway, nursery. It will fit perfectly into, especially in the Scandinavian and loft. To replicate this experience, you need different sized drawers and countertops for the base and top of the rack. You can paint it in any color, but inside it is not necessary to put the same wooden boxes, you can use any boxes or baskets.

3
This shelf can be used simultaneously as a bench. It is enough to connect 3 drawers, put them on the legs and attach the table top. And choose the color according to your taste and desire.

4 Shelf for books and storage
Another example of a pretty shelving for, only this time, the owners decided to fold the boxes like a puzzle: one horizontally, the other vertically. The rack can be painted with colored paint or varnished.

5 Bedside table
One wooden box turned out to be such a cute little bedside table with storage space. The box needs to be painted while the inside. In principle, the design of such a bedside table can be anything: depending on whether you will paint the box and use prints.
6 Poof
A pouf from a wooden box? Easily! It is enough to reinforce the corners with metal plates and reinforce the top of the box before making a soft seat - this will increase its strength and you can sit down without fear of being on the floor or breaking the structure.

7 Shelves for storage in the hallway
This idea is simpler to implement - take a few ordinary boxes, paint them and attach them to the wall in random order. Ready! On such shelves, you can also have the necessary accessories in the hallway.

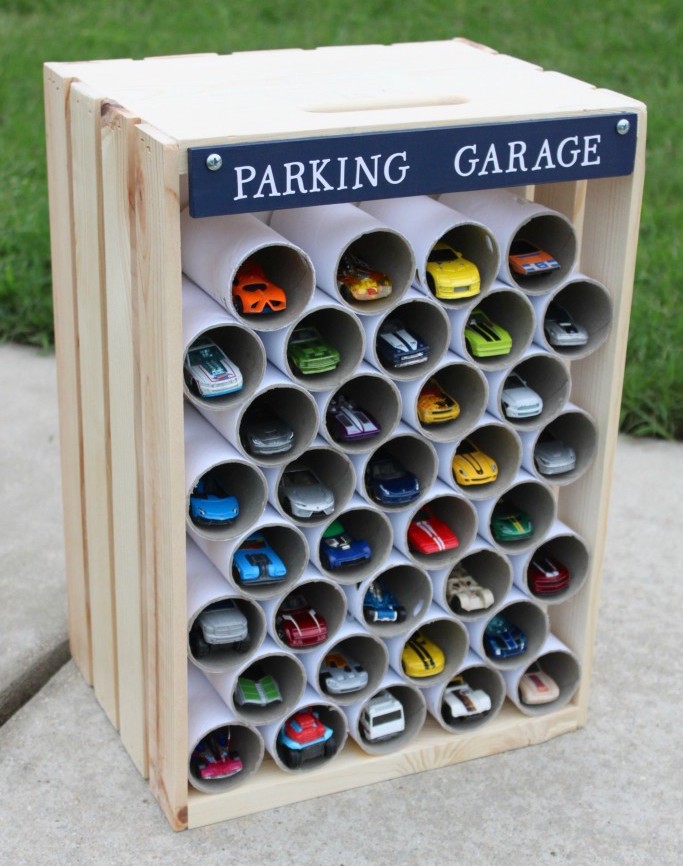
8 Children's "garage" for toy cars
Inventive parents can make such a garage for children's toy cars. To do this, you need one wooden box and cardboard sleeves - you can use paper towels. Divide them into several parts and fold them like a checkerboard inside the box. Can be sealed with glue. The child will surely like it.
9 Pet bed
One drawer, 4 wheels and a soft blanket are all you need for your pet's personal couch. Suitable for a cat or small dog.

10
There is nothing complicated in this idea either. The main thing is to come up with a design for the box and attach wheels to it for convenience.
11
A mini-shelf for important little things and keys will come in handy in the hallway. And it can be made from a wooden box. Attach nails or hooks inside that you can hang a bunch of keys, and experiment with the design: paint, varnish or sign the box.

12 Turntable table
Take a look at this wonderful table at. Of course, it is not at all necessary to use it for a turntable and records, but in this design it looks very stylish. But everything is much simpler than it seems: an ordinary box was painted and attached to metal legs.

13 Wine cabinet
From a wooden box and a beam, which was sawn, painted and attached to the box crosswise, it turned out to be a very stylish wine cabinet. It will truly decorate any kitchen in a modern style, as well as in country or Provence aesthetics. Take note.
A box for storing various small things and products is considered an indispensable attribute in a modern economy. Thanks to this design, all things are in their place, while not forming a mess. For example, vegetables and fruits should be stored in a ventilated facility where fresh air can flow freely.
Monolithic products without any holes are suitable for tools. For various little things, designs with additional doors and a folding mechanism are suitable.

We offer original options for storage boxes made by hand. Here you will find out what materials and tools you need to make these products.

What materials are used for the construction of structures?
Most often, boxes are made of wood and other materials. For tools, it is better to choose solid pine or maple. Alder or aspen are suitable for products. These tree species are distinguished by their durability and strength. They do not emit tarry secretions and do not dry out over time.

Plywood is suitable for making decorative items. Any little thing can be placed here. A special adhesive is used to fix the parts.

DIY master class on creating a box
We offer step-by-step instructions on how to make a box at home. To do this, you will need the following tools and materials:
- tape measure;
- simple pencil;
- board 25 mm thick;
- wood trims 15 mm thick;
- thin plywood;
- metal corners;
- nails and screws;
- hacksaw;
- screwdriver;
- metal hinges for opening the cover structure;
- hammer.

The first step is to familiarize yourself with the diagrams and drawings of how to make a box. This will allow you to correctly match the dimensions of the finished product. Do not make too large structures, as they will take up a lot of free space.

When all the components are ready, you can proceed to making a storage system for vegetables and fruits. The process includes several stages:


On the surface of the boards, mark the size of the side parts of the product. Next, we move on to the bottom of the box. Mark the size on the wood trim. After that, using a hacksaw, we begin to cut the blanks.

We fix the boards to each other with small nails. We fix the bottom details using the same technique.

The cover of the product consists of a plywood sheet. It is installed on special hinges that allow you to control the closing process.


The do-it-yourself box photo shows the whole workflow.

Tool storage box
This type of design is considered the best DIY drawer idea. This product will allow you to keep all the working tools in one place. Here you can make additional sections for storing screws, nails and nuts.

To do this, you need to prepare:
- thin board;
- thick plywood;
- hacksaw;
- electric jigsaw;
- hammer;
- screwdriver;
- tape measure;
- drawing of the finished product;
- metal corners.


On sheets of thick plywood we make markings for the details of the box. After that, we drill holes for fastening metal hinges. Next, we connect the side parts to each other.

We are starting to manufacture the bottom for the storage system. For this, we attach a thin board to the side parts of the box. To prevent it from collapsing under the weight of tools, it must be strengthened with thin boards. For this, several wooden elements are stuffed on the bottom surface.


In the side parts of the plywood we draw the markings for the handles. They will be cut inside the main body of the product. You will need an electric jigsaw here. The cutting base is installed at the beginning of the marking.


In the process of cutting out parts, do not make sudden movements. They can provoke the appearance of cracks on the surface of the product.

Now we start installing the partitions. To do this, cut out a small square from thin plywood. It is fixed with metal corners in the middle of the structure.

The diagram shows a detailed view of the toolbox. The drawing shows the exact number of parts:
- side parts - 4 pcs.;
- bottom - 1 piece;
- partition wall;
- handles - 2 pcs.

DIY photo of boxes


