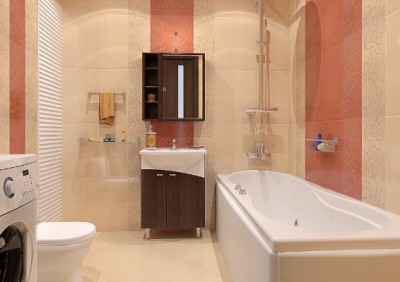
A floral wall in the bathroom. Bathroom tile design options
Most often, the bathroom is tiled. This material is durable, hygienic and easy to clean. But the cost of such repairs is considerable, therefore they are trying to arrange everything so that the bathroom looks the best way over a long period of time. To solve this problem, they carefully choose a collection, select colors, and a layout method. About what options for laying tiles in the bathroom exist, how they are perceived - in the article.
General principles and rules
Everyone knows that light walls visually make the room more spacious. Nobody is going to argue with this, and this fact is taken into account when choosing options for laying tiles in the bathroom. But there are a few more interesting points, the knowledge of which will help to avoid mistakes when drawing up a layout and choosing a tile color, its location, grout color.

Vertical and horizontal layout
Recently, rectangular tiles are more often laid on the walls. In this case, the first thing to be determined with is to place the tiles horizontally or vertically on the walls. It is believed that the horizontal layout visually makes the room wider, and the vertical one - taller. In fact, on colored, bright tiles, the seams between which are filled with grout of the same or similar color, the difference is very small (in the photo there are a couple of pictures below). In this case, the direction of styling has almost no effect on perception. In this case, you can choose the options for laying tiles in the bathroom based only on your preferences.

This effect is more pronounced when using light tiles with a contrasting grout (top pictures). In this case, the gaze "slides" along the seams, creating the desired visual changes. In this case, the vertical or horizontal layout really affects our perception.
Guide strips
To expand the room or raise the ceiling, when choosing a layout, make vertical or horizontal "guides". These are stripes of tiles of a different color, along which the eye glides. These stripes alter the visual perception of the size of the room.
A lighter horizontal strip, which runs along the perimeter of the room approximately in the middle of the height, visually significantly expands the space. If you add a dark stripe to light walls, no effect is observed. Rather, the room will look at its "own" volume, since the dark stripe neutralizes the visual increase in space due to light colors in the decoration.

If necessary, make the ceiling visually higher; with a vertical layout, you can lay out a strip of lighter tiles on one of the walls (preferably opposite the entrance). Even with bright or dark tiles and grouting to match, the ceiling will "rise". If, on this wall, you use a tile of a lighter tone, and even with a contrasting grout and a vertical strip of tiles with an ornament, the effect will be even more pronounced (in the picture below on the right).
Border
Another way to make the room taller is to place decorative border tiles closer to the ceiling. Being high, they attract attention, while the room appears taller. The border does not have to be done around the perimeter. It is enough to make one wall of a different light shade, place a border at the top. Moreover, this contrasting wall can be darker or lighter.

All these techniques are easy to implement, but they help to correctly lay out the tiles. To visualize what you get, you can use special programs.
Examples of tile layout
In addition to the above examples of layouts, there are tile laying options that can be considered classics, others, on the contrary, have appeared quite recently and, although they often go against many recommendations, they look very good.

Darker bottom
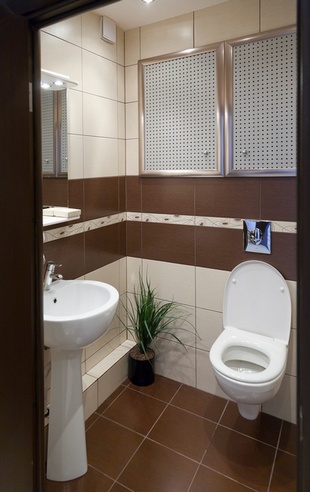
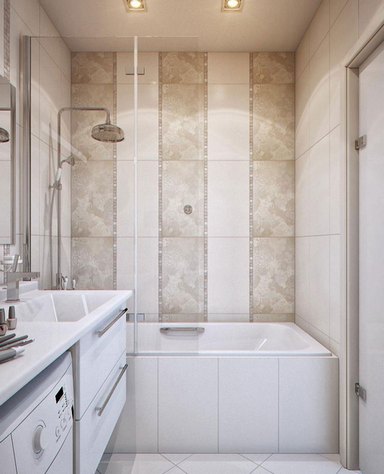
This technique belongs to the classics: the lower third of the wall is made in a darker color, the upper one - a few tones lighter. This method of laying ceramic tiles, to put it mildly, is not at the peak of popularity. It was popular about a decade ago. But there are several tricks that give the classics a modern sound.
With this method of laying tiles, the room seems spacious, since most of the walls are decorated in light shades. In this case, the tiles on the floor are chosen in the same color as the tiles on the lower part of the wall. If you cannot find exactly the same one, they are looking for a very close one in texture and color. In its "pure" form, this method of laying tiles does not look very modern.

To make this bathroom tile look more modern, you can add vertical or horizontal stripes that break up the monotonous decor. Many collections offer not only darker and lighter tile options, but also decor of different sizes, from which stripes of different widths are formed.

More often they combine not two, but three types of tiles: two monochromatic and a decor that combines both primary colors. Decorative elements can be of different widths. Then you can make strips or columns of different widths from them. So that the upper part is not so monotonous and boring, thin stripes of the same color as the lower part of the wall are added, and a vegetable or floral border is added at the bottom.

Most factories produce collections in which there are two basic tile colors - darker and lighter - and a set of decorative elements. Such collections are usually not cheap, but it is easier to compose a competent composition from them, and they are suitable in size, so there will be no problems with styling and fitting.
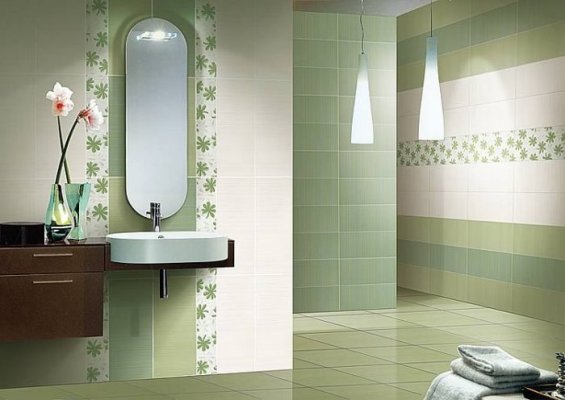
Accent wall
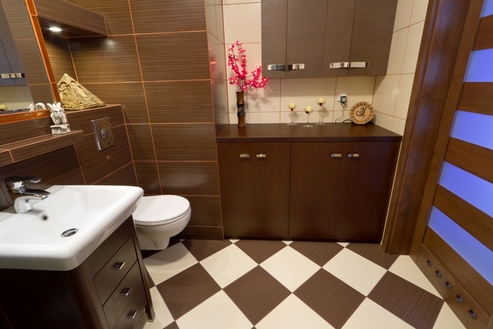
If the division of the walls by height does not appeal to you, but the monochromatic design inspires discouragement, you can consider the option with an accent wall. Most often, it is decorated with tiles of the same color, but in a different shade - several tones lighter or darker than the main one.

In this case, not one wall is trimmed with brown tiles, but it also enters a part of the neighboring one. This technique is suitable for narrow long rooms - it visually makes the room look more like a square.
The accent wall does not need to be the same size tiles. One wall trimmed with mosaics or small-format tiles looks great.

The mosaic looks great both on its own and in combination with tiles of different formats - square, rectangular, large and medium. It is used for finishing curved surfaces - due to its structure, it fits even columns with a small radius.
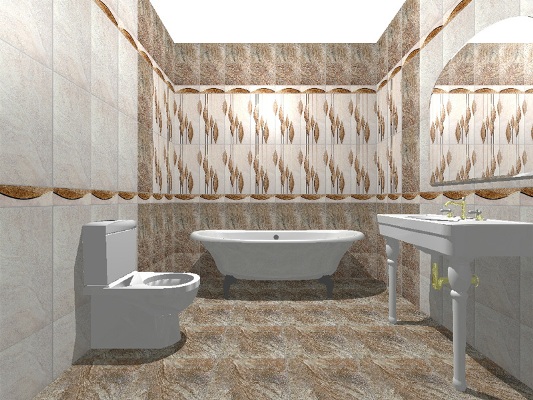
Floral motives
Recent trends in design have led to the fact that most of the bathroom tiles are made in solid colors. Many collections are distinguished by an interesting texture, but they are made in the form of monochromatic fragments. Not everyone likes this design - the interior turns out to be too "cold". You can add fantasy with tiles with flowers or butterflies, floral or geometric motifs.

But with this type of decor you have to be careful: it is too easy to "overdo it", especially in a small volume. But even a few single fragments do not look good either. So it is advisable to work with floral decor in programs that give a three-dimensional picture - it will be easier to imagine what you actually get.
Laying tiles on the floor
In addition, in order to choose the options for laying tiles on the walls in the bathroom, you need to decide how to decorate the floor.

When using a square tile, it is usually laid in the form of a checkerboard (checker pattern), a 1/2 tile offset method can be used. There are two directions of installation - parallel to the walls and diagonally.

If a rectangular tile is selected, there are more layout options - with an offset (deck, braid, herringbone).
There are also options for combining rectangular and square tiles - a labyrinth, if methods using fragments of different sizes.

It makes sense to implement all more or less complex schemes in large rooms - here unusual compositions can be appreciated at their true worth. In small bathrooms, the simplest schemes are most often chosen - usually only a few tiles fit, so there is simply no point in complicating the work.
More options
In the bathroom, decorative tiles are often used as the most practical, economical, inexpensive material with a huge selection of colors, textures and shapes. It can be used both on the floor and for wall decoration. With the help of this finishing material, you can create any design, depending on the style that you want to implement.


Today, there is a layout of tiles in the bathroom in a large number of different options. Experienced craftsmen know many ways. But most often 3-4 are used. In the article, we will figure out what are the ways to lay out tiles in the bathroom, what are their advantages and weaknesses, what design they allow for.


Pros of using tiles in the bathroom
Why do most bathroom owners prefer to decorate these rooms with ceramic tiles:
- The material is very practical. Horizontal and vertical tiles are moisture resistant, serve for a long time, and are easy to clean.
- A large selection of colors, sizes, textures allows you to experiment with design, finding the right combination of shades, to implement any decor ideas, even in a small bathroom. For example, the design with black and white tiles in the form of a chess board is very popular.
- The many options for the layout of the tiles make it possible to combine different colors, thus achieving the individuality of the room, making it an original, author's work. There is an individual layout scheme for each bathroom interior.


Variants
What are the most popular layouts of tile and ceramic material in the bathroom on the floor and walls today:
Standard no offset
This is the most popular layout plan. In Soviet times, all bathrooms in new buildings were decorated in this way, therefore, for many, this layout causes an instinctive visual rejection. Her example in that performance can be observed to this day in the apartments of the elderly. However, if it is carried out using large tiles, then the standard layout without displacement looks quite stylish and original.


Diamond laying
Or diagonal. Also a very common layout. Peculiarities:
- Creates a very interesting visual effect, looks stylish. With its help, the most original and stylish designs are obtained. Gives the room depth, design - sharpness.
- A rather laborious option, therefore, only an experienced master finisher can carry out such a layout. Requires careful calculations and neat cutting of the material. In terms of labor costs, it is comparable to laying a mosaic.


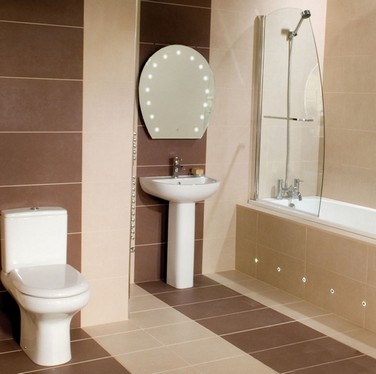
Wall panel
This scheme is a classic of the genre, when the lower third of the wall is laid out with dark tiles, and the upper two-thirds are lighter. The junction of tiles of different colors is usually still decorated with a contrasting border to match, it is also possible from a mosaic. Often this method of decorating bathrooms can be seen, as an example, in various public institutions. These methods can be used for your own bathroom, but it gives the bathroom a little rigor and formality.


Features and rules:
- This layout design makes the room lower while expanding it. The floor plan should be carefully examined.
- In this case, the floor can either coincide with the walls, or be completely contrasting with them. Each design is interesting in its own way.
- In some variations, you can see a combination of a light bottom and a dark top. However, such a tile layout in the bathroom lowers the level of the ceiling, therefore it is suitable for narrow and high rooms. And in most of our standard apartments, small and not too high bathrooms are still more common.
- The border on the walls of the bathroom can be made either as a narrow strip or as a fairly wide independent section, tiled in several rows. In addition, there may well be several of these strips, especially if they are narrow. Just do not forget that each of them will make the room lower a little more.


With border
In this version of the layout, the tiles that are laid out on the floor continue on the wall. But not completely on the entire wall, but 2-3 rows above the floor. Above, it is desirable to make a tile of a different shade, most often lighter. Such a layout plan will make the design of the room lower and wider.
Fragments with emphasis
A very popular layout plan today. But such options for laying out tiles in the bathroom are only suitable for a decent-sized room. In a small room, contrasting accents can create a visual imbalance that looks disharmonious.


- If you decide to choose such a bathroom tile layout project, then you should know that you do not need to focus on more than 2-3 parts of the bathroom. A perfect example of a layout when accents are made in the washbasin, heated towel rail and shower areas. Or in another similar version.
- If you do not want to increase the height of the ceiling, then you should not start the accent section directly from the floor, but it is better to do it at some distance. It is also not necessary in this case to bring the accent to the ceiling.
- You can make accents using mosaics.
- On the floor, this layout plan does not apply. Accents made on the floor look ridiculous and inappropriate.


Equality of colors
In this case, several colors are taken - contrasting or similar, usually 2-3 shades and they are used to decorate the bathroom walls. In this case, the colors should not be mixed. One wall is laid out in one color, the second in another, etc. It is imperative to choose a harmonious combination of colors. Peculiarities:
- Thus, you can visually clearly divide the functional areas in the bathroom. For example, highlight the area near the washbasin in red, and trim the area near the shower room with black tiles. In this case, the layout can be both horizontal and vertical.
- In this case, the floors are finished with tiles of the same colors, but at the same time they can be mixed. For example, it would be great to use a checkerboard layout for the floor.
- This design does not look good in a small bathroom, as it will visually make the room narrow and small.
The owners of the apartments do not intend to engage in the formation of a new interior and the facing of surfaces in the hygiene room with excessive intensity, since this process requires a considerable investment of time, and even more expenditure of financial and labor resources. Therefore, the options for laying tiles in the bathroom should be thoroughly thought out, correctly calculated, all that is acceptable should be identified and only the best should be left.
Bathroom - a room used not only for the implementation of hygienic exercise, this room for relaxation, to restore physical strength and tone. Every touch of the interior should be as enjoyable as the procedures in the bathroom. This means that the design of the bathroom needs to be planned with scrupulous care in order to avoid costly alterations and renovations.
Planning for future layout
The natural choice of every reasonable apartment owner who wants to decorate the bathroom properly is an almost “dear”, incredibly “close” and well-known tile. It is an optimal finishing material for the bathroom, withstands the "onslaught" of steam, water and temperature fluctuations. There can be no other options, but the variability of modifications and brands of tiles is sure to lead to difficulty.
It is impossible to get confused in the configuration of the tile elements: these are mainly rectangles and squares. With a colorful palette, texture, the presence of a relief or color pattern, the caliber of elements is much more difficult, since there are innumerable numbers of them. For novice finishers, there is an excellent recommendation: do not get carried away with small tiles, ornate laying patterns and methods that require multiple tile cutting.
Bathroom - a room for hygiene and relaxation, its design and decoration should be enjoyable
Tiles are the best material for finishing a bathroom, a rational reasonable option
Bathroom design ideas
Own, professional, peeped from neighbors, recorded in popular magazines, design ideas are much more than brands and varieties of tiles. Indeed, the very nature of the material, consisting of individual elements, allows you to create a colossal number of combinations. In order to alleviate the problems of stackers, manufacturers have now begun to supply the market with serial products that include basic elements in several colors and shaped parts that are wonderfully combined with each other in any set.

Serial releases involve the use of various stacking schemes and product compatibility.
Advice. It is advisable to give preference to products from one manufacturer to implement the idea of laying tiles of different colors and calibers, so as not to suffer with the selection of color tones and fitting to size by trimming.
The standard for laying tiles in domestic bathrooms is recognized as a dark bottom and a light top with a border line in the middle. However, it is not at all necessary to adhere to the order of the boring reception. In general, designers do not recommend this scheme for arranging small-sized bathrooms, it optically reduces an already small room, despite the horizontal arrangement of the rows of tiles. The entourage in small bathrooms, typical for domestic planning, should not be oversaturated with decorative elements, given that there are usually too many items there: plumbing fixtures, household appliances, shelves, special furniture.
The traditional light top and dark bottom are diversified by a wall tiled in the same color as the flooring
When choosing a color palette of tiles for a hygienic room, you should give preference to your favorite color, which will be pleasant to look at. As soon as the eye lingers on any product, you need to take a closer look at it in more detail. The main guideline should be one's own feeling, but one should not neglect the sense of proportion: the "screaming" situation will put pressure on the psyche and will not allow one to relax.
Note. It is better to start laying the tiles in the bathroom from the wall, which fully falls into the field of view. Centering for laying the floor in bathrooms is done very rarely only if there is a colorful "spot" in the middle.
Coming up with a design, it should be borne in mind that a competent arrangement of accents will help to visually correct the geometric framework of the room.
With the help of a competent layout, you can correct room imperfections
Those wishing to optically increase the width of the bathroom will be helped by:
- small tiles;
- cold blue, silver, gray-turquoise tiles;
- horizontal direction of laying;
- the diagonal direction of the rows of tiles on the floor surface;
- abstract stripes or a strictly verified transverse ornament;
- a border of tiles of a contrasting color or installation of friezes, laid in the area of joining of the walls with the lower and upper floors.
Hosts seeking to visually increase the height of the ceiling location will be helped by:
- vertically directed laying;
- vertical colorful stripes, friezes in the same direction and highlighted corners along the entire height;
- installation of decorative details not below eye level.

Mirrors and glass will visually enlarge the bathroom space
In reputable stores now offer to "beat" all sorts of options using a special program. You can do the most in the art of design using one of the available graphic editors Paint, CorelDraw or Photoshop, so that the layout of the tiles in the bathroom does not upset later. But before trying on, sketching and painting, the most important process must take place - the creation of a bathroom plan.
Rules for drawing a plan
Roulette, ruler, pencil, paper to help those who want to perfectly lay the tiles, correctly arrange accents and decor details so that they are not shaded and covered with plumbing fixtures, furniture, household appliances.
To hide under the bathroom furnishings and in the far corners, you will need to cut elements.
- Removing the dimensions. This must be done with utmost precision, these figures will help to correctly calculate the material consumption, as well as determine the location of the decor parts, the likelihood of cutting, the size and gluing area of the cut tiles.
- On the floor plan, we display the perimeter of the floor, draw walls, doors, ledges, niches.
- We designate the location, shape and size of plumbing, at this stage we decide whether the transfer and installation of additional lighting equipment will be carried out, we draw the location of sockets, where pipes, taps and other equipment exit.

This is the plan you need to draw for the layout of the tiles on the floor.
The created plan can be duplicated on an additional sheet of paper in order to try out the options for laying tiles with colored pencils. You need to think again about whether the entire surface of the walls will be tiled or whether the tiles can be laid in segments around the plumbing, or to some extent around the perimeter. If the plans, including the paper sketch, have been built, you can start choosing a stacking scheme.

Bathroom tiling sketches
List of popular styling options
Option # 1 - the simplest seam-to-seam pattern
An elementary way of laying, predetermining the direct direction of the rows, parallel to the geometric lines of the room. Accuracy of directions on vertical surfaces is verified with a plumb line, accuracy of contours with a triangle. Rectangular and square tiles are suitable for laying with this method. The expediency of the basic version justifies the minimum consumption of material, the simplicity of the gluing process and the harmony of the combination with all kinds of borders, with ornamental trim.

Basic tile layout and diagrams based on it
Important. Do not rely on a personal eye, glue the tiles in the bathroom using special plastic crosses, which are necessary to form even seams.
Option # 2 - laying the tiles "in bandaging"
This option resembles traditional brickwork. The optimal choice for its implementation is rectangular tiles. The technique is simple, but it has some obstacles: it is better not to use two contrasting colors of tiles, they will create the impression of an uneven floor. The rows are stacked horizontally, the vertical arrangement does not look good. The advantage of the method of laying "in bandaging" is the possibility of using tiles with minor deviations in geometric dimensions. This defect will not be visible.
Option # 3 - diagonal styling
For an inexperienced performer, the method is too complicated, moreover, it is associated with a large consumption of tiles and laborious division of elements into parts. Butt seams, as in the basic laying, resemble crossed lines, the correct location is controlled by the level and the triangle applied to the axes.

Diagonal layout option
Thanks to the diagonal lines, non-parallel walls are visually corrected, the frames of a small room are "moved apart".
Option # 4 - chess
It is a variation on the seam-to-seam theme using tiles in two different colors.

Laying tiles in a checkerboard pattern
Option # 5 - modular way
This method of laying tiles predetermines the use of three or more standard sizes of facing tiles, thereby creating a dynamic non-trivial pattern. It can be a clearly sustained ornament, chaotic arrangement, interspersed with bright dots in a relatively monotonous surface.
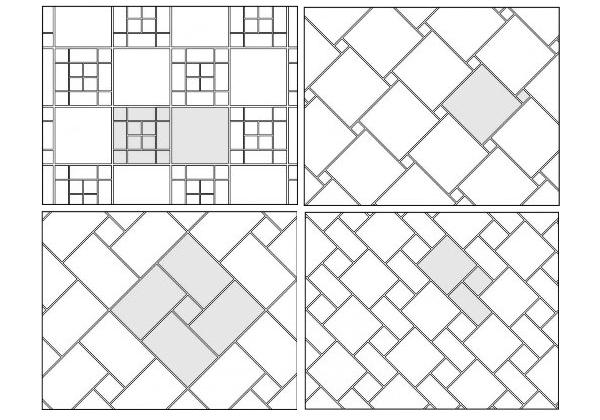
Modular tile layouts
Important. For laying tiles in a modular way, it is imperative to choose tiles with multiple sizes, it is desirable that these are products of one company. The modular version requires preliminary layout of the elements without gluing, since it is very difficult to imagine exactly what the floor will look like.
Option # 6 - Linear Option
For its implementation, two or more colors of the same size tiles are used. Solid or discontinuous, parallel or intersecting, symmetrical, broken or chaotic lines run wherever the owner prefers.
Option # 7 - "ornament"
Ornament is a styling option that resembles a carpet with a geometric pattern, a carpet with a beautiful colored border, or, conversely, a monochromatic "canvas" with a bright pattern in the center.
Note. To the number of tiles calculated according to the area of the surface to be trimmed, immediately buy another 15% of the same material.
A combination of two or more laying patterns is also possible, used by craftsmen not only in one room, but also used for facing one surface.
Not the entire list is given, listing the options for laying out tiles in the bathroom, it makes no sense to describe all the schemes, methods, techniques. Knowing the basic methods of tile location, you can come up with your own unique version. Now it remains to study the technology of laying a durable beautiful cladding in the bathroom and proceed to implementation.
Tiles are the ideal material for decorating a bathroom. It is durable, moisture resistant and easy to clean. With the help of it, you can create original ideas in the interior and hide the imperfections of the room. If you are unsure how to turn a bathroom into a cozy, trendy room, use the examples and tips in this article.
Bathroom design ideas
Replacing the tile in the bathroom is not the most budgetary item for renovation work. Therefore, this is done not so often, but especially carefully. In shape, the tile is most often square or rectangular, and there are many options that differ in size and texture. The standard installation method is a combination of a light bottom and a dark top, separated by a border.
Advice! Try to choose "off-the-shelf products", then you do not have to select different elements separately.
When choosing color combinations, do not forget that bright colors (orange, red, yellow) charge with energy and vigor, and cold ones (green, blue, lilac), on the contrary, soothe.

Combination of tiles and wood finishes
If you want to make a bright bathroom, play with contrast, try to combine yellow and sky blue, red and black, green and gray.
For small baths, it is better to purchase tiles in cold blue and gray tones, measuring 30 x 20, and lay them horizontally. In order not to create the effect of a "well", you cannot lay out the entire wall with a single-color tile. Try, the remaining distance (20-30 cm) to the ceiling, paint with water-based paint or lay out to the level of the bathroom - dark tiles, and light above.
Attention! In rooms with a small area, you cannot use embossed tiles.
If you want to visually increase the height of the ceilings, you must:
- lay the tiles vertically;
- use bright friezes;
- decorative panels, borders, to be laid not below eye level.

An interesting finish for a small bathroom
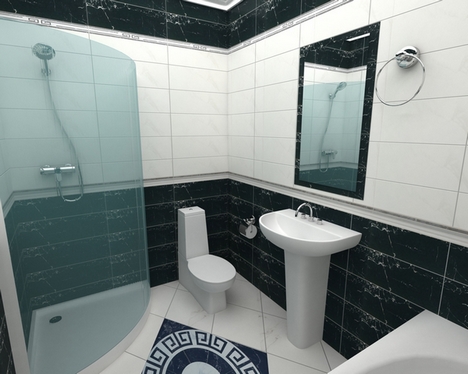
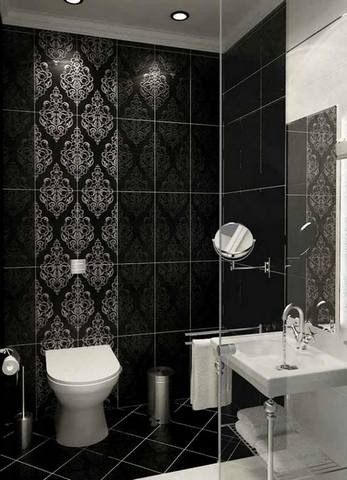
The classic combination of white and black will never lose its popularity. It will look very impressive if the black tiles are matte and the white glossy.

Tile laying schemes
Methods of laying out and tiling with tiles in the bathroom
Starting renovation in the bathroom, you need to decide how you will lay out the tiles, what area you will cover with it. There are three options for tiling the wall with tiles:
- Tiling the entire room.
- Facing with tiles to a certain level. Those. the bottom will be tiled, and the top with another coating (wallpaper, water-based paint, plastic panels).
- Allocation of tiles to certain functional areas: washbasin, bath, washing machine.

Laying tiles only on the floor
There are many more laying patterns:
- seam to seam- that is, the tiles are laid in a row, one after another, both horizontally and vertically. In this way, square and rectangular tiles are laid out, and to give aesthetics they are decorated with beautiful borders. You can combine tiles in two different colors. This seam-in-seam technique is called a checkerboard.
- "Brick layout" or "in a bandage". For this method, rectangular tiles of different shades, laid horizontally, are suitable. In appearance, such a scheme resembles the laying of bricks, i.e. the lower row of tiles is laid with a shift of half a tile, in relation to the upper one. Do not choose tiles in two contrasting colors, this will create an uneven floor effect.

Brick layout
- diagonal scheme. The tiles are laid at an angle to form a rhombus, but seam to seam in relation to each other.

Diagonal tile laying pattern
- modular way. For this scheme, you will need tiles of 3 different sizes. Before laying tiles in this way, lay out all the elements on the floor to see the finished drawing, and then transfer them to the wall.

Modular laying method
- ornamental way. In this case, a certain pattern is laid out from the tiles, for example, a color composition in the center of a plain background.

Ornamental styling method
- patchwork scheme... For this method, you will need multi-colored tiles that do not repeat with each other in the pattern and do not have a common theme.

- curb floor... As a rule, for this method, they choose a bright floor tile or mosaic, while part of it goes onto the wall, by 1-2 rows. The rest of the wall is covered with plain tiles in pastel colors.

Curb floor
Attention! This scheme allows you to visually increase the space, but at the same time visually reduces the height of the ceilings.
How to choose bathroom tiles in different styles
The choice of tiles will depend on the choice of the style of the bathroom. The following main directions of design can be distinguished:
- ... Choose ceramic tiles in pastel soothing colors that imitate marble, complement them with ornate friezes and frescoes.

Classic bathroom
- Minimalism. This style provides for the rejection of all that is superfluous. Use a combination of no more than 2-3 colors in the interior. For example: brown floors, beige walls and white plumbing. In such a design, borders or stucco moldings do not look appropriate.
- Country style. The main rule of this trend is the use of tiles that imitate natural materials. For walls, you can buy tiles for stone, and for the floor. The interior should be dominated by brown, green, beige colors.
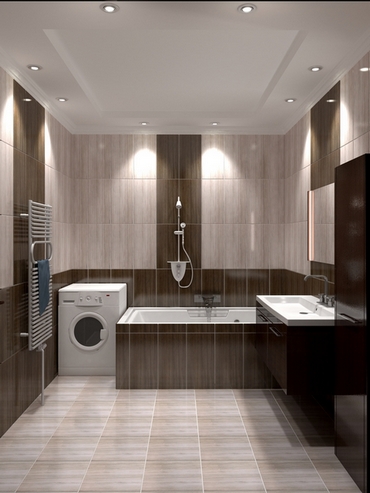
- Modern style. The tiles you choose should create a spacious effect and add light to the room. To do this, use light shades, simple lines in patterns, a minimum of decorative elements. You can play with contrast using light walls and dark floors.

Modern bathroom
- For style, use pastel colors: blue, lilac, coral, cream. You can make a partial division of the wall: first, a medium-sized tile of light colors, and above - wooden panels. Plain tile slabs, decorate with floral borders.
- High tech. The characteristic difference for this style is the monochrome wall covering and lack of decoration. Basic colors: white, black, beige, brown, silver.
Mosaic in the bathroom
A distinctive feature of tiles is the ability to create colorful panels on the entire wall. Most often, a floral or floral ornament is used for the bathroom. Mosaics create "accent walls" - for example, lay out an original geometric pattern or a colored panel on the side where the bathtub is installed.

Mosaic in the bathroom
It is not necessary to use a mosaic for laying out drawings; lay out the wall with mosaics of different shades: blue, turquoise or green in a chaotic manner. Even a narrow strip of multi-colored pieces will create an unusual and bright look, as well as increase the height of the room.
Using our advice, you can create your own unique design or make it easier for yourself when choosing a ready-made option. As a result, you will get a cozy room that will be beautiful and fashionable, and by choosing the right tiles and installation method, you can hide the room's imperfections and emphasize your own style.
How to lay tiles: video
Laying tiles in the bathroom: photo


Ceramic tiles have been and remain the best material for bathroom and toilet decoration. She is not only practical, but also beautiful. The choice is huge today: a variety of sizes, and many colors, and an abundance of decors. I would like to take the opportunity and create something like that in the interior of my bathroom - not like everyone else's. Wall cladding with tiles of the same color is an elegant but rather boring solution. The combination of colors provides not only the originality of the interior - this scheme also has another advantage: a competent tile layout allows you to make the room more comfortable and even correct its shortcomings.
How to combine two to three tile colors so as to achieve not only high aesthetics, but also favorable visual effects? First, it is necessary to objectively assess the "capabilities" of the premises: is it high or low, spacious or similar to a narrow corridor? Immediately you need to decide what nuances you would like to adjust. The layout of the tiles is selected in accordance with the goals.
If there are several basic tile layouts in the bathroom and toilet.
Tile layout options in the bathroom and toilet
1. By the type of wall panel. This is a classic solution that will suit any bathroom, regardless of its size and style. It slightly reduces the room, but adds volume to it. The scheme is simple: about a third of the height from the floor, the wall is tiled with darker tiles, and higher and up to the ceiling - with light tiles. The joint can be decorated with a decorative border.
The floors in this layout can match the color of the "panel" or contrast with it - this is a matter of taste.

A bold interpretation - a lighter bottom and a darker top. This tile layout is good for narrow and very tall rooms. The light "panel" along the bottom will visually expand the room, and the upper part will seem to dissolve.

If the room is very high, you can raise the "panel", that is, lay out a section with contrasting tiles not from the floor, but from half of the wall or even higher.

2. Horizontal stripes. The top "panel" mentioned above can be attributed to this type of layout. Horizontal stripes are narrow, created from decors, or wide in several tiles.


The stripes can be located on the lower third of the wall, in the middle or under the ceiling. There can be several horizontal stripes, and in different colors.

Such a tile layout visually expands the room, adding volume and creating a sense of order.
A popular scheme for a modern bathroom:, light walls and a wide strip (for example, in the color of the floor), located somewhere at the level of half the height of the wall.

3. Vertical stripes. Such a tile layout visually increases the height, adds some monumentality to the bathroom and toilet, but makes the room narrower in appearance. Therefore, for bathrooms similar to a corridor, this scheme is not recommended.
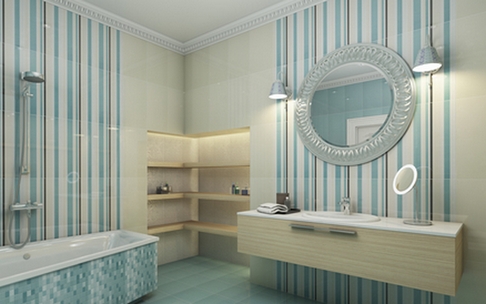
However, if you combine two types of layout - horizontal and vertical stripes- the narrowing effect can be avoided.

Like horizontal stripes, vertical stripes can be wide or narrow. The length and location of the stripes are different:
1. Strip from floor to ceiling
2. The strip "hanging" above the floor
3. A strip that breaks off before reaching the ceiling
4. Several stripes starting and ending at different heights.
Vertical stripes, especially tiered stripes, are the pattern most commonly used for modern bathrooms and toilets.
4. Floor with "border". The floor tiles fit onto the wall. In other words, a strip is laid out along the bottom of the wall, identical to the floor, one or two tiles high. A simple scheme that makes the room visually a little wider, but lower.
5. Accent fragments. This tile layout is very popular today. However, it is not suitable for every bathroom.
The scheme implies the use of background tiles for facing most of the surfaces, while the functional areas are highlighted with contrasting or decorative tiles (panels). This allows you to zone the space and organize it. However, in small rooms, such accent pieces can create imbalances.

So, for example, a high strip behind a toilet in a narrow one can visually narrow it even more, making the bathroom look like a pipe. Selecting multiple areas in a bathroom can create confusion.
It is not necessary to accentuate more than two or three areas in the bathroom, even in a very spacious one. You can, for example, create accent fragments in the area of the washbasin and heated towel rail.
To prevent the vertical accent section of the tile from increasing the height of the bathroom, it should not start from the floor. Or, conversely, touch the floor, but not bring the "focal" element to the ceiling.


6. Equality of colors. According to this scheme, two or three primary colors are introduced approximately evenly, but do not mix with each other. One half of the bathroom is finished with one tile, the other with the other, etc.


The layout of the tiles in this case is carried out taking into account the location of the elements: for example, the half where the bathtub is installed is tiled with tiles of the same color, and the wall opposite to it and adjacent areas of the other. The shower area can be highlighted in one color, the washroom with the other, and the “locker room” with the third.

In this case, the floors can be tiled with tiles of both colors, placing them in a checkerboard pattern or joining them approximately in the middle.
7. "Patchwork" or "Kaleidoscope". This pattern involves combining tiles of several colors, alternating randomly or orderly. This is a solution for creatives with a strong nervous system, who easily perceive the "creative disorder". A cheerful environment in the bathroom or toilet will charge them with positive energy and create a cheerful mood.


8. "Splashes". The main part of the wall is tiled with calm solid color tiles, while several prominent tiles are introduced, randomly located against this serene background. The accent tiles really look like splashes or colored blobs. This effective technique is best used only in spacious rooms. In a small bathroom, walls with "splashes" will create a sense of clutter.

9. "Layering". We gave this name to a scheme that implies the use of several of the listed templates in one room.
Used two types of layouts: by the type of panel and three accent fragments

Two types of layout: by the type of panel and accentuation of the area behind the washbasin

Accent Fragment + Kaleidoscope
For example, the following combination layout can be used in a bathroom:"Panel" along the bottom of the wall, several narrow horizontal stripes, accent fragments behind the washbasin and heated towel rail.
The larger the room, the more patterns can be layered on top of each other. And vice versa: in a compact room it is better to stay on one or two schemes, nothing more.
These are just some of the possible layout options. Tile is a “flexible” material in terms of design and allows you to create all kinds of geometric and patterns on the floor and walls: rhombuses, ladders, “ziggurats”, triangles and much more. Remember that the smaller the room, the easier the tile layout should be.
Separately, it should be said about the tiles, which are faced with the so-called "screen" for the bath. How to include this site in the general scheme? It is best to veneer the frame in accordance with the basic layout pattern. So, if a decision is made to lay out the "panel" along the bottom of the wall, then the frame into which the bathtub is built can be "sheathed" with this "panel", that is, lined with the same tiles. If the walls are decorated with vertical stripes, the bath frame is tiled with background tiles and complemented by a similar strip that can go over to the floor and wall. According to the “equality of colors” pattern, the box under the bathroom is tiled with tiles that match this half of the interior. In addition, the frame can be accent, background or merging with the font itself.
Hallway tiles
