Do-it-yourself wall slitting for wiring and sockets. Options for how to grind walls in a monolithic, brick or panel house: is it possible to grind without dust Scratch walls for wiring
For those who have started repairs and want to quickly get involved with repair work and dust, it is better to resort to the help of specialists. They are the ones who will quickly and efficiently grind the walls for wiring.
Slitting walls for wiring - how to cope with minimal costs
For your wallet, chipping walls for electrical wiring will certainly not go unnoticed, but if you find out all the nuances now, you can save on materials and on the advice of expensive specialists. Strobing for electrical wiring is a "dreary" process, but necessary. If you do not want to spoil the apartment with wires crawling through the entire wall (albeit through special channels with strict directions), then you will have to resort to the help of closed electrical wiring, which is common in the repair business. It is she who helps to hide the wires under the plaster. Not everyone knows how to properly grind a wall for wiring. We will dwell in more detail on this process, which is not particularly entertaining, but necessary for the repair.
As soon as the internal work on the house begins (which has just been built, finished with the walls and roof), the need for electrical wiring is ripe.
How to make walls for wiring - not every owner of a new apartment will give a sane answer to this question. This means that you either need to stock up on literature and raise your education level, or simply hire a specialist. Slitting, whether you like it or not, will still be an integral part of your time-consuming renovation. Of course, you can put sockets on the surface (in an open way) - you say, but you will agree that it will be much better and more beautiful if you still hide the wires out of sight altogether. So you're ready to tackle the dusty job and blaze new trails for a multitude of wires. But first, decide where such electrical appliances will be installed and operated. Pay special attention to those that are powerful consumers of electricity - your favorite TV, a washing machine working from morning to evening, the most important electrical appliance in the house - a refrigerator or a music center hated by neighbors. So that when connected, everything does not burn out at once.
It is advisable to approach the elaboration of the scheme in a comprehensive manner, so that both the electricians approve, and the neighbors do not call the firefighters, and it is safe for oneself and at heart. The width and depth of the recess for the cable are different - discuss this issue with a specialist too. It matters not only where the powerful electrical equipment will be located, but also the lights, sockets and switches. Although, with regard to sockets and switches, they are usually installed in certain places (in the bathroom farther from the shower and taps, in the rooms near the doors, in the kitchen - at the countertop level. An experienced electrician will advise you at this stage to "visually" determine the places the passage of the cable - draw lines with a pencil directly on the walls.
Strobe for wiring, or how to make grooves in the wall
Let's say right away - it's hard to cut walls for wiring. This laborious and rather dusty process will require you to make many grooves (grooves) in your walls, which will be different in both depth and width. You will also need a tool that will not smash the walls to smithereens, but carefully make special trenches. For this process, a puncher, a grinder can be useful. So the perforator first helps to drill a hole along the entire length (groove), then the drill itself (drill) must be changed to a special blade and hollow out the desired groove. But the grinder helps to cut small channels with a diamond disc, and finish the work with a puncher.
But, as experts warn, prepare in advance for a large amount of dust that will invariably appear when using a grinder. For this period, it is advisable to take the furniture out of this room altogether, or at least close it with a building film. The method of working with a chasing cutter does not differ much from strobing with a grinder. Although the price will be slightly higher (diamond discs are still not cheap, and vacuum cleaner bags will often have to be changed). If you already see that you cannot cope with such a painstaking task, it is better to shift this laborious and rather hard work to specialists. After all, you will need to make physical efforts and find an expensive power tool for these works. Yes, and one more feature of this process - before strobing, it is better to find a common language with your neighbors and make you believe that the noise in the apartment is a temporary phenomenon (so as not to write an explanatory note on the complaint in the office of law enforcement officers why you violated the silence mode).
If you have stopped working with a wall chaser, then your grooves for laying the cable in the wall will turn out to be even and of the right size. In addition, spend several times less time on such work (compared to a grinder). It is possible to carry out the chasing of both concrete and brick and plaster walls (usually in a couple of days they manage to change the electrical wiring and install switches, sockets and all wires). If you nevertheless decide to meet it in one day, please note that such work cannot be carried out at night due to the lack of sound insulation. This means that you run the risk of stumbling across misunderstandings even from previously patient neighbors. And do not forget, carrying out complex electrical work, immediately mount the switchboard equipment, and only then carry it out.
Although you are not a master, take some clever advice anyway. Don't try to do everything quickly and in a couple of hours. It is better to measure seven times and cut off once than vice versa - this is how popular wisdom says.
- With a hidden form of laying (when the wires pass under a layer of plaster or in partitions up to 80 mm), the wires are laid parallel to the architectural and construction lines.
- The distance of the wires (laid horizontally) from the floor slabs cannot be more than 150 mm.
- In walls whose thickness is more than 8 cm, the grooves for wiring can be carried out along the shortest path, and when working with a thin-walled interior partition, it is allowed to groove, as we have already indicated, parallel to the construction lines, having a distance between horizontal tracks and floor slabs of no more than 15 cm ...
- The wall chaser can make lines on the walls with two diamond discs at once (located one next to the other). It is fast and reliable.

- Using a special technique (wall chaser), do not forget about the vacuum cleaner, which is necessary to collect dust. It is better if it is an industrial and powerful household appliance (such a vacuum cleaner does not overheat quickly and endures heavy loads).
- To work with walls, you need to choose a tool based on the density of the material that will have to be grooved.
- The recesses in the wall are used not only for laying electrical wiring, but also for piping systems (the width can be up to 5-10 cm).
- Before starting the chiseling (if it is an old apartment), carry out appropriate measures (surface continuity) to make sure that there is no hidden obsolete wiring at this place of work.
- Do not carry out the work yourself if you have a long-standing allergy to dust - neither a mask nor medicines will help you save your respiratory tract from it.

- When conducting channels under the pipes (to further hide the pipes under a layer of plaster), it is better to check the walls by ringing. This will help to make sure whether or not there is hidden electrical wiring in your walls.
- Keep in mind that the whole procedure for replacing electrical wiring is a rather serious thing and you will need experience, or even better, the appropriate qualifications (so think about whether it will cost you that much to carry out complex work by professionals in exchange for ensuring quality and reliability).
Now you know how to grind a wall for wiring. So - good luck!
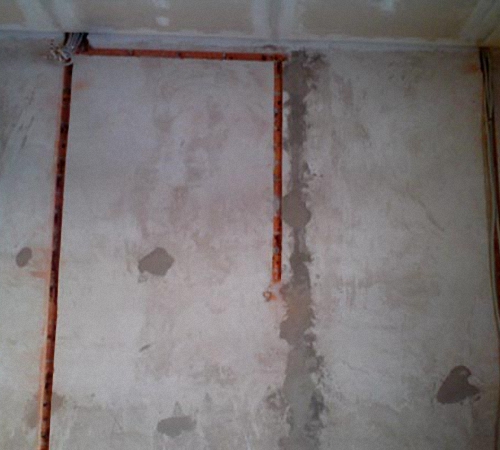
If the electrical wiring in the house changes, it is not always laid through the old channels. In order not to violate the aesthetics of the interior, to ensure fire safety, to protect the wiring from possible damage, it is made hidden and hidden in the grooves - longitudinal grooves hollowed out in the wall, ceiling. The process of preparing surfaces for wiring is called stripping.
Basic rules and regulations for wall chasing for wiring
Changing walls and ceilings for wiring is a responsible type of work, and the procedure for its implementation is regulated by a number of regulatory documents in the field of construction.
- The chasing of channels in the bearing wall can affect its bearing capacity, therefore such operations require mandatory coordination with the architecture management. It is possible to obtain permission to chisel load-bearing walls in brick houses; as a rule, the ban on panel houses is categorical. The problem can be solved by laying wiring in walls made of. We talked about the installation of such walls in.
- It is also strictly forbidden to carry out chipping in floor slabs, horizontal wiring is laid at a distance of 15-20 cm from them.
- The embroidered seam between the slabs cannot be used as a groove.
- The distance from corners, door and window openings to strobes should be at least 10 cm.
- The slitting should be carried out at a distance of at least 40 cm from the gas pipes.
- Do-it-yourself wall slitting for wiring should be done strictly horizontally or vertically, in planes parallel or perpendicular to the floor. The only exception is mansard rooms, where slitting of an inclined surface is possible.
- The maximum continuous length of the groove can be 3 m, the depth and width - 2.5 cm.
- If the thickness of the structure is more than 8 cm, the wire should be laid along the shortest path, if less - parallel to the construction lines.
Wiring stripping diagram
Video instruction on how to gouge walls
What tools do you need?
Slitting for electrical wiring can be carried out using different tools, their choice is largely determined by the base material on which the slitting will be carried out. It can be plaster of different composition, brick, stone, concrete of different hardness, including cellular or with a high content of crushed stone.
- If the layer of plaster is thick enough, you can lay a groove in it under the wiring without affecting the base. In this case, it is permissible to gouge along the ceiling and load-bearing walls.
- In a brick wall, horizontal grooves are most conveniently laid along the seam between the rows of bricks, and for vertical grooving, you cannot do without cutting the brick.
- Concrete is the hardest thing to do, it is the most durable material.
For slitting for wiring, the following tool can be used:

In addition to this tool for chipping walls for wiring, you will need:
- indicators or testers for detecting old hidden wiring;
- level;
- vacuum cleaner;
- personal protective equipment - glasses, gloves, respirator.
How to prepare for work?

Wall slitting for electrical wiring should be carried out according to the markings, which are carried out using a level and a pencil in accordance with the above norms
If it is necessary to chisel the walls in a panel house, the wiring must necessarily go along the supporting wall and ceiling, it is necessary to check the thickness of the plaster layer. If it is not enough for laying the strobes, you will have to additionally plaster the surfaces. An alternative is plasterboard wall cladding, arrangement of a suspended or stretch ceiling - communications will hide under them.
Wall slitting for electrical wiring should be carried out according to the markings, which are performed using a level and a pencil in accordance with the above standards, taking into account the location of openings, niches and protrusions that form additional corners, communications, as well as old wiring.

Slitting for a cable must be done taking into account that it should fit inside the corrugated sleeve, the thickness and depth of the strobes are determined taking into account the dimensions of the latter.
If it is not dismantled, it must be identified before starting work by checking with the old plan, in its absence - using a tester or indicator, and disconnected from the power. The new wiring must not overlap or intersect with the old one.
With a pencil, 2 parallel lines are drawn for each groove. Not only strobe routes are marked, but also places for switches, sockets, junction boxes.
Slitting under the cable must be done taking into account the fact that it must fit inside the corrugated sleeve, the thickness and depth of the strobes is determined taking into account the dimensions of the latter. A plan is drawn up for the installation of electrical wiring and the placement of electrical products.
If the premises are residential, it is necessary, if possible, to take out furniture and office equipment, or carefully preserve them with plastic wrap.
Slitting technology: step by step instructions
The work is carried out in a certain sequence:
- Parallel grooves are drawn at a distance equal to the width of the groove. The chaser allows you to make both grooves at the same time.
- The grooves are selected to the desired depth using a hand chisel or a hammer drill with a chisel attachment.
- The strobes are cleaned of dust and primed, after which you can start laying the wiring.

Parallel grooves are drawn at a distance equal to the width of the groove.
When using a punch, the technology is slightly different:
- The material between them is selected using a punch, which must be held at an angle of 45⁰;
- The edges are leveled using a nozzle - a semicircular chisel.

First, along the entire length of the route, with an interval of 10-15 mm, holes are made with a drill to the depth of the groove perpendicular to the surface.
- If you don't have the power tool you need, you can rent it, it is better to make a choice in favor of a wall chaser, the cost of renting it (from 260 rubles per day, depending on the brand and model) is comparable to the cost of renting a hammer drill (from 200 rubles) or a grinder (from 240 rubles), and the advantages are obvious.
- It is better to rent a wall chaser or a grinder complete with an industrial vacuum cleaner, it is better for them to catch dust than a household one. The average rental price is 400 rubles. per day.
- It is better to grind the walls with a grinder together, the assistant must either moisten the surface with a spray gun to reduce dust formation, or keep the vacuum cleaner nozzle at a safe distance from the tool in order to gouge the walls without dust.
The cost of specialist services
Slitting walls for wiring is the simplest type of slitting (in comparison with slitting for pipes), these works can be done independently. The cost of their implementation by specialists depends on the material of the walls and the tool used.
Most firms provide this service at the following prices:
- in plaster, plaster wall - 100 rubles / m.;
- in brick - 200 rubles / m.;
- in concrete - 300 rubles / m.;
- on the ceiling - double coefficient;
- the cost of slitting a non-standard shape is calculated individually.
By entrusting the slitting to specialists, you can count on the fact that they will offer an optimal plan for laying electrical communications.

Chipping scheme in a panel house
Slitting surfaces for wiring is a work that you can do yourself, but you must strictly observe the norms and make sure that there are no prohibitions on slitting. Labor costs depend on the tool used and the material of the surface on which the chasing is performed. To avoid the formation of dust in the process of work will allow the use of a special tool - a wall chaser together with a vacuum cleaner, it can be rented.
Any master knows that when replacing wiring in an apartment, you have to make holes in the walls. The resulting construction dust settles throughout the room. Is it possible to facilitate the process of work and subsequent cleaning?
A few tips on how to carry out dust-free chasing will be useful to those who are starting a repair.
Than the walls are channeled
The standard arrangement of lamps or sockets does not always suit the owner of the apartment. In this case, the question arises about their transfer to another place. To do this, it is necessary to make grooves or holes in the walls or ceiling. In multi-storey buildings, they are made of concrete or brick. Therefore, if it is necessary to groove the walls for wiring, it is better to take care in advance in order to avoid a large amount of dust.
You can manually make the grooves in the wall, but if you need to lay a long cable, this will take a lot of time. Therefore, it is best to use a power tool. For work of this kind use:
- puncher,
- grinder,
- wall chaser,
- impact drill,
- chisel and hammer.
The use of a hammer drill has a number of disadvantages. First, the instrument makes a lot of noise. Therefore, if work is being carried out in a residential building of a high-rise building, you will have to negotiate with neighbors. The process of chipping with a puncher is quite laborious and time-consuming. In addition, the resulting indentations have an uneven edge. The traditional "grinder" with a diamond wheel gives holes with a high-quality edge, but the grooves themselves have an uneven surface. This creates the risk of damage to the wiring and too much dust in the process.

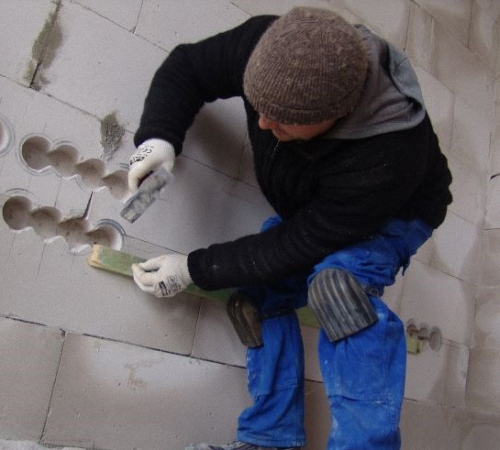
The ideal option would be a wall chaser. With its help, you can quickly and easily make holes and grooves for an electric cable. This tool cuts with two blades. They are insulated with a casing that covers the point of contact with the surface. This makes it possible to punch furrows of different depths. The strobes are smooth on the inside, and their edges remain even.
In the absence of a power tool, you can also make a strobe manually. For this purpose, use a chisel and a hammer. This technique is not suitable for hard materials such as sand-lime brick or concrete. With the help of a chisel, a groove is punched in the wall, which is then deepened and widened. At the same time, the tool is held in the right hand, parallel to the surface, and is struck with a hammer.

How to get rid of dust when chipping
Professional builders use equipment with a built-in vacuum cleaner when laying wiring inside walls. But the cost of such a tool is high and it makes no sense to buy it for a one-time event. In order to grind the wall with a wall chaser without additional options, without creating a cloud of dust, craftsmen have to go to different tricks. The simplest way is abundant wetting of the treated surface with water. Small particles can be collected with a simple household vacuum cleaner.
To make a dust-free grinder, use the technology of wet concrete cutting. It consists in the continuous supply of water to the cutting blade through the attached hose. You can use the help of an assistant who will simply water the disc and the cutting area from a plastic container. In this case, you should be careful not to get any liquid on the power tool.

The following measures will help to reduce the dustiness of the room:
- the floor is covered with foil,
- an industrial curtain or fabric is fixed above the entrance,
- a damp rug is placed in front of the door.
After the grooves are done, the garbage is swept away with a broom and vacuumed. The deepening is treated with soil, the cable is laid and fixed. The channel is sealed with putty, plaster or gypsum.

It is possible to carry out electrical wires without chipping the walls. This option is attractive due to the complete absence of dust. The trade network contains many different products that allow not only to disguise open wiring, but also to revive the design of the room. These include:
- corrugated sleeve,
- cable channels,
- boxes.
If there is a need to replace the wiring, without laying a new one, you can use the existing channels.
Small particles of concrete and sand-lime bricks should not enter the mucous membranes or the respiratory tract. Therefore, when carrying out work, it is necessary to use protection in the form of glasses and a respirator. If there is furniture in the room, it is also better to cover it with a film or cloth.
Almost no renovation is complete without the apartment or replacing the old one. Also, it often becomes necessary to add one or more in order to facilitate the connection of household appliances or equipment and thereby eliminate the need to use wires with splitters. At the same time, it is best to hide the wires in the wall, and for this you can make the walls for wiring with your own hands, without asking for the expensive help of construction teams and private electricians. The main thing is to take into account all the nuances of the organization of the wiring, and correctly perform the strobing.
Rules and restrictions for strobing
Do not grab the chisel and hammer right away. You should first draw a wiring plan on paper and think over the location of all connection points and wiring outlets, such as sockets, switches and outlets for lighting. You should also take into account the material of the walls and how they are channeled. The basic rules according to which the distribution of wires in the walls is made are described in the normative documents SNiP 3.05.06-85. Do not neglect them, it is better not to be too lazy once and get familiar with it in order to know how to properly groove the walls for wiring. The main points are the following points:
- Slitting for wiring should be carried out parallel to the main structures of the building, that is, only vertically or horizontally. The slope of the groove is allowed only in the case of laying parallel to inclined walls, for example, in the attic.
- Horizontal slitting should be carried out at a distance of no more than 150 mm from the floor slabs.
- The vertical groove (groove) must be at least 100 mm from door, window openings and corners, and at least 400 mm from gas pipes.
- The width and depth of the groove must not exceed 25 mm. The length of one groove should not exceed three meters.
- It is advisable to minimize strobe turns on the way from the junction box to the switch or socket. It is best if you restrict yourself to one angle of transition from horizontal to vertical without taking into account the turns in the horizontal plane at the joints of the walls.
- Do not make horizontal grooves in load-bearing structures. This applies to all walls of a panel house, because there they are all load-bearing, with the exception of small partitions.
According to these rules, the layout of the wiring is made. After that, you can directly grind the walls.
"Can load-bearing walls be channeled?"
Wall slashing is governed by redevelopment rules, which may vary slightly for each region. However, according to generally accepted norms, such actions unacceptable in all types of typical multi-storey buildings.
Tools and methods of chipping
There are several ways of slitting, which differ depending on the tool used:
- hammer and chisel. Long, uncomfortable, uneven strobe. But it's cheap;
- hammer drill or hammer drill. Clean and fast enough. The strobe is not very even;
- grinder. The strobe turns out to be smooth, however, a huge amount of dust is produced, which is difficult to catch even with an industrial vacuum cleaner;
- chaser. Using a specialized tool, you can get a perfectly flat strobe with a given depth and width. However, everything is spoiled by the price of the instrument itself.
In any case, the order of actions is approximately the same.

Surface preparation and marking
First of all, you need to check for hidden wiring along the proposed route of the groove. To do this, use a special device that will indicate the existing electrical wiring. It is important to protect yourself from cases when energized wires come across during gating.
On the surface of the wall, markings are applied along the route of the grooves from the junction box to the installation site of the outlet, switch or wire outlet for lighting.
Immediately before carrying out work on the wall chipping, curtain the doorways with a damp cloth to prevent dust from spreading through the apartment or seal them tightly with construction film.
The process of chasing with various tools
Hammer and chisel
The whole process is broken down into small segments. First, the chisel marks the grooves along the edges of the groove for one or two widths of its edge. After that, putting it across the furrow, part of the wall is knocked out in depth. Then you can continue to remove the top layer along the outlined line and at the end proceed to a 25 mm deepening along the entire length. You can also deepen the strobe immediately after each removal of the top layer. With the help of these tools, it is almost impossible to make a strobe if the wall is concrete.
Puncher
In this case, two nozzles with a wide and a short drill and a blade are used. First, along the entire length of the line, which marks the location of the groove, holes are made 25 mm deep at a distance of about 10-15 mm from each other. After that, the device of the groove is performed with a spatula. The main thing is not to put the spatula across the line of the groove, so as not to chip off an extra piece of the wall or plaster. The result is a strobe of the required depth and width, but the appearance will not be very attractive. Punching is the fastest and cleanest process.
Bulgarian, angle grinder
When using a grinder, you should purchase a diamond disc, only in this way it will be possible to grind concrete or brick normally and without problems, and in the case of plaster, the process will go easily. First, two parallel cuts are made along the entire marked line with a distance between them equal to the required width of the groove. Then, using a punch or chisel, you can select all the material between the cuts to the required depth. Actually, therefore, the whole process is almost identical to the previous methods, except that as a result of the strobe, it turns out much smoother. This is very important, especially if you want to minimize damage to plaster or wall finishes.
During operation, the grinder will generate a very large amount of dust, and very soon the whole room will be filled with it. To solve this problem, you can use a vacuum cleaner, preferably an industrial one. A second person will be required as an assistant who will hold the suction pipe closer to the cut.
Wall chaser
In essence, the wall chaser is a logical modification of the grinder version. This device already provides the ability to install two cutting diamond wheels with adjustable distance between them. Both circles are closed with a special casing that completely covers the point of contact with the wall. By adjusting the position of the casing, you can change the depth to which the wall will be cut. In most cases, the casing is also equipped with a special outlet for installing the suction pipe from the vacuum cleaner.
Thanks to everything described, perfectly smooth and parallel cuts are obtained, and the walls are channeled without dust. After cutting along the edges of the groove, it is again necessary to select the excess material with a puncher. The disadvantage of this method is the very price of the instrument. It is too high for home use.
Completion of work
After the grooves are pierced, it is necessary to clean them with a vacuum cleaner or a broom from dust and prime them. The very process of laying the cable and securing it also has a number of nuances that must be taken into account. After all the work, the groove is completed. This can be done with plaster, plaster or filler that can be applied.
Video: do-it-yourself wall chipping from A to Z
(No ratings yet)
Discussion:
Yes, so be it. The wiring is laid in plaster. Accordingly, the plaster is channeled, and not the structure itself. Therefore, it does not matter whether it is a load-bearing wall or not.
The last video made me happy, she says, do not forget about the safety precautions, the employee does not have gloves, no glasses, no helmet (well, let's say she is not needed here and will interfere more). But the best thing is that the employee works as a grinder without a shield 😉
Indeed, if you find yourself on a load-bearing wall, how does the author of the article suggest wiring? Even if you go through it (the article does not prohibit it), you will find yourself on it. So what? Let it go through the air? On the wall with scotch tape?)))
This is the first time I hear that a concrete slab cannot be gouged. After all, you don't even touch the fittings. There will be nothing. A 2 cm groove is possible on any wall.
Also in the “rules and restrictions for strobing” under paragraph 4 it is stated: “The width and depth of the groove should not exceed 25 mm. The length of one groove should not exceed three meters. "
If we are talking about vertical strobes, then more than 3 meters of spans between the ceiling and the floor do not exist in ordinary apartments. Those. the remark is meaningless. And if we are talking about horizontal, then the room should be 3 meters long maximum, otherwise we fall under the restriction. In general, it is not clear at all where the ban is so delusional
From experience, two small remarks: 1st - if you live in an apartment and do repairs only in one room, then it is better to chisel with a puncher or a chisel / hammer, there is a LOT of dust from the chaser, and the dust is fine, things cannot be saved, no matter how you did not try, seeps everywhere. And the second - it is better, if there is an opportunity, to connect a power tool somewhere near the neighbors, and completely de-energize your apartment. During the last repair, I found 4 cables in the wall, although 3 of them were some old and without voltage, but one turned out to be with voltage, so be careful.
I personally think that in most cases you can do without strobing. It is better to bring communications into the false ceiling. And there is less dust and there will be access to wires or pipes. Situations are different, for example, replacing a wire or connecting to pipes.
Just a week ago, electricians finally finished all the manipulations in my apartment. After reading the article, I decided to check whether they followed the rules or not. Were they stepped back enough from the doorways, did they chase them at the correct angles? It seems that almost everything corresponds to the rules, except for one thing: the chipping of load-bearing walls is horizontally present. But it's true, what if they are almost all load-bearing in a panel house?
By clicking the "Add comment" button, I agree to the site.
Overhaul, redevelopment, new construction of a house or utility room are associated with the issue of connecting or transferring sockets, switches, laying a new cable, masking pipeline systems. All communications up to 1/3 of the floor thickness are hidden in the wall panel.
Overview of tools for chipping walls for wiring
- The classic tool is a hammer and chisel. The variant is suitable for chiselling short grooves in a soft pliable volume. It is not rational to use this method for concrete or brick. Disadvantages: high labor costs, long-term work, the final result of poor quality.
- Perforator with a special attachment. Works are carried out in solid volume, reinforced concrete and brick. The final result is of average quality: the edges of the grooves are uneven, chipped and require additional rework. The disadvantage of the tool is that it emits a high noise level of more than 100 dB.
- Grinder with a diamond disc. Excellent option, perfect quality of the groove. The disadvantage of this option is the emission of dust disproportionate to the quality. Advantages: perfect result, fast work completion, productivity, low-budget method. Easy to use tool.
- Wall chaser. It is considered the best option for wiring in walls. The device comes complete with removable discs, with a dust collector. Disadvantage of the method: an expensive tool.
Tips from professional craftsmen on the rules for cutting walls for wiring with your own hands
- Structural wall structures, floor slabs, horizontal joints are unsuitable objects for wiring.
- When drawing up a drawing, wiring gaskets take into account an important condition - the wires are located strictly horizontally or vertically. Driving a groove is outlined on the surface with a level or plumb line.
- The horizontal laying of wires is carried out, maintaining a distance of 15 cm from the floor slab.
- In structures from 8 cm, the wire is laid along the shortest path.
- Do not run wiring in corners, close to window or door openings. The recommended distance from such places to the gates is at least 100 mm.
- To lay wiring in old walls, check the places of possible passage of the current-carrying cable. Use a screwdriver-indicator or a finder for control.

Wall slitting technology for wiring
Concrete wiring is done early in the renovation work. Curtains in a populated area are undesirable due to the high concentration of cement dust. Preparation for work in a living room provides for the dense conservation of office equipment, furniture, flowers, the presence of a construction vacuum cleaner for cleaning garbage and dust. Before starting work, they check with the plan for laying the old wiring, de-energize it or bypass these places. There are several concrete slitting technologies:
- Slitting with a hammer and chisel. The process is broken down into several steps for simplicity. At the first stage, a groove is marked with a chisel along the edges of the puncture to the width of one or two of its points. Next, the chisel is placed transversely to the furrow and one part of it is driven into the wall with a hammer. First, the top layer is removed according to the marking, and then the groove made is deepened by 25 mm along its entire length. This sequence of actions is not so important, since the deepening is allowed immediately during the making of the groove. This method is completely unsuitable for slitting concrete walls for wiring, since the material is too hard for manual hole making.

- The next way is to chisel the walls for wiring with a puncher. Work begins with marking the required area. The nozzles required to complete the grooves are a small drill and a blade. Along the entire length of the line along which the strobe will be performed, holes are made 25 mm deep. 10-15 mm recede from each hole made and do the following. Next, a ditch is made through the finished holes. When arranging it, the scapula is not placed across the intended line, as this leads to the chipping off of excess pieces of the wall covering. With the help of a hammer drill, a groove is made for the wiring of the required width and depth, and these indicators are obtained very accurate. The only drawback is that the edges of the groove are often torn; it does not have a very neat appearance. With the help of a puncher, the chasing is carried out as quickly and accurately as possible.
- Grinding walls for wiring with a grinder. To carry out these works, you will need a diamond-coated disc. It allows you to easily perform work on concrete and brick, in contrast to conventional nozzles, which are difficult to cope with these types of materials. Even if the work will be carried out on plaster, the diamond disc will make the groove faster and easier. At the beginning of work, the necessary lines are marked, then two parallel lines are made according to the marking, the width between which is equal to the required width of the groove. Between the finished cuts, a groove is knocked out with any convenient tool - a chisel or a perforator. The groove is knocked out to the required depth. This method differs from the previous two only in the use of a grinder, which greatly facilitates the process of making cuts for a groove. When cutting cuts with a grinder, a large amount of dust is released. It is recommended to use an industrial vacuum cleaner to collect dust, or simply to protect all objects in the room from debris falling on them.
- Making a groove for wiring using a wall chaser. As the name of this tool implies, it is designed just for making strobes and is used by professional builders. The wall chaser is similar to a modified version of the grinder, it has connectors for installing two diamond discs at once, with the ability to adjust the distance between them. The tool cover is also adjustable, which provides a fixation of the depth at which the discs will cut the groove. Often the tool has a special dust outlet on the casing, to which the vacuum cleaner pipe is attached. The slitting is quick and easy with little dust. When the cuts along the edges of the groove are ready, the excess material between them is knocked out with a puncher or chisel. The disadvantage of using a wall chaser is that the price increases for wall chasing for wiring if this device is used. It is quite expensive and is used only for specialized work. For household gouging, it is best to opt for the option for which all the necessary tools are available.

The completion of the work has the same actions, regardless of what technology was used to make the groove. When the groove is completely ready, it is cleaned of construction dust with a vacuum cleaner or a broom. The groove cleared of debris is treated with a primer. Laying the cable into the wall is another complex technological process that needs to be approached with maximum attention. The laid cable is fixed in the groove and covered with plaster, putty or gypsum.
Some rules for chipping in a concrete wall
Most buildings are made of concrete, therefore, when laying electrical communications in the wall, most often you have to deal with this material. The general principle of working with concrete is no different from the technologies described above. All the tools described are suitable for him, except for the chisel. However, there are some general rules for concrete slitting.
When choosing a slitting technology, choosing between the option of performing work with a grinder or a perforator, it is better to stop at the second option. Rock drills are more powerful machines that are designed to work on hard surfaces. In addition, during the manufacture of holes, such an amount of dust will not be emitted as from working with a grinder. It is recommended to carry out work in multi-storey buildings during the daytime and only on weekdays. The noise level from the hammer drill is so great that its operation will be clearly audible even through several floors.

During work, it is recommended to use the services of an assistant who will moisten the work surface while making holes. This method is widely used by builders, it allows you to reduce the amount of dust flying around the room. The disadvantage of this method is the complexity of the work, the damp wall is less amenable to slitting.
To work on concrete, builders do not recommend using a wall chaser, since in this surface it will not remove a significant part of the material and after it you will have to clean up the remnants with a puncher. Therefore, to facilitate work on concrete, the perforator is immediately used as the main tool.
Structural work in the load-bearing wall
The possibility of carrying out work on chipping in a load-bearing wall is a controversial issue. It is forbidden by law and all architectural norms to carry out any work in the load-bearing partition that weaken its load-bearing capacity. Strobing refers to this type of work. During the removal of the top layer, the reinforcement is exposed, it becomes susceptible to various influences and the formation of corrosion. If corrosion of the reinforcement begins, the entire structure of the house is weakened.
To carry out such work in a load-bearing wall, you must obtain a special permit for this. If we are talking about a panel house, then, most likely, a work permit will be refused. In brick houses, such work is most often allowed. After receiving the papers, all work is carried out very carefully in order to reduce damage to the wall to a minimum level. To determine the location of the reinforcement elements in the wall, use a standard metal detector. He talks in more detail about how the walls are channeled for wiring, the video at the end of the article.
Installation of wires in the strobe and installation of sockets
The wires in the strobe are laid in two ways. The first provides for the laying of cable channels for wiring. In this case, the pipe itself is first laid in the strobe, and then the wires are pulled through it to the location of the sockets or switches. The wire is pulled into the pipe using dense steel wire. If the installation of the wires is carried out without using a pipe, then they are fixed in the groove using plaster, plaster or putty. The wires connected to the socket boxes are cut, leaving a length of 10-15 cm, the left end is tucked into the hole for the outlet.
The most convenient installation of sockets is in blocks in one frame. One block contains not only electrical outlets, but also connectors for cable TV, telephone, Internet, etc. Such blocks can significantly save space and create an attractive aesthetic technical corner in the room. The blocks are mounted on special latches, they are combined even before installation, and only then they are installed in a solid block into the prepared holes.
The holes for the block are drilled in one piece, a gap of no more than 1 mm is left between them, and the central partitions are removed. Thus, the unit is completely wall-mounted. The frames and metal frames of the sockets must be in close contact with each other. After equipping the unit and connecting communications to it, plastic socket frames are installed. This work is carried out after laying the finishing materials on the wall, since the frame of the outlet is designed to hide all the flaws of the decorating elements. When wallpapering under the outlet, their edges are wrapped, but if the wall is painted, then the overlay will hide the seams and chips at the place of manufacture of the opening for the sockets.
To install the switchboard, a rectangular hole is made in the wall. The size of the hole in depth, width and height is adjusted to the size of the future shield, leaving a small margin. First, the shield body is installed in the niche, it is fixed with a solution with gypsum. At this stage, the installation of the hidden wiring is complete. Switchboard equipment refers to electrical work and is carried out taking into account the rules from the operating manual.

