How to make a pond out of an old bathtub
Do not rush to throw away the old bath, it can still be useful for decorating a garden or cottage. You can make an interesting pond from the bath with your own hands, for this you need a minimum of materials and a maximum of imagination.
In order for the pond from the bath to serve as long as possible, it must be placed on the site correctly:
- The pond should not be in direct sunlight for most of the day. It is desirable that it be illuminated no more than 8 hours a day.
- But too dark a pond does not need to be built either. If, under high illumination, it can be reborn into a swamp slurry, then when living in the shade, all living things in it will simply die.
- There is no need to build a pond under the trees, otherwise there will always be leaves and debris in it.
- No need to build a pond in places where there are strong drafts.
Experts advise making a pond from a bath not far from the building or in the farthest corner of the garden. In low-lying areas, it also does not need to be installed and it is highly undesirable for groundwater to pass nearby. The place should be with solid ground, it is good if it is clay and sand. And in winter, snow should lie at the installation site of the reservoir so that the fish in the water do not freeze.
Materials and pit for the pond
To turn the idea of a pond from an old bathtub into reality, you must:
- Pond bath.
- Cement.
- Sand.
- Crushed stone or gravel.
- Metal grid.
- Clay.
- Steel wire.
- Large stones.
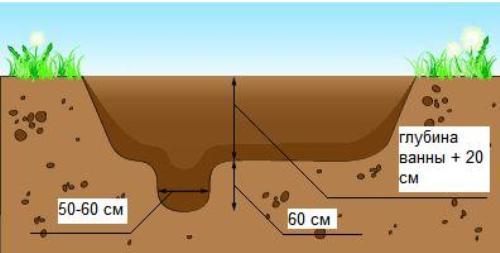
The depth of the pit should be 30 cm more than the height of the bath itself, so that it is completely immersed in the soil and the upper edge does not peek out. Especially this fact must be taken into account when building a pond on a lawn or other flat surface. The earth must be taken out immediately as the hole is dug, if it is fertile, then flower beds can be strewn with it. If the soil is clay, then it needs to be collected in a heap and sheltered from the rains, in the future it will still be needed.
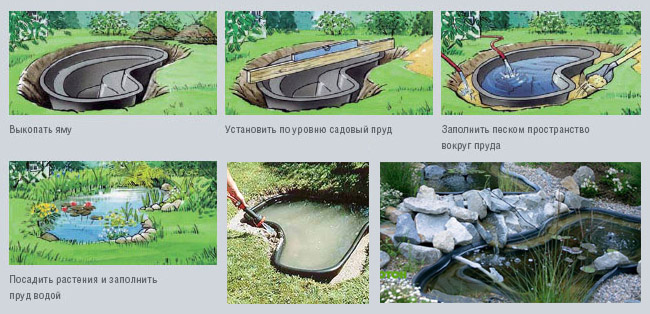
After the hole has been dug, it is necessary to remove the sod around it and dig a ditch about 30 cm deep and wide. Place a container in the hole. To do this, you will need the help of friends or a winch. After the bath is in place, you need to check with a level whether it is installed horizontally. If everything is fine, then fill the cracks with sand so that the container stands firmly.

Bathtub transformation into a pond
You will need:
- container for mixing cement;
- bucket;
- scoop or trowel;
- pliers for wire;
- scissors for cutting mesh;
- adhesive for tiling.
Work progress:
- Dilute with water, according to the instructions, glue with a cement base. If your glue turned out to be white, you need to put a dark pigment on it. As a result, you should have a mixture of pasty consistency. Please note that it hardens very quickly, so the work must be carried out without being distracted.
- Put on gloves and manually apply glue to the entire surface of the bath, first on the walls, and then what remains on the bottom. Do not worry too much that the glue lays down in uneven layers, it will even be better. All actions can be performed either while at the bottom of the tank, or lying on the soil near it. It is possible to smear the surface with glue even before lowering the bath into the pit, but then there is a possibility of damage to the surface. The point of the whole procedure is that the bathtub becomes a natural earthy color, and looks more like a natural pond. Alternatively, instead of glue, you can take a cement solution, but this work is more difficult, since the mixture will flow down the walls.
- Now you need to lay the grid. You can take a solid piece, or you can take small pieces. It depends on the shape of the grid. She needs to cover the upper edge and walls to the middle of the container.
- At the corners of the bath, tie wire rings perpendicular to the wall, in the future, shelves will be attached to them.
- Pour dry clay on the bottom of the bath, layer thickness - 3 cm.
- Dilute the clay with water to make a thick slurry, and coat the walls of the bath with it.
- Plant moisture-loving and not very whimsical plants in clay, for example, mint or coltsfoot in the upper part of the wall of the future pond.
- Wait a few hours until the clay dries out and you can fill the bath with water. Water should be let in a thin stream from a hose, you can put on a spray nozzle, putting it on the bottom so as not to destroy the clay layer.
- In the ditch that runs along the perimeter of the reservoir, you need to place marsh plants that love moisture, and put stones that will create a sense of the banks. When water is added to the pond, some of it always overflows and moistens these plants.
pond decoration
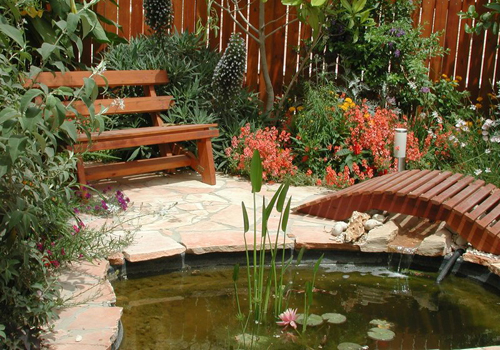
The pond from the old bath in itself is a decoration of the site, similar ones can be seen in the photo, but it can be made even more interesting. For this you need:
- Carry out underwater lighting, then the pond will fascinate with its lights in the dark. This effect is achieved thanks to mini-spotlights, they are placed under water, they are not expensive, and they create an excellent mood.
- Provide surface lighting. To do this, you need to install LED lamps next to the pond, you can also use halogen illuminators. In addition to meeting safety requirements, they are also the most economical lighting fixtures.
- To build a fountain inside the pond, for this you need a pump, which can be above-water and underwater and differs not only in the place where it is located, but also in the height of the jets.
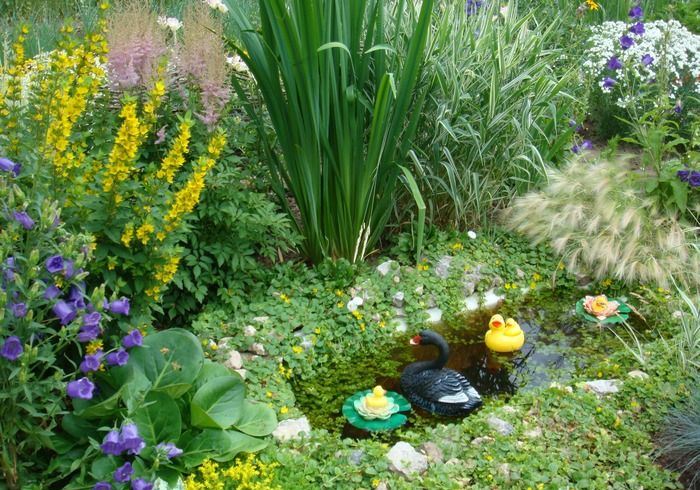
Any, even the most beautifully designed pond in the country from the bath will not look as picturesque as the one in which there is something from wildlife. You can plant plants in the ground on the bottom of the container, or you can leave them on the top of the water, and hide the roots in pots with earth. Tall plants should be planted near the pond, it’s good if reeds take root in you, then the reservoir will take on a natural look. Lilies and water lilies look harmonious on the water, they have one more advantage: they do not need land, they grow on water.
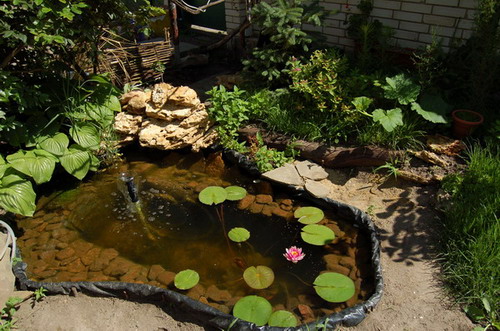
The visiting card of any pond is duckweed, even artificially created reservoirs are not immune from its appearance. Nobody specially planted duckweed, it eventually grows itself from the flowering of water. And if duckweed has appeared, it must be controlled, because it will capture the entire pond.
Always gathers visitors around a pond with fish. You need to choose them in a specialized store and, before buying, be sure to ask the consultant what types of fish can live in a small body of water and not be at enmity with each other.
Do not forget to constantly look after the pond. It must be cleaned of excess vegetation and debris and leaves removed from the surface.
Pond in winter
An artificial reservoir from a bath, as a rule, freezes to the bottom in winter. Therefore, with the onset of the first night frosts, all living creatures and vegetation from it must be relocated for wintering to another place. After that, pump out all the water from the pond. If there are any pipelines, then they need to be blown out and clogged. And clean the walls and bottom well. After that, leave the pond alone until spring.
If for some reason you cannot drain the pond before the cold weather or want to leave it unchanged, then experienced owners of such reservoirs are advised to fill up half of the sand in several plastic bottles, tighten the cork and put it in the bath. In frosts, these bottles will take on the pressure of ice, and the pond will remain intact. For 1 sq.m. reservoir needs one such bottle.
In specialized stores you can find such a device as an aerator, it enriches the water with oxygen, which is especially important in winter. You can also put a special heater in the pond, then the water in it will definitely not freeze. If you do not have the opportunity to buy new equipment, then it is enough to constantly monitor the pond in severe frosts and add hot water to the polynya so that it does not freeze to the bottom, so you can save the life of the fish. And be sure to see that the pond is under a large layer of snow, under it there is always a positive temperature even in severe frosts.
- Do not buy or put snails in the pond, these mollusks will scrub the walls of the bath, and the pond will lose its naturalness.
- You do not need to clean and change the water too often, your pond is not an aquarium with perfectly clean water.
- You do not need to buy carp for the pond, they prefer to burrow into the clay at the bottom, and the water will become cloudy from them.
- For an artificial pond, fish are ideal - tops, they clean the surface of the water surface, including mosquitoes, jumping out of the water after them.
- The water in the pond does not need to be drained completely, it only needs to be topped up once every two weeks. Let the water pour over the edge so that the plants around the pond are also moistened.
- A pond from a small baby bath looks unusual in the garden. It will take half the time and effort to create it.
- If you have several baths, then you can arrange a cascade of ponds in your garden plot.
In a word, if you have an unnecessary cast-iron bath and a bit of free time and imagination, then with a minimum of financial costs you can create a beautiful place to relax.