How to beat the bath from the inside. How to sheathe a bath outside: a choice of practical finishing materials
The market for finishing materials today is truly huge, but for the interior of the bath, where the humidity is always high and there are high temperatures, there are limitations in the use of cladding. It is quite natural that it is impossible to use materials that, under the influence of high temperatures, will emit substances harmful to health: plastics, chipboard and others. This is probably why for the interior decoration of the bath, the popularly beloved wood of various species is widely and universally used - a natural, affordable and easy-to-use finishing material.
Although, if the bathhouse is built of timber or logs, which look appropriate and natural in the interior, the bathhouse can not be sheathed with anything from the inside at all. Indeed, with proper observance of all construction technologies, the owner will not have to rack his brains about additional insulation. Although in this case, it is quite possible to sheathe the bath from the inside with clapboard - this is the most common and beloved facing. Lining is called carefully dried and planed boards made of wood of different species.
Let's take a closer look at the features of different types of wood so that you can choose and buy the most suitable lining option for finishing your bath.
In this video, a professional team is lining the sauna with clapboard:
Which tree is better to choose
When choosing how to sheathe the bathhouse inside, consider the conditions under which the lining will be used: for finishing the steam room, some breeds will be the best, for the rest room - others, and for the washing room - the third.
Linden is the clear leader, especially when applied to the steam room. Charging the human body with positive energy, it releases, when heated, various essential oils with anti-inflammatory and bactericidal effect, helping to strengthen health and enhancing the diaphoretic effect. And she smells just great. In addition, linden does not burn the skin, without heating up much due to its low thermal conductivity.
Aspen, also, is very pleasant to touch, and useful for health, drawing negative emotions and various ailments from the body. It does not rot, even in constant contact with water and is quite soft, so it can be easily cut without breaking. The price of aspen lining is much lower than linden.

Larch is a coniferous species that releases a lot of phytoncides and positively affects a person's well-being, the body's resistance to various infectious diseases. This material will perfectly decorate the walls of the shower room. Larch floors, a reliable and durable material, only become stronger over time. In addition, no tree bugs and rodents are afraid of this wood.
Hard, very hot wood species - oak and ash - are resistant to decay, moisture and temperature. Due to the fact that this wood does not deform, barrels, fonts and doors are made from it. Oak wood darkens over time, which only decorates products made from it. Ash - lighter than oak, nevertheless lends itself to rotting in conditions of high temperatures and humidity, therefore it is subjected to special processing and is used in the interior decoration of baths, in the manufacture of doors, furniture, stairs, railings or parquet.
The most durable of the hardwood species reviewed here is acacia. It surpasses even oak in strength, is resistant to decay, so products made from it do not deform and hardly break. These products are distinguished by their special durability and wear resistance, which makes it possible to use acacia in the rooms of the bath with the highest humidity - for the doors and the floor of the steam room. Acacia boards darken under the influence of temperature and time, acquiring deep beautiful shades.
Baths and saunas, loggias and balconies, walls and facades of houses are sheathed with this beautiful, reliable and natural wood material. The block house looks like a log by its appearance, surpassing it in strength many times. Passing a special drying, this material reaches a moisture content of no more than 12%, therefore, when mounting this board, you do not have to worry that it will dry out or deform.

The inner wall cladding of the bathhouse is performed with a block house of deciduous or coniferous species. Since denser conifers have a greater heat transfer, it is not recommended to decorate the steam room with materials from spruce or pine, because leaning against a pine wall in high temperatures can get a burn. But lovers of a specific coniferous aroma in a steam room often choose a cedar block house for cladding it - over time, its resin ceases to stand out from this material.
Glass-magnesium sheet (MSL) MAGELAN
Since 2007, under the MAGELAN trademark, the building materials market has been rapidly gaining an innovative, highly functional and reliable glass-magnesium sheet - LSU - also called "magnelite".
LSU is made on the basis of magnesium chloride and oxide, wood shavings and other binders, reinforced on both sides with fiberglass mesh with a cell diameter, depending on the purpose and class of the material.

This material has many advantages:
- Magnelite is an environmentally friendly material that does not contain such harmful substances as resins, asbestos, adhesives and phenols. Odorless, it does not emit toxic substances even at high temperatures.
- LSU has high fire resistance, withstanding open fire and significant temperature changes and preventing fires.
- The high moisture-resistant characteristics of magnelite make it possible to successfully use this material in rooms with high humidity - swimming pools, saunas, showers. With prolonged exposure to water, LSU does not soften or deform.
- The antiseptic properties of LSU prevent the formation of fungi and mold, which again allows it to be used in rooms with high humidity.
- This material is lightweight and easy to process, it can be mounted quite quickly and does not require any special devices and tools.
- On the front side of LSU it is possible to use any decorative and finishing materials, which gives unlimited possibilities in the interior decor of the premises.
- MAGELAN is also distinguished by high sound insulation properties, its surface is not electrified, excluding the formation of sparks - these qualities of the material allow it to be used in the production of structures for various special purposes.
The best way to decorate a bathhouse from the inside - everyone decides for himself. But the accessories, shelves and sunbeds in the steam room, of course, are made of traditional wood.
We have told you about the most preferred materials for finishing the bath, from traditional wood to modern material MAGELAN, and we hope that we have managed to greatly facilitate the process of choosing a material for the interior decoration of the bath.
16227 2 12
Sauna decoration: we choose the best materials for the steam room, washing and changing rooms
Steam room
Many years ago, having just moved to the village and built our first bathhouse, we were also very arrogant. And they lined the steam room with pine boards. The scent! The beauty! Joy knew no bounds exactly until the moment when red-hot resin drops began to drip on the head, and ugly streaks appeared on the walls.
I had to tighten up the theory, and not only be proud of my ability to work with my hands. The head in this business is also not superfluous.
Materials for walls and ceilings

It will not be news to anyone that no synthetic materials for covering the steam room are categorically used... Many of them perfectly tolerate heat and moisture, but when heated, they emit harmful substances or get very hot on their own.
But not all natural finishing materials are suitable for this purpose. The most suitable one is a tree in the form of a polished edged board, lining, blockhouse or imitation of a bar. However, there are also limitations!
Are all rocks able to withstand temperature extremes, resist fungus, and not rot due to constant contact with humid air? Not everyone. And many of those that are capable have certain disadvantages: they are expensive, they get very hot or "cry" with resin.
Brief characteristics of different types of wood, which are most often used for finishing baths and saunas, will help you make the right choice:
- Linden. Very little changes under the influence of steam and temperature, retaining a beautiful creamy shade. Fills the steam room with a delicate pleasant aroma. But it gets very hot, so the linden shelf needs to be doused with cold water or a sheet should be laid before planting. It is unlikely that it will be possible to insulate the walls with just linden clapboard without heat-insulating material due to its high thermal conductivity. The cost of 1 sq.m. 600-800 rubles.

- Black alder. By operational characteristics ideal material: almost does not change the appearance and properties, on the contrary - the aroma and color of wood becomes more intense over time. Besides does not heat up, allowing you not to be afraid of burns. But it does not exude especially useful phytoncides and is more expensive than linden - 750-1200 rubles.

- Aspen. Finishing inside the bath with aspen is not the best solution in terms of aesthetics, since it turns gray under the influence of moisture... But in terms of thermal conductivity, it is similar to alder - it does not heat up and can by itself become a good additional heat insulator for walls and ceilings. In addition, it allows you to save money, since it costs 400-500 rubles per sq.m.

- Larch. If you need high quality, beautiful and, as they say, for centuries, then larch is an excellent choice. Including the price (up to 1000 rubles per square meter), if we compare it with the cost of valuable wood species with similar properties. She possesses the highest resistance to moisture, which only increases over time... But finishing the steam room in the bath with larch is a difficult task, since this dense wood is difficult to process.

- Ash. This wood already belongs to valuable varieties and costs a square meter of such a lining in the range of 1500-2000 rubles. As for the use for finishing the steam room, it is perfect for this purpose: it has a beautiful texture, does not darken, is not afraid of high humidity and temperature, and besides has healing properties, especially useful for people with respiratory diseases.

- Oak. This is the densest and most beautiful of our local wood species. In all respects, it is suitable for cladding a steam room, it looks solid and reliable, but it also costs decent: 2300-2800 rubles. This finish is already considered elite.

- Abashi. For those who do not count on high costs, this and the next paragraph can be skipped, since it will be very expensive to decorate even a small room with African abasha oak. 3000-3300 rubles per sq.m. This exotic wood surpasses all others in terms of resistance to moisture and has an unusual richness. But it is unlikely that all this justifies its price, since it does not bring any benefit to the body and, moreover, it heats up a lot.

- Canadian cedar. The most expensive material from the listed, used only in elite baths. Delivers a pleasant aroma and healthy essential oils. Very beautiful, easy to handle. Depending on the thickness of the lining, it can cost from 4000 to 8000 rubles per square meter.

The range of prices in these examples is explained not only by the different thickness of the boards, but also by their length. The short ones are cheaper. In general, all these are products of grade A or Extra, so you can find it cheaper.
Now about the very popular and inexpensive, but completely unsuitable for use in hot and humid environments.
- Pine and spruce. The most inexpensive lining, costing 200-240 rubles per square meter, is made from these conifers. And it is perfect for wall cladding in the recreation room, making furniture for it. The exterior decoration with a pine blockhouse is also quite beautiful and durable, if the walls are built of bricks or blocks.
But you can't put a pine tree in the steam room. I have already described the reasons above - this is the "tearfulness" of the tree under the influence of high temperatures. Moreover, due to moisture, it becomes loose. And since it is impossible to use protective impregnations here, it will not last long.

- Birch. It is completely unsuitable for wet rooms - steam rooms and especially a shower in a bath. Very afraid of moisture: it quickly loses its appearance, begins to rot and mold... But in dry and well-ventilated rooms, it will not yield to larch or oak in terms of strength and durability. It can be considered as a finishing material for a restroom. Especially if it is spacious and you are looking for something not very expensive. 400-440 rubles per square is quite tolerable.

Honestly, from an aesthetic point of view, it is not so important how you coat the walls and ceiling: very few people will understand from one glance at expensive wood how much it cost you. It is much more important how to decorate the bath. Well-sanded, well-fitted planks that are pleasant to touch are half the battle.
Judge for yourself whether the traditional for our region and exotic finish is very different in business:


If your imagination and patience are enough for decorative finishes in the form of backs, headrests and beautiful grilles - even better. All this can be done from expensive varieties.

All these wall cladding tricks are unnecessary if they are built from thick logs of suitable species. It is enough to dig in the seams well and grind the blockhouse. But finishing a block or brick bath is not only decorating unsightly surfaces, but also the possibility of warming them and reducing heat loss. But that is another topic.
It is also necessary to consider such a question as the fire-prevention finishing of a bath from a bar or log.

I will not repeat myself in the following sections about the suitability of a particular type of wood for finishing other premises. Their characteristics speak for themselves; it will not be difficult to make a choice.
Floor
The floor in the steam room should not be slippery or overheated. The most inexpensive solution is a cement screed with wooden ladders laid on top. Slightly more expensive - tiles or porcelain stoneware with the same ladders.

Ladders are gratings made of thick boards or bars that can always be taken out and dried or lifted and washed from all sides. Therefore, there are no special requirements for the type of wood, you can even use pine - it will not warm up enough on the floor to release resin.
Solid wood flooring is another matter. Here you will have to choose rocks resistant to moisture - larch, oak, alder.

There is another option - a heat-treated board. It undergoes special treatment with hot (180-200 degrees) steam in the absence of oxygen, while acquiring very high resistance to moisture, strength and dark shade.

The price depends on the type of wood. For example, a square meter of 40 mm thick floorboards made of pine will cost about 1250 rubles, and from alder already 2700.
Washing room
The washing room can be different. If the bath is supplied with water from a centralized network or a well with a pump, and there is a water heater, it is enough to install a shower cabin or simply equip a shower corner.
This is impossible without running water, so benches and watering cans are needed. It is not uncommon to find both, complemented by a large plunge pool or even a swimming pool. And also washing rooms, combined with a steam room.
In each case, the interior decoration of the wooden bath will be different:
- For the common room, all those materials are used that are described in the previous chapter. It is a wood that can withstand high heat, for walls and ceilings and tiled or concrete floors with ladders.
- In a washroom, separated from the steam room and without a shower, for wall decoration any wood can be used except birch... Including coniferous. The temperature is not that high here, so the resin is unlikely to flow. But the air will be filled with a pleasant aroma.

- Decorating a shower room in a wooden bath can also be done with clapboard, but in this case good supply and exhaust ventilation is needed to let the boards dry after finishing the procedures. They must be treated with a moisture-repellent agent and the coating must be renewed periodically.


- Wall cladding with tiles or stone at least one and a half meters from the floor will be much more durable. If the load-bearing walls are wooden, they are waterproofed, sheathed with moisture-resistant plasterboard, and tiles are already glued to it.


- A very convenient option is a shower room with a door or curtain. It can be arranged in a dead end or a corner can be fenced off with a partition. And there will be no questions about how to decorate the walls in the sink: with tiles. And the rest of the space, where there will be no heat, no high humidity, whatever.

- It's even easier - to put a ready-made shower stall, and then you don't have to bother with wall cladding, plastic panels will do. In this case, materials for decoration are selected in the same way as for a bathroom in an apartment.

The ceiling can be plastered here and covered with moisture-resistant paint that is resistant to washing. But it will be necessary to renew the coverage with regular use of the bath at least once every two years.
Such types of finishes as wooden and plastic lining, slatted or stretch ceiling are also quite acceptable. They are not afraid of moisture, spotlights can be built into them, and the space between the ceiling and the cladding can be filled with thermal insulation.

If the bathhouse is wooden, built from ordinary logs or beams, finishing can be started not earlier than in a year... Because it will settle as the wood shrinks, deforming the cladding.
If you don't want to wait, you can get confused with a floating frame for drywall and tiles. How to do this correctly is described in the article "Facing a wooden house with plasterboard". And not lined walls must be treated with an antifungal antiseptic impregnation on a natural basis.
Dressing room
The materials for decorating this room can be very different. But it's hard to come up with something better than a tree. However, it can be supplemented with other types of finishes: decorative plaster, artificial stone tiles, various wall finishes, etc.
It all depends on the size and purpose:
- If this is a small dressing room in a free-standing bath, intended only for undressing and dressing, it is better to limit yourself to moisture-resistant wood trim. Especially if the sauna is heated once a week, and the rest of the time is not heated.

- If this is a spacious recreation room with a heating system from home, then your desires are not limited by anything. Even though wallpaper and painting on the walls - if only you like it.
Examples for inspiration:


As for how to decorate the bath outside, any facade materials can be used here. Most often, a beautiful log house is left without cladding, limited to caulking the joints, grinding and processing with decorative and protective agents.

And buildings made of bricks, foam blocks and other building stone are finished in accordance with the house or imitate a log house using a wooden, plastic or metal blockhouse.

Conclusion
Now you know what materials to use so that the interior decoration of the bath from a bar will please for many years in a row, without requiring repairs and alterations. For this, it is not necessary to use expensive exotic materials, which have little health benefit. Our native linden in this respect wins a hundred points over the African oak, and it looks no worse.
If you have anything to say or ask on a topic - you are welcome in the comments. Let's discuss.
The history of such a simple but necessary invention as a bath goes back to the distant, distant years, but even today, this structure practically does not lose its relevance. A shower and a bath cannot completely replace a bath, because in it you can not only get rid of dirt, but also improve your health. Usually a bathhouse consists of a dressing room, a sink and a steam room, but the last two points are often combined.
When building each of these premises, it is necessary to decide what is the best way to sheathe the bath from the inside, because the air temperature in the room will depend on this, as well as the amount of fuel required to heat it. In this article we will tell you about all the most popular and reliable options for lining a bath from the inside.
Briefly about the purpose of the cladding
Having built a bathhouse from cheaper materials, you will have to think about choosing a cladding material.

First of all, you need to mention the main characteristics that the selected material should have:
- It must withstand high temperatures and be non-flammable;
- Steam and moisture resistance are also necessary indicators;
- It is advisable to choose natural materials without harmful chemical treatment, so as not to harm your health with harmful vapors.
Speaking specifically about what can be used to sheathe a bathhouse inside, it is worth mentioning the lining, block house and magnolite. It is also not easy to choose one of the three options presented, so below we will tell you in detail about each of them.
Lining for a bath
Lining is the most popular material for bath cladding, because it combines all the most necessary qualities: reliability, beauty and reasonable price.

Also, the lining has a number of useful properties:
- Lining allows you to save a large amount of fuel, reducing heat consumption;
- Behind it, you can hide various communications, increasing the level of comfort inside the room;
- The lining is resistant to moisture and steam, in addition, it is able to regulate the level of moisture in the steam room and allows the walls of the bath to "breathe".
- Longevity and resistance to the formation of mold and mildew are also important properties that this material possesses.

It is also worth paying attention to the wood from which the lining is made:
- The best option for a steam room is linden, because when heated, it releases essential oils that have a disinfectant and anti-inflammatory effect. Also, the advantage of this wood is its low thermal conductivity, which helps to protect the skin and respiratory tract from burns, while increasing perspiration.
- Aspen is a worthy alternative to linden... The price of aspen lining is quite low, and the material itself is resistant to moisture and decay processes. Warming up, aspen promotes health person.
- It is recommended to use larch in the shower, because it has high strength and resistance to water. Larch lining has a positive effect on well-being and improves immunity.
- The steam room can also be finished with acacia clapboard... Acacia is a very durable tree, so products made from it serve for a very long time. The only drawback of this wood is its high price.
You can see an example of such a cladding in the photo.
Block house for a bath
If you cannot decide how to sheathe the steam room inside except for the lining, then remember the block house, because it has similar qualities, but a different appearance. The block house has a semi-oval shape, so the walls made of this material look like a log house, which gives your bath a "historical naturalness". The strength and resistance to various influences of the block house are quite high, however, it is recommended to carry out a bactericidal treatment once a year.

Block house is classified by quality:
- Class "C" material undergoes only surface treatment, various defects may be present on its surface, for example, cracks or chips. Such material is not recommended for installation in a bath;
- Block house class "B" it is of average quality and is rarely used to decorate a bath. On its surface, there may be small cracks and knots no more than 3 cm;
- On the surface of class "A" material you will not find any flaws except for small knots. This option is great for a bath.
- « Extra "class has a perfect finish, and its surface is free of any imperfections. Ideal for decorating baths, however, it also has a fairly high price.
The block house is made of various woods, but only deciduous and coniferous materials are suitable for the bath. Remember that using spruce and pine is highly discouraged, because you can burn your skin on their heated surface.
Magelan
This is a modern, however, not the best material for bath cladding on the construction market.

If you are thinking about how to sheathe the dressing room inside besides the lining, then you can undoubtedly resort to this option, in addition, it is perfect for other rooms due to its qualities:
- It is completely unaffected by moisture and decay processes;
- High temperature, as well as its drops, do not harm this material;
- Magnelite sheets are easy enough to mount.
This cladding is made of the following materials: fine wood shavings, magnesium and other unnatural components, which are reinforced with glass mesh. By making the bath cladding from such material, you reduce the environmental component of the room.
Conclusion
Now you are familiar with all the options for the internal lining of the bath and you can independently decide how to sheathe the sauna inside, starting from your own desires and financial situation.
The best options to sheathe the bath inside. What material for the inner lining of the bath will look beautiful and at the same time will be inexpensive. Photo with various options for the natural inner lining of the bath.
The most important stage in the construction of a bath is the installation of the inner cladding. It is worth paying special attention to the choice for the interior design of the bath, since the service life and the quality of the finish will depend on this. The processing material also plays a role in maintaining the proper appearance of the inner lining.
When choosing a material, you should pay attention to the following qualities:
- steam resistance;
- hydro resistance;
- resistance to fire;
- environmental friendliness;
Internal lining of the bath: the best options
All of these characteristics are possessed by a combination of foil and basalt wool. Installation begins with the installation of a frame made of wooden beams (the best option here is wooden bars 30 x 30 mm), then the filling is done with cotton wool. Foil plays the role of insulation, since it has the necessary listed characteristics, and is placed in a layer on top of basalt wool. Foil is fixed using a pneumatic steller.
Pine lining is another option for high-quality interior decoration of a bath or sauna. Linden and alder are also often used due to the fact that such wood does not emit tar when heated. If you process the material according to all the rules, then its service life will significantly extend.
Pine lining: one of the most common options for the internal lining of a bath due to its aesthetic appearance and decent performance characteristics
A material that imitates a timber is also successfully used for cladding a bath from the inside. In addition to the technical characteristics, it also has a pleasant appearance. The material is very convenient to mount, it is not subject to deformation, unlike natural wood, cracks do not appear on it over time. The imitation wood pattern gives the impression of real wood. Raw materials for imitation of timber are used environmentally friendly, so this finishing option can be considered ideal.
Rules for choosing material for interior decoration of the bath
Often, the low cost of the material can seem very attractive and there will be a desire to save money on interior decoration. But you should not be led to such tempting offers, since in the matter of interior decoration, first of all, it is worth focusing on the environmental friendliness of the material.
Attention! Use only natural materials for interior decoration of the bath, as when the temperature rises, chemicals can have a negative effect on human health, in particular, cause an allergic reaction.
Natural materials have the following advantages:
- Fire resistance;
- Lack of harmful substances;
- Good air permeability;
- They do not have a specific smell.

When visiting a bath made of natural material, there will be no discomfort, since such a design will breathe and circulate air. Wooden finishing materials will be the best solution here.
How to choose a coating treatment
This question is more complicated than the choice of the material itself, since the variation in coating protection means is much greater, and the composition of such mixtures is very controversial.
Such funds are designed to protect the coating from fungus, the appearance of cracks. When choosing a means for processing wood, you should pay attention to the composition, which should not contain harmful components. When heated, such a composition should not emit carcinogenic substances, and there should be no specific smell. The amount of chemicals in the composition should be minimized, otherwise it can affect health.
Water-based formulations can be prioritized. For example, a varnish with such a composition, after good drying, will be completely harmless even at high temperatures.

Since the bath is a room with a high level of humidity, it is recommended to additionally process the inner lining to protect against fungus and cracks.
Wax is also often used because of its simple application. It protects wood better than other means from possible fungus, which is likely to occur in a room with a high humidity level like a bath.
Advice. An option is possible not to process the coating at all. In this case, after each visit to the bath, it should be thoroughly dried, and if damage is found, replace the material section as soon as possible.
General conclusions on the choice of interior decoration of the bath
Naturalness is the key to a high-quality bath, which will only be beneficial. When choosing, avoid cheap, but chemical-laden materials, and use high-quality and natural materials, such as wood, varnishes and other water-based substances and wax mixtures. In a bath with a natural finish, you will enjoy not only the process, but also the aesthetic appearance.
Video: Internal lining of the bath
Building a bathhouse is only half the battle. It is important to properly equip it from the inside: complete the decoration, install the stove, arrange furniture, etc. High-quality finishing of the premises will make the bath procedures truly soulful and as pleasant as possible.
In the bath, there are traditionally several rooms with different indicators of humidity and temperature, respectively, there are a number of restrictions for the use of some finishing materials.
| Premises. Conditions | Recommended materials | Materials that are undesirable for decoration |
|---|---|---|
Steam room. | 1. Wood. Decorating with a pair of lining made of wood is considered a classic. This material is best suited for wall, floor and ceiling decoration. It requires processing with special impregnations (it is impossible to cover wood in the steam room with varnish and paint not on a natural basis). 2. Stone. It is often used for wall cladding behind the furnace, at the same time being a fire cut. The solution is practical, durable, and quite original. 3. Salt panels. Ideal material for medical treatments. Illuminated salt blocks will pleasantly transform the steam room. But it is better to use this material in saunas with electric stoves, because direct contact with water and excessive moisture will have a detrimental effect on the material. 4. Brick, facing. Can be used for wall cladding behind the stove. Combines well with wood wall cladding. 5. Porcelain stoneware and ceramic tiles with a non-slip surface for finishing the floor and / or wall behind the oven. Recommended as a top coat for insulated screeds. It is better not to put tiles on a wooden base in a steam room. 6. Mosaic. Traditional material for finishing hammams. It is not often used in Russian and Finnish baths. | 1. Parquet and laminate. 2. Linoleum. 3. PVC panels for wall and ceiling cladding. 4. Ceramic tiles are glossy (slippery). 5. Ceiling tiles of all types. 6. Plaster. |
| 1. Porcelain and anti-slip tiles, mosaics. Recommended in combination with an elastic anti-fungal moisture resistant grout. 2. Natural or artificial stone. 3. Wood impregnated with antiseptics and water-repellent compounds. The service life in the shower is rather short. The best type of wood for finishing a shower room is larch. 4. Moisture resistant drywall. It is used for the construction of partitions, as a base for laying tiles. Plasterboard can be used to protect the walls made of laminated veneer lumber from moisture. It is permissible to paint the gypsum fiber board with moisture-resistant paint, but this option is short-lived. 5. PVC panels. Not a bad option for finishing walls and ceilings, provided that waterproofing is properly organized. Decorating wooden walls with plastic panels is permissible only after complete shrinkage. 6. Moisture resistant plaster. Finishing can hardly be called budgetary; additional waxing is required. It is possible to bring to life unique patterns by choosing the right structure and shade of the composition. | 1. Parquet and laminate. 2. Linoleum. |
|
| Any available materials are suitable for decoration. | It is not recommended to trim the wall adjacent to the steam room with wood or plastic. Better to use facing brick, stone, decorative plaster. |
Consider several ways to decorate the bath inside.

An example of finishing the ceiling of a rest room with clapboard
Lining is used very often for wall decoration. These can be expensive panels made of cedar, larch or more budgetary ones made of aspen or linden. Often, bath owners combine different types of wood, the finish is unusual and very beautiful. It is better to use pine lining for covering the dressing room; in a steam room it is not the best choice.


The combination of lining from different types of wood for wall and ceiling decoration

The lining is fastened vertically or horizontally, and patterns are laid out from the rails, fixation is made to the battens of the sheathing. Foil vapor barrier must be used. But it is already difficult to surprise someone with such a finish.

If you have a sufficient amount of free time and material, a share of diligence and accuracy, pay attention to method of mounting the lining "herringbone".
Step 1. Calculation of the lining. Calculate separately the area of each wall in the steam room (it is necessary to multiply the length of the wall by its height), sum up the results. It is possible not to deduct the area of the doorway, since it is necessary to provide for a stock of material, taking into account the scraps.

When buying lining, pay attention to the label - manufacturers indicate the number of panels in the package, as well as the area of the finishing material. Divide the total area of your steam room by the area of one package and get the number of packages you need for finishing.
If there is no information on the label, you will have to measure the length and width of each panel without taking into account the width of the spike, and then calculate the number of panels for finishing. It is better to purchase material with a margin.
Important! Do not use knotted lining to decorate the steam room. The density of the knots is higher than the density of the solid wood; when heated, the knots will fall out.
Step 2. Preparing the lining for installation. Unpack the purchased lining and store in a heated room. You can start finishing in two days.

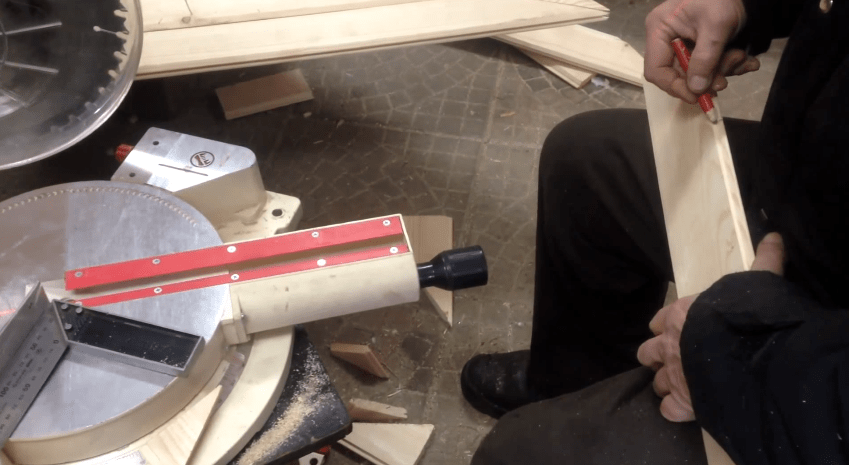
During this period, prepare the workplace and tools:
- jigsaw or circular saw;
- level, plumb line, tape measure, protractor, square, pencil;
- finishing nails, hammer;
- wooden plinth for floor and ceiling;
- mallet.
Step 3. It is better to fasten the lining with the spike up. Based on this, we make the layout of the panels.

The herringbone can be angled up or down.

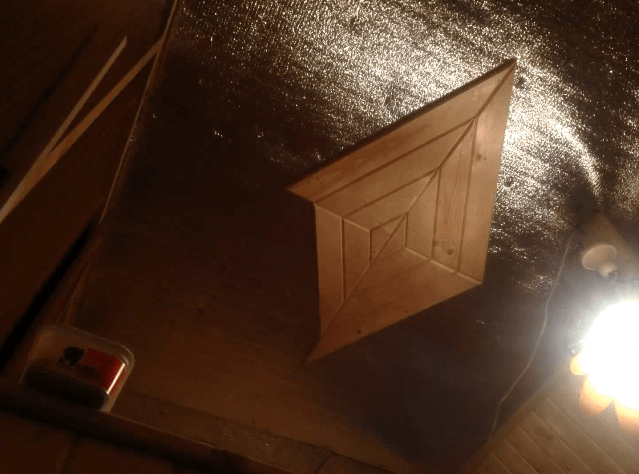
The photo shows a way of laying herringbone with a downward angle
Cutting must be done at an angle of 45 degrees. The ends of the panels should be on the lathing bars. For convenience, you can create a template and perform markup on it.
Step 4. We begin to fix the lining from the top. We fix the first panel with finishing studs through and through. If the bath is wooden and has not yet shrunk, it is better to leave a gap of 3-5 cm between the ceiling and the cladding, which will be covered with a plinth.
Insert the second panel with a thorn into the groove of the top panel, precisely align the ends of both panels. Fastening is carried out with a kleimer. We insert the kleimer into the groove, hammer three finishing nails into the holes of the kleimer through the doboinik. One panel will need at least two cleats, depending on the length of the lining.

We continue fastening from top to bottom until we reach the floor. It is also worth leaving a gap of up to two centimeters here. Lastly, from above and below, we fasten the triangles cut from the lining, fixing them with nails through and through.
We mount the next row in the same way, but change the direction of the lining.
After installation, the joints of the panels are closed with a thin wooden plinth, fixing it with finishing nails strictly vertically.

There is one more way of laying the "herringbone". The technology resembles the laying of parquet. The lining is sawn into rectangular planks. Laying is carried out with a shift equal to the width of the panel, excluding the tenon. Fixation is done with clamps or construction brackets.

Herringbone wall cladding method
Wall paneling prices
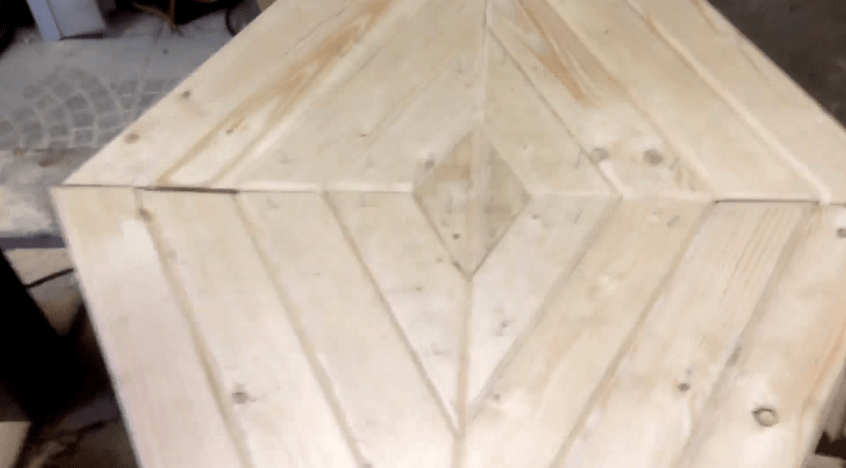
Method of mounting lining "rhombus"
As a crate, it is better to use not a timber, but boards. This will simplify the installation process. The method is applicable for both wall and ceiling decoration.
Step 1. You need to draw a rhombus with angles of 30 and 60 degrees. Draw a straight line between the corners of 30 degrees, breaking the rhombus into 2 triangles. We cut the paper blank, transfer the drawing to the lining so that a thorn is located on the two edges of the rhombus. We cut out the workpiece. We connect two triangles to make a rhombus. We fix the rhombus with finishing nails through to the crate (two nails for each triangle, we do not drive in the carnations completely).
Step 2. We take the whole panel of the lining. We apply it to the rhombus, connecting its spike to the groove of the board. On the board we make markings for cutting.


We are leading a straight line to the thorn. On the lining spike, draw a line perpendicular to the board itself, continuing the pencil markings to the other side of the panel spike.
We saw the board according to the markings. To do this, turn the lining over with the pencil markings down, put the edge of the circular saw on the line marked on the spike. We turn on the saw and make a cut.


We take the second lining board. We attach it with a groove to the rhombus (on the edge where there is no thorn). We carry out markings for cutting, observing the accuracy of the angles. We carry out the check with a protractor and a long ruler. We cut along the markings.
Advice! It is more convenient to connect the initial elements on the table or on the floor, nailing the wooden elements with finishing studs to a piece of FSF plywood.
Step 3. We continue to work. Haste is unacceptable. It is important to accurately mark and cut, to join the corners. We mark or number each element so that in the future it will be more convenient to mount it on the wall or ceiling.
Step 4. When the decorative element reaches the desired size, you need to take out the carnations and disassemble all the panels that were collected on the table.
We will assume that the insulation and vapor barrier have already been completed, the crate is full. Using a level and a tape measure, you need to find the place where the center of the rhombus will be located. Accordingly, the center can be located only on the plane of one of the beams or sheathing boards. We nail the central rhombus to the crate by driving the finishing studs into the thorn. For convenience, it is better to use a doboinik so as not to break the lining with a hammer.
We attach the following lining boards to the central element, adjust them with light blows from a mallet and fix them in the same way.
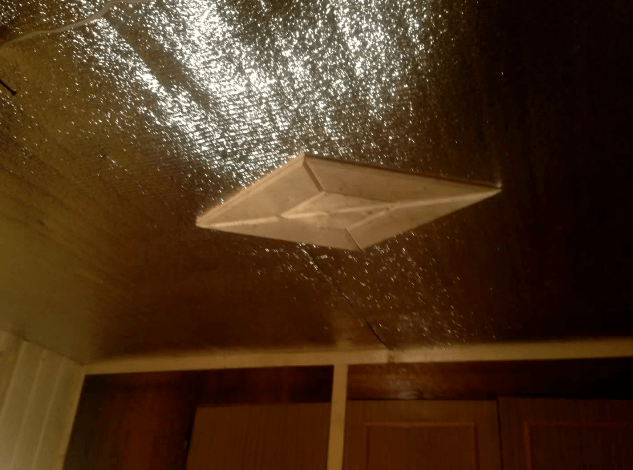

Assembling a rhombus on the ceiling. When the decorative element is fixed, further cladding can be carried out parallel to the fixed panels or perpendicular
The joints of the rhombus can be closed with a thin wooden plinth, nailing it through with finishing galvanized nails.
On a note! By placing the lining panels in different directions, combining the lining of different types of wood, you can create an interesting pattern that will turn a simple steam room into a work of art. Wood of the "elite class" is considered to be cedar, fir, ebony and mahogany, rosewood, Canadian hemlock, African oak, pear and elm, eucalyptus.


When the cladding is complete, saturate the wood with a protective compound.
Video - Decorating premises with clapboard, the result of laying boards in different directions
Video - Lining ceilings
Mosaic wall decoration
If the walls of the bath are wooden, of course, you cannot put tiles or mosaics on them. Moisture-resistant drywall will act as a basis for the mosaic. This material is quite hard, does not deform in high humidity conditions, does not emit harmful substances into the atmosphere, that is, it is completely safe.

The frame for drywall is similar in structure to the frame for the lining. For its arrangement, we will prepare a timber of 50x25 mm and 75x25 mm antiseptic, galvanized self-tapping screws, perforated corners. We will carry out the marking using a tape measure, a plumb line and a level.

The timber must be antiseptic on its own or purchased material that has already been processed. Store the timber indoors
Step 1. We fix the timber under the ceiling with self-tapping screws (if an interior partition is being made, then the upper timber must be fixed to the ceiling). Using a plumb line, we make markings on the floor for attaching the lower beam. They must be in the same plane.
Step 2. We fasten the lower beam to the wall with self-tapping screws for wood.
If the walls are made of blocks or bricks, the fastening is carried out with dowels along the pre-drilled holes in the wall.
Step 3. We measure the distance between the upper and lower bars, this will be the length of the vertical posts. We cut the timber with a jigsaw or a saw. We install the first rack in the corner of the room. We fasten the rack to the upper and lower beams with perforated corners and self-tapping screws.
Step 4. At regular intervals, install the following racks in the same way. We check that the racks are in the same plane.
Step 5. We cut the timber to a length equal to the distance between the posts. We fix intermediate jumpers between the posts with corners and self-tapping screws.

Prices for moisture resistant drywall
moisture resistant drywall
Frame made of metal profiles


Step 1. Using a laser level, we check the verticality of the wall. We set the level on the floor, measure the distance from the wall to the beam in different places with a tape measure.
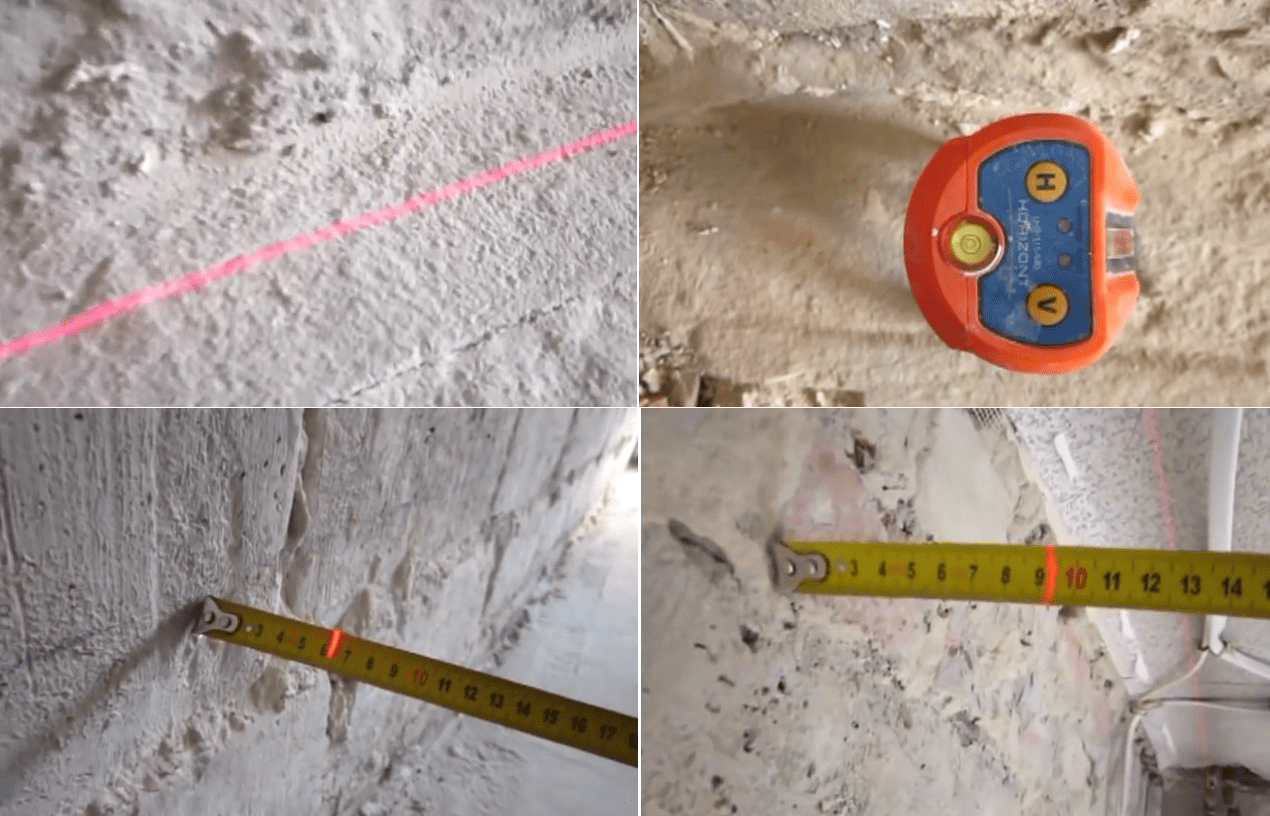

Step 2. If the differences are significant, we knock down the protrusions with a puncher. We remove debris and dust. We repeat the plane check operation again.

Step 3... Using the rule and a pencil, draw a line on the floor (we retreat from the wall by about one and a half centimeters). A profile will be located along this line. We fasten the PN 50x40 profile to the floor with dowel-nails.

We draw a line along which the profile will be located

Step 4. We insert vertical guides (PN 50x50) into the lower fixed profile and fasten them to the walls (in the corners of the room) with dowel-nails 6x60 mm.


Step 5. We fix the PN profile to the ceiling. The top and bottom profiles must be in the same plane. If the length of the room exceeds the length of the profiles, we make docking, that is, we insert one segment of the profile into another with an overlap of up to 40 cm.

Insert the profile into vertical guides. Be sure to check the horizontalness of the upper guide, for this we insert a vertical profile in the center and apply a level.

If necessary, move the upper profile a little and only then fix it with self-tapping screws to the ceiling. We install the fasteners at intervals of 50 cm.
Important! The laying of electrical wiring, pipes and other communications must be completed before the start of finishing work.
Step 6. Install intermediate profiles. We fix the ends at the top and bottom with self-tapping screws with a press washer. The distance between the profiles is taken taking into account the dimensions of the drywall sheet. For example, from the extreme post we fix the next two at a distance of 40 cm, and set the fourth post so that its center is at a distance of 120 cm from the first (corner) profile.


Step 7. We check the position of the vertical posts with a level and begin fixing the profiles with suspensions.


We insert the suspension between the vertical profile and the wall. Mark the points for drilling holes with a marker. We drill holes with a puncher, insert dowels into the holes, attach suspensions and fix them with self-tapping screws.
We bend the shelves of the suspensions, screw in the self-tapping screws "bugs" to attach the suspension to the profile.


First, we fix the suspensions in the center of the profiles, then the rest. The vertical step between the suspensions is about 50-60 cm.
On a note! To prevent the vertical profiles from shifting or turning along their axis during the installation of suspensions, we fasten them with a horizontal profile, screwing it with self-tapping screws with a press washer.

Step 8. We install jumpers. We mark the profiles for cutting. According to the markings, we cut the profile with a grinder.

We stretch the cord horizontally and, according to this marking, fix the jumpers with self-tapping screws and a press washer.


Installed jumpers. They are necessary if the size of the drywall sheet is less than the height of the walls.
On a note! Use magnetic screwdriver bits. This will simplify and speed up installation.

Installation of drywall sheets on the frame
Consider an example of installation on a metal profile frame. Installation of sheets on a wooden frame is carried out in the same way, the joints of the sheets should be located in the center of the profiles. Do not allow direct contact of drywall with the floor; plastic linings will be placed under the sheets. It is also not necessary to fasten the sheets tightly butt-to-end; it is better to leave a 1 mm gap between the edges for the convenience of filling.


For cladding, we use sheets of moisture-resistant gypsum board 12 mm thick. We fix the sheet with self-tapping screws 25 mm long. The step between the screws is about 15-17 cm. Screw the screws in a checkerboard pattern.
First, we fix the sheets along the perimeter, then along the line of vertical profiles. We draw a vertical line according to the level and along this line we carry out fasteners. We recessed the caps of the self-tapping screws into the sheet by 1 mm.


Prices for metal profiles
Puttying seams
The joints of the sheets must be putty using a mesh and a moisture-resistant putty. If the edges of the drywall have a hand-cut edge, chamfer it at an angle of 45 degrees with a sharp knife. A primer is applied to the joints. The mesh is embedded in the putty mixture. After the putty dries, the seams are rubbed with sandpaper.


Mosaic wall decoration
To fix the mosaic on the walls of the bath, it is better to use a moisture-resistant glue, for example, "Ceresit CM 115".

Step 1. Cooking glue.
The room temperature should be from +5 to + 30 ° С. The recommended water temperature for the adhesive mixture is from +15 to + 20 ° C.
Gradually add the dry mixture to the water. For 1.5 liters of water, 5 kg of the mixture is required. Mixing is carried out with a construction mixer or a drill with an appropriate attachment. Drill or mixer rotations should not exceed 400-800 rpm. After the first mixing, we pause for 5 minutes and repeat the mixing.

Advice! You should not cook a lot of glue at once, the time of its application is limited to 20-30 minutes. Do not dilute the finished glue with water. If it thickens slightly, you need to mix the mixture well.
Step 2. We apply glue to the wall. We begin to glue the mosaic from the upper left corner. We collect some glue with a regular trowel and apply the mixture to the edge of the notched trowel. We distribute the glue evenly over the drywall.
Step 3. We unpack the mosaic, take one piece and press the mesh to the glue. Gently straighten it so that there is the same distance between the elements. We roll the entire fragment with a roller or a wide rubber spatula.

It is important to lay on a level so that the rows are even. The area of the applied glue should not greatly exceed the size of one fragment.
You can only cut the mesh; it is not recommended to deform the pieces of ceramic or glass themselves.
Step 4. After 24 hours (or more, depending on the drying rate of the glue) after laying the mosaic, we grout. To fill the joints, we use a moisture-repellent compound with antifungal properties, for example, Ceresit CE 40 Aquastatic.
For 2 kilograms of dry mixture, you will need 640 ml of cool water. Mixing is carried out with a construction mixer at a speed of up to 800 rpm. Pour the dry mixture into water gradually. After mixing, take a five-minute break and repeat the mixing of the grout. The finished solution must be consumed in two hours. It is unacceptable to exceed the specified amount of water, so as not to deteriorate the properties of the grout.

Apply the grout to the mosaic with a rubber trowel, spreading it diagonally. After 15-20 minutes, remove the excess with a damp (but not wet) sponge or cloth. Remove the remains of grout from the surface of the mosaic with a dry cloth.

Mosaics can be used to decorate a shower room or dressing room completely or combine this finishing material with ceramic tiles, porcelain stoneware.


Talcochlorite is highly valued by bath attendants for its beneficial properties. The stone accumulates heat well, cools down for a long time, and the vapors emanating from soapstone have a healing effect for the body.

Talcochlorite is used to decorate stoves and walls in a steam room, but nothing will prevent you from decorating with tiles from this stone, for example, a relaxation room in a bathhouse or a shower room.


Talcochlorite is available in various variations - tiles with a smooth or textured surface, mosaics and even bricks. Manufacturers offer skirting boards, curbs and soapstone corners as additional elements. If you are going to finish the wall in the steam room, you will need heat-resistant glue for stone (used for facing stoves, fireplaces), and when facing the shower, it is better to use moisture-resistant mixtures.

The surface on which the tiles will be laid must be flat and pre-primed. Tiles are laid from the bottom up, observing the horizontal rows. The glue is applied with a notched trowel, the tiles are gently pressed against the wall. Laying is possible both end-to-end, that is, without gaps between adjacent elements, and under joining. The second method is suitable for tiles with a regular shape and a smooth surface. Tiles are cut with a grinder with a diamond disc. Grouting is done with a heat-resistant stone mixture.

The combination of soapstone tiles with different textures looks quite extraordinary.

Combination of smooth soapstone tiles and torn stone tiles
Talcochlorite prices
talcochlorite
Video - Mining and processing of talcum powder
Video - Technology of gluing decorative stone
Remember - the interior decoration of the bath should be not only exclusive, but also practical. It is important that the finishing materials do not contribute to the development of mold and mildew, are easy to clean, safe for health and as durable as possible.

