Train cut. Passenger carriage made of cardboard - TT scale (1: 120)
Tell your friends about it:
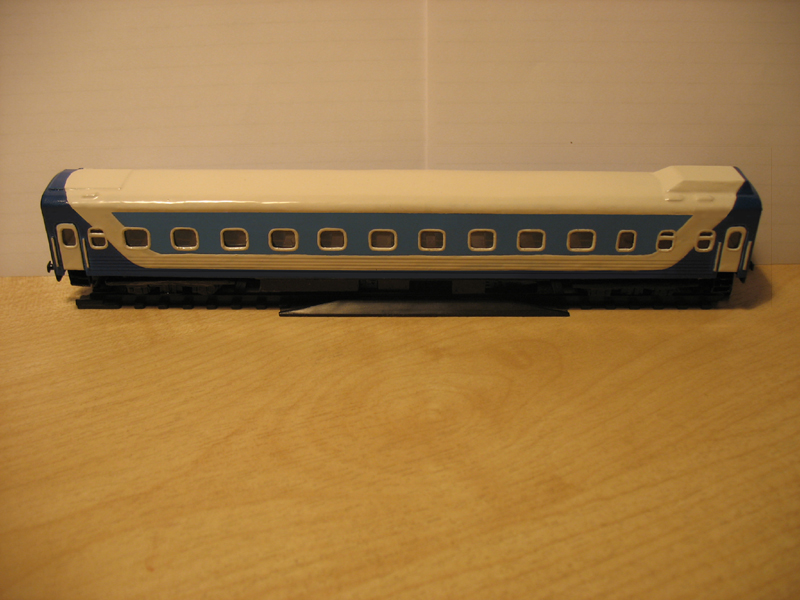
The passenger carriage is designed to transport people. They are built of metal, trimmed inside with precious woods, plastic, artificial leather, have good ventilation, electric lighting, radio, service compartment. The seating position can be easily converted into sleeping areas. The cars are mostly green, sometimes dark red. They have good shock absorption, so there is no unpleasant shaking while driving. Passenger cars are mounted on two two-axle bogies. For the model, paper is used, taking into account the traditional coloring of the cars.
The proposed model has been simplified, the roof structure has been changed in order to facilitate the work. First, the end walls of the car are prepared, then the body is cut out, folds are made along the ruler. The roof is made from a wide strip of paper, in the middle, along the long side, a small fold is made. Installation is not difficult. End piece valves
grease with glue and attach to the walls of the car, then glue the roof. The car is mounted on two biaxial bogies, which are prepared in advance. The finished model produces
finishing (fig. 99).
"Dedicated to folk crazy people"
If your desires in building a model of a railway exceed the capabilities of mass production, it's time to think about making your own models. There are different materials and technologies - here we consider the manufacture of cardboard.
First of all, you should stock up on everything you need.
First you need a good white cardboard (preferably 0.35 - 0.5 mm - determined by eye with a ruler).
You also need the right tools:
- mechanical pencil with a 0.5 mm shaft,
- PVA glue,
- ruler 30 cm,
- corner,
- washing eraser,
- threads (preferably not very fluffy),
- transparent plastic, double-sided tape,
- emery of two types (large and small),
- paper knife, ordinary scissors,
- manicure scissors,
- clothespins (preferably plastic with flat surfaces),
- and also something else on the little things, which will be indicated below.
And most importantly, you need a sincere desire to make a layout!
Here we will consider the production of a model on an already finished chassis. Carriages from TT-model or VTTV can be used as a donor.
In the production of any model, reference materials are required in the form of drawings and illustrations of the modeling object. To save time, I also used the CMV from the TT model.
So, let's begin. If a drawing is used, then all dimensions must be recalculated in the appropriate scale, in my case - 1: 120. Next, on a sheet of cardboard, you should draw a basic scan of the car WITHOUT a roof (as a result, you should get an elongated parallelepiped without a floor) ( Rice. 1).

On it we draw everything that should be on the walls of the carriage, that is, windows, doors, lines where stiffeners should be, etc. After everything is drawn, we cut through all the windows with a knife.
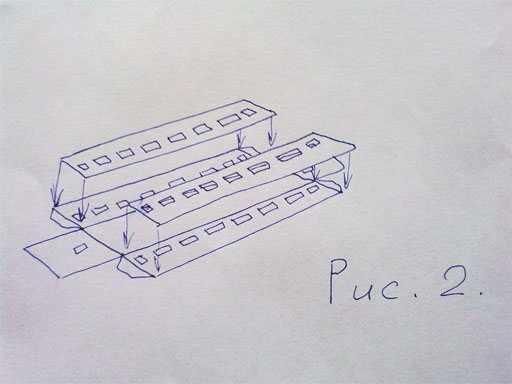
Now it is necessary to increase the rigidity of the future body- on the reverse side, you need to glue on the walls a second layer of cardboard with already cut windows so that the windows coincide with each other ( Rice. 2).
Since the cardboard when wet has a bad property to swell, it is not necessary to smear a lot of glue, but it is necessary to quickly and with a thin layer spread on one side and immediately press firmly and put it under the press.
Now let's move on to the stiffeners. They are made from threads that are glued along the drawn lines: first, a glue strip is applied, on which the thread is then applied and pressed with a finger. The bottom line is to saturate the thread with glue and remove excess glue from the surface. With all the ribs glued on, it's time to outline the doors. To do this, cut a thin groove along the door contour with a knife. After that we coat the cut out contours of the doors and the already glued threads. When everything is dry, you need to gently walk over the surface of the threads with fine emery and once again grease with glue. For all coatings, we try to leave as little glue as possible, so that later unnecessary irregularities do not come out. The handrails are made from thin strips of cardboard.
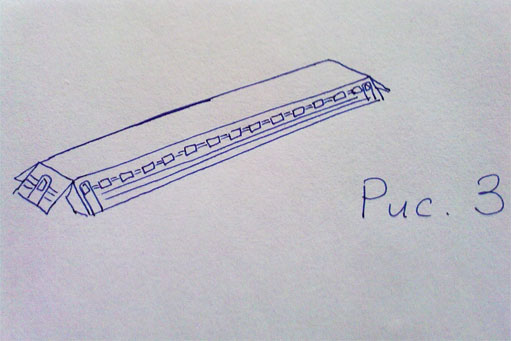
Now it's time to start assembling. We press the folds on the back with scissors. Then we cut out, carefully bend and glue ( Rice. 3).
Carefully sand the roughly protruding cardboard at the gluing points.
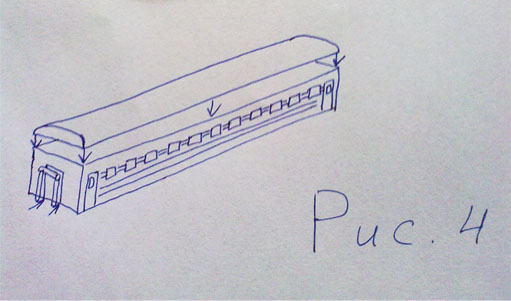
Roof. To get a roof of the desired shape, you first need to create a parallelepiped of layered cardboard, the height of which is equal to the height of the roof itself (usually painted gray). The width and length should be 1 and 2 mm higher than the width and length of the car blank, respectively (these are approximate figures). This is necessary so that after gluing the roof (by the way, it is also desirable to glue it with a press), it can be sanded from the sides and thereby adjusted to the size of the car. Next, the roof needs to be given a convex shape - for this, we draw a roof profile from the ends and cut off the excess lengthwise. After that, we grind first with a large emery, and then with a small one. After that, coat the roof with glue and wait until it dries. We process it with fine emery and repeat the operation. Now you can glue the roof. If you find something to press it while it dries, it will be good. If in the original there are stiffeners on the roof, then they are made in the same way using threads. We coat the joint of the roof with the body with glue. The air intakes can then be attached to the roof. We glue cardboard from the ends of the car to hide the joint, although, depending on the situation, you can do without it. Transitional soufflés ( Rice. 4).
Let's talk a little about the insides. First you need to make a floor of 2-3 layers of cardboard. Next, we mark the layout of the partitions on it, which, after cutting, "put" on the glue. The total height of the internals with the floor must be matched to the height of the undercarriage. We glue the upper shelves to the walls, and the lower ones will most likely have to be glued to the floor. After that, a strip of cardboard 1 cm wide and 2 cm long less than the length of the carriage is glued on top of the partitions.
Now you can paint. It is advisable to use water-indelible paints. Spray paints, regular oil paints, or special model paints can be used. Then we use scotch tape and brushes of different sizes to get the desired color.
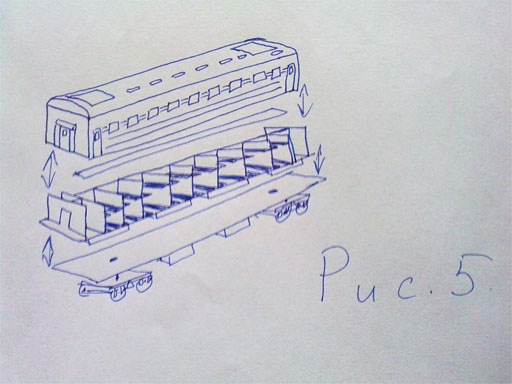
When everything is dry, we glue strips of transparent plastic on the inside of the walls of the car using double-sided tape. From the inside, we glue double-sided tape on the roof, and then press the insides of the car to it. From the bottom to the floor of the car, we again glue double-sided tape and press the chassis to it ( Rice. 5).
The car is ready!
Watch also the video on how to make a freight car out of cardboard.
"Making a train from colored paper with your own hands." Master class with step by step photos
Degtyartseva Natalya Vasilievna, teacher MAU DO DDTT
Vladikavkaz, North Ossetia - Alania
The work is intended for children aged 7 and older, teachers and parents.
Purpose: toy, interior decoration, a gift for family and friends, an exhibit for an exhibition of technical creativity.
Target: make a train from colored paper with your own hands.
Tasks: educational - to master the technique of manufacturing a steam locomotive and a trailer; developing - to develop the practical skills of learning children when working with scissors, to develop fine motor skills, imagination and fantasy of the child; educational - to bring up an aesthetic taste.
Materials and tools: colored paper, scissors, glue, ruler, pencil, eraser, compasses.

Riddles for children.
Brothers have equipped themselves for a visit,
They clung to each other
And they rushed off on a long way,
They only left the smoke.
(Train)
Far far away
On the railroad track
Maybe this fellow
Take the whole village away.
(Train)
Behind the haze
Behind the whistle
The brothers run in single file.
(Wagons)
V. Struchkov
Iron Already creeps
Passengers are transported into the distance.
(Train)
Iron Snake
Wriggles in the steppes.
Lost in the steppes.
A clear voice
Runs after the drizzle.
I ran a thousand miles.
She unhooked the long tail.
Fifteen Brothers
They love to ride.
First with a pipe
Leads everyone behind him.
(Train)
One hundred barrels
Leads Gudochek.
(Train)
Steel Mare
Rushing across the azure steppes.
Run a hundred miles
She unhooked the long tail. (Train)
On steel paths
The Centipede is racing.
Knock knock knock.
Round heel clicks.
With a funny song
On an iron ladder.
(Train.)
V. Tunnikov
Every day there and back
Carries goods carefully.
In the rain, blizzard, heat, frost
A hard worker is racing - ... (steam locomotive)
Step-by-step progress of making a train.
Manufacturing of a steam locomotive.Departing from the narrow edge of the A4 sheet by 1 cm, bend the sheet on both sides of the ruler. Putting the ruler with the left edge on the second bend, bend it again. Let's make four bends this way.

Having received four wide strips, cut off the excess part of the sheet along the last bend. Bend the edge of the sheet, stepping back 1 cm from the left edge, and then bend the sheet on the other side of the ruler.

Cut off the excess paper, leaving 1 cm fields for gluing in the middle square. Cut the edges of the square to the line, as shown in the photo.

We glue the side parts of the square. Let's shorten the main part of the locomotive cabin by cutting it to the width of a ruler on the right side of the part.

We glue the edges of the long strips, getting a column. We glue the roof to the post. The locomotive cabin is ready.

To make a window, we will prepare a square with a side of 2.5 cm from colored paper, and a square with a side of 1.5 cm from white paper. For the door, cut out a 7x2.5cm rectangle and 1cm strip for the handle. For the front part of the locomotive, bend it, stepping back from the edge by 1 cm above and below a square with a side of 4 or 5 cm. Cut the folded parts of the sheet for gluing.

We glue the prepared square into a tube. We will glue a window and a door on the locomotive booth.

On a 6x5cm rectangle we will glue a colored strip, 1.5cm wide. On a previously prepared wide pipe, stick it along the edges of a strip, 0.5 cm wide.

Glue the small pipe in the center of the large pipe. Glue the large pipe, bending the edges, to the locomotive cabin. On the free edge of a large pipe, glue a piece of paper in the shape of a square.

Let's make a strip of 3x7cm. We twist the edges of the strip in different directions with scissors, getting an eight.

We will make wheels for wheels with a radius of 1.5 cm and 0.7 cm.

Cut off the extra edges of the square on the large pipe of the steam locomotive, glue the wheels and the figure eight, as shown in the photo. The locomotive is ready.

Carriage manufacturing.
Departing from the top edge by 1 cm, bend the sheet on both sides of the ruler. Then the sheet on both sides, putting a ruler to the right and left of the edge of the sheet. Cut the lower part of the sheet to the width of the ruler. To do this, draw a line at the bottom of the sheet. Let's make cuts as shown in the photo.

From the second of the same sheet, we will leave only the middle part, cutting off the excess bends, as shown in the photo.

Cut off small rectangles from the sides of the first piece.

We glue the side parts on the first part, as shown in the photo.

Glue the second piece to the top of the first piece.

We glue the side parts of the car to each other.

Let's make a 11x5 cm rectangle for the door and two 7x5 cm rectangles for the windows. From white paper we will make a rectangle for the door window 3x6cm and for the car windows - two rectangles
3.5x5.5cm. Let's make a strip for the inscription of the direction of the train 1.5x9 cm.

We will glue the details of the door and windows to the carriage.

Let's make six wheels according to the previously proposed sample. The diameter of the large circle is 5cm, the small one is 3cm. We glue the wheels along the edge of the car and in the middle. The car is ready.

We glue the car to the eight fastening on the steam locomotive.

Our train is ready.

