Laying paving slabs with your own hands. How to Lay Paving Slabs - The Complete Guide
Today, manufacturers of building materials produce a large number of types of paving slabs that differ in color, shape, raw materials from which they are made, as well as in their technical characteristics. It's easy to get lost in this variety.
The question of choice is most often based only on the financial capabilities of the owner of the site, since good paving slabs are expensive, and cheap ones are short-lived and not too beautiful. The modern building materials market offers a classification of its main types according to raw materials, that is, made from:
- natural natural stone of hard rocks;
- soft natural stone such as sandstone or flagstone;
- artificial stone;
- ceramics and other firing materials;
- colored and monochrome concrete;
Most often, individual developers purchase tiles made from colored concrete mixtures. This material is affordable and sold in almost any hardware store.
High-quality colored concrete slabs are made by vibrocasting or vibrocompression. Piece products made are distinguished by bright color and smoother surface. Vibro-pressed material is more durable and frost-resistant, but not as bright.
Stamped tiles are also sometimes offered. Be very careful with your purchase, as it is most likely a poor quality material made by a handicraft method.
A very important issue is the thickness of the material, which you must decide on before laying paving slabs with your own hands. For pedestrian paths on a personal plot, a thickness of 40 mm is recommended, and for a car park - at least 60 mm.
If you decide to pave the sidewalk on the street along your site, then use 60 mm tiles, and on the road (but this will be too noble on your part) you need to take products with a thickness of 80 mm.
Materials required for installation
Before laying the paving slabs with your own hands, in addition to it, you must purchase such materials as:
- stone or plastic curb;
- cement grade PC400;
- crushed stone, fractions no more than 40 mm;
- sand, best of all river or washed;
- geotextile.
The required amount of these building materials is determined separately and directly depends on the structure of the base, the type of soil and the expected operating conditions.

Marking future tracks
It is recommended to take a copy of the site plan with structures, trees, flower beds and other elements of the arrangement applied to it. Draw a diagram on it. This will be the instructions for laying paving slabs, according to which you will work further. When drawing up such a scheme, the direction of the slopes should be taken into account for the free flow of water from the tracks.
When deciding on the width of the tracks, it is necessary to provide so that 2 people can easily disperse on it. Usually this value is 1.0 - 1.2 meters.
In the event of a vehicle passing through, the possibility of the presence of a person who should not be forced to leave the paved surface is also taken into account.
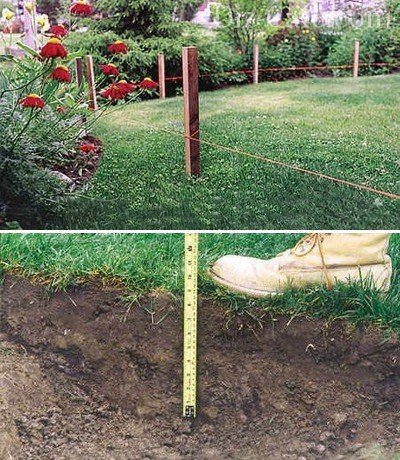
 Marking and excavation.
 The marking is done according to the drawn up plan using a tape measure and a cord, which is pulled along the pegs hammered along the planned path. When pulling the cord, it is necessary to add 10 cm to the width of the track on each side, with a gap for the subsequent installation of curbs.
Excavation and protective layer
The amount of work performed depends on the density of the top layer. In the event that the surface is dense clay or any other similar soil, in connection with which it is planned to import bulk soil, then preparing a path for laying tiles is reduced to a simple leveling of the surface.
In all other cases, it is necessary to remove 30-35 cm of the surface layer along the entire marked perimeter.
At the bottom of the trench, it is necessary to pour a thin leveling layer of sand and tamp it well together with the soil. This underlying layer will then be needed, which will prevent the germination of weeds, allow water to be diverted from the drainage layer and prevent the penetration of groundwater rising in the spring.

The strips of geotextiles are laid out in such a way that the neighboring canvases overlap by 15-20 cm, and at the edges of the trench there is a turn up by at least 20 cm.In this case, the technology of laying paving slabs with your own hands will be fully observed, and the result of your work will be incomparably better ...
Drainage device
On the tamped bottom of the trench, lined with geotextiles, a layer of rubble 15-18 cm thick is poured. It will serve as a drainage system for collecting and removing melt and surface water. The presence of a drainage layer will prevent possible accumulation of moisture in the base of the track and subsequent swelling in the event of freezing of the soil.
Crushed stone should be well tamped and sprinkled with a thin layer of sand. A second layer of geotextile should be laid on top of the drainage. It will let moisture down, preventing it from returning.
 Stone products are fixed with mortar, and plastic ones - with the wedges supplied with them.
 Placement of enclosing curbs
At the next stage of work, curbs are installed. For this, you can use almost any material. External fencing of paths is made of stone, concrete, plastic, brick, wood, slate and any other flat materials.
The traditional option is a ready-made piece of concrete curb. Recently, manufacturers have offered on the market several types of plastic curbs, which are distinguished by their durability, low cost and ease of installation.
The curb is installed after the drainage layer is installed.
Applicable types of bases
For the device of pedestrian paths on the site, one of three possible types of support base is used:
- concrete;
- cement-sand;
- from compacted sand.
A concrete base is the most expensive, and therefore it is advisable to use it only in the case of expected large loads on the surface. The cement-sand base is the most common and versatile. A sandy base can be used with low surface loads and the absence of heaving soils and their movements.
 Schematic representation of a concrete base.
 Pouring a concrete base
Work on the concreting of the base, before laying the paving slabs, begins with reinforcement. For this, it is best to use a ready-made welded metal mesh with a mesh size of 100x100 mm. If you have remnants of old metal pipes, wire, a bar with a thickness of more than 5 mm or other similar metal remnants, then reinforcement can be done with their help.
To do this, lay out the metal in the form of a lattice and tie its individual parts at the intersections with wire. It is advisable to raise the reinforcement mesh above the surface by 3-5 cm, placing it on metal or stone supports.
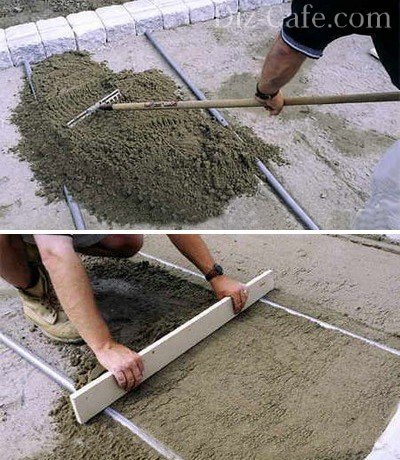
A layer of concrete should be 10-12 cm thick, and its surface should be below the surface of the earth by a tile thickness of minus 3 cm, since we then have to put paving slabs here with our own hands.
If, after the device of the drainage layer, the depth of the working trench remains quite large, then the excess is covered with sand, which is then rammed. Concrete mix using PC400 cement is prepared in cement, sand and crushed stone as 1: 3: 5.
The concrete is poured in one go. In the case when the volume of concrete for pouring is very large, it is advisable to order the concrete mix with delivery to the place. The cost of concrete in this case is slightly higher, but you will save a lot of time and effort. Paving slabs are laid within 3-5 days after the initial setting of the concrete.
 Step-by-step process of FEM installation.
 Sand and cement base
 Cement-sand base.
 This type of base provides for laying tiles on a dry cement-sand mixture prepared in a 1: 5 ratio. The thickness of such a layer is 12-15 cm. To reach the desired level, clean sand is poured under the cement-sand layer and thoroughly rammed.
It is important that at the time of laying the tiles, the base material is dry. Therefore, before laying paving slabs, you need to make sure that there will be no precipitation in the next couple of days. The poured mixture must be well tamped and leveled.
For the device of a sandy base, river or quarry washed sand is used. The presence of lime or clay elements in the sand is not allowed. After filling the sand, it, again, must be spilled with water, tamped and leveled. Next, paving slabs are already laid.
Tile processing before laying
Before you lay the paving slabs yourself, it is recommended to treat it with a hydrophobic compound, which will further protect the material from moisture, increase its frost resistance and durability. In addition, they give the tiles a more attractive look, prevent the appearance of mildew, mold and salt stains on the surface.
To process the tiles, they are dipped in a hydrophobic solution, dried, and this operation is repeated. During preliminary processing, the tiles must be carefully inspected and all products containing defects must be set aside, since we will then lay them out in other, inconspicuous areas.
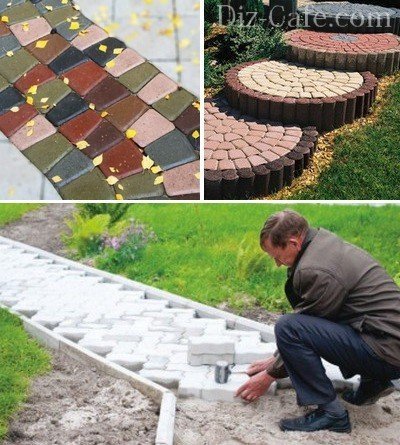
Laying paving slabs
 Laying paving slabs: photo of the process.
 The technology of laying paving slabs on a concrete base provides for its fixing to a layer of cement mortar. It is necessary to put the paving slabs on the mortar so that it fills the seams as much as possible, and the thickness of the seams does not exceed 3 mm.
Leveling is done with a rubber hammer and checked with a building level. Advancement during laying occurs "from yourself", that is, you are always on the already laid tile, and you are laying the mortar in front of you. At the end of the laying, all seams must be sealed with mortar to obtain a continuous monolithic coating.
The stages of laying paving slabs on a cement-sand and pure sand base are the same. The paving slab stacker works on the self-method, that is, you move along the sand and lay the material in front of you. If it is necessary to level the surface, sand or a mixture is poured or, conversely, removed.
Each stone must be tapped with a rubber mallet to securely fit into place.
 After finishing the installation, a small amount of cement-sand mixture is poured onto the surface, which is then swept with a brush to fill the joints.
 Then the surface of the newly-made path must be watered and this procedure must be repeated after another 2-3 days.
Below is a video tutorial on the topic "Laying paving slabs with your own hands: step by step instructions." The process of laying paving slabs, considered in it step by step, will tell you about the procedure for laying paving slabs, the features of this process and how to further care for the coating.
Greetings, my friends - handshakes.
Owners of private houses dream of a beautiful arrangement of their yard. A lawn, a beautiful fence, a barbecue woman, and, of course, paths. The simplest option is this, but a better material is paving slabs, the durability and strength of which you can not tell you about.In this article, I will introduce you to step by step instructions for laying paving slabs.
This is a rather difficult task, but if you follow simple rules, then in about 5 days you can make a standard private courtyard, with a little handiwork :)
A few simple and effective tips before starting work, which will subsequently save you a lot of time and nerves:
- First, you need to draw up a detailed plan for future work and, on its basis, make a markup. Use regular twine and wooden pegs for this. Thanks to these simple actions, you will be able to correctly assess the scope of future work and at least roughly understand how many consumables you will need.
Usually the site is divided into several zones:
- the main entrance to the courtyard, as well as a parking place
- paths around the house and in the yard
- rest zone
The tiles differ both in size and in the method of production, and each zone has its own
| Appointment track | View tiles | Tile thickness | Tile thickness |
| Sidewalk, pedestrian part | Vibrocast | 25-40 mm | Sand pillow |
| Road (entry point, car parking) | Vibrocast | 40-60 mm | Cement-sand cushion |
| Industrial | Vibro-pressed | 60-80 mm | Concrete + DSP pillow |
If you have loose or moving soil, then you cannot do without, in other cases, a DSP - pillow is enough.
2. Choose your tiles carefully. At the moment, there are a lot of manufacturers on the market and, unfortunately, not all are conscientious: (High-quality paving stones should have good operational properties and will delight you for more than one year)
3. When installing, it is important not to forget about the slope (5 mm is enough) so that the water can flow out without hindrance.
4. Before starting work, it is necessary or (if any), to lay all communications.
5. Do not forget that when it rains, all work must be stopped. The styling pillow must be absolutely dry
Materials and tools
 1. Paving slabs
2.Sand and cement
3. Curb or curb
It will be required not only for a beautiful framing of paths or garden beds, but also to prevent paving slabs from creeping (thanks, Cap!).
4. Level
5. Lace
6. A wheelbarrow, so as not to drag an unbearable load on its hump
7. Broom
8. Buckets and shovels
9. Trowel
10. Rule
1 1. Two long pipes - preferably about an inch
12. Mallet - aka a rubber hammer
13. Rammer
There is no point in buying an electric rammer, as it is impractical, although it can be rented. In Rostov, this service will cost about 1000 rubles a day.
But in order not to waste extra money, we will make a regular rammer from scrap materials.
Here is one of the options for handshaking:

14. Bulgarian
It is advisable to purchase a diamond-coated stone disc. And do not forget to wear safety glasses when cutting, otherwise I certainly understand that two eyes are a bit too much ... :)
So, the tool has been mined - let's move on to earthworks.
Preparation of the base
1. Installation of curbs. How to do it correctly -. There is a small nuance here - the fact is that there are handlers who first put the curb, and then begin to lay the sidewalk stone; but there are - on the contrary, those who first lay the sidewalk stone, and then the curb. I believe that this is not fundamental - if only everything was done "according to the mind."
2. In order to avoid the germination of vegetation in the future tiles, it is necessary to lay a layer of geo-textiles. Geo - textiles are laid in two layers - before and after gravel.

3. Next, you need to deal with the slopes of the site. A slope, even a slight one, must be present, otherwise, after rain, all the water will remain in place. It is best to make a slight slope towards the street, the street level will be the zero mark.
4. We drive in along the zero line (remember: the zero line is the place towards which the water will flow) two columns and pull the lace, not forgetting to use the level :)

5. We drive in two more columns, thereby indicating the entire area of the site

6. Stretch the lace parallel to the posts with the zero mark - only a few degrees higher. We control the process by level.

7. Ultimately, we get a rectangle that covers the entire front of future work.

8. Now it needs to be divided into several bands. We choose the width of the stripes, focusing on the width of your rule. It should be borne in mind that this is not jewelry work and special accuracy is not required from you, so you can "shake hands" as much as you want!
9. Thus, our site turns out to be cut into small areas and this is done in order to make it easier for yourself!
10. Then we begin to level our site for laying paving slabs. Here everything is extremely simple - if something sticks out, then we knock a shovel in the teeth and knock it down.

If there is a pit, then add sand and cement mixture. We make it right on site in a 6: 1 ratio (six parts of sand to 1 part of cement).

The gap between the lace and the ground should be about two tiles wide.

11. We proceed to adding the base. We knead our "brew" of sand and cement and begin to sprinkle our marked squares, which then must be carefully tamped with our "self-made" rammer.

And so ...
 12. After all the work done, we will have a fascinating journey into the world of crustaceans :) The fact is that almost all subsequent work on laying paving slabs will take place in the "sic" position. Therefore, we put on clothes "a la bumzhe", we prick a couple of ampoules of diclofenac for prevention and barely restraining the attacks of flatulence, we continue to work :)
Now we need our inch pipes. They must be positioned so that they are parallel to our threads and are strictly at the same height.

By the way, the gap between the tile and the lace should be about a centimeter less than the thickness of the tile.

Having installed the metal guides, add a little more sand - the mixture and insert the rule under the threads, run through the pipes, leveling the base.

Where we see gaps, add the mixture and repeat the operation. You can ram it with your own hands, and then add a little more cement-sand mixture until you get something like this.

So, preparation of the base for laying paving slabs completed.
DIY step-by-step instructions for laying paving slabs
1. The first step is to train a tile - a wheelbarrow to help you, paying attention to the fact that there is no marriage. The tiles may have factory defects and are best left for trimming.

2. The most important thing is to lay the first stone! We expose it exactly along the lace.

3. Then we knock it down with a rubber hammer, achieving the ideal level.

4. We begin to lay the tiles from ourselves. We observe the pattern and thus soon something similar will begin to appear in us.

5. In the same way, lay the tiles on the rest of the marked squares.

6. If any obstacle appears on your way (sewer hatch, post, etc., etc.), then it is better to bypass it with a whole tile, and leave the trimming for "sweet"!

7. In order to lay the tiles in the empty places formed when avoiding obstacles, as well as places of contact with curbs, we use a "grinder". The places where the pieces will be laid must also be carefully tamped.
 Grouting paving slabs
After the tiles have been laid, they need to be pushed in to fill in the gaps.

Prometh or, in fact, fill up all the cracks with the same cement-sand mixture, you just need to pay attention to the fact that sometimes "efflorescence" or white spots remain on the tiles. If you do not want to take risks, then you can use just sand.

Then it remains to thoroughly shed the paving slabs and if the bedding "goes into the cracks", then it is necessary to repeat the above steps.

IT'S IMPORTANT TO KNOW
Friends, the distance between the tile and the curb is by no means concreted, and is also filled with DSP or plain sand.
Step-by-step instructions for laying paving slabs - video
Well, that's all friends. Hope mine step by step instructions for laying paving slabs I proved to you that not only the pros, but also ordinary citizens can do it, because it is not in vain that they say: "The eyes are afraid, but the hands do it."
The ideological rukozhop and the author of this blog, Alexander Alexandrov, were in touch with you.
Subscribe to my blog updates and keep abreast of all the latest trends in construction trends.
Paving slabs are a modern type of material that is great for refining small areas, such as paths in squares and parks, entrances to the garage, decoration of the local area in a suburban area. It's no secret that now manufacturers offer a wide variety of shapes, types of tiles that can create an individual design style on your site. Various color textures are applied, patterned, allowing to highlight originality and preserve a unique style. Laying paving slabs with your own hands determines not only the architectural ensemble of the future site, but also its durability. Therefore, it is important to follow the installation technology and not neglect simple and binding rules. But, in general, the technology itself is quite simple and does not require special knowledge in the construction industry. In this article, we will reveal a step-by-step work plan and find out what is needed to lay out a site with tiles on our own, as well as what materials and tools will be needed for this.
Materials and tools
There are 2 main types of tiles used to lay the sidewalk:
- Stamped.
- Vibrocast.
- Granite.
The first type is more budgetary, does not require special production costs, however, the quality of such tiles is often lame. But the tiles made using vibration casting technology, on the contrary, are famous for their durability, but there is a small disadvantage of this type - this is a high price. Tiles come in a wide variety of sizes and configurations, widths and lengths.
Height ranges from 20 mm to 70-80 mm. Given the purpose of the site, it is worth focusing on size and height. For small paths, high strength is not required from the tile, so even thin tiles from 20 mm will do. But for platforms and driveways, it is better to use thicker tiles from 60 mm.

In addition to the tile itself, you will need:
- Crushed stone, sand. It is better to use the fraction for crushed stone no more than 40 mm.
- Cement or special plaster mixture.
- Geotextile. It protects the tiles from sagging.
- The border is usually sold per piece.
What tool is needed for laying paving slabs:
Hammer (rubber).
Level (better than 1 m).
Grinder with a diamond wheel.
Several masters.
Manual rammer.
"Meter".
Shovel.
Rope (for marking).
Pegs.

NOTE
In addition, buy rubberized knee pads and mittens. There will be work with water and electricity.
First, you need to decide on the size of the site and take into account all the nuances, create a plan drawing for convenience. We choose the type of tiles, what pattern or color we would like. Given the dimensions, we calculate the amount of material. It is also advisable to mark the site, for this use pegs and a rope.
Check all the nuances several times, take into account the inconveniences and others. Pay special attention to vegetation, trees or shrubs need to be bypassed or completely removed from the site, especially if these are young trees. As the roots of trees or shrubs grow, they will begin to raise the soil, due to this, swelling of the tiles will be observed, which will break, rise and sink in some places. Therefore, it is better to deviate from the seedling at least a meter, and preferably more.

Before laying paving slabs, it is necessary to carry out work on the preparation of the soil. First of all, it is necessary to remove the top layer of the soil, which will level out unevenness, compact the soil and create a sand and gravel cushion. The characteristics of the site depend on the purpose of the site. For the arrangement of sidewalks, a platform is made 20 cm deep, and for car parks and entrances 27-30 cm.
After the recess has been dug, it is necessary to compact the soil. To do this, it must be poured from a hose with a sprinkler, after which you need to walk with a rammer. An easy-to-execute procedure plays an important role in the durability of the pavement surface, as it prevents the subsidence process of the site, which is observed over the course of the operation of the road surface.

Types of paving slabs with their pros and cons
Modern manufacturers of building materials produce paving stones using various modern technologies. Depending on the characteristics of the technological process, sidewalk tiles are divided into 3 types:
- vibrocast;
- vibropressed.
Vibrated tiles produced using plastic compounds . The "filling" of the building material is poured with the help of equipment into special containers - "vibroforms". Paving slabs of this type have an attractive appearance, they imitate natural wood or brick. Most often, this type of building material is used for individual construction. Vibro-cast tile elements are used to equip the backyard plots of country houses and cottages. They are also laid out on paths located in parks and garden plots.
Vibro-pressed tiles made in a different way. The pre-prepared concrete mixture is poured into a special mold. After that, it is subjected to pressure, which is created by special equipment - a vibropress. Thanks to a special manufacturing technology, the building material has a strict shape with a rough surface. Sidewalks, pavements, squares and roads in crowded and public places are laid with vibro-pressed tiles.
A large number of options for products of various colors are available to modern consumers. Also, paving slabs can be of various shapes, the following curly paving elements are most in demand:
- honeycomb;
- paving stones;
- scales;
- Clover;
- wave;
- fleece;
- gzhelka;
- flower.

Depending on the material from which the paving slabs are made, it is subdivided into several types. Relatively inexpensive building materials made of concrete and clay are popular among modern consumers. In the arrangement of suburban areas, clay paving slabs are often used, imitating roofing tiles. To improve the technical characteristics of building materials, manufacturers can add a binding material to the tiles, for example, granite chips.
The most wear-resistant is the one with excellent strength characteristics of natural stone. It easily tolerates sudden temperature changes, due to which it has a long service life. Concrete slabs become unusable after 3-4 years, asphalt pavement will begin to deform after 2 years, and granite slabs will last more than 25 years. One more plus of granite - it does not require additional means of protection from damage. The disadvantage of natural building materials is the high cost.

Stages of work on laying paving slabs
When arranging a suburban area of a public place or a garden path, it is necessary to follow certain rules and adhere to the recommendations of specialists. To perform high-quality and durable tile laying, you must:
- Make drains to drain atmospheric water... When laying paving slabs of any kind on the sand, rain or melt water will drain into the gaps between the paving elements and be absorbed into the base. If the base is concrete, then it will collect between the tiles and the concrete, which will lead to swelling of certain sections of the walkway. To avoid this, a slope is required, which can be longitudinal, transverse and transverse-longitudinal. The gap for the drainage of atmospheric water should be between the tile and the curb.
- Compare tile size with walkway dimensions... The larger the area and width of the paving path, the larger the curly tile elements should be. Large paving slabs do not facilitate the installation process. Because large tiles carry more weight, they are more difficult to transport, lift, move and level. While adjusting the height, you will have to lift the heavy bed repeatedly to add sand.
- Select the correct track size... The width of the path should be selected taking into account the dimensions of the paving slabs and the width of the gaps between the paving elements. This will avoid unaesthetic and time-consuming cutting of the tile material. This rule applies to laying tiles with the correct geometry. When creating circular patterns and imitating natural stone, you cannot do without the cutting process. In this case, it is necessary to think in advance about the location of solid and trimmed tile elements.
- Bring all communications to the process of laying tiles... If you do not take care of this in advance, you will have to dismantle the tiled flooring and re-equip it. If at the moment there is no need for communications, it is recommended to create conditions for the laying of sewer pipes in the future. To do this, it is necessary to lay inexpensive plastic pipes with a diameter of 50 mm or more under the path, in the places where future communications pass.
- Lay a geotextile layer. It must be placed between the cushion of the base under the paving slabs and the soil to avoid subsidence of the path and the germination of grass between the curly paving elements.

Stage 1 - Layout of paving slabs - schemes, patterns, drawings
Sidewalk paving stones and tiles are presented by manufacturers in an extensive assortment, which allows you to get a durable and aesthetic coating in public places, on the adjacent territory of a private house or cottage. The main task of the designer is to choose the right tile design option and determine the method of its placement. If you are engaged in independent arrangement of a suburban area, you should first familiarize yourself with the types of tiles, paving methods and options for laying the finishing material.
Due to the standard ratio of the length and width of curly paving elements (FEM), there are a large number of paving slabs laying schemes. For example, using a single-color Brick, you can arrange paving elements in different ways - along the path, diagonally to the longitudinal axis and lay out an original decorative pattern on any part of the roadway.

When using monochromatic curly paving elements, FEM Brick layout schemes of the following types are popular:
- "Linear" laying. The bricks are placed parallel to each other along the track line, while the seams of adjacent elements coincide.
- "Herringbone". Shaped paving elements are located at right angles to each other;
- "Brickwork. The orientation of the paving elements is preserved as in the "linear" masonry, but a bandage of ½ or ¼ Brick in adjacent rows is added;
- "Block" masonry. The two paving elements are parallel to each other, and the adjacent 2 blocks are deployed at right angles.
Helpful advice! If you add Cube tiles to the figured elements of the brick paving, you can significantly increase the quality and attractiveness of the exterior of the paving area.
When laying paving slabs of 2 or more colors, you can use a variety of paving options, allowing you to create a stylish and aesthetic design of the local area. If tiles of several colors or textures are used for the improvement of the territory, a simple in execution and externally spectacular layout of the "Chessboard" tile is often used. The standard block layout consists of paired brick or cube paving elements.

When paving sidewalk and garden paths with multi-colored curly elements, it is recommended to observe the following rules:
- On suburban areas, there are practically no flat sections of roads without elevation differences and the presence of intersections. To make a high-quality drawing of the paving area, you need to draw a sketch on a scale or create a full-fledged project with the future ordering of the FEP.
- In order to stylishly equip and decorate the territory of a large area, you need to choose an original large-sized drawing.
- When arranging small sections of roads, it is recommended to use a small repeating pattern, drawing or ornament.

In almost every suburban area, there are winding sections that need to be equipped with paving slabs. Curly paving elements allow you to create radius patterns with little effort and quickly. Paving slabs are laid using a special technology, which includes the following steps:
- creating a sketch in a special program or on a scale;
- the contact layer, consisting of grain screening, grating or sand or grating, is applied to a section of the paving zone, after which it is carefully leveled;
- FEM laying is performed from a smaller radius to a larger one, provided that the paving elements are located with a side length along the path;
- compaction - after filling, the joints are filled with washed quarry or quartz sand, after which the tiles are compacted using an areal vibrator.
Important! If the Bricks are oriented across the path, then a row of small radius is first laid. In this case, the longitudinal seams of the paving elements are displaced in the form of a wedge of the required size.
Using the above-described laying technology, you can lay the Brick element with a similar radius pattern on straight sections of the road with a large format. In the process of work, it will not be possible to do without trimming some concrete products, which is why the pattern will contain small pieces of paving elements. Despite this, the radius pattern will significantly increase the decorative value and attractiveness of the paving area.
Stage 2 - Preparation of material and tools for laying paving slabs
This is one of the most important stages in the arrangement of a paving area with tiles. To quickly and efficiently complete the work, you need to prepare everything you need for laying paving slabs. The following materials are required for paving:
- sand;
- tile;
- cement;
- border.
For self-laying paving slabs, you need to prepare tools:
- nylon thread;
- rubber hammer;
- level;
- pegs;
- long rule;
- Master OK;
- rammer;
- broom.
If you plan to trim curly paving elements, you need to prepare a grinder with a disc for cutting concrete. It is also recommended to buy knee pads that will help secure your knees when working with an emphasis on this part of the body.

Stage 3 - Layout for laying paving slabs
The marking of the paving site involves determining the contour of the future sidewalk path. The marking place is indicated with pegs inserted into the soil, between which a nylon thread must be pulled. Since it serves as a guide for the subsequent laying of tiles, the thread must be pulled clearly in level. During the marking process, the following rules must be observed:
- The area for paving slabs must be marked with stripes 1 - 1.5 m wide.
- All paths located in a suburban area should have a slight slope towards the drain, due to which sedimentary water will not negatively affect the coating and destroy it.
- After laying the paving slabs, it is necessary to check the width and level of the paths, as well as the convenience of their location in the suburban area.
Stage 4 - preparation of the base for paving slabs
Thanks to a carefully prepared base, the coating will last longer, guaranteed. Over time, the tracks will not sag and will last longer.
If before that there was already a tile on the site, it must be unconditionally removed, and also removed at least 25 cm of soil. Pay attention to the remaining roots or steams, all this must be removed without regret, so that various plants do not grow from your tile in the future. Be sure to consider the water flow, even through small cracks, water will still enter the soil.
Important! It is necessary to ensure that the base for laying the elements of paving slabs is perfectly flat.
If clay prevails in the soil, then it is better to make a kind of hollow and drainage at the end of the trench. And in order for the water to flow into the drainage system, you need to make a small slope along the edges with transverse and longitudinal drains.
The main feature of the "pillow" is that no matter what type of mortar will be used during installation, it is imperative to make a crushed stone or sand base. To ensure reliability, additionally make a screed from the solution.

Important! For areas that are expected to be heavily influenced by weight, it is imperative to make a screed.
To begin with, on the first level, we lay and carefully ram a layer of crushed stone or gravel. Next, a layer of sand is laid on this tamped base. Keep in mind that the layer of sand should be about 3-4 cm after tamping. And the tile should protrude beyond the total height of the site, by about 1-1.5 cm. It is recommended to lay geotextiles between gravel and sand, which will allow precipitation to flow freely, but keep the sand from subsiding.
If, according to the characteristics, the soil is not heaving, you can use only a layer of one sand of 10-15 cm, but at the same time it must be moistened. After scattering over the site, the sand is poured abundantly with water, and after a few hours it is compacted. And with the top layer you need to use a ready-made mixture, or prepare yourself a sand-cement mortar, with a ratio of 3 to 1. You need to fill in about 3-5 cm.

Helpful advice! In order to maintain a single level of the embankment on the site, you can use life-faq, namely, build a kind of guides from pipes, which are then easily dismantled.
Stage 5 - Technology of laying paving slabs
Remember one important rule, you need to lay the tiles only from yourself, thereby you will not break the base. Also, it is necessary to carry out laying regardless of the size of the material, you need to diagonally and each element should be tightly adjusted, this will help to solve the problem of uneven seams. It is recommended to leave no more than 2 mm between the plates, so that after that there is enough space for powder. It is better to tamp the laid tiles with a wooden mallet. If the element does not lay down evenly, or has failed, gently toss the sand with a trowel and press down.
After all laying, we level the "swollen" tiles in the general tone using a rubberized hammer and a level. There are times when, to create a pattern, you need to cut the tile and cut it, so, do this only when the whole formatted tile in the pattern is all laid. For cutting, it is better to use a special knife, or in the absence of such, a grinder.
Important! Installation of paving slabs should not be carried out during rain or immediately after precipitation, since the soil and the pad placed on it must be dry. Optimum humidity is a guarantee that the tiles will last for many years.

To add the final touch to the design of the site, the installation of a border will help. These stones allow you to create a geometrically flat area. After laying all the material, a trench is pulled out along the edge for the installation of curbs. It is necessary to install the border in such a way that the top of the tile itself does not rise above the stone. The curb is placed on the mortar, the consistency is not less than M100. On the side, the curb must also be poured with a solution, and sprinkled on top with a small layer of sand.
After laying all the elements, we check the site so that there are no bulges or pits. If defects are found, we eliminate them and fill absolutely all joints with sand or a mixture with the addition of cement. All excess is easily removed with a broom, and after the seams from the hose you need to thoroughly moisten. If, after moistening, the sand has subsided, it is imperative to fill it up in order to strengthen the coating. Otherwise, under the load of adjacent slabs, the canvas will begin to rise or sink and "walk".
Important! Please note that the sand used for dusting should in no case have any impurities, otherwise vegetation may appear in the cracks over time.
It is only after a few days to begin the full development of the site, that is, to walk, ride on it. Previously, this should not be done, since the solution must harden and dry out. Do not forget that the tiles need to be cleaned and washed periodically. In winter, do not use metal scrapers or crowbars to clean the area; this will damage the surface of the slab. It is also categorically not allowed to use salt-containing mixtures, because over time they will destroy the coating. In addition, keep in mind that any tile is not "friendly" with varnish, paint and other chemicals.
When ennobling the adjoining territory, many owners often wonder how to cover the paths, the front and back yard, the recreation area ... The sidewalk slab is perfect for these purposes. The functional coverage in landscaping is unmatched. The price of the material is far from fabulous, and laying paving slabs with your own hands is quite simple to perform. So the design of paths and areas on the site will not be too expensive, and at the same time it will be a worthy frame for the garden and decoration of the local area.
Variety of colors, shapes and textures
This allows you to create a harmonious ensemble, combining all the elements of the site into a complete picture, and to embody any design and architectural ideas.

Due to its aesthetic appeal and excellent performance characteristics, paving slabs are indispensable in landscape design.
Environmental friendliness and comfort
Paving slabs do not emit harmful volatile substances when heated and do not soften under the scorching sunlight. Sand-filled inter-tile joints allow excess moisture to seep out after rain, preventing the formation of puddles.

The tiled path does not violate the natural need of plants on the site for water and gas exchange
Ease of maintenance and durability
Paving slabs are an ideal coating in frosty winters, they have high strength and low abrasion.

With high-quality installation, the tiles can last more than 15 years.
Both the technology of laying paving slabs and their subsequent care are quite simple. In case of damage to the coating, it is always possible to restore the site by picking up and replacing just a few tiles.
In order for the paved paths and areas on the site to become not only an original addition to landscape design, but also to serve regularly for many years, it is important to take into account a number of key points during the work, how to properly lay paving slabs. For example, depending on the location and purpose of the coating, paving slabs can be laid both on mortar and on sand or crushed stone.

For arranging garden paths and recreation areas, it is enough to use a sand-crushed stone "pillow"
Tiling work step by step
At the stage of preparation for laying paving slabs, it is extremely important to correctly select products and the necessary tools from a wide range of goods that will be simple and convenient to work with. When choosing a tile, it is necessary to focus not only on taste preferences, but also take into account the operational characteristics of the material. So, when equipping a recreation area or a covered carport, you should ask the manufacturer: is the tile capable of withstanding heavy structures or is it designed only for human weight.
Attention is drawn to the roughness of the surface, the shape of the product: are there any rebounds, will it be necessary to trim it
To carry out the work, you will need tools:
- Master OK;
- wooden or rubber mallet;
- manual ramming;
- metal or wooden pegs;
- cord-ordering;
- building level;
- I-beam or pipe of any diameter;
- watering can or garden hose with a spray;
- rake and broom;
- cement M500 and sand.
To determine the number of tiles and raw materials for the base, it is necessary to think over the layout of the site, taking into account the location and size of its paths and sites.
One of the basic rules for laying paving slabs is the need to equip paths with a slight slope at the rate of 5 mm per meter so that water flows freely from them into wells or lawns.
Arrangement of the base
The success of the entire construction directly depends on the reliability of the base surface. When arranging the base along the edges of the location of the future track, stakes with notches at a height of 5-7 cm are hammered, at the level of which the cord is pulled. A layer of turf, stones and debris is removed from the construction site.
In order to lay any paving slabs with your own hands, you must first carefully prepare the base
To level the surface of the delineated area in elevated places, an excess layer of soil is removed, and on the contrary, it is poured on depressions, pits and hollows. The rake-leveled base is carefully tamped. When working with soft soil, it is advisable to moisten the leveled soil surface with water before compacting. Careful compaction of the base will prevent uneven subsidence of the sidewalk.
The depth of the base is calculated with a margin of a couple of centimeters, taking into account the fact that shrinkage always occurs during compaction. On average, for laying a layer of sand and the tile itself, it takes from 20 to 30 cm.

After excavating the soil, the face of the tile should reach the desired level
The entire surface of the future track is given a transverse, longitudinal or longitudinal-transverse slope. At this stage of the arrangement of sites and paths, work is also carried out on the laying of communications. Laying geotextiles before sanding will prevent weeds from growing between the tiles.
Creating a "pillow" of sand or rubble
Sand can be laid on the prepared base layer of soil, which will not only increase the stability of the sidewalk, but will also act as a drainage system. The dumped sand must be leveled with a rake and watered with water until puddles form on its surface. Already after 3-4 hours in sunny weather, the "pillow" can be given a smooth, even shape using a profile, which can also be a regular pipe or beam.
To level the surface of the sand layer, you can use inch PVC pipes.
The pipes are placed like rails at a distance of 2-3 meters from each other. The gaps between them are filled with sand to the same height, providing an even surface throughout the site.
To give greater strength to the coating, paving slabs can also be laid both on a crushed stone base and on a mortar. For this, it is necessary to prepare a dry sand-cement mixture in a ratio of 3: 1. The mixture is laid out in an even layer on the base, the screed is performed with a channel. When working with "difficult" soils, it is advisable to use a combined installation, consisting of a layer of cement-sand mixture and concrete.
Installation of paving stones
Before laying the paving stones, it is necessary to pull the order-cord along the chamfer. It is better to start laying paving slabs with your own hands from the curb. The first row is laid out strictly along the cord. The tiles are laid out in the direction "away from you".

Place the "bricks" in such a way that they fit snugly together
This will avoid increasing the width of the seams. The use of crosses will make it possible to set equal intervals of 1-2 mm between the tiles. If the tile does not lie flat, you can remove or add a layer of sand under it with a trowel and then tamp it again.
It is necessary to level the paving slabs using a building level and a mallet. Upon completion of the laying of the tiles, the seams are covered with a layer of cement-sand mixture and poured with water.

To give the track a neat and attractive appearance, the tile joints can be "rubbed" with quartz sand
If the tile does not fit well with other buildings or landscape design elements, you can trim its edges with a grinder.
Upon completion of the work, garbage and sand remains are swept away from the finished track. Installing the curb on the M100 liquid solution will prevent the tiles from loosening and "creeping" of the track.
Video master classes with examples of styling
In the future, it is enough just to renew the sand washed out by water in the seams of the paving stones. The path, decorated with paving slabs, will be an excellent decoration of the site.
Paving slabs firmly occupy a leading place among construction products used for paving on city streets, squares and individual sites. Indisputable proof of such popularity is available in any city, village and in private farmsteads. In this article, we will look at how to lay paving slabs on a concrete base.
Most often, the tiled floor is arranged:
- on sidewalks and squares;
- around administrative buildings, offices, shopping, sports and entertainment complexes, train stations, airports, educational institutions and other places with high traffic of people;
- in public parks, lawn and garden paths on private plots;
- private car parking areas and parking lots for large equipment;
- in the improvement of suburban areas.
Main types of products
Depending on the manufacturing methods, the following varieties are distinguished:
- vibrated;
- vibropressed;
- hyper-pressed;
- polymer sand.
The composition of paving slabs usually includes sand concrete with the addition of granite chips, limestone, shale or rubber chips. Basalt chips are added less often.
- sawn paving stones, which have all smooth edges;
- sawn and chipped with a flat bottom and top edge;
- chipped, with uneven edges.
In the first two types, the flat top surface can be heat treated, which makes it non-slip.
The most common square paving stones with sides of 10 cm and a thickness of 3 to 10 cm.
When is it necessary to lay paving slabs on concrete
The following can be used as a base for a tile covering:
- crushed stone or gravel-sand cushion;
- concrete, reinforced with steel meshes or single rods, composite reinforcement or vibro-fiber to increase its strength.
The tiles can be laid on existing concrete screeds or on newly constructed ones.
Although in the first case, the work is much easier and faster, laying tiles on concrete is necessary to ensure a stable and durable coating in the following cases:
- the presence on the site of the work of soils with an increased susceptibility to shrinkage (recently dumped embankments, silty sands, peat);
- heaving clay soils, characterized by uneven swelling in certain areas;
- a concrete base for paving slabs is arranged when the surface is exposed to significant loads, for example, a parking device for a car;
- when cladding on existing solid concrete foundations, when their dismantling is impractical and is highly labor intensive (blind area around the house, existing concrete coatings, floors in garages and outbuildings). The decision whether to lay paving slabs on concrete is made after a thorough examination of the existing old concrete pavement. Laying on old concrete allows significant savings on building materials, protects the existing pavement from further deterioration and significantly improves its appearance.
Advantages and disadvantages of laying paving stones on a concrete base
The concrete base for laying the paving stone has the following advantages:
- high strength and resistance to the application of significant loads and mechanical stress;
- durability;
- installation of tiles on a concrete base minimizes the risk of shrinkage;
- ease of implementation, allowing you to lay paving slabs with your own hands;
- there is no need to use complex expensive technical devices;
- resistance of the base to chemical attack, water washout, temperature extremes;
- on a solid concrete base, the process of leveling tiles in a single plane is much easier with obtaining a clear rectilinear shape and a perfectly flat surface
- absence of failures caused by poor-quality compaction of the base;
- environmental friendliness of paving with tiles.
The existing cons:
- the technology of laying paving stones on a concrete base is more complicated than on sand and crushed stone cushions;
- the need for a reliable drainage device. Having seeped through the seams in the coating, water will remain between the concrete base and the tiles and, when freezing temperatures occur, it can swell and even split the paving stones. To avoid this, the paving stones are laid with certain slopes, point water intakes are laid in concrete, storm systems are arranged;
- a concrete base for paving stones is more expensive than a simple cushion of rubble and sand;
- if the technological process is disturbed, after the end of the first winter, coloring of the concrete base may occur.
What are the requirements for paving slabs?
When used for paving any types of products, they must meet the following requirements: 
- when laying tiles outdoors, frost resistance ≥ 200 t cycles;
- compressive strength ≥ 30 MPa;
- water absorption by weight ≤ 5%;
- abrasion during annual operation ≤ 0.7 g / cm 2;
- the purchase of products must be carried out from the same batch, since in different, even from the same manufacturer, the tiles will differ in geometric dimensions and color saturation;
- environmentally friendly products, when used both for outdoor work and indoor with the device of cobbled flooring in warehouse and utility rooms;
- lack of porosity on the surface;
- strict adherence to geometric dimensions with the evenness of all edges;
- absence of internal and external cracks, as well as chips;
- naturalness and uniformity of coloring.
The technology of laying paving slabs on a concrete base
The following methods of paving on a rigid base are distinguished:
- A dry mixture of 1 to 5 cement with sand is poured over the concrete base, the thickness of such a dry mortar is taken up to 5 cm.Due to the complexity of creating the necessary slopes for water drainage, a slope from 2 to 5 degrees is created in the process devices of a concrete base. So that moisture does not linger under the tiles, pieces of polymer or asbestos pipes are vertically laid in the concrete screed, 1 pc. for every m2.
After the concrete mixture has hardened, the top of the pipes is cut off at the level of the top of the concrete and the holes are filled with fine crushed stone. They begin to lay paving stones directly from the curb, after laying 4 elements, the maintenance of the given level is checked using the building level. Ensuring the quality of adhesion is carried out with a rubber hammer, with a light tap, the tile is sunk into a mixture of cement with sand or, if necessary, is lifted with a dry mixture (grinder) or a cement pad. With this method of paving, labor costs are significantly reduced and costs for materials and work are saved. Laying is done in front of you with movement on an already paved surface. The downside is the need for thorough compaction of the mixture, and then the finished cladding.
Tamping can be done with vibrating plates, and in their absence, you can use a piece of thick wide board. The method is most repairable, as it allows easy replacement of individual damaged tiles. - For mortar, it is widely used when paving large areas. The cement-sand mortar is applied to the base with a layer of up to 3 cm to the area of reach by the master and leveled with a notched trowel.
Laying paving stones on concrete using this “wet” technology is carried out first with whole tiles, taking into account the desired pattern, all mortar is removed from unpaved areas with trowels, the cut tiles are installed on a fresh mortar after the main one has solidified under solid tiles. Compliance with the required slopes and the flatness of the pavement are checked using a level and a rule.
The tile in all methods is laid in compliance with equal gaps (5 mm), the resulting seams in both of the above methods are filled up with a grinder or simply sifted quartz sand and spilled with water. The movement of people on the laid surface is allowed no earlier than in a day. - Glue the tiles to the concrete using a special construction adhesive. With this method, it is possible to create the necessary slopes only on a concrete base, since the glue is spread with a very thin layer (from 5 to 10 mm) on a small surface area (≤ 1 m application, small. For the same reason, paving slab glue is diluted in small quantities to avoid hardening.
The seams are filled with the same glue, or you can use a grinder, as in previous cases. The hardened special construction glue provides a strong and reliable connection with concrete, therefore this method is used quite often, but it will not work to replace a damaged element without its final fracture.
Step-by-step instructions for paving on a concrete base
Composition and sequence of work:
- Layout of sites and paths on which paving is planned, with the marking of the markings fixed with wooden or metal pegs. The boundaries between the pegs are covered with lime or chalk.
- Removal of the fertile soil layer with the device of an earthen trough, taking into account the location of reinforced concrete curbs or curbs. The depth of the trench for the curbs depends on their height, the top of the curb, to ensure drainage from the paving surface, should be 2 cm below the top of the tile and rise above the level of the lawn.
- Installation of curbs or curbs. A strong cord is pulled onto the hammered pegs at the height of the curbs, taking into account the observance of the necessary longitudinal slopes. For collecting water flowing down from the tiled surface, it is recommended to provide trenches for laying the rainwater system trays close to the curbs. Reinforced concrete elements are installed in trenches on a compacted sand base with a small layer of lean concrete or mortar on top of it. The elements are fixed with wooden pegs and pouring concrete mixture.
- Concrete foundation device. The soil in the earthen trough is carefully rammed and covered with geotextiles to prevent weeds from growing. The concrete is placed on a compacted cushion of sand or gravel ≥ 10 cm thick.
In some cases, the curbs are installed by craftsmen after concreting the base. This option, when performing work independently, is not recommended for execution. To protect the edges of the sites from crumbling soil and create a concrete base with even edges, formwork is mounted from 40-mm thick boards, which will have to be carefully unfastened. If the curbs are installed immediately, then they themselves will serve as formwork. The advantages of this option:
- there are no costs for the purchase of materials for formwork;
- time is saved for its installation and subsequent disassembly;
- the concrete mix will be poured without seeping into the cracks between the boards;
- additional fixation of curbs in the required position.
The concrete is poured no earlier than one day after fixing the curbs. The break can be used for a reinforcement device (paths that vehicles and heavy equipment will not enter may not be reinforced). The thickness of the concrete is taken as a wound of 15 cm in the absence of reinforcement and 20 cm in the presence of reinforcement. In the presence of mobile heaving soils, the thickness can increase up to 40 cm.
Reinforcement is carried out with meshes connected from steel or composite reinforcement with a diameter of up to 10 mm and cells from 15 to 20 cm. The meshes are located at the top, at a distance of about 5 cm from the top of the concrete, with laying on concrete pads. It is possible to fill in two stages: lay a layer of concrete about 10 cm, carefully level it, lay grids on fresh concrete and pour the concrete mixture up to the required level.
When pouring large areas, every 3 m, it is necessary to arrange expansion joints from boards laid over the entire thickness of the concrete. On the paths, such seams are arranged every 6 m. Before the start of hardening, the concrete boards are removed, and the resulting seams are filled with hot bitumen.
- How long does it take to lay tiles? The concrete will gain the minimum required strength in about three days, therefore, it is impossible to start work earlier. A suitable laying method is chosen, if the permeability on the surface is high or if it is planned to drive vehicles and heavy technical equipment onto it, then it is preferable to pave with tiles on cement mortars or construction adhesives. If there are obstacles on the cladding area (sewer hatches, flower beds, drainage holes, etc.), their outline is made with whole tiles.
Before the completion of the work, the final design of the abutments of the required configurations is carried out with cutting the tiles using a grinder with a circle on concrete or a circular saw. At the end of the installation, the joints are filled. You cannot walk on the paved surface, no matter how much the edge of the tiles is damaged, for about 3 days. If necessary, the obligatory passes can be carried out by laying on the paving surface of plywood sheets. - In conclusion, after 3 days, construction residues and debris are swept away, after which the entire surface is washed with water under pressure from a hose.
Laying tiles on a concrete blind area
Blind areas around buildings are usually made up to 1 m wide.First, the condition of the blind area is examined, after which the following operations are performed:
- concrete is cleared of dirt, existing cracks in it are cut;
- the entire surface of the old concrete is poured with a 2 cm layer of cement mortar;
- the boundaries of the future paving with pegs are marked;
- the location of the curb along the edge of the site is outlined, the top of the curb should be located taking into account the implementation of a slope to the side of the building of 2 cm for each running meter. m and below the top for paving stones by 3 cm.Then a mark is marked on the plinth, equal to the sum of the height of the tile and the thickness of the preparation for it, to which a strong cord is attached, the second end is tied to the pegs at the planned height of the top of the curb;
- according to the arranged markings, a trench is developed for the curbs, then an earthen trough is developed between the edge of the blind area and the curbs;
- then work is carried out in the manner described above when arranging a concrete base and paving with paving slabs.
When performing work on our own, the cost of paving is reduced by at least 2 times. Additionally, how to properly lay paving slabs, you can read in the technical literature or consult with experts, this will help to avoid damage to expensive materials and ensure the durability of the coating.

