Rules and technology for finishing walls with plastic panels. Description of the process with photos and videos
Nowadays, surface finishing with plastic panels has become quite popular. Such repairs look quite presentable and do not require large expenditures. However, not everyone knows how to fix PVC panels to walls and ceilings, and therefore everyone is trying to come up with their own way. In today's article, we will talk about the rules for finishing with such material. We will try to figure out as much as possible what is required for the production of work, how complex they are and whether it is possible to perform them without having certain experience.
PHOTO: www.nashaotdelka.ru
Do not think that all PVC panels are the same. There are significant differences between the products of Chinese and European manufacturers, which should not be neglected. In order to purchase, you should pay attention to a few points. You should not buy plastic panels if:
- Damage to the stiffeners is visible.
- The drawing on the front side is blurred, the lines are drawn indistinctly.
- There are differences in shade between panels of the same batch.
- The dimensions of PVC panels for walls and ceilings do not match.
- There are scratches on the surface.

PHOTO: remontnik.ru
Naturally, such a product will go at a discounted cost, but significant problems may arise during the installation process. And the end result is unlikely to please the master. It is also worth paying attention to strength. If you press your finger on a Chinese (cheaper) product, the plastic breaks easily, while European panels are more resistant to mechanical damage. After punching, the plastic instantly returns to its original state.

PHOTO: en.made-in-china.com
Related article:
In the publication, we will consider sizes, applications, varieties, advantages and disadvantages, criteria for the right choice of panels, average prices, popular models, expert advice.
Plastic panels for the kitchen and other premises of an apartment or house
The differences between Chinese and European panels or PVC tiles for bathroom, kitchen walls are significant. Among the main ones are (China/Europe):
- front side thickness - 1.5/2 mm;
- stiffeners per panel - 20/29;
- panel weight - 1.7/2 kg;
There are also differences in external data, which do not speak in favor of the Chinese manufacturer.

PHOTO: homeli.ru
What glue to use for pvc panels
This type of fixing plastic panels is suitable if the walls and ceiling are fairly even. However, it is not always possible to work with a ceiling in this way. If PVC panels are glued, it is impossible to install recessed spotlights. But more on that later.
For gluing surfaces with plastic, 3 main types of compounds are used - universal (for polyvinyl chloride), "moment-mounting" or liquid nails of any manufacturer. The use of glue simplifies the work and reduces the time spent on it, however, subsequently it will be problematic to replace one of the strips separately. In addition, difficulties will arise with the complete replacement of plastic panels - the wall will have to be thoroughly cleaned.

PHOTO: remontik.org
What is the crate for PVC panels made of in the kitchen or in the bathroom
Plastic panels are attached to the ceiling or wall both with adhesives and with the help of. But for the second option, you need to assemble the crate. It can be wooden or metal, made of thin-walled steel profile. Also, plastic panels can be fixed to the crate with special clamps called kleimers.
The method of installing PVC panels in a bathroom or kitchen using a crate is more laborious and takes more time, but it allows you to replace individual slats if they break. This happens when plastic is hit by a hard object.

PHOTO: paneligid.ru
How to cut PVC panels: the choice of tool
The most preferred tools for cutting plastic panels are a regular clerical knife and a hacksaw. The plastic is not too hard, so it can be cut easily. But if the panel can be divided along the length without additional tools like a ruler (the blade goes along the stiffener evenly, without deviating), then a square must be used for a transverse cut.
Many use or for these purposes. In this case, a long line along the lamella can be drawn using a steel guide for the PVC panel from which the frame is assembled.

Do-it-yourself plastic panel ceiling: finishing technology
Ceiling and wall plastic panels have differences in structure. Despite the fact that in appearance they are the same, their density, and hence the weight, are different. Softer plastic strips are used for the ceiling, which is not surprising. After all, walls are more at risk of mechanical damage. At the same time, the cost of PVC ceiling panels is approximately 30% lower.
Works on preparing the ceiling for the installation of plastic panels
Here, the amount of work will depend on how it is planned to fix the plastic tiles on the surface. In any case, any irregularities that may interfere with a snug fit should be removed. Installation of PVC wall panels on the ceiling is quite acceptable if it was not possible to find the right ones for the colors.
Before facing the ceiling, you should consider where the cables will be laid for supplying to the fixtures, if any are planned for installation.

PHOTO: masterpotolok.com
Installation of PVC ceiling panels with glue
With this method of facing, the old coating and it should be removed from the ceiling. You should first cut the plastic strips to size and lay them out in the next room. It is especially important to do this if a ceiling covering with a pattern is laid. The adhesive composition is applied dotted on both sides of the back of the strip, with an interval of 5-7 cm, after which the plastic panel is pressed against the surface for a short period of time. Such compositions, for example, as liquid nails, seize very quickly and are able to hold the PVC strip on the ceiling in 15-20 seconds.

PHOTO: gooley.ucoz.ru
How plastic panels are attached to the ceiling on the crate
If you plan to install spotlights, then you need to assemble a wooden or metal crate (frame), which is fixed to the surface with dowel-nails. In this case, the self-tapping screws are screwed into the wood or steel profile through the inside of the groove on the plastic panel. After that, the spike of the next strip is inserted into the groove and the fastener is repeated. It is enough to fix one panel, and even a novice master who does not have experience in such work will understand how easy it is. The only thing to consider is the need to install the crate strictly according to the level. Both a conventional tool and a laser one are suitable here, although experts say that a liquid level is best suited for this task. Therefore, before you start making a crate for plastic panels, you need to take care of having the right tool.

PHOTO: abvmaster.ru
The nuances of wall decoration with PVC panels
If the home master has figured out how the ceiling is finished with plastic panels, there should not be any problems with the walls at all. Everything is much simpler here. Attention should be paid only to the location of the stripes. For a bathroom, it is better to choose a vertical arrangement - so moisture will seep between the panels less. But for the kitchen will have to proceed from the size of the surfaces. It is necessary to calculate how much material will be left with vertical wall decoration with plastic panels, and how much with horizontal. Often the difference is significant.

PHOTO: megamasterok.ru
It makes no sense to paint step-by-step installation instructions with your own hands, everything was described using the ceiling as an example. For clarity, we suggest that you familiarize yourself with photo examples of such finishes.

PHOTO: www.vannadecor.ru

PHOTO: absolom.ru

PHOTO: build-experts.ru
And now consider the options for mounting PVC panels using adhesives:
 PHOTO: tvoidvor.com
  PHOTO: stroy-podskazka.ru
  PHOTO: repairflat.narod.ru
 Illustrative examples of how wall panels are attached to the adhesive composition, as well as a crate for leveling the wall, can be seen in the photo gallery:
 PHOTO: strbuild.ru
  PHOTO: otdelka-expert.ru
  PHOTO: v-kvartiremont.ru
 Summing up
The choice of the method of finishing surfaces with plastic panels is very simple - it is better to mount the ceiling on the crate, the walls (if they are even) on adhesive compositions. Each of the methods has its own advantages and disadvantages. But what can be said with certainty is that a properly executed finish will please the eye of the owner for more than one year. But the unpleasant smell that may appear in the room after removing the protective film should not worry the master. In a day or two, it will completely disappear. Of course, provided that the material is not purchased in a small shop on the outskirts at an ultra-low price.
What are the methods of fixing plastic panels to the wall? How to choose material? What tools will you need? All this and step-by-step instructions for installing plastic panels.
Advantages of plastic panels
Polyvinyl chloride is a practical and durable material. It is widely used to decorate the surfaces of walls and ceilings. With the help of a wide variety of its shades, shapes and textures, the interior can be made stylish and beautiful. Advantages:
- resistance of the material to moisture;
- a simple system for attaching wall panels, which is within the power of beginners;
- long service life;
- fire safety;
- hygiene;
- convenience in the process of washing and cleaning;
- low cost;
- resistance to mold and mildew.
The disadvantage of PVC panels is low impact strength. It is necessary to carefully check the delivered building material and carefully mount it.
Tools for attaching PVC panels to the wall
Before installation, it is necessary to prepare a tool and auxiliary materials that will help in the work:
- for marking - a tape measure with a pencil or a washable marker;
- for cutting the canvas - a hacksaw with fine teeth;
- building level, plumb;
- triangle;
- for processing corners - a plastic profile or slats;
- for fixing on the surface - self-tapping screws, dowel-nails, kleimers;
- perforator, screwdriver;
- antiseptic solution, sealant, glue.
Accessories that will be needed in the process:
- corners external and internal;
- docking, starting and F-shaped profiles;
- plinth ceiling and floor.
To save time, choose a store where the entire set can be purchased in the same place as the main material.
Choice of plastic panels?
The characteristics of polyvinyl chloride depend on the manufacturer. There are panels from Europe and China on the market. In terms of quality, the overwhelming majority of participants in the first group win. The strength of the panel depends on the thickness of the walls and the number of rigid ribs located inside. Optimal indicators: the thickness of the front side of the panel is 2-1.5 mm, the number of stiffeners is 20-29, the total weight of the lamella is 2-1.7 kg/m2.

You should not make a purchase if:
- stiffeners are deformed or damaged;
- the lines of the drawing are indistinctly expressed, the edges are blurred;
- shades of panels from one stack differ from each other;
- scratched surface;
- the sizes of the segments are different (in this case, the fastening of plastic panels to the wall will be complicated due to loose fixation).
In order to check how reliable the material is, you need to press its surface with your finger. The front side should bend and return to its original state. If the panel is deformed, this indicates that it contains a high content of chalk and the service life will be short.
Calculation of the required number of plastic panels
Calculations are necessary in order to avoid overpayments due to the additional purchase of material. It will also take time if there are not enough building materials. Fixing PVC panels to the wall involves their vertical or horizontal arrangement. The choice depends on taste preferences. The calculation for the vertical is carried out as follows:
- 1. We measure the room (length around the perimeter);
- 2. Subtract the width of door and window openings;
- 3. Divide the remainder by the width of one panel.

The result is the number of panels needed to finish the room. It is imperative to add a few additional units to it in case the material is accidentally damaged.
Horizontal calculation:
- 1. We measure the area of the room;
- 2. Subtract the area of door and window openings;
- 3. The resulting number is divided by the area of one panel from the kit offered in the store.
We add 10% to the obtained value - in reserve. When installed horizontally, the material will need to be cut, resulting in a small residue in the form of scraps.
PVC crate: material calculation
When decorating the walls with plastic, you will need to hide the wires for electricity. To do this, mount the panels on the crate. In order to buy the optimal amount of materials, calculations will also be required here. The crate is made of metal profile elements and wood laths.

Procedure for calculation:
- 1. We measure the height of the walls in the room;
- 2. The resulting indicator is divided by the step of placing the rails in the future crate (recommended 50 cm);
- 3. We multiply the result by the perimeter of the room - we get the length of the profile in linear meters;
- 4. We measure the height of the corners in the room;
- 5. Multiply by their number - we get the total footage of the profile for processing corners;
- 6. Add the perimeter of door and window openings.
As a result, you will get two values - the length of the rails for the crate and the corner profile. Be sure to add some margin in case the material gets damaged during installation.
How to install wall panels in the bathroom
For rooms with high humidity, in particular, a bathroom and a bathroom, PVC panels are best suited because they are not afraid of moisture, fungus and mold. With the help of modern decor options, the design of these rooms can be made stylish and concise without spending a lot of money. To do this, it is not necessary to buy expensive collectible tiles - use PVC.
The process can be presented in three versions:
- with the use of adhesives;
- using self-tapping screws;
- using clamps.
Glue is suitable for perfectly even and smooth surfaces. Choose any of those sold on the market: liquid nails, universal "Moment" or a specialized composition for PVC panels. Glue will simplify and reduce the cost of bathroom repairs, because there is no need to build a crate. The disadvantage of this option is the difficulty of replacing a damaged panel with a new one, since it will be firmly glued to the wall. It will have to be dismantled along with the outer layer of wall decoration, which will then need to be restored.
Self-tapping screws are easier. The option is convenient for masking pipes and wires. To speed up the process, it is recommended to use a screwdriver. Surface leveling is not required. The disadvantage is the need to build a crate base from wooden slats. This is an additional cost of time and money. Before attaching the wall panels to the clamps, a metal crate must be installed on the wall.
Finishing the bathroom with glue
Before installing plastic panels, it is necessary to prepare the base. To do this, you need to thoroughly clean the walls, putty, let them dry and level. Before that, the old coating is completely removed from the wall - wallpaper, tile or peeling paint.
Putty will well hide all the cracks, cracks and bumps on the walls. The size of the differences is allowed up to five millimeters. If the plastic is stuck on deep pits or bumps, then over time it will deform or peel off. Why remove the old coating from the wall? It contains dust, dirt and grease. All this will prevent the normal adhesion of the adhesive coating. If whitewash is applied to the wall, it is thoroughly washed off, the fat is cleaned off with detergents. Then a primer is applied and the wall is leveled.

Step instruction:
- 1. Wall preparation: remove the old coating, clean, putty, sand;
- 2. Clean the back of the panel with a damp cloth, dry;
- 3. Apply glue to the back side of the building material using the dot method with a step of 20 mm;
- 4. Attach carefully.
When using liquid nails as an adhesive composition, the panel is then tapped and detached from the surface for 5-7 minutes. The composition requires weathering. After a short break, the PVC returns to the wall.
The frameless method does not involve the formation of corners. As a final finish, cladding with ordinary plastic corners is suitable. They do not have grooves, so use transparent silicone to mount them.
When finishing around the sockets, pre-cut holes for them. Make the necessary measurements and mark the place where you want to make a cut. During work, turn off the electricity.
Skirting boards are installed last. For this, self-tapping screws are used - with the help of them, the material is attached to the wall, before that, holes are drilled. The joint zones between the segments of the lamellas are filled with silicone sealant or ordinary mounting foam. This must be done so that moisture does not get under the plastic surface of the updated wall.
Glue choice?
The modern market offers universal adhesive compositions:
- Moment Crystal;
- Kleiberite 636;
- Emfikol 34012A.

They are suitable for fixing PVC without professional help. Specialists use glue for plastic. The main rule of choice is to buy in a specialized store. This way you will protect yourself from acquiring fake or expired products. If you decide to buy PVC adhesive on the market, pay attention to the date of manufacture and the appearance of the package. Good quality adhesive composition will provide:
- its quick setting with surfaces;
- long and reliable fixation;
- resistance to temperature extremes, moisture, frost.
Kitchen "apron": fastening technology in a spacer
Most often, the so-called. "apron" in the kitchen is made using expanded clay or tile. But you need to be able to lay tiles. Those who do not want to spend money on calling the master and are confident in their abilities can equip the kitchen with PVC panels. Modern plastic options successfully imitate expensive collections of ceramic tiles.

The technology "in spacer" does not require the use of lathing, adhesive composition and special fasteners. It is suitable for small kitchens where the work area is covered with a single panel sheet. Step-by-step instruction:
- 1. Install the panel on the countertop with the bottom edge, cut the material to the required dimensions of the intended "apron";
- 2. Insert the upper part behind the hanging cabinet so that it securely presses the sheet against the wall; fixation can be improved with fasteners in the form of staples;
- 3. Fix the bottom of the panel with a skirting board - it must be securely fixed to the countertop, it is better to choose a massive and durable option for the floor.
The advantage of this method is that the "apron" at any time can be easily changed to another.
We fix PVC on the crate frame
Before sheathing, the wall must be cleaned, but without serious leveling of the surface. Cosmetic repairs to the bathroom, bathroom or kitchen require additional treatment of the walls with an antiseptic composition and waterproofing.

For the manufacture of the crate, wooden bars 2x2 cm are taken. For rooms with high moisture content - bathrooms and showers - metal elements are recommended. Before using wood, the material is thoroughly dried to avoid its possible deformation. The bars are treated with an antiseptic. If you decide to use metal, then choose a profile element marked UD (main part of the contour) and CD (contour guides).
The construction of the crate structure must begin with the markup. First, we determine the lower level - it can be on the floor or higher, depending on the design idea. This is where the bottom plinth will be installed. As a guide, take the most protruding section of the wall - it will determine the total indentation of the crate. Add 2-3 mm to the indent. This must be done, because wood even under slight influence of moisture is deformed.
Then the upper fit line of the crate and the side levels are determined. To level the top and bottom, use the building level, for the sides - a plumb line. Fixation is made on direct suspensions. We place screws in increments of up to 25 cm for wood and up to 15 cm for metal. We fasten the bars first along the edges, then to the center. This avoids design distortions and inaccuracies.
After attaching the top, bottom and side rails, we proceed to the installation of the internal ones. This is done taking into account the choice of the type of arrangement of the lamellas themselves - vertical or horizontal. Subsequently, the lamellas will be attached perpendicular to the internal guides.

Step-by-step instruction:
- 1. We install moldings - external, internal (corner, lower, upper);
- 2. We fasten the first panel and fix it with a clamp (the edges of the lamella are included in the upper and lower profile);
- 3. The second panel is inserted into the groove of the first, fixed in the same way, and so on;
- 4. We install the material to the end of the wall;
- 5. We fasten the last panel so that it fits snugly into the corner area all the way.
If there are pipes in the room that need to be hidden behind the panels, the crate is formed in such a way that they will be located under its frame. Additional corners required. Counters, valve taps and other elements to which access should be periodically opened can be hidden behind a decorative door. To do this, the panel to the guide must be "planted" on small loops.
When choosing and installing a room, bathroom, kitchen, follow the rules:
- you should not combine plastic with expensive finishing materials - stone, tile, granite, it will look tasteless;
- for small rooms, choose panels of light shades or with photo printing;
- smooth materials are suitable for rooms with high humidity; a pronounced and deep texture will require constant cleaning, otherwise mold or fungus will appear;
- when choosing panels, try to stick to the overall ensemble and color scheme in the decor.
Plastic panels are a unique modern product with which you can create incredible images. With a little imagination, you can make your home unique and original. Study the proposed instructions and boldly proceed with the repair!
Among the huge variety of ways of external and internal design of buildings and structures, wall decoration with PVC panels (made of polyvinyl chloride) takes its rightful place.
Not so long ago, the choice of such a finishing material was not large enough. Panels with a depleted monochrome (one-color) color with a predominance of white were offered on the market.
Currently, the color palette has been greatly enriched through the use of new dyeing technologies and the application of various patterns in the form of abstract patterns or imitations for other more expensive finishing materials of artificial or natural origin.
There are many types of PVC panels. They may differ:
- by appointment - for facing walls (thicker) or ceilings (thinner);
- in length and width;
- by type of connecting lock and method of fastening;
- according to the method of drawing;
- along the surface topography.
The design of PVC panels is a cellular-channel structure formed by the upper and lower horizontal planes interconnected by longitudinal bridges. This design has good soundproofing and heat-shielding properties. 
They are mainly used for cladding walls, partitions or ceilings of glazed loggias, balconies, utility rooms. Often you can find ceilings lined with them in kitchens, bathrooms and toilet rooms. Sometimes they are used to decorate rooms with a humid microclimate as a budget (cheap) replacement for ceramic tiles.
They are also used for facing and protecting the facades of buildings or their parts (for example, plinths). Such exterior panels can have a textured embossed finish and imitate stone, brick or even wood. For cladding the outer surfaces of walls, panels are also specially produced with an outer surface resembling a clapboard with a specific configuration of the seam characteristic of this type of finish. 
This type of cladding is not recommended for finishing residential premises or places where people spend most of the day. The inability of such a coating to pass air and steam leads to the creation of an unfavorable microclimate in such rooms and the impossibility of creating coziness and comfort required for human life.
Neighboring panels are interconnected by means of a lock similar to a parquet spike, which uses the elastic properties of polymer plastic and creates an almost hermetic joint. The lock is of two types - with a broadened lower part, designed for direct attachment of the panel to the frame using screws or nails, as well as with a thin groove, on one of the side faces for attachment with special metal clamps, which, in turn, are nailed or screwed to frame. 
Sizes can vary greatly. So, for example, less durable panels with a thickness of 5 mm are used for cladding ceilings, and with a thickness of 8 ... 10 mm - for cladding walls. They can be from 200 to 370 mm in width, and vary in length from 2.6 to 3 meters.
The drawing on the panel is applied both by means of hot knurling and by the method of lamination, that is, finishing the outer front layer with a polymer film with graphic patterns. 
With a sufficiently even surface intended for cladding, the panels can be mounted using adhesive mastics designed for gluing PVC products. However, for greater reliability, it is better to use wooden or metal frames. For the manufacture of wooden frames, square bars with dimensions of 40 x 40 or 50 x 50 mm are suitable. For metal - use bent sheet profiles designed for mounting drywall sheets.
Important: before use, the wooden frame elements must be treated with antiseptics.
Preparing for installation
Calculation of the material required for finishing with plastic panels
Based on the area of the surface to be lined, calculate the required number of panels that are required in order to sheathe the walls or ceiling. That is, the finishing area is divided by the area of one element. This value is directly dependent on the size of the panels used. When purchasing, you should carefully monitor their similarity, as colors and patterns may vary in shades from batch to batch. You can ask the seller to provide the opportunity to join several panels from different packages and see if they differ in thickness and in color or pattern. 
The calculation of the required number of frame elements is performed according to a pre-drawn layout of the panels. At the same time, it is taken into account that the distance between these elements is taken close to or equal to 500 mm. Fastening and leveling in the plane of the frame elements is carried out with screws of the appropriate length, if the frame and the working surface are wooden. For concrete or brick walls, dowel-screws are used, installed in pre-drilled holes, and perforated strips with bent ends are used to align and connect metal elements with walls or ceilings.
To increase the heat-shielding and sound-proofing properties, mineral wool mats or foam boards can be laid between the frame elements.
What tool should you use
The set of tools that require the installation of plastic panels on ceilings and walls is quite minimal:

Surface preparation
The surface of the walls does not require any special preparation, except that, if it is not covered with crumbling plaster, there are traces of soaking and there are areas affected by fungus and mold. Such defects should be eliminated, and the wall should be treated with antiseptics, followed by a primer.
Wall decoration with plastic panels
Let's now consider how to properly attach plastic panels to the wall using a frame. PVC panels and the elements to which they are to be attached are installed in a perpendicular direction. That is, if the installation of plastic panels on the wall requires a vertical arrangement, the frame elements are fixed horizontally on the walls, and vice versa. 
The frame slats are fixed to the walls in 500 mm increments. This size was not chosen by chance. If the step is larger, the stiffness of the cladding will be lowered, if more often, there will be an excessive waste of material. Panels are attached to the frame with nails or self-tapping screws. If the panel design does not provide for self-attachment, clamps are used. Each subsequent one snaps into the lock of the previous one, and an almost imperceptible perfect seam is formed that does not require additional finishing. 
If for some reason the frame device cannot be completed, there is nothing left but to glue the plastic panels to the wall. This is possible under one condition - the working surface should be as even as possible. How to fix plastic with glue?
First you need to decide what to glue. Glue or adhesive mastic should be chosen so that they have good adhesion (ability to stick) to two dissimilar materials at once - PVC and brick, plaster, wood or other materials that make up the finished surface. 
Before proceeding with gluing, the surfaces to be glued must be well cleaned, dedusted and degreased with any organic solvent. A thin layer of glue is applied to the PVC sheet, after which, by pressing and pressing, the adhesive is applied to the slab and wall.
You can assemble a number of panels inserted into each other (up to 3 ... 5 pieces) into a group and it can already be glued to the ceiling or wall. After installation, in order for the panel not to slide along the wall under the influence of gravity, it must be fixed using specially designed and assembled fixtures.
To mask the seams that form on the short side of the panels when they are built up, or in the right and reverse corners of the joints, or at the junction with surfaces that do not need cladding - for different thicknesses of sheets, special plastic profiles of a special configuration are produced, or, as they are also called - " moldings.
PVC wall panels are the easiest, fastest and most economical way to finish. Polyvinyl chloride has a number of properties that contribute to its long-term operation as a finishing material for any premises (bathrooms, balconies, living rooms, offices and shops). Wall decoration with PVC panels is not such a difficult job, anyone who knows how to use a hammer, a level and a screwdriver can handle it.
About how to fix PVC panels to the wall, how the battens are installed and what qualities PVC tiles for walls have - in this article.
What are wall panels
PVC panels are often used in modern renovations, they are mounted both on walls and on ceilings. Wall decoration with "lining" is carried out very quickly, and the cost of such repairs will be significantly lower than tiles or drywall, for example.

The panels consist of an upper decorative layer, dense plastic on the wrong side and thin plastic partitions acting as stiffeners.
Of the advantages of PVC panels, as wall finishes, it can be noted:
- the material is suitable for finishing any premises (with high humidity, with temperature fluctuations, with high traffic);
- lamellas are easy to clean with a damp cloth, do not absorb odors, they do not leave stains;
- the light weight of the material facilitates its transportation and installation;
- a huge range of textures and colors (you can find wood, stone, tile, plain, multi-colored, glossy or matte lamellas);
- compliance with sanitary standards - the material is not susceptible to infection by mold and fungus, living microorganisms do not develop in it, bacteria do not accumulate;
- the ability to hide communications and electrical wiring under the finish;
- fire safety - the material does not burn, but melts;
- simple installation of PVC panels, which is easy to do on your own;
- long service life - the finish does not fade over time, does not turn yellow and does not deform;
- thanks to the internal chambers, the panels soundproof and insulate the room.
Advice! If the room needs additional insulation, the air gaps inside the lamellas can be filled with any heat-insulating material.

When purchasing material for wall decoration, you need to pay attention to its quality:
- panels should not be too light;
- the shade and pattern on the decorative surface must be uniform and clear;
- each lamella must contain a sufficient number of internal partitions, because they provide material rigidity;
- it is better to choose material from the same batch so that there are no color mismatches;
- along with the panels, you need to buy moldings - decorative elements that cover the joints, corners, slopes and cut lines of polyvinyl chloride.

The main and, probably, the only drawback of PVC panels is their fragility - the material is quite easy to damage under mechanical stress. Therefore, the cladding must be transported with care and carefully fasten the PVC panels.
How to install PVC panels
Wall cladding with plastic panels can be done in two main ways:
- Directly on the wall with glue.
- On a wooden or metal crate.
PVC panels can only be glued to a very even and smooth surface. If the wall in the room is just like that, then wall cladding will take quite a bit of time and effort. You can’t say much about how to glue the panels - they are simply applied to the wall, leading the upper edge into the ceiling molding, and the joint line and the back wall are coated with special glue for plastic.

How to properly attach plastic to the crate
The type of crate largely depends on the purpose of the room and the climate inside it. For wet and cold rooms (bath, kitchen, balcony, pantry), a metal profile crate is more suitable. The same profile that is used for the installation of drywall sheets will do.
For other rooms, you can use wooden bars. In this case, you will need a special tool to cut the tree to the desired size.

Attention! For wet rooms, a wooden frame can also be used, but before installation it must be treated with an antiseptic and dried thoroughly.
In the installation of the crate, it is especially important to observe the level. Regardless of how the panels will be located (vertically or horizontally), the frame must be absolutely even. Then there will be no distortions, crooked joints and plastic protrusion.
Installation of the crate on the wall
Before attaching a profile or wooden blocks to the walls, the surface must be prepared. To begin with, the wall is cleaned of the old finish: the wallpaper is removed, the paint is removed, and so on.
The plaster is tapped and weaknesses are determined, they must be removed and replaced with a new layer of plaster mixture. They also repair cracks, chips and other major damage to the walls. The surface should not be perfectly smooth, however, the smoother the wall, the easier it will be for the master to fill the crate with high quality.
The metal profile or bars are cut to size, having previously determined the location of the PVC panels.
Attention! If it is decided to mount the panels horizontally, then the guide battens should be in the opposite direction, that is, vertically. The reverse rule also applies: with a vertical arrangement, the “lining” of the profile is mounted in a horizontal plane.
It is necessary to start the installation of the vertical crate from the corner of the room. To do this, use a plumb line in one of the corners to draw a straight line. Relative to this straight line, the profile will be mounted.
With a horizontal crate, zero strips should be fixed at a level of 1-2 cm from the floor and ceiling. If it is supposed to sheathe the ceiling with “lining”, you need to leave a margin of a few extra millimeters.

Most often, PVC panels are mounted vertically, which reduces material consumption and simplifies installation. In addition, the range of such panels is much wider.
A special molding is attached under the ceiling, into the grooves of which the upper edges of all panels will be wound. Then you need to drill holes in the wall with a puncher relative to the drawn line. The step between the holes should be no more than 15 cm.
The first profile or bar is attached to the wall with self-tapping screws or dowels. Its evenness must be checked by the building level. Departing from the first profile of 50 cm, you can install the second one. Installation continues until the opposite edge of the wall is reached - the floor or ceiling line.
How to install panels on the crate
The "lining" begins to be mounted from the angle that is opposite to the doorway. It is this corner of the room that will always be in sight, it must be lined with special accuracy.
A corner molding is installed directly into the corner (there are moldings for both internal and external corners, as well as universal parts). The part is attached to the profile with self-tapping screws.

Now you need to fix the first panel. First, measure the desired height of the lamella (distance from the floor to the ceiling) and bring its upper edge into the ceiling molding. There are latches on both sides of the panel: on the left - narrow, on the right - wide. A narrow latch is inserted into the groove of the corner molding until it stops, and wide locks are designed to install fasteners. A self-tapping screw is screwed into them, a nail is hammered in, or special clip-clips are used.

The installed panel is checked using a level. If all is well, you can mount the second part. Thus, the installation of PVC panels continues until the opposite corner of the wall is reached.
Here, almost always, the panel will have to be cut vertically. To do this, use a hacksaw. The edge is led into the end, corner or universal molding to hide the cut line. The last panel is not fastened with screws or clamps - it is enough that the molding holds it.

To further strengthen the joints, the edges of each panel can be lightly lubricated with silicone sealant.
To beautifully process door and window slopes, the panels are carefully cut and their edges are covered with decorative overlays. Places for sockets and switches are pre-cut in the panels with sharp scissors or a hacksaw, after installation they are covered with decorative overlays.
After all the walls are lined, you need to check the installation level again. The lower edges of the plastic panels are covered with a plinth.

Installing PVC panels is quite simple. Absolutely no difficulties will arise when the walls in the room are even and smooth - the panels are simply mounted on glue. However, you need to understand that it will be quite difficult to replace a damaged panel and, moreover, completely dismantle the cladding during the next repair - the panels will have to be torn off along with pieces of plaster.

Mounting plastic panels on the frame is more difficult, it will take more time and increase costs. But, if necessary, you can remove the damaged panel very quickly and “painlessly” for the rest of the coating. In any case, PVC wall paneling is the easiest and cheapest way to update a room.
Today we will analyze in detail for you: how to finish the walls with PVC panels, how to build a frame for this and how to make slopes correctly.
More and more often you can find on the walls in houses and apartments, not wallpaper - which are familiar to us, but PVC plastic panels. And now they make such panels in which the seams at the junctions are completely invisible, which gives a solid surface. Previously, PVC panels could be found in the kitchen or in the bathroom. However, they often trim the walls in other rooms. PVC panels for walls have a completely different color and you can choose any pattern you are interested in.
In general, we will do everything with our own hands so that the whole structure looks dignified and beautiful, as if a real professional did all the work. As a result, a spectacular wall should be obtained, on which PVC panels will look not only as a decoration, but also as a full-fledged detail of the composition.
Helpful information:
A few words about plastic and its properties
The first thing I want to note right away is that PVC plastic panels are absolutely harmless. Modern technologies have made it possible not only to reduce the cost of production, but also to remove all harmful substances from the composition of plastic. That is why the installation of PVC panels on the wall can be done absolutely in any room, and even in the nursery. It's good when you also have . It can be perfectly combined with the walls.
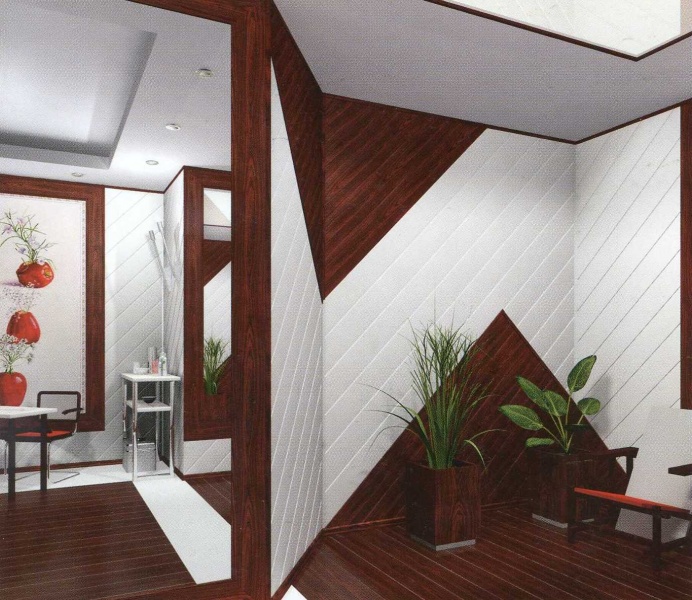
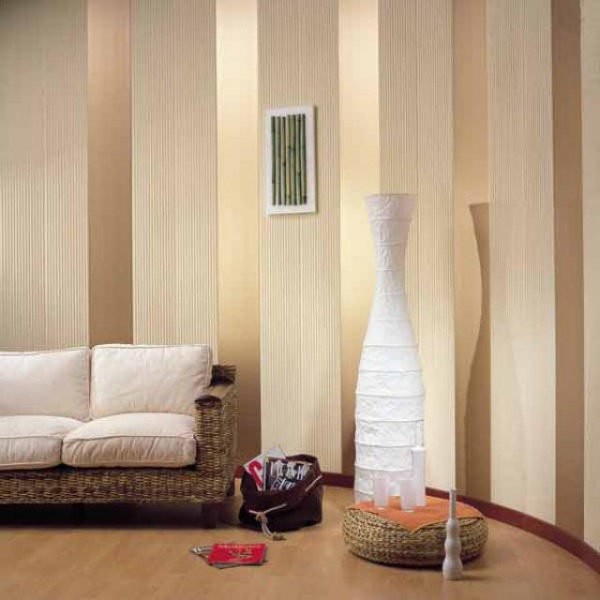
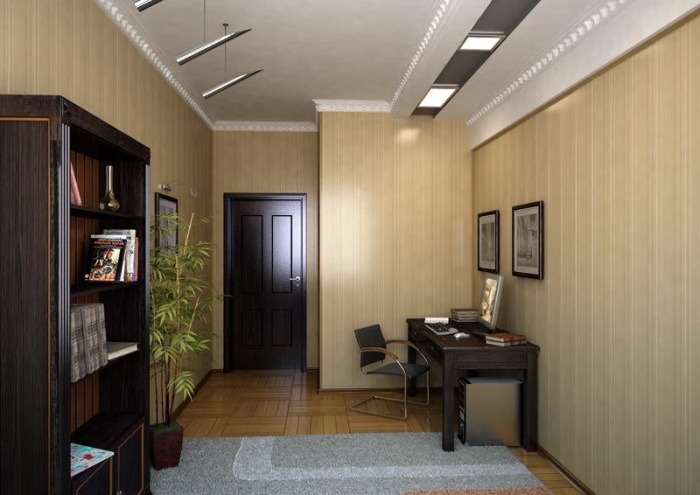
Now the choice of PVC panels is so wide that absolutely any design elements in the interior can be created from them. Another not unimportant factor is that the panels are really beautiful and look very decent on the walls. For example, here are a few interiors where the walls are finished with PVC panels. It looks beautiful and dignified, which means that PVC wall panels are actually a great replacement for even the most expensive wallpaper.
Volumetric PVC panels in the interior
It is noteworthy that any image that will be of excellent quality can be applied to PVC panels. They can be easily pasted over with ordinary self-adhesive, this allows you to achieve any desired effect. It is very fashionable to put 3D images on the wall. In general, fantasy can be limitless.
Finishing with PVC panels allows you to hide any wall defects. With their help, you can beautifully finish any niches where, for example, vinyl wallpaper, it is quite difficult to stick butt. And the end result and the quality of the finish is really impressive.
Indeed, without understanding the specific points of installation, without reading the advice of professionals, you should not take up work on your own. The work itself is quite delicate and requires professionalism not only in the hands, but also in the head.
You need a good tool. With a square, a saw for metal and a drill, the whole result will not be called a finish, but a “lining”. Even though the panels are easy to care for, they are not considered to be the ideals of hygiene. You should not do wall cladding with plastic panels in the bedroom, since plastic does not breathe at all, and this will negatively affect healthy sleep. The maximum that can be done is a kind of panel on part of the wall.
In any light, the plastic glare is quite strong. And this is undesirable for the child's psyche. This is recommended not only by psychologists, but also by medicine. It is also necessary to take into account the moment that the panels inside are hollow and any living creatures can start in them. Many "specialists" try to seal holes with silicone during installation. I must say right away that you should not do this, because during thermal deformation, individual panels can lead and all work will again turn into a “lining”.
There is one more minus. The panels burn excellently and at the same time emit quite toxic gases. Of course, you can’t light them with a lighter or a match, but in an open fire they flare up perfectly.
However, despite all this, PVC wall panels are the ideal solution for the implementation of some individual idea. And all this looks quite beautiful and interesting. Drawings on panels can be further projected onto floors, which can also be done with 3D drawings.
Let's see what experts say about plastic panels:
- When decorating walls with PVC panels, it is necessary to take into account the coefficient of their expansion. After all, materials such as polyvinyl chloride expand quite strongly when heated. Therefore, when decorating walls with PVC panels, thermal clearances must be made for a width, or rather, half the width of the installation profile. The installation of the panels to the crate itself must also allow some deformations in the plane of the panels themselves.
- If you are going to install the panels on a soft crate using staples or on a wooden crate, then it is advisable to use thermal washers together with self-tapping screws. This will slightly complicate the installation of PVC panels on the wall, but will save all your work in the future. In the heat, some panels can simply pop out of the overall structure and such moments happen quite often.
- If you take the laying of the laminate on the walls, then during installation special brackets are provided - clamps that fix the panels on the crate of any kind and design. At the same time, each panel is able to move a little, which allows it to expand freely with a rise in temperature.
Instructions for fixing PVC panels on the wall
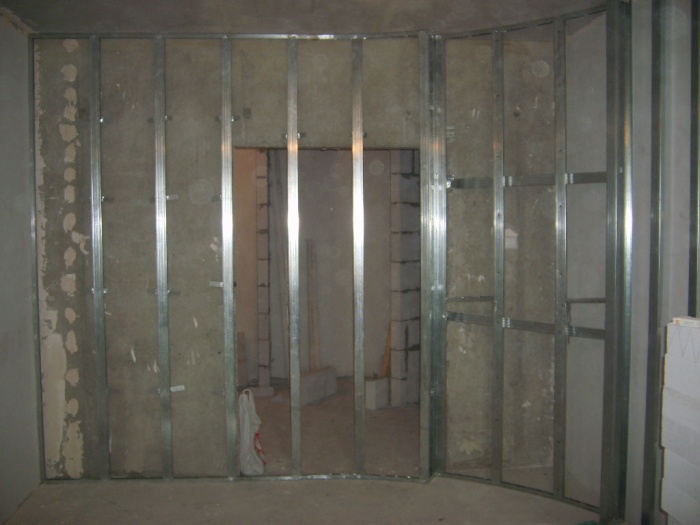
All panel elements are fastened easily and quite simply. The most basic and time-consuming part is the creation of a high-quality crate. Since it is the main bearing part, it must be done very accurately, but more on that later, but now let's take a closer look at the elements of the PVC panels themselves.
- To the crate number 8 it will fit exactly the mounting large shelf. It is attached with screws or staples.
- In order for the fastening small shelf to firmly dock with the large shelf, it is equipped with a longitudinal protrusion, which should hang over the crate.
- To finish the walls with PVC panels, you will need a start and finish profile. In the picture, this is a profile under number 7, with its help it is possible to frame the entire structure of PVC panels. It is the wide shelf that will be attached to the crate itself, and the narrow one is necessary in order to hold the panels themselves. There are also special finishing profiles, and they can be detachable. With them, a narrow shelf can be removed and put back, this allows you to make special latches.
- Under number 4 and 5 inside and outside corners are shown. During installation, you will need these elements in the decoration of some niches, or corners. Here you need to know that the corners are purchased a size larger than the size of the PVC panels themselves.
- Under number 1 we have a connecting profile. It is necessary in cases where you want to sheathe the walls with PVC panels that have different colors, or their length is not enough for the entire structure. It is mounted like a normal installation profile.
- Under number 2 plinth shown. It is also often called a fillet. It is usually mounted with glue and has a facing function.
- Under number 6 the installation combined profile is shown. It is necessary in order to insert the ends of the panels into it, and the plank that runs perpendicular is closed with a plinth. Usually it is used only at perfectly even angles. Otherwise, unpleasant dirt will accumulate in the cracks.
- All corners that overlap another material can be hidden using F-corners. We have them under number 3 attached with regular glue.
PVC wall cladding tool
- Circular saw or electric jigsaw. The saw will be preferable because the jigsaw can play on the stiffeners and the cut itself will not be as smooth as we would like. I used a metal file, since the ends are still sewn up with a plinth or profiles. You can also use a hacksaw, the main thing is that there are small teeth.
- If you need to cut different angles, then it is advisable to purchase a miter box. It should have 45 and 90 degree angles.
- It is very convenient to use a construction stapler when sheathing walls with PVC panels if the construction of the crate is wooden.
- It is also convenient to use a rubber mallet. It is often used when laying laminate. It is quite convenient for her to get the bar of the panel, which is stuck in the grooves. Otherwise, you may damage the cladding profile or crate.
- If the finishing profile is not collapsible, you will also need a plastering spatula. When you install the last panel, you need to bend the profile with something. So the spatula is the most suitable tool.
Installation of PVC plastic panels on the wall
It is better to watch the whole process in the video below, and in the description we will talk about the main stages of work that must be followed when decorating walls with PVC panels.
- First of all, we make a wooden crate.
- It is necessary to immediately fix the guide profiles, starting and finishing.
- We insert the first panel into the installation profile, which will be at the bottom. We bend the panel with an arc and bring the upper end into the upper profile. Remember that you must bring the mounting small shelf into the starting profile.
- With the help of a rule and a mallet, we drive the profile tightly into the groove. The bar should be firmly in place. Next, the panel is additionally fixed on the crate. This is done with the help of brackets, which are driven through a large mounting shelf. In this sequence, each PVC panel is installed, up to the penultimate plank.
- The last panel must be evenly cut from the side of the large mounting shelf in width and always in size. Moreover, it is necessary to leave a few millimeters for thermal expansion.
- Using a spatula, we bend the shelf in the finishing profile and insert the lower end of the PVC plank into the groove. And we start immediately in the finishing profile and in the installation. It is advisable to do this work together in order to fully control the process of installing the last bar in place.
- In the same way, we will start the panel at the top. We bend the profile bar with our spatula and drive the board into place.
- The edge bar is also attached to the crate with brackets. This is done easily. You just need to bend the profile a little and drive the brackets into the necessary places.
- Skirting boards are installed at the very end.
If you are using a finishing special profile, then the most important thing is to apply and then snap the shelf.
If you purchased a cheaper profile, then after all the manipulations with it, it may remain bent. This is also fixable: the profile is heated with a household hair dryer, and then the curved place is smoothed out with a cold iron.
The gaps between the profiles, especially in the corners, can be covered with homemade grout. Mix sawdust with PVA glue until the dough is thick. Or you can choose the color of the silicone profile.
Pay due attention to the crate. If it turned out to be careless, then the last plank of the PVC panel will definitely show this. Most often, the edge begins to bend outward. The result is a "line".
How to make a crate for PVC panels
The crate can be made both wooden and using a metal profile - C. The advantage of the crate is that. Moreover, the insulation will be quite significant. If you are constantly cold, then this will help correct the situation. It is best to use mineral wool mats for insulation. For those who like to listen to quite loud music, you can put a layer of soundproofing on the walls.
The crate itself is attached to the walls with dowels or self-tapping screws. If the walls are curved, then the vertical strips are installed using a plumb line or level. For the substrate, you can use pieces of rubber, trimming the panels themselves.
The most convenient crate is the usual linear one. The maximum step for PVC panels is 50 cm. The minimum step is 30 cm. All ledges, openings, window slopes, wall corners must be framed. Lathing battens should not be with hanging ends. The only exception would be the protrusion of your window sill. For it, a special recess is cut out in the panel that will adjoin it.
Video on wall decoration with PVC panels
As you can see, the panels are quite easy to work with, and most importantly, all the work goes quickly. The main thing is to assemble the crate, and the installation of panels is an easier and rather fun task.
How to sheathe slopes with plastic
Slopes are the biggest problem plastic finishers face. After all, specially made obtuse corners are not produced, and if they were produced, then finding slopes with clear angles is also a problem. Many get out of this situation in different ways, but they all go to the fact that as a result the angle is straight when the slope itself narrows inward. Along with this, there is a fairly simple way to finish the slopes with plastic.
- We sew up to the corner the two sides of our slope. You can allow an indent of exactly half the width of our corner shelf.
- We begin to cut the right corner along the length from the side of the slope, leaving a margin of up to 6 cm in two directions.
- We carefully cut one of our shelves on the corner on both sides equally. We try to cut exactly along the very edge of the corner.
- Next, you need to draw a straight line from the corner at an angle of 45 degrees. At the place of the cut, we cut off the extra piece with a pruner or with the help of garden shears.
- Along the very edge of our corner, it is necessary to make an incision with a knife at half the thickness of our facing profile and apply glue from the inside.
- Then it remains to impose, and press until our corner opens as we need. And it remains only to wait until the glue grabs.
The final rounding
We install PVC panels on a soft crate
Here it probably became interesting to everyone: “How can you finish the walls with PVC panels for soft facing? - after all, it will never withstand the weight of the entire structure. Trust me, all the cladding on the soft crate that the beginners made stand for 15 years, and without any signs of damage.
According to its properties, soft lathing has the same thermal expansion as PVC panels. The adhesive base itself stretches quite well. It turns out that the board on it begins to stretch, and then falls into place. But in order for everything to actually work out, you need to do some preparatory work:
First you need to remove the wallpaper from the wall. The surface itself must be leveled with a very strong putty. You can use "Prospector" or "Hercules". The putty layer should be at least 3 - 4 millimeters. This is necessary so that if there are protrusions or irregularities in the wall somewhere, then a sufficient layer of putty will stabilize everything and the normal thickness will remain to hold the PVC panels on the wall.
Only high-quality finishing profiles are required. Without them, you will not be able to make wall cladding with PVC panels, but on a soft crate.
In order for the panels themselves to hold firmly on the crate, it is necessary to reduce the contact of the adhesive layer with air. Therefore, you need to glue everything quickly enough and also systematically.
From the beginning of the tape, remove the protective layer by 3 centimeters, and cut off the tape itself. The initial end is pressed to the top point on the wall, and the bottom end to the bottom point. It is convenient to do it with only two people. As a result, we begin to peel off the bottom layer of the protective tape, and the adhesive tape itself is immediately firmly pressed against the wall. At the very end, you must also leave the tail of the tape about 3 centimeters. In the same way, we make a crate around the entire perimeter or the intended area.
Installation of PVC profiles on a soft crate
To begin with, we lay our installation top profile, which we pull out the entire protective tape horizontally and from under it. At this moment, the second assistant presses the profile tightly against our double-sided tape. The bottom profile for the panels is also glued according to this principle.
After that, vertical profiles are installed in the same way, without taking long breaks between gluing the profile and opening the adhesive base. It is more convenient to do everything from the bottom up. Thus, your profile will not hang on tape. After that, we fix the finishing profile.
All PVC panels must be accurately cut to size. The slightest jamming between the profiles must not be allowed. In place, each panel is placed consistently and simultaneously from above and below. Here it is already forbidden to use a mallet or a rule.
The entire protective film, namely its tails, is cut or re-glued as work progresses on installing the PVC profile on the wall. One of the shelves in the panel must be cut to 10 mm, and this cut piece is glued to our edge board. The result is a durable construction that will serve you for years. But according to my principles, I have a negative attitude towards a soft crate. I just don't trust double sided tape.
In conclusion, I want to add a few brief recommendations on PVC wall panels and their installation:
- The best option would be to finish the bathroom, as well as a balcony or your loggia. PVC wall panels feel great in the hallway, which is connected to the living room. PVC panels in general help to relieve the entire interior.
- If you decide to sheathe the room with seamless panels, it would be better to install an air conditioner for this, or ventilate the room more often, since the panels are not able to pass air.
- You can also install PVC panels on the wall in the bedroom, but this is done only as a kind of panel. It is not recommended to use such a finish in the kitchen and in the children's room.
As a result, PVC wall panels look quite effective if they were installed by a really master. A good renovation in an apartment is not only about sticking new wallpapers and painting the ceiling, but also some decorative elements that can be easily done using plastic panels.
Following our advice, wall decoration with PVC panels will not be a burdensome task for you, and the result itself will delight you for many years. Trust an experienced plastic specialist!
tweet
Pin it
Like

