What is and what does a door chute look like? Production - KOLIZEI interior doors and floor coverings We assemble the frame of the door frame of any size.
Styling ... Concise Dictionary of Anagrams
Ludka- R. see Lodz ... Toponymic dictionary
Stomach- In the upper left part of the peritoneum is the stomach (gaster, s. Ventriculus) (Fig. 151, 158, 159, 160), an organ that processes food with the help of digestive juices. The shape and size of the stomach may vary depending on the amount of ... Human Anatomy Atlas
Female shiny pillowcase, a thin layer on what, shell, semi, watering, enamel; dullness on the eye, whitish darkening of the transparent membrane of the eye. | · Old. headband, probably light, shiny. | · Old. outerwear, raincoat, mantle. Luda ... ... Dahl's Explanatory Dictionary
Portal: Arctic / Projects / Islands of the Novaya Zemlya archipelago This project was created to coordinate work on the creation of articles about the islands of the Novaya Zemlya archipelago. On the basis of the project, a list of islands in the Novaya Zemlya archipelago was created. Contents 1 Map 1.1 Scale ... Wikipedia
Alphabetical list of the islands of the Novaya Zemlya archipelago. Abankiny Stones Aleksandra Island (Arkhangelsk Region) Artyukhov (island) Afanasyev Island Babushkin Island Bazarny (island) Bashmachny Bezvodny (island) Nameless (island, Tsivolki Bay) ... ... Wikipedia
PSG Zlin ... Wikipedia
Female, Greek bloody diarrhea. Dyspepsia, indigestion of the stomach. Dysuria, urinary retention. Dahl's Explanatory Dictionary. IN AND. Dahl. 1863 1866 ... Dahl's Explanatory Dictionary
City, adm. c. warriors., Poland. Mentioned in 1332 as Lodza, in the 17th century. Lodzya, modern. Lodz. The city is located on the river Ludka (Lodka) boat, and its name is from the Old Polish todzia fishing boat. Apparently, the primary is the hydronym associated with ... ... Geographical encyclopedia
This term has other meanings, see New Earth (disambiguation). New Earth ... Wikipedia
Books
- Stomach ulcers. Pathology and Therapy from the Point of View of a Therapist, Enell Harald. Moscow-Leningrad, 1929. State publishing house. Typographic binding. The preservation is good. Enell's small book gives, in a compressed form, a complete overview of the current state of pathology ...
Design features
1 - Box
consists of a frame of a door frame 80mm wide. and an extender, ordered at will, with which to close a wall of any thickness from 100 mm. without additional fasteners and painting.
2 - Material
the door frame and door frame are made of eurobeam, spliced in width and length on a microthorn, and faced with veneer. On the door leaf, under the veneer layer, there is an MDF sheet backing for full adhesion of the veneer.
3 - Platband
platband (width 60-65mm, L-shaped). Fastened into the groove of the box or expander, without the use of self-tapping screws or glue. The most accurate adhesion of the casing to the wall and ease of installation. At the request of the customer, the doors can be completed with a flat, rounded casing or a portal, which makes the appearance of the door more individual.
4 - Hinges "OTLAV" (Italy)
semi-hinged, barrel-shaped, made of high-quality steel, equipped with a ball axis. By slightly turning the hexagon, adjust the door in the desired direction (down, up, back, forward, right, left) and can withstand the weight of the door up to 70 kg. The hinge is covered with a decorative cap, which is matched to the light of the handle in accordance with the aesthetic needs of the client.
5 - Dissolve quarter
significantly improves sound insulation, hides the gap between the frame and the canvas, the striker and the lock tongue, and also makes the appearance complete.
6 - Decor
decorative elements from pieces of glass (fusing), stained glass, sandblasting allows you to give individuality to each door. It is possible to apply various types of milling or aging effects to the infill.
7 - Handle "Colombo" (Italy)
multilayer coating using precious metals and treated with a special protective varnish resistant to abrasion.
8 - Panel
consists of MDF, which significantly improves sound insulation. MDF is strong, durable and does not shrink. Eco-friendly material without glue and formaldehyde.
9 - Castle "AGB" (Italy)
Lock mechanisms can be: "standard", "plumbing" - a toilet, bathroom, "turnkey" - an office or a second entrance door, "magnetic" or "card" lock - for modern hotels.
10 - Seal "DEVENTER" (Germany)
Good heat and sound insulation as well as cotton-free closure. Fastened by plunging (without glue) into the groove of the door frame. The color is brown or beige, depending on the color of the veneer of the door.
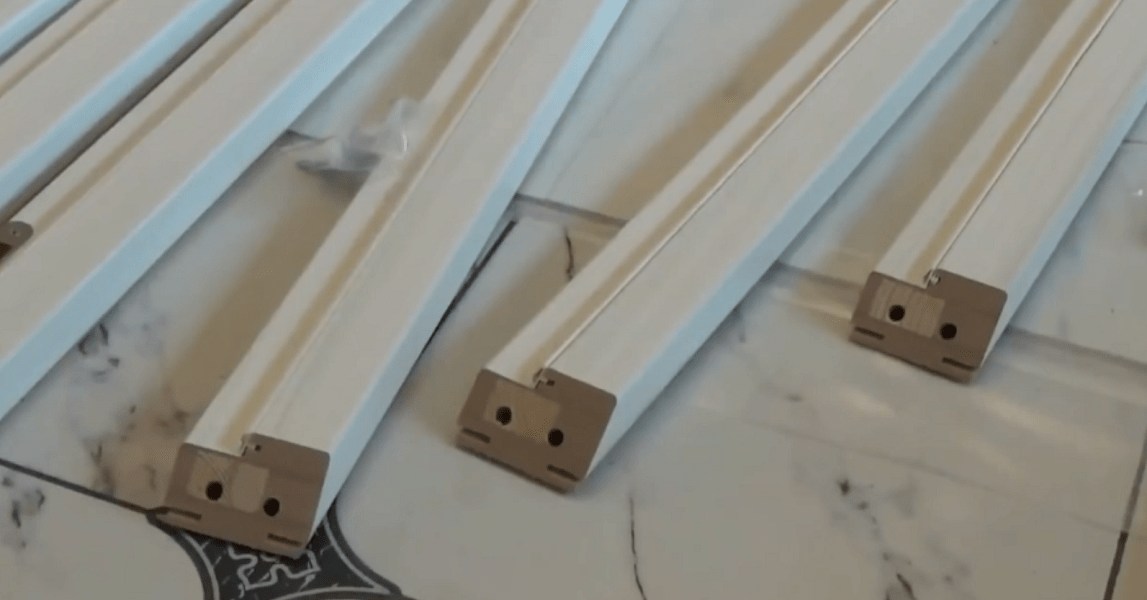
Lutka and platbands

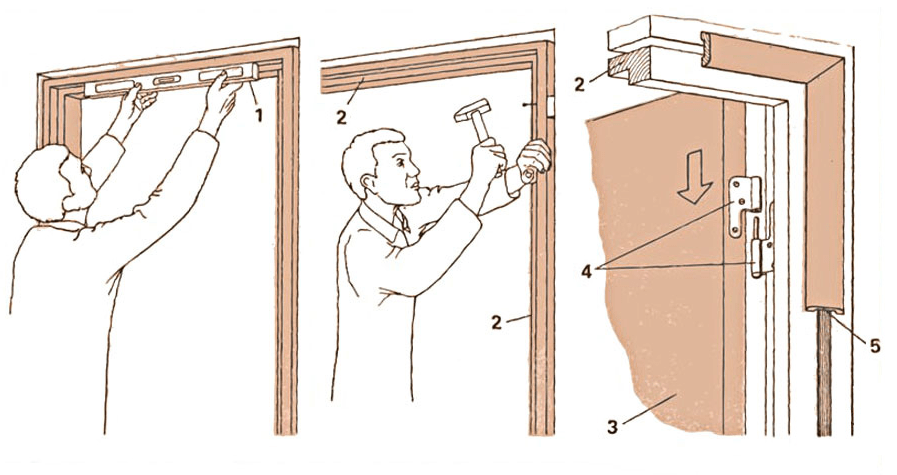
The door lute is fixed in the wall opening, the door leaf is hung on it. One of the most important indicators for a loot is its reliability and ease of installation. The main disadvantage of most loot is the difficulty of adjusting to the width of the wall. To eliminate this drawback, a new constructive solution was developed, using a telescopic euro box (Fig. 1). The Euro box consists of a main tray (80 mm.) And an additional expander (add-on), with which you can close a wall of any thickness without additional fasteners and painting robots. L-shaped platbands are attached to the groove of the door strip or expander without the use of glue and self-tapping screws or nails.
The door leaf is made with a flowing quarter, this design allows you to make a gap between the bead and the leaf up to 7 mm. This prevents the leaf from rubbing and hides the lock tongue. For canopy, barrel-shaped hinges are used (Fig. 1). The hinges are adjustable in three planes, made of high-quality steel and equipped with a ball axis to facilitate rotation, designed for a door leaf weight of up to 70 kg, the hinge is covered with a decorative cap that matches the color of the handle in accordance with the client's aesthetic requests. For better closure, a German “Deventer” sealant is installed in the door frame trap, it also provides good sound and heat insulation and closure without cotton.
Glazing and thresholds
Glazing
The door leaves are supplied from the factory complete with glass. But the unique way of glazing the door makes it easy to replace the glass.
Thresholds
Interior doors are produced without thresholds. Firstly, it is argued that floor coverings should be specially designed for the floor. When finishing doors, a veneer covering is used, which has a decorative effect that will retain its appearance for many years, but is not intended for door sills. Secondly, exhaust ventilation ducts are built in the doors used for the bathroom, so that the doors do not impede air circulation, therefore an air gap of about 5 mm is created between the floor and the door leaf.
Installation and operating conditions
The door block can be installed in a prepared doorway.
It is forbidden to install the product before the completion of the "wet" processes (plaster, cement screed floors, etc.)
Barrel hinges are used for the door canopy. In both halves of the hinge, two rods are mounted - centering and adjusting, designed to adjust the position of the hinge in the horizontal plane. By turning the hexagon, the door is adjusted in the desired direction.
To avoid rubbing, leave a gap of up to 7mm between the door leaf and the strip.
In relation to the floor, the door is installed in such a way that an air gap of up to 5 mm remains.
Mechanical parts must be protected from dirt and other foreign objects.
The core and tongue of the lock must be easy to move and operate quietly.
The expander (add-on) and the casing are of a standard size, cut at the place of installation.
The door block must be protected from direct sunlight to avoid partial discoloration of the product.
Cleaning takes place with soapy water. It is forbidden to use abrasive and chlorine-containing products.
The door unit is delivered in a package (polystyrene, polyethylene, cardboard), the door leaf is ready for installation (glass, hinge, lock mechanism, seal, striker)
Doors from "Meranti plus" meet the requirements of GOST 475-78 "Wooden doors. OTU "can be operated in closed rooms with a relative humidity of 40-60% and an ambient air temperature of 12-24 ° C.
Damage to the factory cover of the door block is not allowed.
The secret of the highest quality of our interior doors lies in the production on the latest automated equipment, as well as in the highly qualified staff of the factory.
We draw your attention to the fact that differences in the pattern and shade of wood veneer are characteristic features of products covered with natural veneer, emphasizing the beauty of natural wood.
Modern MDF interior doors have a lot of advantages - attractive appearance, low price and practicality. MDF provides unlimited space for the implementation of design ideas, and an extensive range of sizes allows you to choose the best option for interior openings of any depth and width.
It is not difficult to install MDF doors on your own, which makes it possible to save money on the services of specialist repairmen.
Door selection rules
If you decide to do the door installation with your own hands, the first thing to do is to make accurate measurements of the doorway, preferably without the old box. The main parameters are its depth, width and height.
- The depth of the opening is the thickness of the wall, according to which the door cut (box) is selected;
- The width of the opening is the width of the door + approximately 8-9 cm for installing a loot.
The standard size of doors for a bathroom is 60 cm, for a kitchen - 70 cm and for interior doors - 80 cm.Thus, to install, for example, a kitchen door, the opening width should be about 80 cm.

The MDF box itself has a standard thickness of 2.5 cm, multiply by 2, it turns out 5 cm.Add the necessary allowance for the free movement of the door - about 3 mm on each side. The remaining distance of 3-4 cm will be needed to adjust the correct position of the trap in space and to additionally fix it with the help of polyurethane foam;
- Opening height. This parameter plays a role not so much when choosing a door height (the standard height of modern door leaves is 2 meters), but when choosing a frame design. It can be with or without a threshold. The calculation of the height of the trap with a threshold is carried out according to the same scheme as the calculation of the width of the door. And if the door is installed without a threshold, then another 1-2 cm will be added to the 3-mm margin for free movement of the door at the top (depending on the thickness of the floor covering).
Based on the data obtained, the choice of the door and accessories for it is carried out. Ultimately, the set should look like this:
- Door leaf;
- a box (2 vertical beams and one or two (if a threshold is provided) horizontal beams;
- narthex slats (vertical and horizontal);
- additional strips (in the case of a non-standard opening width);
- fittings (handle, hinges, lock (if necessary).
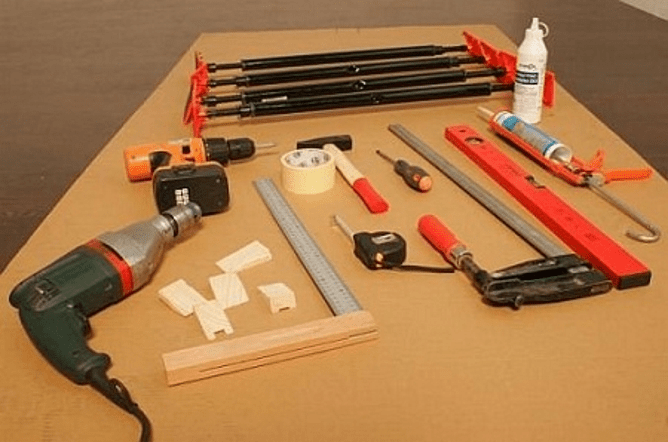
A set of necessary tools
Do-it-yourself installation of interior doors is, although not particularly difficult, but a responsible and painstaking process that will be very difficult to carry out without the appropriate tools. For the accurate and quick execution of all work you will need:
- an electric drill or hammer drill (depending on the material from which the walls are made);
- drills or drills for 4 and 6 mm;
- hand saw with fine teeth;
- drill for wood with a diameter of 4 mm;
- chisel;
- screwdriver or Phillips screwdriver;
- tape measure and building level;
- miter box;
- quick-assembly dowels with a length of at least 75 mm and wood screws 3.5x60mm;
- polyurethane foam.
DIY door installation: step by step instructions
The complexity of the do-it-yourself door installation process will depend on the initially selected model. The more expensive options are already supplied with hinges and a handle and have ready-to-install part sizes. Their assembly resembles a constructor, since structural elements do not require adjustment, it is enough just to fasten them in a certain sequence, install the box in the opening, put the door on the hinges and refine the finished structure with platbands.

We will consider a more complex option, when the door leaf is completed only with blanks for the future loot and has no hinges or handles. The first thing to do is to dismantle the old door and door frame.
Build a new loot
This process is performed on a flat horizontal surface, i.e. on the floor (in order to avoid damage to the elements of the box, it is recommended to lay a soft substrate first).
First of all, the upper crossbar of the box is sawn off, taking into account the width of the door, allowances for freedom of movement (in total ≈ 6 mm) and the thickness of the strip (2.5 x 2 = 5 cm). Next, the vertical elements of the loot are mounted. They are laid out on the floor perpendicular to the top bar. All elements are in the "on edge" position. When joining horizontal and vertical parts, a right angle should be obtained.
The recessed strips are temporarily inserted into the mounting grooves, on which the door is placed. Spacers with a thickness of ≈ 3 mm are inserted between the door leaf and the frame along the perimeter (for example, even strips of cardboard).

Taking into account the possibility of splitting MDF elements, it is strongly recommended to pre-drill the places of future screwing in of self-tapping screws with a wood drill of a slightly smaller diameter.
The attachment points should be closer to the center of the parts. Two self-tapping screws are enough to connect each side of the box.
Having received the U-shaped base, it is necessary to cut off the excess vertical elements along the length. At the same time, one should not forget about the threshold (if it is planned) or about the required distance from the floor (taking into account the thickness of the floor covering). Having measured the required length and cut off the excess, the lower part of the box is fastened with a threshold part of the same width and in a similar manner with the installation of the upper crossbar, or a mounting plate for temporarily fixing the correct contour of the loot (attached to the lower end sections of the vertical racks). This completes the assembly of the box.
Cut in loops
This process requires maximum precision and accuracy in work. The easiest way to do it is with a manual milling machine, but if there is none, then you will have to use a hammer and a carpentry chisel.
After inserting the folded hinges into the gap between the door and the frame, and placing them at a height of ≈ 250 mm from the upper and lower edges of the door, it is necessary to make the appropriate markings on the door sill and end of the door on the side where the hinges will be located (taking into account the right or left door opening) ...

Having removed the door from the assembled structure, using the available tools, it is necessary to cut out recesses in the boot and the end of the door corresponding to the thickness and contour of the hinge plates. Next, the hinges are installed into the prepared "nests" using self-tapping screws (usually they are included with the hinges).
DIY installation of a loot
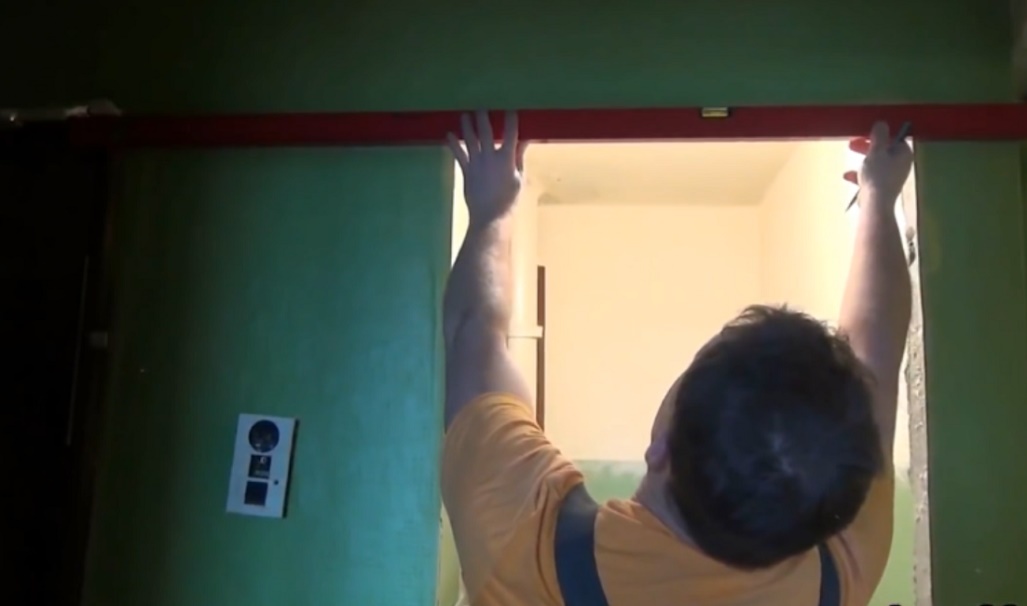
The assembled structure must be inserted into the doorway, controlling its correct horizontal and vertical position using a building level. The box is fixed by means of wooden wedges and self-tapping screws.

Door leaf installation
The next step is to install the door leaf with embedded hinges on the inserted frame. This checks the correctness of the vertical and horizontal clearances. If the door opens and closes without interference, and all the gaps are the same, then the installation is correct.
Final fixation of the box
In the gap between the door and the frame around the entire perimeter of the structure, it is necessary to insert spacers (for example, strips of cardboard of the appropriate thickness (≈ 3 mm). The next procedure is to fill the remaining space between the doorway and the frame with foam.
 We recommend purchasing a special gun for working with foam - this will facilitate and simplify the process of installing the box
 After the foam has completely dried (≈ 12 hours), the excess foam is cut off and the lower fastening strip is dismantled.
Installation of platbands
The easiest and best way to carry out this procedure is with a carpenter's miter box and a saw with fine teeth. Having measured the required dimensions of the horizontal and vertical platbands, they must be carefully sawed off at an angle of 45º.

Installation is carried out by means of thin self-tapping screws, followed by decorating their caps with special overlays in color with cash, nails without caps or mounting glue.
 To all visitors and readers of the site "", my compliments!
We continue to move in the repair of our small-sized kitchen, i.e. this article will be the continuation of a series of publications on this topic.
We will deal with replacing the old door block with a new one.
On the Internet, the topic of installing interior doors, of course, is not new and there is more than enough information about this.
I would not like to repeat myself, and therefore I will not talk about the installation of hinges and locks, as well as talk in detail about the dismantling of the old and installation of the new door blocks.
I would like to tell you in detail about such a little-known topic of calculation and assembly of a wooden door frame. Moreover, I have not raised the door question on the pages of my site for a long time.
At first glance, nothing is complicated in this, but I assure you - this is only at first glance. As in any other work, there are nuances, without taking into account which it may turn out not what you wanted, or even the whole work in the end. I'm not talking about wasted time and nerves.
So, in order for everything to work out quickly and beautifully, nothing special is required from you - just read the entire article.
Calculation of a wooden box based on external factors
In order to make a calculation, several factors must be taken into account.
Factor 1.
Opening dimensions.
The standard size of the opening is 10 cm larger than the dimensions of the door itself.
Let's say if the door 700 × 2000 mm, then the size of the opening should be 800 × 2100 mm.
Advice.
In order to accurately measure the dimensions without dismantling the old door, you just need to remove the trim on at least one side.
Which, in fact, I did.
My opening turned out to be not standard in height ( 2020 mm), and in width too, but not at all by much ( 810 mm).
Factor 2.
The choice of the door leaf.
As you know, the standard dimensions of interior doors are.
Since the door is intended for the kitchen, therefore, its dimensions should be as follows: 700 × 2000 mm.
The full name is a door laminated with glass with elements.
Advice.
Door blocks made from solid wood are better than laminated or MDF, but they are more expensive.
Therefore, everyone decides for himself.
Factor 3.
Choosing a door frame (loot).
The width of the box must match the thickness of the opening wall.
Advice.
✔ It is better when the width of the box is 5 mm greater than the thickness of the wall, and not vice versa.
✔ If the loot is wider than the wall, then the difference can be equally scattered on two sides and the missing layer of putty can be applied, thereby leveling the wall with the box.
✔ If the wall is thicker than the door frame, then the platband will not exactly adhere to the wall, i.e. it will simply turn out, which is not good.
You can read more about working with a platband in this one.
Usually, laminated doors come with MDF frames, covered with a special decorative film.
But we decided that a wooden box would be better. the doorway was initially wide, which in turn would complicate the very process of installing the MDF loot.
After all, it's not a secret for anyone that a box made of a thick wooden bar (40-50 mm) is much easier to install than a thin (22-30 mm) MDF tray.
Factor 4.
Door blocks are available with a threshold (lower cross bar) or without a threshold.
In our case, the box will be with a threshold.
In short, we bought 4 wooden blanks for the future loot with the following dimensions:
- 2100 mm - length of two bars.
- 1000 mm - the length of two transverse bars.
- 120 mm - the width of all bars.
- 45 mm - thickness of all bars.
We will make a door frame from them.
Calculation and preparation of wooden blanks for the box.
I have already said that the doorway is not a standard 2020 mm high.
We will build on this size.
☛ Immediately we give the minimum gap on the polyurethane foam - this is 10 mm, it turns out already 2010 mm.
2020-10 = 2010 mm
☛ We also minus the size of the thickness of the cross bars of the door frame.
Advice.
In order to maximally preserve the height of the installed door, it is necessary to reduce the thickness of the transverse bars as much as possible, but within reason.
note
that I did it on a carpentry machine.
Example.
The initial thickness is 45 mm.
We can safely reduce the bottom bar by 20 mm.
And 10 mm - the top one.
45-20 = 25 mm- the thickness of the bottom bar.
45-10 = 35 mm- the thickness of the top.
☛ Summarize the thickness of the bars.
25 + 35 = 60 mm- the thickness of the two bars.
☛ We subtract the depth of the two folds (20 mm) - the size of the recess (fold) in the bars for the door stop.
20 mm because we have two bars (top / bottom)
60-20 = 40 mm. And it was 70 mm!

We end up with:
2010-40 = 1970 mm.
1970 mm- this is the size of the length of the right and left frame of the door frame ready.
note if the door leaf is not planned to be shortened, i.e. the factory size remains (2000 mm), the racks are cut to length with such dimensions.
- 2005 mm- for door blocks with a threshold.
- 2013 mm- without a threshold.
Let's continue.
☛ Now, already reduced in thickness, the transverse bars must be cut to length, but taking into account the width of the door (700 mm).
☛ We measure from any edge (as it is convenient for anyone) 45 mm (rack thickness).
☛ We make a slot 10 mm deep.
 ☛ From the resulting slot we measure 685 mm and make another cut, but so that the marking line remains.
 A logical question: "Where did the size 685 mm come from?"
This is the width of the door (700 mm) minus the depth of the two folds (20 mm) and the gap for closing and opening the door (5 mm).
(700-20) + 5 = 685 mm. Advice.
In order to accurately measure the depth of the two folds, it is necessary to dock the two racks of the box.
 There are not big discrepancies +/- 1.5-2 mm, that's why I measure it like that.
☛ Add 45 mm to the second slot and cut it off.
 With simple calculations, we get the length of the transverse bars:
45 + 685 + 45 = 775 mm.
☛ We process the slots for joining the riser with the transverse ones.
☛ Chisel a fragment.
 ☛ Modifying with a milling cutter.

Advice.
If there are a lot of blanks, then it is better to cut with a stationary circular saw under the stop - this is faster.
Note, that the cuts I didn’t come out to the end, so I cut them with an adjustment hand saw on wood with a straight fine tooth.
 In order not to scratch the product, I put a piece of fiberboard to protect it.
 ☛ I drill holes ø5 mm for fastening.

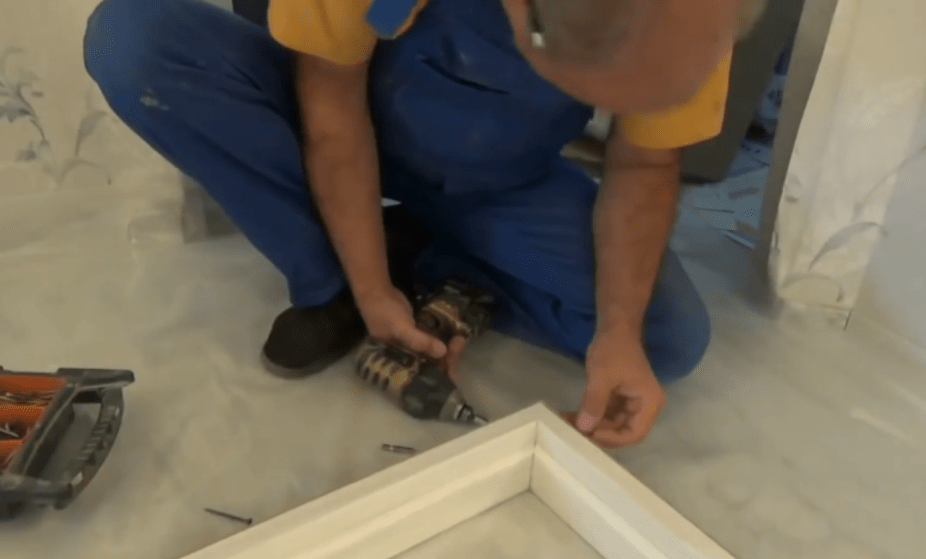
Assembling a wooden box
☛ I assemble the entire structure by twisting together with self-tapping screws.
 Note,
for reinforcement, I additionally screw the self-tapping screws into the end.
Note,
for reinforcement, I additionally screw the self-tapping screws into the end. 
 That's it, the door frame is ready, you can paint it to match the color of the door (alder).
The ability to handle carpentry and measuring tools is already a reason to try to solve such a difficult task as installing interior doors with your own hands. The work is simple, but tricky in its own way. It will take scrupulousness, and even tediousness in marking and adjusting, otherwise it will not work to correctly install the interior door with a box.
Features of installing interior doors
At first glance, nothing complicated, but this is only a superficial impression. The point is not just to install the frame and door leaf in the interior opening, but to do it beautifully, without distortions, scratches and sagging hinges. If this is the first experience, then it is best to make a detailed step-by-step instruction for installing interior doors with your own hands before starting work. It's not a shame for beginners. Even experienced craftsmen often make notes with their own hands - what not to forget and what to look for when installing the door frame on a specific interior partition.
During the installation process, you will need to solve two of the most difficult tasks with your own hands:
- Correctly assemble and install the box of interior doors, align and fix it so that the frame does not sag under the weight of the door leaf;
- With your own hands, mark and cut out the mounting grooves on the vertical rack of the box and on the end of the interior door leaf.
It takes an experienced craftsman 2-3 hours to install an interior door; a beginner will need at least a day to completely install the frame and hang the door leaf.
Advice! It is not necessary to stupidly follow the instructions for installing interior doors, which recommend consistently embedding the fittings of the locks, fixing the hinges, and only at the very end solve the problems with hanging interior doors. The main thing is to install the frame and door leaf with a fresh head with your own hands, and platbands, locks and handles with platbands can be postponed for the next day.
You will have to measure and saw a lot. All cuts are done by hand with a hand hacksaw, therefore, in addition to fresh strength, you will need to stock up on quality tools.
Tools for installing interior doors
A day or two before the start of work, it will be necessary to assemble a working arsenal for working with lumber. It can be collected from friends or rented. Why two days before installation? Because ahead of time, before the start of work, you will need to check the serviceability and operability of each tool with your own hands:
- Building levels - small, 70-100 cm, and large, 150-200 cm, with a working bubble indicator. Usually, they do not pay attention to the state of the camera and the lighthouse, considering them to be in good working order, but at the box office, it happens that there are bent and even broken copies, this is the most important tool in installing interior doors;
- A marking tool is a carpenter's corner with a ruler, a tape measure and a 1-meter metal ruler. We check the presence of angle marks at 90 o and 45 o;
- A screwdriver or electric drill with a bit attachment for cross-head screws. We check with our own hands how the cartridge is holding, and the serviceability of the wiring - batteries;
- A cutting tool, you can cut a bar of interior doors with an electric jigsaw, but it is best to stock up on a pair of hacksaws - carpentry and metal. The first one is used for cutting the parts of the box, the second one is used for thin cutting of platbands.
In addition to the tool, you will need a hammer, clamp, wood chisel, polyurethane foam in a cylinder, tape and gloves. There is not much dust and waste when installing interior doors, but you still have to periodically clean it up with your own hands so as not to spread it throughout the apartment.
In addition, it will be correct to have a punch with a bayonet in stock, because when installing the interior door frame, problems with the doorway in the wall may occur. Ideally, the gap between the uprights of the box and the ends of the opening should remain 10-20 mm, for normal alignment and foaming of the cracks. In reality, the opening may be uneven, and you will need to knock down part of the concrete or stone with your own hands, with a puncher or a hammer with a chisel.
How to assemble an interior door frame
The best option would be to buy a ready-made door kit, which usually includes:
In this case, the whole process of installing the box of the interior frame comes down to transferring the second parts of the hinges to the frame parts with your own hands, assembling the loot with self-tapping screws and installing it in the opening.
The entire work will take less than two hours. One of the options for installing interior doors with your own hands in the video

The only drawback of the above scheme is that not all manufacturers of modern models of interior doors release their products in kits designed for do-it-yourself installation. Most often, the customer buys a door leaf, and platbands and frame parts are purchased with the expectation of installing an interior door with a frame on their own.

How to install an interior door with your own hands
First of all, it is necessary to lay out the door leaf on a flat area. Next, the selected pair of beams are laid to the left and right ends of the sash. We measure the width and the estimated height of the future supporting frame with a tape measure. Then, using a building level and a tape measure, they check the dimensions of the interior passage.
Important! This is done in order to determine whether the platbands will cover the edges of the break in the wall, and how thick the additional elements must be used.

If you "miss" with the height or width of the frame, you will have to redo the platbands with your own hands, or, even worse, you will need to raise the interior door in height.
We assemble the frame of the door frame of any size
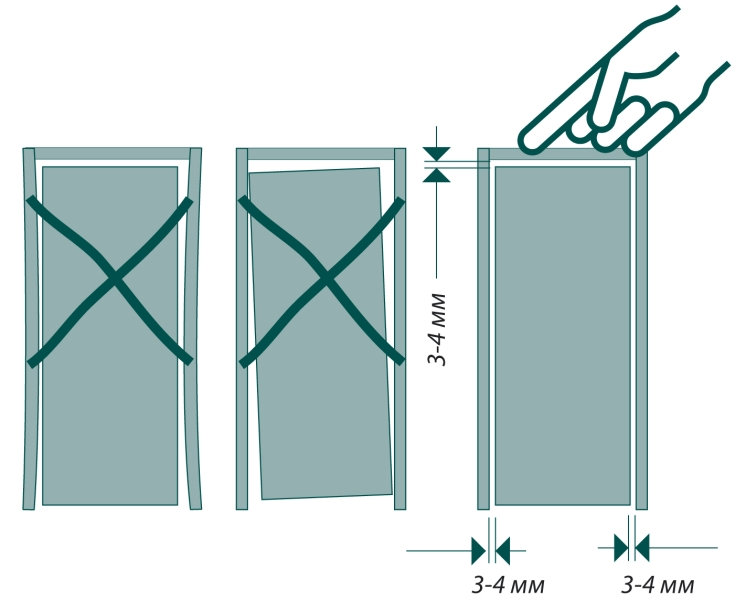
In order for the installation of the interior door to turn out without distortions, it is important to choose the right distance between the left and right pillars so that the door leaf enters the frame with a small gap, no more than 2 mm per side. In this case, the door will open freely without wedging in the trap.

The easiest way is to assemble the frame with your own hands using a clamp, a saw and two blanks. Vertical racks, as in the case of preparation, are attached to the ends, leveled and fixed with clamps.

From the side of the upper and lower edges of the web, an allowance equal to the thickness of the bar is left on the blanks. At the same time, a cut line is applied to the left allowance with their own hands at an angle of 45 ° for further joining with the horizontal cross members of the frame. Without disassembling the structure, markings are made for cutting grooves for awnings, a lock and a handle.
If the interior door is too wide or of a complex shape, then usually at this stage the conformity of the frame configuration with the door to the shape of the interior opening is checked. To do this, a couple of nails are hammered onto a wooden plank at a distance from each other equal to the outer width of the frame. The plank must be fixed above the opening, and a pair of construction plumb lines are suspended from the nails. If the gap between the frame and the wall is 10-15 mm, then the calculation is correct.
Installation of hinges on an interior door
After all the checks have been completed, it is necessary to cut out the mounting grooves for the awnings in the canvas using a chisel or a carpenter's knife and hammer. The easiest way is to mill a niche using a hand router, but, as practice shows, the work can be done by hand and without an expensive power tool.

If this operation is difficult, then for interior doors you can use overhead hinges or models for drilling. For installation, you just need to drill holes for screwing in the fasteners.
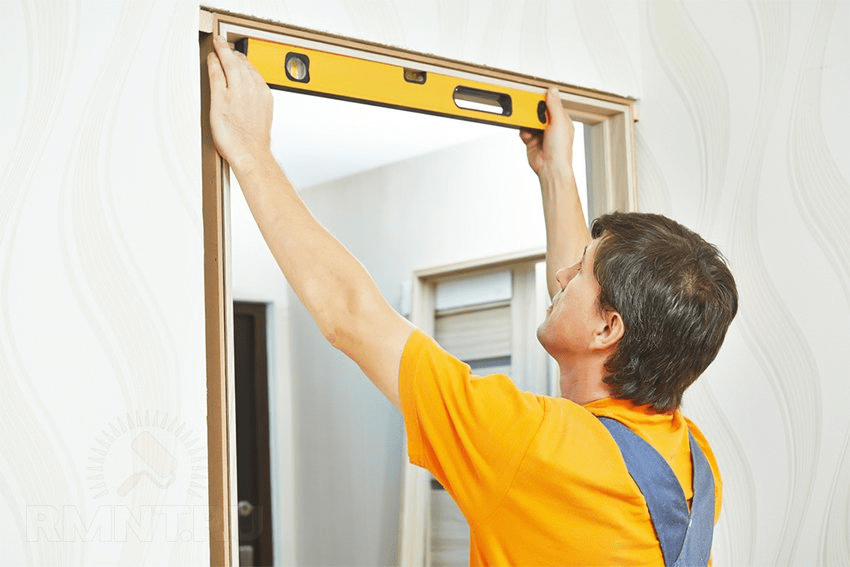
We fix the frame in the doorway
- We mark with a marker on the step the level of the upper horizontal cross member of the frame, this will help to perform the correct installation horizontally and vertically;
- With the help of wedges and a building level, we align the frame vertically and horizontally with our own hands. We fix the position of the frame in the opening with wooden plugs and wedges.

Advice! If the frame and door leaf are lightweight, then the frame can be fixed with mounting perforated petals to the wall of the interior partition.

Next, it is necessary to blow out the space between the frame and the wall with foam, while the installation on the PPU is carried out, it is necessary to check it again and, if necessary, finally level it vertically using a long building level. We put a small building level on the upper mark and, if necessary, knock the frame to the desired height.

Installing the door leaf
After the loot is firmly fixed with the hardened foam, it is necessary to install the mating parts of the sheds. To do this, initially the door leaf is lifted with wedges so that a gap of 1-2 mm is obtained between the sill and the lower edge.

It remains only to install the sash on the awnings, and you can proceed to the decorative finish of the interior doors.
Installation of platbands on an interior door
Facing the frame with platbands is not particularly difficult. First of all, the vertical planks are installed. The height of the plank is measured according to the mark made earlier, after which the platband is applied to the frame and the cut line is marked at an angle of 45 °.
Advice! It is best to make an undercut with your own hands using a thin hacksaw blade for metal. Previously, adhesive tape is glued to the cutting line. The plank is nailed or glue down.
The installation of the second vertical casing is carried out in a similar way. After the installation of the vertical parts has been completed, you can mark the saw line on the horizontal bar, and in the same way install it on the door frame.
What are the sizes of extensions for interior doors
Additional strips are used as an additional element to increase the width or thickness of the door frame. Most often, the installation of extensions on interior doors is required in a situation where the wall is much thicker than the canvas, and there is a gap between them that needs to be closed.

The width of the additional slats ranges from 10 mm to 200 mm, for interior structures the most common size is 10-20 mm, and often, due to the non-standard profile of the slit, the additional strips have to be ordered or cut out by hand from the platbands.

How to install extensions on an interior door
If, after installing the box, an unpleasant fact is revealed that the vertical plane of the frame is recessed into the space of the interior opening relative to the wall surface, then the only way to correct the situation is to use additional strips.
First, it is necessary to determine the size of the extension; for this, the building level is applied to the wall and the distance to the front edge of the box is measured with a ruler. Thin strips are nailed with wallpaper nails, wide extensions are glued to the frame.
Professional tips on how to install interior doors
Among the features of the installation of home doors, the following problem areas can be noted.
Before installing the platbands, you need to make sure that the frame or additional strip is located in the same plane with the surface of the interior wall. Otherwise, even if you make a perfect wash down of the edges with your own hands, a gap will surely appear between the platbands.
The second problem that one has to face is the sagging of the doors when installed incorrectly. To correct the situation, you need to remove the canvas, place washers, or trim the edge and install the door in place.
Conclusion
Do-it-yourself installation of interior doors will require a little practice in installing awnings and extensions, but in the general case, the work is simple, and with the proper skill, the canvas can be hung in a few hours. The craftsmen say that with each installation, the quality of do-it-yourself work doubles.

